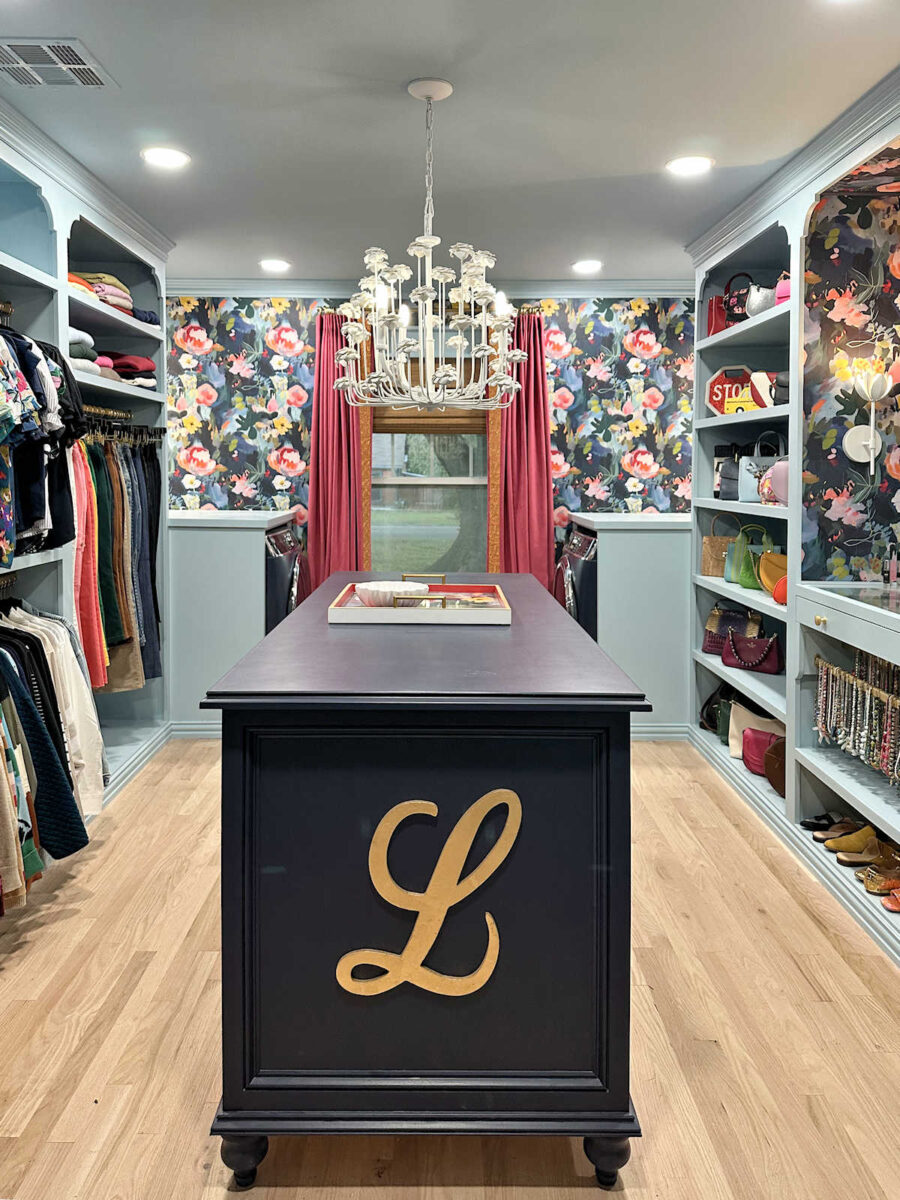
Walk-In Closet Progress — Closet Rods & Finished Ceiling (Plus, Two DIY Tips)
I’m slowly but surely checking off projects from my punch list for the walk-in closet. Yesterday, I finished up sanding the patched areas on the ceiling drywall, primed the ceiling, installed three of the four closet hanging rods, and painted the ceiling.
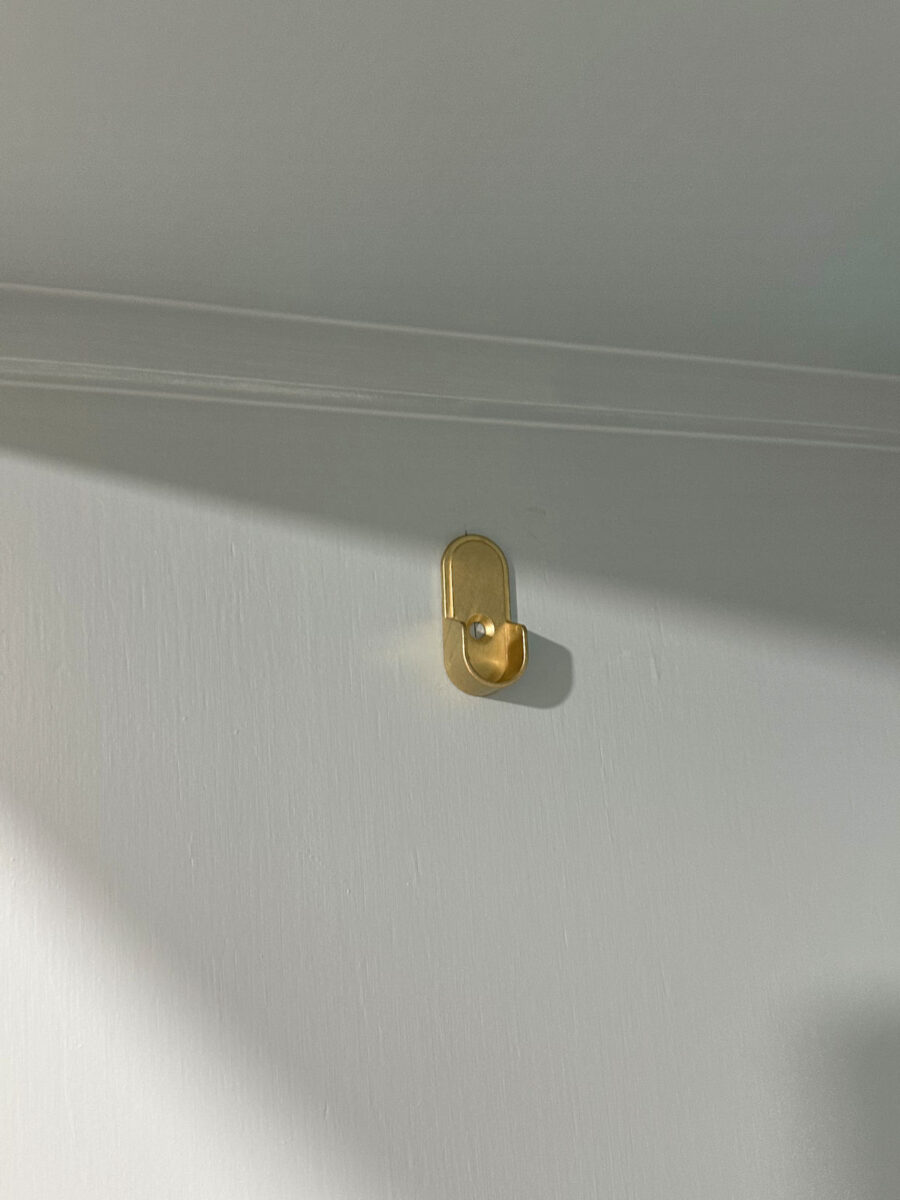
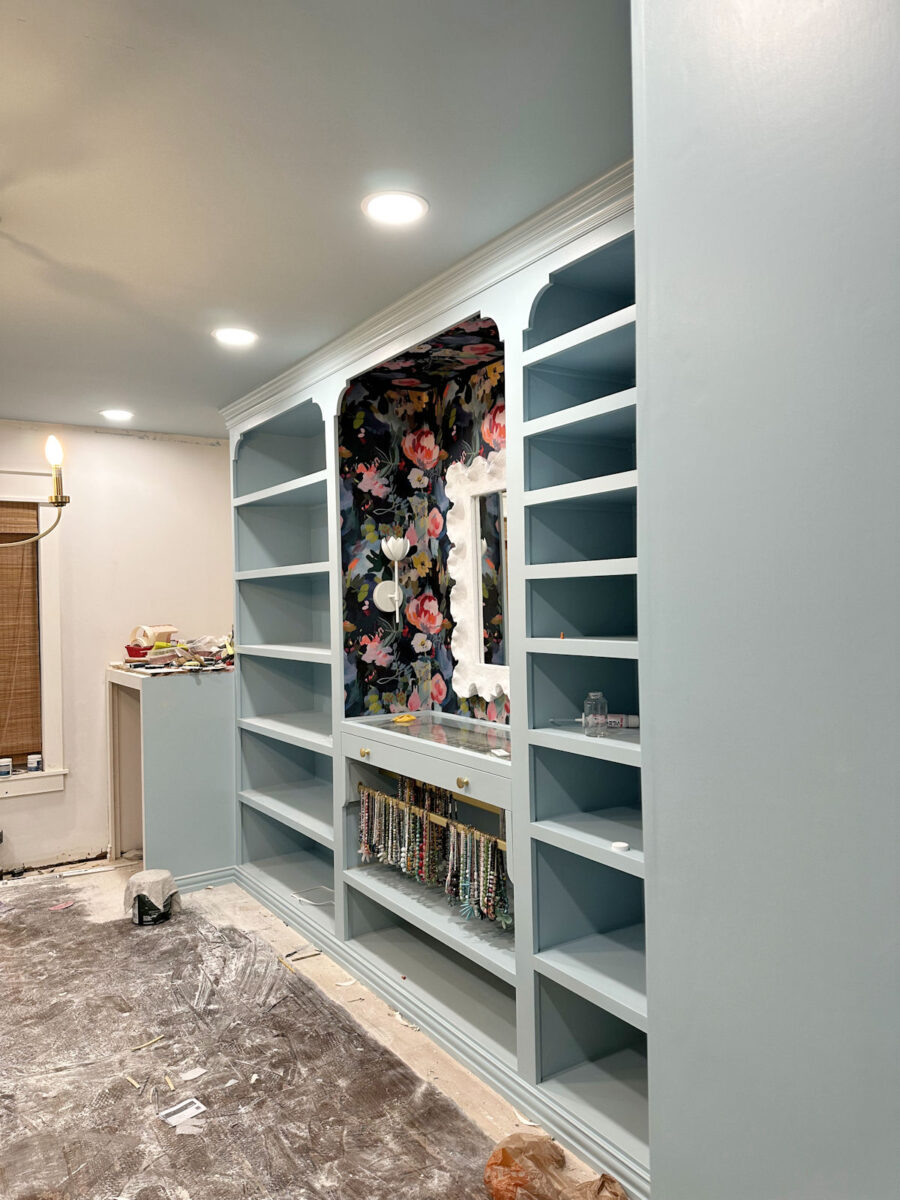
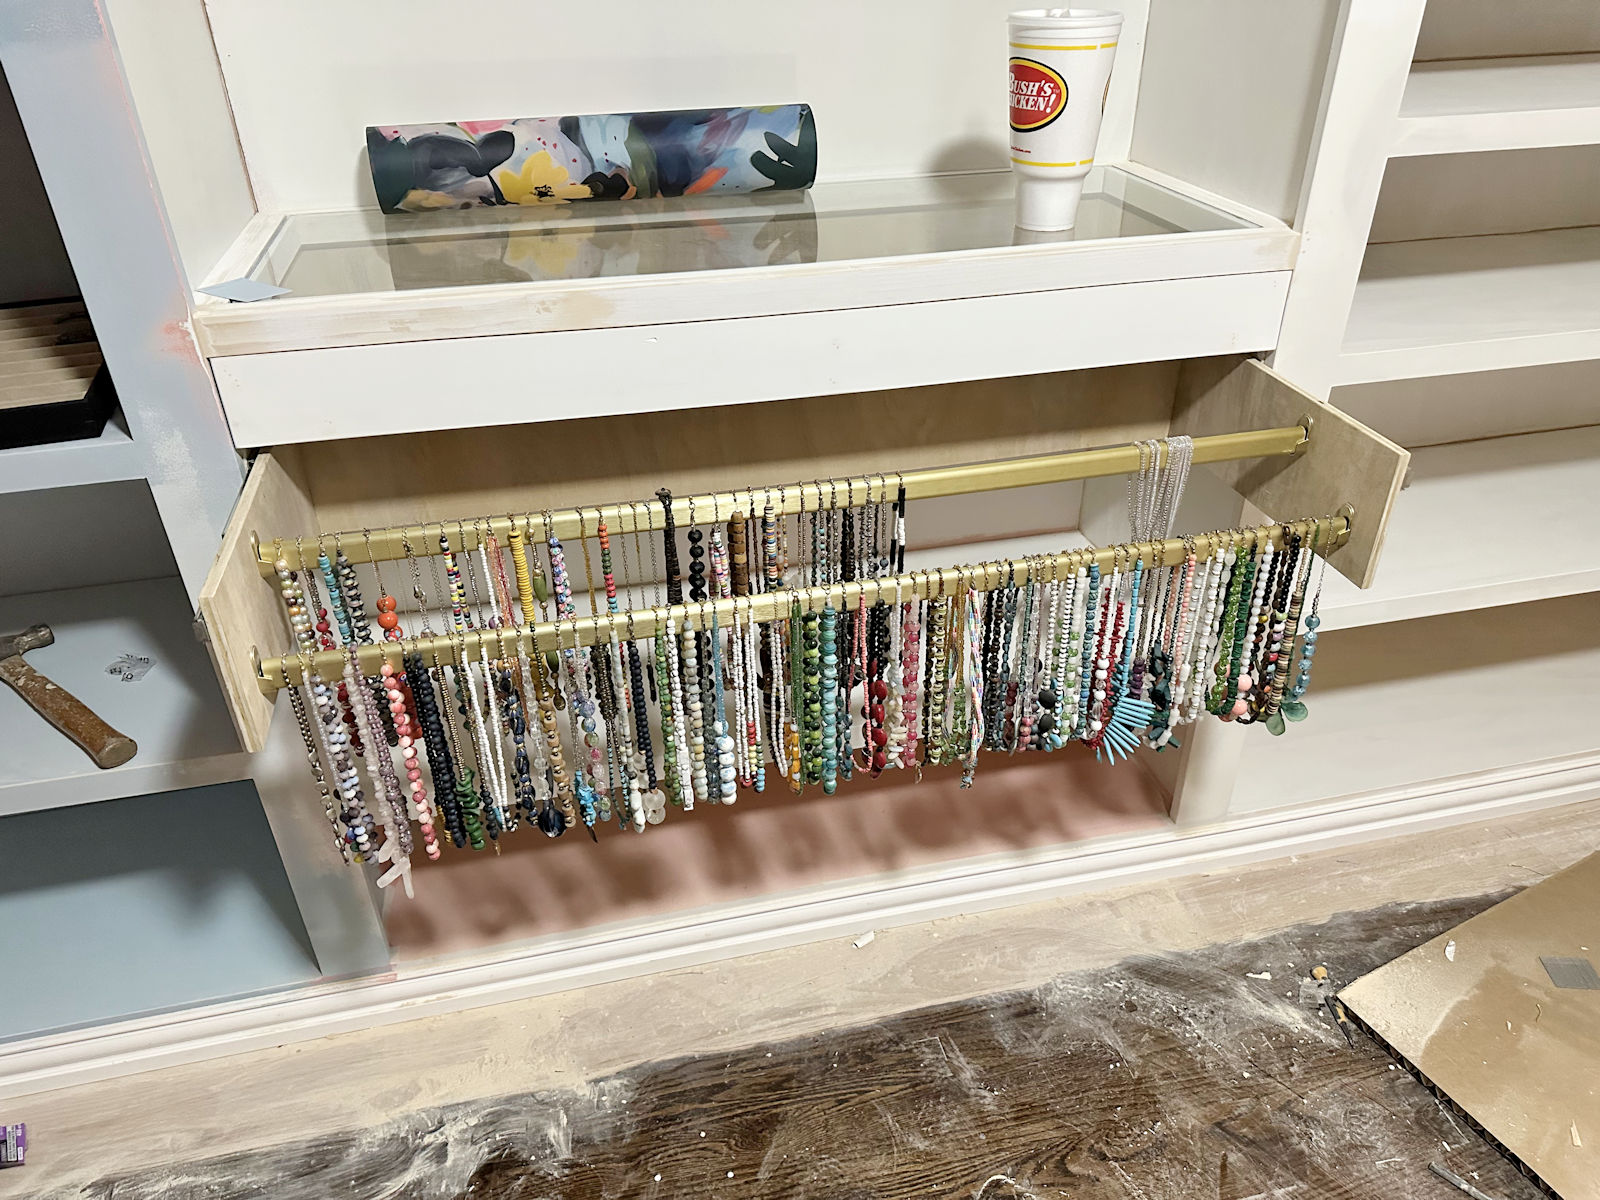
I’ll start with the closet rods. I absolutely love how these matte gold rods look against the blue cabinets!

Installing these rods was pretty simple. They came with these mounting brackets that have these 5mm pins on the back, and then they’re held in place with a screw in the middle. (Please excuse my gross hands. I always say that you should never trust someone who claims to be a DIYer and has clean hands and perfect fingernails. 😀 )

To install those brackets with the pins, I marked where I wanted them to go inside the cabinets.

But here’s my first tip. If you’re installing several items that all need to be installed at the same height/distance, rather than using your tape measure to mark and measure the placement for each one individually, cut scrap pieces of wood to use for this process. I wanted all of my brackets to be 8.5 inches from the back of the cabinets, and 1.75 inches from the brace for the shelf above it. So I cut two pieces of scrap wood. I cut the first to 8.5 inches, and used that to quickly mark the vertical line for my brackets…
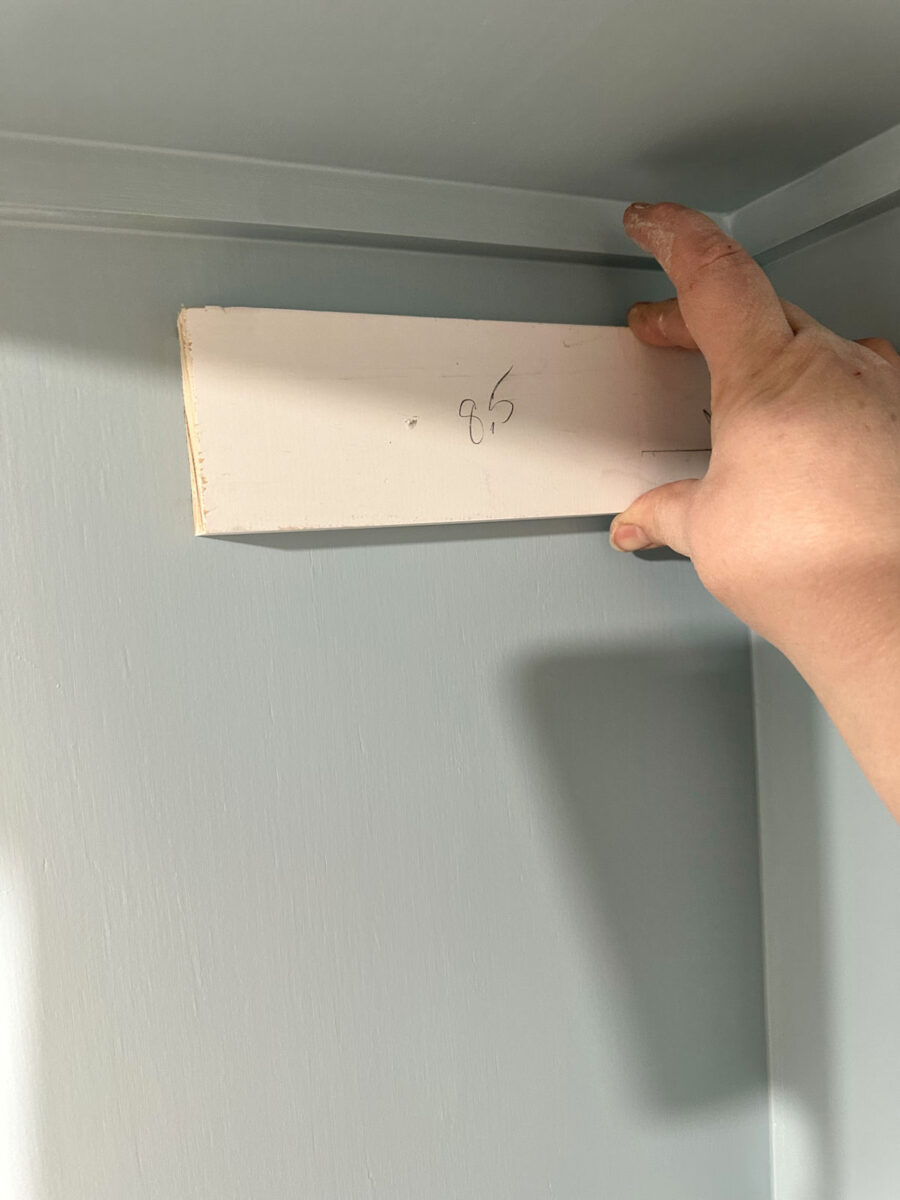
And then I cut another piece of scrap wood to 1.75 inches to quickly mark the distance from the shelf brace above it.
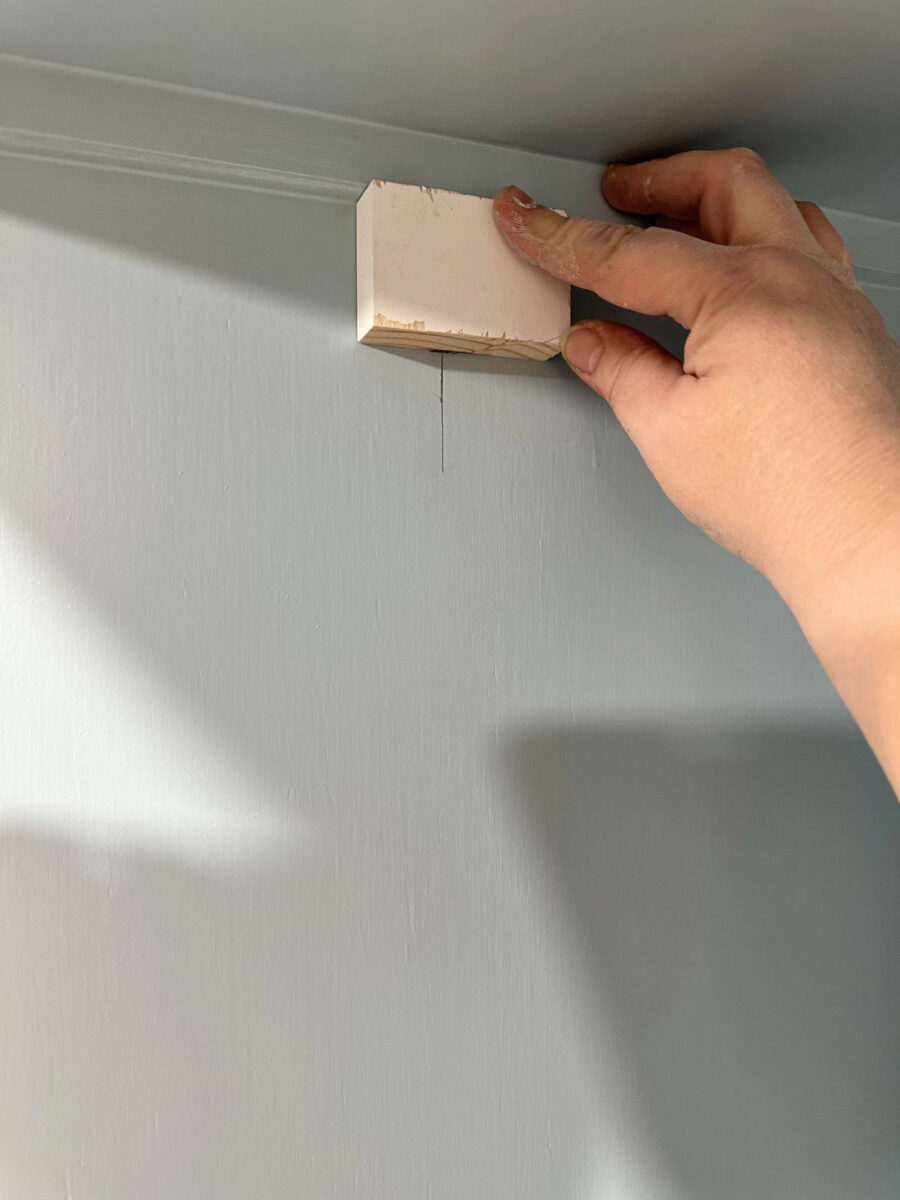
That way, I don’t have to count on my accuracy in using a measuring tape for each and every mark, which is good, because sometimes I make mistakes in my measurements. This is a foolproof way to get all of the measurements exactly right, and it goes so much faster.
And here’s my second tip. When you need to drill holes for something like these mounting brackets that have pins in them, and those holes need to be in very precise places, don’t try to measure and mark that spacing using a tape measure. Just use something like paint or lipstick on the backs of the pins and press that to the wall or cabinet where you need to drill the holes. For these, I used the darkest lipstick I have (and rarely wear).

And then I lined up the top pin to the point where my two marks crossed, and lined up the bottom pin on the vertical line, and then I knew exactly where I needed to drill the holes. No guesswork. No measuring with a tape measure and hoping that I got the measurements exactly right.

Each one fit perfectly because the marks came directly from the pins on the bracket.
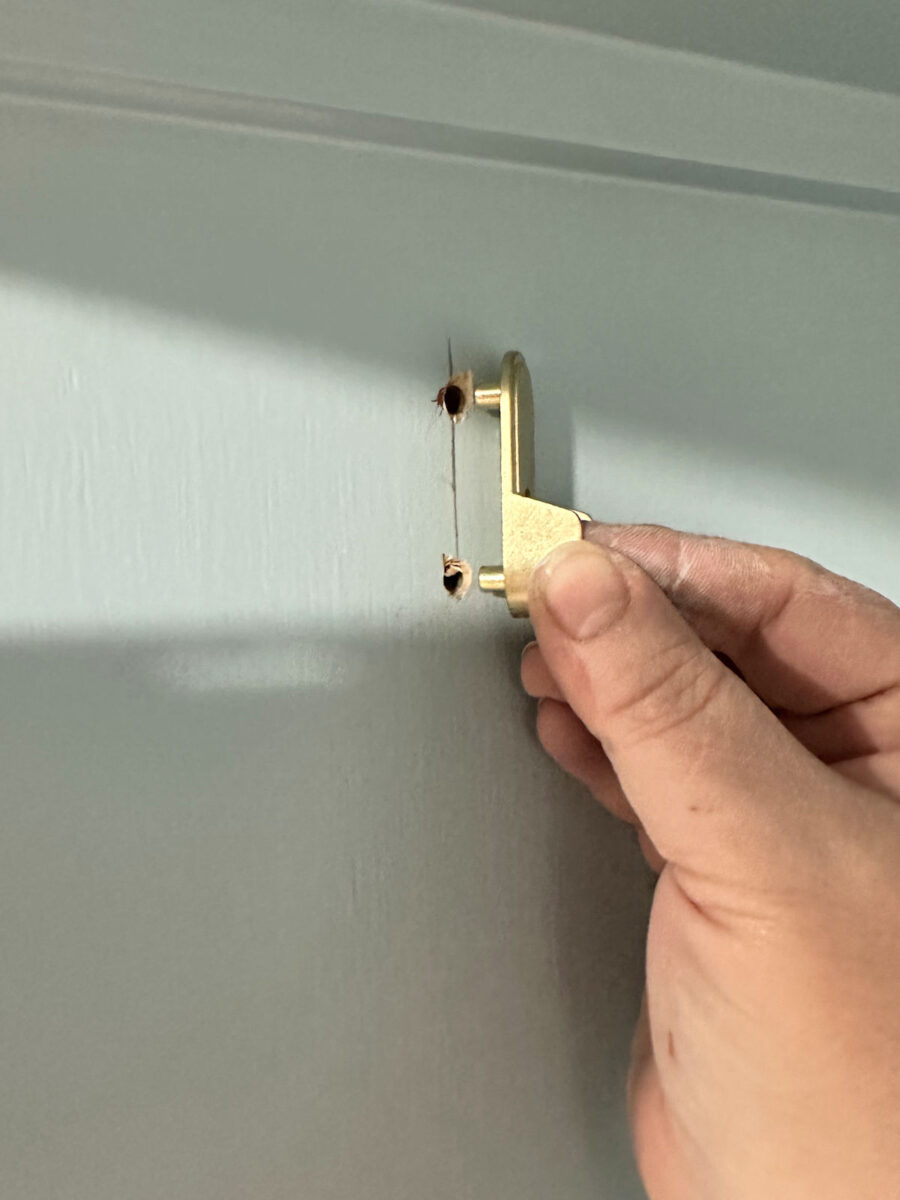
So I very easily pushed that bracket into those perfectly spaced holes, and then I was able to secure it with the screw that was provided with the bracket.
I’m all about taking the guesswork out of processes that I need to repeat over and over and finding ways to repeat those processes that don’t rely on me using a tape measure to mark each individual placement. And doing it this way makes the process go so much faster.
So the good news is that that process went very smoothly. I got the brackets installed for all four rods, and I got three of the four rods cut and in place.

The bad news is that there was no such foolproof method for cutting the bars. Each one was a slightly different measurement, so I had to measure, mark, and cut them individually. And on the very last one, I managed to cut it one inch too short. 😢

No problem. I can just order a new one, right? Wrong. They’re out of stock on the one I need. *Sigh* Of course they are. I’m so frustrated with myself for this. Measure twice, cut once, right? I didn’t do that, and now I don’t quite know what I’m going to do. I can’t find a way to contact the seller on Amazon to see when or if they’ll have more, so I may have to chance it with another brand. I can’t believe I did that. I had to cut a total of six rods for this closet, and I managed to do five of them just right and messed up on the very last one.
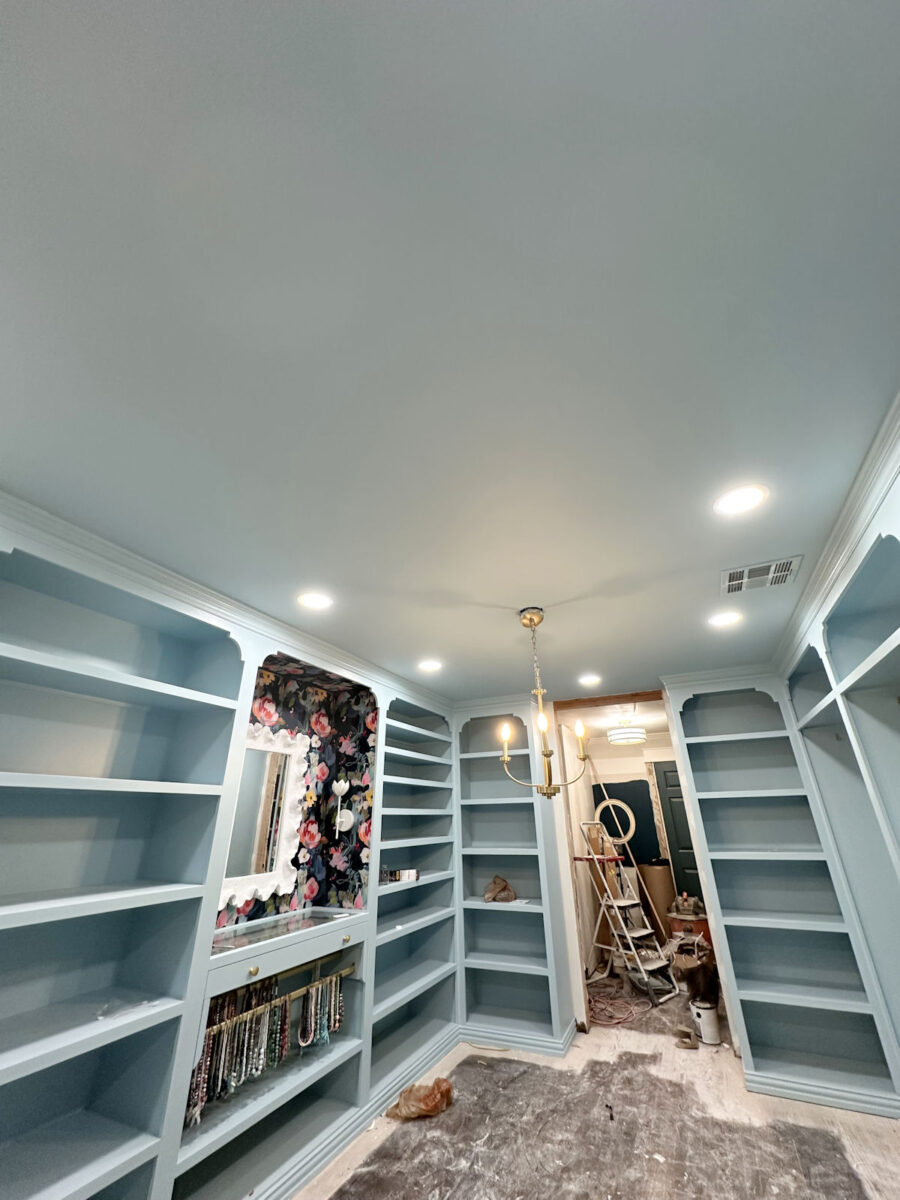
But I had to put that out of my mind and not obsess over it, because I needed to keep moving forward on this room. I was determined to get the ceiling completely finished before I went to bed last night. And I did! As I mentioned in a previous post, I decided to color drench this room with the Sherwin Williams Billowy Breeze that I used on the cabinets. So everything except the wallpapered areas and the floor will be the same color.
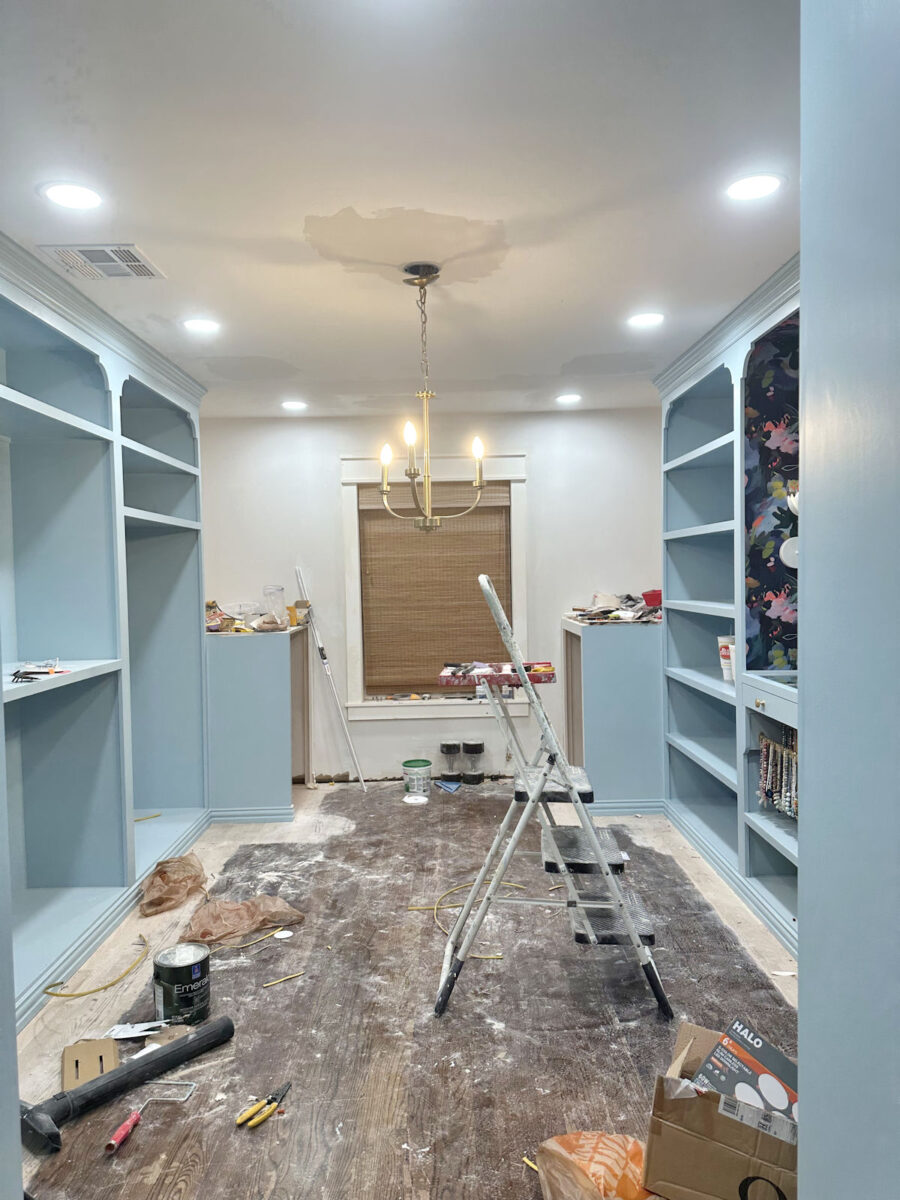
When I went to bed last night, the ceiling was still completely wet from the second coat of paint. But here’s how it looked early this morning after everything was dry.
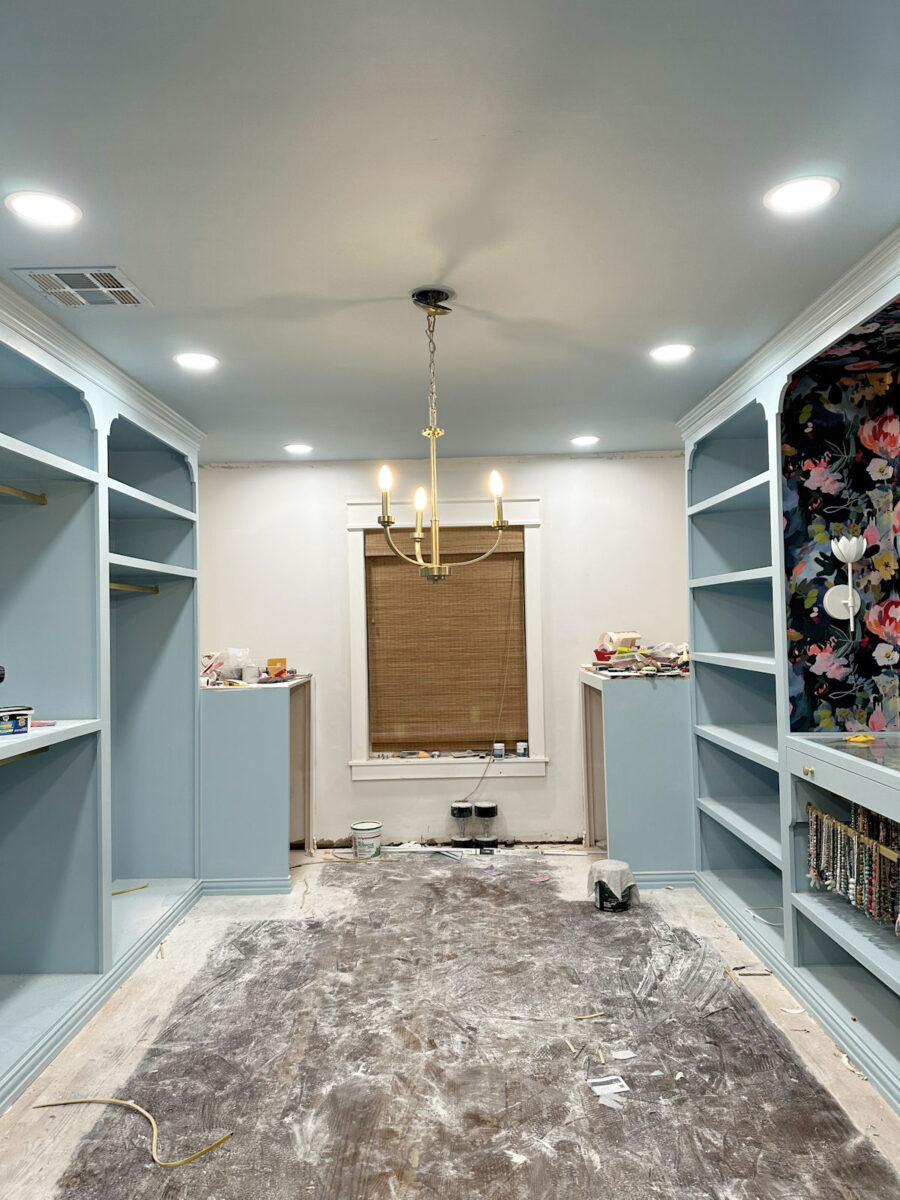
I used a satin sheen on the cabinets and flat on the ceiling.
It’s actually kind of hard to tell that the ceiling is blue unless you can see it next to the white walls.

But I’m really proud of how this turned out. Drywall is my least favorite thing to do, and I’m not great at it. So when I had to do repairs on the ceiling, I really tried to take my time and not rush through that process so that I could get it as smooth as possible. A pro could have done it much better than I did, but even at that, I really don’t think that anyone would notice the repaired areas.

I think that looks pretty darn good! Of course, using flat paint helped. If you want to hide imperfections, flat paint is the way to go.
Here’s a reminder of what the ceiling looked like a couple of days ago…
And here it is finished…
I’m not a drywall pro, but I’m pretty proud of how that turned out.
I should mention that it looks like the room is a little darker now with the darker ceiling, but I don’t really think it is. I had turned down the brightness on the lights because it was hurting my eyes to work on the ceiling with the lights turned up to full brightness. I forgot to turn them back up all the way before taking the pictures this morning. With them turned to full brightness, the room is still very bright.
So that big project is finished! New lighting…check. Repaired ceiling…check. Primed and painted ceiling…check. Closet rods installed…3/4 of a check.

That’s a pretty ceiling, if I do say so myself. 😀

Now the challenge will be to see if I can get this room, the foyer, and the bedroom cleaned up by the time I go to bed tonight. If I can, I’ll be at Home Depot first thing tomorrow morning to rent the sanders for the floor. I’m not going to stress over it, though. I’ll try my hardest, but if I just can’t get it done, I’ll finish the clean up tomorrow, and then rent the sanders first thing Friday morning. But either way, these floors are about to get sanded. I’m so excited to get this dark stain off of the floors and see how these rooms are going to look with light, bright floors!
More About My Walk-In Closet/Laundry Room

see all walk-in closet/laundry
room diy projects
read all walk-in closet/laundry
room blog posts

Addicted 2 Decorating is where I share my DIY and decorating journey as I remodel and decorate the 1948 fixer upper that my husband, Matt, and I bought in 2013. Matt has M.S. and is unable to do physical work, so I do the majority of the work on the house by myself. You can learn more about me here.


Hi Kristi: It’s really coming along well. I just love that color and the lights remind me of going into a Disney World shop – so bright and cheery! I’m keeping my fingers crossed that you are able to get your 4th rod, easily and quickly. Enjoy your lunch today with your family.
Adding the new ceiling lights makes the blue so much brighter. Previously I was not so keen on the color because it looked murky to me but now I can see the appeal of that color. What a big project, and you are doing so well at working through all the individual challenges!
Thanks for the tips, very helpful. Can a wooden rod be painted and used temporarily until the matching metal rod is available? Everything is coming together so beautifully. Your vision and talent are amazing!
No, because I’m using oval rods instead of round rods. 🙁
Great job on the ceiling!!! I’ve seen “pro” work that didn’t look near as good!
So sorry about the rod. Wonder if you could find a metal curtain rod that would slide in until you get replacement?
Could you do a temporary “repair” on the rod, using something inside the short rod and an added piece of leftover rod? A carefully placed hanger could cover the seam until/if you get a replacement….Just a thought.
Oops! Should have read further! Seems like a popular idea!
The gold hanging rods are very pretty. Hopefully, amazon will have them back in stock soon.
On your short rod, if the rod is hollow can’t you maybe cut a wood dowel and place in each end to make up the difference? It would be a bandaid until you can get another, but allow you to use the area. Hey the dowels might not even be visible.
I’ll have to think through how I could do that. If I had chosen round rods, that would be very easy to do. But of course, I made it more challenging for myself because I decided to use oval rods. 🙁
Maybe see if you have scraps that are close to the height of the rod (possibly trim wood?) and sand it to the shape needed?
How about a steel flat instead? Something like this, also comes in other sizes.
https://www.lowes.com/pd/Hillman-4-ft-x-1-in-Hot-Rolled-Steel-Solid/3053695
That should be able to slide into your oval rod and probably has a greater carrying capacity. Tougher to cut but doable with an angle grinder. If necessary, you could get a metal working shop to cut it for you.
Love the color drenching.
Wondering about that 4th rod…Could you fill in the too short area with a wood shim painted the same blue? I know it would be noticeable, but would clothes cover it?
Kristi.. for the rod, could you make 1/2 inch “spacers” out of wood (paint them) and use the rod in the bottom of the 1/2 hanging section for the “left side full hanging” rod location? It would allow your pants to not fully “fill” the area, maybe won’t be as noticeable and allows you to keep the incredible progress going??
Not sure if this makes total sense… but hope you catch my drift.
Great job, thanks for bringing us along on the ride 🙂
This is what I came to say, that wooden blocks could be put at one or both ends to make up the difference in length, until a new rod came be delivered. Just a temp fix but would work in the short run.
Kaein, My thoughts completely. This would work till the new rod arrived. Or it could work well, and no replacement needed.
Are you planning to paint the window and door trim the cabinet color? Also will you put crown around the window end of the room. I don’t remember if they were on your still to finish list.
I will be painting the window trim the same blue, but I didn’t do that yet because I’m seriously considering removing the window trim to install the wallpaper. I think it would be easier than working around the trim with those 1/2-inch pieces sticking out from the header piece on each side. I’m still considering that, so I don’t want to paint it now since I’d just have to recaulk and repaint when I reinstall it.
I will be putting crown molding around the wall areas, and it will be blue as well.
Hi, I don’t know if anyone has mentioned this, but what about using a couple of rosettes in wood or mdf to space out your rod brackets to make the rods fit. Something preprimed glued and screwed to the side walls. Once painted, They would almost disappear. If you put them in the lower cabinet, they would not be that noticeable. I’m thinking path of least resistance.
Sorry about that last rod. We’ve all been there, done that.
Everything is looking beautiful, and I can’t wait to see the floor transformation.
You’re doing a beautiful job! Your closet is looking absolutely beautiful!
It always amazes me how quickly you get things done! I know sometimes you feel like things are moving slowly, but from where I’m looking you are flying through things. Love the drench! You are doing a great job!
I want to say if you go to the item in your ordered list and click ask product question you will get the AI chat bot but with persistence you can get an option to message seller.
Hopefully you’ll find a way or another option from another vendor.
For the short rod, just add a block on end to make up difference, paint it blue, add bracket and closet rod. No one will see it with clothes hanging and shelf above.
My house has closets that were using similar oval rods, but chrome. This shape is pretty generic shape. At worst you could paint one…I found I wanted one an inch longer too. I got my extra so long ago I forgot which store(wally world, blue or orange box), but it was under $20 with a ship-to-store option because shipping was so costly. I went to pick it up and it was shipped in an 8’+ long cardboard tube. It was tricky to bring home with a hatchback. I cut that tube down to hold all my extras for rod/curtains. I hope this helps.
I am assuming the closet rod is hollow. If you have a small piece left over, you could cut it the inch necessary and use a dowel (scrap piece of wood) through the center of the two pieces so they reach the two brackets. They won’t be as sturdy as the others, but would work temporarily until a new one is purchased. permanent
Ugh! That’s so frustrating! I know how many times I’ve saved something in my Amazon cart thinking that when I got a gift card, I’d move it to the cart and by the time I’m ready to buy, it’s gone. Here’s one from another company. Would this work? It’s not cheap 🙁 https://www.hardware-decor.com/products/8ft-oval-closet-rod-satin-brass-finish
Well done! And the color looks amazing. I’m so impressed with everything you’ve done in this room and can’t wait to see where you go from here!
Is the lower middle rod long enough to swap and use in there? If you can’t find an exact match It wouldn’t be noticeable in that lower hanging area. It’s all beautiful.
I just tried it, and it fit perfectly! I just ordered a new one from another Amazon store, so if it doesn’t match perfectly, I’ll use it in that lower middle section. Good idea!
Love the color! Are you not going to have a full-length mirror in the closet?
You must be new here 😁😁 She has repeatedly told us her full length mirror will be in the foyer along with a bench.
It is looking soooo good! Cheers to you!
I know that I’ve said this previously, but you are simply amazing! Fantastic and precise way to measure by cutting the scrap wood, etc. I’m so sorry about the mistake with the rod. But, I know that it will get straightened out!
Genius idea
I just have a question I’ve been pondering. What was the factor that decided the washer and dryer should go at the far end of this closet?
I believe concerned venting the dryer.
My main consideration in that decision was the venting for the dryer. I was determined to have the dryer sitting against an exterior wall for the shortest venting possible so that it could be regularly and easily cleaned out. I didn’t want the vent traveling through the wall 10+ feet before hitting an exterior wall, which it would have had I put the dryer just inside the closet doorway.
But my second reason is that my washer and dryer are navy blue. I didn’t want them sitting next to the foyer, which will be wallpapered in teal grasscloth. I wanted quite a bit of separation between the two colors, and I wanted a way to bridge the two colors, which is why I chose the wallpaper I did, which has both teals and navy blue in it.
But mainly, the venting issue.
I’m sooo glad you decided to color drench! I have been painting my ceilings for 30 years now-I used to watch this guy on TLC I want to say his name is Christopher Nolan but I can’t be certain anyway his mantra was NO WHITE CEILINGS he was way before his time. I put oval rods in my closet (although cheap ones) I got them at Target.
No his name was Christopher Lowell-his show was so cheesy but it was the 90’s and I loved him.
Oh my goodness, I remember him! I used to LOVE his show back in the 90s!! Ahhh…the memories. 😀
Oh dear! Would you like to borrow my list of words for occasions like the too short rod?
I like the lipstick idea except for the fact I don’t own any!
I am lining my studio with bookcases and all my outlets are at 4 ft high and 4 feet between.I want to cut the holes in the bookcases big enough to show the complete cover plate. Finally came across the idea that works best for me! Cheap white toothpaste from the Dollar Store. You can get a “peak” when you squeeze some out, it’s water soluble and doesn’t stain anything. Put a little peak on each corner of the cover plate and push the bookcase into place. The toothpaste will stick to the “wood” on the back so I know to cut the rectangle a 1/2″ bigger. Viola! Outlets are ready to use in spite of bookcases.
If you have the name and model number of your rods, try a Google search to see if anybody else carries them.
Haha! Yes, I’m going to need that list ASAP! 🤣 I’ve had more than one occasion during this closet project where that list would be useful, and I’m sure to have more. 😁
I am finally caught up! I gave up reading blogs in 2020. I am a completist but I started with the condo was finishing up.
Your house is looking so amazing. I wish I could visit, paint pour, or we could walk around home depot and show me the upgrades for the $$ stuff needed to basically just build basic furniture. I usually understand the little ikea guy.
Maybe do a series where you dress up plain ikea dresser your way to show you can already dress up what you have to do is “Kristi-fy”. Stuff that may be in someone’s house and they don’t want to get rid of it, but it needs *something*. That might be a fun project to do and you could do it on YouTube! Show what we can do to customize what we already have, to kick it up a notch even though it’s a rental. Something small and fun for you to get out of the monotonous stuck in something. I have lots of questions and stuff lol.
Beautiful beautiful. I’m so glad you went with the blue. The closet is looking lovely.
Why not put a 1” board on the closet wall, paint it blue, put the rod hanger into the board, finish installing the rod and call it a day. You can always put a scarf or something over it to hide the 1” blue board. Go to the next item on the list.
If the rod is hollow, can you run a dowel through the middle of two pieces of rod that together make up the distance (even though it’s oval), and then glue or tape the two pieces together? It seems like the dowel would provide support and and the rod sleeves would both look good and fit into the brackets. Everything’s looking great!
How did you paint around the can lights neatly? I have friends about to paint their bathroom including the ceiling… they are kinda sloppy and I am hoping to pass on a good tip for them!
I removed the lights and left them hanging free while I painted. They were still hooked up and turned on to give me the light, but they weren’t flush against the ceiling. I woke up early this morning and put them back into the ceiling before taking the pictures.
I don’t suppose the rod for your necklaces would be able to be switched with the short one? If not, I would add small “spacers” of wood to the sides of the unit where the rod belongs, in a depth to fix the too short width. Paint them with the blue, attach the brackets to those and install the rod. I think once the clothing is on there, you won’t notice, and no one but you (and us~) will know! ( I’m at a loss as to understanding how those brackets will support the weight of the clothes. Those short”pins” and one screw??? Doesn’t seem like enough to me, but I wait for proof!
I don’t know how long your rods need to be, but there are oval rods in stock on Amazon in satin brass in 36, 60 & 94 inches. The listing says 36 inch rod but once you click on the product it has other sizes.
Kristi. Can you order the same shaped rod in a different finish
Until the ones you want are back in stock. It probably won’t be that noticeable with hangers and clothes on the different one.
At least you can hang up everything for the short term.
Everything is looking great! One more tip:
When I have to cut lots of different lengths of something, I cut the longest ones first. That way, if I do accidentally cut one too short, I can use it for a shorter length. Of course, that means if you get to the last piece and make a mistake, you can’t do anything. But it’s a good tip! As in, if I need a 47, a 45 and a 43 inch length of something, I start with the 47. If I were to make a mistake and cut it a bit short, I can use it for the 45, and so on. I don’t make these mistakes often, but I do this just in case.
A faster way to mark for your closet pole brackets is to make a jig. Cut a scrap piece of wood and drill the holes where you want them, then just place the jig in the corner of your wall and with a punch mark where the holes go or drill directly through the holes in the jig.
I don’t know if any of your poles are a whole inch shorter than the others but a good habit is to always cut your longest one first. If you make a mistake you can use that one for one of the shorter pieces. Once you make that first mistake cutting one too short you’re more on alert with all the next cuts. I speak from experience 🙂
I was hoping you would take your jewelry out of there while you were doing all the ceiling sanding and hole cutting. There is a lot of dust everywhere, unless you can wash them afterwards. The room looks stunning, sure wish I had ceiling lights in my kitchen, it is so dark.
I covered that section completely with plastic before I started sanding the ceiling. I only uncovered it this morning for the pictures. 🙂
The ceiling is absolutely beautiful and it was the right decision to color it to match the cabinets. After you showed us an example, I started looking for that online and really like the look when they color of the room is correctly done. And thanks for the two hints on how to install those brackets. Great tips.
JB Weld is an amazing product that you could use to attach an one inch piece to the rod with it. I have used it for may items and it has held up well.
Wow, Kristi, just looking at that photo and seeing all that you have accomplished is a.maz.ing. And now you can be sure that there will never be any wasps building nests on your ceiling. (Those who live in the South will get that, lol.) I think the color drenching is just beautiful and I’m anticipating seeing the flooring and wallpapered end wall. This will be a room that will bring you joy for years to come!
I’m loving watching the progress on this dream closet! Everything is beautiful. One thought about the rod that you cut a little short….are you planning to do a retractable garment rod? Maybe the short rod could be used for that? Every once in awhile, if I’m getting dressed up for an event…which is rare…I wished I had something like that to organize my clothes for the event!
I have done a couple of closets with a system sold at Menards. They use the exact same rod holder (it appears…) and oval rods. However they are silver. Wondering if an interim measure could be to buy a silver rod and paint it until the other ones back in stock.