DIY Decorative Cabinet Feet For Stock Cabinets
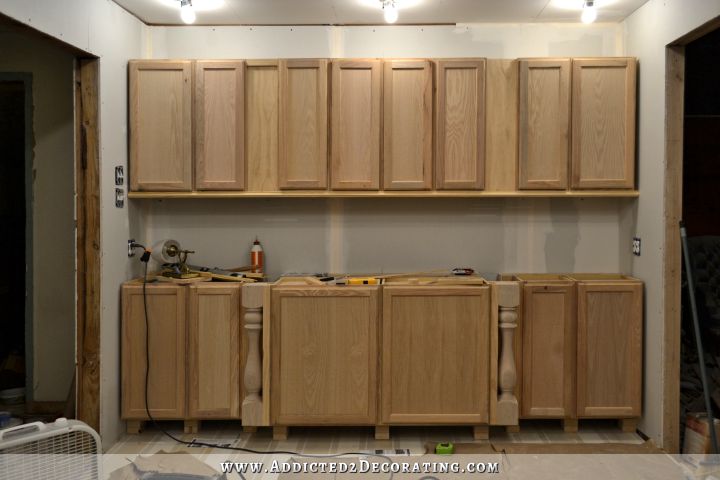
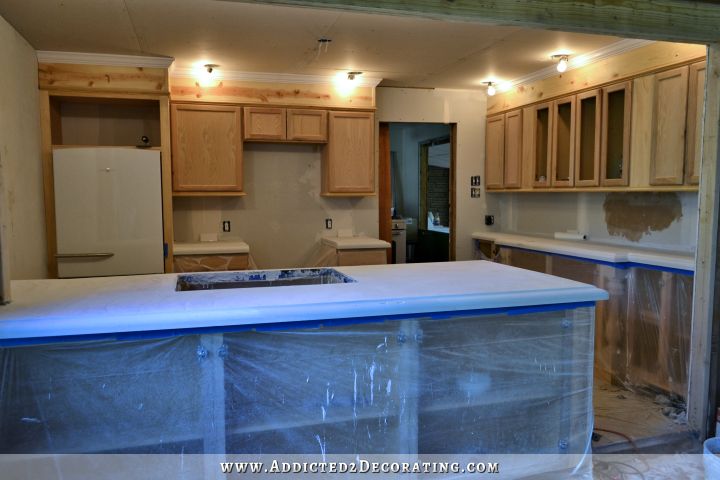
The cabinets on the wall of cabinets are starting to look a bit more custom now! I made and added the decorative wood cabinet feet yesterday, and it turned out just like I had envisioned. I love it when that happens! 😀

That’s quite a step up from the 2 x 4 bases that were showing the day before, right?
Right now they look a bit washed out and blend in with the floor, but just imagine the gorgeous green paint color on the cabinets. Can you picture it?
The actual wood cabinet feet were a breeze to make, but all of the prep work leading up to installing the feet was a bit time consuming. Here’s how I did it.
How To Make Decorative Wood Cabinet Feet
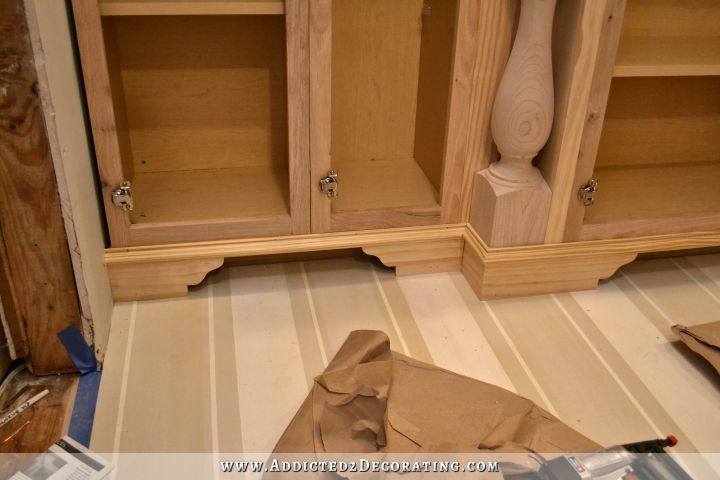
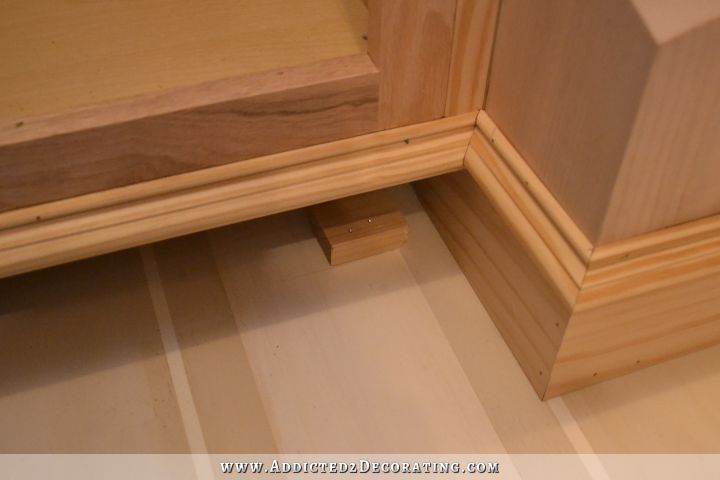
First, I used toe kick plywood to cover the 2 x 4 bases of the cabinets. This thin plywood comes pre-cut to 4.5 inches tall and comes in 96-inch lengths so that you can cut it to the length you need. I glued and nailed the toe kick plywood to the 2 x 4 bases. Then, just like I did on the upper cabinets before installing the decorative molding, I added 1 x 2’s along the bottom edge of the cabinets, making sure that the front edge of the 1 x 2’s were flush with the front of the cabinets.
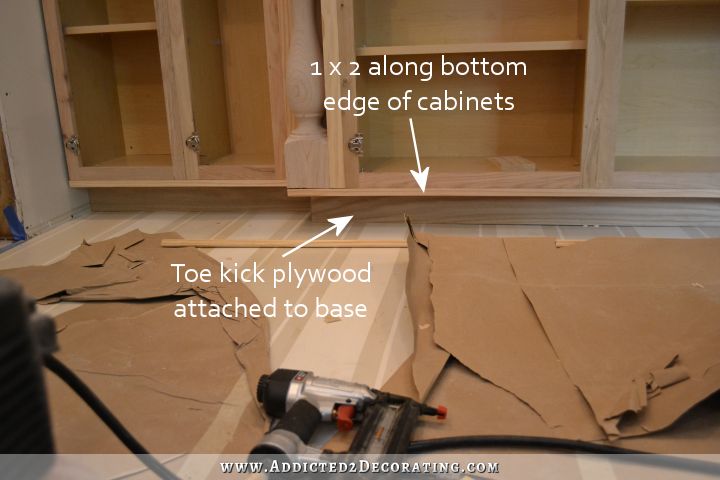
I attached those 1 x 2’s using 2.5-inch nails and wood glue, and I nailed straight down through the bottom frame piece on the cabinets. So the nail basically went in the same direction as the arrow on the picture above under the caption “1 x 2 along the bottom edge of cabinets.”
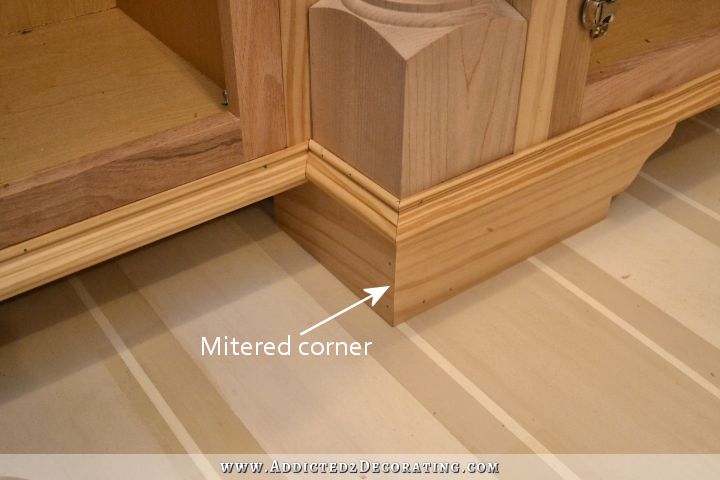
Next, I attached the decorative trim right along the “seam” where the 1 x 2’s met the cabinets. This decorative trim had to be mitered at the corners.
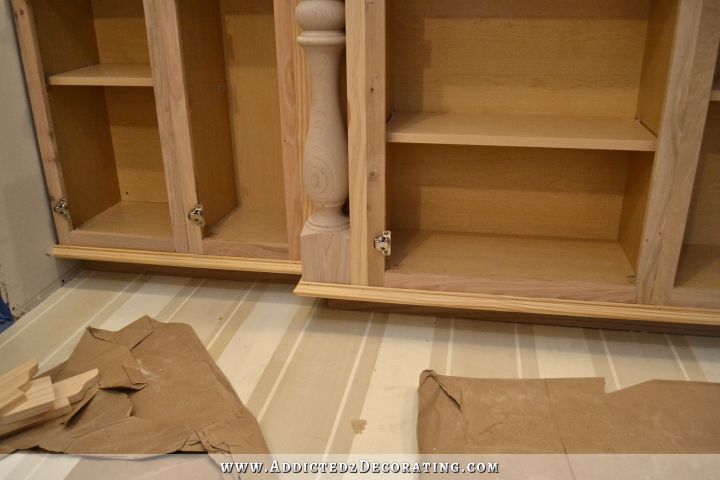
Here’s a close up look at the decorative trim I used. I think it was called something like “panel molding” because it can be used along the edge of paneling or beadboard since it has the rabbet on the back similar to what picture frame molding has.
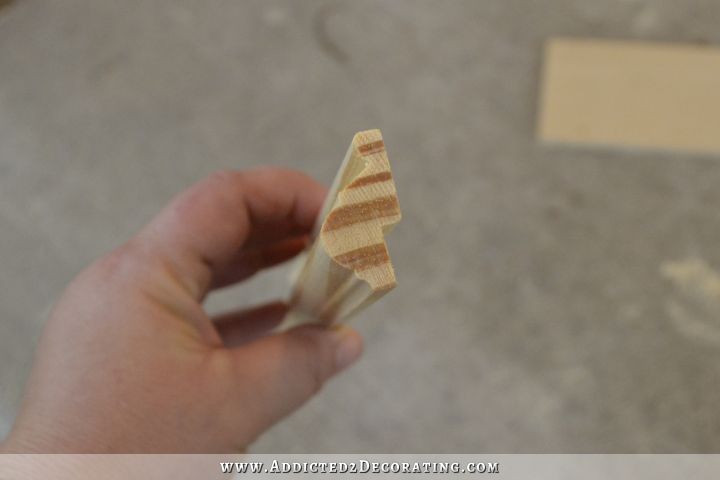
I attached that molding so that the rabbet was at the bottom, and I just slid the decorative foot back behind the trim and into that rabbet.
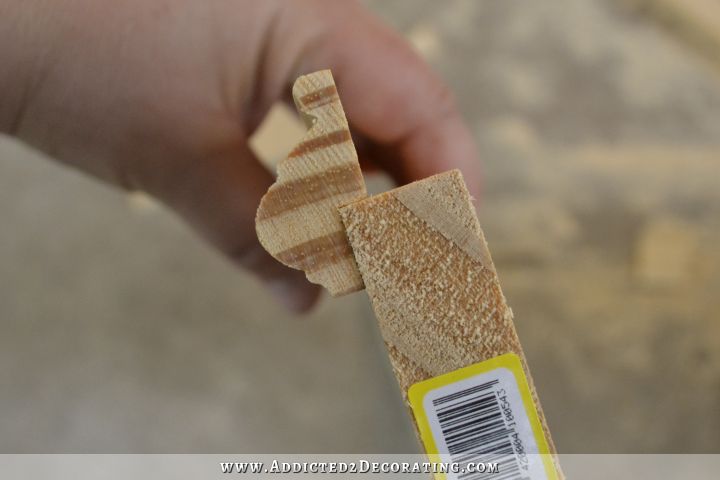
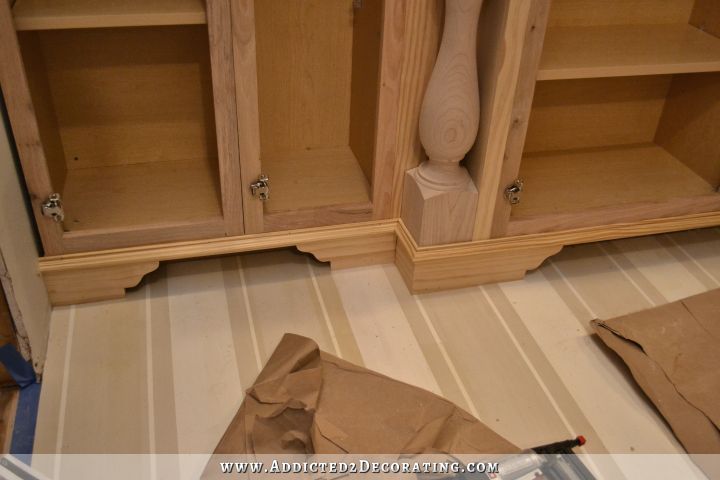
I made the decorative wood cabinet feet out of 1 x 4 lumber. I started by making a pattern, which I drew freehand on a scrap piece of 1 x 4 and then cut out using my jigsaw with a detail blade. (Note: Any time you cut details and curves, be sure you have a detail blade in your jigsaw! These blades are small and thin and are generally labeled “curve” on the package.)
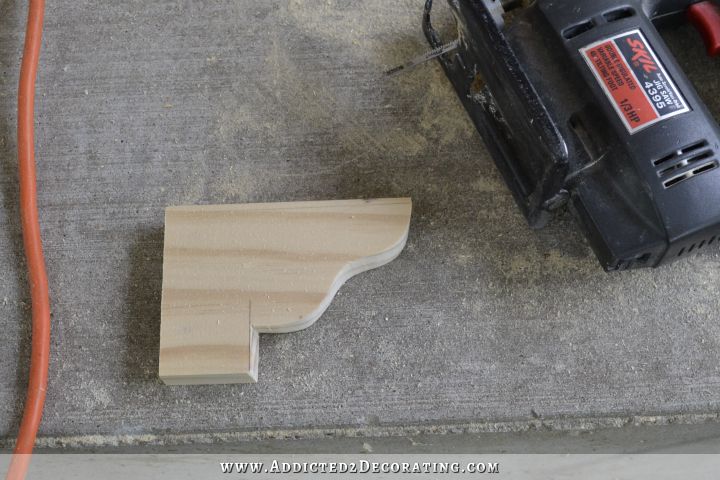
Then I used that pattern to trace all of the feet that I needed. I only used the pattern for the curvy side and left each one pretty long (about 10 inches or so). I used my miter saw to cut the straight sides of the cabinet feet after determining how long I wanted each foot.

After I determined the length I wanted the feet to be, I cut them down with the miter saw and then put them into place. The feet on the corners of the bumped out section had to be mitered. All of the others had straight cuts on the ends.
I didn’t get a picture of this part, but I set the feet into place, and then reached inside and carefully drew a line on the floor along the edge of the feet. Then I removed the feet, used a small piece of 1 x 2 and glued and nailed it to the floor. This gave me something to nail the foot into for support. Then I added a small bead of wood glue along the top front edge of the foot, put it into place, and nailed it to the brace I just attached to the floor.
I added a brace for each foot. You can see the one I added for the side foot here, and if you look really hard and possibly squint your eyes and turn your head just so, you can see the light pencil mark on the floor that I marked by placing the foot in place and then tracing along the bottom back edge.
Those gave me something to nail to, and added stability to the feet.
I’m really excited about how these decorative wood cabinet feet turned out. I love it when a project turns out like I had planned and envisioned in my mind!
I can’t wait to get them painted!!
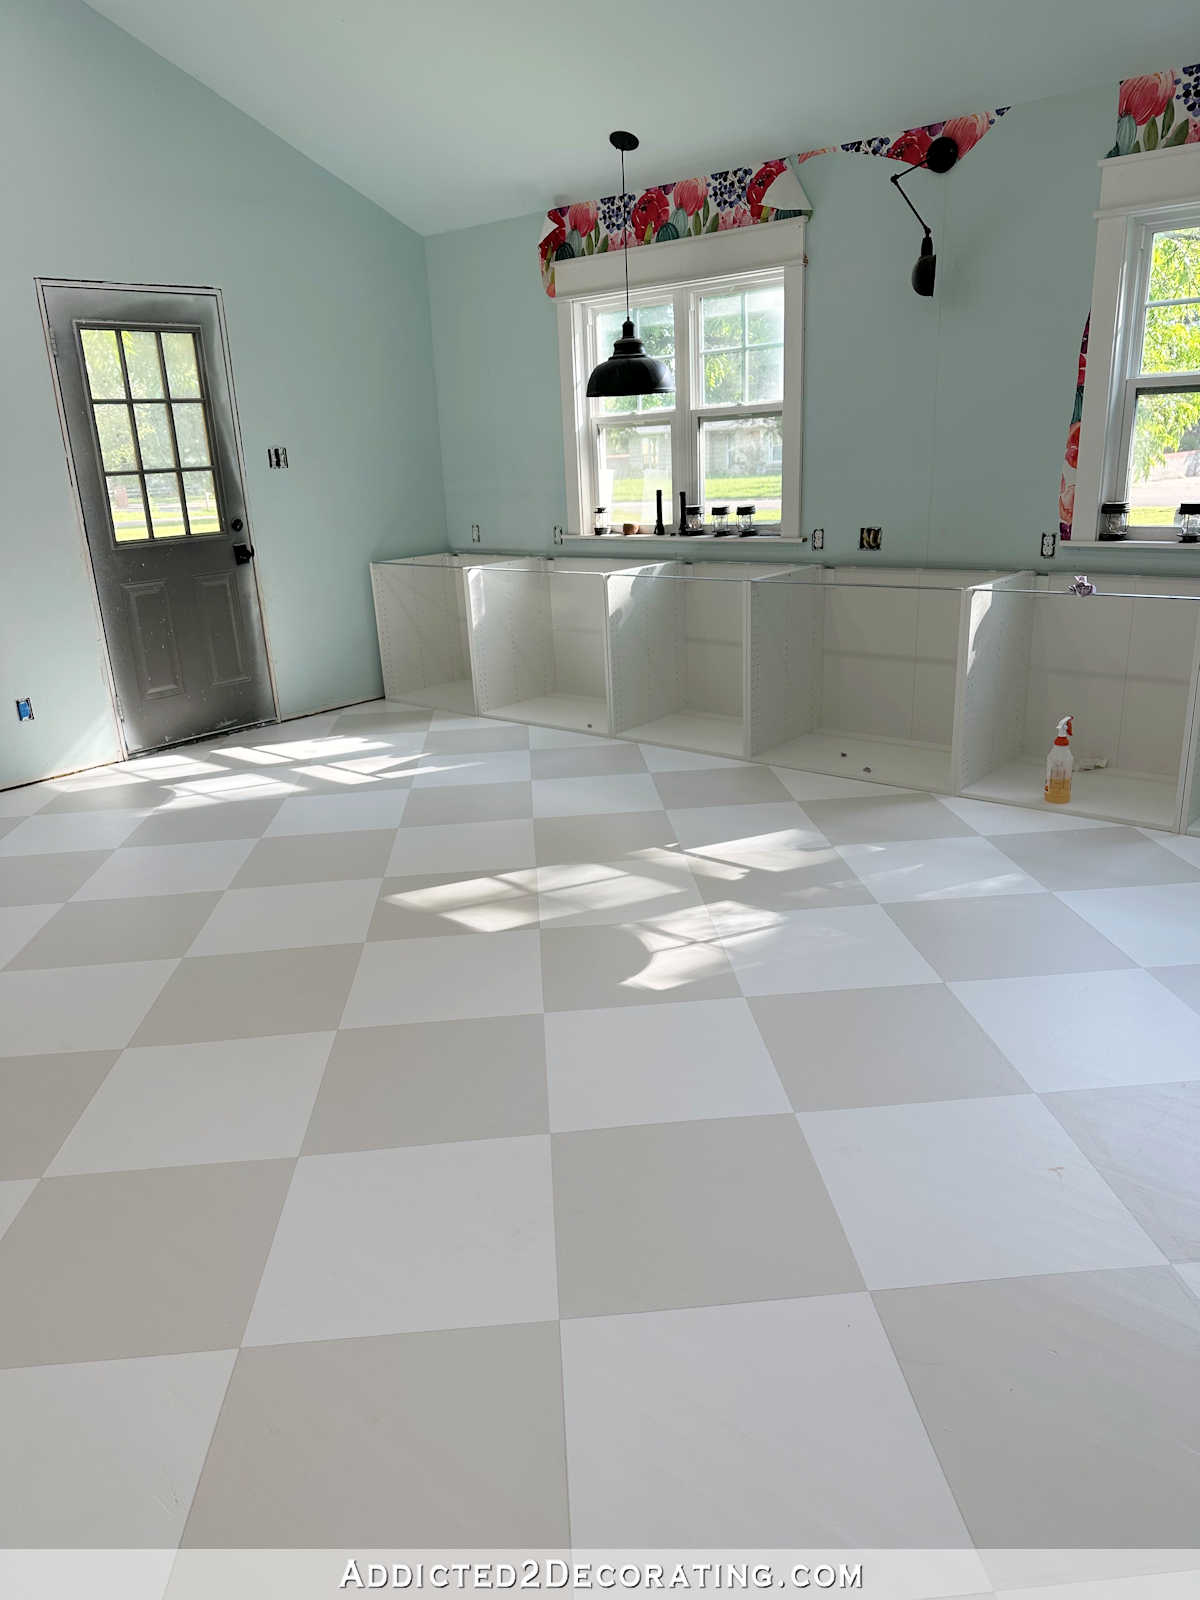
I still need to finish up the trim on the top cabinets — topper, crown molding, etc. I was sure I was going to get it finished yesterday, but at the last minute, I decided to add lighting to the four center upper cabinets (the ones that will have glass fronts), and I can’t add the trim to the top until I have the lights installed. I’ll get that finished up today and hopefully show you the finished (i.e., completely built, but still unpainted and with no countertop) wall of cabinets tomorrow.

Addicted 2 Decorating is where I share my DIY and decorating journey as I remodel and decorate the 1948 fixer upper that my husband, Matt, and I bought in 2013. Matt has M.S. and is unable to do physical work, so I do the majority of the work on the house by myself. You can learn more about me here.
That looks SOOOOOOOO good!!!
Looks fabulous! How will you paint them, with a brush or sprayer? What kind of paint will you use, latex or oil?
I’m planning on spraying everything. I’m still undecided on the paint I’ll use, though.
WOW Kristi, I get so emotional when reading your blogs about your kitchen…I guess I just get so excited for you and that you are able to do these type of things….!!! I’m just wondering how you will paint your cabinet feet so close to the floor. I know you will cover the floor but to get every nook and cranny..
You are AMAZING……!!!!!!
I don’t know how it could get any better than this! These cabinets are so beautiful, even before the paint. The painted floor looks wonderful running right up under the toe kicks. I’d hire you at my home any day of the week. You’re so much better than most custom cabinet builders. You have succeeded in making totally custom cabinets out of stock cabinets.
You. Are. Amazing!
I am so impressed your miter work is exquisite . So nice that really makes them look great..
Simply jaw dropping and it’s not even finished… oh and am I the only one that wants to yell… “Heeeey Rabbet!” no? ahhh..well… 😉
Wow! I can’t believe the transformation of this room. Good job!
You’re so stinkin talented!! I love it. Such an inspiration!
These look wonderful! You are so creative.
How do you not get paint on your floor when you pain the toe kick and feet?
Very precision taping. 🙂
WOW!!!! those feet are amazing!!! If you get this much done in a present life – I’d love to see what you did in your past life! I bet you designed and built the Empire State building! 😀
Cannot wait to see the paint!!!
You need to start wearing the superman logo. You really are superwoman! Besides getting those cabinets up by yourself, really amazing, you are such a talented wood worker now. Those feet look so great, as does the floor. You have done an heroic amount of work since you moved in. Really superwoman!
You work decorating miracles. Better than HGTV! My favorite program on HGTV used to be “Decorating Cents” ,they dumped it for yet another searching for Real Estate in some exotic place, like we all do that. So glad I found you. Even if I do not tackle the big things you do ,I have used a few of your painting projects and ideas and I love knowing things can be done with taste and affordably.
I am so impressed with what you are doing with these cabinets. You’re taking the mundane and making it extraordinary! But what I’m most impressed with is that YOU are doing most of this work by yourself. Go on Girl!!!
Kristi, you amaze me! Wonder Woman! I totally agree with all, looks stupendous. Cannot wait to see the finished product.
Like Peg I too miss “Decorating Cents”…I wonder if we were to send voluminous mail to HGTV they might resurrect it…who cares about going off to far off lands…we live here! We need ideas here!
Kristi…hangest thou in there…take some time today to refresh and re-energize so you do NOT make mistakes.
Hugs
Gaye
Looks Grrrrrrreat….. Can’t wait to see you tomorrow….! 😀
Wow! This looks amazing. I’ve been wanting to do this to our master bedroom vanity but am trying to be patient and wait until we do some renovations. Thanx for this post because I would never have thought to add those blocks on the bottom for added stability which obviously would be needed.
Watching the transformation of your cabinets makes me look at the kitchen I built and wish I had had the inspiration at the time to recreate stock cabinets. I did take ready made cabinets and paint them diff colours on the top than the bottom but that’s as custom as I went. This makes me want to rip out a perfectly good kitchen and start again.
I don’t think I could live without a kitchen sink or a dishwasher for two months though. I thought I was being ingenious when I put a stack of dirty dishes in the jacuzzi tub and turned it on. It should work like a dishwasher right? Lol. Ten minutes later I looked in and the layer of suds was a solid mass a foot above the top of the tub. Isn’t renovation fun?
Oh, that is too funny!
Oh my goodness, that’s hilarious!!! 😀 Kind of like putting dishwashing liquid in a dishwasher. Been there, done that. 😀
Amazing! I can’t tell you how much I enjoy your blog! I look forward to each new post!
Bravo! Bravo! *applause*
You are a genius!!!! I can’t believe how custom they look (of course, they are custom by a terrific DIY lady)!! Sure wish I had your skills!
I think the rich and famous are going to start calling you. Your kitchen surpasses the Diaz kitchen and is on a budget. When you’re ready for a “vacation”, come to Georgia. I want you to design my kitchen!
You should be so proud of yourself! The cabinets look great.
Oh, did you notice how gorgeous your floor looks in some of the close up photos?
Yes, I love how the wood grain shows through. I was hoping that would happen so that it actually looks like a painted hardwood floor.
Love it!
You are Wonder Woman……I was out of town for 10 days and when I opened this email this morning, I was amazed at your progress. My first thought………….does this lady ever sleep? You use your talents so effectly and I do appreciate you showing in detail. Good, NO, GREAT JOB!
Kristy-
I am just so excited! I check my email everyday…and I always have bills, bill reminders, sales from places I could care less about, tips and healpful health and weiht loss info…and then on some specail days, the sky opens, the sun gleams out a little brighter and the angels start signing for there is an email from you!! I love your ideas and the way your mind thinks!!
You have even inspired me to do some of my own power tool using!! We had some damage from a recent tornado and in the end had to rebuild our HOA mandated privacy fence. I used a cordless, rechargeable drill to screw in the runners, while using measurements to keep them “straight per the crazy angle of the ground. And I used *gasp* a nail gun to nail on some of the planks. This weekend, I may move into the worl of the jigsaw to cut several end pieces of the same fence to finishher off!
During all of this, we are attempting to sell/rent our current house and buy a slightly older – though not quite as old as yours – house that needs some updating…I have ideas, I know how to draw floor plans (by hand and a little AutoCad) and I am so excited to get started on the projects. I also scoped out a jig thingy when I was at our home improvement store on Sunday!!!
Thank you for making things seem so easy, doable and giving such great advice – some of the best has been that it doesn’t always work out like you imagined but not to get discouraged and to keep moving!!
Sorry, terrible typing skills today.
Correction: “straight” – gotta finish those quotations!!
Correction 2: I may venture into a skillsaw this weekend.
Correction 3: finish her off…as in the fence!
Great job on tackling those projects yourself!! Doesn’t it feel empowering? I love the feeling of not having to rely on others (for the most part) to get stuff done around my house. I just pick up the tools and do it myself. It’s very empowering and freeing to me.
I am totally in love with this. I’ll need to put this on my pinterest board for whenever we get to the kitchen because I’d rather spend my money on countertops and other things.
Kristi you ard right up there with the best. The cabinets are amazing…….and so are you.
Yes, I CAN imagine that beautiful green paint on the cabinets! What a superior job you have done!
You are amaZing !!! I don’t know how you do! Just a suggestion: have you considered breaking up top cabinets with a few glass doors to lighten everything up???
I’m excited to see the final result !!!!!
Yep, that’s part of the plan. 🙂 On today’s post, you can see that I cut out the center panel on the four doors in the center.
Very nice. Are you going to paint the backside of the feet? I would think that it will be hard to access once installed, but likely visible from certain angles.
No doubt about it- you get a lot done in a short time!
I’ll paint as much as the paint sprayer will reach. If the sprayer can’t reach it, then that means it can’t be seen, and I won’t worry about it. 🙂
That looks AMAZING!!! I can’t wait to see it painted! BTW, I need to learn to miter. Could you do a post on how to get the corners that perfect?
I’ll see what I can do! 🙂
I’m sorry, I feel like this is all I ever post…but you are simply amazing.
It looks awesome!!! I am so impressed!
I even have the Cotton Pickin’ Wood Butcher reading your blog now :^) We are well and truly hooked :^)
Blessings,
J
Just Gorgeous! I check your blog everyday in eager anticipation to see what you are up to next! Thank you for sharing your journey with us. I am enjoying it so much. 🙂
Wow. Wow. WOW! It’s LOOKIN’ GOOOOOOD! I can imagine it with the green paint! I’m just shakin’ my head at all you do so well. BTW, what nail gun do you have, would you recommend it, and if not, which one would you get? I’m going to get (my husband) one for Father’s Day. hahaha
I bought a combo set at the end of last year. I think it was a seasonal special, though. It’s Porter Cable, and it came with a 6-gallon 150-PSI pancake air compressor, a 16-gauge nail gun that shoots up to 2.5 inch nails, an 18-gauge nail gun that shoots up to 2 inch nails, and a staple gun. I think the whole set was $150. And I absolutely LOVE it. Before that, I was using a cheap Campbell Hausfeld compressor and nail gun that I bought as a set at Lowe’s for $99. Porter Cable is such a huge improvement in quality.
I admire your gusto and skill. I am not comfortable at all with power tools. Maybe it is because I have a small child but won’t dirt and such get stuck being the pieces? I thought maybe you have made them thicker so they went all the way back to the kick plate to prevent this but it didn’t look like it.
I’ll probably end up cutting some pieces of wood to block off most of that space behind there.
nice very nice !!!!
Amazing….not that I didn’t expect it! Each little step figured out and worked out so perfectly. You are a very talented and gutsy lady. How did the floor fare? I was a little worried when I saw the paper torn. Hope the poly did the trick to protect it. Looking forward to the rest of it as I am sure you are too. Wish I could wave a magic wand and have it all done for you, but then we would never learn anything! Mary Anne
The floor has actually remained unscathed so far. But I still have lots of work to do, so we’ll see if I can get it all done without scratching or damaging it. 🙂
Oh my word! Looks amazing!
Phenomenal work, as always! Love the cabinets, but my favorite thing about this post is getting to see close ups of the floor. I love seeing the wood grain show through and the little variations in color coming from the natural wood. Your kitchen is going to be amazing!
Cabinets look wonderful ! (so does the floor!)
Beautiful beautiful! I am so impressed with your mitering skills.
Oh, the wall o’cabinets looks AMAZING! Those feet are beautiful, the whole arrangement is, the turned wood pieces and the feet really give the cabinets a rich, substantial look. Very custom. That wall is going to be a showpiece when it’s finished!
Also, YOUR FLOORS! *drools heavily* They look wonderful with the cabinets!
I agree completely…!! I wish this had a “like” button…!!!!!!
Oh my gosh! So beautiful already. Can’t wait for paint!
Yowza! That is looking great!
That looks awesome!!
Wow, you are so talented! I love seeing what you are capable of and it always looks great1
I love following along with you on this journey. You give me ideas and inspiration to tackle a rental overhaul that I have been procrastinating on. How do you get your mitre cuts so perfect. This is something I struggle with. Is there a trick you use?
Kristi, you astound me! I love your website. I totally agree with all, looks stupendous. Your transformation idea is amazing. This makes me want to rip out a perfectly good kitchen and start again. This looks startling. Great work.
How wide are the feet? They look a lot wider on the cabinets than the template you show.
The template is just for the curved side, and then I made the width appropriate for each cabinet section. The sections have different widths.
Ok, so now I think you are indeed very very clever. They are amazing
I’m new to your blog. I LOVE everything you have done so far. Thank you for all the info and education. It’s helped with my small diy projects, your projects are AMAZING! Thank you!