Wall Of Cabinets Installed (Plus, How To Install Upper Cabinets By Yourself)
It took me all weekend, but I got all of the cabinets on the wall of cabinets installed, including the upper cabinets, which I installed by myself. 🙂
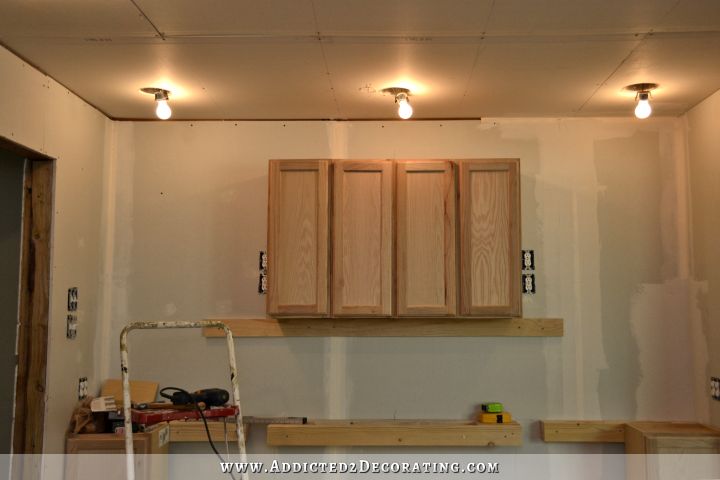
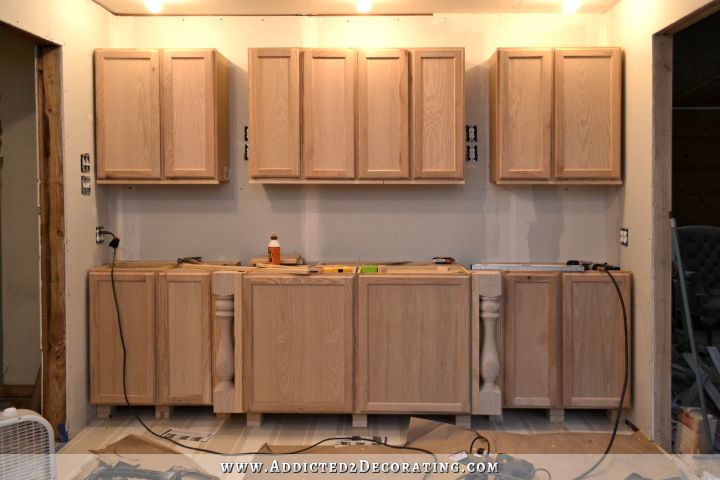
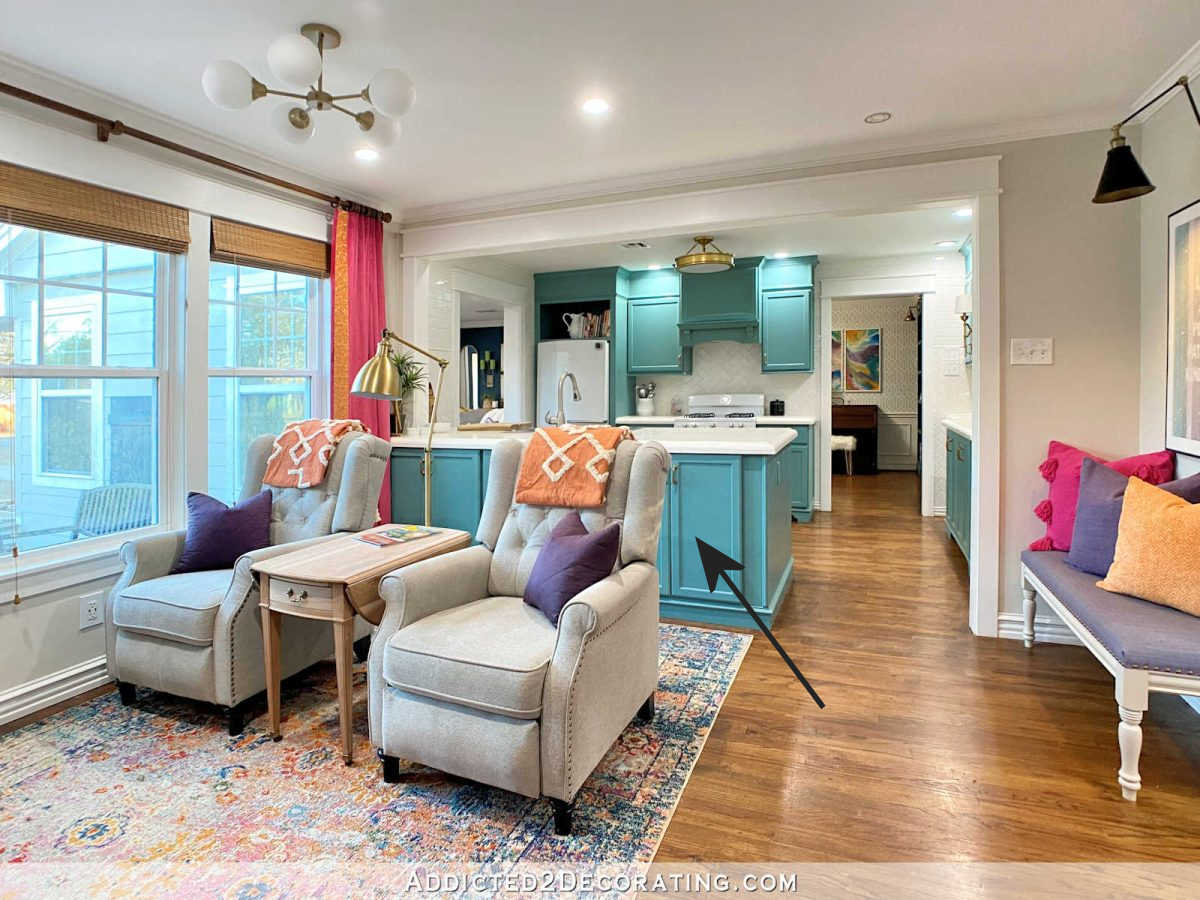
I still don’t have the decorative trim (cabinet topper, crown, toekick, decorative feet, etc.) in place. I mean, I literally only got the cabinets and the decorative wood legs in place, but I can finally see this wall shaping up and I’m getting excited about how it’s going to look! So after a whole weekend of installing cabinets, here’s how it’s looking. (Ignore the trim piece at the top of the left spacer where the sconce will go. That piece shouldn’t be there. I just forgot to remove it.)…
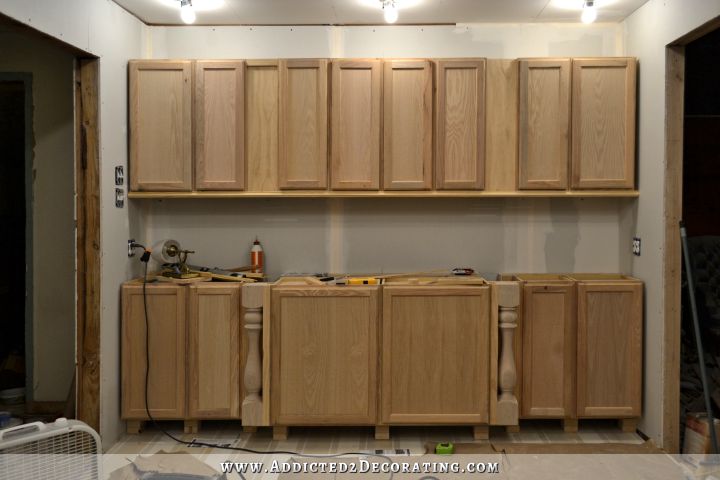
One thing to note about stock unfinished cabinets is that the doors are kind of wonky and uneven. One door may be a full inch from the bottom of the cabinet, and the next door may sit only 1/2-inch from the bottom of the cabinet. It’s a pain, but it’s one of those “you get what you pay for” things. Fortunately, you don’t have to settle for wonky doors. I’ll be fixing those and showing you how I do it.
And you’ll also notice that I didn’t finish the taping and mudding above the upper cabinets. Just ignore that. It’ll get done, I promise! It’s just another example of how I don’t always do things in a logical, efficient order. Instead, I do things in an order that keeps me motivated to continue working. But it’ll all get done, even if it is illogical and inefficient. 🙂
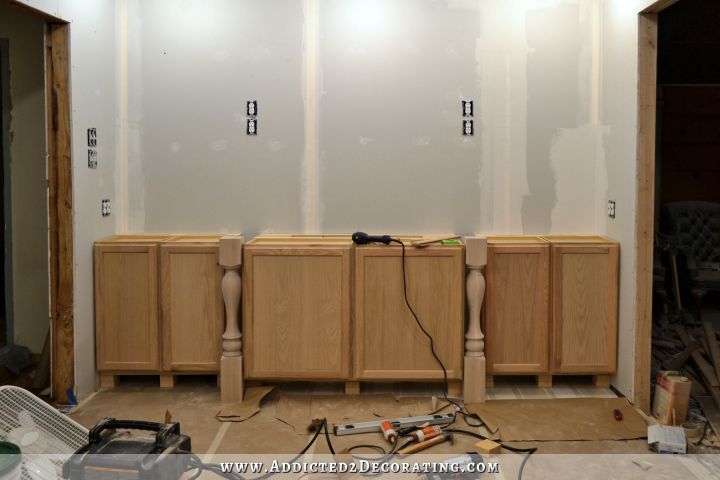
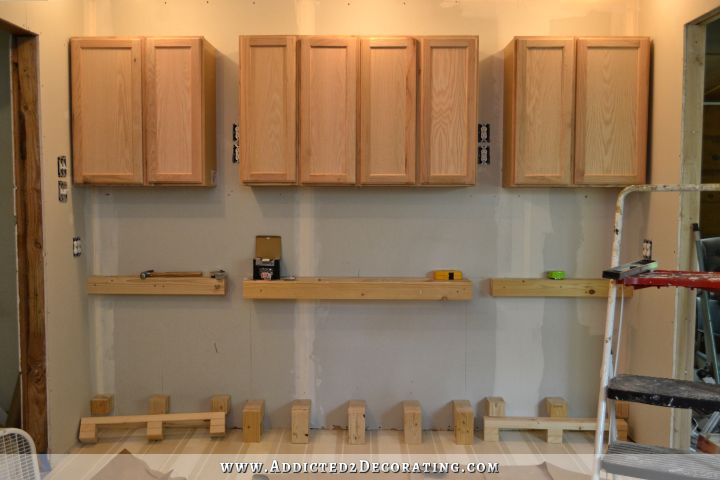
So when I left you on Friday, I had installed the bracing and spacers for the lower cabinets, but I hadn’t actually installed any of the lower cabinets. They were just sitting there.
The main reason I hadn’t installed anything (besides the fact that I needed to install the uppers first) is because I first needed to have my wood legs cut down to 30 inches (they were originally 36 inches), and I didn’t have a tool that would cut through 4.5 inches of wood. Thankfully my neighbor saw my post about needing that done, and offered to help me! I went over on Friday evening and she and her husband and I cut the legs down using their table saw. And yes, it was a three-person job, but we got it done perfectly!
But I’m very glad that I was forced to wait a bit on the installation, because it gave me time to really look at and study the picture and notice that something just wasn’t right. When I posted the picture on Friday, it struck me how squished together everything looked around the wood columns. There was no “breathing room” around the columns, and while the cabinets doors did open and close just fine, it just didn’t look quite right.
So I ended up taking two of the 15-inch cabinets on the outer sections back to Home Depot, replacing them with 12-inch cabinets, and then filling in with spacers to spread things out a bit and give a bit more room around those wood columns.
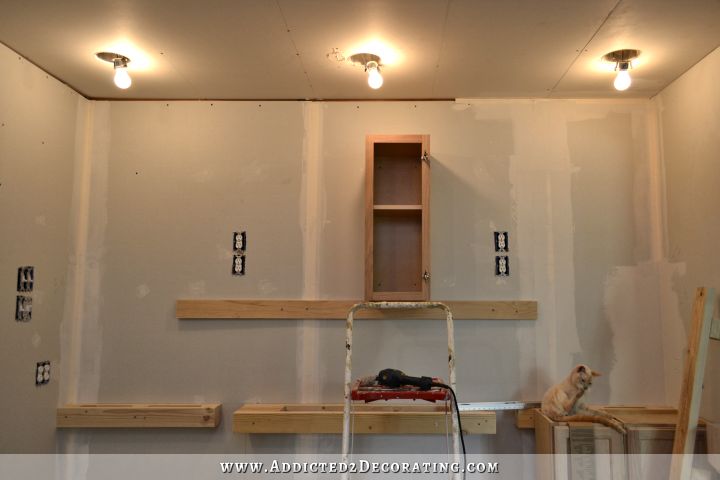
But before I worked in that, I removed all of the lower cabinets and installed the upper cabinets (the main reason I hadn’t installed the lower cabinets yet).
I started by measuring and marking a line where I wanted the bottom of the cabinets be on the wall, and I also measured and marked the center of the wall. Then I used a scrap piece of wood and screwed it into the wall with the top edge of the wood right on the line that I drew. I used my level to be really sure that the piece of wood was level all the way across, and screwed it into studs.
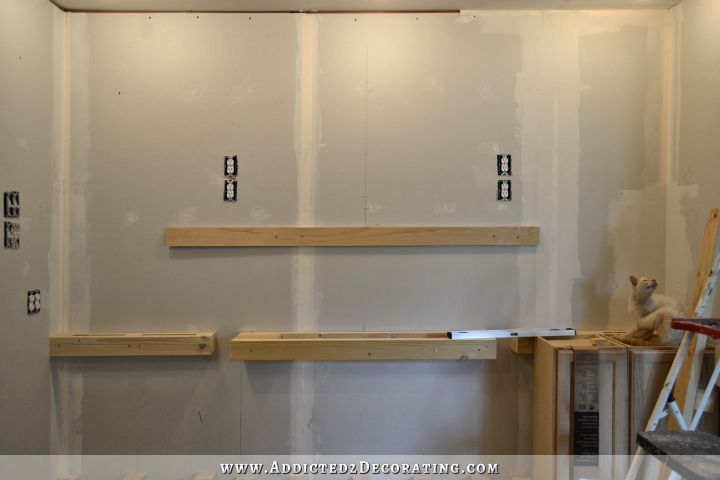
Then I used that piece of wood to set the cabinets on while installing. That way, I just had to lift and set the cabinet into place, but once it was in place, I didn’t have to hold the weight of the cabinet. The brace did that for me. I could easily slide the cabinet to the left or right and get it perfectly into place before installing.
Now just a few important things about installing upper cabinets, especially if you’re doing it by yourself:
- Remove the doors and shelves (if you can) to get those out of the way and remove excess weight.
- Pre-drill the holes for the screws before you lift the cabinet into place. Do not try to screw in the cabinets without pre-drilling the holes.
- Insert the screws into the pre-drilled holes before you lift the cabinet into place. Just be sure they’re not poking out the back of the cabinet.
- You do still need to use your level to be sure that each individual cabinet is going in level. Don’t depend completely on the brace to keep things level. Just use the brace to hold the weight of the cabinet so that you can easily do the fine tuning before screwing the cabinet to the wall.
And again, when using stock unfinished cabinets, don’t be discouraged about the wonky doors. Those can be fixed.
I did have to move the brace twice to get all of the cabinets installed. I do think it’s easier and better to use a shorter piece of wood and move it, rather than using one long piece of wood as a brace, because the longer the piece of wood the less likely it is that it’ll be level all the way across.
The spaces are for the outlets, which are for my sconces and undercabinet lighting, and each outlet is connected to a light switch on the left wall.

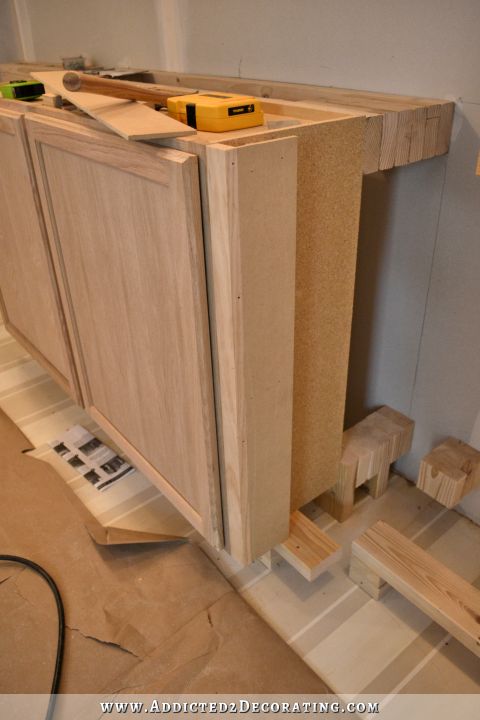
With the upper cabinets installed, I was ready to install the lower cabinets with the new configuration (smaller cabinets, more space, and spacers added around the columns). Adding all of the spacers presented a bit of a challenge, but here’s how I did it.
First, I installed the two center 24-inch cabinets, and then attached a 1″ x 2″ strip to the outer edges of these cabinets using wood glue and my nail gun with 2.5-inch finishing nails.
Next I added some spacers to the side of the cabinets. I just cut pieces of 1″ x 2″ lumber, and stacked two pieces on top of each other, and then glued and nailed them to the side.
Stock cabinets like this are made with particle board sides, so if the sides are going to be showing, you have to cover them with panels. They sell oak panels that can be used, but I’ve found that if the cabinets are going to be painted, it’s much cheaper to use 1/4-inch MDF cut to size.
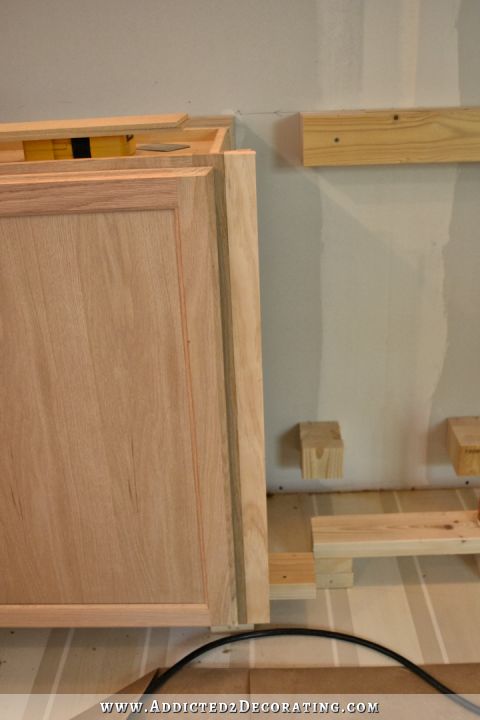
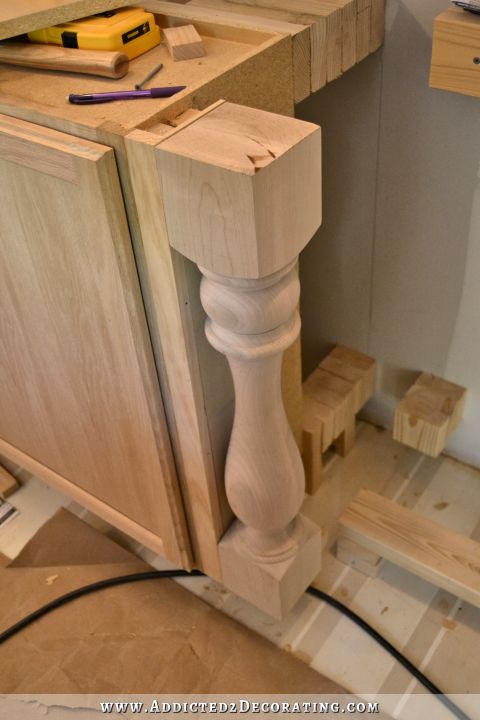
My columns are 4.5 inches square, and the edge of the spacer board already in place is 3/4-inch. That meant that I needed a piece of MDF cut to 3 3/4 inches by 30 inches high. I cut and attached that to the side, nailed into the spacers.
That gave me the perfect depth (4.5 inches) for my wood column. I put the column in place, pre-drilled a hole, and then attached it with one 3-inch screw going through the lip at the top side of the cabinet (close to where the purple pencil is), through the top spacers, and into the wood column.
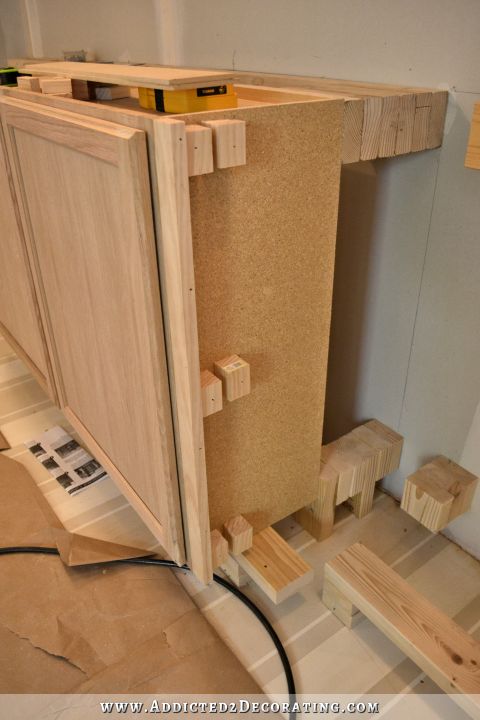
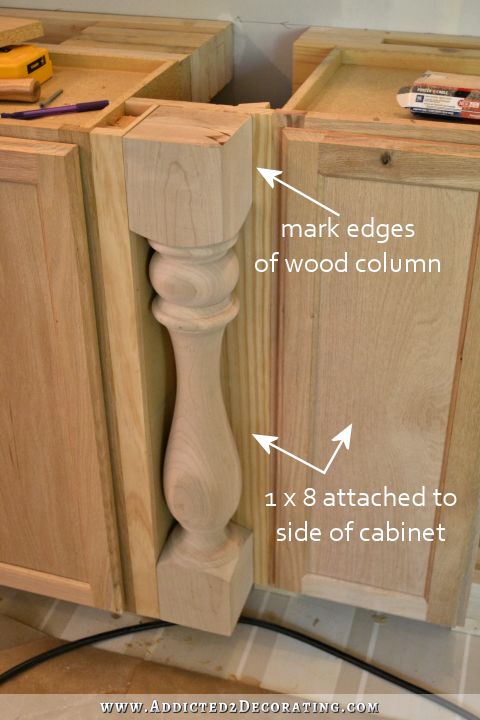
With that column held temporarily in place, I took my next cabinet and set it in place. This was a 12-inch cabinet, and I had attached a 1″ x 8″ spacer to the side of it, just like I had attached the 1″ x 2″ to the side of the 24-inch cabinet. This 1″ x 8″ was attached to the side of the 12-inch cabinet just using wood glue, which I had allowed to sit overnight to dry thoroughly.
I set the cabinet with the 8-inch spacer in place behind the column, used my level to be sure it was exactly in place, and then marked where the edges of the blocks on the wood columns needed to go on the spacer.
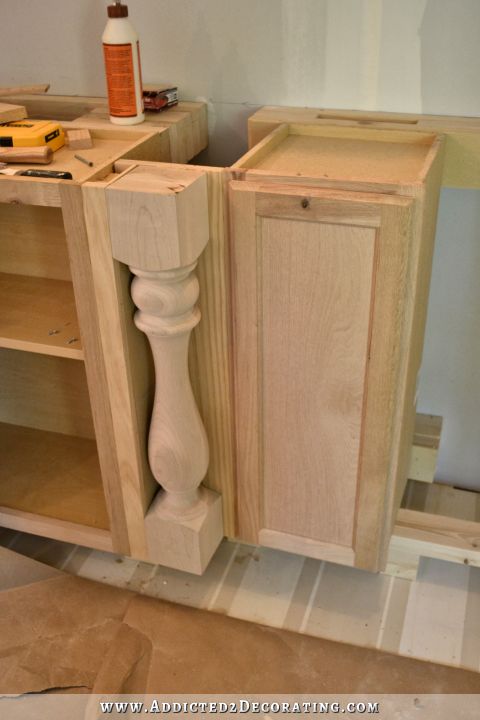
Then I removed the cabinet, unscrewed the one screw holding the wood column and removed it. Next I lined up the column on the marks I just drew on the 8-inch spacer, and attached the column. I used wood glue, and then 2-inch nails through the back of the spacer and into the column to get it into place quickly, and then used two 1.5-inch screws to really hold it in place. (I pre-drilled the holes!!)

Then I added wood glue to the sides of the column and the edge of the 1″ x 8″ spacer and set it back into place. I replaced the screw going through the upper lip of the 24-inch cabinets and into the wood column, and then added another screw at the bottom going through the inside of the 24-inch cabinet and into the bottom block of the column. And finally, I finished up by screwing the 12-inch cabinet to the back bracing on the wall.
And if that sounds complicated, believe me, it was 100 times more complicated trying to work out the logistics of how to get that done, which is why just installing the cabinets on this wall took me all weekend. 🙂
Someone with a much more analytical brain than I have could have whipped that out in about 30 minutes, and probably could have found a much more efficient way to do it. But unfortunately, I’m stuck with the non-analytical, non-numbers-oriented brain I have, so stuff like this takes me forever to figure out. But I got it done!
With that 12-inch cabinet and the wood column finally in, I just had to add the last cabinet and it was done.
I had hoped to get more of the trim work done, but I didn’t get very far on that at all. I did attach the trim to the bottom edge of the upper cabinets, though. Here’s how I did that.
I started by attaching 1″ x 2″ lumber to the bottom of the cabinets, making sure that the 1 x 2 was flush with the front of the cabinets.
You can see that the frames on the cabinets aren’t perfect. Such is the nature of stock cabinets, but it’ll be all covered up when I’m finished. Then I used my level to draw a line all the way across very close to the bottom of the cabinets.

And then I used that line to attach the trim.
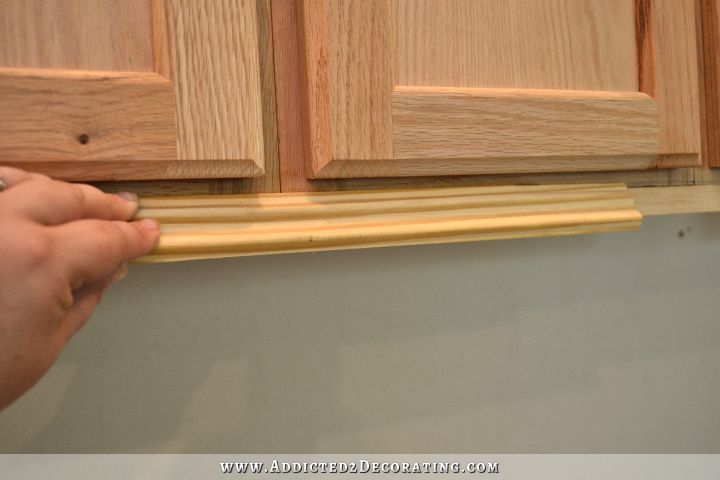
The 1 x 2’s gave me something substantial to nail the trim into, and the line made it quick and easy to attach the trim as straight and level as possible.
So that’s where I ended up last night when I called it quits.
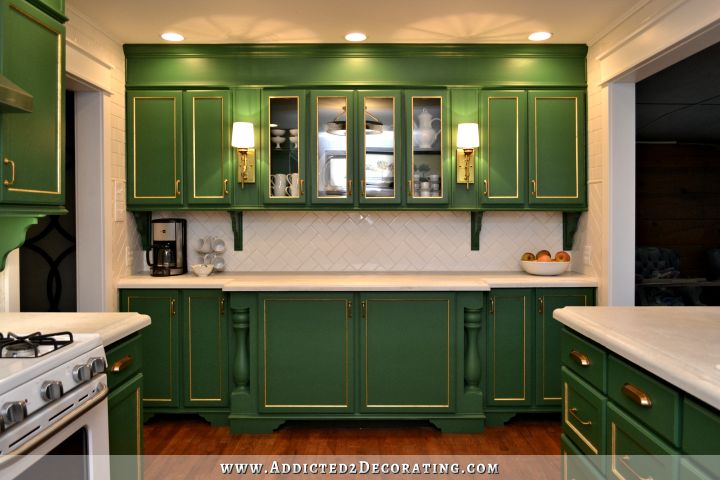
There’s still so much trim work to be done, but that’s what will really take these cabinets from “cheap stock” cabinets to “fancy custom” cabinets. I’m hoping to get all of the trim finished today. But before I can jump into that, I suppose I have a bit of taping and mudding to do. 🙂

Addicted 2 Decorating is where I share my DIY and decorating journey as I remodel and decorate the 1948 fixer upper that my husband, Matt, and I bought in 2013. Matt has M.S. and is unable to do physical work, so I do the majority of the work on the house by myself. You can learn more about me here.

I kept clicking to see what you got done this weekend. My goodness it was alot! Thank you again for explaining how you do things. It is looking fantastic! Can’t wait for tommorrow. LOL
Goodness gracious, you impress me every post! I can’t imagine tackling all of this but you’re such a great role model, maybe some day I will!
You amaze me more every day. On days I get a lot done, I tell my husband I am a “beast”. Girl, you are a beast and you totally rock!!! I love it!
Holy moley, girl, you are a dynamo! It’s so exciting to see it all coming together!
I was wondering why you didn’t prime and paint the columns before you installed them. Can’t wait until you show how to fix wonky doors!
Ha! You and me both! 😀
I was so concentrating on how to just get them installed, and when they were finished I just stood there thinking, “How the heck am I going to paint those?!” *Sigh* I’ve definitely made it many times more difficult that it would have been had I primed and painted them first, but they’re in place now (glued with wood glue) and there’s no turning back. So I’m just hoping that my paint sprayer can get primer and paint into all of the nooks and crannies that can be seen. 🙂
I was thinking the same thing about priming and painting the columns, and actually priming all the cabinets first. I was thinking that if you had built a box behind the columns that might have worked as well. I thought the bump out cabinets were going to be deeper cabinets, not just bumped out further.
Of course, all that being said, you did an awesome job on those cabinets! That’s a lot of work to do all by yourself. Thank goodness you are good at explaining yourself, and take lots of photos, because otherwise, we’d all be lost. As always you are inspiration for us all.
Go Go, Dynamo DIY Diva! 🙂
So excited for you – your progress is amazing! I think the smaller base cabinet on each side of pillar was a great idea – now, that I see the difference, it looks much better:) And, it looks like it matches the upper cabinet above it – which is a strange quirk of mine:/ Love to see what you’re doing – again, such an inspiration for all of us:)
OMGEEEEEE!!!! It looks phenomenal!!! Congrats!!!!
YOU are AMAZING!!
love you cat.
Nice work!
Wow! I wouldn’t have gotten that far in a weekend! But I think I would have primed and painted the wall before I hung the cabinets….I would guarantee getting paint on my new cabinets otherwise.
I think I’m going to spray the cabinets, so that’s why I’m doing the wall last. Thankfully I have a steady hand, so I can cut in around the cabinets with a brush with no problem. 🙂
You can do it, your FREAKING AWESOME……!!!!!!
Great job, the cabinets look great! Wondering if you are putting crown above the cabinets? If so, why mud and tape when it will be covered by the moulding? Can’t wait to see your finished product!
I honestly don’t know why it’s necessary. I even googled it, and just saw that people said at the very least, you need to tape the seams and put one thin coat of mud on all of the seams, even if they’re going to be hidden behind cabinets. I’m so tempted to leave it since it’ll all be covered up, but I want to do things right. I just wish I understood why it was necessary. Understanding the “why” behind things like that helps me to be motivated to do it.
I’m not sure if it’s a good enough reason to seal that but I would want that crack at the ceiling sealed 1) to keep drafts and heat from the attic from coming into the room and 2) to keep bugs and crawly things from finding a way into the house. The cabinets look amazing and I am so happy you’ve showed us how to set up the bases on the wall and floor to set the cabinets at the correct height. I had no clue and I needed to know this!
Of course, you only need those bases if you’re using wall cabinets as base cabinets. 🙂
If you’re using base cabinets as base cabinets, like most people do, they’re already the right height.
*Applause*
Fantastic! You are amazing and BRAVE! Where do you find the energy? I can’t wait to see the finished result. I noticed you didn’t bump out the four upper cabinets and I’m just curious why you decided against it? 🙂
My energy comes from sheer determination to get it done (’cause nobody else is gonna do it for me! 😀 ) plus green tea extract. I’ve started taking green tea extract every day, and I can tell a big difference in my energy level! Seriously!
I did decide to leave off the bump out on the upper cabinets just because, while 4.5 inches isn’t much, I decided that I didn’t want to take up that amount of visual space in my already very small kitchen. I hope I don’t end up regretting that decision, because now I’m having trouble with the spacers for the sconces. I just can’t get them to look right no matter how I try to trim them out. Hopefully I can figure out something!
Kristi, my dear, I don’t think it’s the green tea extract! You’ve been a human energizer bunny/dynamo/kick@$$ girl ever since I’ve been reading your blog, and that’s been quite a while! HOWEVER, now that you mention green tea extract giving you extra pep, you’ve got to tell us which one you use. I need all the help I can get in the energy department! Thank you in advance!
The wall o’cabinets looks GORGEOUS already and it’s not even finished. It is going to be amazing when done. You never cease to amaze me. *bows down to your awesomeness*
This is the one I’ve been taking:
http://www.swansonvitamins.com/swanson-superior-herbs-green-tea-extract-500-mg-60-caps
They have a buy 1 get 1 free sale right now, too! 😀
Thank you so much for the info Kristi! I really appreciate it. While I don’t expect to transform into an enegizer bunny like you are, I do think I’ll give the extract a go! 🙂
there are no words you just plain flat out amaze me with each and every post. nancy
Wow, I finally got a chance to sit down and check my email. I had 45,but none from you! I was so disappointed. Then as I was going through the mail, I noticed some new ones had come in and there you were. Yay, so glad to see the progress. I don’t think you give yourself enough credit….my husband was a math/physics major in college, so you know he has a head for numbers and space. There is no way on God’s green earth that he would have figured out everything that you did, and then get them installed. I am printing all of your blogs and making a DIY binder, just in case we end up have to remodel a house in our retirement. We will hire the labor, but Phil can manage the project. So just so you know, there may be a kitchen just like yours somewhere in FL, LOL. You certainly inspire a lot of people to step out of their comfort zones, me included. You are just plowing along like the little train that could….I love that about you! Remember to take the time to rest on your laurels and enjoy what you have done…..it is really a great accomplishment. Blessings`~
You are AMAZING!! What you accomplish . . . how it turns out . . . your thought process spelled out for us . . . AMAZING!!!
Amazing job that you are doing! You must sleep like a rock at night! I’m so impressed.
When joining 2 cabinets together you can screw them together, by the hinge side, and it will suck them together, giving a cleaner tighter fit. You can also tap the bottoms with a rubber mallet to move them a touch so they meet. Since you put a bottom trim piece on it isn’t noticeable. I can HARDLY WAIT to see the paint. I am so much more impatient than you. Great job!
Great Job! You really have drive.
Are you going to put in undercabinet lighting? You want to make sure your moulding will cover the fixtures.
Yes, I’m going to have undercabinet lighting. I’m leaning towards the tape LED lighting, so there’s not much to cover up. But that’s definitely one reason I like moulding at the bottom of cabinets — to cover up the lighting. I skipped that step on the cabinets at the condo, and I regretted it every single time I looked at the cabinets and saw the undercabinet lights peeking out from beneath the cabinets. But I used halogen puck lights there, so they were considerably larger.
When you get the lighting installed, I’d love to hear if you feel they give you enough task lighting.
When I looked at the pic my first thought was “Wow, how gorgeous!” My second was, “oops she forgot the top piece of trim on the right side.” I think it looks much more finished with the trim piece.
I’ll be trimming it out, but just not with that particular trim. It looks too much like the frames around the cabinet doors, but it’s just “off” enough to look like a mistake.
Wow, I can already see glass doors in the upper middle cabinets. I can even see them painted. This is so amazing. Love what you are doing.
And look at all that light you already have in your formerly dark kitchen.
Yes, I love it! I used to dread being in that room because it was so dark and depressing. Now it’s so light and lovely — even with it completely torn apart and unfinished. I love being in there now! 😀
As others have said, you are amazing with all that you accomplish by yourself. Wow. Everything is look great. I tend to just jump into projects and not plan as much as I should so I end up working harder and not smarter. My husband will come over and say, why don’t you do it like this?! I’m usually saying, what was I thinking?! I change course and am more efficient and thankful for what tidbit he shared. As for the taping, I was just thinking what a pain that was going to be, to have to lean over the upper cabinetry, however, I know you will make it work. Cheering you on from afar!
Kristi
How are you going to get to the outlets you installed now that there is a piece covering them?
There’s still a big opening underneath. I can stick my whole arm in there and reach them quite easily. But those outlets aren’t for everyday use. They’re just for the sconces (on top) and the undercabinet lighting (on bottom) and each outlet is controlled by a switch on the left wall. So once those things are plugged in, I won’t really need to access those outlets. I’ll have four outlets on each end of that countertop for everyday use if I want to plug in a crock pot, coffee maker, etc.
Thanks Kristi for the information…it was a question I had and you had a ready answer. Thanks for that.
Gaye
Wow Kristi, you rock! I am in awe of how good this looks even half done. I can visualize that gorgeous green, and I am positively drooling.
What is the plan for those “secret” plug outlets covered by the spacers? Are they accessible from both the top and the bottom?
They’ll only be accessible from the bottom once the trim is on the top of the cabinets. Their only purpose is so that I can plug in the sconces and the undercabinet lighting, and each outlet is controlled by a light switch on the left wall. For everyday use, I have four outlets at each end of the countertop that are “hot” all the time,like a normal outlet (i.e., not controlled by a switch). The reason I did it that way is that I figured it would be easier to reach under there and plug in the sconces and undercabinet lighting rather than having to reach in there and hard wire everything after the cabinets were installed. So I’ll have to add plugs to the sconces, and buy the plug adapters for my undercabinet lighting.
I loved the cabinets – but the thing I loved MOST was the little peak of painted floor we get to see WITH the cabinets – a sneak-peak of awesomeness ! It made me smile to see them peaking out under those cabinets:) LOVE LOVE LOVE THEM:)
Well, busy weekend?!?! So much work done! I will be eager to hear whether there is enough task lighting from the “tape” lights. If so, maybe I’ll replace ours.
Holy Smokes girl! I’m exhausted reading what you have done!! Does Matt realize what a Wonder Woman he married!! Be safe and have fun!
He tells me all the time how amazed he is at me and my projects. 🙂 He’s definitely my biggest fan.
That is so sweet! What a great husband! =) Kristi, maybe I missed it, but did you say how far your bottom cabinets overhang the base you set them on? Is there a standard rule to follow with an overhang like that?
I have the LED tape lights installed under my upper cabinets in my kitchen and I absolutely love them. And yes they are perfect for task lighting. We actually use one set of ours as a night light (mine are on three different switches). Your cabinet wall looks great! Thanks for sharing all your hard work with the rest of us!
Hi, loving the progress. Cant wait for the finale…!!!
Geesh! I thought my weekend was busy and I was exhausted at the end of it. I see that I am a slacker compared with what you accomplished! LOL YOU ARE THE BOMB! Those cabinets look great and I love how you planned your electric use and added so many outlets. Can’t wait to see more… : )
So inspirational. It’s giving me so many new ideas for our eventual remodel.
Also, your posts aren’t showing up in Feedly… The last one I can see is from May 28. All other blogs seem to be coming through fine. Just thought you might want to know.
It’s looking awesome. I agree with you that those columns looked a little squished, but I just thought it was a trick of the eye and that it would look better once everything was installed. Good call on trading out the cabinets. Can’t wait to see the finished product! 🙂
I am so impressed with what you are doing with these cabinets. I loved the cabinets – but the thing I loved MOST was the little peak of painted floor. You are so creative. Wow! I cannot believe the transformation of this room. You are really super rock. Good job!
I thought that it made sense when you said that installing cabinets yourself will take time since they can easily be installed incorrectly or too close together. I have been thinking about installing new kitchen cabinets myself but I have been worried that I will end up causing damage or spending a really long time doing it. I will be sure to hire a professional instead so that I can ensure quality in the work.