John & Alice’s Kitchen
Well, it’s finally finished. Finally. The kitchen…finished. The family room…finished!! I was beginning to think this day would never come.
I’m going to do this reveal in two different posts, and not because I just like to draw things out, but because we had a bit of technical difficulty with the camera. We were able to get some pictures of the kitchen, and then the camera decided to stop cooperating, so we’re headed back this morning to get the pictures of the family room, and I’ll show you those tomorrow.
Of course, I first have to remind you where this room started. It was a sea of orange stained oak.

And of course, the green and white checked wallpaper and matching wallpaper border (with the matching valance) only made the room that much busier.

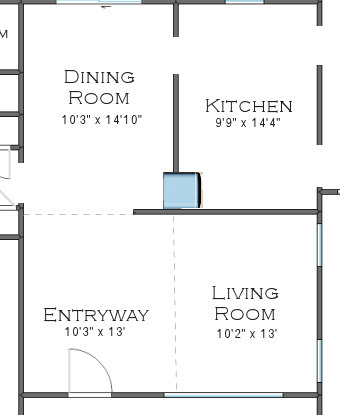
The dark cabinets and busy walls made the kitchen feel much smaller than it actually is. In fact, the kitchen is quite large.
The good thing was that the cabinets were in great shape, so they just needed a coat (or two or three) of primer and paint. The countertops were replaced with granite, and the square off-white and hunter green backsplash tiles were replaced with a clean and simple matte white subway tile. The appliances were upgraded, and the flooring was replaced as well.
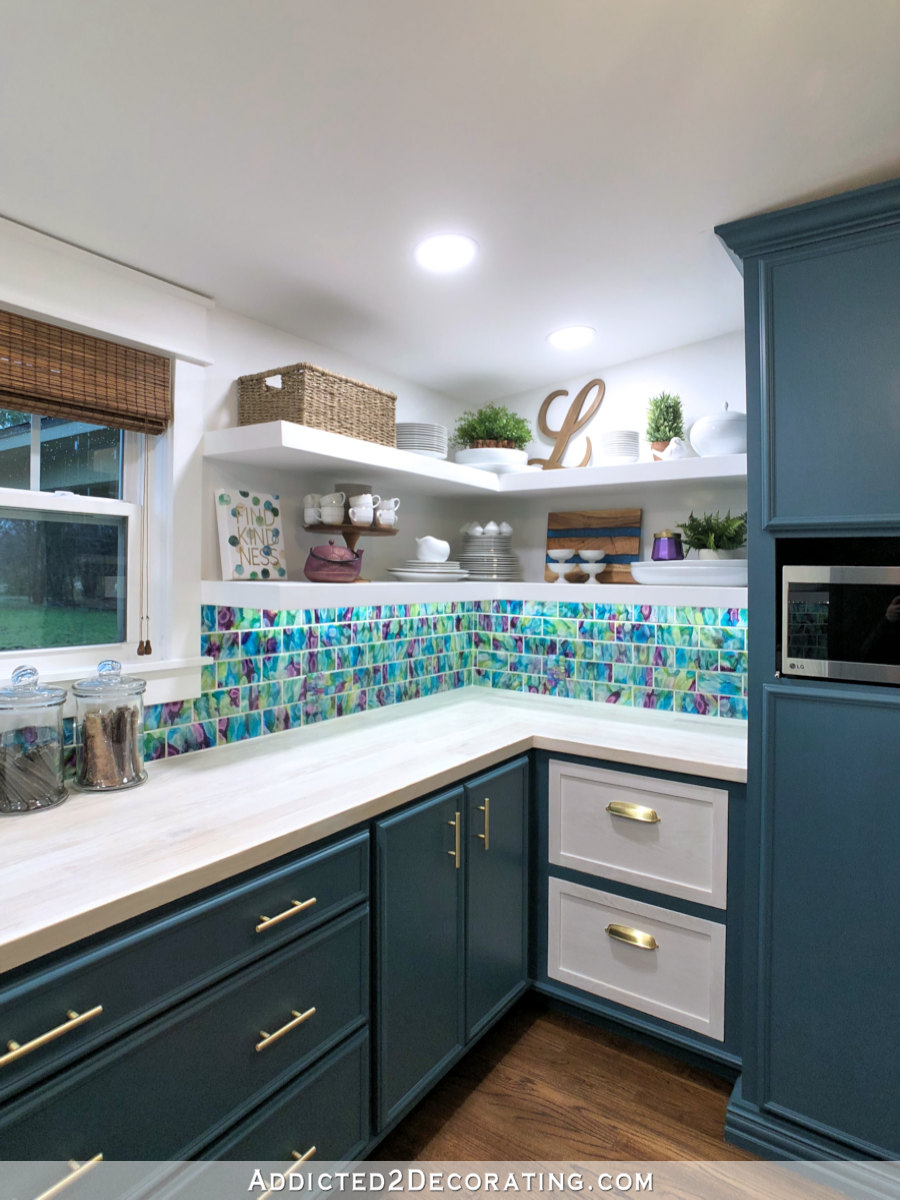
And here’s what the kitchen looks like today…

The upper cabinets are painted in a color called Alabaster from Sherwin Williams. The lower cabinets are painted in a color called Elephant Skin, which is a Behr color that I had color matched at Sherwin Williams. The cabinets are painted in a satin finish oil-based paint.

All of the new cabinet hardware is from Home Depot, as is the new woven shade and the over-the-sink light.
Remember the hole left by the old trash compactor? You can see here what I ended up doing with that space.

I love the bit of texture and warmth that those baskets add to the kitchen.
The wall color above the cabinets (which you’ll see much more of tomorrow in the family room pictures) is called Rainwater, which is a Martha Stewart color from Home Depot.

The door to the laundry room (next to the fridge) got a coat of black paint, as did the door to the garage in the family room, which you’ll see tomorrow. I love black interior doors!

So, that’s the kitchen! Quite a difference, right? Here’s another before and after view…


And here’s one “quick view” before and after of the kitchen. Just move your pointer on and off of the picture below to see the before and after views of the kitchen.

Update: I finally got pictures of the family room posted! Click here to see the before and after of the family room.
*I’m linking this post to the link parties listed at the bottom of this page. Scroll down and join the parties!*

Addicted 2 Decorating is where I share my DIY and decorating journey as I remodel and decorate the 1948 fixer upper that my husband, Matt, and I bought in 2013. Matt has M.S. and is unable to do physical work, so I do the majority of the work on the house by myself. You can learn more about me here.


Great job, Kristi! I hope you're taking a vacation after all that "manuel labor"! Looks great!
Gorgeous! Nicely done girl. I love it!
Just beautiful, gives me hope for my kitchen!
Fantastic work, as usual!!!
Looks phenomenal! Love the bottom cabinet colors… gives me ideas, hah. Was the wood flooring also part of your remodel? We're looking at switching from tile to wood and would love to hear more about that!
You did a fantastic job!! The finished kitchen is gorgeous!!
Looks great Kristi! I'm slowly remodeling my kitchen as well, so it is fun to see other kitchen remodels.
AMAZING!!!! What an improvement, that first kitchen was just an eye sore! lol You did such a great job, Kristi!!!!
Oh, you bet! I can guarantee that for the next week or so, I'll be nothing but a useless lump on the sofa. 😀
The flooring was installed in the whole house all at the same time about a year ago. It's actually Mannington vinyl plank flooring. It's really beautiful, and a great choice for a kitchen, bathroom, and any other areas where water is used. They had it installed throughout the entire house (with the exception of two bathrooms, where they used Mannington vinyl tile), and it looks really pretty.
Wow! It is incredible. What a difference. I love it but especially love the baskets under the counter where the compactor used to be.
Oh, I bet they are loving this kitchen now! I have the same orange cabinets too so that gives me some ideas. I've heard removing that tile is a pain but I sure love those vinyl wood floors. It is beautiful – great job!
Kristi,
The transformation is wonderful! I really like the colors chosen and the raised counter makes such a difference.
Wow! What a transformation!! It looks great!!
IT LOOKS AMAZING… can't wait to see the Family Room.
2 questions… I forget….what did you use for the new floor…. Also, did you install the backsplash yourself???
beautiful kitchen,, much prettier than the orangy oak look. Love the colors you chose and that rug on the floor.
I can not wait to see the family room !!!!! The kitchen is just amazing!
That seriously looks AMAZING! You guys did a wonderful job! We are very slowly remodeling our kitchen too, it's so exciting!
I love black interior doors too!! What a great job in the kitchen. The space totally opened up. Nice work!!
Utterly SPECTACULAR!!!!
Just beautiful. What an awesome transformation. 🙂
Looks Great!
Oh my gosh, your kitchen is amazing!! I've been thinking of painting our cupboards for awhile now but also heard that it is A LOT of work! Did you hand paint them or us a sprayer? Any tips?
Beautiful – I've missed you Kristi!:`))
I used a brush and a roller. I do have some tips! They're right here: http://blog.addicted2decorating.com/2011/04/more-painting-tips-painting-cabinet.html
What a difference. It's beautiful!
Your kitchen looks fabulous! What a great job! Stopping over from Diy Showoff!
Hi, I love what you did with your old cabinets. The paint made a huge difference. Beautiful! I just posted our new kitchen today but am having a problem linking with Met Monday so I'd love your you to come over and see it.
Wow. This is gorgeous. I'm thinking of redoing my own kitchen cabinets and I was wondering–do you recommend using an oil based paint instead of a latex based paint? I do a lot of cooking and I just don't think latex would hold up that well. I'm not very handy and would appreciate any advice you could give. Thanks!
I definitely recommend oil-based paint. That's all I ever use on cabinets. My brand of choice is Kelly-Moore, but I actually used Sherwin Williams paint in this kitchen, and it looks great.
Kristi your kitchen looks beautiful. You did an excellent job with your vision and completed project. Thanks for sharing.
You both did a great job! What a huge difference paint and elbow grease can make! Love the baskets.
Dropping by from Met Monday. I hope you'll come see the nursery I helped DD2 create.
Allison
Atticmag
The wide planks do look great… Thank you!
Thanks so much! I am so inspired by the work you've done! 🙂
Love it! Did you use any sealer over the paint? I have decided to paint my cabinets but haven't decided on a color or technique yet.
Emily
domesticdeadline.blogspot.com
No sealer. Just oil-based paint.
How do you keep these type of painted cabinets clean? We just moved into a little retirement place in the Rio Grande Valley in Texas and the sellers painted the cabinets in a Behr semi-gloss cream. They attract dirt like I cannot believe! Do you poly coat the cabinets doors and drawers to resist dirt. I can't imagine me trying to keep these up with little kids around…right now it is just me the the hubs.
I don't think the issue is the color or the fact that they're painted. I think the issue is that they used latex paint. (Behr doesn't sell oil-based paint.) I always, ALWAYS paint cabinets with a quality oil-based paint. Then it's just a matter of cleaning them off with a wet sponge when they get dirty, and occasionally using a gentle spray cleaner when needed.
If your cabinets are painted in a cream colored latex paint, then I would definitely suggest an oil-based top coat. But be VERY sure that you use something that says specifically that it is "non-yellowing". Polyurethane has a yellow tint to it, and if you put that over something that is a very light cream color, the color may not end up looking even, and it will yellow and darken the color.
Thanks so much for your reply…I will look into the polyurethane and make sure to purchase the right one. I wish the previous owners had done the job the right way. Your cabinets look great.
WOW! Looks incredible!
Wow…amazing change I love it.
xo jaan
This looks amazing. The wall color and rug are really lovely.
What a MAJOR difference! I love white kitchens.
Great cabinet, have u remodeled the old or it is newly created, but i personally feel making cabinet white in colour may not be a good idea, as it usually gets dirty, and how do u manage to clean floor tile, because even if u have auto clean chimney, the kitchen gets quite greasy, do u have some quick tips of keeping kitchen clean.
http://www.dimensionsbydesign.com.au/
Nice job! The new kitchen looks so open and fresh-it's great that you were able to repurpose the kitchen cabinets.
Hi Kristi,
I am in the process of painting my honey oak cabinets and was googling the colors I had chosen to see if anyone else had used the same colors. The colors you chose for this kitchen are almost identical to the ones I will be painting and I am glad to see that they look good together. I love your blog and will probably pop in from time to time. I will be posting my kitchen makeover over on my blog, thethriftyhome.com
Jen
Great Kitchen makeover, Kristi! For an easy, DIY backsplash, check out the project kits at
NewBacksplash.com
Great Job! indeed. I love the clean look and arrangement. Perfect for a Real Cook or someone who just wants to look like one. hahaha. Thanks for the Inspiration
Kristi I am about to paint my kitchen cabinets white as well. Except the island, that color is up for grabs…..grey…black…turquoise!….anyway….. I have a question. How long did this take you? I won’t have as many cabinets to paint, my kitchen is smaller. I am not a seasoned cabinet painter, so it will likely take me longer, but a baseline would be nice to have.
You have won me over to the oil-based paint team. It just makes sense, and after I read your tutorial on how to clean the paint brush, well, lets just say that was my worst fear! Scarier than turquoise paint, even. 🙂
Hi Colleen~
A kitchen the size of John & Alice’s (in this post) I think could be done in two weekends–one weekend for the doors, and the other weekend for the cabinets.
When you use the oil-based paint, just don’t forget to use Penetrol (or another paint conditioner)!! It really makes all the difference in the world!! And place the cabinet doors flat to paint to get the smoothest finish. And DON’T put them under a fan or anything to dry them faster. You want them to dry slowly and naturally to allow the paint conditioner to smooth out all of the brush marks. 🙂
Kristi,
Thanks for replying so quickly! I will definitely take all your advice and use penetrol and remove the cabinet doors. I just retired, so I am not working an 8-5 job right now, so can work on them every day. As soon as I close on the house, which will be soon I hope! Should I let the cabinets have a drying time of a day, (or more?) between coats of primer/paint?
I really enjoy your website! Love all the DIY projects and blog advice as well.
If you use oil-based primer (I prefer oil-based Zinsser Cover Stain), it dries very quickly, and you can generally sand and top coat in just a few hours…sometimes as soon as one hour, depending on the weather. With the paint, I let it dry at least overnight before recoating.
Have fun!
Random question – where did you get the roman shades in the kitchen? I’m having a heck of a time find decent ones! Thanks!
Nicole
They’re stock shades from Home Depot.
I about to start a re-do kitchen in a manufactured home. We want to stack the dishwasher, wall oven and microwave, due to space issues????