2020 Desk Calendar (Plus, The Easiest DIY Project You’ll Ever See Me Do!)
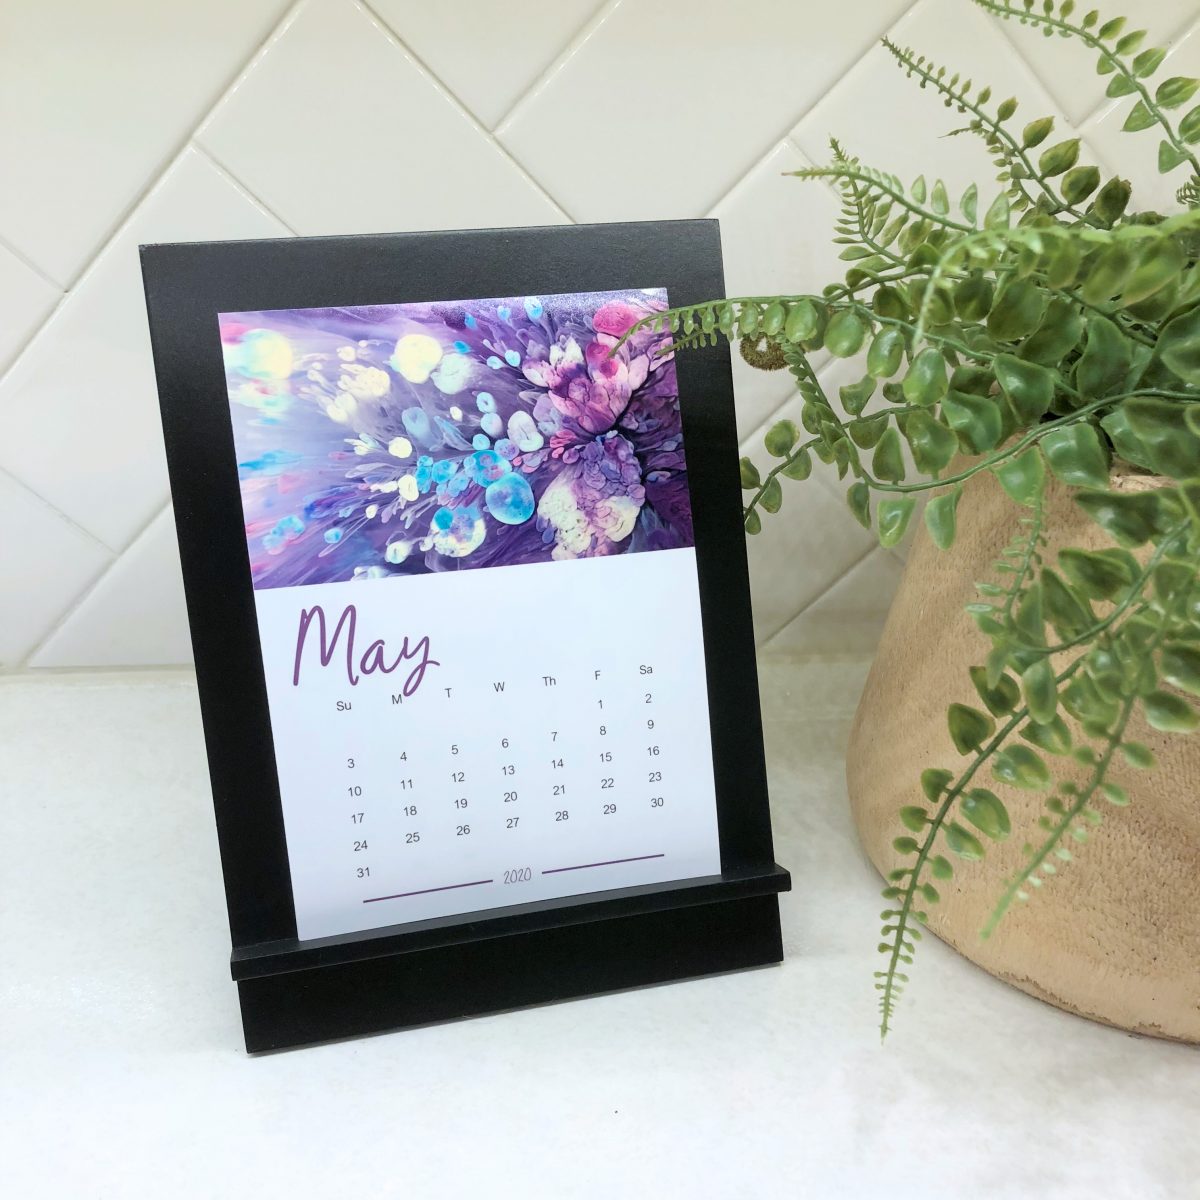
My very first desk calendar is finished and available in my Etsy store as a digital download. This calendar features 12 of my favorite macro photography images, and of course, it’s full of color. You can find it here…
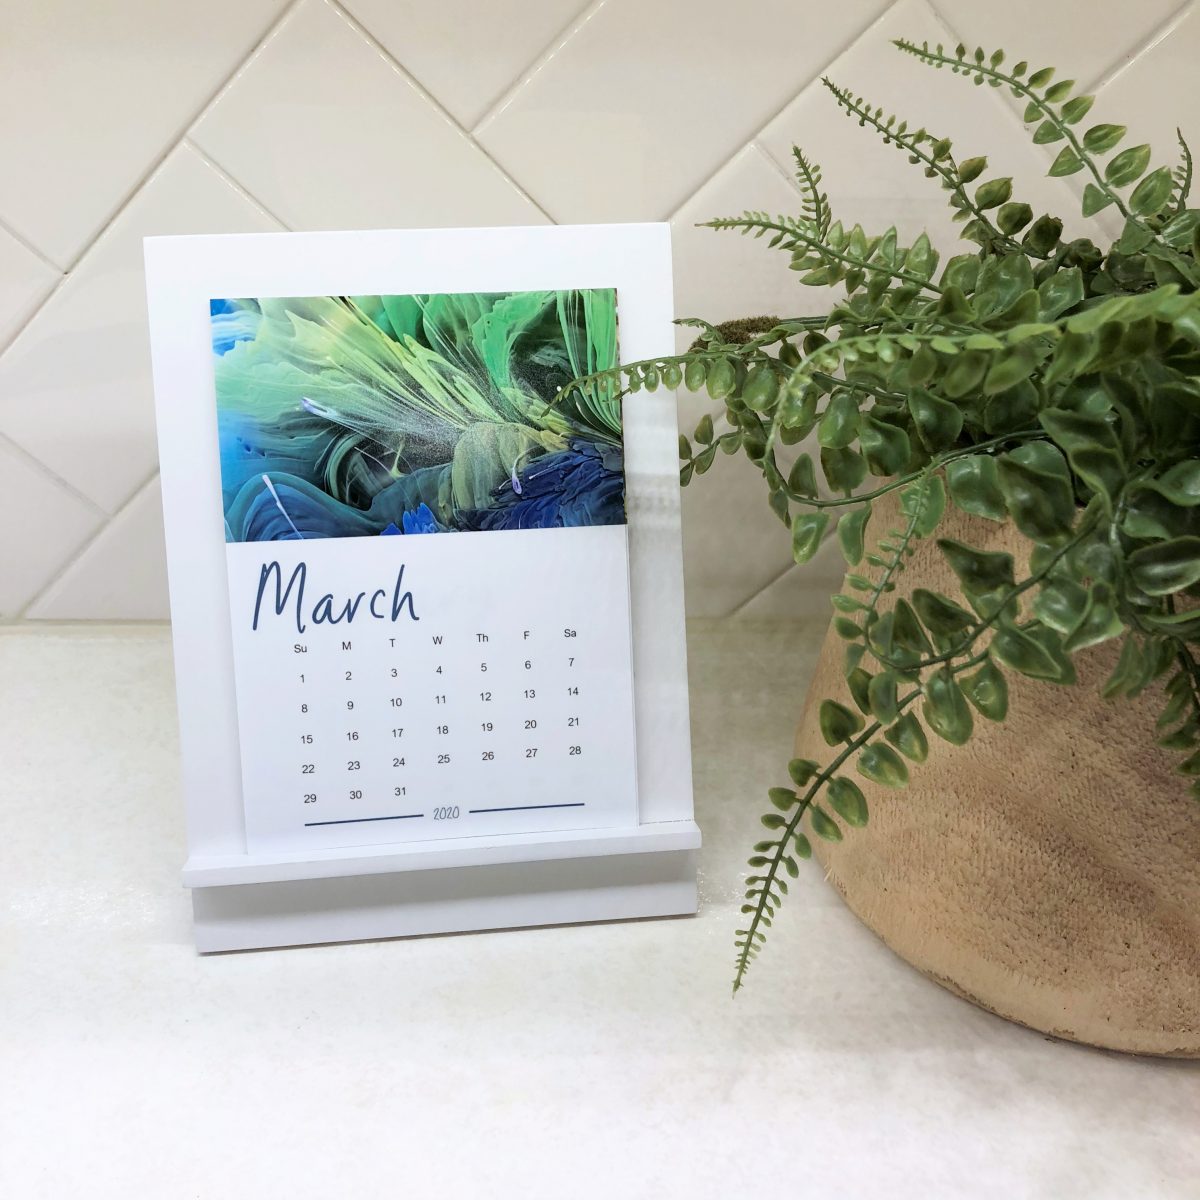

Here’s a peek at all twelve months…

After I had my calendar printed, I searched for a simple, streamlined desktop easel or stand for it, and couldn’t find anything I liked. So, of course, I decided to make my own!
Y’all, this is probably the easiest DIY project you’ll ever see me do. And if you’re wanting to ease into learning how to use a table saw, this is the project for you! The table saw is the only tool you’ll need, and with just a few cuts, you’ll have an assembled desk calendar stand.
By the way, if you’re looking for a table saw, this Dewalt is the one I have and I absolutely love it. It’s big enough to do almost anything I need to do with it, but it’s small enough to be portable.
Through my own DIY journey, I’ve learned that starting simple and seeing actual finished products is a great way to learn and to build the confidence I need to tackle increasingly more difficult projects.
And because these are so quick and simple, a desk calendar with a stand would also make a great gift for teachers, co-workers, gift exchanges, etc.
So let me show you just how easy it is to make this desk calendar stand. Here’s a video of the process…
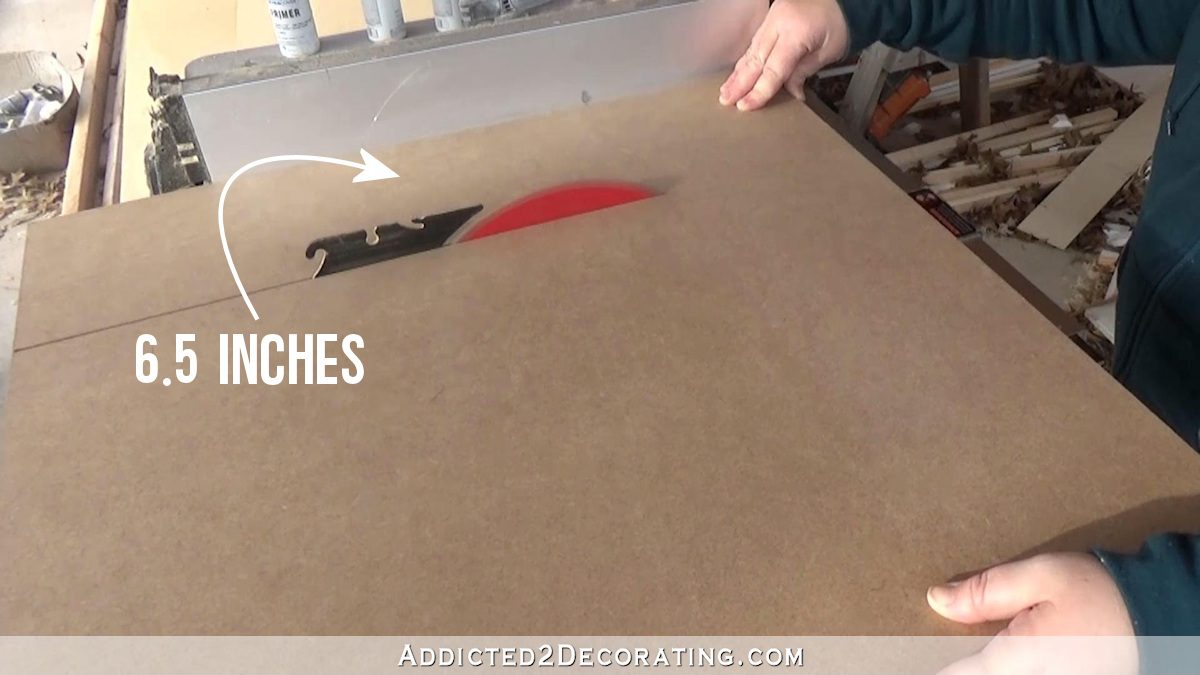
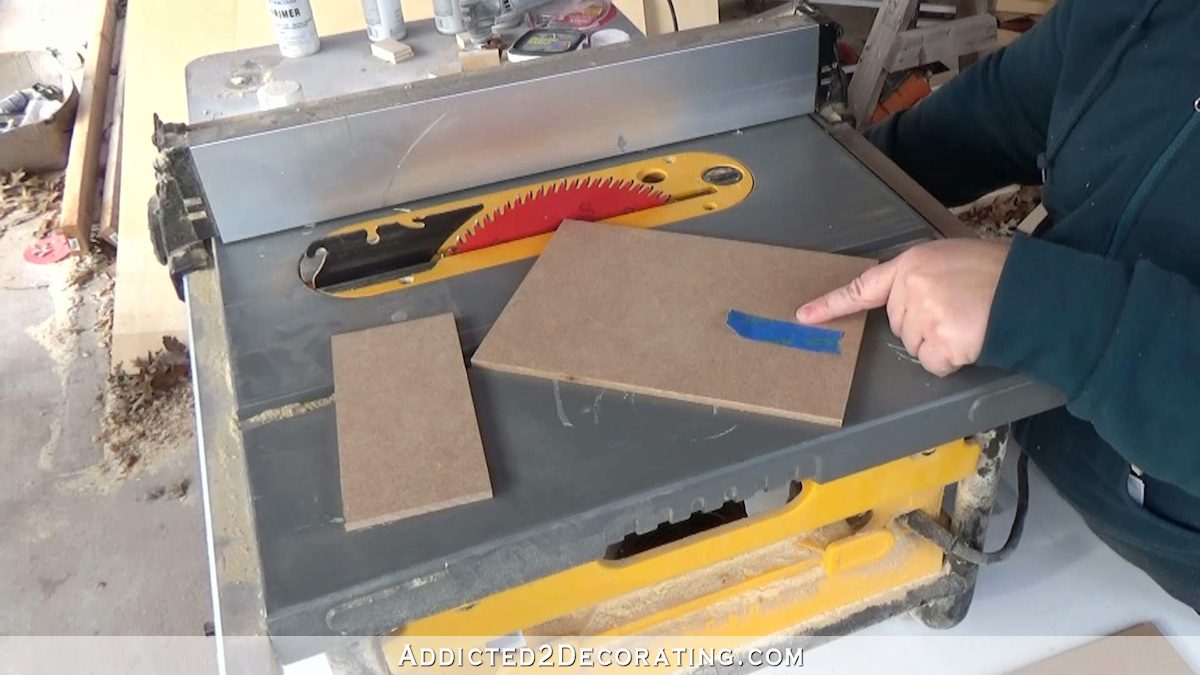
I started with a 2′ x 2′ piece of 1/4-inch MDF that I bought at Home Depot for $3.99. I can get four stands out of one piece of MDF, so that means each stand is about a dollar. Not too bad!
First, I set my fence to 6.5 inches and cut the board into strips. I only need one strip for one stand, but I went ahead and cut my whole board into 6.5-inch-wide strips.
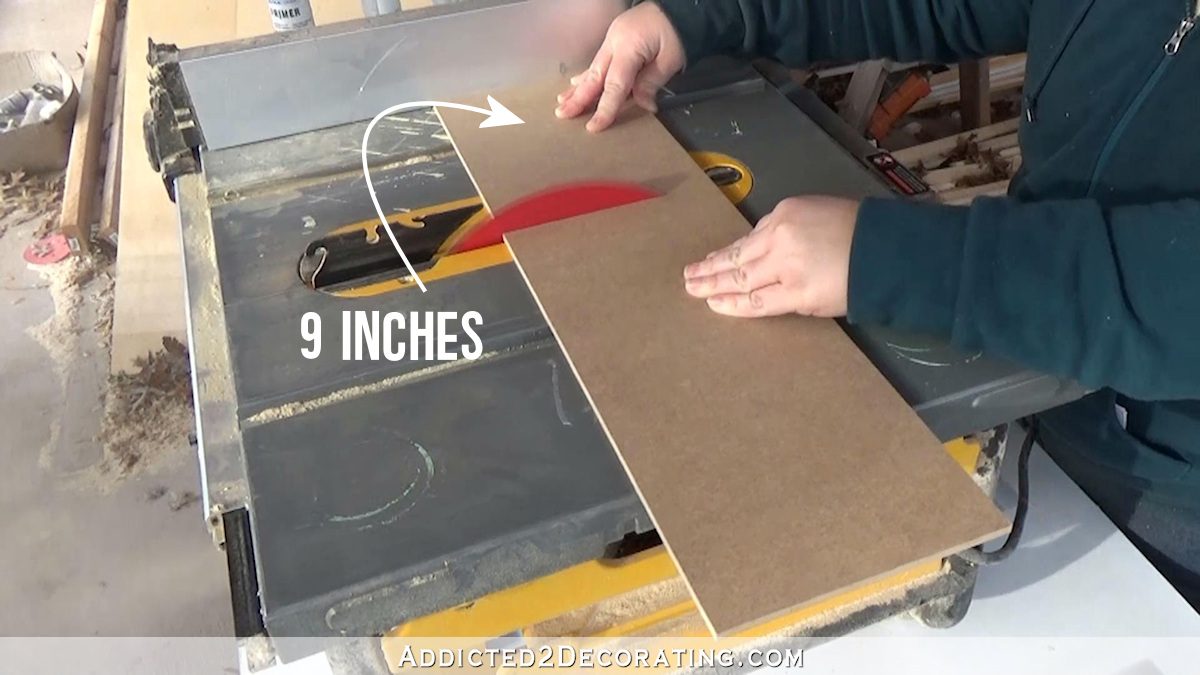
Then I set the fence to 9 inches and cut the large piece for the stand.
And then I set the fence to 3 inches and cut the small piece for the stand.
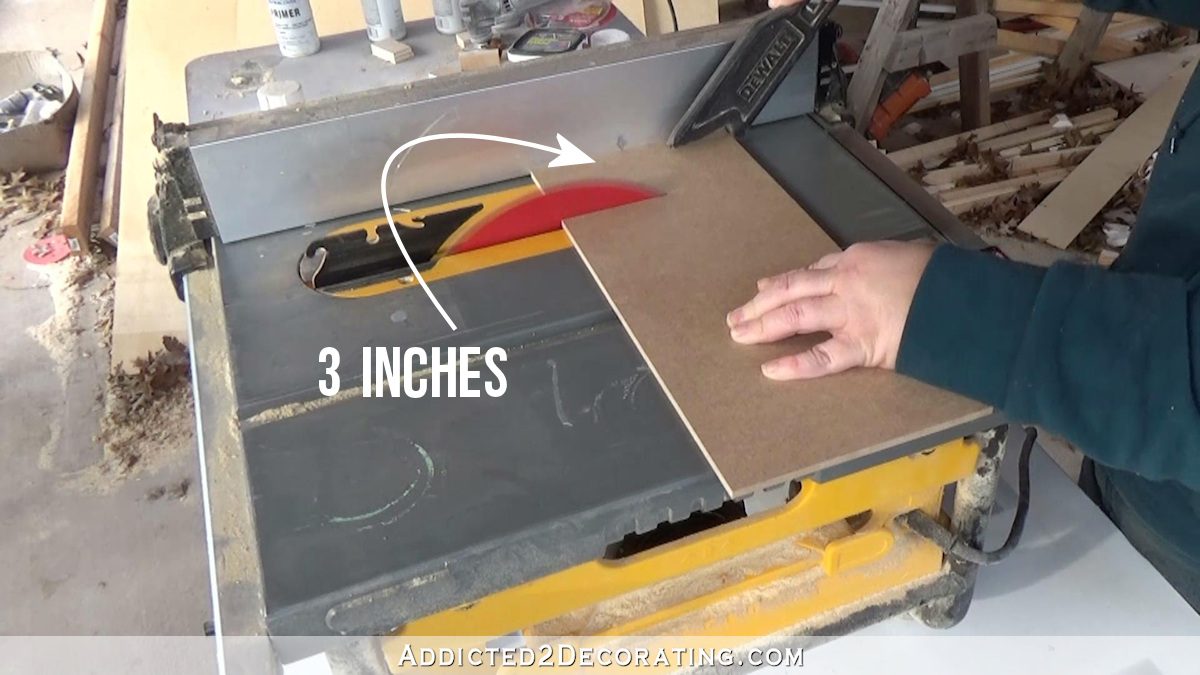
And those are the only two pieces required to make this stand. That’s it! 😀
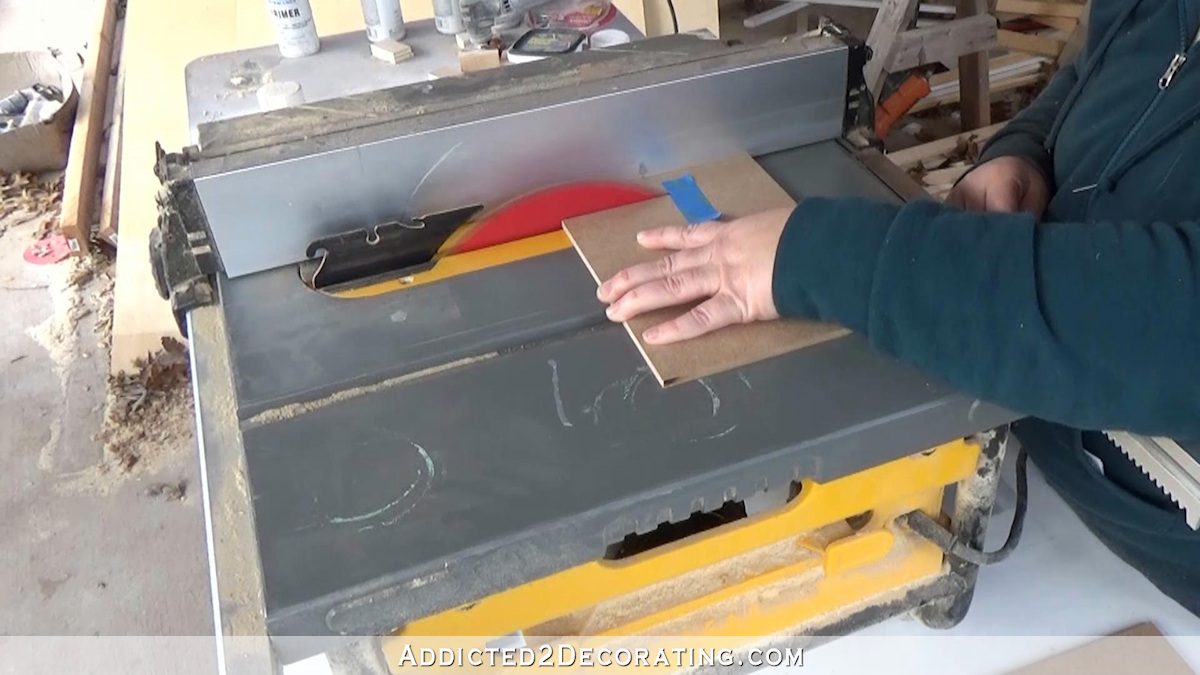
Next, I measured and marked the center at the 3.25-inch mark using painters tape. I did this on both pieces.
In order for these pieces to fit together to create the stand, I needed to cut a slot into each piece. So starting with the small piece, I set the fence to 1/2 inch and made a cut from the edge to the center line marked with the tape. Then I moved the fence over 1/8 inch (to 5/8 inch) and made another cut. This gave me a 1/4-inch slot in the small piece.

I repeated that process on the large piece starting with my fence set at 1 inch, and them moving it over 1/8 inch (to 1 1/8 inch) for the second cut. This gave me a 1/4-inch slot in the large piece as well.
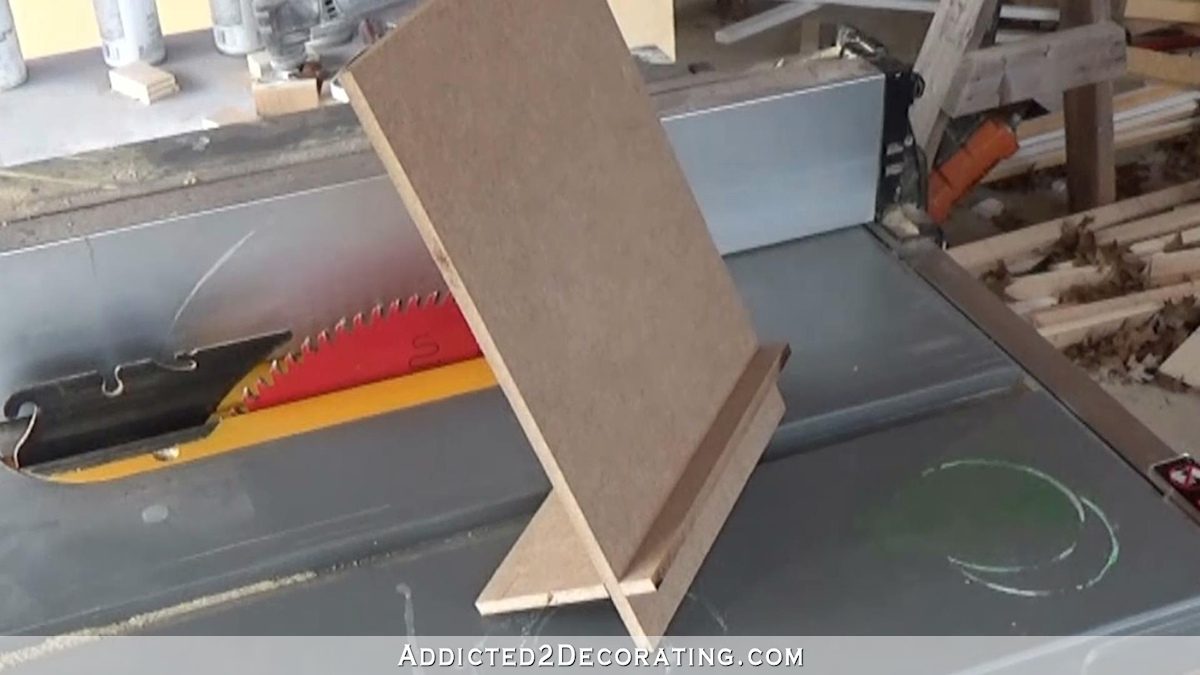
Then I slid the pieces together, lining up the slots and pushing them together all the way.

And I had a desktop stand! I mean, it doesn’t get any easier than that, right?
To finish them, I gave each one two coats of spray primer and two coats of spray paint, letting each coat dry thoroughly and then sanding with 220-grit sandpaper between each coat so that the finished stand would have the smoothest possible finish.
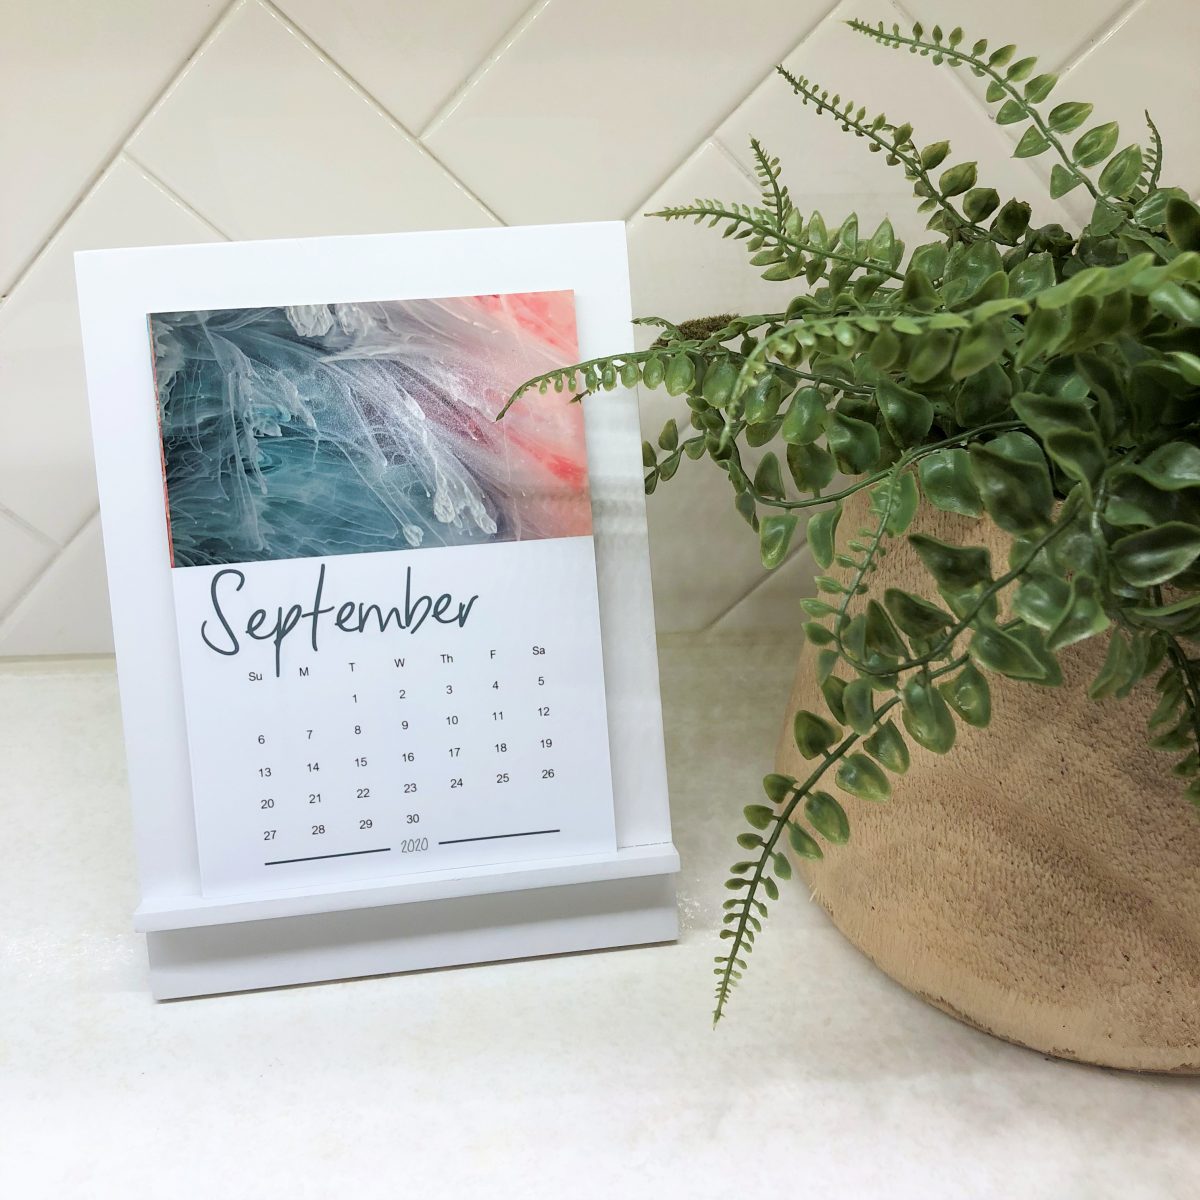
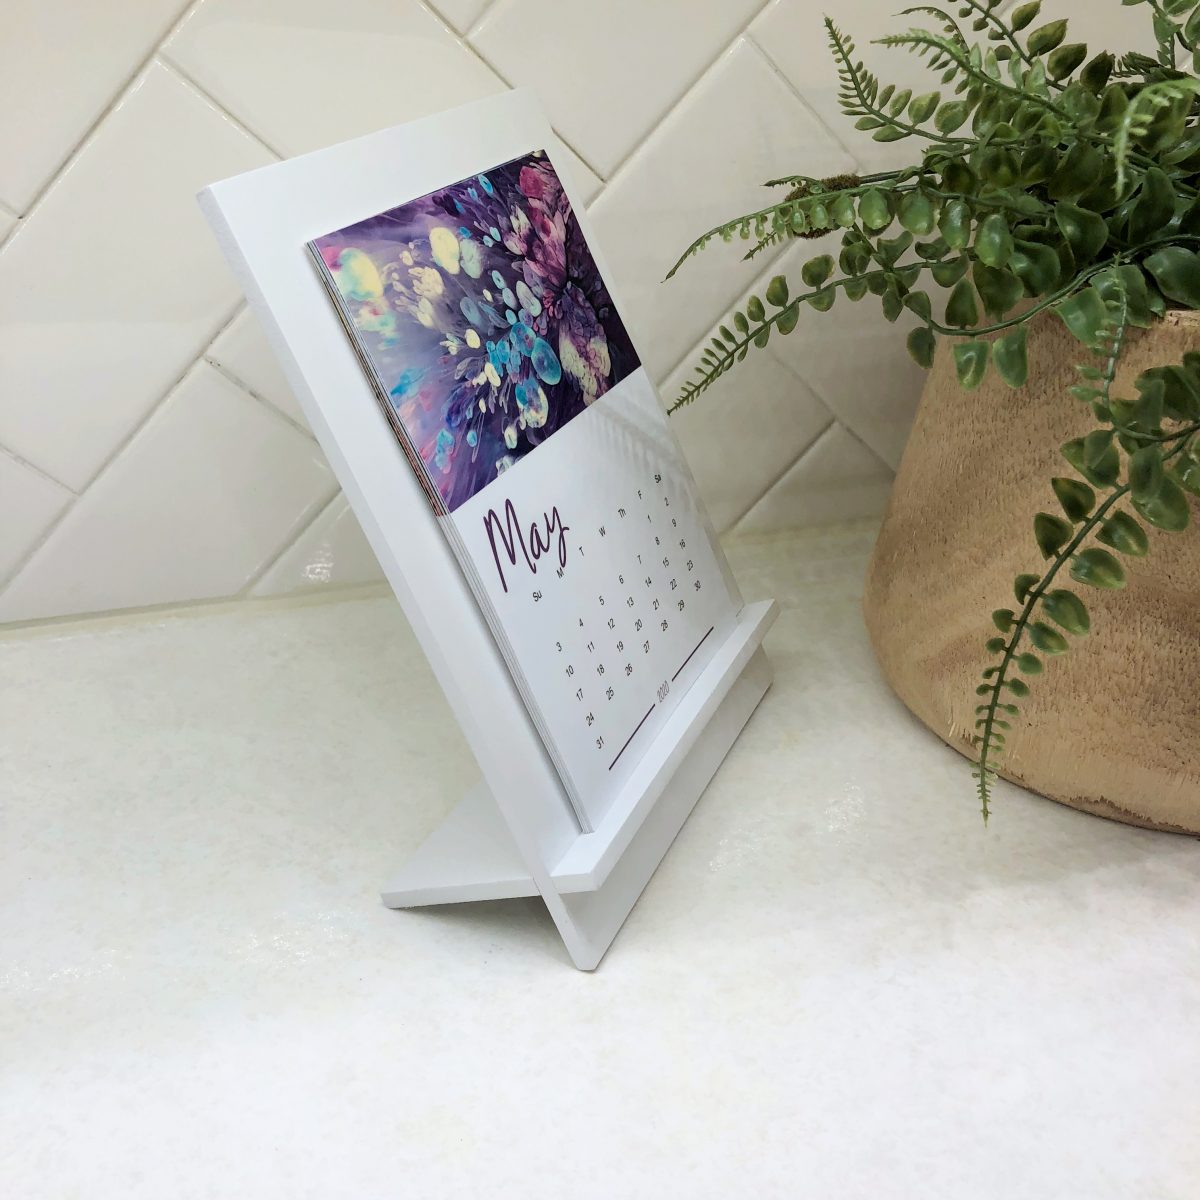
I made two of them — one white and one black. I think the black one is my favorite, but I tend to be drawn to black accents lately.

If you’re new to using a table saw, or haven’t yet given it a try but really want to, you should give this try! This type of project is just what you need to wade into the shallow end of using a table saw, and it’ll give you the boost of confidence you need to tackle more challenging projects in the future.
*This post contains affiliate links.

Addicted 2 Decorating is where I share my DIY and decorating journey as I remodel and decorate the 1948 fixer upper that my husband, Matt, and I bought in 2013. Matt has M.S. and is unable to do physical work, so I do the majority of the work on the house by myself. You can learn more about me here.

I love your blog and have been following for years. Lately something seems different with the quantity and placement of the ads. Every few lines of your text, an ad video is inserted. They are on the side of the screen as well. There are more ads than content. I get so frustrated with the experience, I leave. I just went to a few other blogs I follow to compare. So far the difference between yours and theirs (admittedly, a small sample) seems to be whether or not the ads are inserted within the blogger’s text. In these other blogs the ads are only displayed along the right hand side, not in the middle of the text. I don’t know how it works, so admit I am completely ignorant, but something seems very different on your blog recently that makes the reading of it painful. Again, I want to stress, I think you are terrific, and I have been a devoted follower for years. Just wanted to comment and inquire about something that seems a little off on the reader’s end.
I understand that ads can be frustrating. Please understand that, until recently with the opening of my Etsy shop, these ads on my blog are my only source of income for the blog, and the only source of income for our household. For the last 12 years, I haven’t charged for my content and tutorials — which I work very hard on and give away for free — and I don’t load my blog up with sponsored posts. Those ads are my income, and as the sole breadwinner in my household who also has the responsibility of being a full-time caretaker for a disabled husband, those ads are necessary for now.
I don’t understand why you’re seeing many video ads in a post, either. There’s one video player that’s on every single post (once in each post), and then on days like today when I have a project that I did a video for, that video will also be in the post. Most day, there will be one video player. Today, there are two. The second one is today’s project. You shouldn’t be seeing more than that.
Maybe she needs to clean out the cookies on her computer. That helps mine many times.
I only see one video ad and the video Kristi made for the blog post. Might be spyware on your computer.
I agree about the video and ads. frequently the ad copy overlaps the actual blog content. your site is well developed so I wonder if the ads are from my carrier rather than the ads you insert.
Just as a FYI – I see 4 embedded ads (fixed ads centered in the text that are not videos) and one scrolling ad window on the right hand side. I’m using google chrome on a full-size computer monitor. Not sure how it’s showing up on a mobile device.
I think the ads are more to to with how advertising works on the internet. I have three ads on this page, all stores that I have entered in my search bar. One at the bottom that seems random . I just scroll by or click the little x in the corner of the ad and close it.
I am on a tablet and the only video on my screen is the one of Kristi making the stand. I also have no ads like you’re talking about. The few times I’ve seen ads I just scroll on by if I’m not interested.
Your calendar is beautiful. Wish it had room to write activities for any day.
Absolutely beautiful calendar, Kristi! Love the DIY stand as well. Keeping this post bookmarked in case I ever muster up the courage to try a table saw project 🙂 I agree these would make fantastic gifts! Thank you for sharing <3
These are terrific; I like the black too. The photos on the calendar show up better. And it’s been my experience all bloggers have ads so I just keep scrolling if it’s a tutorial I’m interested in. For example, I’m not a seamstress and don’t own even my basic machine anymore so I might not bother with curtain tutorials. So if this is your only income I say “carry on”!
Trying to pick my chin up out of my lap, but I’m just blown away! The calendar stand is delightful and so simple, I think I can actually make one, especially if I get the other half to cut for me! LOLOLOL Christmas gifts coming up! I can see it holding picture frames that are meant to be wall-hung, too!
I think this calendar is GORGEOUS!! I just have one question… I’m using a refillable A5 sized planner, would it be possible to make them in more than one size? I would LOVE to use these in my planner! If it isn’t possible I totally understand… Just thought I’d ask and cross my fingers!
I love this idea, and the calendar is gorgeous! I had been trying to figure out a stand for a similar calendar of my own a few years ago, and this totally works!
Your calendar is beautiful!
Would like to order the calendar but need the easel frame (black), please.
Kristi, I have a feeling you’re going to have to make some of those calendar stands for your Etsy shop! I love them both, but am very partial to the way the white one looks with the calendar on it, just lovely! Off to check out your Etsy shop — congratulations on opening it, I’ve been waiting for the day for a long time!
Kimberly
Kristi, your calendar is gorgeous! Thank you for sharing! Happy New Year! Toodles, Kathryn @TheDedicatedHouse