DIY Edge Grain Plywood Herringbone Coffee Table
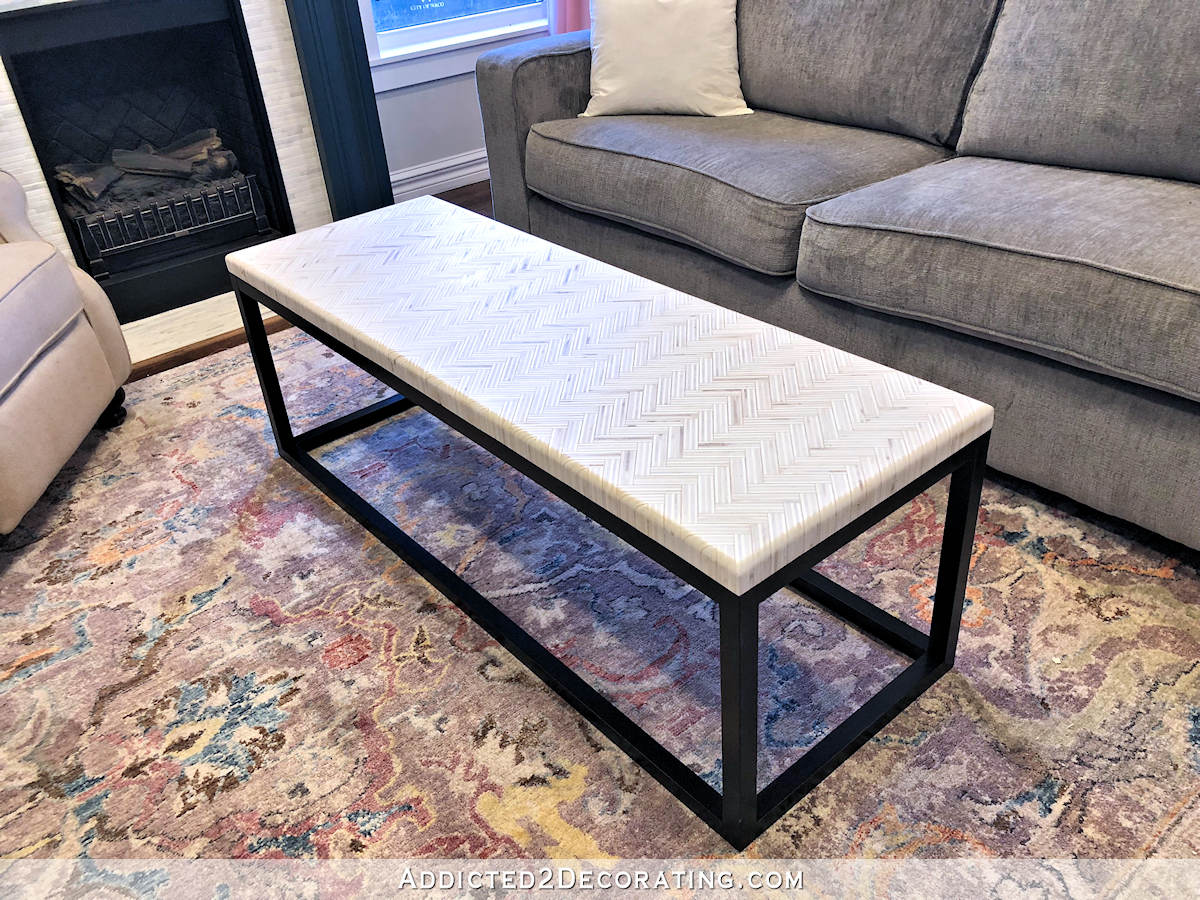
My living room coffee table is finished! Y’all, this might be my favorite thing I’ve ever built. If not my favorite, it’s definitely in my top five. Here’s how it turned out…

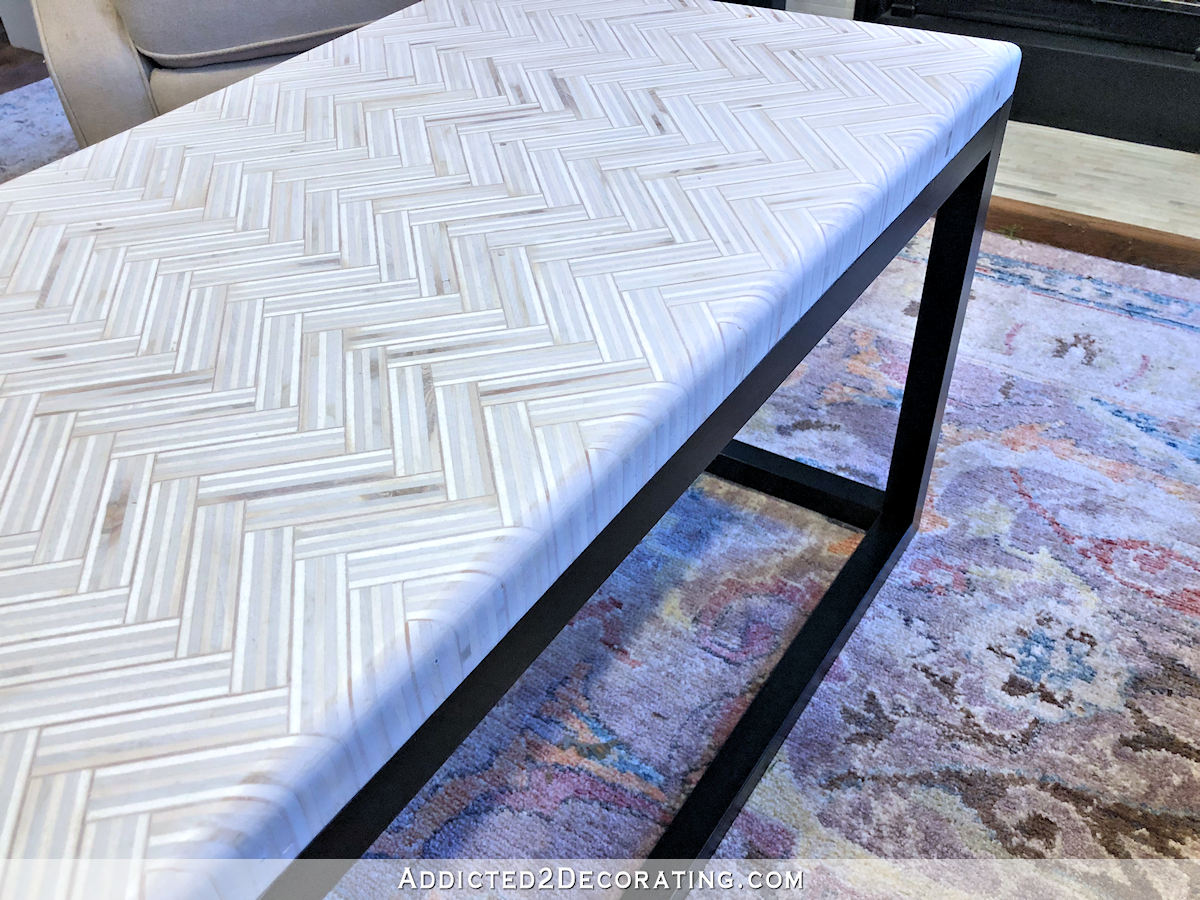
Isn’t that pretty!? And it’s plywood! Not just plywood, but the edge grain of plywood. As in, the part that most people generally try to cover up. But instead of covering it up, I made it the feature of this coffee table. Here’s a video of the process…
You’ll have to give me a little grace with that video. I waited until yesterday to do my narration, and of course, I woke up with a cold. I couldn’t breathe out of my nose at all, and I had watery eyes, constant sneezing, and a sore throat. It was like Monica Geller in The One with Rachel’s Sister (a.k.a., the one where Monica was sick) narrating a video. But in the end, it all worked out fine…d. Fine…d. (It’s a really hard word to say!) 😀
And by the way, if you’re ever wondering about my tool and product recommendations for DIYers, you can see what I use and recommend in my Amazon Storefront. Click here to find that. When you’re there, you’ll find three different categories for now (I may be adding more in the future). So for this project, you’ll probably want to click on the Tools & DIY Products to see the specifics. Lots of my choices would make great gifts for DIYers as well!

Anyway, this was a very time-consuming project since I had to glue and nail over 550 plywood pieces for the top (and that’s for a relatively small coffee table), but there’s nothing particularly difficult about this build. If you have lots of patience and moderate building skills and confidence with power tools, you can totally do this! Let me show you how I did it…
I started with one full sheet of birch plywood. I had Home Depot cut it down into manageable pieces for me (about 12-inch-wide pieces), and then I brought it home and cut those pieces into strips that were 1.5 inches wide.
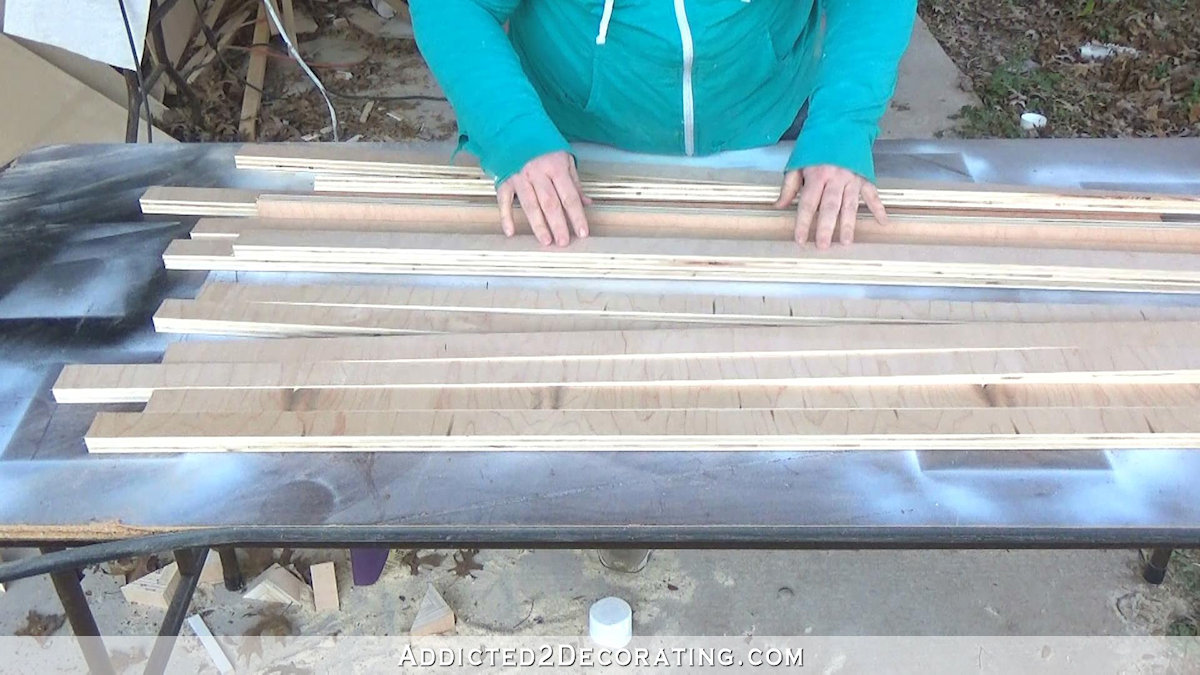
Then I cut those strips into 3-inch pieces.
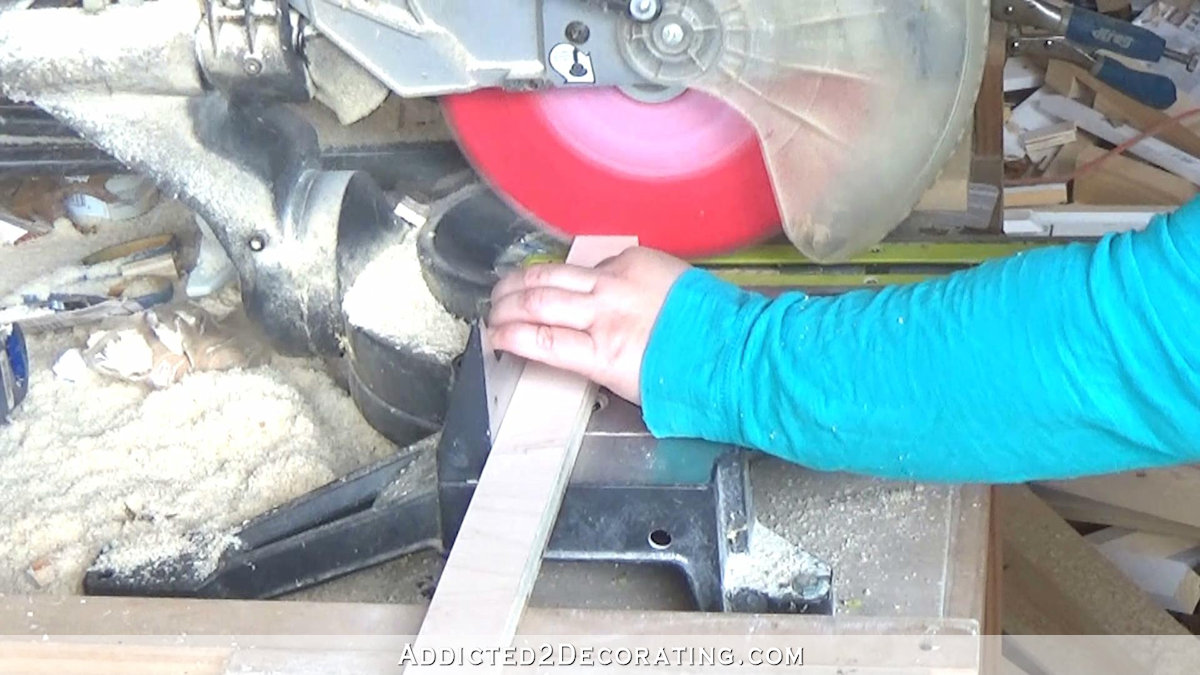
Since I had to cut so many pieces (over 550 pieces), I clamped a scrap piece of MDF to my miter saw so that I didn’t have to measure each piece before cutting. This process actually went much faster than I had expected.
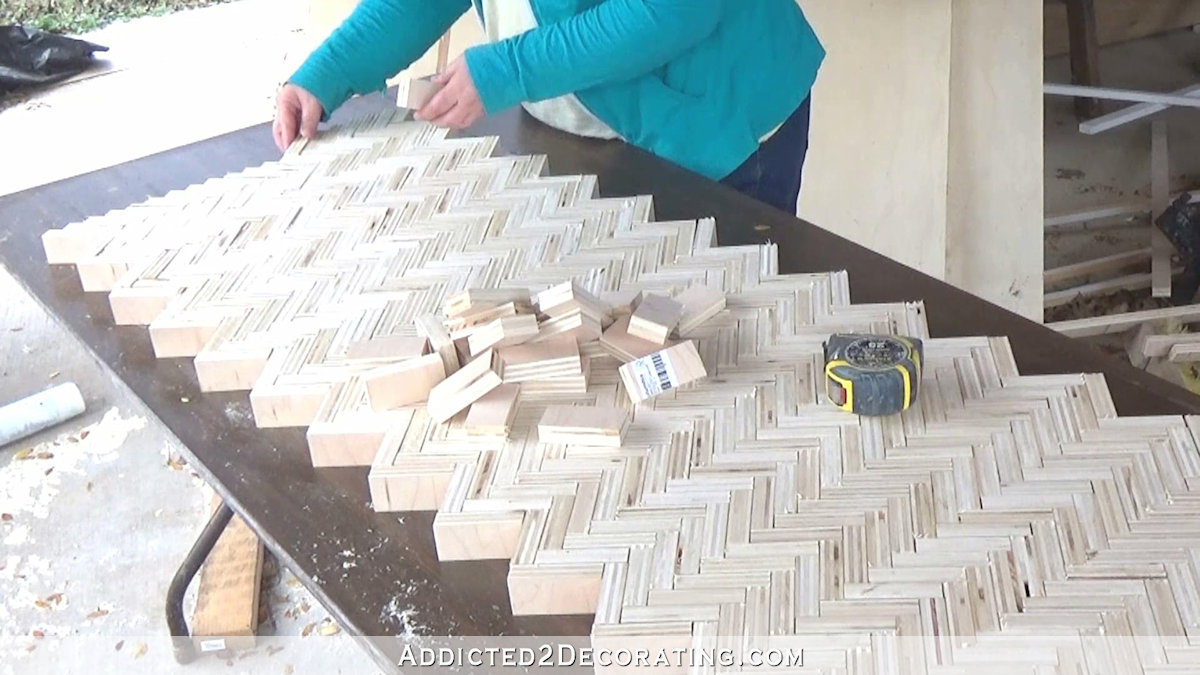
As I cut the pieces, I placed them on my work table in a herringbone design.
This was the only way I could determine how many pieces I’d need to make a table the specific size I needed. I tried to do math to figure it, but kept coming up with the same obviously wrong answer that I’d need four SHEETS of plywood for the top. 😀 I knew that couldn’t be right. Clearly I was making some errors in my calculations (good thing I never wanted to be an engineer), so this way just seemed easier. As it turned out, I needed about 2/3 of a sheet of plywood.
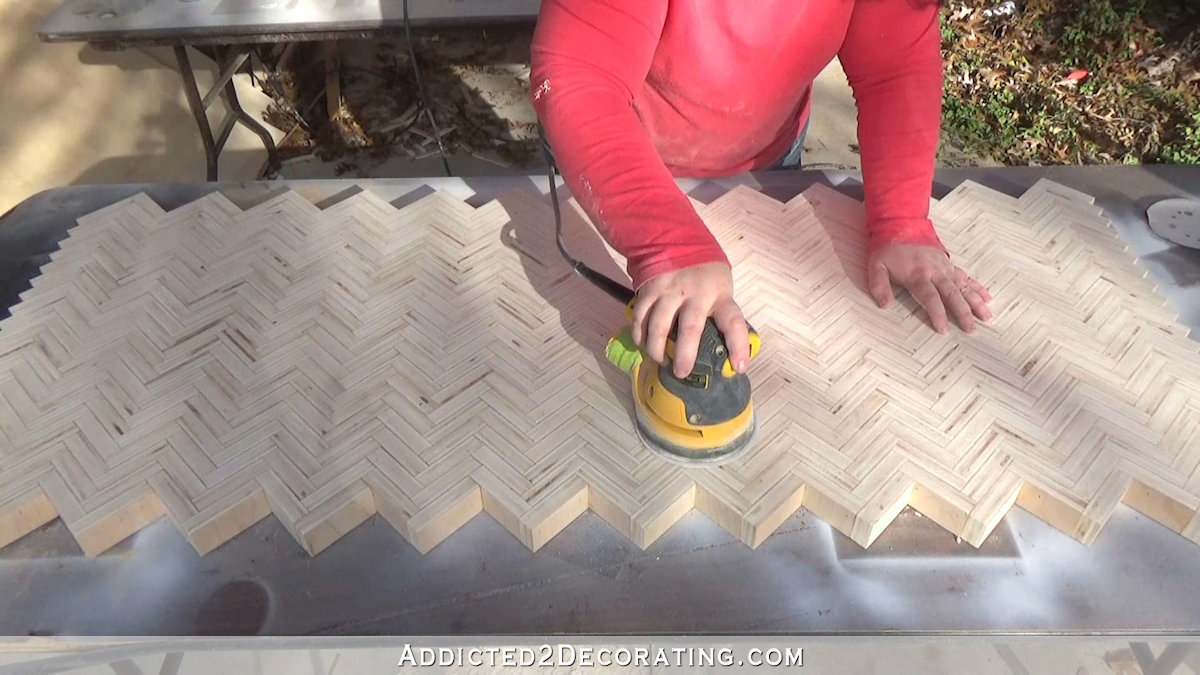
Once I had enough pieces for my table top, I sanded each piece by hand.
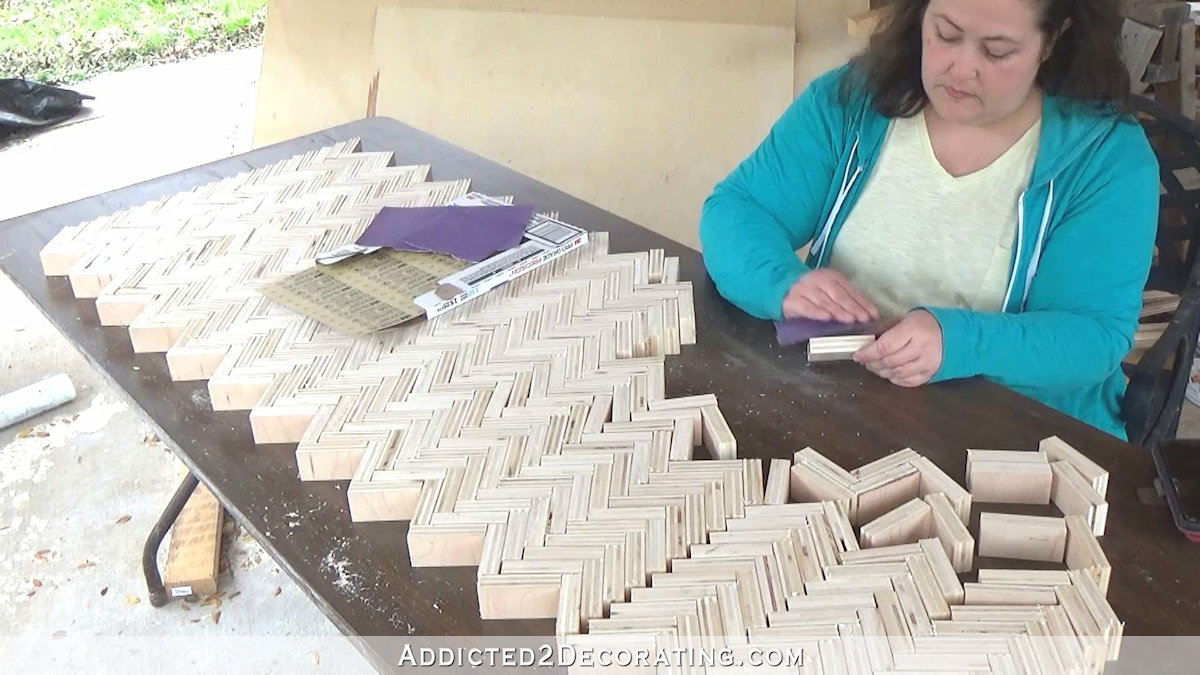
The reason I did this is because even though I had a brand new fine tooth blade on my saw, it still left those hairy wood fibers everywhere. And those got in the way of the pieces fitting really snug up against each other. I wanted to assembly to be as easy as possible, so I decided a little extra time (or two hours) of sanding would make things easier later.
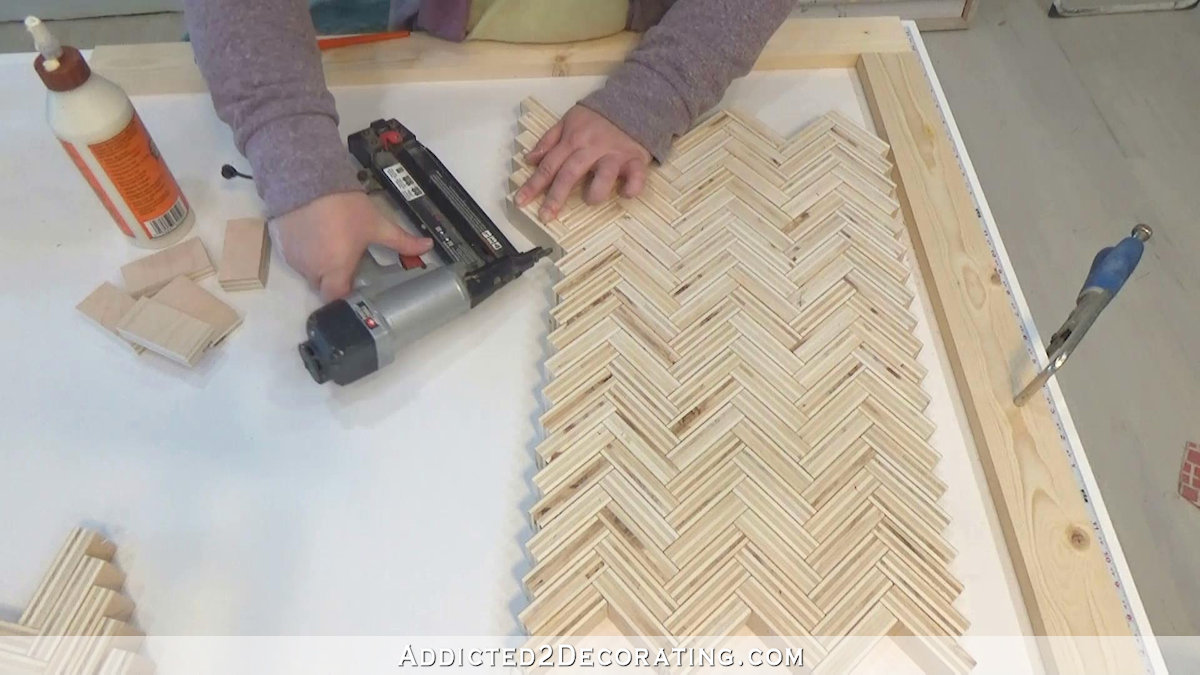
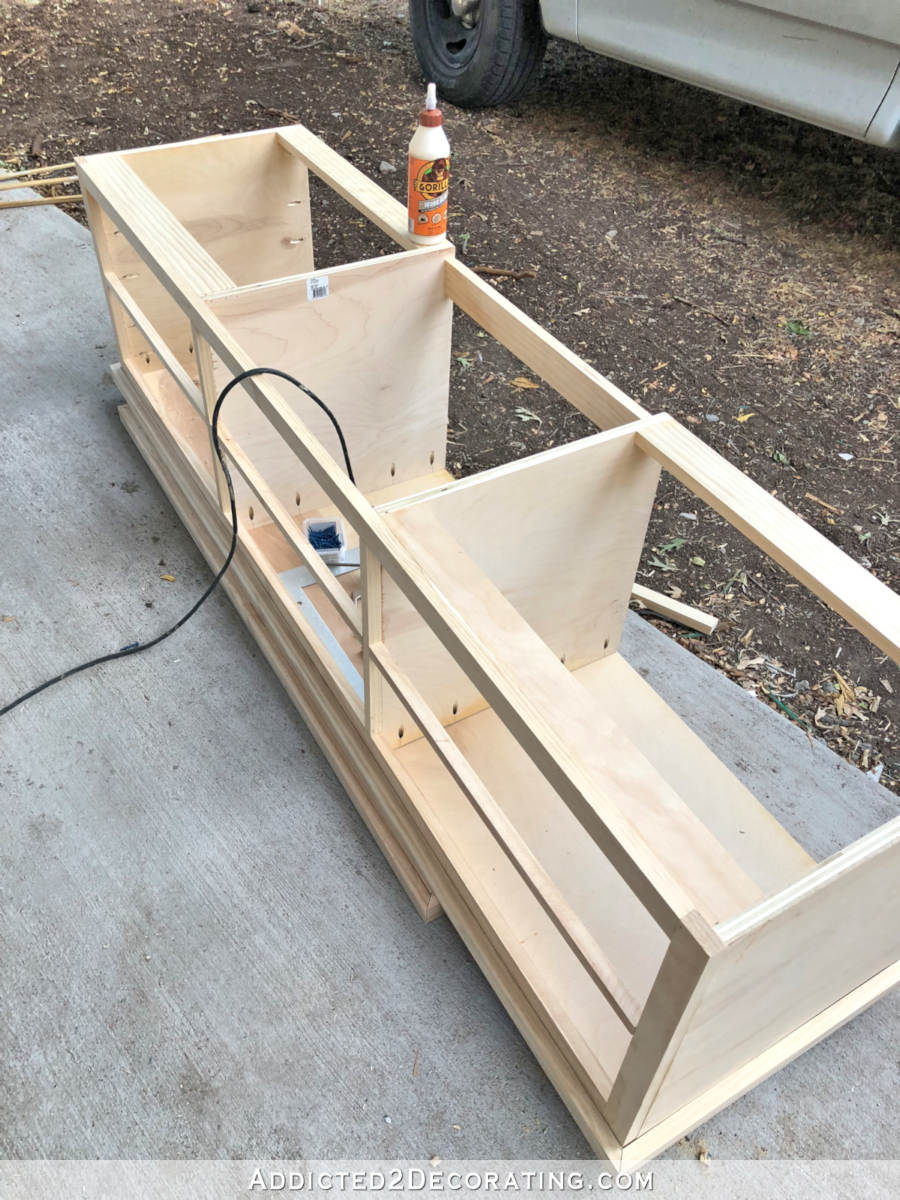
To start the herringbone design, I made a series of “L” shapes using pairs of wood pieces. I glued and nailed these together using 1.5-inch 18-gauge nails. Then I glued and nailed those “L” pieces together until I had a row of them long enough for the width of my table.
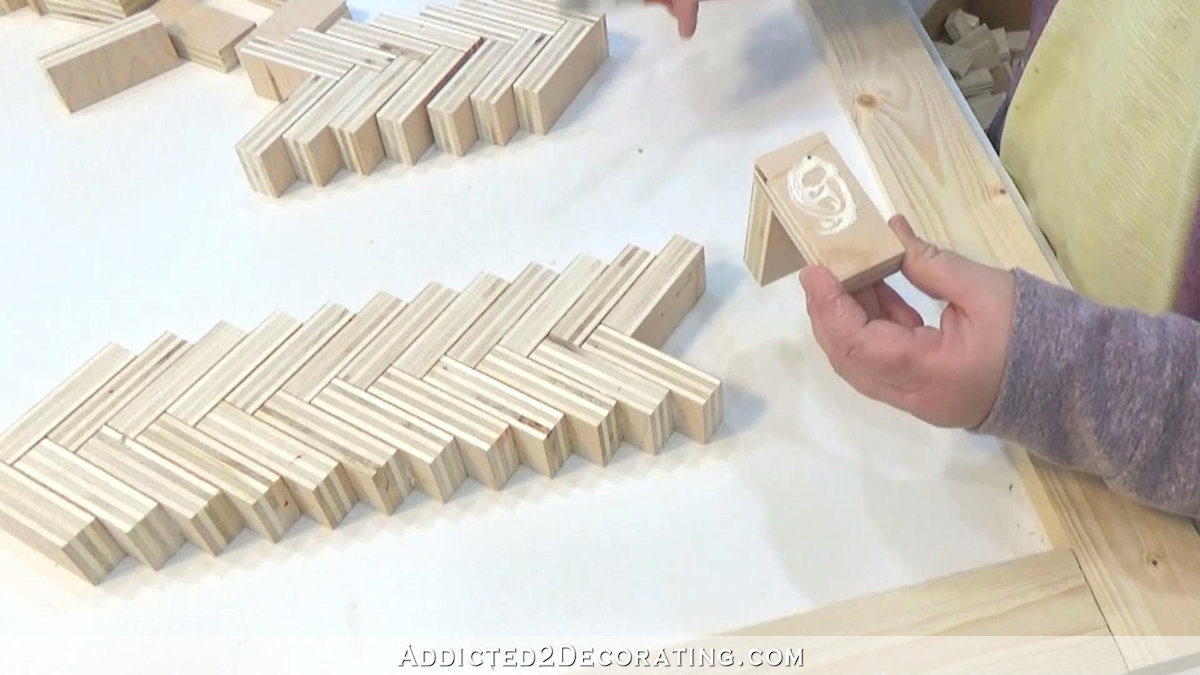
I wanted the finished width of my table to be about 18 inches, and since a herringbone design leaves jagged edges that have to be cut down, I made each row about 24-26 inches. I just measured as I went along to make sure I had enough area in the middle (minus the jagged edges) for my table.
On the subsequent rows, I made sure to glue and nail each piece into the edge of the piece on the previous row, as well as into the face of the piece on the current row. In the video of this build, I show what happens when you fail to nail the pieces to the ends of the pieces in the previous row. Spoiler alert: Everything falls apart. 😀 Which should have been obvious to me, but somehow escaped my attention on my first attempt at building the table top.
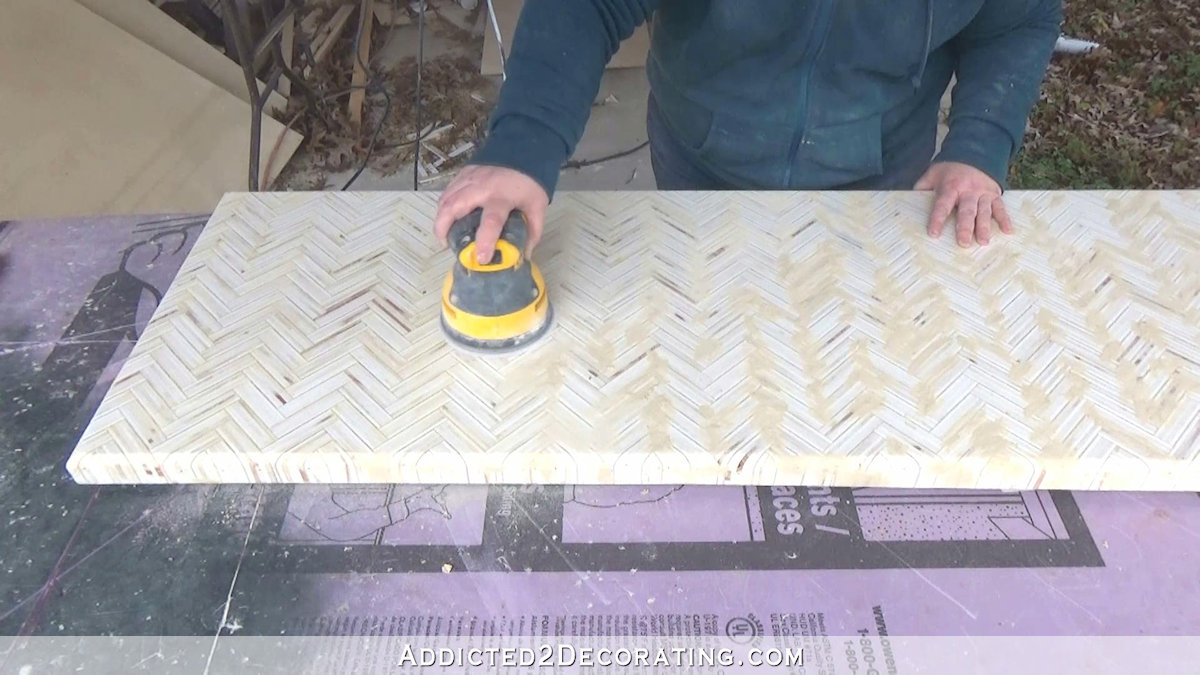
After leaving the table top overnight for the glue to dry, I took it outside and used the belt sander with 40-grit sandpaper on it.
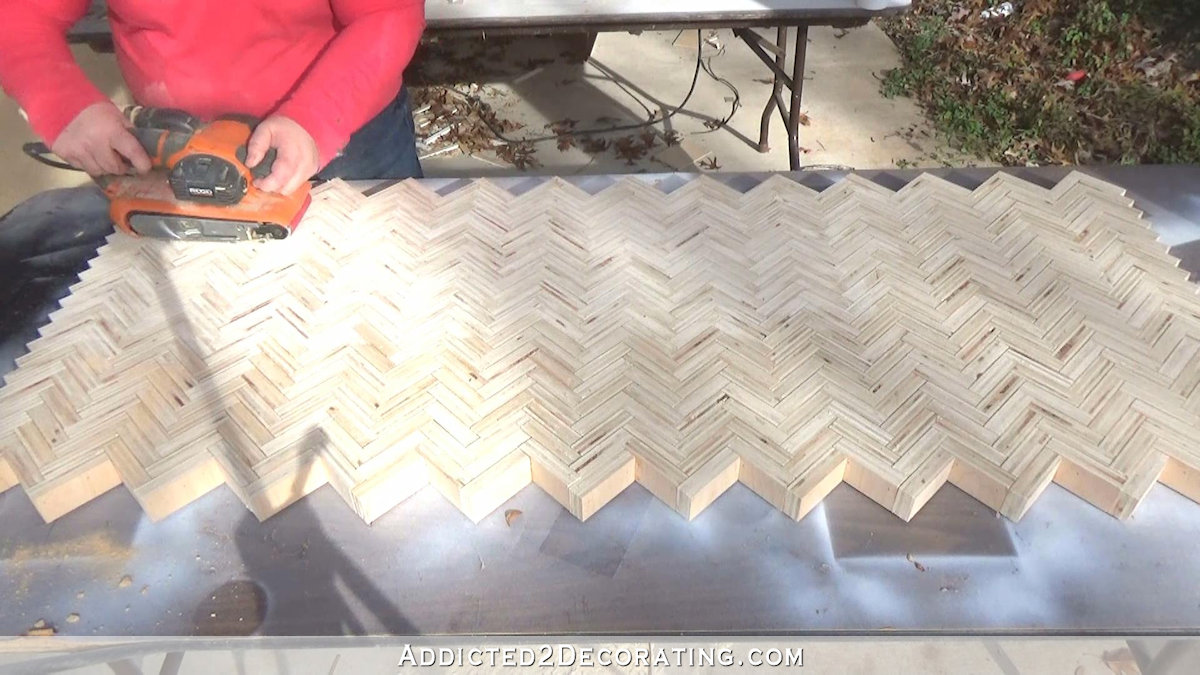
If I had a planer (or access to a planer that will work on something almost 30 inches wide) this would have been the time to use it. But unfortunately, I had to resort to using my belt sander. It did the job, and it did it very quickly, but that is one of my least favorite tools to use.
But then I followed up with the very pleasant job of fine sanding with my rotary sander.
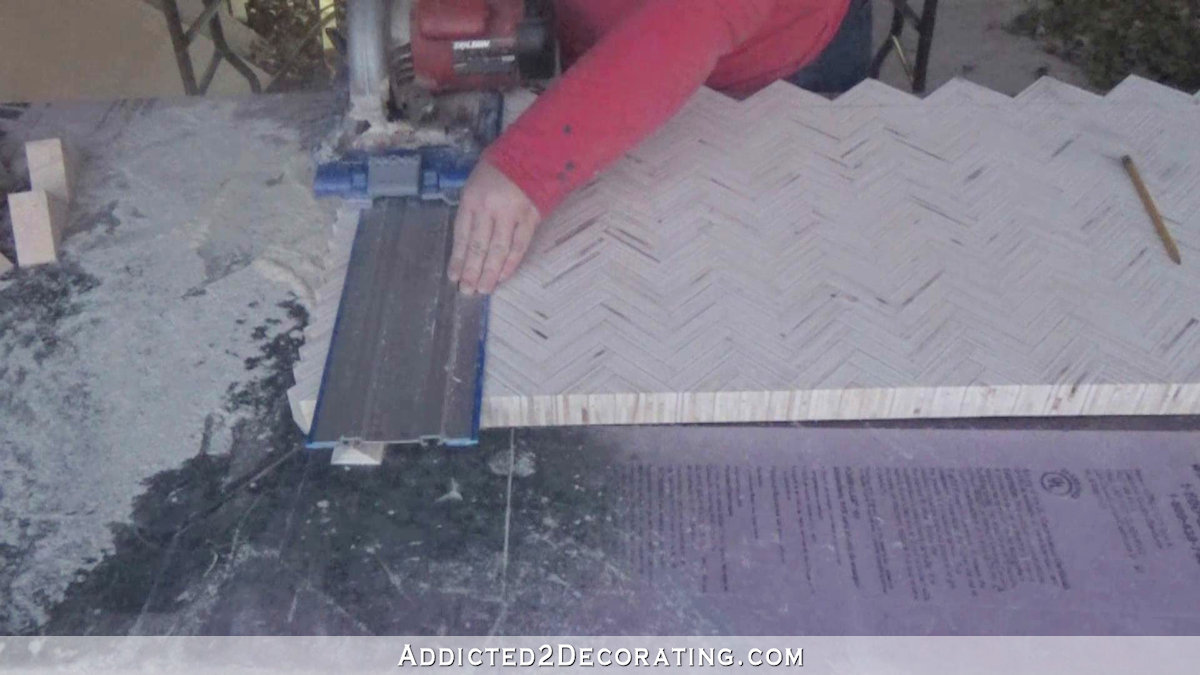
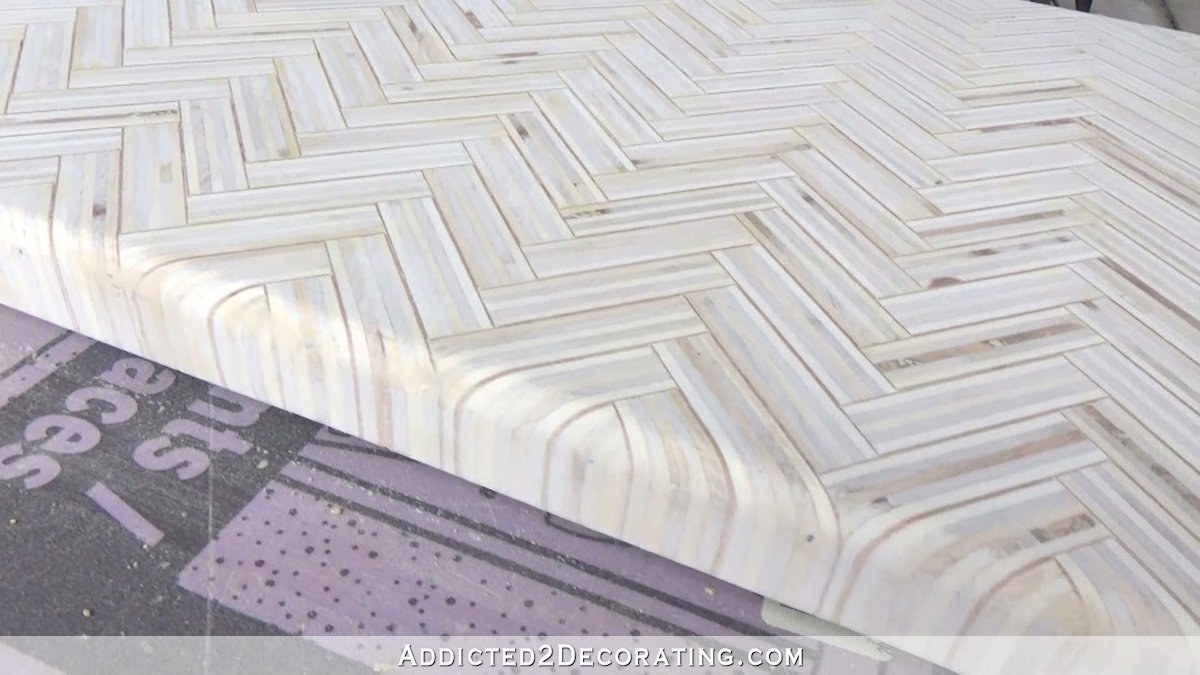
With the top mostly smooth, I used my track saw guide to cut the edges. I was so afraid I’d make a mistake here and all of my hard work would be ruined, but I managed to cut the edges pretty perfectly with the Kreg circular saw guide. I was also losing daylight very quickly, but I was determined to get it done before it got too dark.
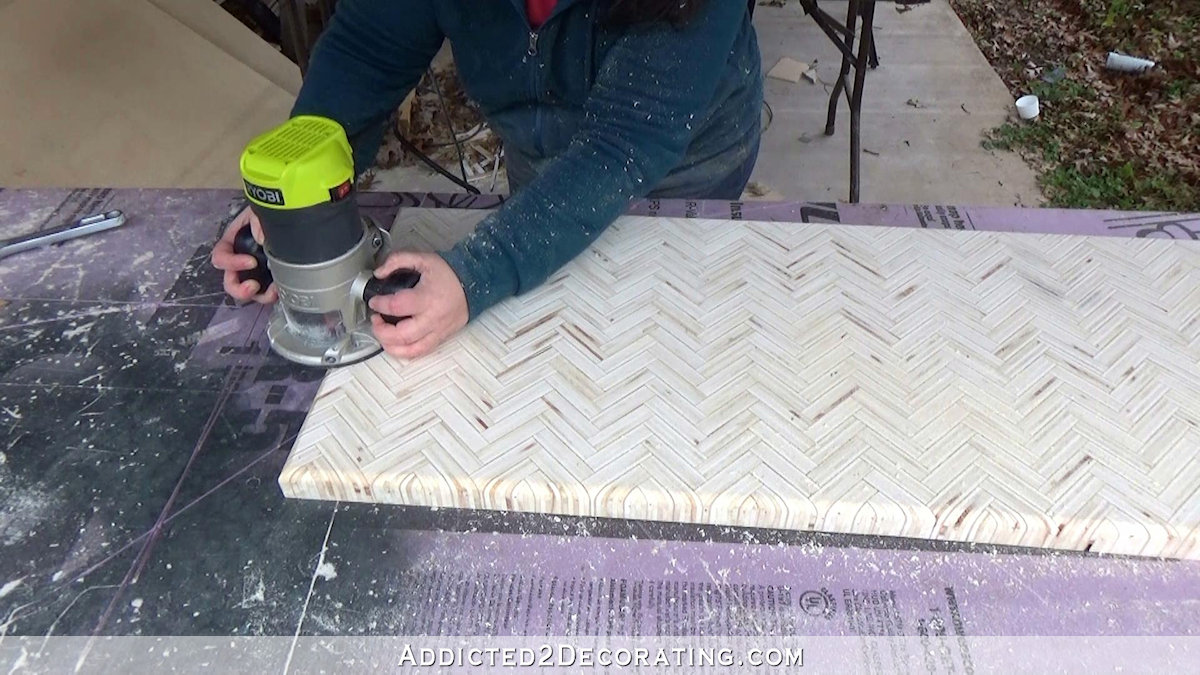
The next day, I moved on to the step that I think took this table top to the next level — routing the edges with a 1/2-inch radius roundover bit.
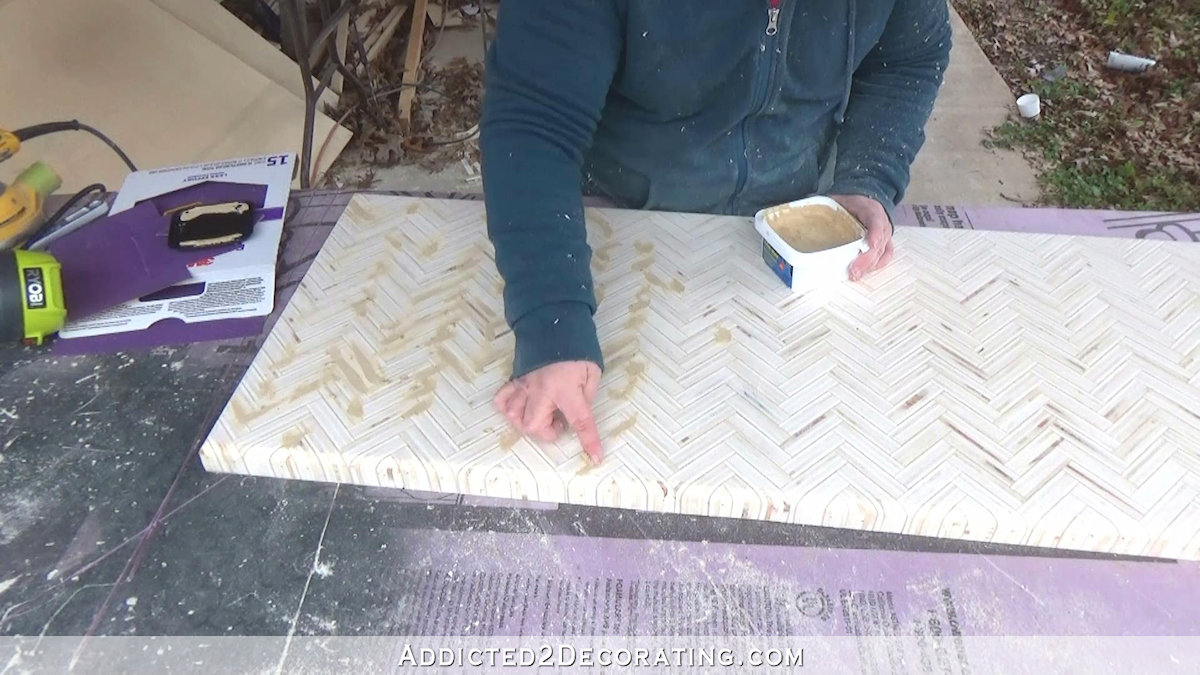
That was followed by lots of wood filling. If I had to do this all over again, I would have made sure that I had some full trowel wood filler on hand, and I would have troweled it onto the entire surface and edges. Plywood has LOTS of voids and cracks in it, and if you like a perfectly smooth surface like I do, full trowel wood filler is the way to go.
After that was dry, I started on my final finish sanding. I started with my rotary sander and sanded up to 150-grit, and then finished off with sanding everything by hand to 220-grit.
By the time all of the sanding was done, this thing had a super smooth finish. And I just love that rounded edge and how the design gracefully spills over the edge like that…
To finish the top, I used some clear water-based polyurethane (some that I had left over from the studio floor), and mixed in a little universal tint in white oxide. I wanted to lighten and brighten the wood, and remove some of the yellow color, without hiding the wood grain and the design. This worked perfectly.
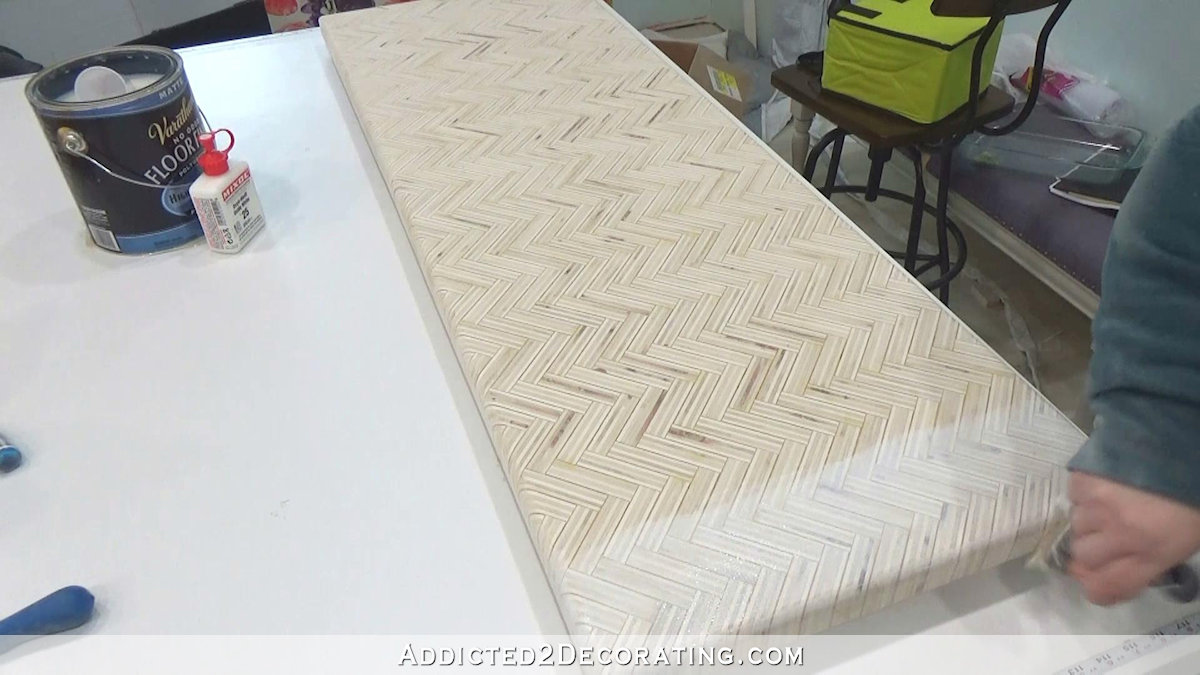
When that was dry, I sanded with 220-grit sandpaper again, and then followed up with another coat of clear poly.
I wanted the top to be the star of this furniture build, so I kept the base as simple as possible. It consists of four legs and eight stretcher pieces, all cut from 1-inch-square lumber. This lumber started out as 1.5-inch-square (the same that I used on my studio desk), but that seemed a bit too bulky for such a small table. So I ripped the pieces down to 1 inch square on my table saw, and that seemed perfect.
This base couldn’t get any easier. I simply glued and nailed the top stretcher pieces directly to the bottom of the table top, and then glued and nailed the legs to the stretcher pieces.
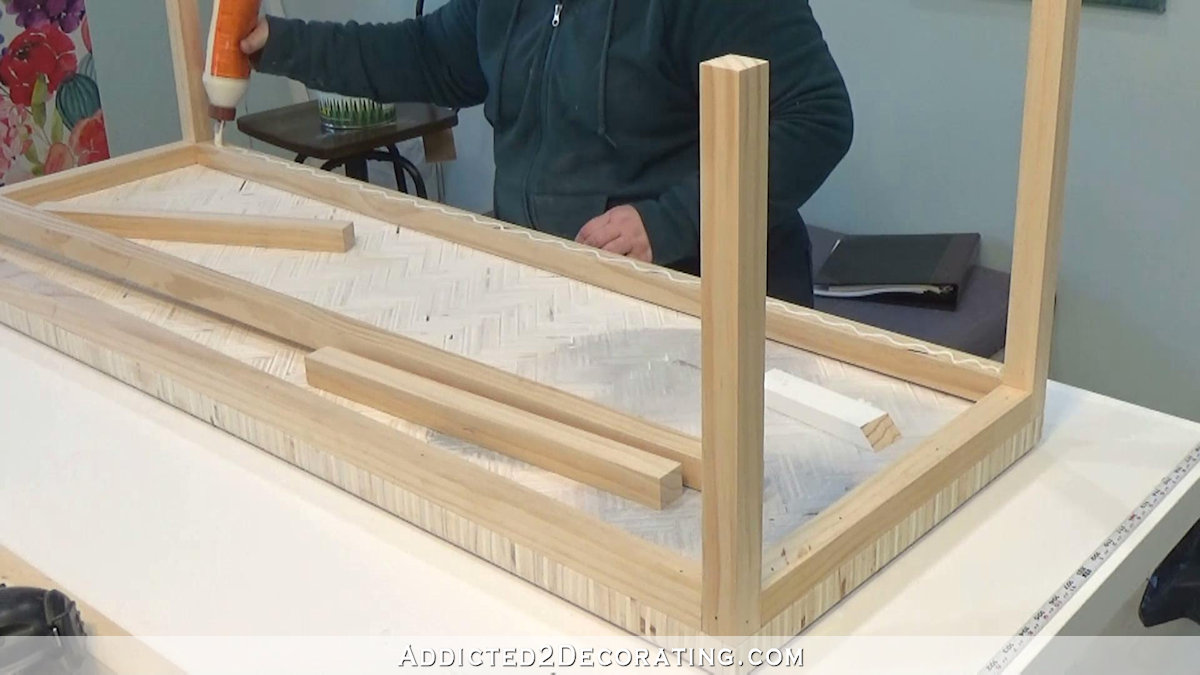
The I turned it right side up, and glued and nailed the bottom stretcher pieces into place.

I mean, it doesn’t get any easier than that. Now I do want to emphasize that if I were building this to be used as a bench, I would add more support pieces, and I’d put everything together with additional joinery, like pocket screws. But when the glue dried on this, it was very sturdy and sufficient for use as a coffee table.
To finish the base, I taped and papered off the top, and then gave the base two coats of spray primer, two coats of spray paint, and one coat of spray clear finish. I sanded between each coat with 220-grit sandpaper so that the final finish would be as smooth as possible.

And once the paint was dry, I removed the paper and tape, and it was finished! I’m so proud of how this turned out!
I’ve noticed myself walking by my living room very slowly now just so that I can enjoy the view of my new coffee table. 😀
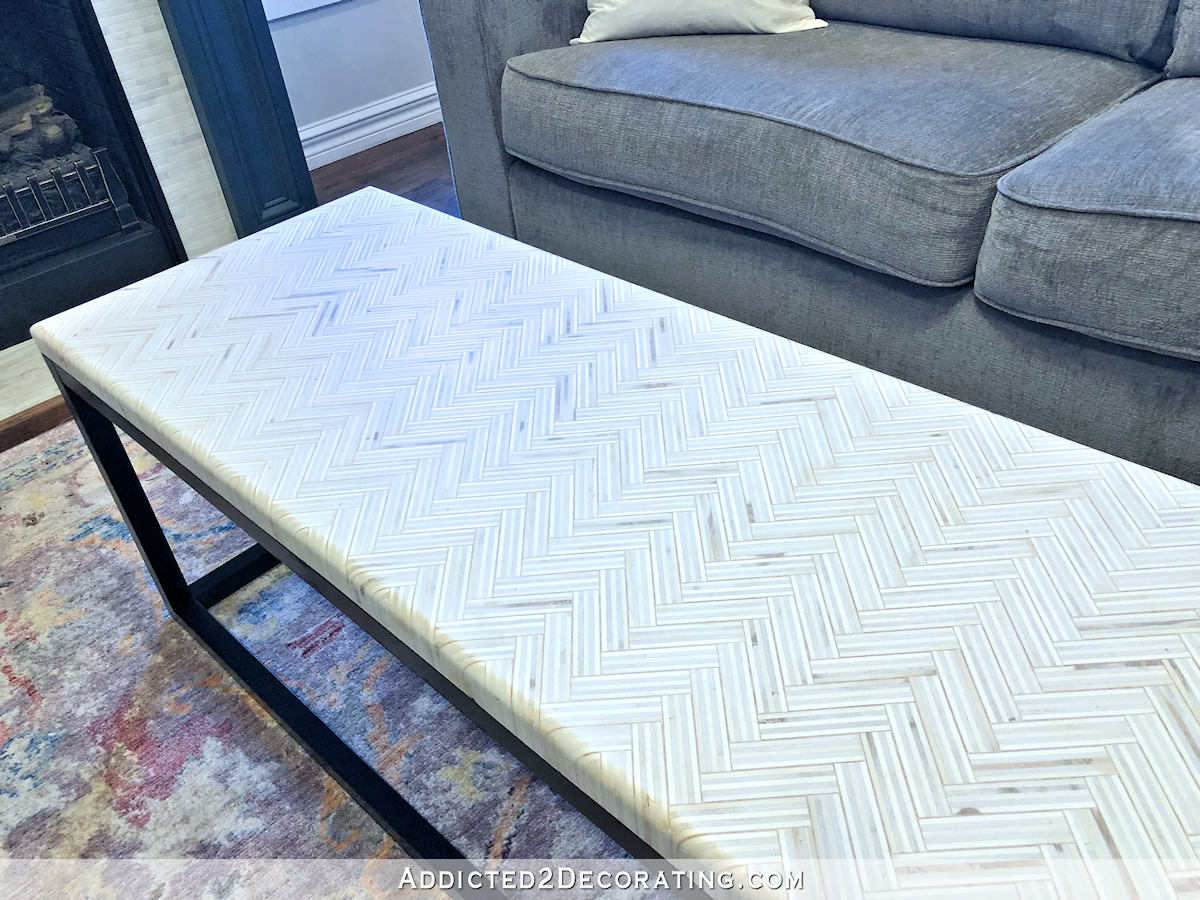
And the way that the design looks on those rounded edges is my favorite thing about this table.

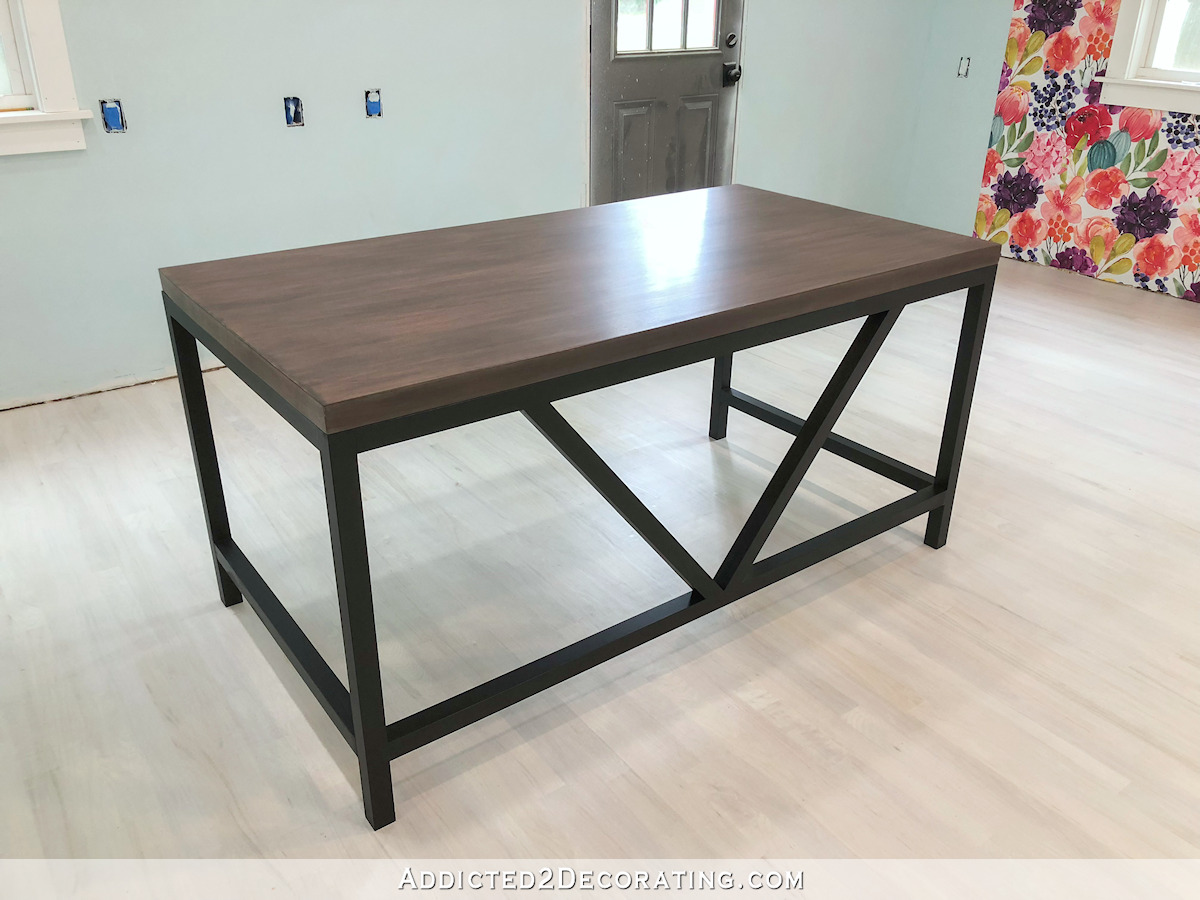
By the way, if you’d like to see how a base like this would be built using pocket screws, you can refer back to my studio desk. It’s almost identical in design and built with pocket screws and wood glue to be super sturdy. You can find that here…

Addicted 2 Decorating is where I share my DIY and decorating journey as I remodel and decorate the 1948 fixer upper that my husband, Matt, and I bought in 2013. Matt has M.S. and is unable to do physical work, so I do the majority of the work on the house by myself. You can learn more about me here.


I. Love. This. SO. Much.
I also love that we’re getting to see YOU in some of the pictures!
Stunning.
I LOVE this. I think I gasped out loud when I saw the picture. Kind of like I did when you did your pantry reveal. Gorgeous!!
I think this would make an awesome backsplash. If I had the patience to do it! Great job as always Kristi.
Love it! Well done!!!
I too think the edges are amazing!!! Great job!
The rounded edges are gorgeous!
Love it…!!!!
How did you deal with the nails around the edges? or did you not nail those, just glue? It’s beautiful!
I just bought a new 4.5″ circular saw and had to buy a second one for my SIL who hung a solid core wood door for me and had to trim a bit off the bottom. My coffee table is a monster! It’s a hatch cover from a WWII Liberty ship.
STUNNING!!!
I love this so much! If you were to build this as a bench, would you add a piece of plywood under? Also, I’ve never used a router, can you add the one you have to the amazon list of diy tools. Thank you, you are such an inspiration and give me confidence that I too can make this!
This is a beautiful piece of furniture I must say. But I think I saw a version of the word easy at least three time sand there was nothing easy about this table!
LOVE those edges!
Really a beautiful table. Not sure I have your patience to make this.
So unique!
WOW. You have created another furniture masterpiece. Can we have a photo with it in place with the whole living room so far? GREAT job, Kristi!
It is beautiful, Kristi. The black base really grounds the room. Your hours of labor were well worth it.
It is gorgeous and the rounded edges are perfect! It’s great that you solved the mystery of the edges for me, because when you posted the sneak view a while back, I couldn’t fathom what you’d be doing about the edge. Cutting them off in a straight line is an answer that didn’t even occur to me 🙂 Thanks for teaching me yet another lesson…
Beautiful. This is one of your the best project. For me… 🙂
I have been reading your blog for years now and this is the first time I am leaving you a comment.
You have so much of patience.
Kristi, just popping in as I wanted to add this comment to the NY Resolution post, Sorry have ended up adding it here as I couldn’t see the comment box there.
I just really really wanted to recommend Trello, it’s free
Cheers
It’s a beautiful waterfall effect. Great work Kristi!
Wow!!! Just Wow!! I love it. What a gorgeous, truly unique and absolutely stunning coffee table. So different, one of a kind custom piece……just what I like. Your creativity never ceases to amaze me. You’ve made so many things that have been my favorites, but this table and that rounded edge now wins my favorite piece hands down……..well, until the next amazing thing you make !!!!!
I love it. I think it is also one of my favorite projects of yours.
This is so beautiful. I would love it for a kitchen island top so that I could see it all the time!
Love the edges too! Fabulous table, but NO WAY would I have the patience to do that, and I consider myself a very patient person. And I would probably cut off a finger or put a nail through my hand with all the repetitive actions. Hope you feel better soon!
***SOOOOOO*** NICE! And the routed edges just really make the table perfect!
I’m typically not a fan of herringbone patterns, but that waterfall edge is absolutely gorgeous. The light top and dark legs is such a great design choice. Brava
You are unbelievably talented!!! Love it and everything you do!
So imaginative. Beautiful lines, very impressive and stunning visually. I can understand why you gaze at it as you very slowly drift by!! What a feat to produce such a table. Many accolades to you – and merry xmas from New Zealand.
Wow, this is very special. Great work, and that rounded edge is perfection.
Look at you….working in that studio, on your worktable!! Sooo jealous!
Wow! You are so, so talented and an inspiration to me. Have you ever said how you started working with wood? If not, I’d love to know and I’m sure others would to. If you’ve shared this before, could you point me to where it can be found? Again, Wow!
It’s so beautiful!!! A fabulous result from such a labor of love. I totally understand why you would go by several times a day just to admire it. Another amazing job, Kristi!
I couldn’t see the vision for the coffee table in the first pics you posted a few weeks back but wow, just gorgeous, and I love the white tint of the finish. Happy holidays to you and Matt!
I smiled when I heard new blade. When I worked for Black and Decker I was told a blade needed an hour of use before it became optimal. That’s about three years of typical homeowner use. They joked that’s when they would replace the blade. Love the table.
OMG…d. When I read that part of your post, I almost fell off my chair laughing! You are–as we like to say in Alabama–a “HOOT”! As for your coffee table, I AM IN LOVE LOVE LOVE! Dang it, now I have to add THAT to the list of things I have to make after seeing how beautiful a job you did! You never cease to amaze me <3 <3 <3
Absolutely stunning! And I love the suggestions from your other readers: an island top (or counter top), a backsplash, etc. This design is suited to so many different uses and it really is stunning. When I first saw the picture, I thought the base was metal and that’s a compliment, btw! Well done, you, and I hope you and Matt have a spectacular holiday season!
WOW!! I was going to make a similar table using butcher block, but I think I’ll try this instead. Amazing work. Merry Christmas!
So beautiful. I thought the base was metal! Great job!
Lovely table. I love the rounded edges and the design they made. I am insecure about there not being a board underneath the plywood pieces. I just know in my house someone would sit on it, or put a heavy platter on it and bang! A plant would leak or something like that. Great video, your voice was fine.
God bless you ! You only create MASTER-PIECES. I admire your grit for creating such pieces, the patience, amazing !
This might be my favorite furniture piece you’ve ever built. It’s gorgeous!
WOW! That’s waaaaay cool. Love the edges also!
Amazingly Beautiful. I have been searching for a new dining room table. This might be the top I have been searching for. Thank you for sharing your experience. Happy Holidays to you and your family.
You are just so talented and amazing! Great job, I love it!!! You have such a eye for things. This Old House needs you!
Wow, that is a gorgeous and very impressive table. I adore the top of it, and at first thought the base was metal! You’re a genius who does such astoundingly good work. Amazing!
Had to come and watch this again. Just so cool! I ALSO thought the base was metal.
HOw thick of plywood did you use? LOVE THE TABLE want to make one as a console.
I used 3/4-inch plywood.
This came out amazing!! I am totally going to make a top using this style! I have a small foldable card table/tv dinner table idea that this might work for, maybe even a stool top too.
Thanks for the ideas!