An Anticlimactic End To The Week
Well, y’all. This week didn’t end the way I had hoped. I was almost ashamed to show my virtual “face” on the blog today because I know we’re all anxiously awaiting real progress on the porch skirting. We all want to see how those faux stones will look once they’re adhered to the porch, and I did my very best to make that happen. But as is sometimes the case, it just didn’t work out.
I started my workday yesterday by grinding down the concrete on the porch skirting area. As you’ll remember, I had previously painted the whole front area with black paint. I did that when the plan was to do a skirting design with PVC boards and I knew that tiny slivers of the concrete would show through that design, so I wanted it to be black.
But now that I’ll be adhering concrete “stones” to the front, I needed not only to get rid of that black paint (the concrete stones needs to be adhered to bare concrete), but I also wanted to smooth out some rough areas on the concrete to make it smooth and flat so that the concrete stones would go on easier.
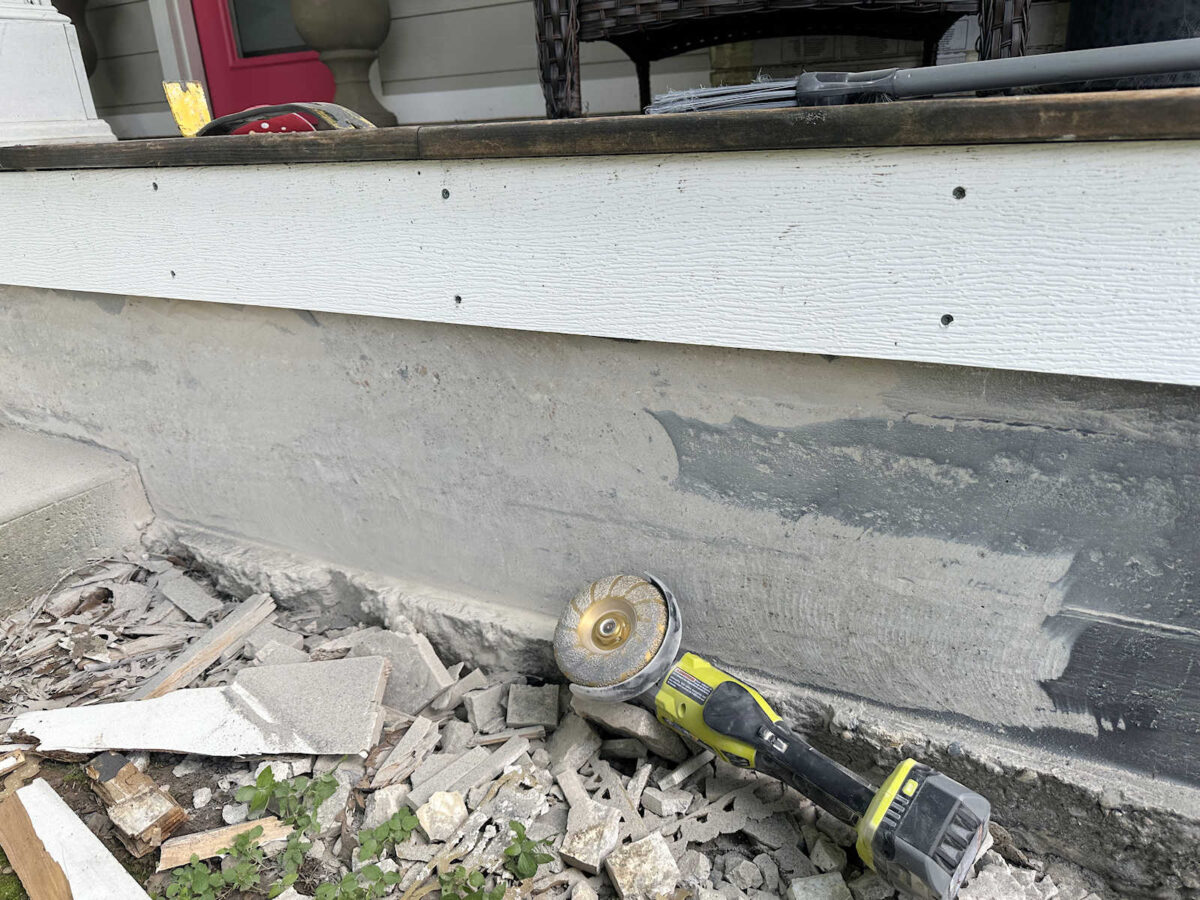
This was a very messy job, and I wasn’t able to work long before my first battery for my handheld grinder ran out of juice. So I swapped it out for a charged battery, and I got this far before the fully charged batter ran out of juice. And of course, my other battery hadn’t had nearly enough time to charge by this point, so I couldn’t go any further. This is why I have such a love/hate relationship (leaning more towards hate) with battery-operated power tools. I like corded tools, and I cannot lie. 😀
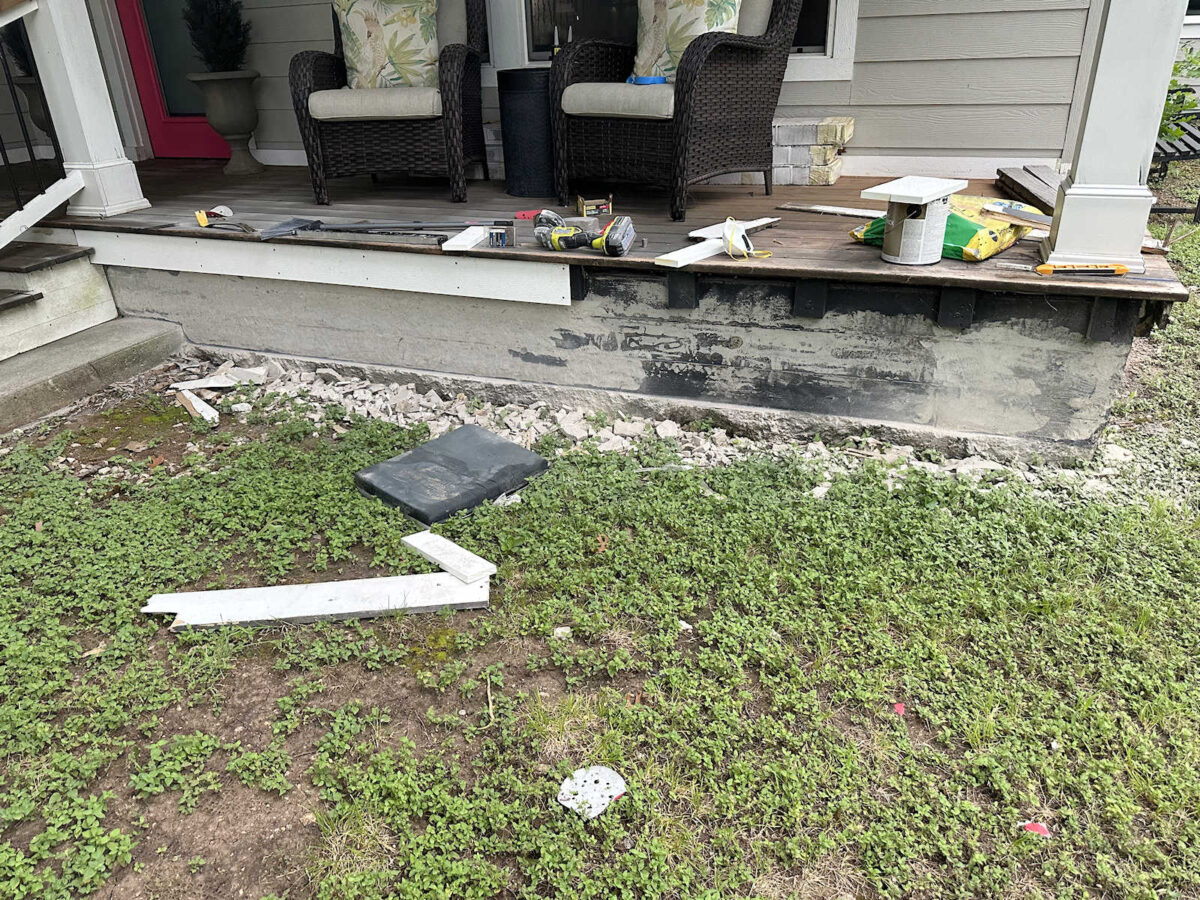
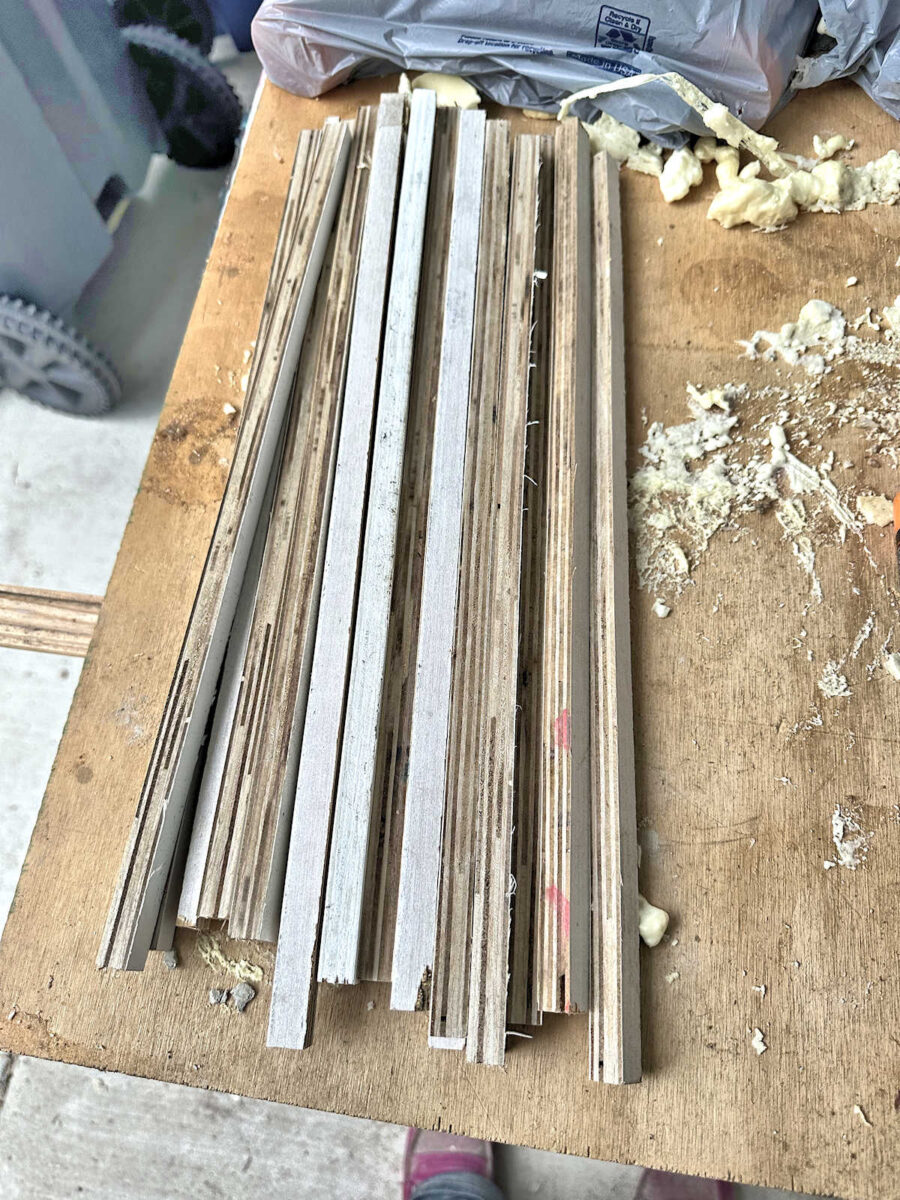
But I was determined to move forward. I didn’t quite get halfway with grinding the concrete, but I thought if I could at least get half of them attached, I’d be satisfied with my progress. So then I did the other prep work I needed to do to get started. Starting from the left side of the design and working to the right, I got the stones arranged so that once I got started, I wouldn’t have to be wasting time determining which one came next. And I also wanted to be able to anticipate ahead of time when I’d need to cut a stone to fit.
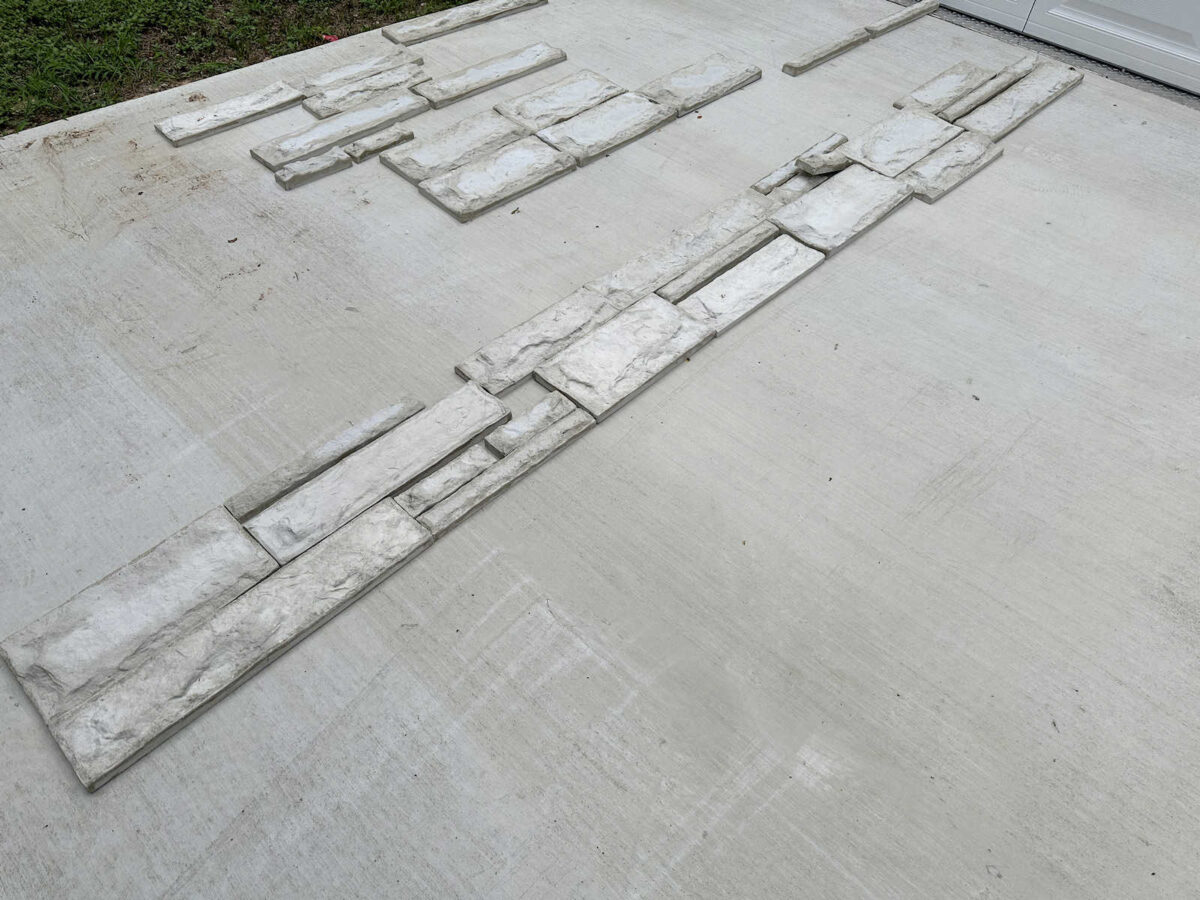
And of course, this was pretty easy to get these arranged because I had already worked out my map of the design. The stones with the white asterisks are the ones that need to be cut..

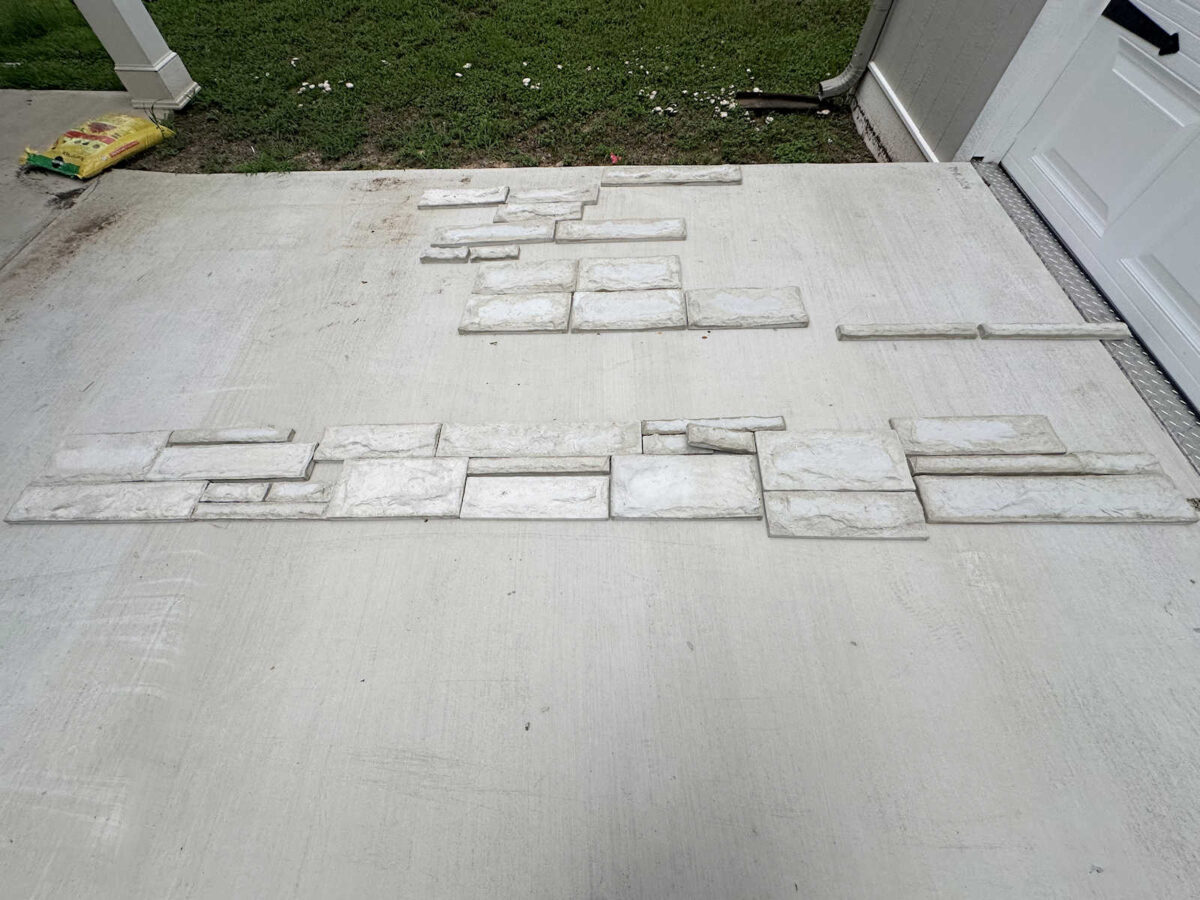
And then I used some scrap 1/2-inch plywood and cut that into strips to use as the spacers for my 1/2-inch mortar lines between the stones.
I got my tile saw all cleaned up, set up with plenty of water in the basin, and plugged in so it was ready to go when I got to those stones that needed to be cut. And with that, I was ready to go! So I got out the adhesive I had chosen, cut the inside plastic cap and the top off, put it in my caulk gun, and squeezed as hard as I could, but nothing came out.
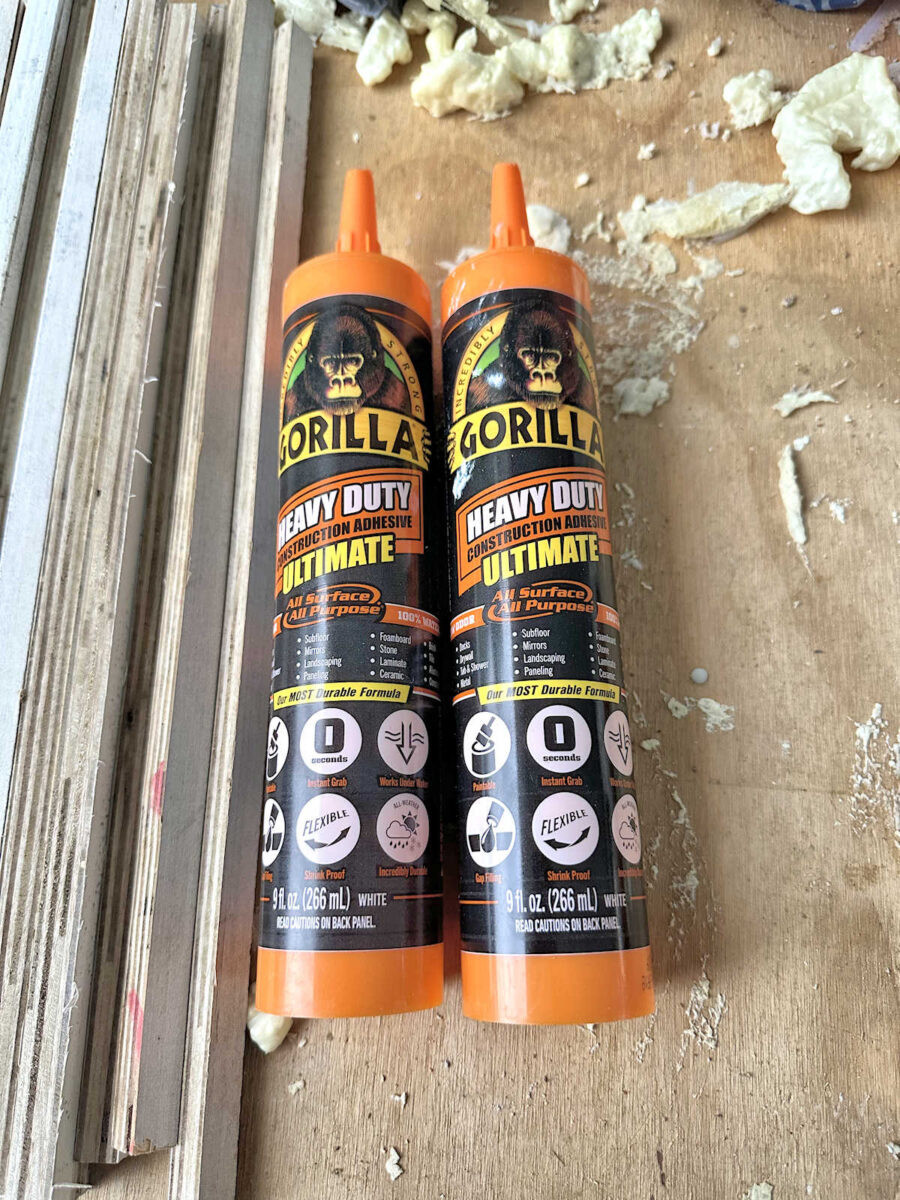
I chose this specific construction adhesive after doing quite a bit of research comparing the pros and cons of using construction adhesive and mortar for a project like this. After comparing the two, I decided on construction adhesive. This particular one can be used on wet surfaces and even underwater, which is helpful since we’re having so many rainy days lately. But I chose this one specifically because it has the strongest initial hold of any construction adhesive available at a big box store. You can see on the label that it says it has a “0 second” hold. Most construction adhesives have a minimum of a 30-second hold, meaning that you have to hold the item in place for at least 30 seconds before it’ll really grab on. A “0 second” hold is what I wanted.
But no matter what I did, I couldn’t squeeze a single bit of adhesive out of that tube. So I thought maybe I had gotten an old tube that had dried up. I got a second one out and tried it. Same thing. I literally squeezed that trigger with two hands and with as much strength as I could muster, and it didn’t move the adhesive at all.
So I got online and searched “Gorilla Ultimate construction adhesive won’t come out of the tube”. And of course, Google’s AI told me to be sure that I had cut the tip of the tube off (duh!), and that I had punctured seal inside. Well, this adhesive doesn’t have a seal that you puncture like silicone caulk has. It has a plastic thing that you have to cut off with a utility knife. Of course, I had done that. This isn’t my first time using construction adhesive.
And then it said, “Gorilla Ultimate is notoriously difficult to use because it’s so thick. Try putting the tube of adhesive in a bowl of hot water for ten minutes before using.” So I tried that. Still…nothing. I’m telling you that no matter how hard I squeezed, it didn’t move the adhesive out of the tube even a fraction of an inch. I’ve used plenty of caulks and adhesives that were difficult to get out of the tube, but I’ve never had an experience like this where the adhesive didn’t budge at all when I used all of my strength to get it out.
So I gave up. I was exhausted and had a splitting headache by that time, so I decided to call it a day. I’ll try again this weekend with a different kind of adhesive. I’m just really disappointed that this one didn’t work out. Maybe I just happened to grab several tubes from a bad batch. Or maybe the box I got those tubes out of had been sitting on the shelf too long and it dried up. I don’t know. Maybe I’ll forgo the construction adhesive plan and go back to the mortar idea. But whatever I use, it has to have a very strong initial hold. So if you have any ideas, I’m all ears.
Anyway, it’s a disappointing end to the week. I sure was hoping to see at least some of the stones attached by the end of my workday yesterday, but sometimes our DIY timelines don’t work out the way we want them to.
More About Our House Exterior & Yard

see all exterior &
yard diy projects

read all exterior &
yard blog posts

Addicted 2 Decorating is where I share my DIY and decorating journey as I remodel and decorate the 1948 fixer upper that my husband, Matt, and I bought in 2013. Matt has M.S. and is unable to do physical work, so I do the majority of the work on the house by myself. You can learn more about me here.

Yes, all construction adhesive is very difficult to squeeze out! I think our hands are just not strong enough. As someone who believes we can do everything a man can, this is hard to say 🫤 Go to plan B
Relax, I’d view a few more videos to see if there’s an extra trick. but it looked to ooze slower.. so it’s a likely difficult squeeze in perfect conditions. From your experience, I bet a seal on the bottom cap, where it pushes was broken in transit. It’s so stiff it didn’t squish so it solidified partially where the seal opened so it’s tough to even start. Take the day to chase down gorilla glue or just the store for a refund. Now you got another day to charge the batteries.
Also Fathers day usually sees a Ryobi sale at a certain orange store to buy a tool or fancy charger to get a free battery, or Bogo pricing on batteries. I’d look if there’s a something to improve that supply maybe charge 2 or more at once. Now you got rotary tools.
While I was saying buy a new tool. I agree with others. I see your caulk gun has the structure of light duty ones. For budget look for heavy duty or higher thrust guns. I hate using the electric caulk ones, you typically get less control to start/stop. A stronger tool…It may be like buying new pruners. For a landscaping project I had old 20 yr hand me down loppers, then gifted a new Fiskars power gear and it was night and day easier. Same action but the way it was hinged made it significantly easier.
I think they both dried up. I even had an unopened tube of silicone dry up on me after a year. Best get a fresh tube and try again.
Perhaps it’s worth investing in a powered (electric) caulk gun? This one has 750 lbs of pushing force…. https://www.homedepot.com/p/RIDGID-18V-Cordless-10-oz-Caulk-Gun-and-Adhesive-Gun-R84044B/312317871?source=shoppingads&locale=en-US&fp=ggl
Kristi, I too have run into this issue, which I resolved by purchasing a battery operated caulk gun. Game changer when working with thick adhesives and silicones. Hope this helps.
Get yourself a battery operated caulk gun. We had electric way back in the 80s in the Air Reserves. It will save your hands.
How frustrating! I’m sorry this happened to you. Have you tired contacting Gorilla? Sometimes a company can give you advice or offer to send you new products. I’m guessing Home Depot would refund you.
I looked on Gorilla’s website and there is info on contacting them by email or calling them.
No worries, don’t strain yourself over this at all. It may mean that you are to do something else. And I agree about the battery versus corded. We have a variety of tools up here on the farm, and for the jobs that would drain batteries, we have them in corded, and we also have a small generator to take with us out in the woods when we need that corded device over the battery ones…a hassle, yes, worth it in time saved, youbetcha. Remember that it is your birthday weekend, and may I say Happy Birthday early as it were, I do hope that you enjoy your day celebrating however many times around the sun you’ve made. By the by, we used a construction adhesive from Loctite, and it worked great even with the fact that it was cold out when we attached it. Some came off later, but we were able to reapply them with no problems. Remember, if you go the mortar route, you will need to apply a layer of lathe down, like hardware cloth so that the mortar can adhere to the concrete. OK, sending you birthday wishes and your favorite dinner with cake, cheers!
Cheers to you, Matt, and the Fur Party Crew!
If all else fails, maybe cut one of the tubes in half. If it’s dried up, return them, but if not, you could butter the back of the bricks from dipping into the tube.
Happy (early) Birthday! I’m so glad YOU were born! I hope you have a wonderful birthday weekend!