My “New” Stained Chevron Table
![]()
I finally decided that a painted table top just wasn’t right for my little breakfast room. I wanted a stained chevron table top, but of course, that posed some problems.
If you’ll remember, I made this table out of cheap pine (or some sort of yellow wood), and I absolutely hate the way that pine looks when it’s stained. The grain turns orangish yellow, and just looks…well…CHEAP in my opinion.
Want proof? When I made this chevron wood table top a couple of months ago, I did try to stain it. And it looked AWFUL!! See all of that orange grain showing through?
![]()
(Psst…if you missed the “how to” on building a diy chevron wood table top, you can find those instructions here.)
So that’s why I decided that paint was the only option. But clearly, a multi-colored chevron table top just wasn’t right for my tiny condo. So I tried one color for the whole top, which I showed you a couple of days ago.
![]()
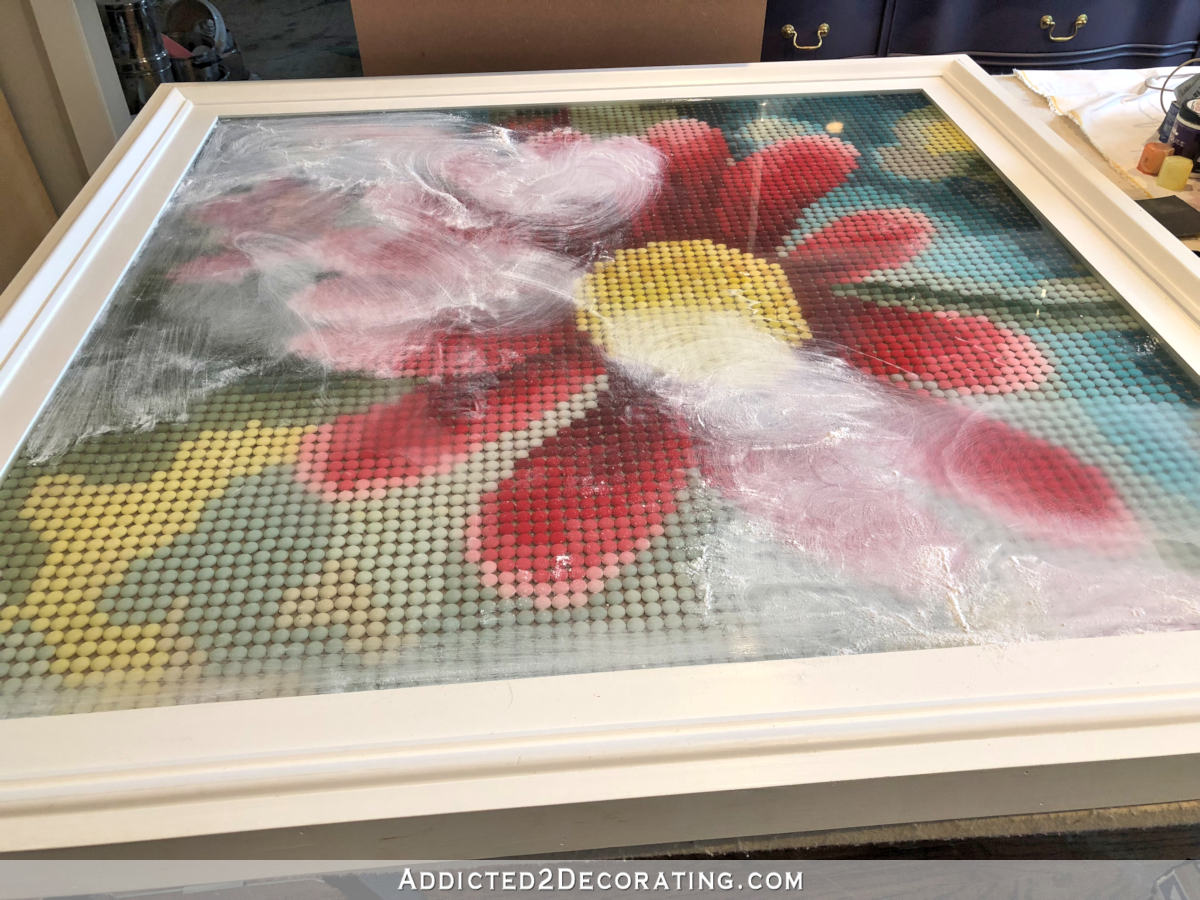
Obviously, a neon yellow table wasn’t going to do. So I dragged out my sander and sanded down the table top…AGAIN. Then I used a vinegar/steel wool mixture over the entire top just to take away some of the yellow color.
Then I was ready for stain. I remembered that I had some pre-stain wood conditioner, so I used that first, hoping that it would make this cheap wood take stain a little more evenly. Well, it did. And it wasn’t pretty. I mean, it SOAKED.IT.UP. And can you see how one column looks really dark, and the next looks much lighter? That’s just because of the direction of the wood. It’s kind of like sewing with fabric that has a nap to it (like velvet). Needless to say, I wasn’t crazy about this look.
![]()
Also, after sanding all of the yellow off of the table top, and staining it, I noticed that there was some yellow paint stuck in some of the crevices. That just wouldn’t work for me, so I got out my X-acto knife and dug out the yellow paint. It was very tedious and took about two hours. But that left me with all of those deep crevices between the slats of wood. That’s certainly not very practical for a dining table.
To be honest, at this point I was about in tears. I was ready to drag this table to the dumpster and wash my hands of it. In fact, I even got on Craigslist and looked for dining tables. I found one that I loved, and even called to inquire about it.
But I hate giving up. Buying a new dining table just because I want a new table is one thing. Buying a table because I’m giving up is quite another thing, and when it came right down to it, I just couldn’t let myself do it.
So I pressed on, and then had a happy accident. As I was sanding the first coat of polyurethane, the fine polyurethane dust fell into the crevices between the slats of wood, and I loved how it looked! It highlighted the chevron pattern that I love so much, but it was subtle.
![]()
But obviously, polyurethane dust would just dissolve as soon as I applied the next coat of polyurethane, so I got out some wood filler, filled all of the cracks, and then gave the entire table a good sanding to get some of that dark stain off and bring out the grain of the wood. I wanted the grain to show. After all, that’s a huge part of what creates the chevron pattern. But I just didn’t want the grain to be orangish yellow. And it wasn’t.
And after a couple more coats of polyurethane, I was loving my table!! I mean, I really love it! The chevron pattern shows, but it’s subtle and, dare I say, sophisticated! And I’m nothing if not sophisticated. 😀 (Just kidding. I’m far from sophisticated.)
![]()
The finish with the grain showing through almost gives the wood an aged look. And interestingly, the alternating dark and light columns have pretty much disappeared (thank goodness!!!).
![]()
And in fact, now the rows appear to be alternating dark and light. And I’m okay with that.
![]()
So now, I love my table again. I’m so glad I didn’t give up!!
And talk about a night and day difference from how this table started out!!
![]()
I still like that painted top…just not for my breakfast room. 🙂
This project was for my condo breakfast room makeover. Click here to see the whole before and after of the breakfast room makeover.

Or click on the thumbnails below to see other DIY projects that I did for my condo breakfast room makeover.
[categorythumbnaillist 494]

Addicted 2 Decorating is where I share my DIY and decorating journey as I remodel and decorate the 1948 fixer upper that my husband, Matt, and I bought in 2013. Matt has M.S. and is unable to do physical work, so I do the majority of the work on the house by myself. You can learn more about me here.


Looks beautiful!
Looks beautiful! Love it.
I’m so glad I follow your blog!!! I’ve been longing for chevron wood floors for some time now. Maybe one day I’ll get them. But unfortunately our low maintenance needs & lower budget with our hectic family of 6, determine we’ll be installing vinyl plank (faux wood) flooring instead. I recently fell hard for the flooring while installing it for an extended family member. Unfortunately, no chevron with that flooring.
I can’t tell you how excited & happy I am to see your chevron table. I’m so over the moon giggly about it!!! You see, it fulfills that chevron beauty with wood I’ve been craving. I’ve been loving on rustic, long, narrow, trestle style tables for some time when I realized it would perfectly fit our dining space & our growing family’s needs. Was determined we’d build one and finally found a base style I really like & will function beautifully for us. But hasn’t found a top I loved until now. Thank you so much for sharing & inspiring others like myself Kristi!
I love this version, I’m glad you didn’t give up!
I love both versions of the table, both are gorgeous.
I love it, Kristi! A lot to be said for perseverance and this proves it!
I’m so glad you stuck with it. It is beautiful!
This looks incredible; those that are enthusiastic about wood sanding will appreciate the beauty of the restoration process. I offer wood floor sanding services in Leeds, including dust free wood floor sanding. I’m truly passionate about the whole process and find the results so rewarding; a cost-effective and sympathetic process!
Kristie, I love how it finally turned out. It looks so warm and rich. Nice stain to go with the color of your cabinets and make the whites in your decor pop. Yeah for conquering the table and not giving up! Beautiful
Beautiful transformation! It is such a great table!
Leslie
I am sitting here feeling very envious about the fact that you have this incredibly unique table in your home. You were so right to keep persevering, this version is beautiful. Thanks for sharing with us! Anna
Good for you, Kristi! Your perseverance is impressive. This is the way your table wanted to look all along.
This came out really great! I’m glad you didn’t give up! =]
You receive an “A” for persistence!! The results are quite beautiful!!
I feel for you- I had a dining table that gave me fits, too! I love yours both ways, too bad you couldn’t have made it a reversible table! 🙂
You are amazingly persistent! I did like the painted top but have to admit that this stained table top is much better in your breakfast nook. Beautiful wood grain. Great job and again, I applaud your persistence!
Glad you did not give up either. It looks fantastic Kristi!
Your table looks great! Love the chevron pattern on the top and the stripe. I am glad that you did not give up. Thumbs up!
Truly wood sanding really aids in the restoration process of any wood. Your work really looks awesome and impressive. I enjoy reading your page and I hope to see more of this. Great work!
The 3D look of the chevron pattern is really kind of mesmerizing. I would love to have a floor like that one day.
Maude
I like the finished product and the fact that you stumbled across it by accident, I love it when that happens.
What a fantastic project! I’ll be linking to it on our Living Rooms pinboard. Check it out at pinterest.com/homedepot later this week!
– Chante
Wonderful color on the table top! Can I ask what kind of stain (brand and color) you used after the vinegar/steel woolcoat?
I like the stained a lot better than the painted table top. Very nice! I admire your creativity and perseverance