DIY Upholstered Wingback Dining Chair – Finished! (How To Upholster The Frame, Part 2)
Hey there! I know…it’s Saturday. I don’t usually post on weekends, but I’m thinking that might change. Obviously I haven’t been keeping a very regular schedule lately, and rather than trying to force a schedule that just isn’t working for me lately, I think for a while I’ll just try posting whenever I want to regardless of the day of the week, or time of the day. You can give me your thoughts on that. And if don’t want to miss anything, but think you might if I post randomly, you can always subscribe (in the Subscribe section on the right sidebar) and get posts sent to your inbox. Anyway, let me know what you think about that idea.
I finished my first wingback dining chair yesterday! Now I just need to finish up the second one, and that will be one major project I can cross off of my list.
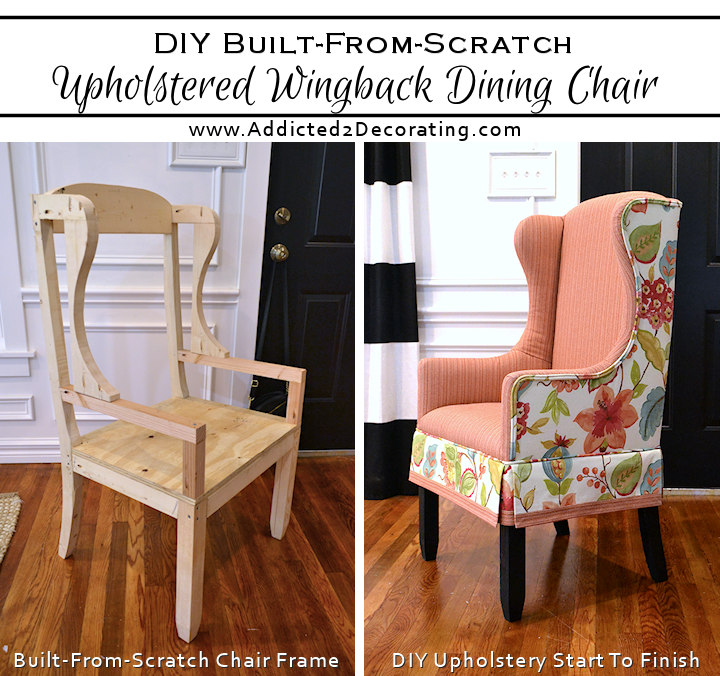
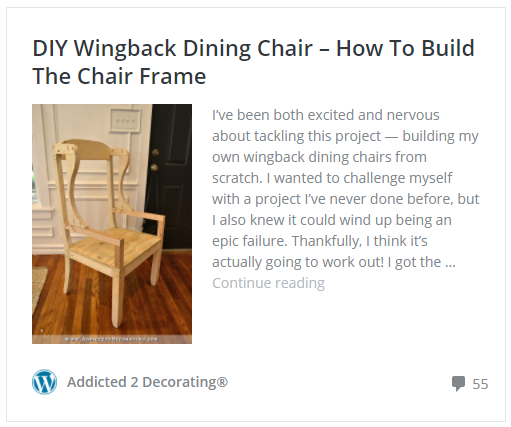
In case you missed the first to parts of this project, you can click here to see how I build the chair frame.
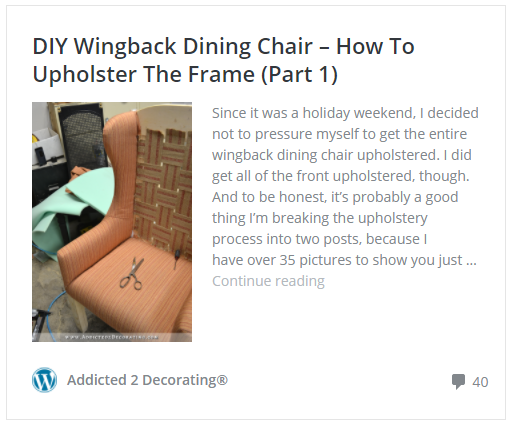
And then you can click here to see Part 1 of the upholstery process.
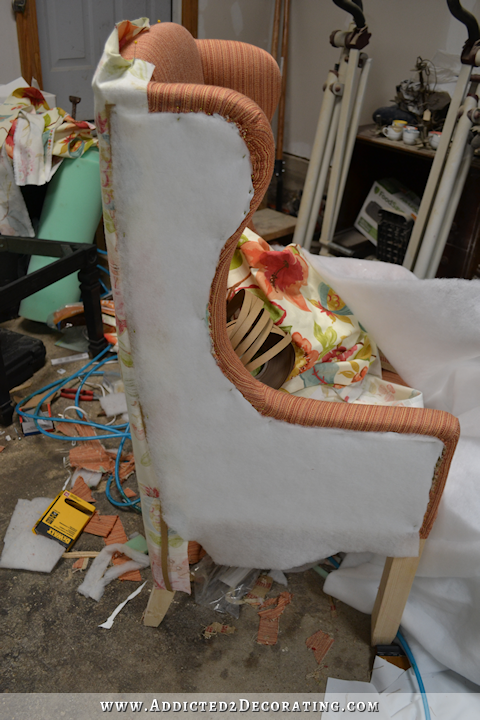
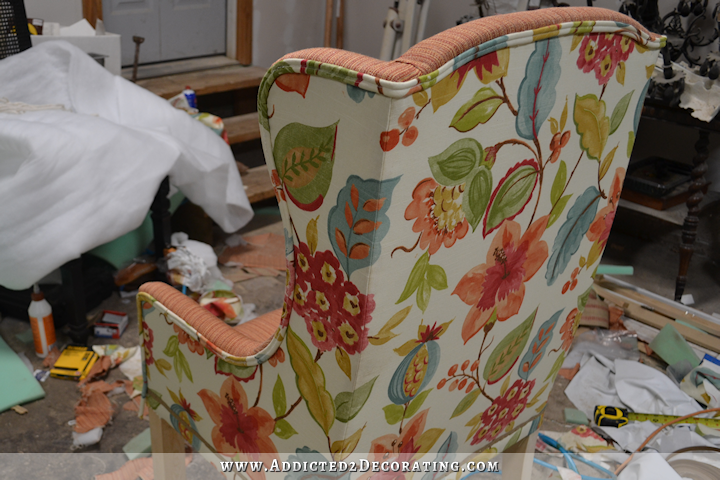
So at the end of the last post on this project, the front of my chair was upholstered…
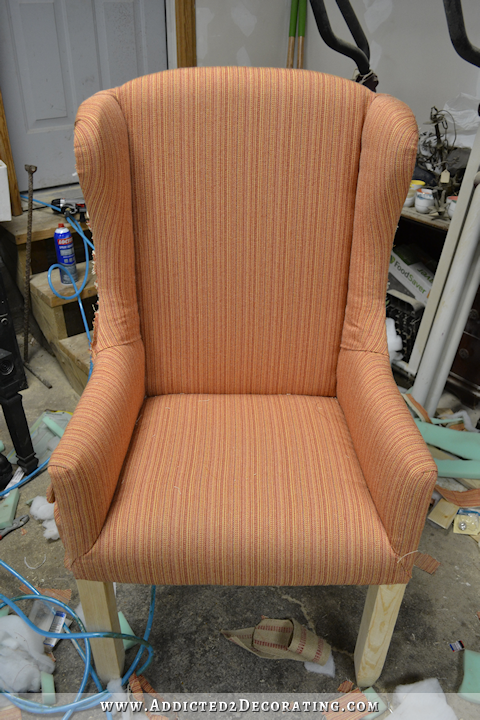
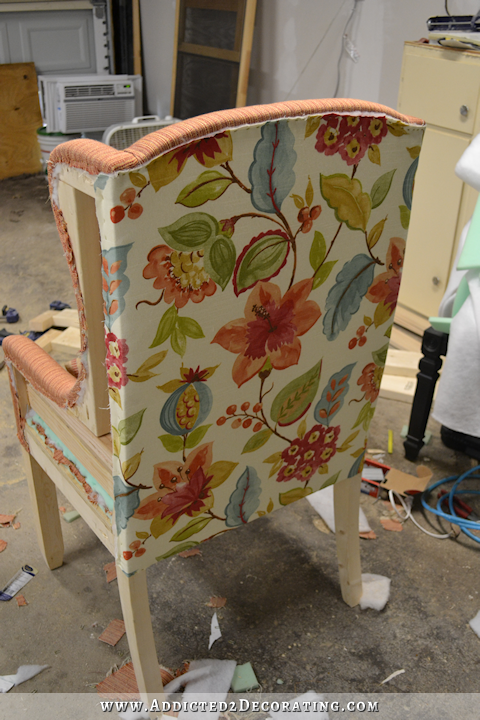
And I had cleaned up the back and the sides (meaning that I made sure no foam, batting, or fabric was sticking out past the frame) so that they were ready for upholstery…

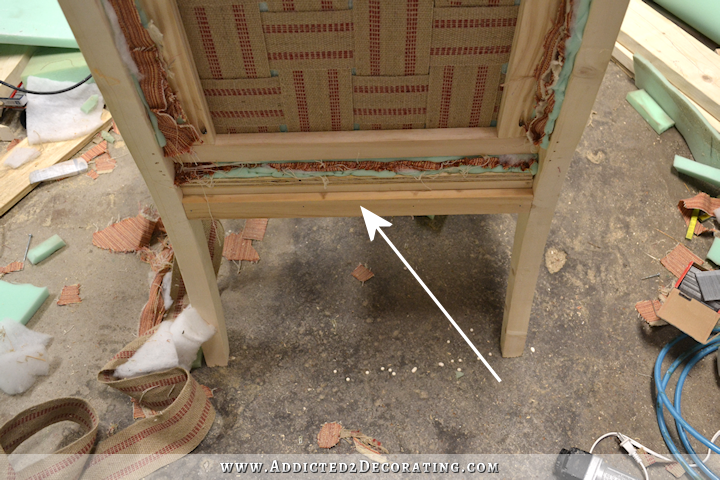
Before I could start on the back upholstery, I first had to add one more wood support piece at the bottom of the back, flush with the side frame pieces. I made sure that the bottom edge of this piece was level with bottom edge of the side seat support pieces, and this just gave me something to wrap fabric around, and later to staple the skirt into.
Using my webbing stretcher, I added jute upholstery webbing to the back of the chair…

…and then covered that with fabric. Any fabric can be used for this, but I used blackout lining.

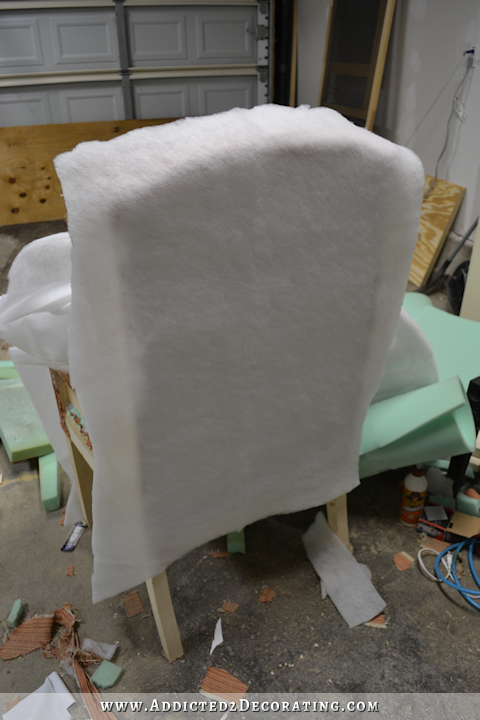
And then on top of the lining, I used spray adhesive to attach a layer of polyester high-loft batting.
And then I attached the fabric. On the top edge, I stapled right on top of the fabric about an inch from the top of the chair. On the sides, I wrapped those around to the sides of the chair and stapled the fabric into place. And then on the bottom, I wrapped the fabric under the chair frame and stapled.
Here is a close-up view of the top edge where I just stapled right on top of the fabric…
And a view of the side, where I wrapped the back fabric and batting around to the side of the chair and stapled it place from top to bottom.

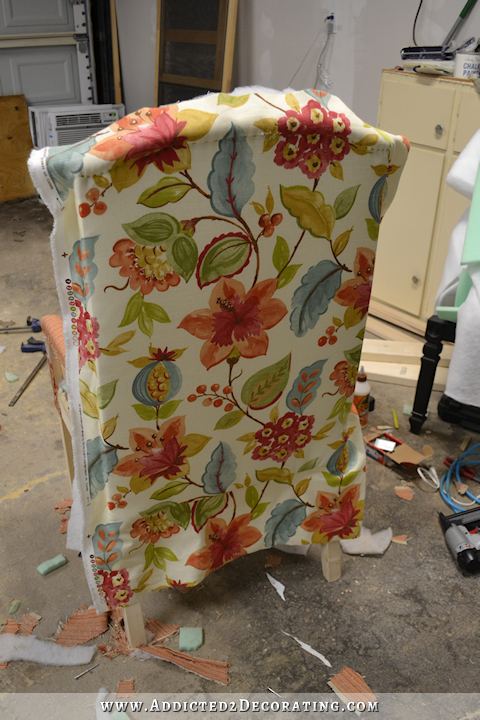
And once the entire back was stapled into place, and all of the excess fabric and batting was trimmed, it looked like this…
Okay, now let me pause, and explain something…
I know there are those of you who do upholstery who are yelling at your screen right now, “KRISTI, YOU DID IT WRONG!!!!”
Yes. I did it wrong. I’m well aware of that. 🙂 When upholstering a chair or sofa, the proper order is seat, arms/wings, back rest, chair sides, and then the back. In other words, the back is the last thing you’re supposed to upholster, and the side edges of the back require tack strips, like the ones that I used on the entryway chairs.
If I were doing this the “proper” way, I would have first attached covered welt cord all around the sides and the back, and then I would have upholstered the sides, first using flexible tacking strip to attach the fabric around the curves of the wing and the arm, and the wrapping the fabric on the back edge around to the back and stapling it into place. And then I would have finished up the back of the chair by using cardboard strip along the top and tack strips on the sides.
And voila! That’s the proper way to upholster. If you’re completely lost, this is probably the best video I’ve seen of the process. (This guy’s videos are amazing!!) Start watching at 7:46 to see the proper way to upholster the sides and back of a chair or sofa.
So why did I do mine in the wrong order, using non-standard methods?
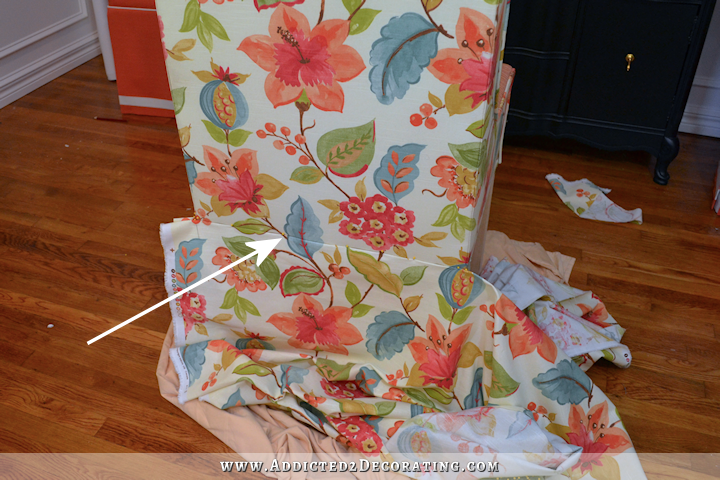
For one reason only. The fabric that I used on the sides and back has such a large pattern, and more important to me than doing things in the proper order and using the proper methods, was enduring that I matched the pattern of the fabric all around the sides and the back of the chair. I didn’t want any breaks in the pattern. And try as I might, I couldn’t figure out a way to use the proper methods while ensuring complete accuracy in matching the pattern. So I decided to start with the back, and then do the sides and match the pattern on the sides to the back.
Make sense? 🙂
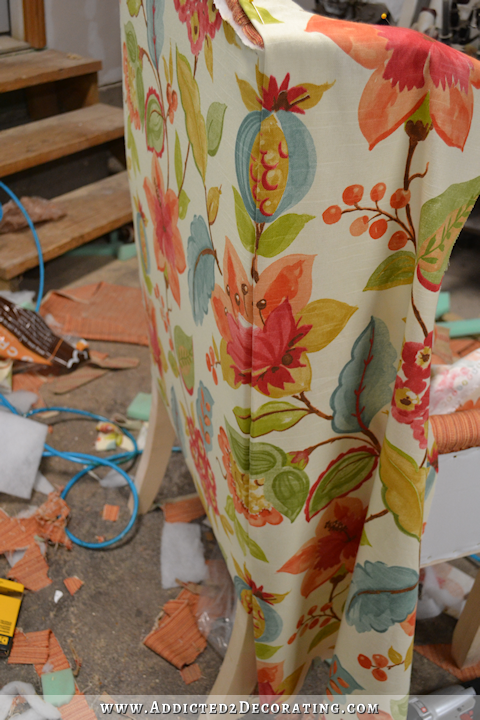
So after attaching the fabric to the back, I worked on the sides, starting with attaching more jute webbing…

…and then covering that with a layer of fabric (i.e., blackout lining, but any fabric can be used).

Then I attached the fabric along the back edge. I used cotton fabric, which creases easily just by pressing it with my fingers. So starting at the top, I folded and creased the fabric so that the pattern would match the fabric on the back. I did this all the way down the back edge, using just a few staples under the fabric to hold the piece in place.
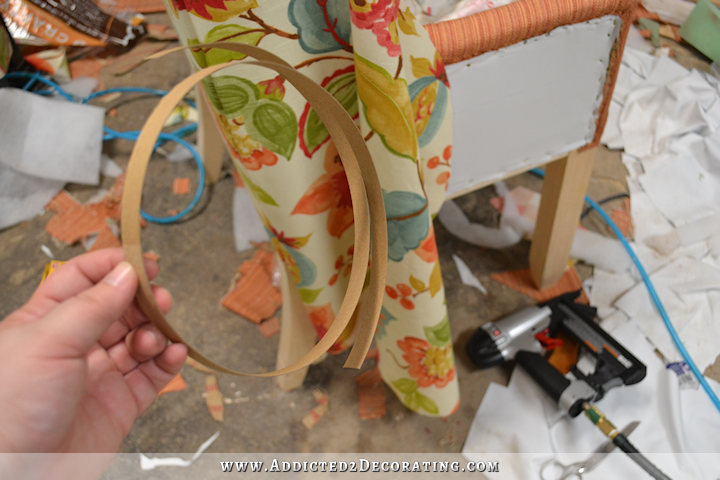
Here you can see a close-up of the crease that I pressed in with my fingers, but because I had not yet used cardboard strips, and the fabric was just being held on with a few staples here and there, it wasn’t yet a tight fit.

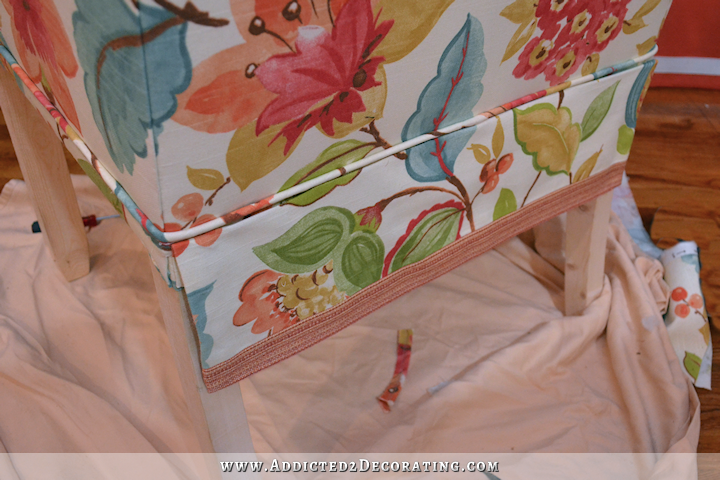
With the fabric edge creased and stapled into place all the way down, I then went back and added the cardboard strip. It looks like this — just a 1/2-inch wide strip of cardboard.
And I stapled it into place so that the cardboard was perfectly lined up with the back edge of the chair.
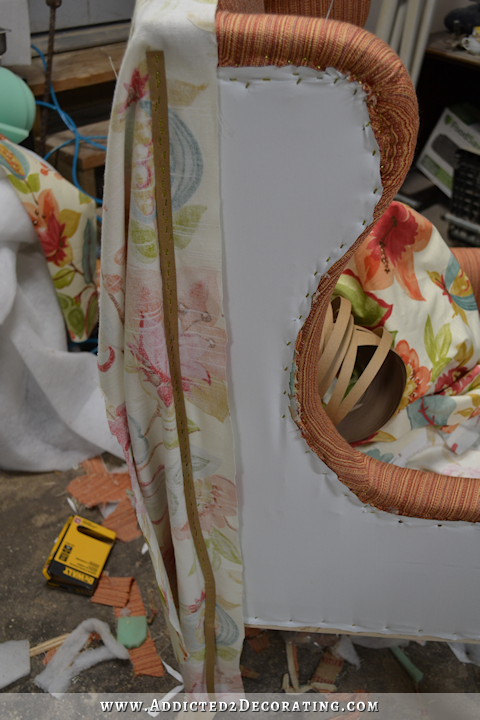
Next I added a layer of batting, making sure to cover the cardboard strip so that it wouldn’t show through the fabric.
And the I pulled the fabric forward over the batting and stapled it into place. Around the edges of the wing and the arm, I stapled right on top of the fabric about 3/4″ from the edge. On the bottom, I wrapped the fabric under the chair frame and stapled it into place.

With the piece stapled into place, and the excess fabric cut away, it looked like this…

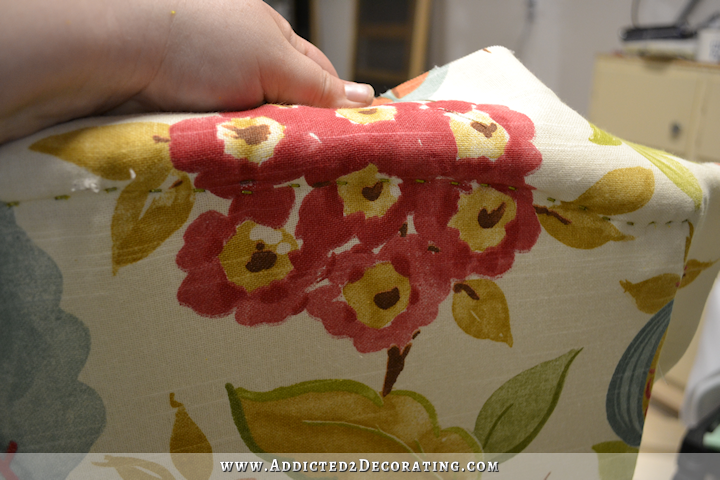
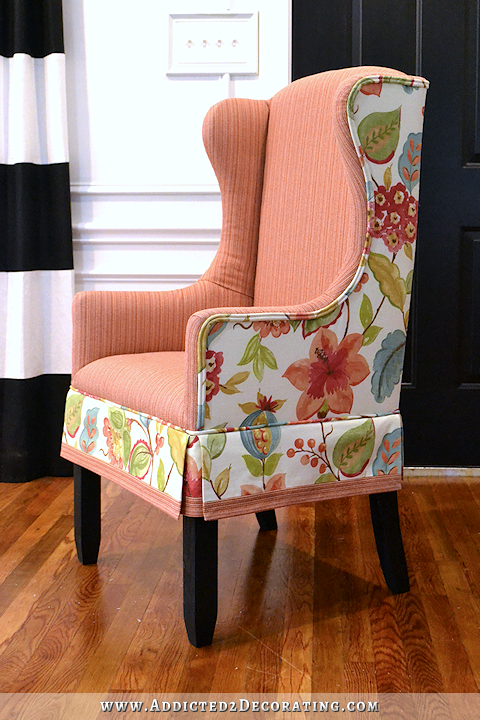
And here is my perfectly matching pattern on the corner where the side piece meets the back piece…
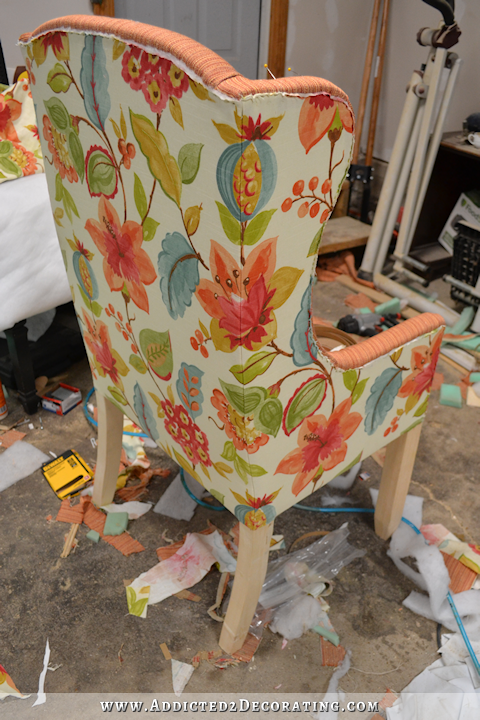
I repeated that same process on the other side of the chair.
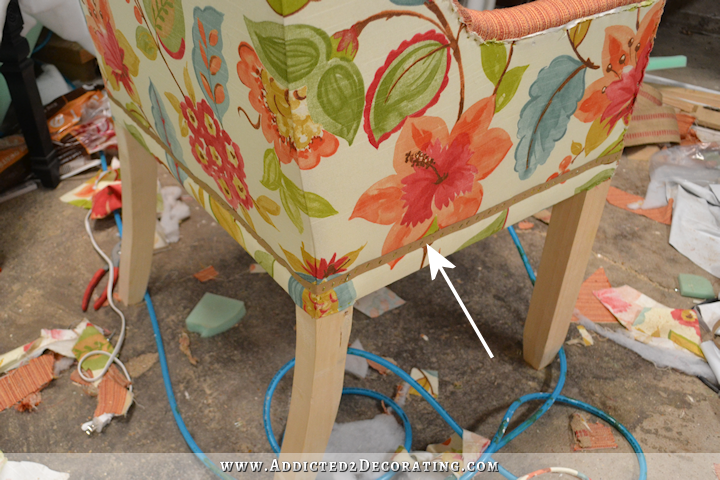
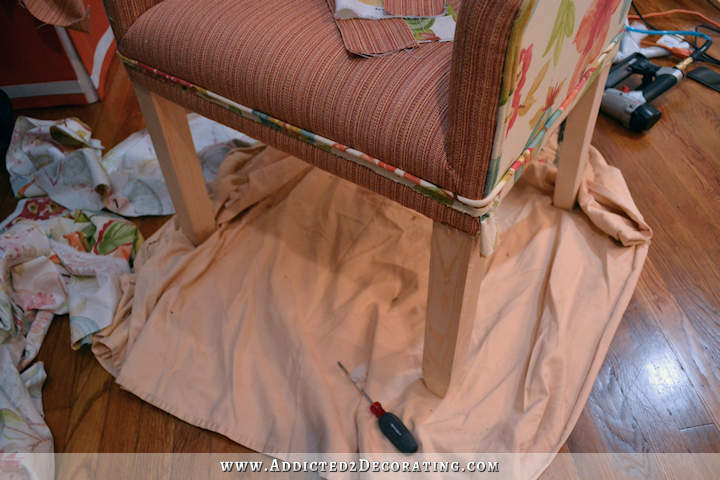
With the sides and back completely covered, I then added a strip of cardboard on all four sides of the chair, measuring up 2.5 inches from the bottom of the seat frame. This cardboard strip would be used as a guide for the skirt placement.
Since I didn’t do the back and side upholstery using the standard method, that meant that I was left with staples and raw fabric edges that needed to be covered. I could have purchased any coordinating ready-made trim from the fabric store, but I recently purchased a double welt foot for my sewing machine, so I decided to try that instead. I made several yards of double welt cord…
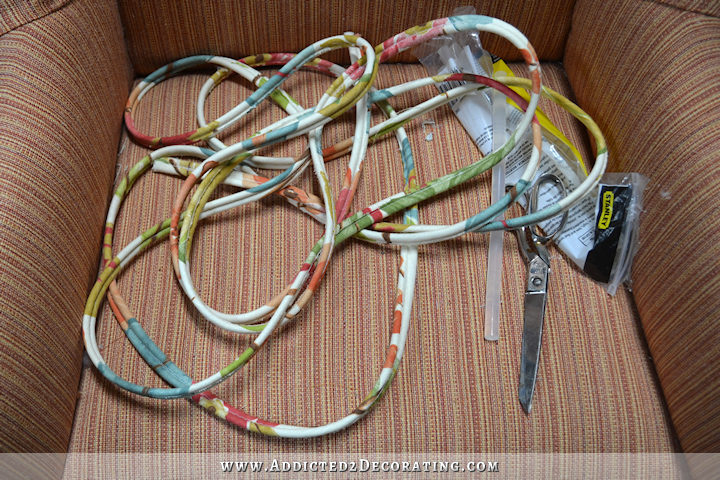
…using this easy method of making continuous bias tape without having to sew strips together…

And then attached that with high-temp hot glue.
Just a note: It is perfectly acceptable to use hot glue on upholstery as long as you’re using quality, high-temp glue. I also suggest using an actual made-for-craftspeople gun rather than those small, cheap glue guns that you always see in the checkout lanes at craft stores.
I bought my big glue gun at Home Depot, where I also buy my glue sticks.
Anyway, while it’s perfectly acceptable to use hot glue, I will readily admit that this is a non-standard use of double welt and hot glue. Double welt cord is generally used to trim seats and backs on showood chairs where the fabric meets the wood frame. But I’m okay with doing things unconventionally. 🙂
The final part of this chair was the skirt. I started by folding the fabric so that the pattern matched along the top edge of the cardboard strip that I stapled on as a guideline for the skirt.
Then I pinned the fabric into place and cut a piece large enough to make the skirt. This was just a rough cut. I measures and cut the pieces accurately after I unpinned the fabric and sewed each piece.
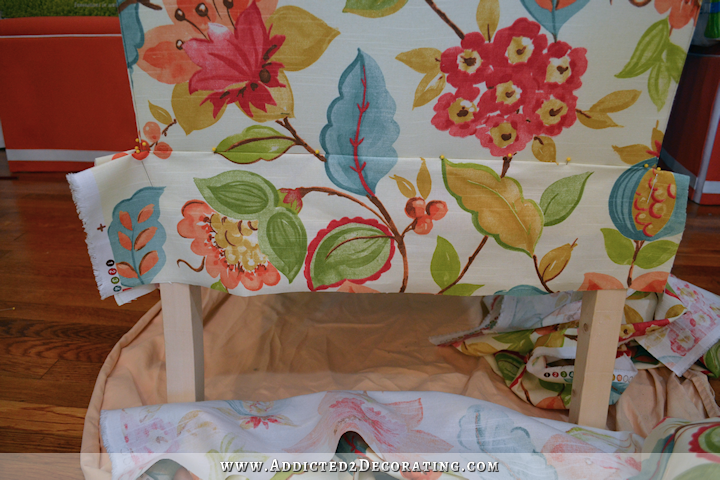
I repeated that for the other three sides.
Then I removed the pinned fabric and stapled welt cord (single cord this time) to the cardboard guide.
I didn’t take detailed pictures of the process for making the skirt pieces, but the skirt is made up of eight separate pieces — four wide pieces for the four sides of the chair, and four narrower corner pieces. Each of them were made exactly the same way, and each piece is lined.
First, I sewed an accent strip to the bottom of each skirt piece in the coordinating fabric, and then I used this tutorial for making mitered corners.
I only mitered the bottom two corners on each piece, since the two top corners wouldn’t show. Also, while I did line my pieces as shown in the video, I did not top stitch the lining into place. I’m not a fan of topstitching, and especially not on upholstery pieces. Instead, I attached my lining (I used blackout lining) using permanent adhesive tape for fabric.
As I finished each side piece, I stapled it into place with just a few staples. I didn’t use cardboard strip at this time.
I attached all four side pieces in the same way. Then I attached the corner pieces using cardboard strips pushed as close to the welt cord as possible. After all four corners were attached with cardboard strip, I filled in the middle areas of each side skirt piece with the cardboard strip.

And finally, I painted the legs black. Yes, a normal person would have done that before starting any of the upholstery, but y’all know by now that I often do things out of order. 🙂
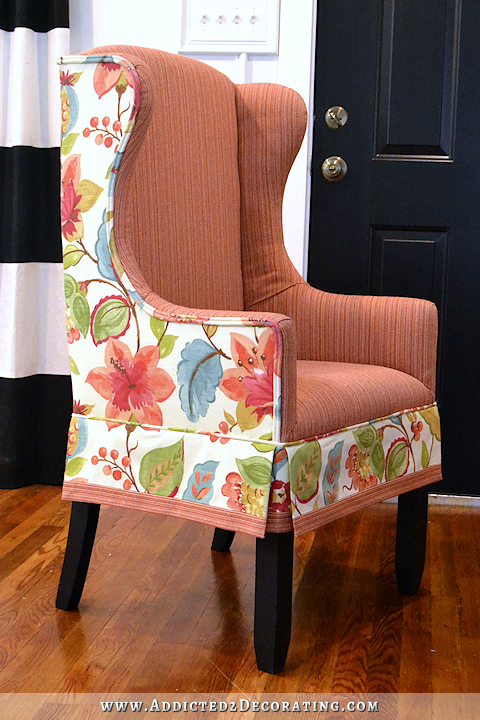
And done! With all of the patterns matching from piece to piece.

I’m so glad I went with this floral fabric. I love those huge flowers, and the colors are perfect for me!

But just a word of caution: When you have a large pattern with a big pattern repeat, you end up wasting a lot of fabric! I originally bought six yards of the floral fabric for the two chairs. I cut out as many pieces as I could for both chairs, but had to go back and by more. They only had four more yards in stock at Joann Fabric, so I bought all of that, but I STILL don’t have enough to match patterns for the skirt on the second chair. I’ve got lots of fabric left over, but just none with the right patterns on it. 🙁
So that’s one down and one to go. The next one should be much easier now that I’ve figured out the process.

Addicted 2 Decorating is where I share my DIY and decorating journey as I remodel and decorate the 1948 fixer upper that my husband, Matt, and I bought in 2013. Matt has M.S. and is unable to do physical work, so I do the majority of the work on the house by myself. You can learn more about me here.


STUNNING!!!! This is my favorite project ever of yours.
100% agree…. You are amazing
I don’t care when u post or don’t post……..just post! I think the success of your blog is that u have hooked me and now I wait and wait and wait to see the finished rooms and then the next room and the next room and the next room. I am having so much fun watching you.
I can feel your happiness in your posts and prefer those, so post then. No pressure RIGHT?
This dining room will look awesome and I can’t (but must) wait
Thanks
First, let me say that I love your chair! You did a fabulous job and I really like the fabrics that you selected. I’m not sure about the matte black on the legs, but then I am not looking at it in person, either. You did high end work and it seems that a little bit of a sheen to them would really compliment it. However, it’s your home and your chair, so do what is most pleasing to you 🙂
Second, I think that you should post whatever, whenever you want! It’s your blog, and yes, I am reading it, but I can read it whenever it’s convenient for me, so why shouldn’t you (the one who is doing all the work) be allowed to post whenever it’s convenient for you?
I was unsure about the legs, too. I think you’re right about them needing some sheen.
I say POST WHEN YOU WANT TO! I’m subscribed and get them all! You are always so busy DOING stuff that whenever you decide to sit down and share should be when it works for you!
Yes, I love the surprise of getting a post on a weekend. Schedules are overrated.
Hello Kristi,hope we’ll.Am Moses a carpenter from Uganda East Africa.Where can I please get templates for the queen Anne wing back chair? Secondly is there a school that teaches upholstery in the U.s and can I fly over to enroll for a short course pls.
That is unbelievably beautiful! Kudos!
Absolutely perfect! I love the contrast of the tiny stripes vs. large floral print! I have a Joanns in town and another not far from here, if you’d like me to look here for the fabric.
Thank you so much! I might take you up on that if I can’t order it directly from Joann.com.
Kristi, I’m sitting here in my office with the stupidest grin on my face! I am in LOVE with your chair, and so incredibly impressed that you built it from scratch! That upholstery job and fabric matching are so fine and precise, it just makes my OCD heart sing LOL! Standing ovation for you.
Also, I’m in Los Angeles on the west side. There are a number of Joann’s stores around that I can get to fairly easily by driving in various directions. If you need to expand your search area for your fabric, I’d also be willing to do some personal shopping around here for you, just let me know!
Thank you so much for the offer, Kimberly! I found a 2.5-yard remnant at FabricGuru.com, and I’m thinking that will be plenty. But if not, I’ll certainly call upon you and Debra to help me out! 🙂
Just let me know! Also, I have fairly easy access to all the fabric shops in downtown L.A. If you need more than that 2.5-yard remnant and for some reason Joann’s doesn’t pan out, I’d be willing to trawl DTLA to find it for you!
Oh! I have to say – when I first saw the fabric on the chair, I thought it was a bit boring, and sort of not what I expected. But with the finished product, trim and back and everything, I am blown away! A beautiful chair and a beautiful job!
I agree! The initial fabric didn’t wow me but combined with the flower pattern it’s just beautiful. I LOVE IT!
I love your chair and I think it will look great in the room. Kudos to you!
Post whenever works for you because I’ll read them whenever I see it in my inbox!
In love with this chair – no words to describe my amazement!
hi the chair looks great ive never seen chair frames sold in the uk like that,ive made a leather chair cover b4 have it in my portfolio ive made covers for many chairs and sofas and its great to know that I still love sewing,im designing some leather blinds at the moment will post some pictures soon
What a lovely surprise to find you here on Saturday!
The first thing I noticed on your beautiful chair was that you’d matched the pattern perfectly on the skirt, so I was sure the rest would be, too. Who cares whether you did it out of the usual order as long as the result is what you want? Your chairs are beautiful, and you have every right to be proud of yourself! Brava!
Will you be able to order this same fabric so that not only the pattern matches but also the chairs match exactly? I hope so!
The lady at Joann said they have lots of this fabric in their warehouse, so I should be able to order it. But knowing just how much to get so that I have the right patterns is harder without having the fabric in hand. I hope I guess right!
When in doubt, order two extra yards. It’s worth the expense! With this big repeat, can you consult with a local upholsterer?
I’d suggest measuring how often the pattern repeats. Then check if there are overlaps between the patterns you need to cut, so you know how many repeats of the pattern you need. So once you know that you need, say, 4 repeats of the design, you can order a length of fabric that corresponds to 5 (to account for the pattern being cut in the middle on the edges).
Absolutely beautiful! The attention to detail with the pattern matching is fantastic!!
Oh my emotions are going crazy for your talent and patience. And the coordinating fabrics are just delicious! This may be your most impressive project so far, but I’ve said that before. So, I’ll just say Ooh la la, and thanks for sharing with all of us!
Brilliant! I love following your processes when you’re figuring things out…and the pattern matching is just gorgeous. About posting when the project calls for it rather than on a particular schedule? I say do it when it seems right to you. This Saturday post came like a little weekend gift. Thanks!
Wow! I love this chair! Beautiful craftsmanship, too!
I agree with the others about posting when you want. We’ll read your blog whenever posting is most convenient for you.
Hi Kristi, I am so impressed with everything you do. This chair is beautiful. I have really enjoyed watching how you put it together. The matching patterns amaze me..
Not trying to rush you in any way, but, I am so anxious to see the final result.
Your entryway is spot on, I love it all. I also love colors. Thanks for sharing.
You and your hubby, have a nice weekend.
Peggy
I use Bloglovin to follow my favorite bloggers, so no matte when you post, I get it. It’s your blog, you should post when you feel you want to! 🙂
So the chair. WOW!!! Absolutely beautiful. And matching the pattern is such a high end touch! Maybe you could call a Joann’s in Dallas to see if they had more of the fabric so the other chair will match up as well? Just a thought!
I never doubt your taste or your methods. It came out gorgeous!
Absolute triumph – love the plain and patterned. Can I say I think the black legs look clunky and heavy looking compared to the fabric – but I wish I had your determination and talent. Fantastic job.
Kinda my thought too. IMHO, I kind of think the legs don’t go with the gorgeous chair.
Just beautiful! I am now really anxious to see the whole dining room completed.
Beautiful work! I LOVE the floral fabric! And what a nice surprise on a Saturday – your post was a welcome and positive distraction from all the sad news from the last few days that has been filling my Facebook feed.
Agreed!
Stunning Kristi. I was thinking as you matched the pattern that I was going to be sure and ask how much extra fabric would be required! A LOT. Also, cutting on the bias for the welting would have used additional fabric. But I think it really shows quality when everything matches. When purchasing upholstered furniture I always look for that. Especially with something like a plaid. LOVE the double welting and don’t care if that is an unusual way to use it. Just stunning. What does using the webbing instead of something give you? I subscribe so don’t care when you post and when I saw it pop up first thing I thought was Kristi doesn’t usually post on Saturday!
The webbing gives added strength to the back and sides. You know how, when people pick up a chair, they often grab it from the back and put their knee right in the back of the chair to give it a nudge? If there’s only a couple of layers of fabric there, and no webbing to give it the much needed strength, a knee to the back of a chair like that can actually rip the fabric right off.
I agree…post whenever you want. I’m subscribed as well, so I won’t miss out. Love, love the chairs, although I did think the skirts would be longer. I’ll have to study on this. LOL. It is absolutely amazing though.
OMG first let me say that your welt cord tutorial is going to SAVE my life! I just redid two queen Anne side chairs that were my Gram’s. I loved doing every part of them. But now I’m at the double welt cord stage and it’s been 4 months! (Yeah, I know).
This probably gave me the kick in the pants to finish it! I made small batches of single welt for the inside curved seams, but the outer double welt project has just stopped me cold! I felt like such a lazy lady because I had not gotten up enough energy to do both inner and outer edges of BOTH chairs, (it’s YARDS and YARDS of double welt cord to be sewn). I was actually starting to look at gimp as a possibility! And that is only because the settee that was also given to me, is still original and was made with gimp. Thank goodness it’s still in perfect shape!
The chairs are just incredible! I don’t think I’ve ever read a blog where somebody actually MADE a chair from scratch! You never cease to amaze!
Great job lady!!!
For these chairs (both chairs) I needed 12 yards (!!) of bias tape to make welt cord. On my decorator fabric, which is about 55 inches wide, I just marked off nine diagonal rows, sewed the seam on the side, and then the long strip. It was SO fast!! It really does make the job of covering cord much less of a hassle. I used to avoid it also before I learned this method. Now it seems so easy..and fast!
YAY!! Seriously thank you so much! I’m actually stoked to get them done now!
I love it!
Who cares what the order is “supposed” to be, as long as the outcome is the same. ( BTW, that video was awesome!)
The chair came out stunning, and I am so in love with the floral print. Hope you can find more of it somewhere. I promise to wait until fall to maybe hunt it down and buy some for myself. 😉 I may want to make roman shades with it!
I personally don’t mind when you post, I follow on facebook, and am there more than e mail, so I never miss a post.
You never cease to amaze me! Your chair is simply stunning. I was surprised and excited to see you in my inbox today 🙂 Between email and Facebook posts, I never miss a post from you. I say post whenever you want.
As always you do the most stunning work. I love the color selection and even the legs!! Can’t wait to see the whole dining section come together. And post when you like. I’m on the other side of the world to you so I am happy to see a post whenever!!
I am utterly amazed at how you pulled that off. Its stunning.
Oh Kristi, your chair is simply beautiful! It really brought a smile to my face and just made me feel happy! Such fabulous fabrics and, of course great work. I’d love to know which fabric it is, please? (Doubtful I could buy it in Australia, but one never knows).
It was such a lovely surprise to receive your post today, our Sunday! I think you should post whenever you feel like it, and keep your blog a thing of joy for yourself, not a thing you feel you have to do. Whenever your emails appear in my inbox, I am just always happy, and grateful to receive them. Thanks Kristi.
Seriously, how many people can say they actually built an upholstered chair from start to finish! It’s beautiful. It’s a wonderful tutorial, I followed it with great interest. Love the chair, loving the room, and really admire your work.
Your chair is amazing! When this dining room is done, it will blow us all away. What am I saying, it already does before it’s finished. I believe the other rooms might be easier until you get to the sun/living room. Post when you feel like it, you know everybody is going to read no matter when! I am so proud of you!
It’s so beautiful! You amaze me 🙂
That is an awesome chair! I have been showing hubby your step-by-step Reno projects and he is just amazed as I. I love the prints you used. Maybe you can do some pillows from your extra fabric.
Those chairs will be amazing! I’m always so amazed by what you tackle and how well you execute, always thought out to every last detail. Very professional, no, better, because it is so personal. You are an inspiration!
We are totally gobsmacked at the ballsiness of this project!!! You get Triple A Plus for the guts to take it on. The chair is incredible, and the attention to detail is outstanding. Wonderful job!
Your amazing! Beautiful work!
Kristi, your chair is simply stunning! It boggles my mind what you have accomplished in your home by yourself. You truly are a jill of all trades…and have mastered all!
Like someone said previously, I wasn’t impressed with the first fabric, but seeing the second, and how it
all goes together is fabulous ! I am totally impressed with the entire project. I have a use for those
cardboard strips …where did you get them ?
I bought mine at Joann Fabric. It comes in a big roll, but it’s not expensive at all. Or if you have a local upholstery supply shop, they’ll for sure have it.
Thanks !
Okay Super Girl,
Can you hear that?
Standing ovation from Arizona. LOve iT.
You are really something !
Oh my word!! That is so gorgeous. The fabrics you chose are stunning and you did such a good job on the upholstery job. You made it look easy but I’m sure it was not. I love it!! Sharing on Facebook and pinning.
I don’t care how you did it – right way, wrong way – whatever. The chair is beautiful!! Love that floral!! Well done once again.
ps. it doesn’t matter to me one wit when you post. I will read everyone any day of the week 😀
Are you kidding me? That looks AMAZING!!! I’m floored – and that may be the first time in my life to use this expression! Well done!!!!
Absolutely stunning and beautiful
I love your chair! You have such a clear idea of where you want to arrive, so to watch you work out step by step how to get there is so educational. Thank you for sharing your process.
Just wow! You are amazing. Thank you for posting the tutorial. This chair is just incredible. You are such an inspiration. <3<3<3
What can’t you do? You and your work are amazing!
I love reading your blogs! These DIY wingback chairs are absolutely stunning! I was wondering if you could share a ballpark figure of the cost of making one? Minus the tools needed. I want to try, but I have to be reasonable with my projects…especially since I have no need for one of these chairs. LOL
I say post when you want to post. We can read it when we get ready, so why shouldn’t you post when you get ready?! Thank you so much for sharing with us. It’s always a pleasure to read your posts.
Marti
I totally meant to tally how much it cost, and completely forgot about it! I’ll work on that and add that info to this post.
Absolutely Gorgeous!! And your Tutorial is amazing! Thank you so much for being such a wonderful teacher for all of us!!!
I love this chair, the fabric choice and everything about it!! I love getting your posts. Send them whenever you’d like.
I don’t care what day or time you make a post. I will read them. And I LOVE the chair. It looks amazing.
I have been in awe of former projects but I believe this one tops them all. I have done some carpentry, some remodel, some upholstery and a lot furniture rebuild and restore or paint but “Never ever have I ever ” thought I could build a chair like this from scratch. To You I bow down !!!! Nor do I think I ever want too but there is now a magnificent tutorial for those who do. I don’t think I have the talent or patience for this. You rocked it
Also forgot to say post whenever you like I have always been subscribed. I do anxiously await what you post though it who wants to be tied to a schedule when creativity does not.
Kristi, you are amazing!!! 🙂
THIS IS JUST SUPER AND YOU ARE A SUPER-WOMAN! CONGRATULATIONS FROM BELARUS!
Kristi,
ou are nothing short of amazing! I have read your blog for a couple of years now and don’t think I’ve commented, but I am am just blown away with this project! The quality of this piece is incredible! You are so unbelievably gifted!
Just an aside, one of my favorite projects of yours was the piano when you refinished it in a wood tone. It wasn’t what you wanted, and you changed it, but I thought it was absolutely beautiful! I’m always amazed!
Best to you!
Carrie H.
Massachusetts
Beyond impressed! You are a GODDESS and my hero! So inspired to finally create my own chairs!
Are you kidding me? This is absolutely amazing. Is there anything you can’t do? Great job. Simply stunning.
I’m standing up and applauding! This is the K2 of DIY’s and you hit it absolutely out of the park! Brava!!! I think some rectangular lumbar pillows from the leftover floral fabric would look smashing so order don’t worry about over ordering.
Is that “K2” as in the mountain, as in mountain climbing? Just wondering why not the “Everest”, LOL?
Well up until a week ago, I’d have chosen Everest, but my daughter(who has been watching several of these Netflix mountain climbing disaster shows) told me K2 is actually more of a challenge. Not the climb up but, more specifically, the descent is the cause of most deaths. Anyway, in the vernacular, I realize I should have gone with Everest as it’s more commonly associated with the pinnacle of difficulty. This chair is, to me, both summits rolled into one. I am in awe…! And I wish Christi lived next door so I could watch her accomplishments and have her hold my hand while I leap off into another of my projects. LOL
Wow! Just gorgeous and so YOU! I know that is YOU because I read your blog religiously. 🙂 In fact I have been running 100 mph all morning and finally sat down to recharge and your blog helps me do that. Isn’t it interesting that I can relax to all your hard work! 😅
I think you have more than paid for your new sewing machine with this project! Just beautiful!
WOW!!!!!!! You are amazing!!!
I love the fabric combination and the black legs. It turned out stunning! Will these be for your dining room table? That would explain the need to make your own frame, since a typical wingback probably would sit too low and be too wide for the table. Are they comfortable? I am enjoying seeing you do all this work , and enjoying looking at the beautiful fruits of your labor vicariously, ha, ha! I am just glad that I don’t have to do all that work!! You make it look easy, but I know it would be rather difficult and frustrating for most of us, and it wouldn’t probably come out looking half so professional!
And, I agree, post whenever you like. I didn’t even realize that you didn’t post on weekends–I just never paid attention before!
I like the idea of you posting when you feel the need to post.
And, like you…..I’m rather unconventional in the way I go about accomplishing things so I say whatever works to get the job done to arrive at the desired outcome is the best way to go.
You go girl.
and I love that fabric.
FABULOUS job, Kristi! The matching pattern looks so professional, and the combination of floral and stripes is just classic. A custom chair like this would cost megabucks. So, it looks high end, how does it sit? Is it comfortable?
You’re so talented ! Wow !
How long did it take you to get this awesome result?
I subscribe too so post whenever you feel the need..!!! I love the chair. AMAZING…!!!
This chair is absolutely stunning and so gorgeous Kristi. You must be so proud how it’s turned out. I’m blown away by your attention to detail (matching the pattern, making your own welt/piping) and how very professional your chair has turned out. You really are a superwoman!!!!! I just love the floral fabric with the combination of the front fabric……and so you!!!!! Your dining room is going to be so amazing.
I follow you on Feedly, so I always get your blog post, and yours is always the first one I look for……you are truely an inspiration and you give me so much confidence to tackle DIY things. I say to myself, ‘if Kristi can do it, I can do it’. So thank you Kristi.
I’m blown away! Your talent, style, and constant creative productivity keep me coming back every time, so post whenever you want to! Congrats on the gorgeous chair and good luck with the rest!
Love it Kristi! I really like the contrasting fabrics. The chair looks so happy! the end product turned out really well. It looks like you painted the legs black, but they look so matte. I would think a little bill of glossy paint would look good on the legs.
Well, I love the chair, and especially how you got all the patterns to line up!! I hope you get the rest of the fabric you need for the 2nd chair!
Kristi,
Oh my gosh – it’s so beautiful. Like someone said above – it made me smile just looking at it.
Post whenever!
Can’t wait to see the room when you are finished. It’s going to be incredible.
A
You are amazing! I’m in awe of your skills.
You have such amazing vision – absolutely love it :)!!!
The way you matched the pattern at the corner was astonishing! As I was scrolling down, I didn’t imagine it could look so good. Wow!
Kristi you should try building a loft bed with built-ins and shelves on the side when you have the oppurtunity. It saves up a lot of space!
beautiful! i want to make one too!
I have learnt so much from this post especially on tackling the inside arm using two pieces of fabric, I did one project where I used one piece and just couldn’t get the curve right. Thank you so much for sharing and in such great detail.
Oh, and I love Alo on YT his videos are soooo informative
I know its like a year later, but do you have any pictures of the chair at the table?
HI Kristi,
I am just starting to reupholster a wing back chair and need to know how much welting is needed? Could you give an idea of how much to use?
Regards,
Henri
It’s hard to say without seeing the chair. But all you need to do is take your measuring tape and measure the linear inches of all of the places you want to put the welt cord.
Wow! I found this while searching for swivel wing back dining chairs for our senior residents. I am so amazed by your skill and commitment. You took such care in showing it all too. You are a very special lady.
My search continues. God bless.
Hi Kristi
I have been following you on Pinterest and instagram and you amazing me with your go to spirit – so I finally decided to tackle my goodwill finds of 2 wingback chairs in original mustard gold velvet to reupholster after reading a ton of how tos and blogs your self powered approach and style like me do it your own way and color choices screamed here’s my twin ! So I’m doing it with your guidance and lots of pictures the little skirted edges and trim perfect –
I can do it too
Blessings for you sharing your talent and love for design and your home and life !
You encourage so many –
Thank you
MH
Hey Kristi, I just came across your gorgeous chair. this fabric is exactly what I have been searching for for a year! Exactly the colors I need. I figure there is probably not much of a chance of finding it, but I’d sure like to try. Can you send me the name and manufacturer? I did look on Joann.coma nd fabric guru and had no luck. Thanks for any help you can provide. Susan
I have two wingback chairs I want to recover. This set of posts is the best I’ve seen to help me. Your chair looks fantastic.
I enjoyed seeing the process of the chair very much, amazing!!! I am also a self-taught decorator; I love doing everything from scratch in my home. I applaud your ingenuity.
First time reading you blog……impressed with you chair !!!!!
Kudos to you
It’s Jan. 2026. I took classes on upholstery about 12 …15 years ago from a lowrider vato. He was a great teacher. Anyway, I’m ready to do another project – two wonky wingback side chairs that I think were someone’s first upholstery project. They currently don’t have arms, so I’m in the process of reconstructing the chairs to have arms…it’s tedious for me, I don’t like doing destruction/construction, but it’ll be worth it. I LOVE how you upholstered this chair the “WRONG WAY,” and it STILL turned out BEAUTIFULLY!!! This revelation, that you don’t have to follow the rules to get ‘er done, should inspire people to upholster something, and to not be afraid to try it.🤷🏻♀️☺️