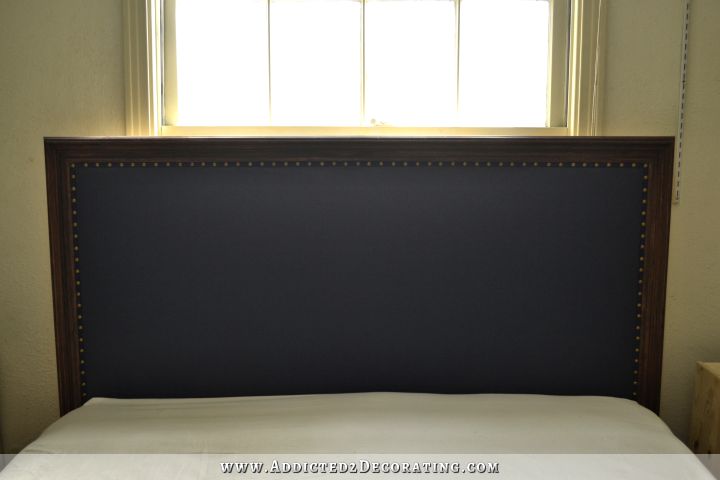
DIY Wood Framed Upholstered Headboard With Nailhead Trim – Finished & Installed!
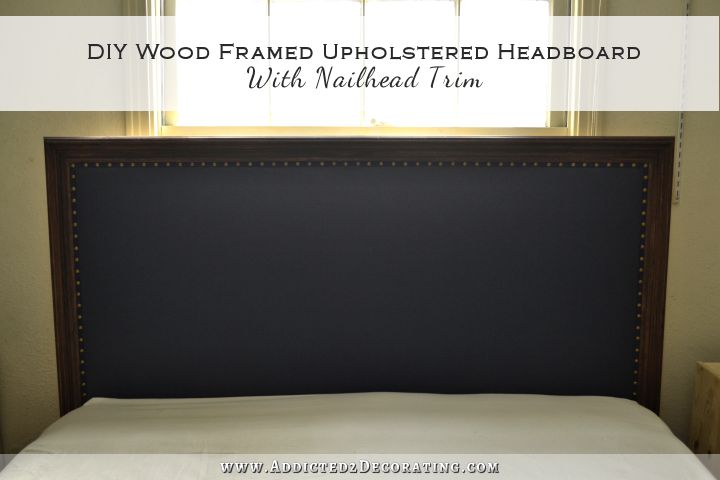
I finished my headboard! Here’s how it turned out…
Unfortunately, I wasn’t able to get any full-length pictures showing the headboard with the bed frame, but I’ll share more as I make more progress on this room.
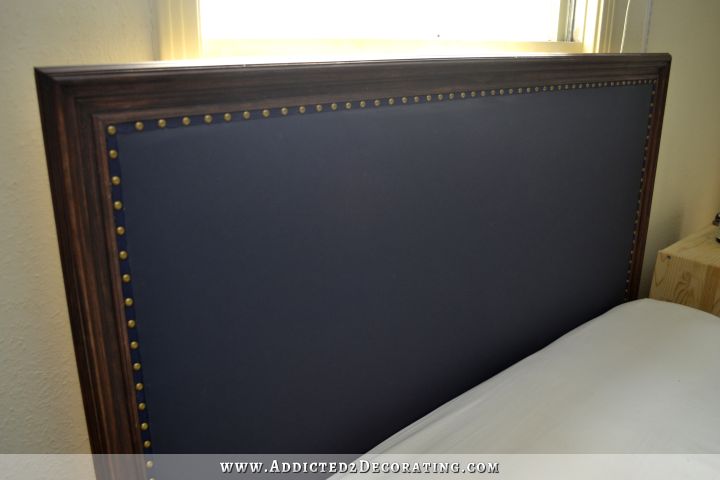
I wasn’t sure how I’d like the navy blue with the stained wood, but I love it! I think it’ll be a perfect backdrop for the P. Kaufmann Sea Breeze Patriot fabric that I chose for pillows.

And the Robert Allen Cats Cradle in Papaya that I chose to go with it.
 via
viaYesterday I showed you how I made the frame for the headboard, and here’s how I finished this headboard…
I started the upholstery steps by adding 1-inch foam to the center of the headboard inside the wood frame. I generally use spray adhesive, but this time I used hot glue. It works fine, too. It’s okay to piece foam together, but just make sure that you also glue the pieces to each other along the edges so they don’t shift.

On top of the foam, I added a single layer of hi-loft batting. I glued this around the edges of the green foam and trimmed it just before it reached the wood frame.

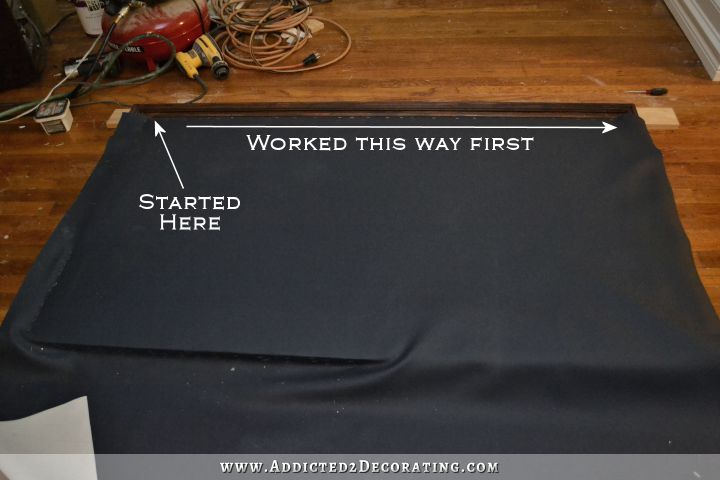
And then I added the vinyl. I started along the top making sure I was working along a factory-cut side of the vinyl. Before each staple, I pulled the vinyl taut, and actually kind of stretched it a little bit to be sure there would be no wrinkles. I did the entire top edge before moving on.
Here’s a close up of the staples. I did go back and add more in those gaps, but you can see that I used that small piece of moulding as my guide. I put my staple gun up against that moulding each time before stapling.

With the top completely stapled on, I did half of the bottom. I started right in the middle, pulled the vinyl down taut and stapled. Then I worked my way to the left bottom corner. I really can’t stress enough how I pulled the vinyl taut with each staple, pulling it down, but also to the left.
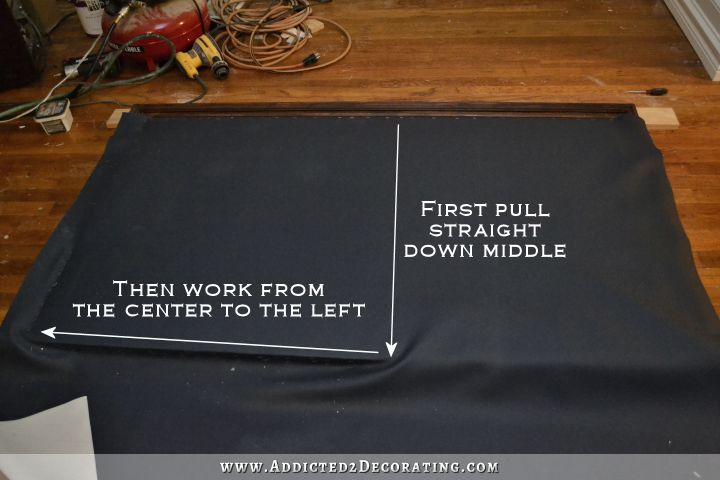
And then I worked up the left side.

With the left side finished, I repeated that process on the other side, starting on the bottom middle, and working my way to the bottom right corner. Then finishing up the right side.
With the whole thing stapled, it looked like this…

I used an X-acto knife with a very sharp blade to cut the excess vinyl right along the inside edge of the small moulding.

And finally, I added the finishing touches. First I used hot glue to attach extra wide bias tape around the edges to cover the staples, and then I added nailhead trim on top of the bias tape. You can use any trim for this part — bias tape, grosgrain ribbon, gimp, or any other narrow trim.

To get my nailheads spaced evenly, I added a nail head to the top corners, and then measured between them. I divided that number by 1.5 (I wanted 1.5-inch spacing) to see how many nailheads I needed, and if I needed to adjust the spacing to get them even. I ended up with spacing closer to 1.25 inches to get them spaced evenly. Once I had the spacing needed for the top, I just repeated that same spacing down the sides.
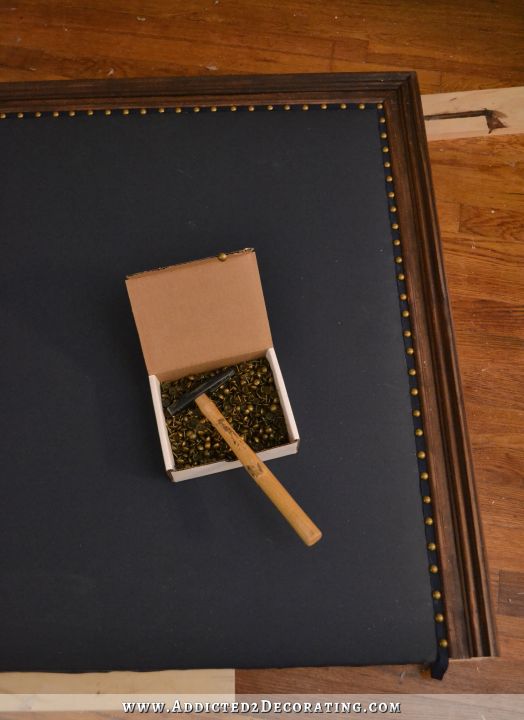
One thing to note about nailheads is that they’re pretty forgiving. If you don’t get a nailhead in perfectly spaced, don’t worry about it! Just hammer it all the way in (preferably using a tack hammer as shown above), and then firmly but somewhat gently tap the nail head on the side of the head to get it exactly where it needs to go. You can actually adjust the positioning about 1/8-inch in each direction using that method. If you try to adjust it more, the head might pop off, and you’ll need to use needle nose pliers to get the nail out, and then you’ll have to start over again with a new nailhead.
I generally hang my headboards on the wall using a large Ook Hangman French Cleat (available at both Lowe’s and Home Depot), but since my bed is going in front of a window, that wasn’t an option. To install this headboard, I placed it on the bed frame, making sure that the backs of each were lined up, and then I used 2 x 4 lumber. I wanted this headboard attached very securely, so I actually used wood glue first, and then screwed the 2 x 4 into the back of the headboard in four places (two at the top, and two at the bottom), and then screwed it into the bed frame in five places. Because of the positioning of the trim on the bed frame, I had to use a 1 x 4 spacer, but it worked perfectly.

And that’s it! It was actually quite a chore getting it installed by myself, but I managed.
While I had the bed moved, I also brought the sea grass rug in that used to be in the living room. Talk about a chore! After getting that thing in place, and then installing the headboard, and then moving the bed into place, I was about ready to pull my hair out. But it’s done, and this room already feels more like a comfortable bedroom. And I’m just getting started!
2015 Master To Do List, Item #84 – Make a headboard, AND Item #88 – Move seagrass rug into bedroom: DONE! 🙂

Addicted 2 Decorating is where I share my DIY and decorating journey as I remodel and decorate the 1948 fixer upper that my husband, Matt, and I bought in 2013. Matt has M.S. and is unable to do physical work, so I do the majority of the work on the house by myself. You can learn more about me here.
Beautiful job. It’s going to look amazing with your choices of fabric!
So pretty! The navy with the stained wood is subtle and elegant.
I’ve found it helpful when using upholstery tacks to use a nail set to start the hole for the tack. It takes a few minutes to do the extra step, but it really minimizes the frustration of bent tacks.
Great job! And love the fabric, too! If you had used thicker foam would you have shaved the edges or just squished them down with the batting and vinyl? I have no experience with upholstering but need a thicker finished product. Thanks.
It turned out so beautifully. Love, love, love.
Thanks for a great tutorial. It looks so professional. I’ve had previous disasters because I didn’t pay attention to the details. Can’t wait to do this!
Love it and love the fabric choices for your pillows. 🙂
Just perfect! What a handsome piece of furniture and to think that you made it yourself…congratulations!! The bed is the centerpiece of the room and you have certainly set an elegant tone. I can hardly wait to see how it looks when you finish the details.
Nice job Kristi. I really like the navy blue and the fabrics you have chosen will look lovely. No more cold neck! Yay. You are plugging right along with your projects so far this year. I think you are doing a bang up job. Can’t wait for the music room to be presentable. The Pony columns deserve to be showcased! Hope you move on to the front entry now. Not too big to do and does not seem too overwhelming, I thin that having your living room colors locked into your head and the music room walls done, the foyer area should be easy. Please do not focus on the green table, that can always go somewhere else or be painted a different color. Blessings
oh wow, it definitely gives the room a direction. I love the colour combo of the stained wood and vinyl – so elegant!
Love the way this turned out. I think I’m going to try one for my daughter’s bed.
Beautiful! I didn’t like upholstered headboards before but this made me change my mind.
Just three words – you are amazing!
Love it! Simple, but elegant. BTW, number 88 can be crossed off too!!
oh hey Kristi, look: I’m not the only Kristi.addict who counted your projects for 2015 🙂 and you seem to have done it yourself, too, in order to cross off the appropriate number?!
and I didn’t mean to conceal my name or anything – I kind of jumped to and fro in the lines when typing (shouldn’t be doing that on the sofa when sleepy :)), sorry!!
I really think it turned out well! Very classy! It’s also masculine enough for the husband, especially with the grass rug.
Love it! Its so beautiful and practical.
Did the staples give any problem when installing the nailheads right over them? Looks great!
Incredible job! Looks amazing and I love your choice of fabric against the navy headboard!
I loved how the headboard looked just framed out, but it’s even more gorgeous now! I love this idea, as I am pretty sure that our bed will be placed infront of a window in our new home as well. We never used headboards before, but I think this will be the front runner in our design choices! Thank you so much for sharing your process! I’m looking forward to becoming a DIY Diva in the near future!
I do second the question someone else asked about going about getting a high loft plush area. What’s the best way to do that?
I think the easiest way to get a high loft upholstered section would be to upholster a separate board and inset it into the framed area.
You make this look easy! I love the Navy with the wood and the nail head trim is the perfect touch that just makes it simply elegant!
Absolutely fabulous! Love the navy, love the fabric choices. You work so hard. Having a pretty bedroom will be a nice way to end each day.
For the first time, only a few of the photos came through on my kindle fire. 1,2,5,6,& 8 appear but the rest just show an outlined square where the photo should be. Just an FYI because maybe others are having this problem. I love the stained moldings with the navy blue!
All the photos work now. Thank you!
This truly looks like you bought it at a very high end furniture store. So elegant!
Beautiful job!
Beautiful job—as usual, you amaze me with your projects (I’d be reluctant myself—but am totally inspired by your attitude, abilities, & results!)
How does the headboard look from outside the window?
love the navy and wood combo. Your fabrics choices will work wonderful. Cheers
Which color did you decide to paint the walls of your master bedroom?
Love all your choices for this bedroom — it is going to look amazing when totally finished. Wish I had even one tenth of the talent that you possess — guess I’ll settle for living vicariously through your work. Thanks for posting all that you do.
Love it Kristi. You’ve done an amazing job…..yet again!! The pillows are going to look stunning against your new navy and wood headboard. Can’t wait to see the final reveal.
I like it! It looks great and I’m sure the fabric you chose for pillows will be beautiful against the navy blue.
It’s beautiful and I love the fabrics as well.
So happy for you, getting more things checked off your master list. I have to say, when I have had headboards that weren’t attached to the bed frame, the bed tends to separate from the headboard when you are leaning your back against it, you know, the bed can slide away a little, and that is very uncomfortable! This has never happened to you? If so, how do you keep your bed from creeping away from the headboard when you don’t want it to? I always want my headboard attached to the bed frame.
Beautiful! If there was a contest for blogger with the best detailed tutorials you would win for sure!!!
Hi Kristi, I commented earlier on the pictures but didn’t have the time to read how you did it. I have done a number of headboard but I use a different method. I usually use a piece of plywood and spray it with adhesive and then cover it with one inch foam. Then I take cotton batting and cover the foam extending the batting six to eight inches beyond the edges on all four sides. I then lay out the fabric smooth it to make sure there are no wrinkles, then I will tack it in the middle middle, bottom middle, top middle, and all four corners. We turn it over and making sure the fabric is staying taut and straight we fold the excess batting and fabric over the edges and staple it in place. At the corners we cut the batting away so the folds are not so bulky. I fold it like you would a bedsheet (if that makes sense). Then if I want to frame it I purchase the molding and have it cut to my measurements. I paint the frame and assemble it by using wood glue and “L” brackets. Then we glue a 1×4 to the back of the frame allowing an inch or so to show in the center opening of the frame. Then we pop the fabric covered piece into the frame, turn it over and put about 10 short screws through the 1×4 into the plywood. We hang it on the wall with cleets and use Velcro to keep the bottom in place. Just another way to get the same thing I guess. I have not used nail heads, however if I did, I still think I would use the ones on the roll. It goes so fast! I have at least three head boards in my basement waiting for a new home. One of these days one of my kids will say what is that…..then I will wip out some new fabric and say new head board for your guest room, plus pillows and a throw. They think I buy everything. No idea how creative Mom is! Blessings
Wonderful bed head. Very professional looking,love the choice of the fabrics will be lovely when all put together.
I love the headboard and the floral fabric and the other fabric you have chosen. Lovely and fresh looking. I have made my current headboard and am now bored with it, so think I might give this type a try when I redo my room and am delighted to have such details on how to do it. Thank you
stunning job! just found your lovely blog. i think this is a brilliant idea! thanks for the step by step!
This came out beautiful! Question, did you have any issues hitting the staples while hammering in the nail heads?
??
No, I didn’t. The staples were a tiny bit further away from the moulding than the nailheads.
Oh ok, makes sense. I’ve made a couple of headboards before and I’d like to make another for our guest room and I really like this style. Thank you!
Where did you get your bulk box of nail heads? The most I can find is a box of 100, do you know how many you used total?
Thanks!
I don’t know how many I used, but I buy mine at a locally-owned upholstery shop. If you live in or near a large city, I’m sure you have an upholstery supply shop that probably carries them in bulk.
Wow this looks fabulous …it looks like it came from a high end shop 👍