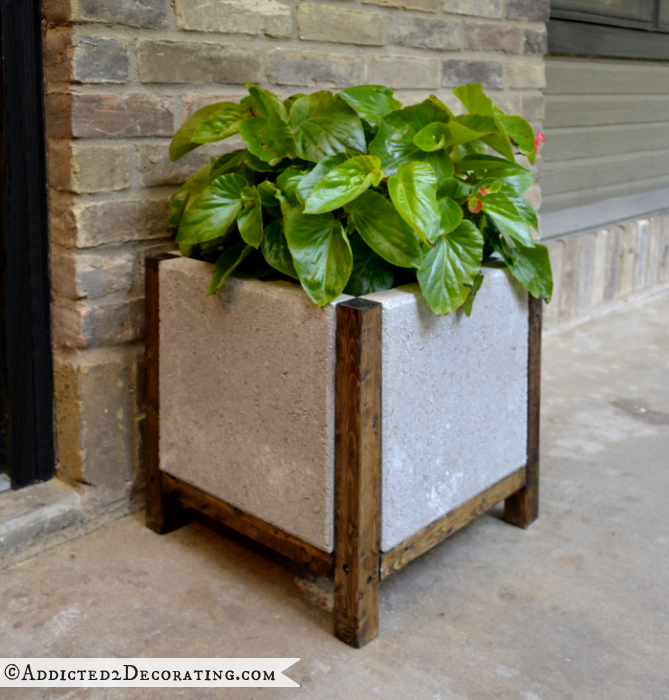
Easy DIY Wood and Concrete Planter
I’ve been thinking about how to add some curb appeal (sidewalk appeal?) to my little condo. When you have limited space to work with, it can be a bit of a challenge, but I thought I could at least add a nice planter on each side of my front door. I looked at Home Depot, and their planters were all at least $20 or more each (the ones I really liked were about $50 each…yikes!). I decided I could make something for less, so I came up with this little wood and concrete planter idea.

It was really easy to make, and super cheap also. The concrete stepping stones were only 99 cents each. Then I used two 2″ x 2″ x 8′ pieces of wood, and those were under $2 each. I had the screws and scrap wood on hand to make the bottom inside support (where the plant sits) for the planter, so the only other thing I had to purchase was the concrete adhesive, which was just over $7 for a tube. So the supplies I purchased to make two planters came to just around $20. Can’t beat that!
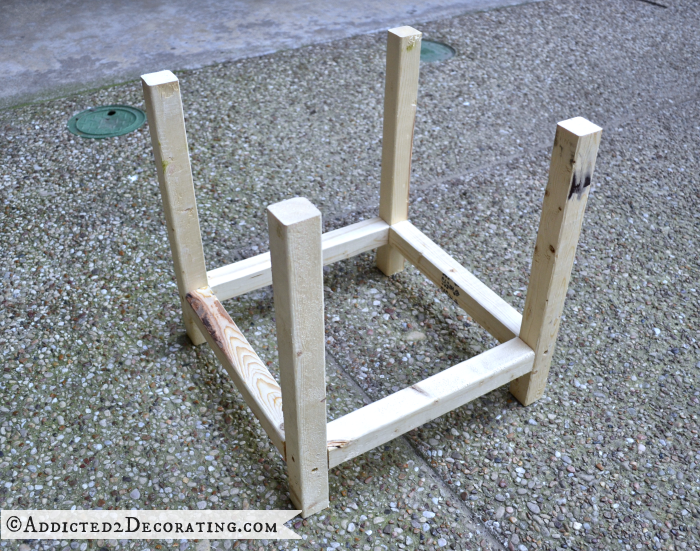
To make it, I used my miter saw to cut the 2″ x 2″ wood into four pieces that were 16 inches long, and four pieces that were 12 inches long. I also cut a scrap cedar fence board into two pieces 12 inches long (if you use something other than 12″ x 12″ concrete stepping stones, you’ll obviously need to adjust the measurements), and then some scrap lattice into four pieces 11 inches long. (The lattice isn’t shown in the picture below, but you can see it in the assembly picture.)

Next I screwed the 2″ x 2″ pieces together, with the 16-inch pieces forming the legs, and the 12-inch pieces forming the support between the legs. I pre-drilled the holes for the screws so that my wood wouldn’t split. I also used some wood glue before screwing the pieces together. I just made sure that there were 12 inches from the top of the wood piece to the bottom support so that the 12-inch stepping stone would fit.
Next I sanded and stained the frame and added the 11-inch lattice pieces to the inside of the support pieces. These will hold the cedar fence board pieces that I cut, which will hold the plant.

When the frame was dry, I used a construction adhesive made specifically for concrete (found at Home Depot)…
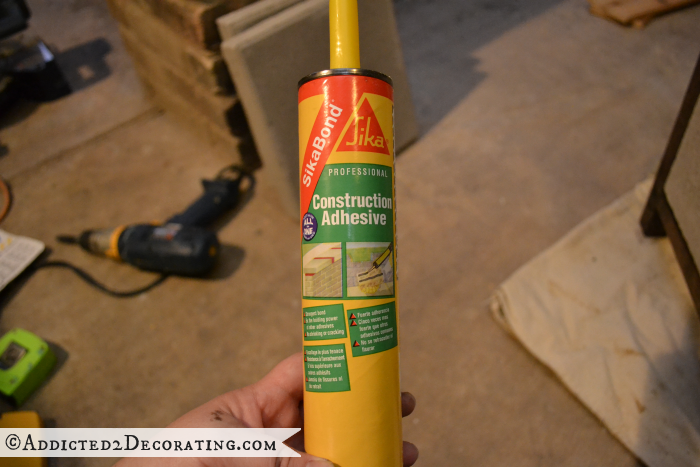
And I placed a thick bead of adhesive around the inside edges of the frame and carefully placed the stepping stone in the frame. I was very careful to avoid getting the adhesive on the front of the stepping stone or on the wood frame. Once the concrete was in place, I placed the 12-inch cedar pieces inside, resting on the lattice support pieces, and the filled it with my plant.

(I just kept my plant in the plastic pot that it came in and set it inside the planter. If you actually want to fill this with dirt and plant the plant directly in the planter, you’ll need to line it with landscape cloth first.)
I had a couple of frame pieces that weren’t fitting snug against the concrete pieces, so I used clamps to hold it overnight.

And this morning, I removed the clamps, and the thing was solid as a rock!
I still need to make one more for the other side of the door, and then I need to paint my door and trim. Since I do all of my sawing out here, and I’m constantly going in and out the door with tools and lumber in hand, my front door is looking a little beaten up and sad. It’s on my “to do” list. 🙂

Addicted 2 Decorating is where I share my DIY and decorating journey as I remodel and decorate the 1948 fixer upper that my husband, Matt, and I bought in 2013. Matt has M.S. and is unable to do physical work, so I do the majority of the work on the house by myself. You can learn more about me here.

That is gorgeous!
Cute! I’m wondering how heavy the container is, and if a set of small casters on the bottom of the legs would be a convenient idea…?
It’s pretty heavy. Not sure exactly how heavy, but once it was made, I couldn’t pick it up. I just scooted it into place. If you think you’ll want to move them around, casters would definitely be a good idea.
I love the look of the modern/industrial concrete combined with rustic wood.
I love it! I have to pin this to remember it. Another great idea, Kristi!
Those are perfect to add curb appeal to a small space. Very inviting! What color are you going to paint your front door? Something to go with your interior scheme?
Unfortunately I don’t have the freedom to choose a paint color. 🙁 It will have to be the same red that’s on it now (that matches the other 30+ doors in my building), so I’ll just be giving it a fresh coat of the same color.
I love red so that would work for me. A fresh coat of paint will be nice and these planters will add more curb appeal, for sure. : )
PIN, PIN, PIN, PIN, PIN!!! Love this, the tiles could even be painted with a design or solid. Great idea, Kristin.
Yep, or they could be stained with concrete stain. So many options!
It’s the perfect look!! You are so clever Kristi!!
I love these! I do have one question. How did you set the concrete into place without all the adhesive squishing out?
I was able to get the vertical wood pieces apart just enough to set the concrete in without just pushing the adhesive out the back.
Thanks, I’m gonna try this!
I really like this! So simple and unique!
You are so creative! Will your association allow you to put a fun door knocker on your front door?
Ohhh, ohhh, you could stencil your address on it in black if you only had one in front.
Is it heavy to lift?
You have the most amazing ideas. LOVE!
Very cool!
What a great idea! I really love this!
Beautiful, brilliant idea
This looks so professional and lovely
Very clever.
Really Really great idea, super modern and durable. I WANT 1 NOW! haha, i will make it, thanks on the good step by step info.
BTW yes it is heavy, but then that is exactly what i want for a front yard potted plant. Deter anyone from thinking they can just pick it up and walk away with it easily.
I keep wondering what you have done with the condo. Are you going to sell it?
Yes,we’re going to sell it. Hoping to get it on the market soon. 🙂
Wow! I love these!! Great tutorial.
Simply BRILLIANT! So simple and yet so awesome, Thank You!
I made an herb planter one block wide and two blocks long, adhering the blocks together with Bondo.
It is very heavy.
This is a gem of an idea! You have a knack for this type of stuff and I sure appreciate you sharing it with Pinterest. I’m gonna try to make some of these right now!
Beautiful! It remind me of Carlo Scarpa design’s. Got me thinking in how to add a saucer …. Thank you.
These are so cute! I’ve been making my own concrete planters but wanted to add a little something extra to them. I like incorporating the wood. Thanks!
Oh wow! Love this idea! This will work great at the cemetery in the space between headstones. Thank you!!
I love this so much!! This is SO clever!