Guest Bedroom Progress & Plans
Well, now that we have all of that dishwasher nonsense behind us 😀 , we can move on to more pressing matters, like our guest bedroom. If you’ve been following me on Instagram stories, you already know that I’ve made a bit of progress on the built-in closets that are going on either side of the window. For those of you who haven’t been following along behind the scenes, let me get you caught up.
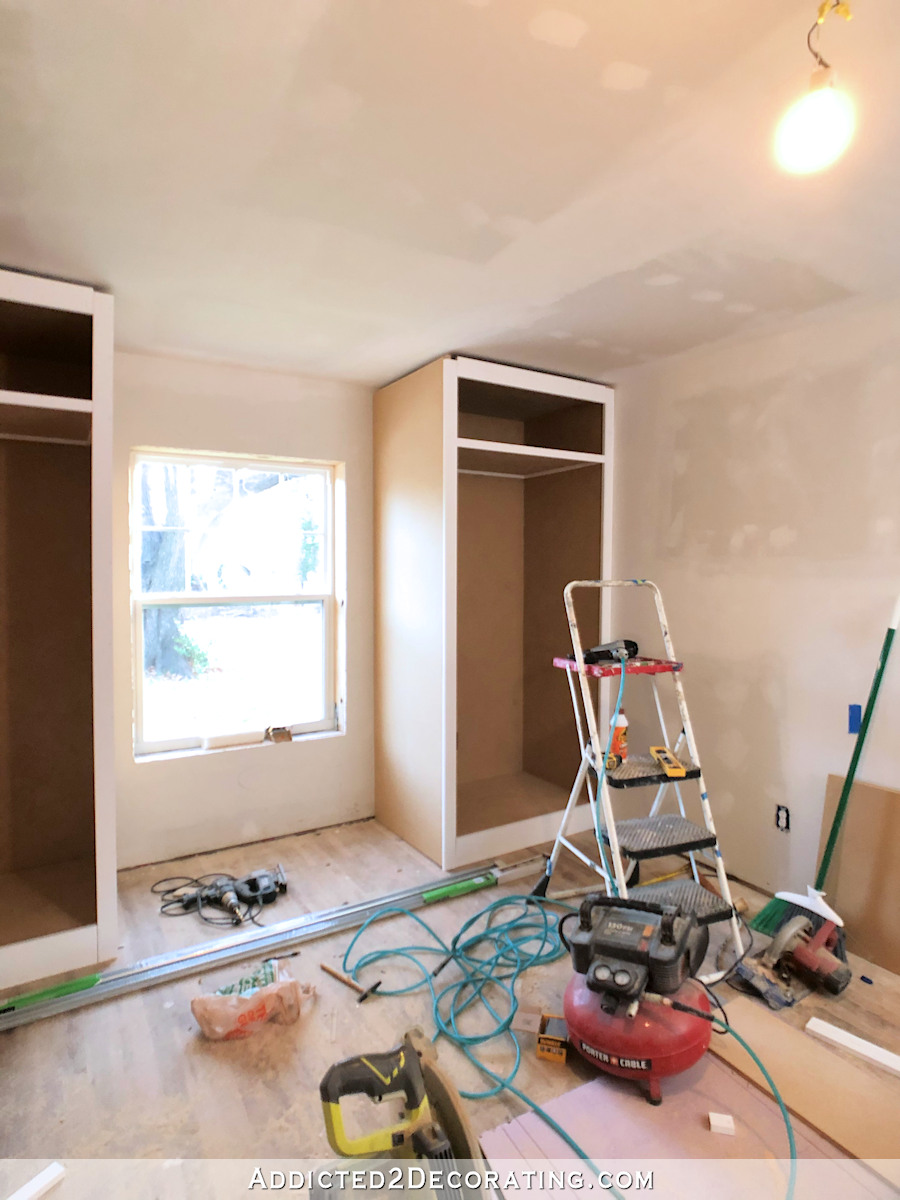
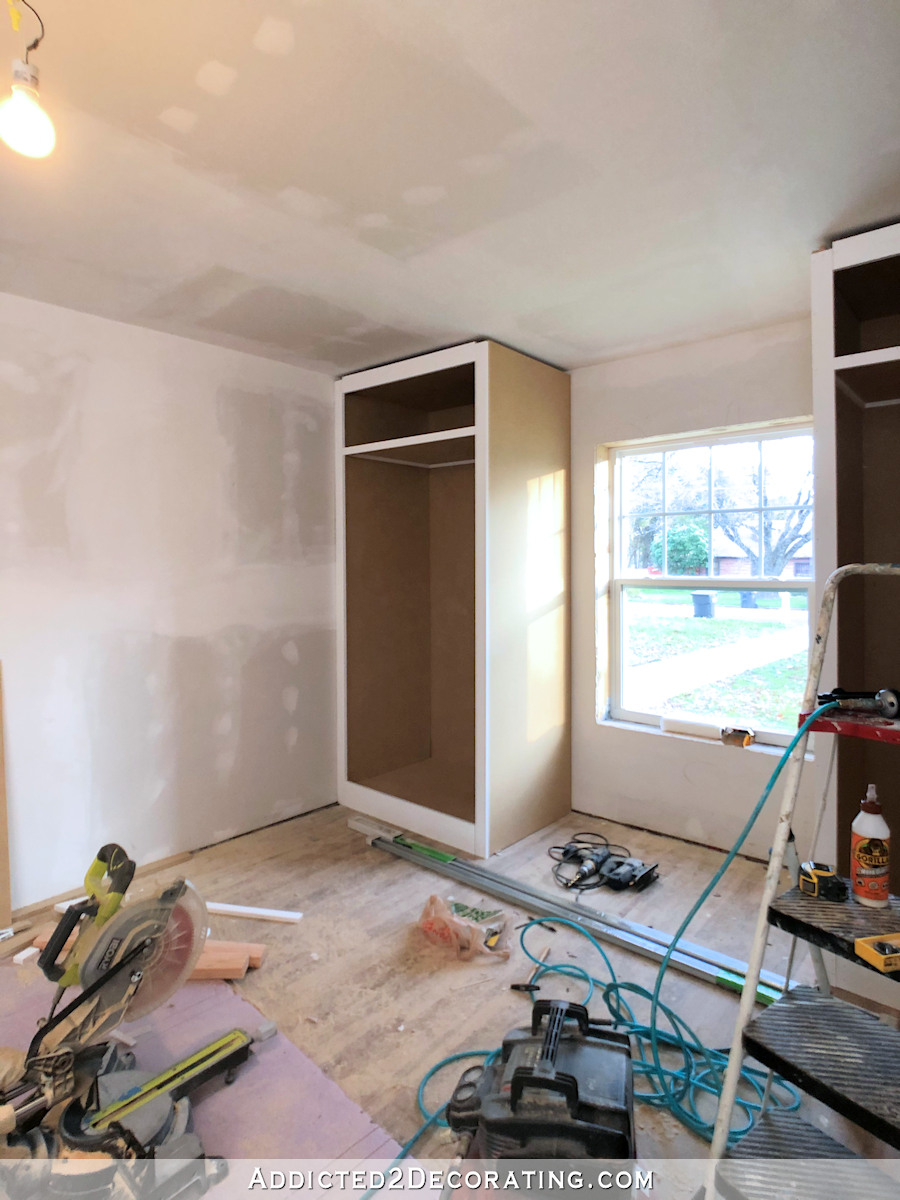
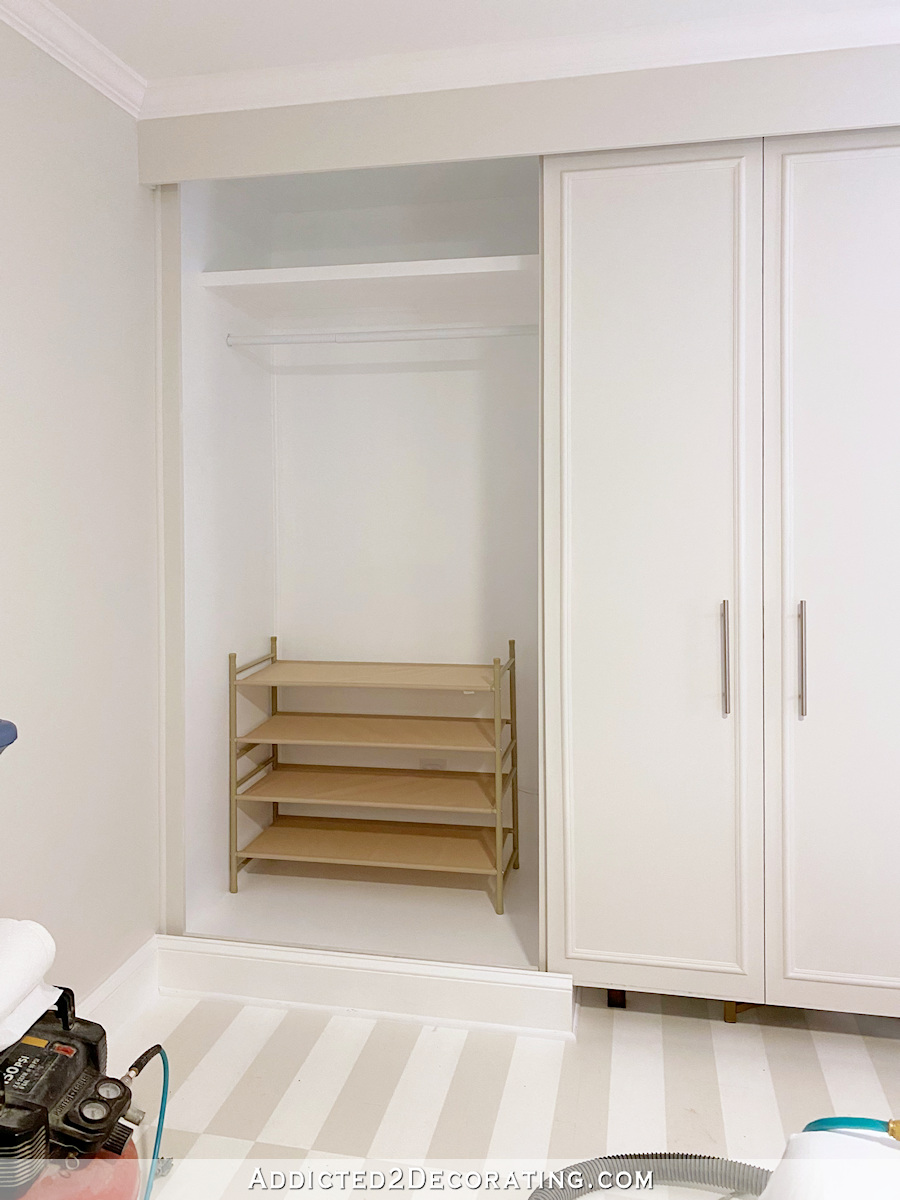
This is where the closet project stands as of this morning…
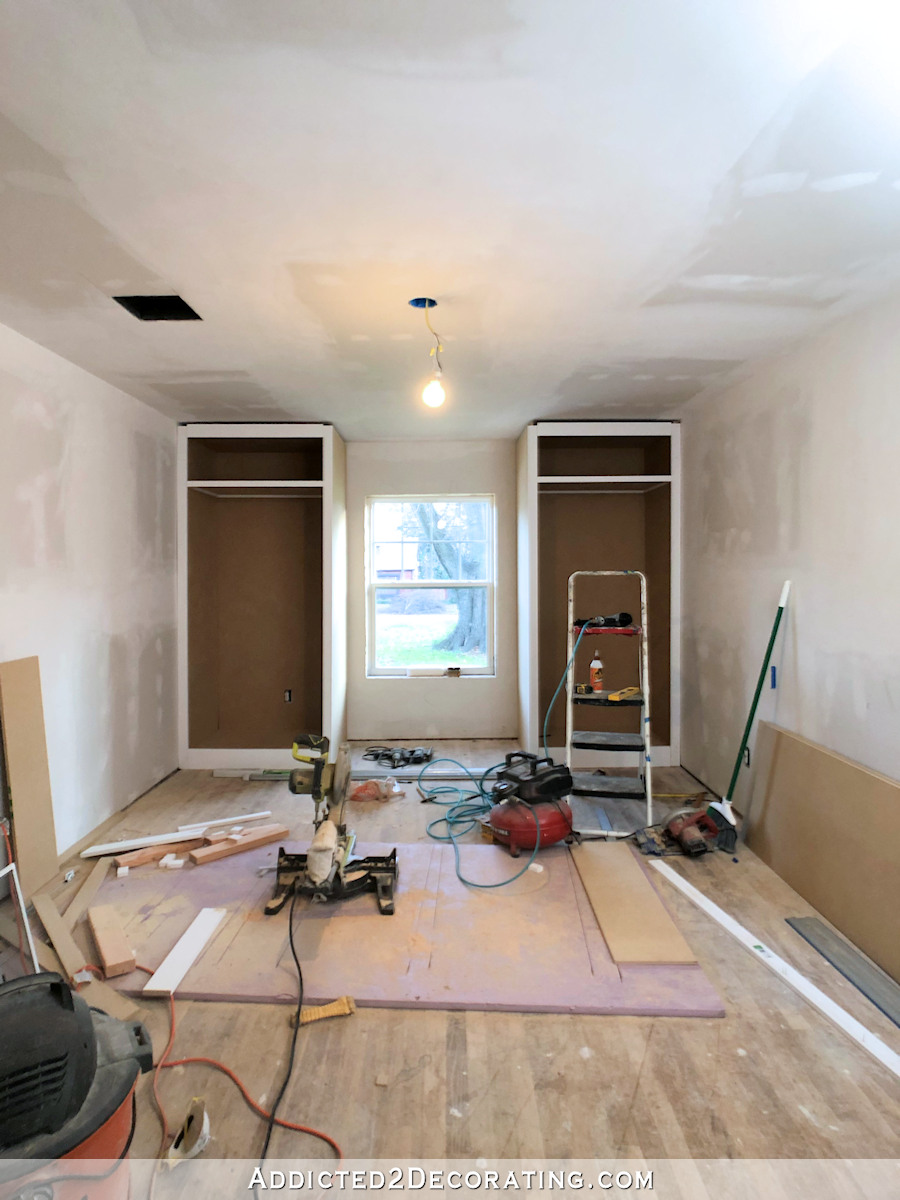
The plan is that the closet on the left will have two hanging bars inside. The closet on the right will also have two hanging bars, but it will be partitioned in a way that part of the upper bar will allow for full-height storage for long items that would hang past the lower bar. But I’ll get to more of that later.
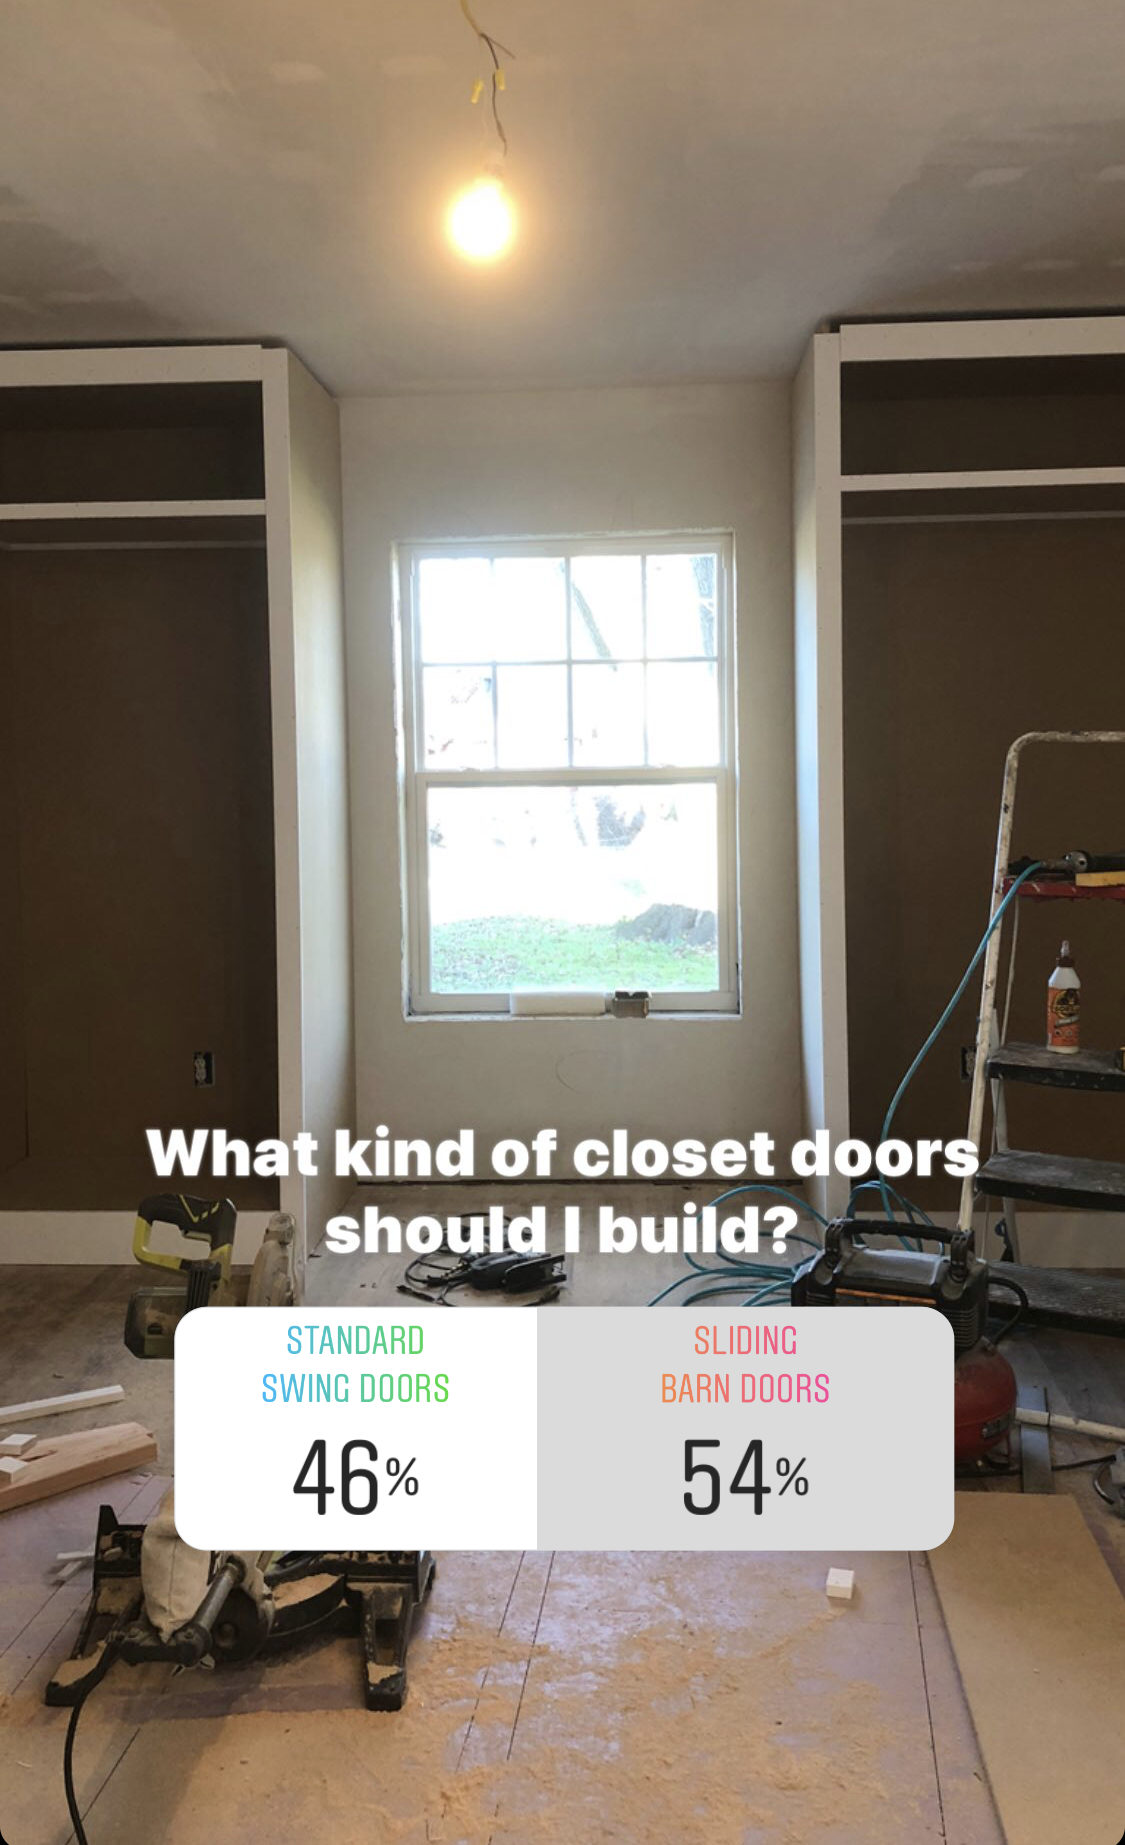
The more pressing issue is the doors. I couldn’t decide what type of doors to put on the closets — standard swinging doors or sliding barn door-style doors. If I used standard swinging doors, each closet would have two doors, split in the middle, and installed on hinges. You know…like standard cabinet doors.
The one issue with that style is that is that this room is pretty small, and so a door swing would limit the size of a nightstand that I could put on the right wall where the bed will go.
The other option — sliding barn door-style doors — would free up the space needed for swinging doors. If I go with sliding doors, each closet would only have one large door (probably designed to look like double doors) that would slide towards the window and window seat area to open the closet, and then slide back.
And just to be clear, when I say “barn doors”, I’m not talking about the style of the door. I’m simply referring to the fact that they’d slide open like barn doors, but the style of the doors would actually be more traditional. My music room doors are hung on literal barn door hardware (not even the pretty kind, but the utilitarian kind that is actually used on barns to hang doors), but I don’t think anyone would see those doors and think “barn doors,” right?
Anyway, I put it to a vote, and the sliding door idea won out. In the beginning, it was a landslide victory for the sliding doors, but as time went on, it kind of evened out a bit more. But the sliding door idea still won.
The main question was what I would do about the track for the sliding doors. Would I actually be okay with having a track visible on the ceiling above the window seat?
Well, of course not. 😀 So figuring out how to deal with the track (and actually finding a track that would work) was what was holding me back from jumping in with both feet with this plan.
But after spending about an hour at Home Depot last night, wandering around and considering different options, I finally came up with a plan. So this sliding door design is 100% the direction I’m heading. I like it far better than the swinging door option. And people shared other options that I hadn’t considered — curtains, other door designs, etc. But I just keep coming back to this sliding door plan. It’s simple, and now I know exactly how I’m going to do it, so I’m going for it.
Basically, I will build a header out of 1″ x 6″ lumber (maybe ripped down a bit smaller if needed) that will be attached right at the ceiling, and long the top of that header will be the crown molding that continues around the room. Right behind that header will sit the track for the doors. So the track will be hidden from sight, and there will be one continuous piece of crown molding from the top left corner of the left closet, going all the way across (uninterrupted) to the top right corner of the right closet. I think this will work perfectly!
I really love this idea, and I’m excited to get to work on it. I just hope it turns out looking like the image I see in my mind. 😀
As is my standard m.o., I built the closets out of MDF (medium-density fiberboard), and trimmed the front with pre-primed finger joint boards.
The reason I use MDF instead of plywood is because I plan to paint these closets, and I much prefer the smooth finish of MDF over the wood grain finish of plywood for painted surfaces. If I were planning on staining or clear coating the closets for a natural wood finish, plywood would have been my preference. But you’ll notice that I almost always build with MDF because I almost always prefer a painted surface. It’s just an added bonus that MDF is cheaper than plywood. 🙂
As far as the rest of the room goes, I’m incredibly excited about my plans. You’re going to see some influences from past (long gone) projects come back in this room.
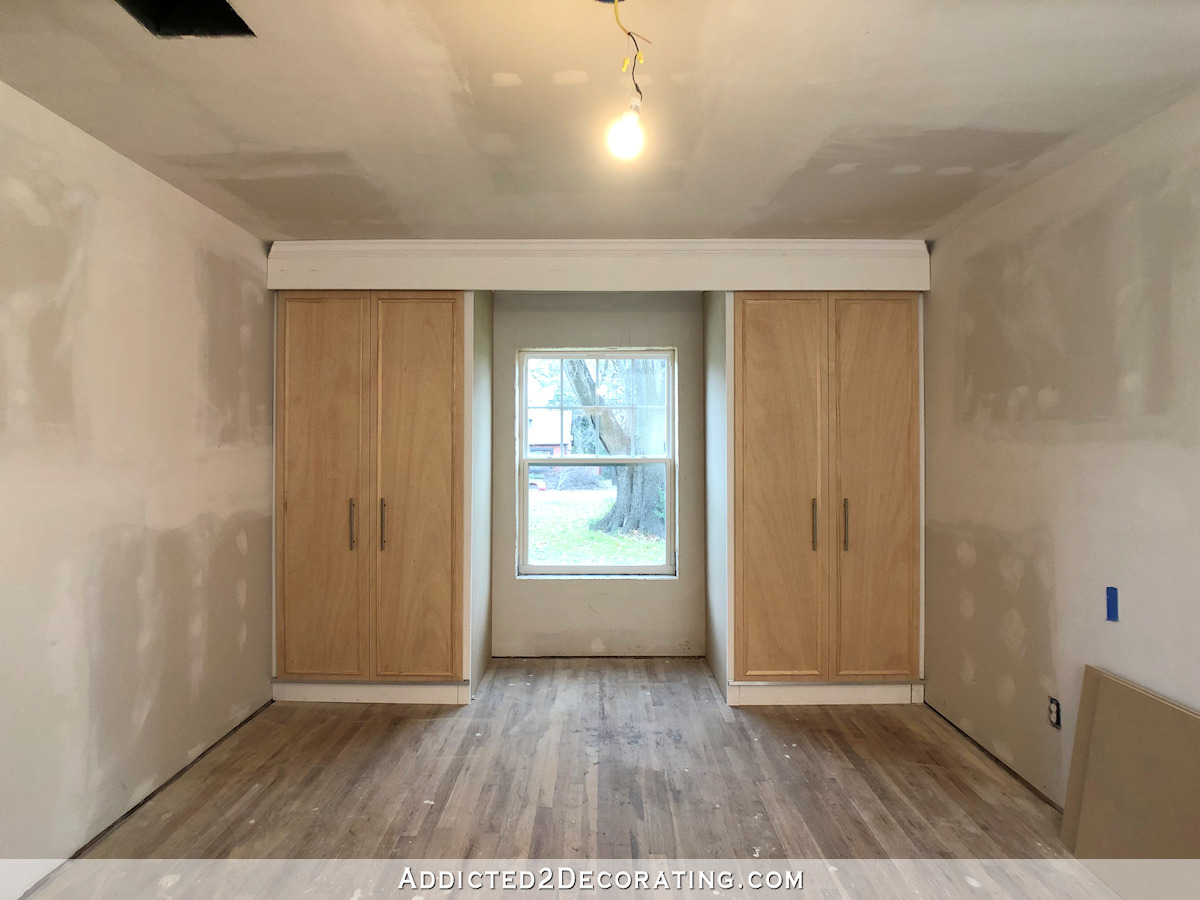
First, I’m going to do picture frame molding on the walls. I finally have a room with two uninterrupted walls (i.e. no doors, no windows) that are opposite each other, so picture frame molding will work perfectly in here. Here’s the general layout of the room…

To help you get your bearings, I was standing in the hallway, just outside the doorway to this room, to take the picture. And this is the room I’m working on…
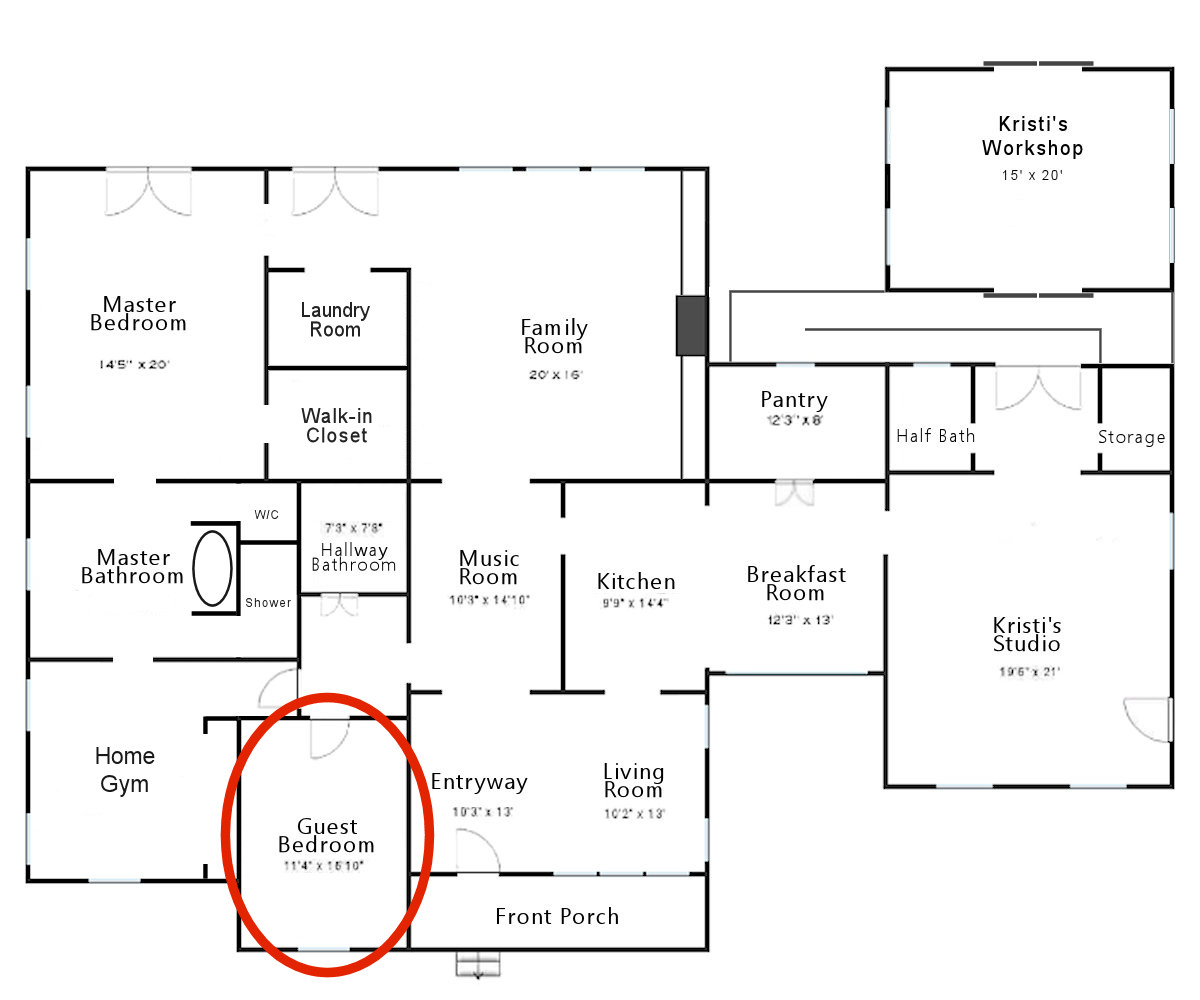
(Side note: That floor plan is our long term goal. The master bedroom, laundry room, and family room will be part of a big addition we have planned for the future. Those areas don’t actually exist right now. 😀 )
I plan to paint the entire room — walls, ceiling, baseboards, crown molding, closets, window trim, door trim — the same color. I really hope it turns out like I see it in my mind!! Right now, the color I’m leaning towards is Behr Rain Washed.

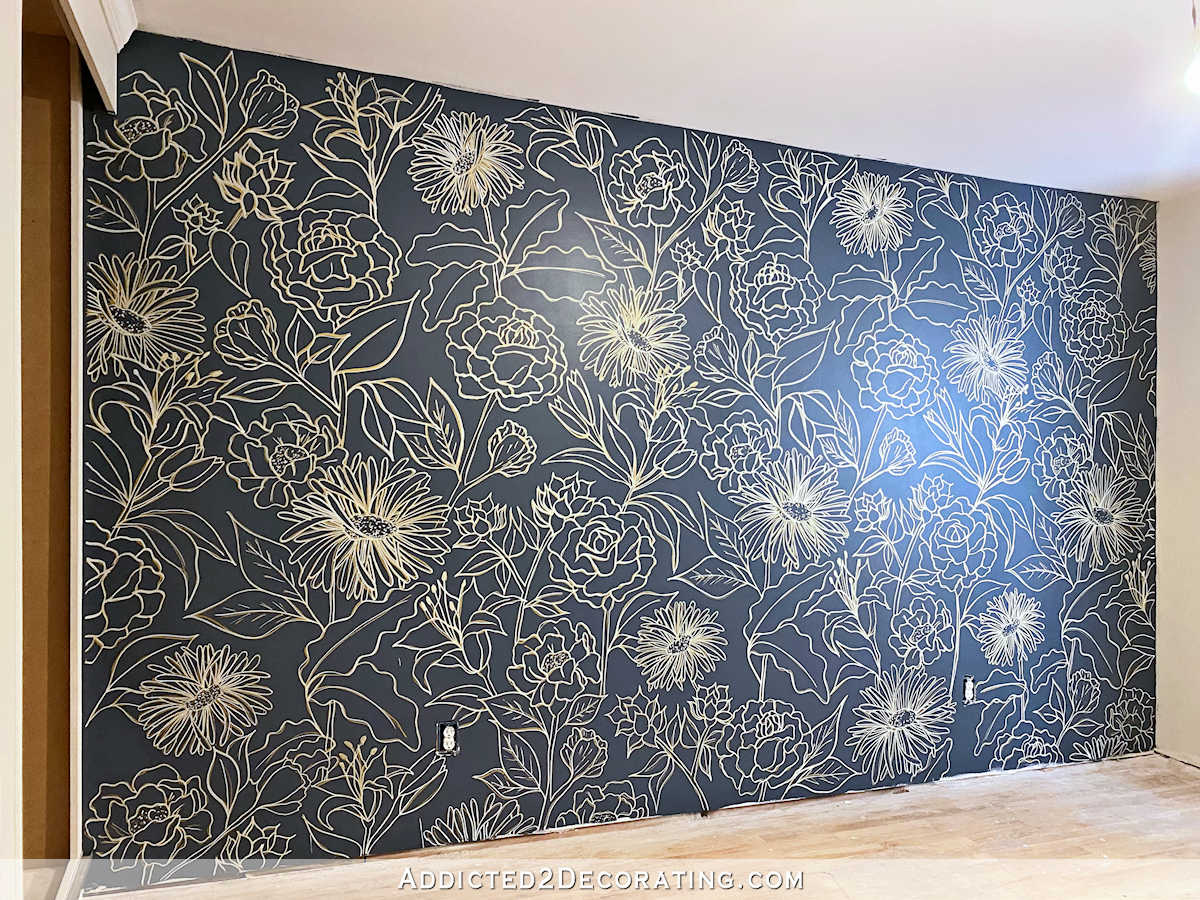
On the headboard wall, I’m going to design and use a wallpaper inspired by this wallpaper from Laura Park Design.
I would use that wallpaper, but the colors aren’t exactly what I want. But I can use that as inspiration to create my own in colors that will work perfectly for what I envision.
I’ll also be making a diamond-tufted headboard, and I can’t wait to tackle that project! I’ve made at least two before, but never for our house. So I’m excited to make one and actually get to keep it. 😀
I want this room to be happy and colorful, so that’s the direction I’m heading.
If you want to follow along behind the scenes, come follow me on Instagram! And speaking of behind the scenes, this coming Saturday is the big master bathroom demolition day. My mom, sister, bonus sister, and hopefully my brother will be here helping me demolish that room down to ceiling joists, studs, and floor joists. And we plan to keep y’all up to date with the progress both in Instagram stories as well as Facebook Live. So if you’re not following my Facebook page, but don’t want to miss our demolition day progress, you can find my Facebook page right here.

Addicted 2 Decorating is where I share my DIY and decorating journey as I remodel and decorate the 1948 fixer upper that my husband, Matt, and I bought in 2013. Matt has M.S. and is unable to do physical work, so I do the majority of the work on the house by myself. You can learn more about me here.

So happy to see a walk in closet on the house plans, much needed. I was wondering about who was going to be doing demolition. Now, I’m not a fan of trims ceiling and walls all same color. But love to watch all your progress on Facebook, Instagram, and look for a posts every day.
The all-on-color thing will be new for me. I generally love a contrast trim, and I may end up painting the ceiling, crown molding, baseboards, and window/door trim white in the end. So we’ll see. 🙂
I would do floor to ceiling draperies and a window seat with baskets.
Or internal draperies in the cabinets. Something to soften up the small room and to highlight the window.
I don’t want curtains on the closets, but I will be adding fabric to soften up the room. Just not on the closets. 🙂
You will love the sliding door plan! That is the way we built our guest room closet using traditional styled doors. The track is hidden under the header/moldings and I love it. Our guest room is tiny and we built a murphy bed across from the closet. It is my favorite room in our house.
I’m excited to follow this, I want to claim floor space currently occupied by walk in closets to other purposes and create reach in wall clothing storage.
We just took the walk in out of our master bedroom to incorporate that space into a larger ensuite bath with a soaker free standing tub. We put one built in on each side of the bed that frame it nicely. They are 24″ deep and are all double hanging and then one behind our bedroom door with a built in laundry hamper just love it!
I can’t wait to see the finished bedroom. I’m sure it will be a wonderful space.
Given that you’re doing a window seat anyway, I think the header/apron to hide the track will look perfect. Just like a bridge board that you might put over a sink to connect the fronts of cabinets on the left and right side.
Excited to see progress here! I’m sure you’re already ready to move out of the breakfast room!
Remind me of timing again? Since you’re doing the work on the master bath yourself, why does the demo have to happen this weekend? I’m one of those people that worry about your attention getting split in too many directions.
My mom, sisters, and I try to get together at least once a quarter for a Day Of Fun. And my bonus sister Cathi suggested that this time, we work at my house. 😀 This was the day that we all had available, so we scheduled it. We’ll get the demo done, but I won’t be jumping right in with the bathroom remodel. I still have quite a bit I need to do before starting the bathroom. At least this way, it’ll be ready when I’m ready. I probably will go ahead and put the new subfloor in though. I can’t imagine living indefinitely with a whole room that only has floor joists and the earth below the house clearly visible. 😀 That might be a little freaky, but my cats would probably enjoy it!
I have a similar setup in my home and can’t wait to see how you tackle this. However I live in a barn on a farm (concrete floors) so may go the more rustic route. That’s going to be a lot of house for 2 peeps. I can barely manage my 2 bedroom 1700 sf home but I have 10 acres and a huge garden.
Every thing is looking so good Kristi!
Off topic — I’ve wanted to paint my fridge ever since you painted your freezer but i didn’t want to have to sand it. On another blog i saw a painted fridge and the blogger used Slick Stick by the Dixie Bell Paint Company. Zero sanding and it’s held up well. So i ordered some from Amazon and can’t wait to try it!
Can’t wait to see what you do.
Funny, while reading this, I was thinking “Why does she always use MDF?” and BOOM, next pharagraph — Why I use MDF!
What happened to Matt’s game room?
Matt decided (and yes, it was Matt’s decision and not mine 😀 ) that at this time, he’d rather have a room dedicated to exercise (my treadmill, his exercise bike, and other things we may want in a home gym) than a room dedicated to gaming. I suggested we could do both in the one room, but right now, he’s just not focused on gaming. As long as he can have his Xbox set up somewhere (and I’ll definitely find a place for it), he says he doesn’t need/want all of that other stuff right now. His priority is just to gain strength and get more mobile this year.
I’ve been wanting to ask forever, but absolutely don’t want to pry, but then here I am…prying…Is Matt’s symptoms better after doing Keto for a year and more importantly fasting? I’m very curious, because I understand a little about autophagy and of course listening to Dr. Fung about the diabetes, blood pressure, etc…Just wondering about real life people, that I feel like I know and can trust…I love the work you are doing on the bedroom and I can’t wait to see how the sliding doors turn out.
I like the layout of this room a lot. It’s perfect for guests and the two closets with sliding doors will be great on either side of a window seat with a view!
I totally love the idea of sitting in the window seat and opening the doors and hiding from the world and reading a book staring out the window looking at birds and the sky. lol I know, I know…. juvenile.
Can’t wait to see it happen!
Yes! This! 😃
Curious how you will finish out the crown moulding on the BACKSIDE where the window seat is, or will the hardware just be visible from the seat?
The same way — header on back of the track and crown molding around the inside perimeter of the window seat inset area.
I’m very excited to follow along with the molding. I’d like to do this in my bedroom, but am……chicken! 🐣
Looks great, Kristi! And I love the plan for the window sea and sliding closet doors! 🙂
Our first house had a similar room layout & we (HE) built closets on either side of the window. I liked it. We had room for regular doors but I love the “barn” doors with all the moldings. Can’t wait to see.
Like the sliding doors option👍. What if you put the wallpaper on the window wall and up on ceiling of window seat area (instead of headboard wall which I think might weight the room more to one side)? It would create a colorful little nook.
I love that light blue color. I am using a similar but softer shade in various places to lighten things up. Its a super old Glidden color called Quiet Rain, it has followed us to 6 different fixer upper’s and we always re-purpose that color somehow. I love your ideas and am so thankful for your honesty in so many ways, your willingness to tackle any project and then allow us to follow along!
Too funny! That color appears green on my screen. I’ll need to look at it from someone else’s screen to see blue.
I’m looking at your “boxes” and wondering if the very top stretcher(?) will be wide/high enough to accept the track for the slider? I don’t know if they are all the same sizes, but our track is 2 inches high, and the rollers run on top of that. Or, are you going to mount the track to the back of the header? I’m a bit confused I guess. But glad you chose sliding doors – we love ours!
I have already seen your frustration last night on Instagram….Hope you are feeling better this morning and get it straightened out… You can do it!
This is going to amazing! Excited to follow along and see the progress! Toodles, Kathryn @TheDedicatedHouse