How To Build A Small DIY Writing Desk With Drawer – Part 1
After considering several options for how I wanted to use this space between the closets in the guest bedroom, I finally settled on building a small DIY writing desk with a drawer. This is a very easy and relatively quick building project.
I got this basic build done in one afternoon/evening. If you’re pretty new to DIY furniture building, and want to try your hand at a pretty simple build, this is a great piece to try.
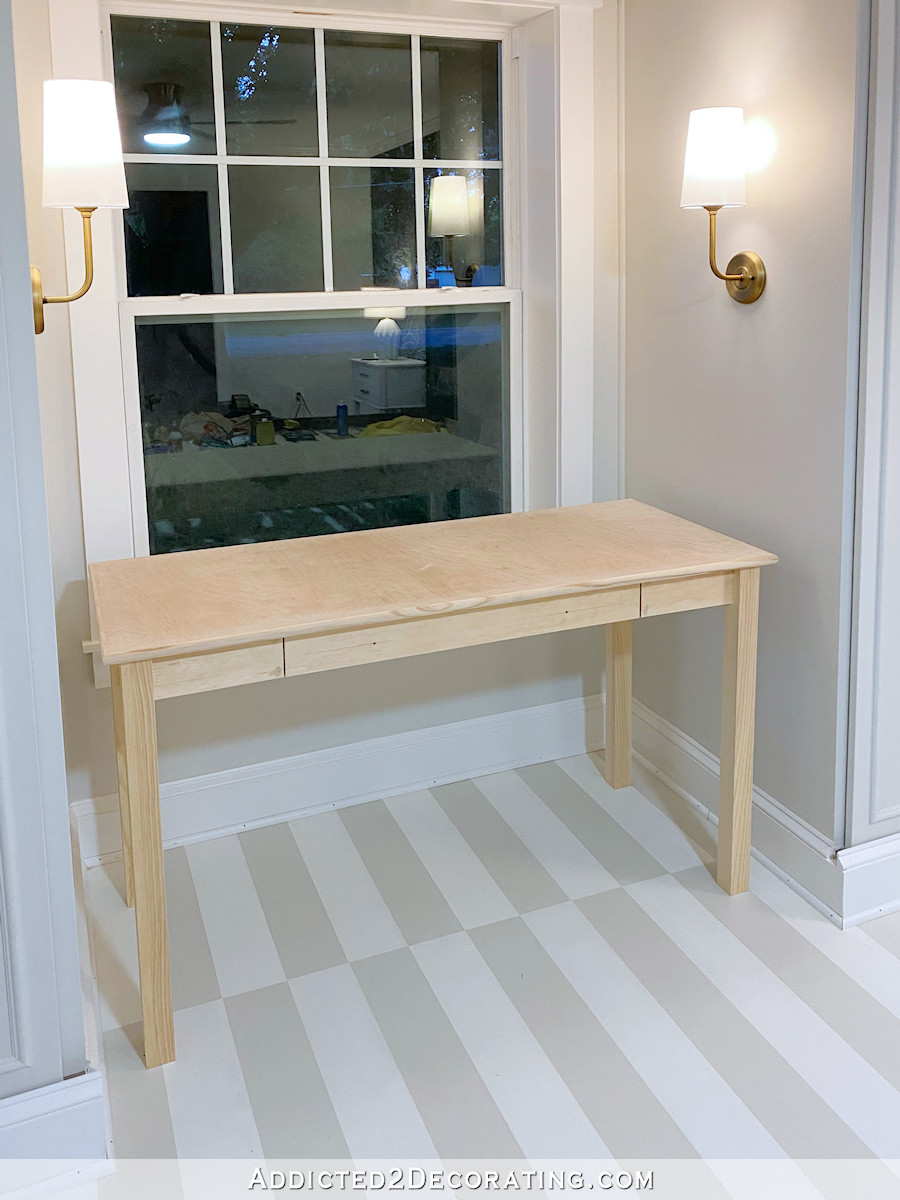
I still need to decide how I want to finish the desk (paint? stain?). Right now, I’m leaning towards stain, but we’ll see.

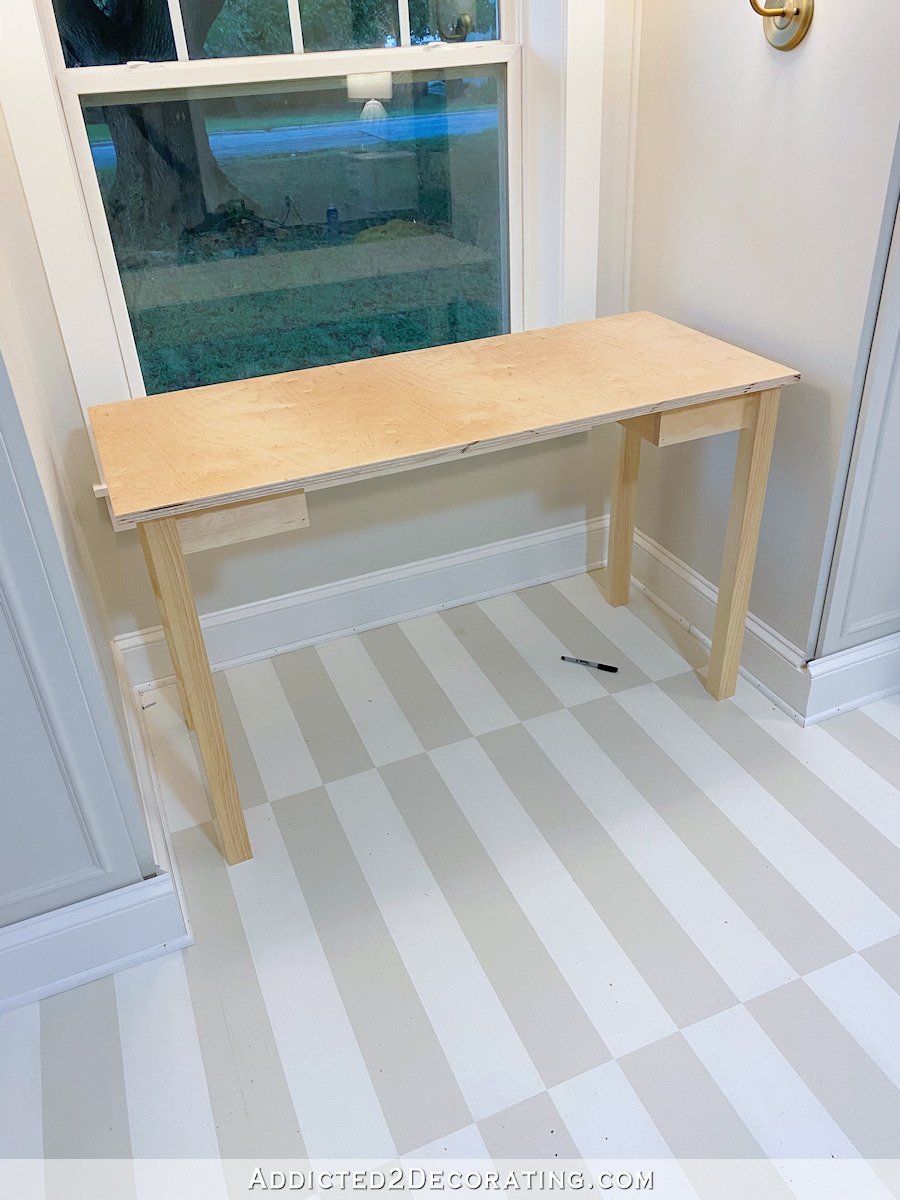
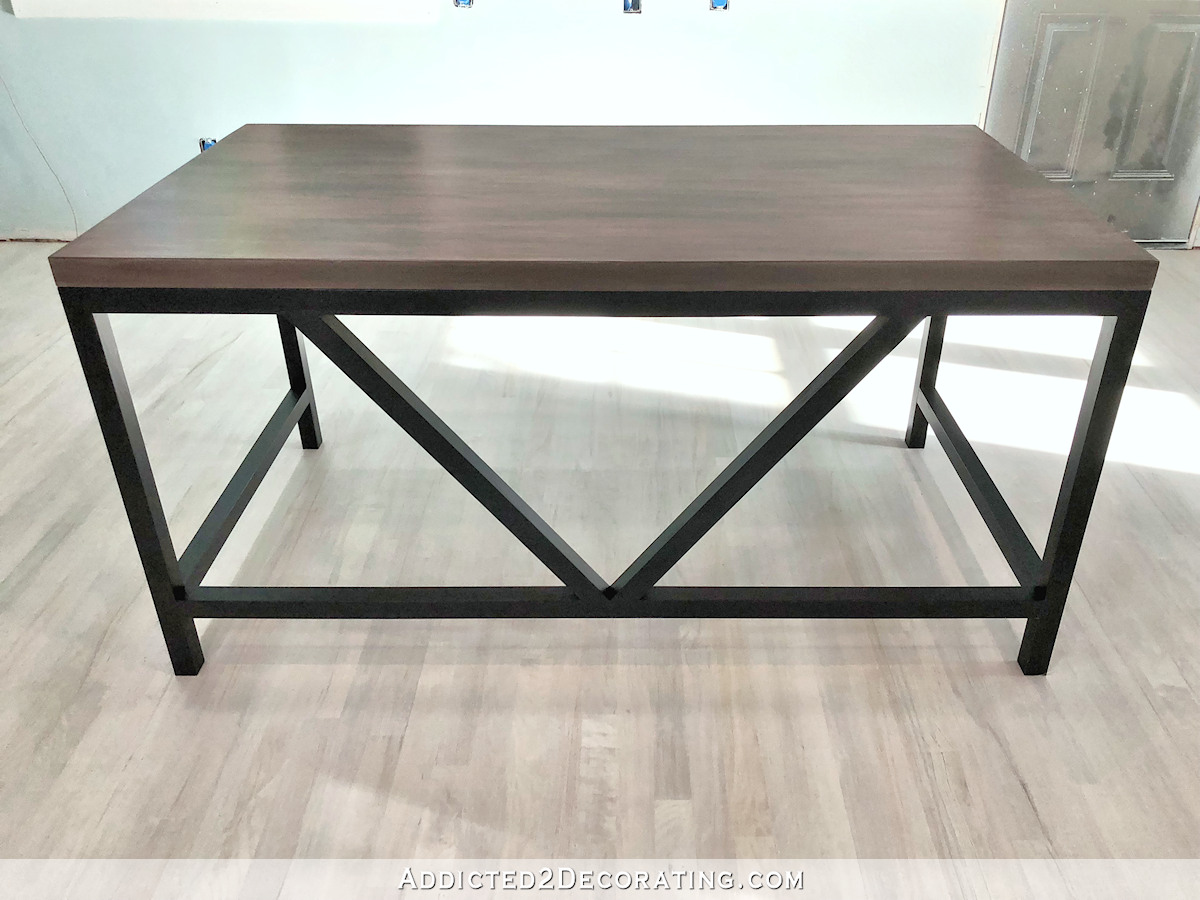
This desk is 30″h x 48″w x 20″d. So let me start from the beginning and show you how I built this simple little writing desk, and of course, you could adjust the measurements to make the desk exactly the size you need for your particular room.
How To Build The Desk Base
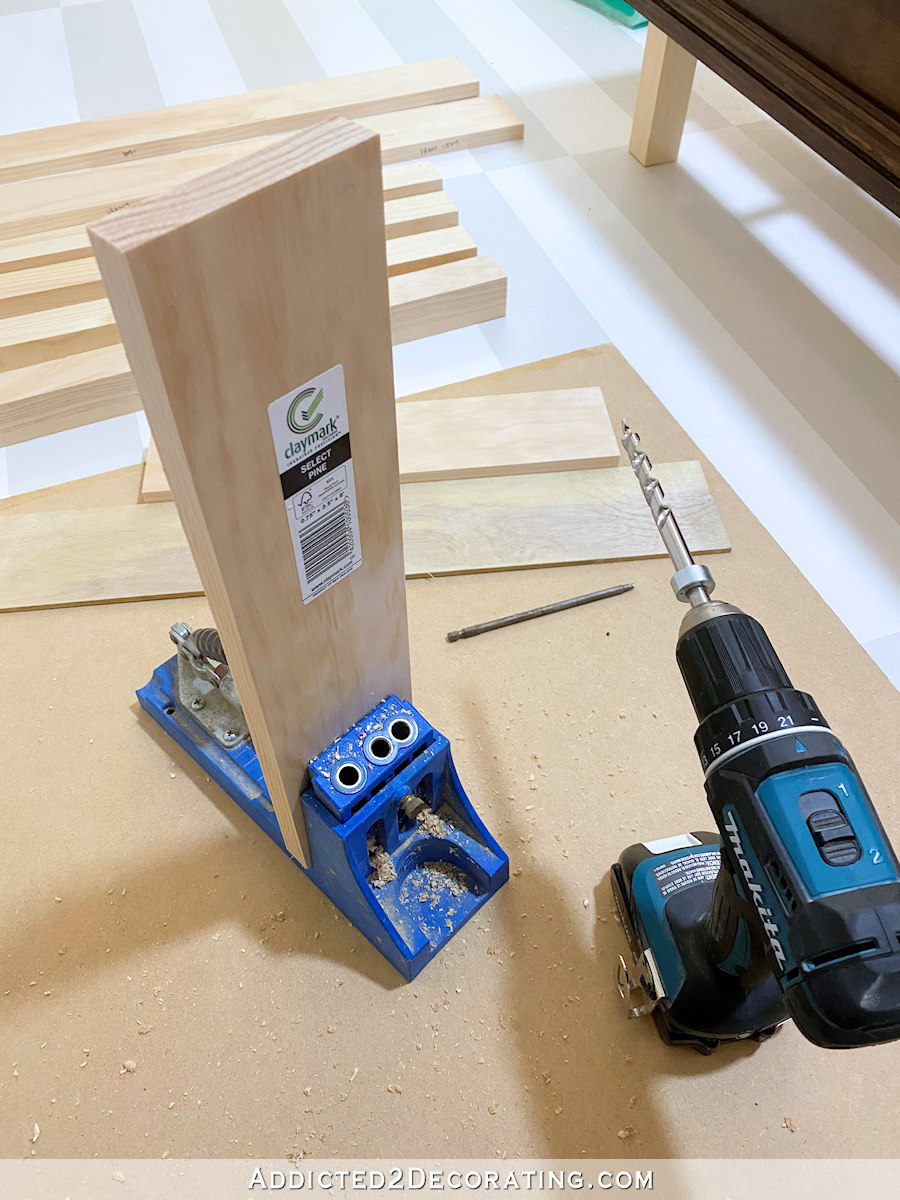
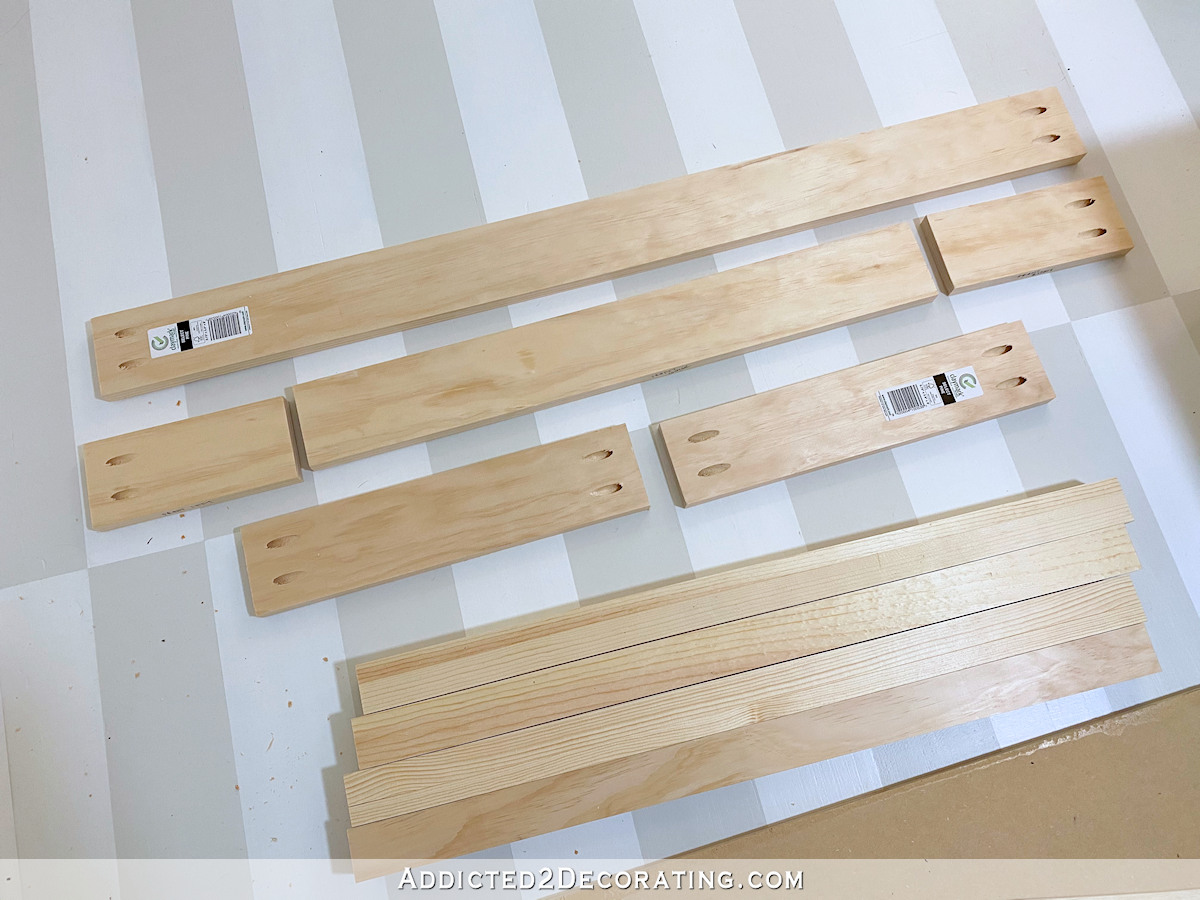
The base of the desk was made using 1″ x 4″ lumber, and 1.75″ x 1.75″ square dowels. I cut the pieces as follows, but of course, these can be adjusted to make the desk any size you need.
- Two side aprons cut to 15 1/2 inches long using 1″ x 4″ lumber
- One back apron cut to 42 1/2 inches long using 1″ x 4″ lumber
- One front apron cut to 42 5/8 inches long, and then cut into three pieces — two small, stationary apron pieces that are 8 inches long, and the remainder will be used as the drawer front, using 1″ x 4″ lumber (Note: If you’re going to stain the desk, make sure this piece is cut so that the grain of the wood is continuous from one end to the other.)
- Four legs cut to 29.25 inches long, using 1 3/4″ square dowels

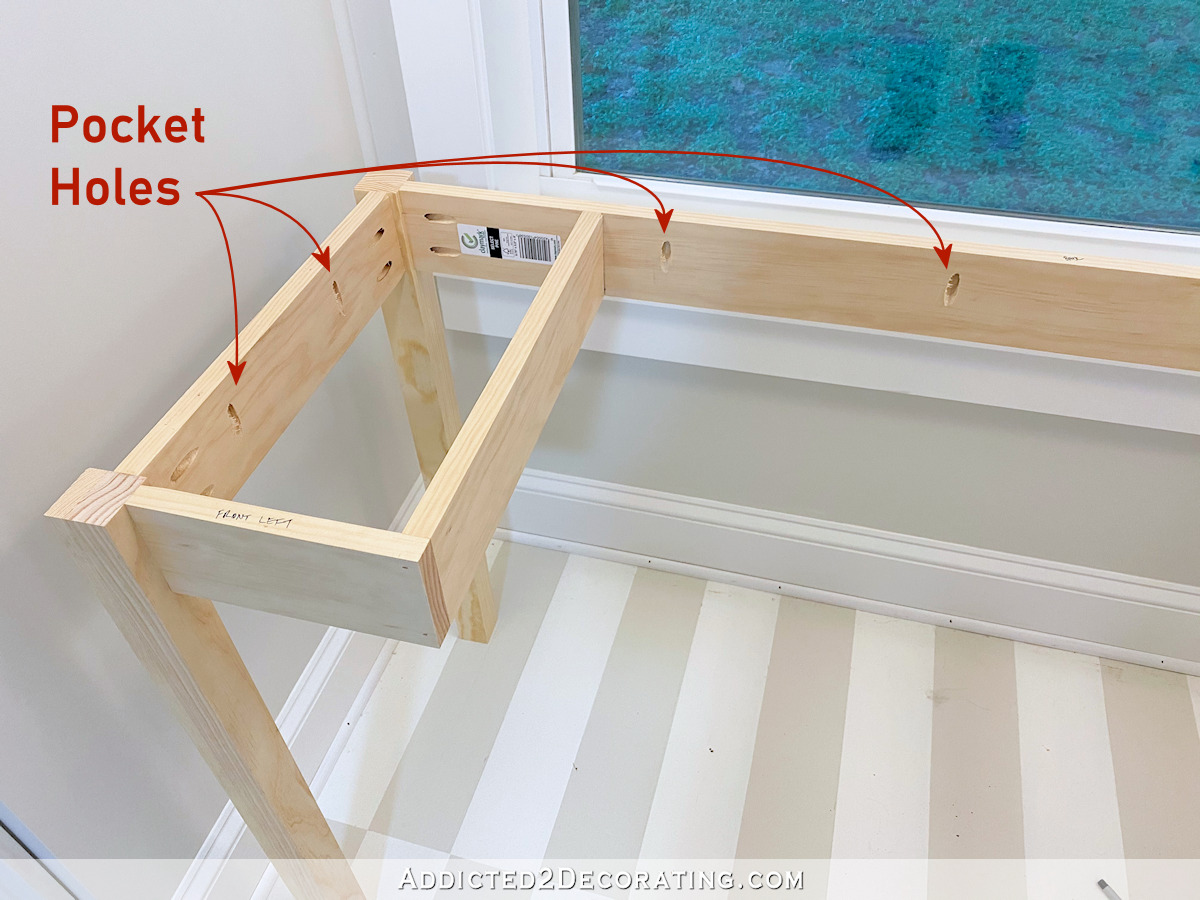
Using my Kreg Pocket Hole Jig (affiliate link), I drilled pocket holes into the sides of all of the apron pieces.
Here’s how those looked with all of the pocket holes drilled. You’ll notice that the center front piece (i.e., the drawer front) does not need pocket holes.
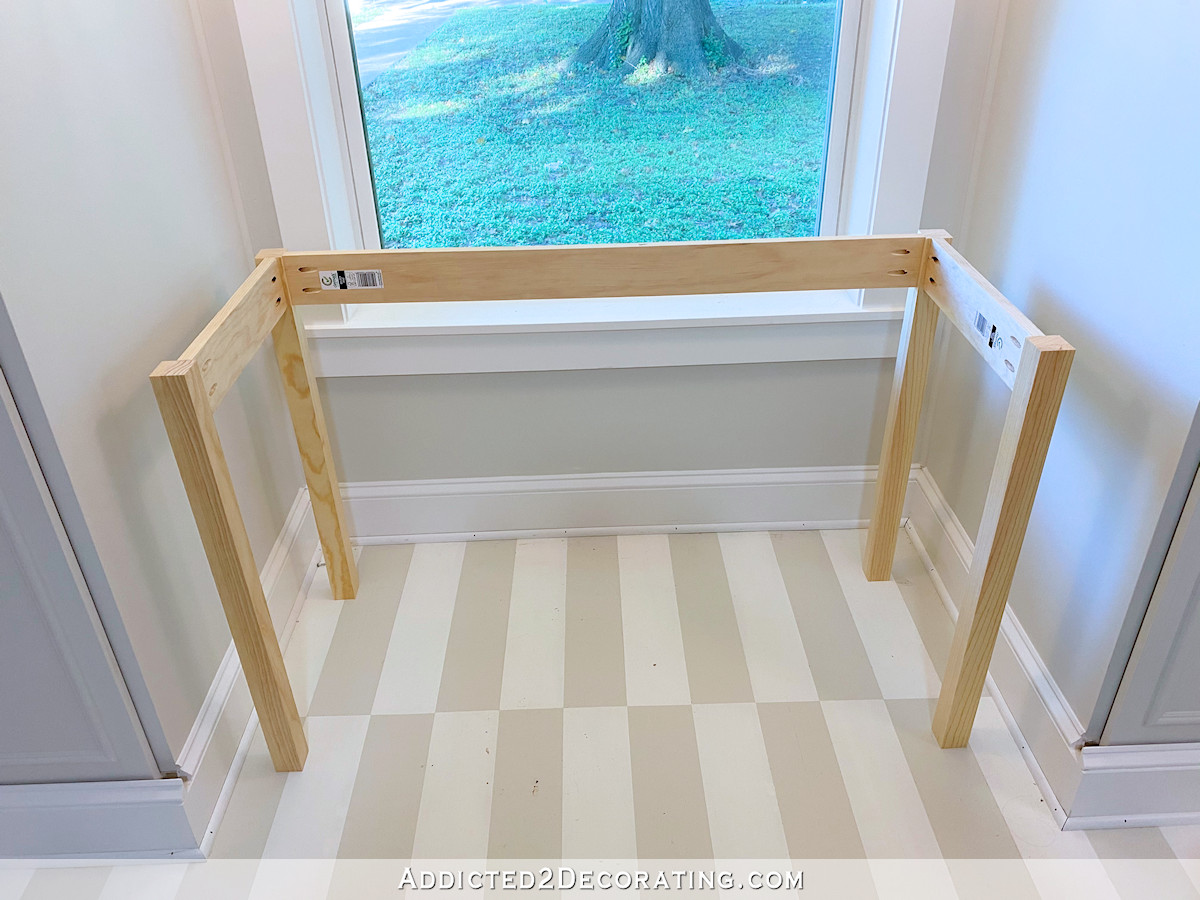
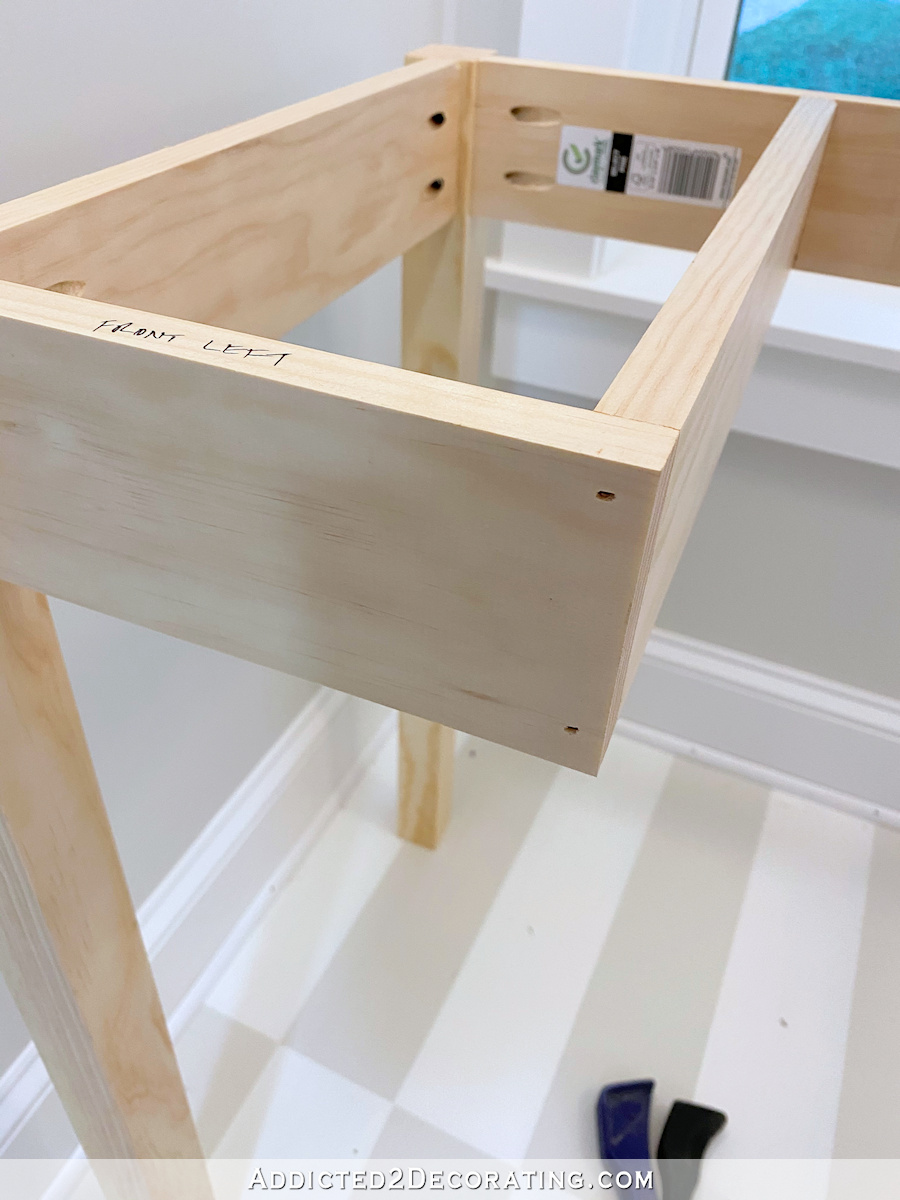
I assembled these pieces starting with the side apron. I placed wood glue on the end of the side apron piece, and then using a Kreg right angle clamp (affiliate link), I clamped the side apron piece to the leg. I like aprons on tables and desks to be set back a bit from the legs, so I used a piece of 1″ x 4″ lumber (which is actually 3/4″ thick) as a spacer under the side apron piece. With the pieces glued and clamped together, I screwed the pieces together using the pre-drilled pocket holes.
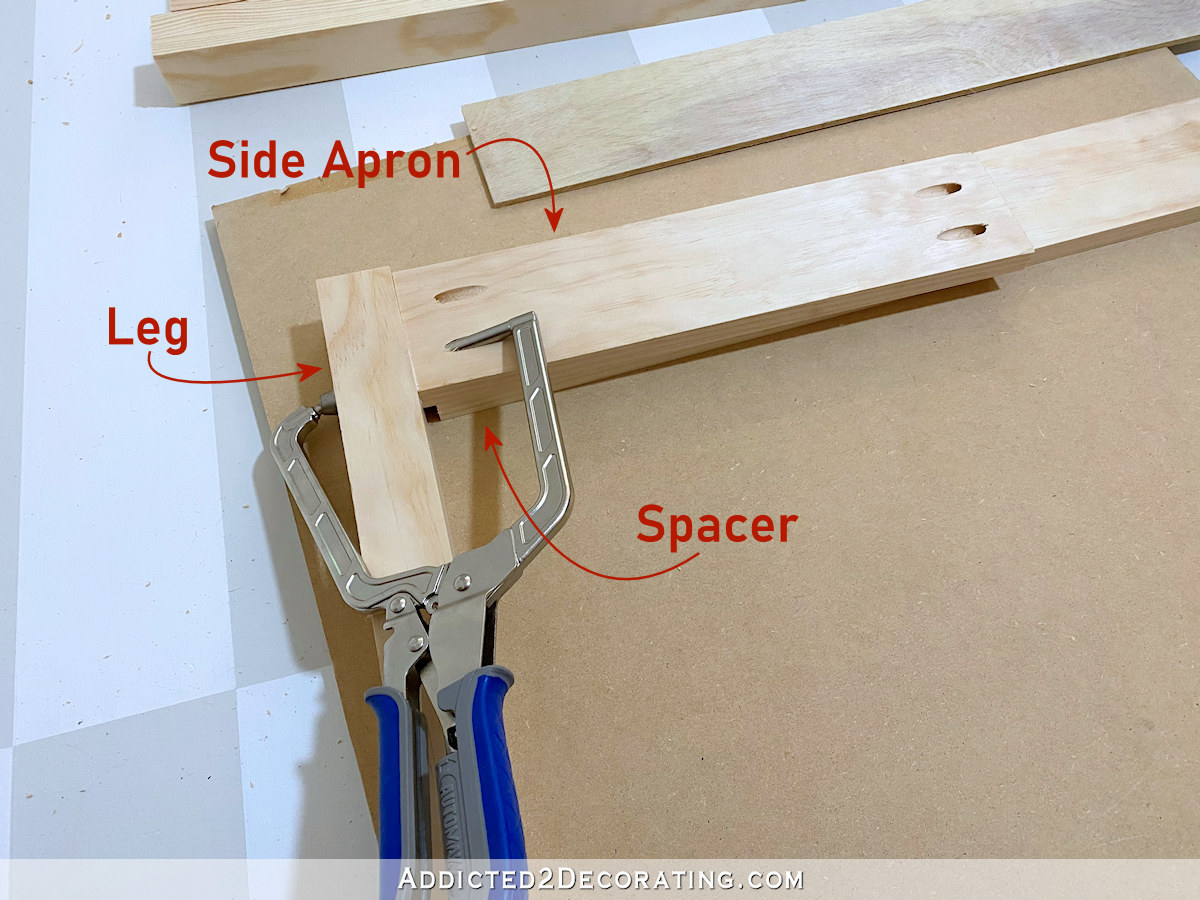
Then I repeated that process on the other side of that apron piece — glue, clamp, and screw the pieces together.
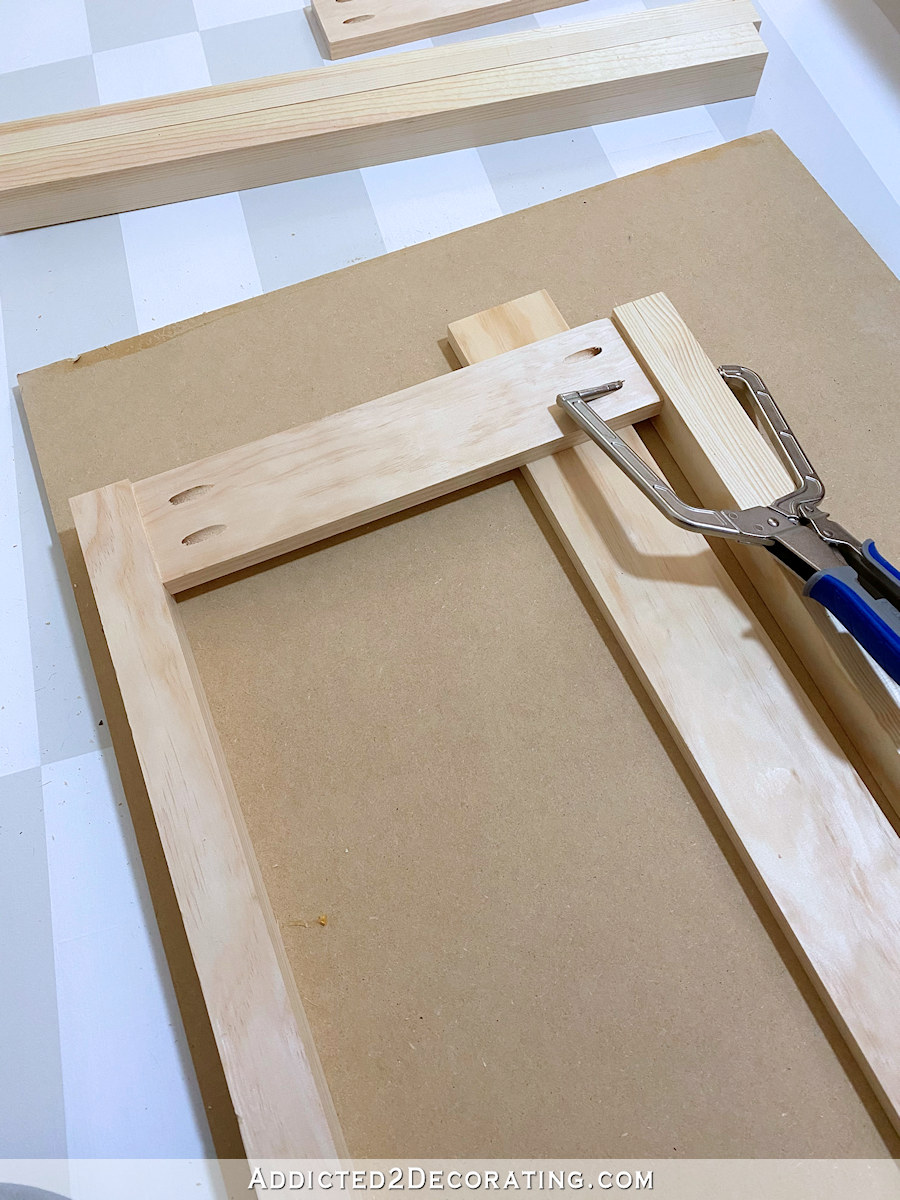
Here’s what the back side (i.e., the side that would face underneath the desk) of that piece looked like once it was assembled…
And here’s what the front side (i.e., the side that would be visible on the finished desk) looked like once assembled…
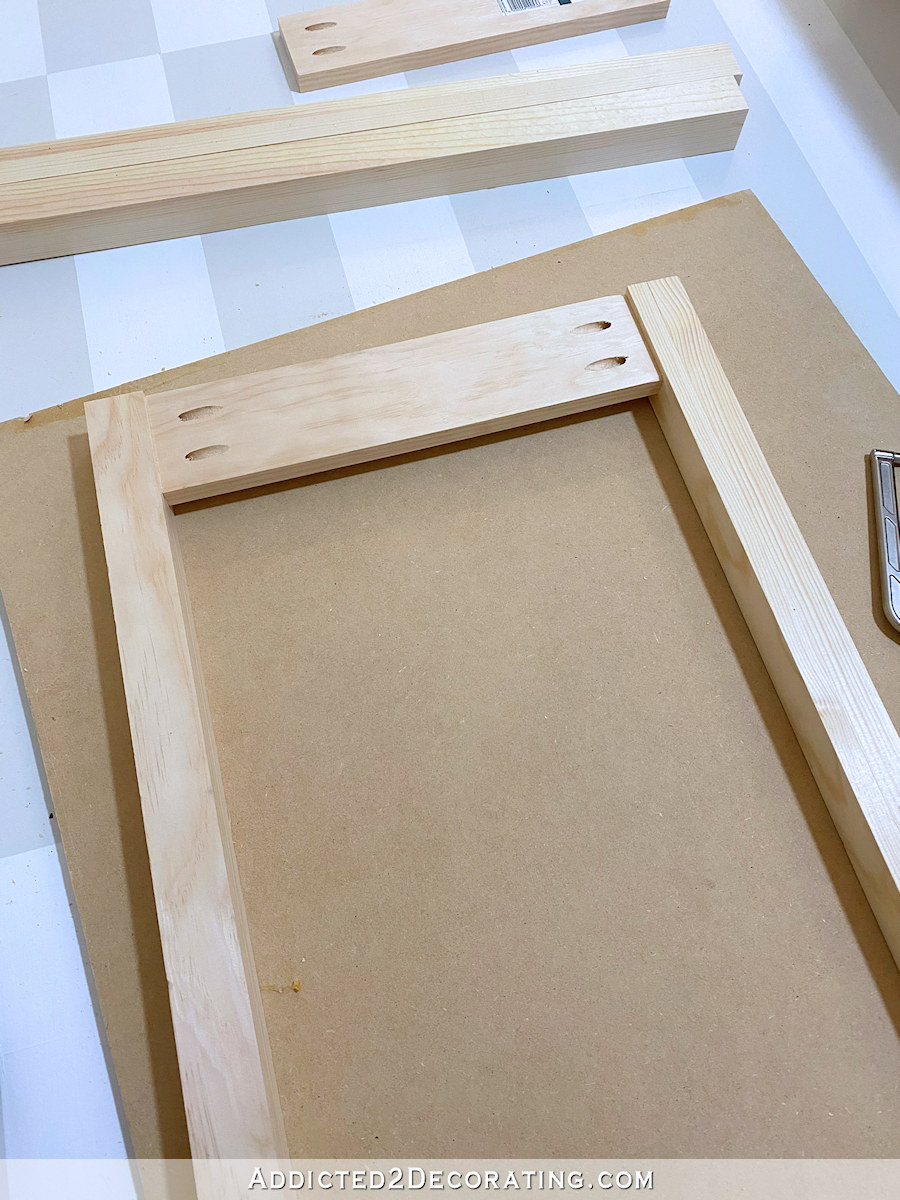
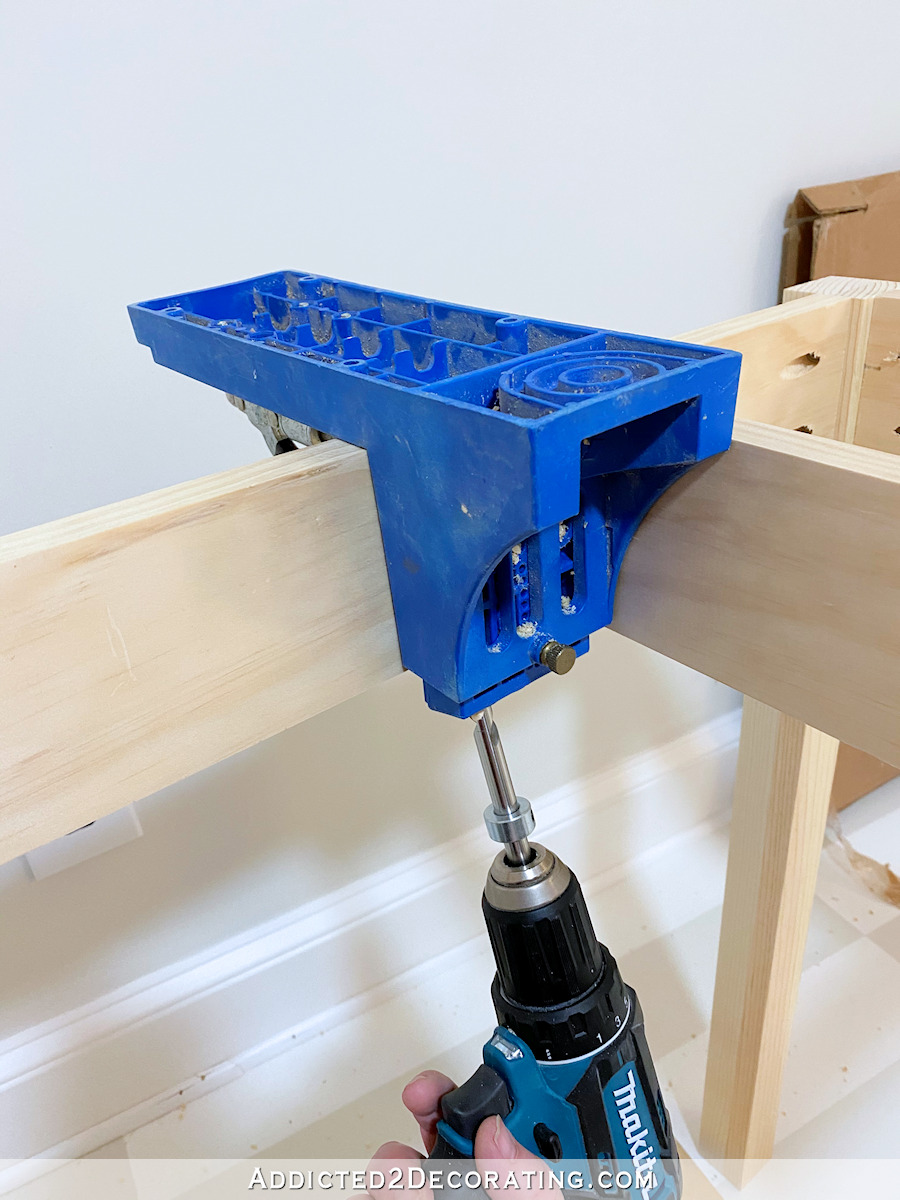
Next, I stood the assembled side piece up on its edge, and attached the back apron piece in the same way, placing it on a 1″ x 4″ piece of wood as a spacer before gluing, clamping, and screwing the pieces together…
After repeating that process on the other side, this is what the base looked like at this point…
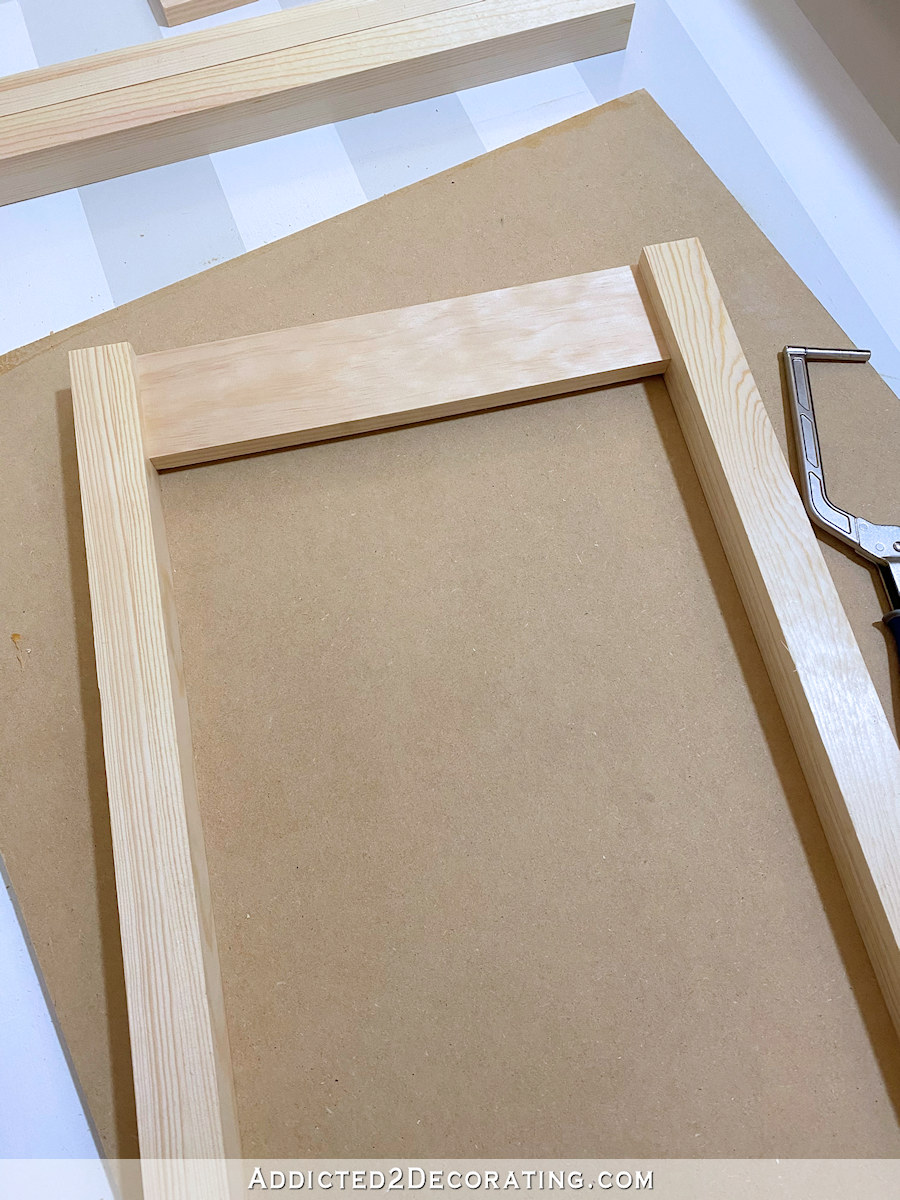
In order to attach the two small stationary apron pieces on the front, I placed the desk base on it’s front…
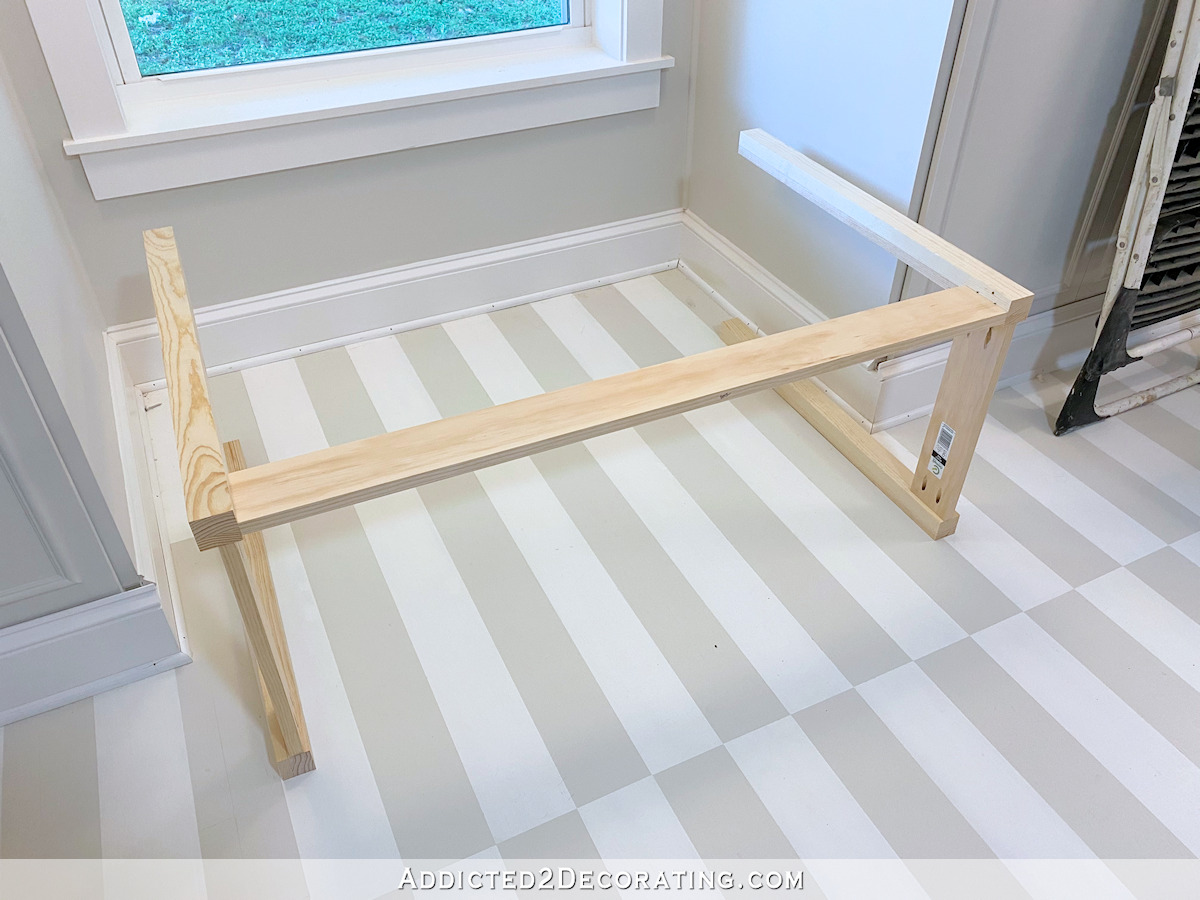
And then attached the small front apron pieces just like the others — spacer underneath, glue, clamp, and screw the pieces together.
With the two small front apron pieces attached, it looked like this…
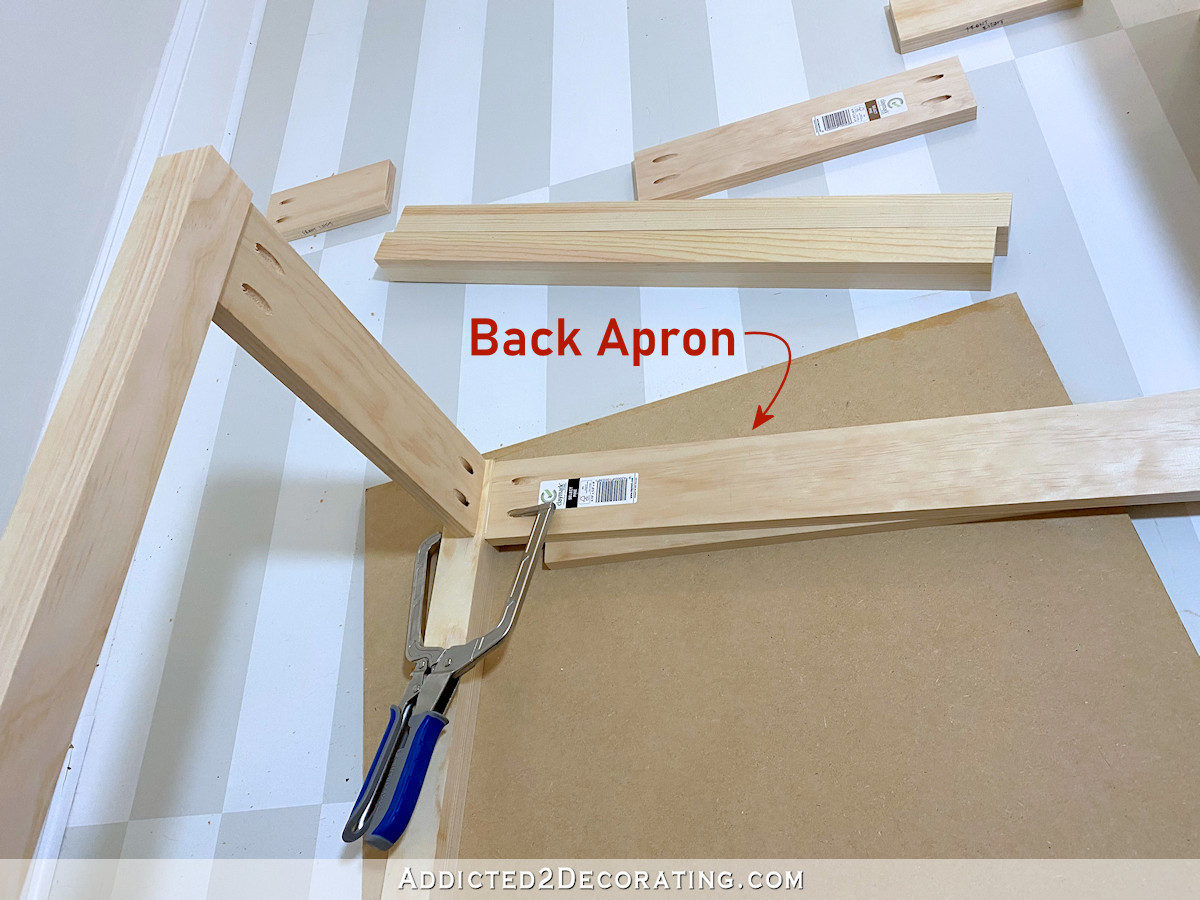
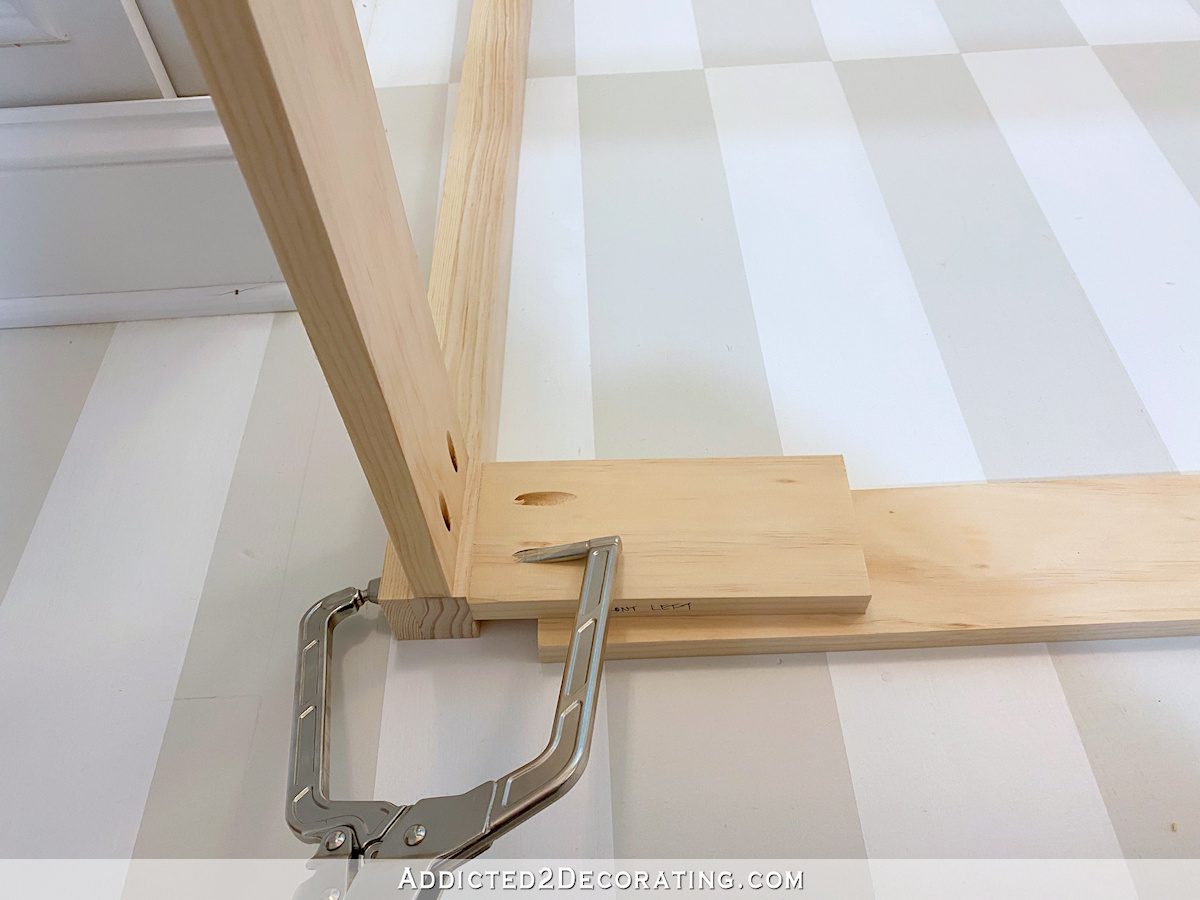
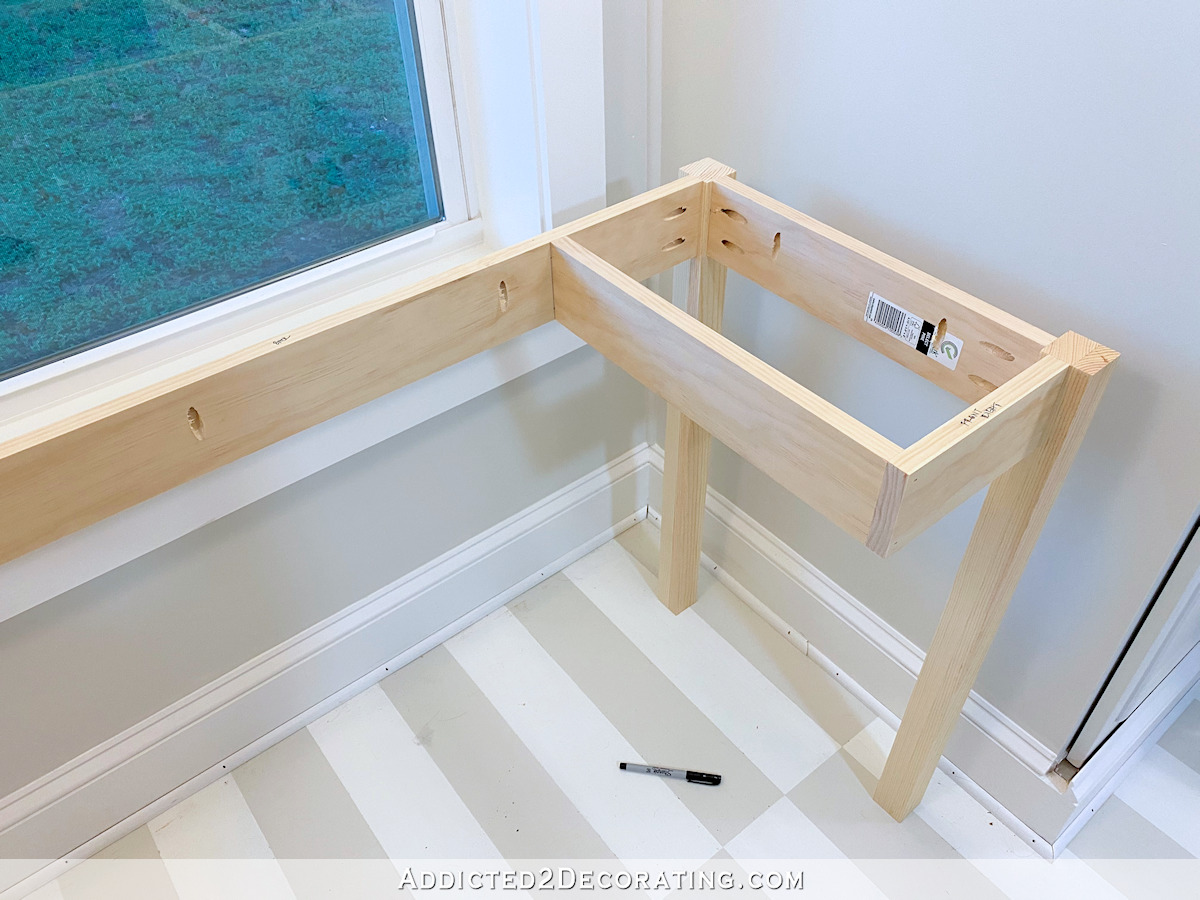
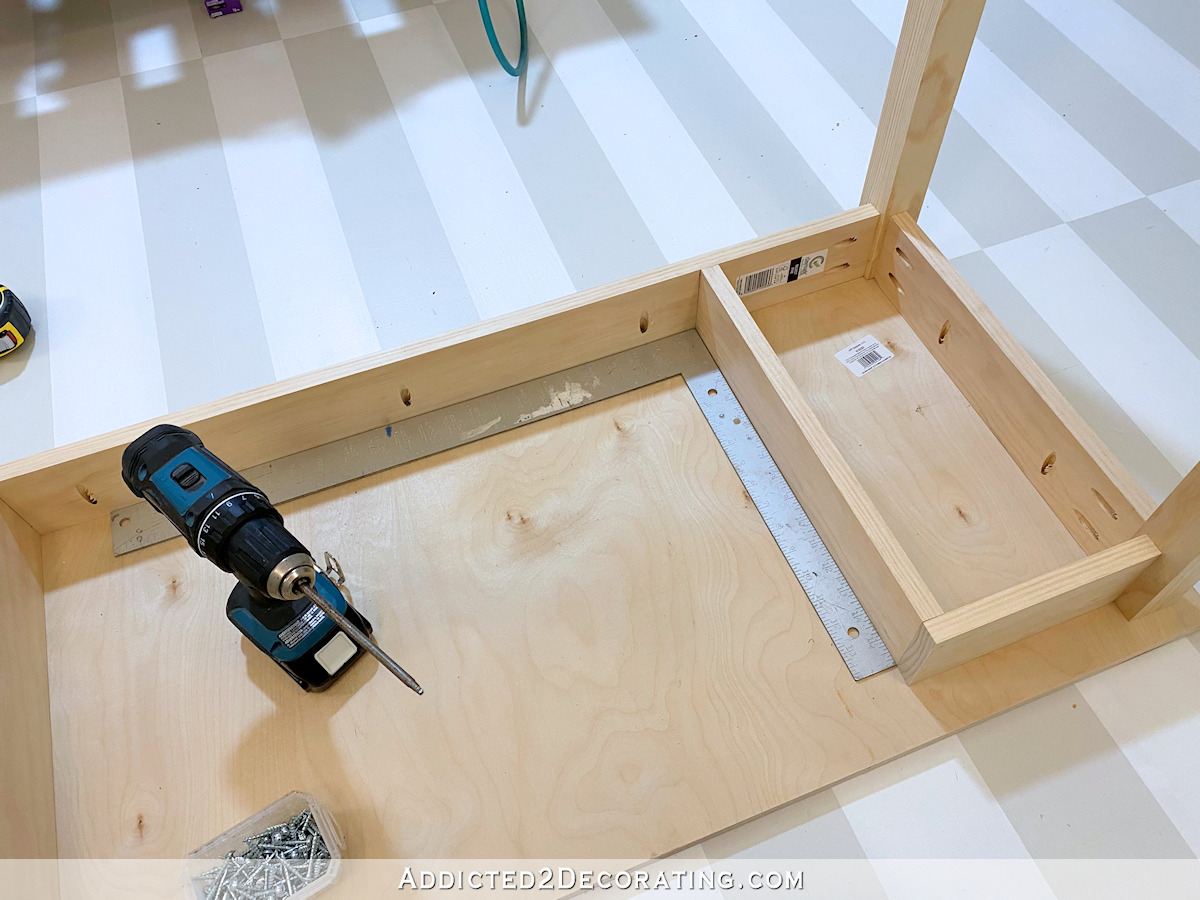
Next, I double-checked the measurement of the front apron piece…
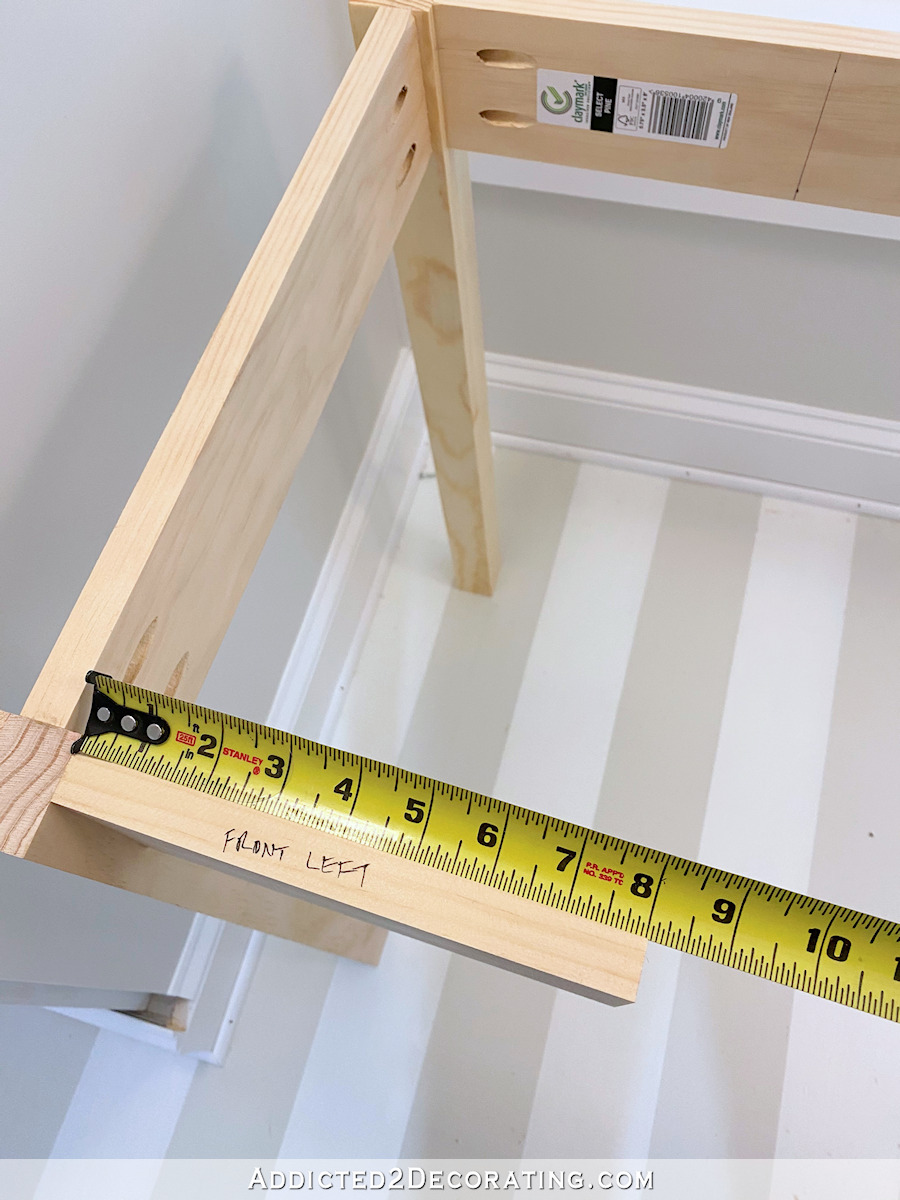
And marked that same measurement onto the back apron piece…
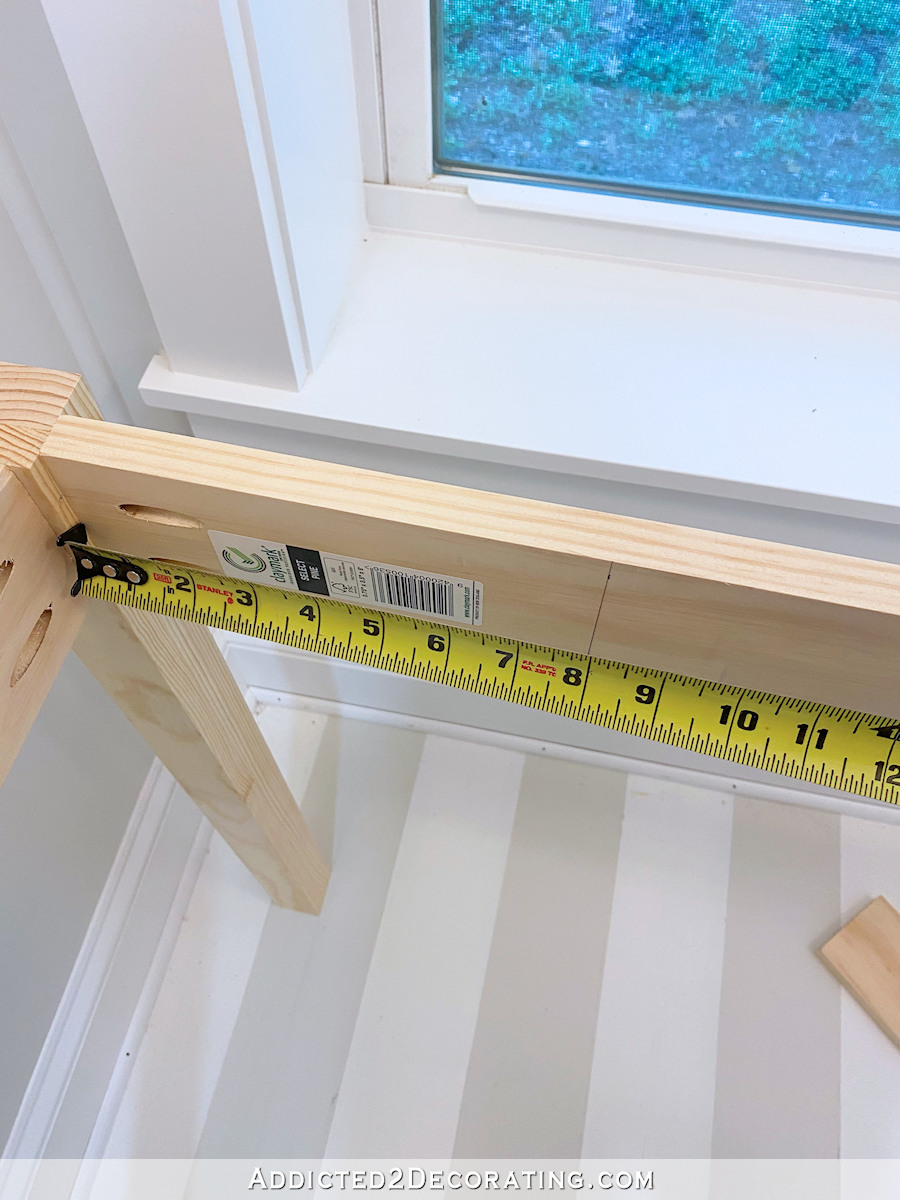
And then after measuring the distance between the front and back apron pieces (I took that measurement close to the legs)…
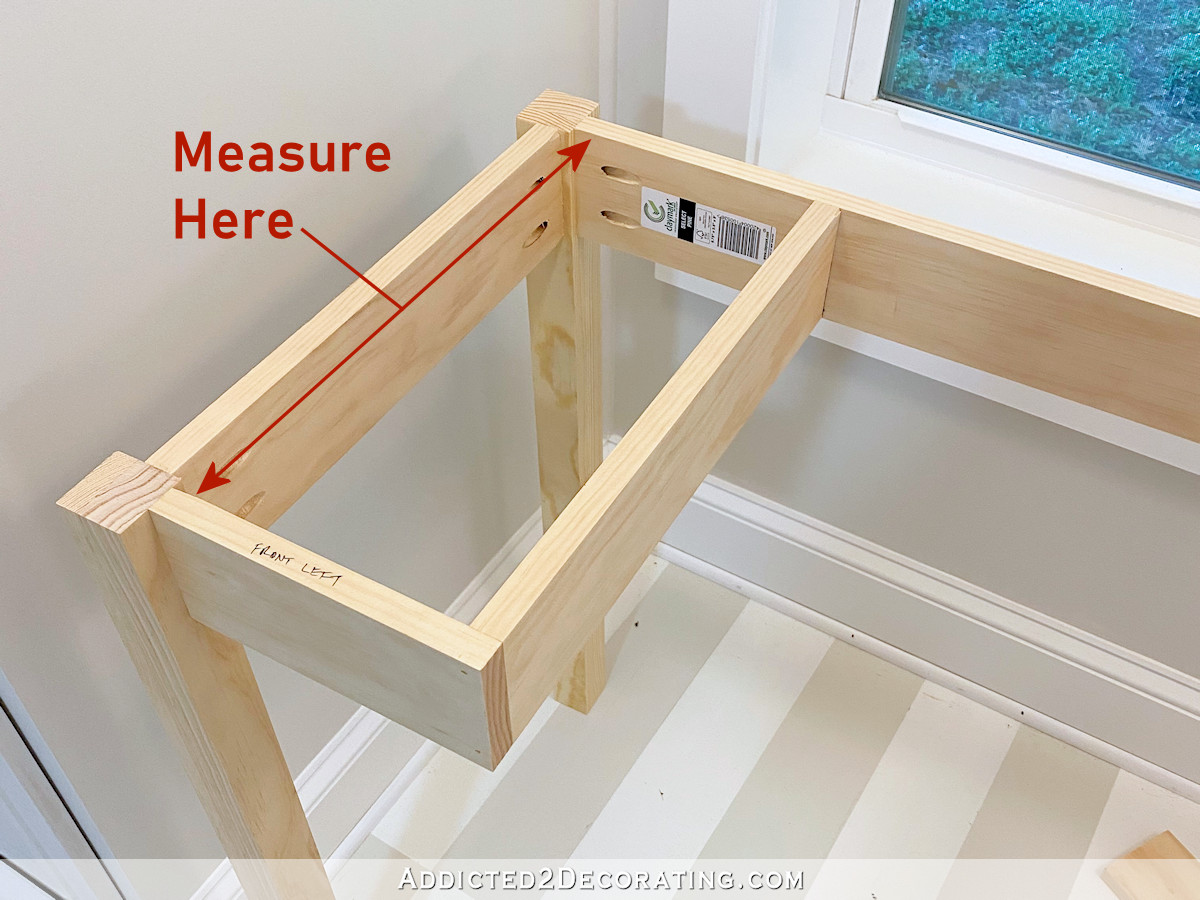
…I cut a piece of 1″ x 4″ lumber to that length and attached it as shown below, using the mark that I had drawn on the back apron for placement.
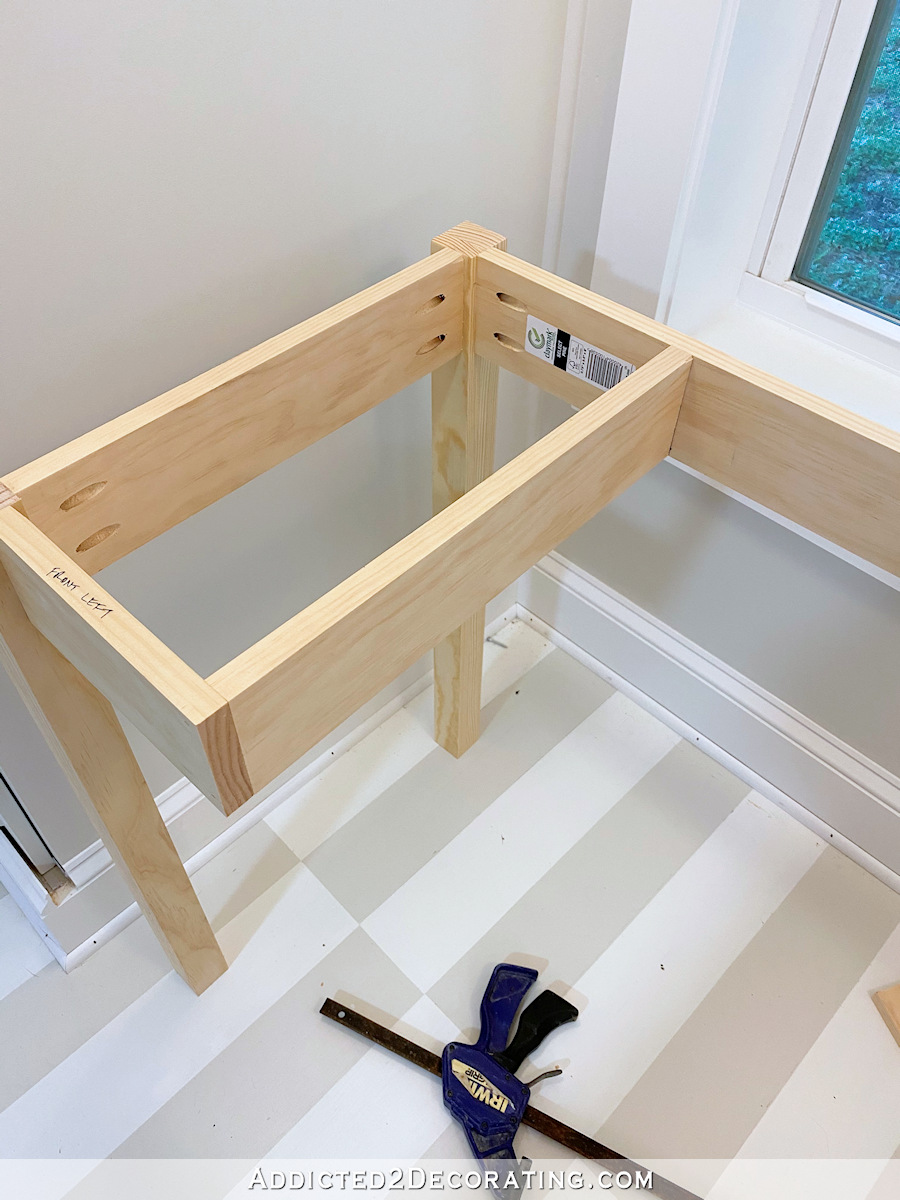
To attach this piece, I used my 16-gauge nail gun with 1 1/2-inch nails and just shot the nails right through the front and back aprons into the edges of the piece.
I’ll just use a bit of wood filler to fill those holes before I paint or stain the desk. However, if you have objections to shooting nails through the front apron, you can attach this piece with pocket holes as well.
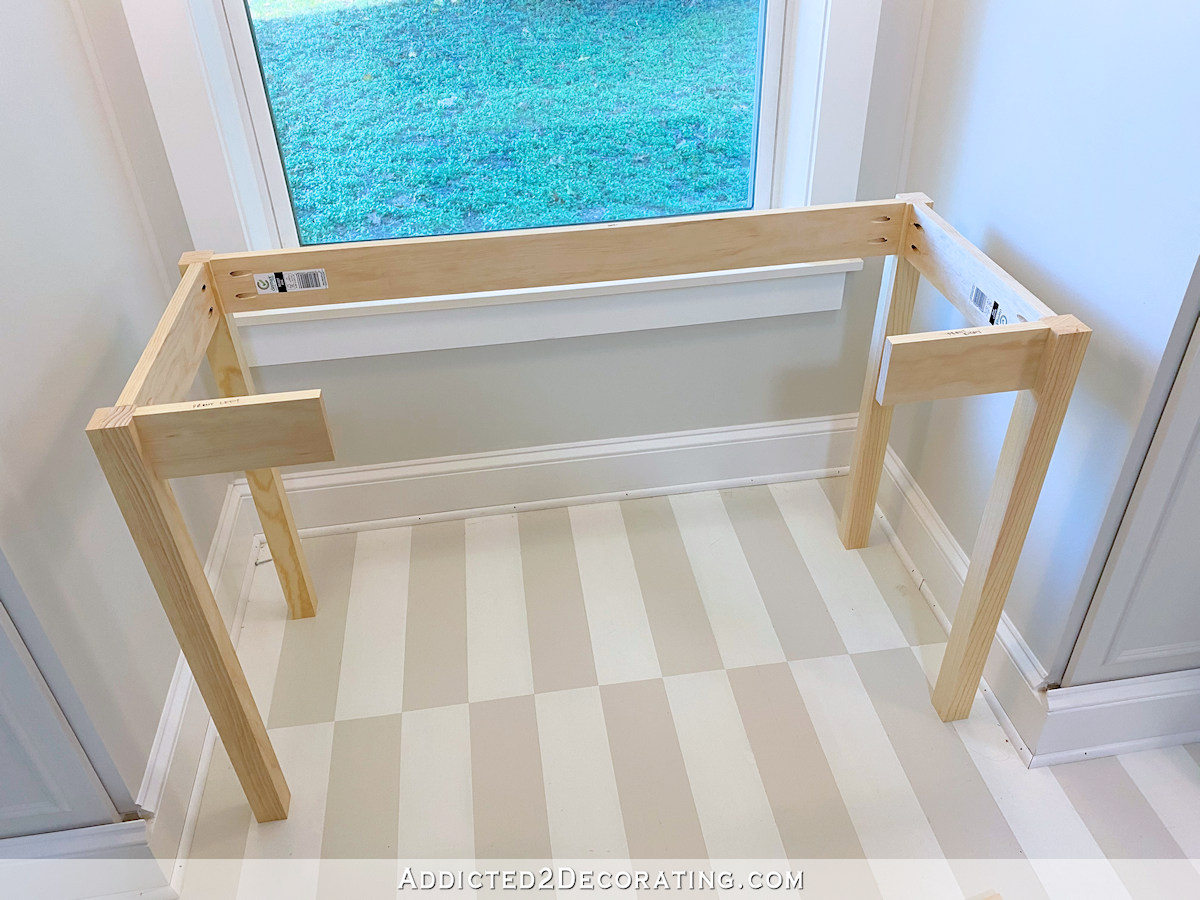
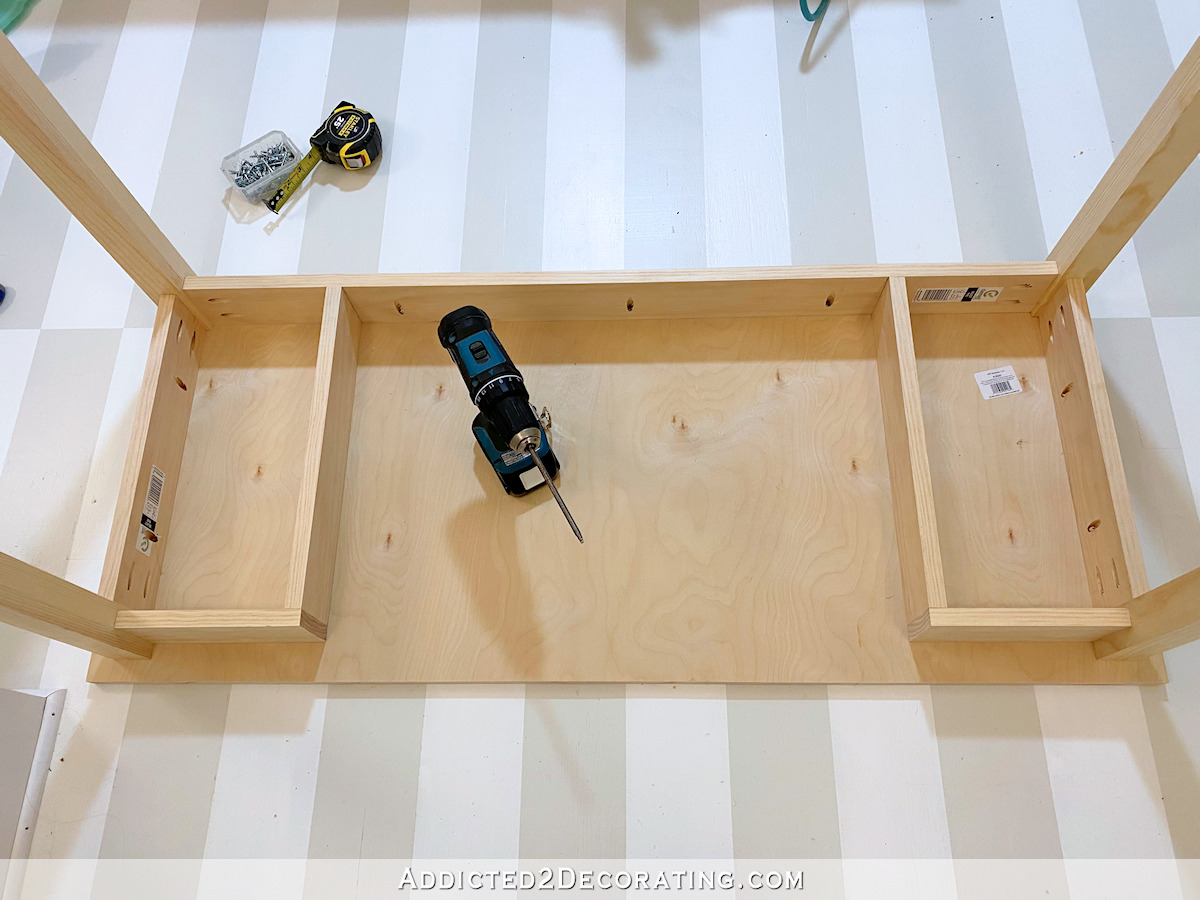
After repeating that process on the other side, I was ready to cut and attach the desk top. However, it was at this point that I realized I had forgotten to drill the pocket holes to attach the top. So I had to get a bit creative by attaching the Kreg pocket hole jig upside down, and drilling the holes upside down. It wasn’t really that big of a deal. It certainly would have been easier had I remembered to do this before assembling the base, but this worked out just fine.
Here you can see four of the nine holes that I drilled to attach the top.
And more on the other side. I also drilled some on the front apron pieces, which you obviously can’t see in these photos.
How To Attach The Desktop To The Desk Base
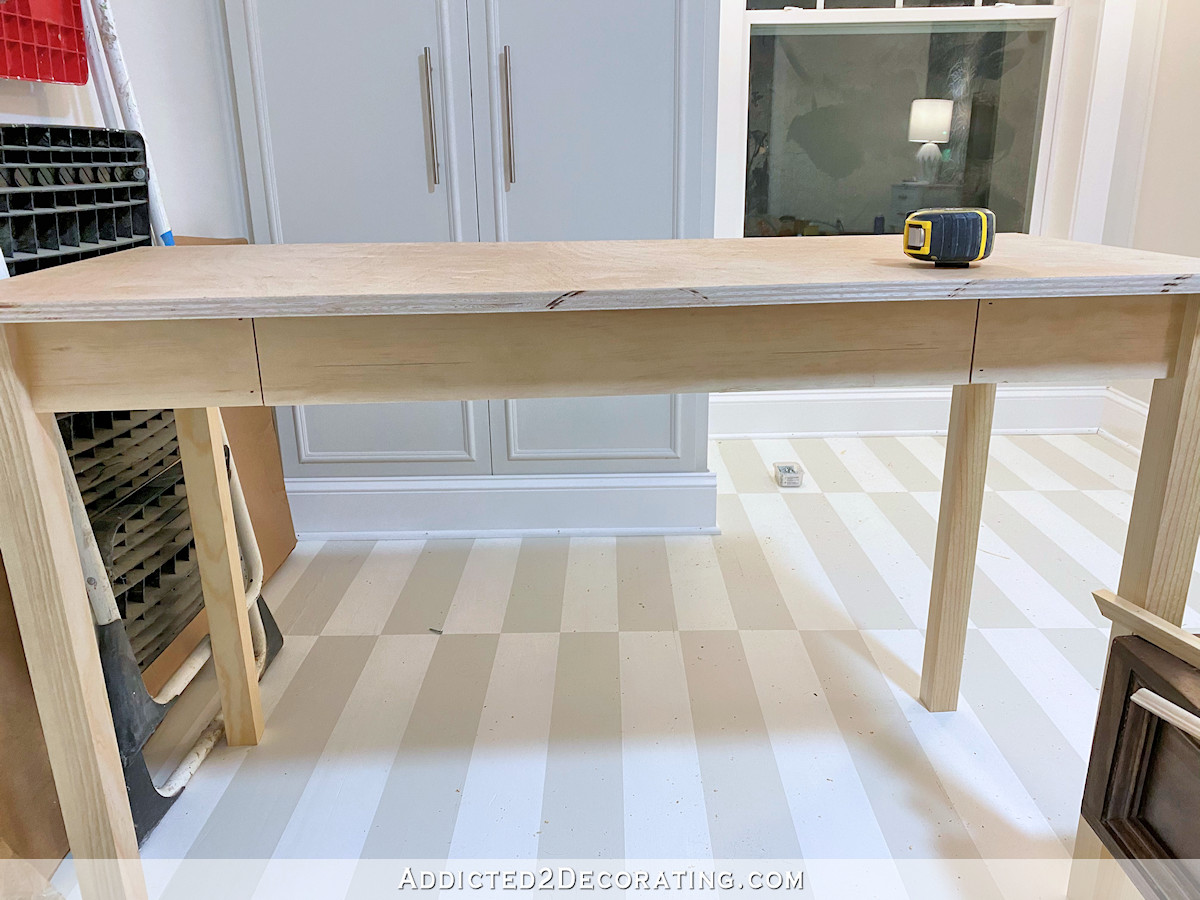
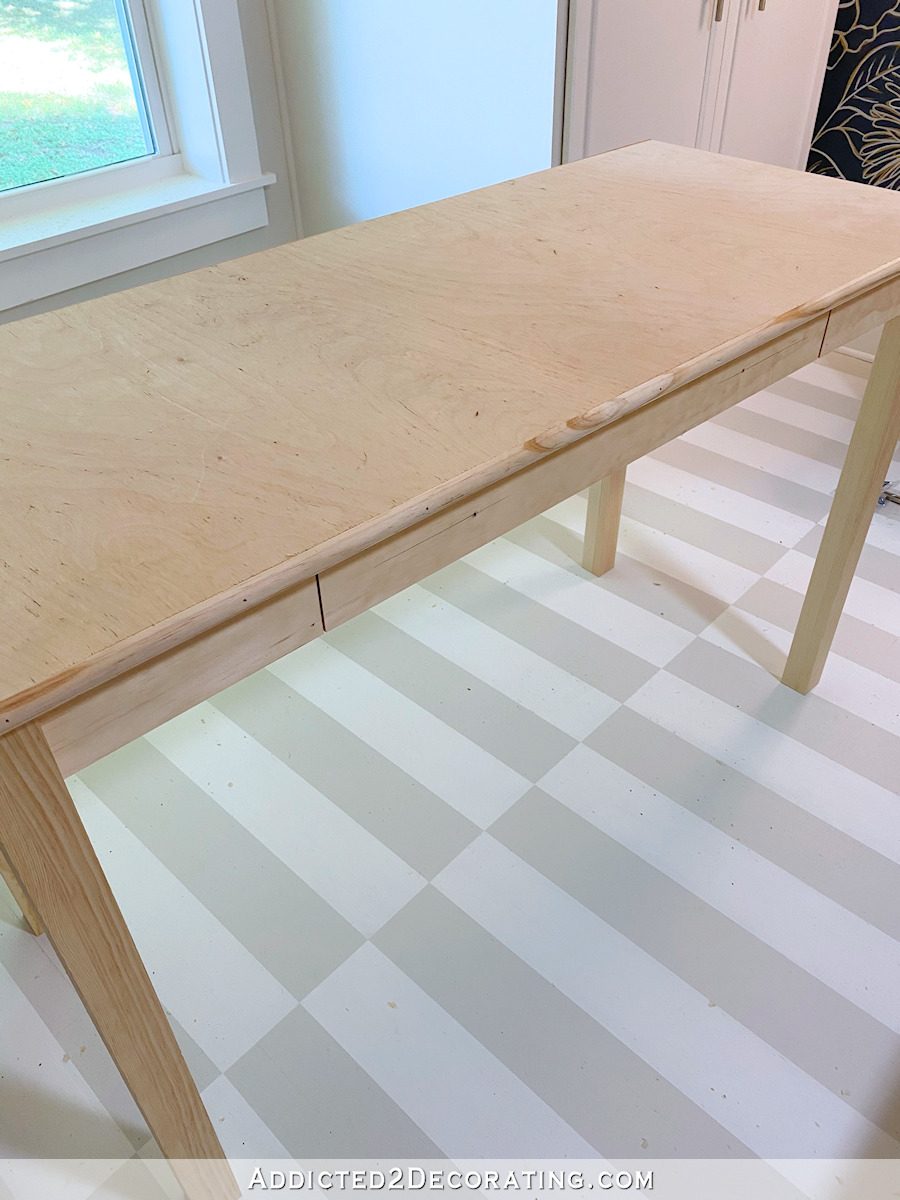
Next, I used my table saw to cut a piece of 3/4″ plywood for the top. I cut the piece to 48″ x 20″. Then I placed it on top just to check for proper fit both on the base as well as in the space.
To attach the top, I put the plywood face down on the floor, then placed the desk base upside down on the plywood and measured for placement. I measured to make sure the placement was just right, and then I screwed the base to the top starting with the three center pocket holes on the back apron.
Before screwing the sides of the base onto the top, I used my framing square to check for square. It’s imperative that this center section that forms the drawer well is perfectly square so that the drawer will function properly.
I repeated that on the other side until I had the base completely attached to the top.
How To Build The Desk Drawer
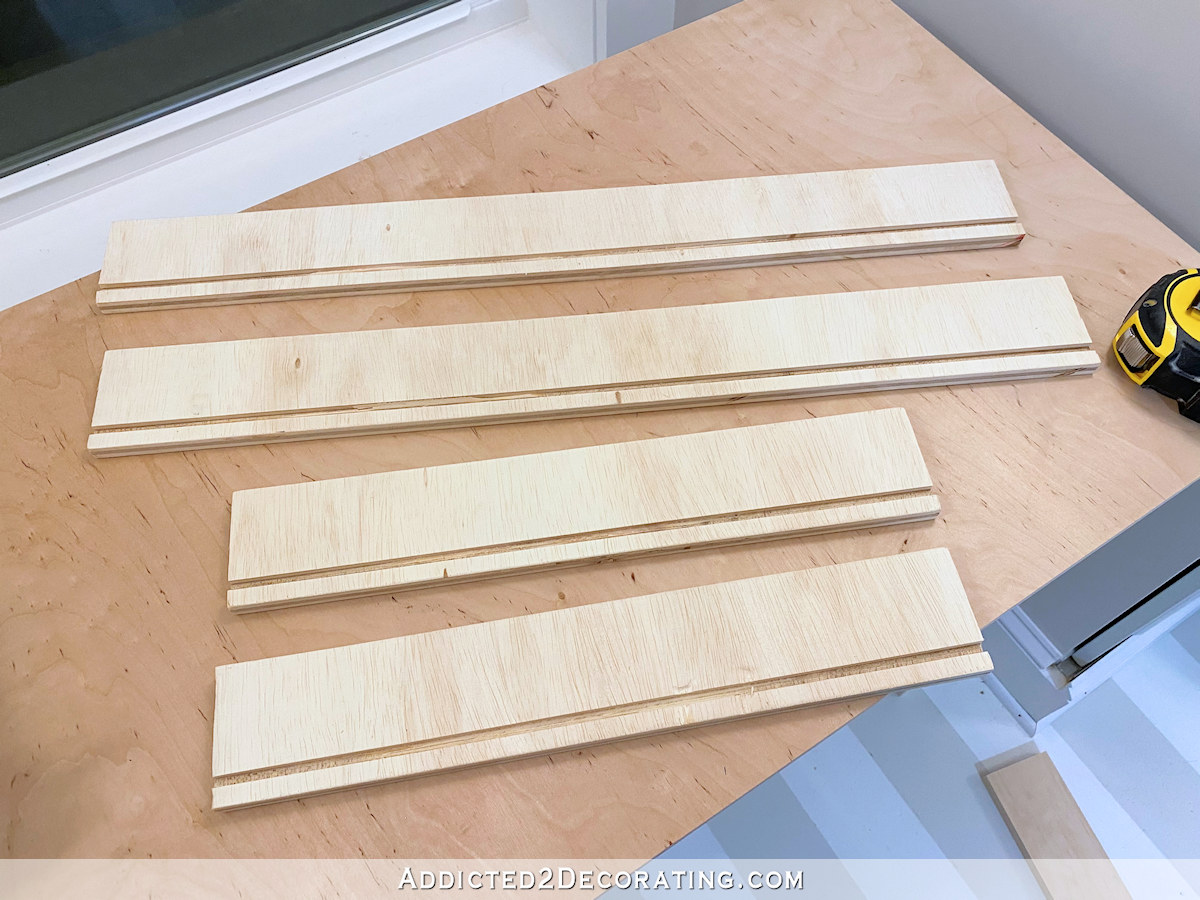
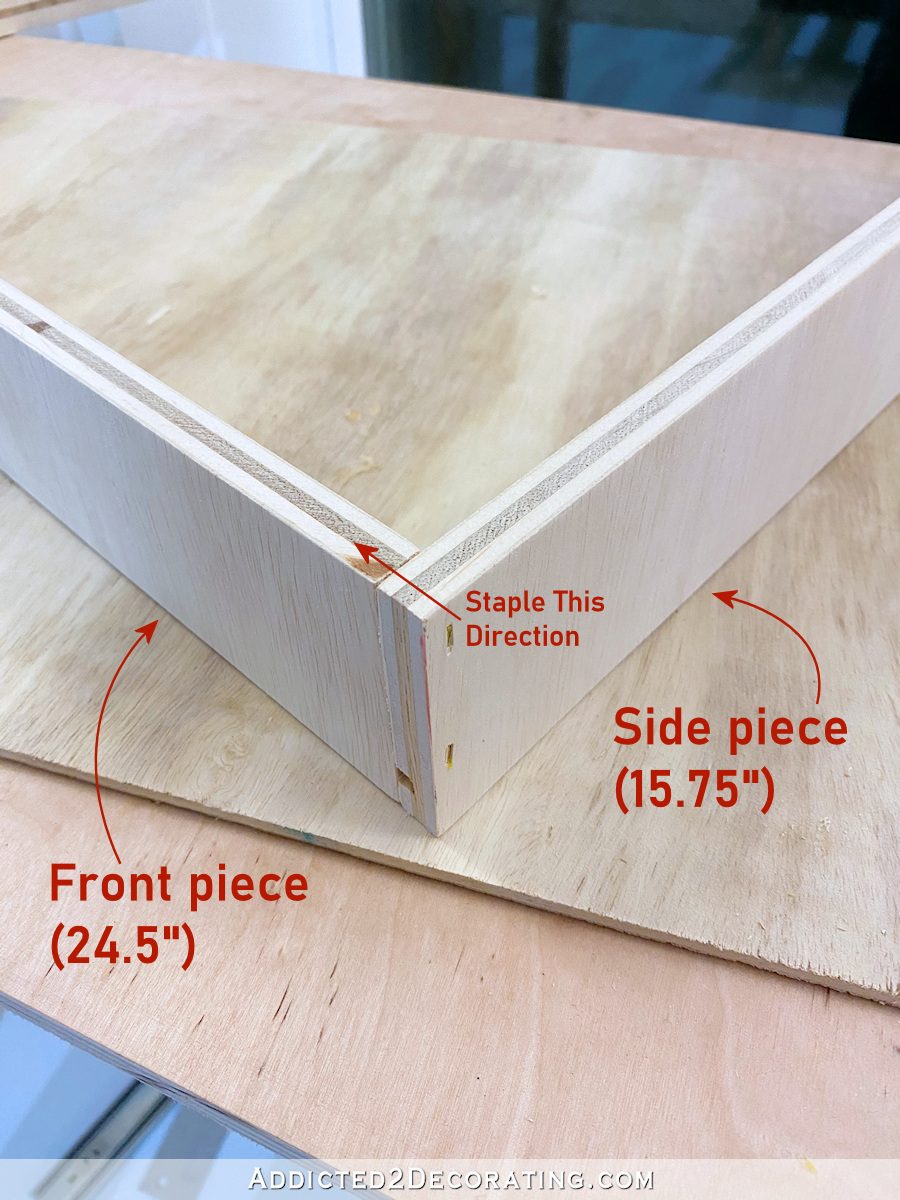
I used 1/2-inch plywood to build the sides of the drawer box, and using my table saw, I cut the drawer sides 2.75 inches high. Then I used my miter saw to cut two pieces to the full depth of the drawer (15.75″ for my desk), and two pieces to the width of the drawer well minus two inches (24.5″ for my desk). To get this measurement, you measure the width of the drawer well opening, and then subtract the space needed for the drawer slides (generally 1/2 inch for each slide, so 1 inch total, but double check the specs on your particular drawer slides), and subtract the width of the sides of the drawer box (since I’m using 1/2-inch plywood, that is 1 inch for both sides).
Next, I set my table saw so that the blade was 1/4-inch high, and set the fence to 3/4-inch, and ran each piece through to cut the slots for the bottom of the drawer. This took three passes for each piece because after the first pass, I moved the fence over about 1/16 inch, and ran each piece through again. Then I moved the fence over another 1/16 inch, and did it a third time. It took three passes to get the slot wide enough to accommodate the piece of 1/4-inch plywood that I would use for the drawer bottom.
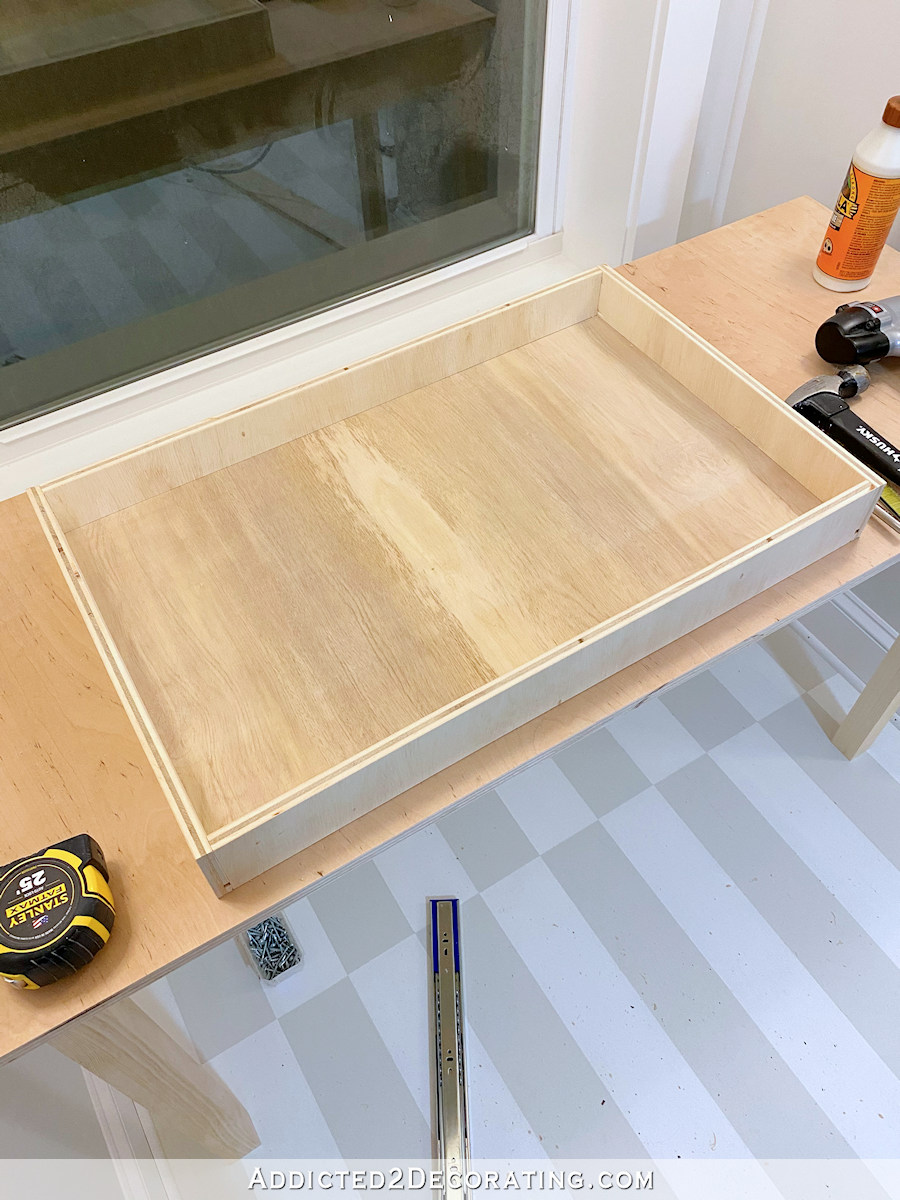
I assembled these pieces using wood glue and 1-inch staples in my narrow crown staple gun (affiliate link), and I attached them so that the drawer box sides (i.e., the 15.75″ pieces) attached to the ends of the front piece.
When I had the front and two sides attached, I cut a piece of 1/4-inch plywood to size (this took some trial and error), and slid it into the slots…
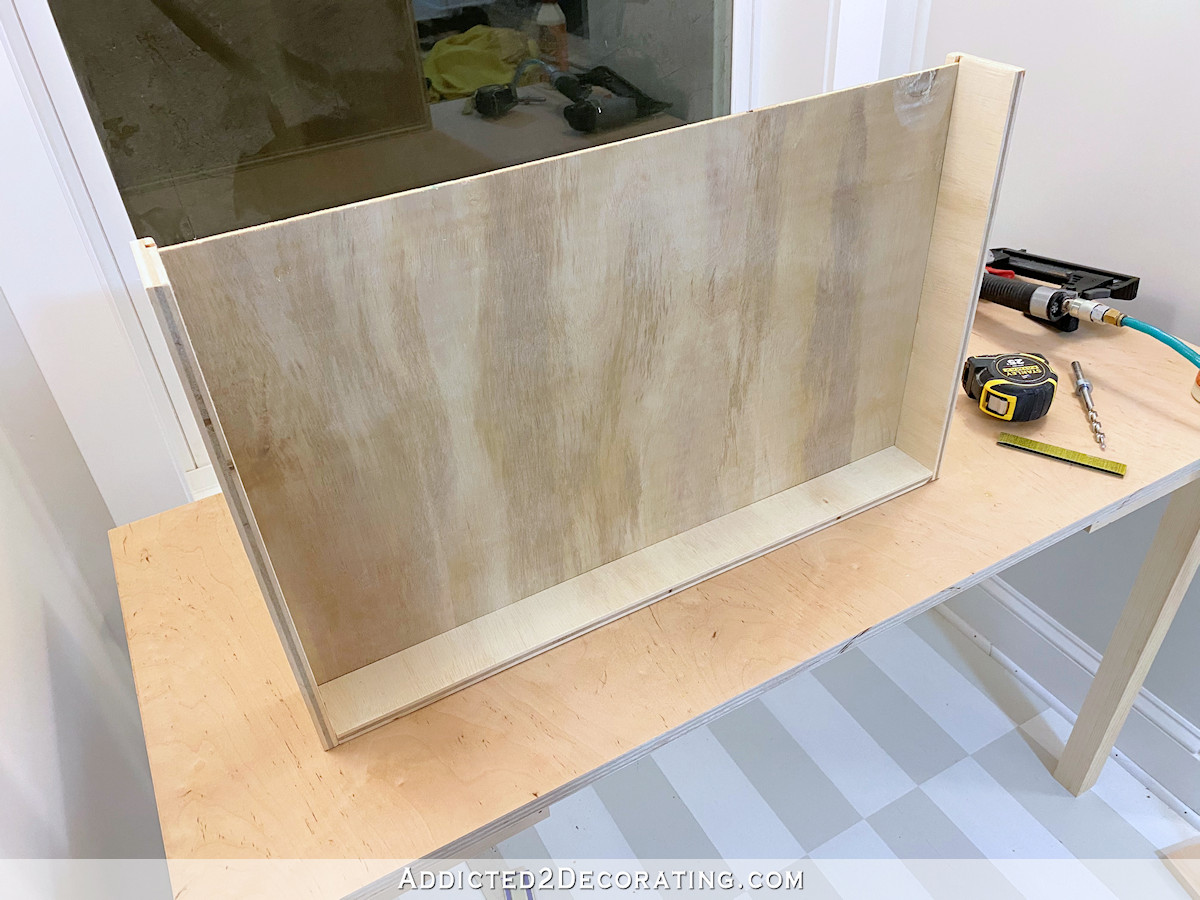
And then I attached the back drawer box piece using wood glue and staples.
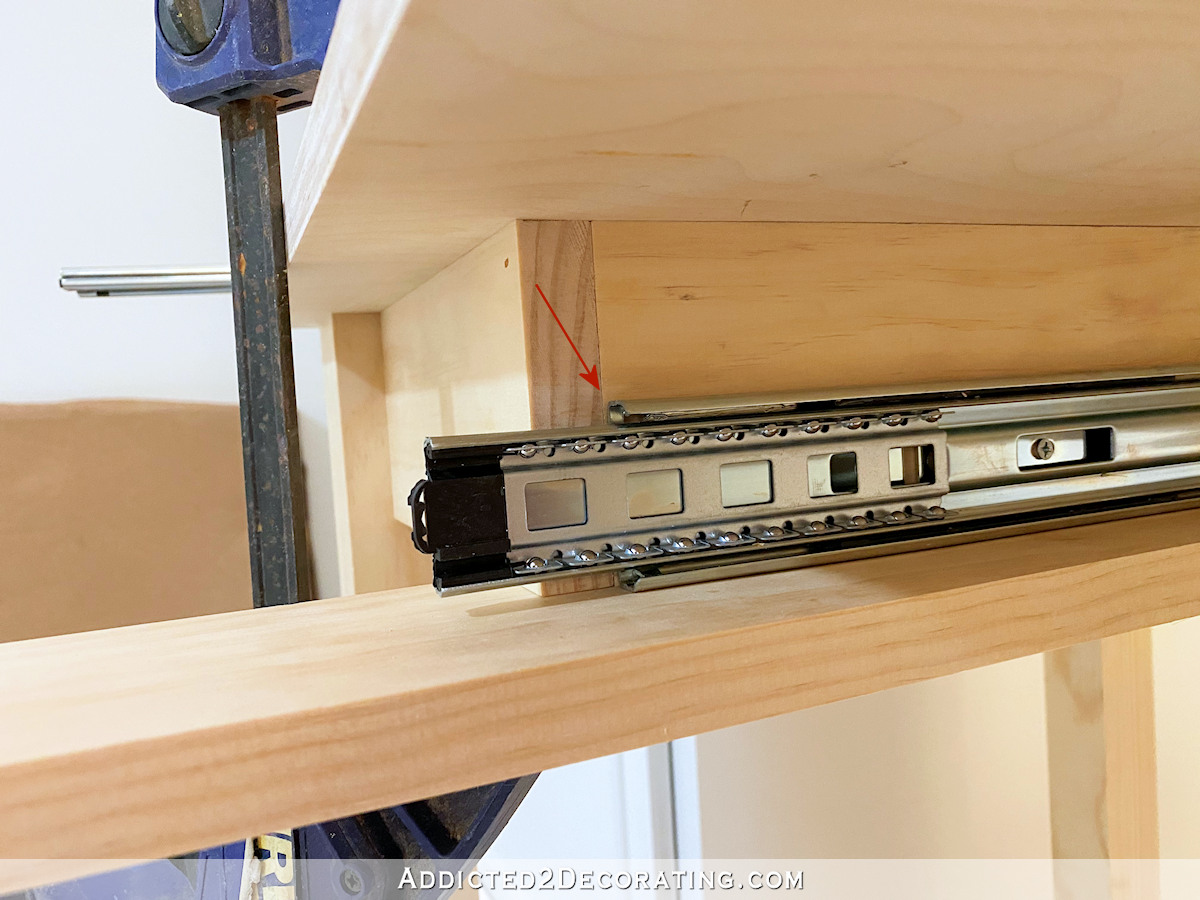
To install the drawer sides, I couldn’t use my standard method (i.e., using the Kreg Drawer Slide Jig (affiliate link)) since there was no rail to clamp the drawer slide jig to. So I had to get creative. Instead, I used a long piece of 1″ x 4″ lumber, and two clamps to hold the lumber just to the bottom of the drawer bay side where the drawer slide needed to be attached. That way I could place the drawer side on the lumber and easily screw it into place.
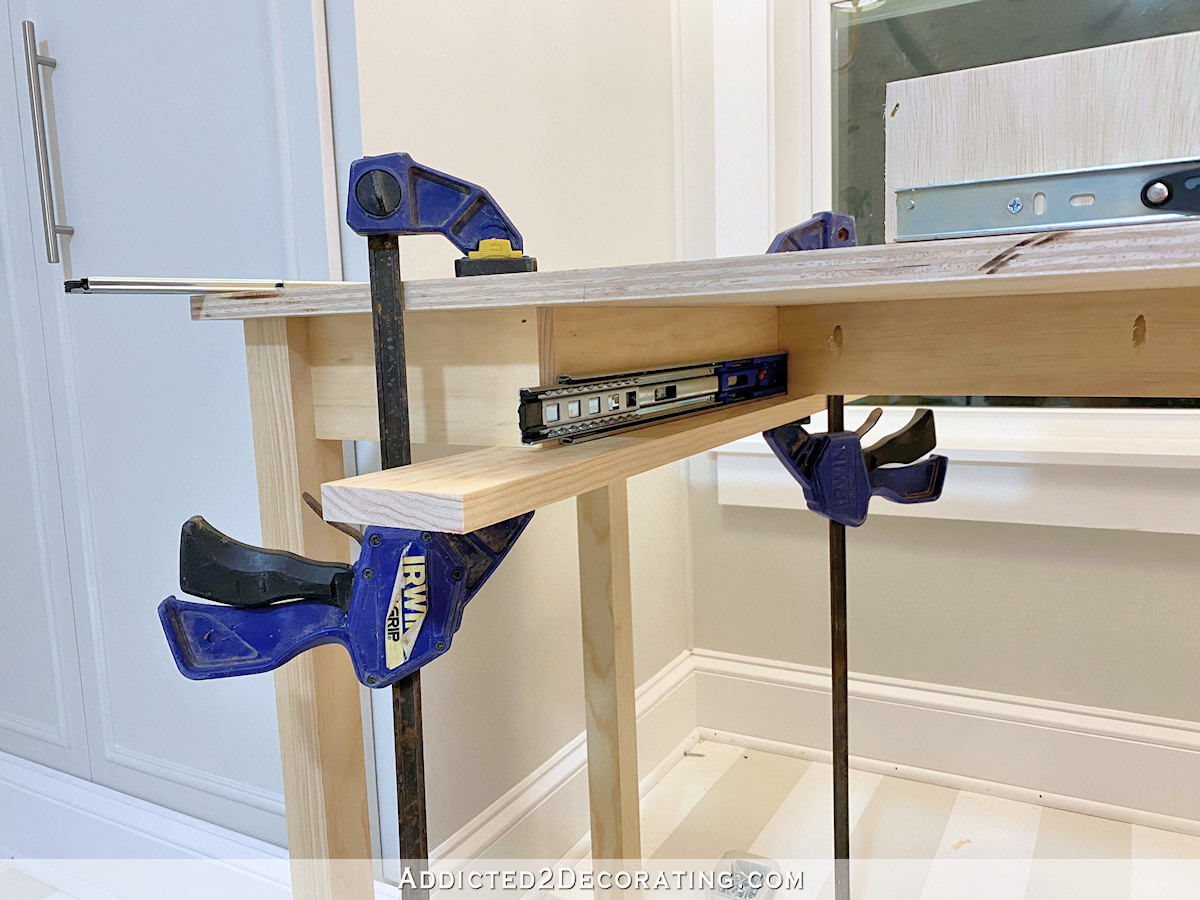
This placement was very important and had to be precise so that the drawer front would line up perfectly with the small apron pieces on either side once it was attached. So I made sure that the front edge of the drawer slide was lined up as perfectly as possible with the back edge of the front apron piece.
(Note: I used soft close drawer slides for this drawer, and on soft close drawer slides, the part that attaches inside the drawer well won’t fully close until the part that attaches to the side of the drawer is attached. That’s why you see that part sticking out about two inches in the picture above.)
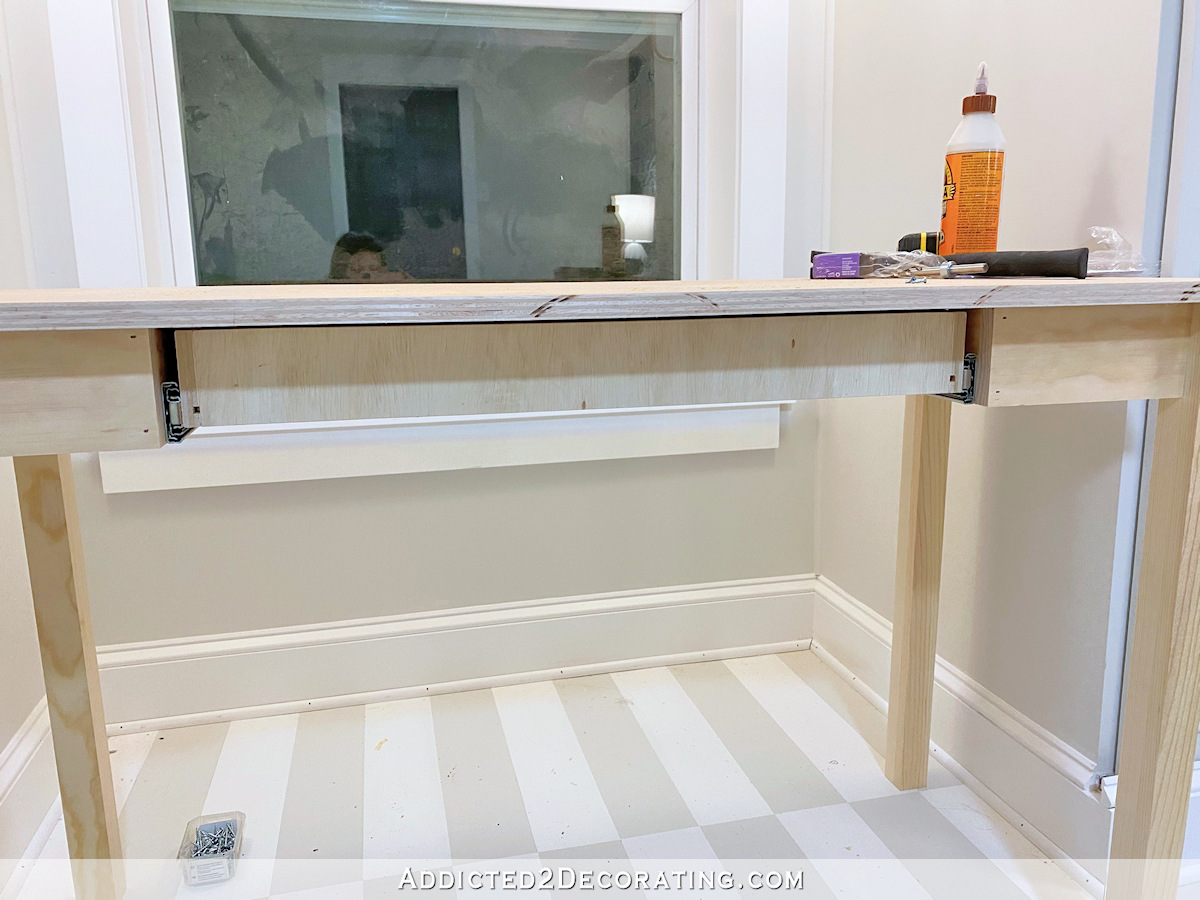
I repeated that process on the other side of the drawer well, and with the slides attached to the sides of the drawers, I was ready to install the drawer.
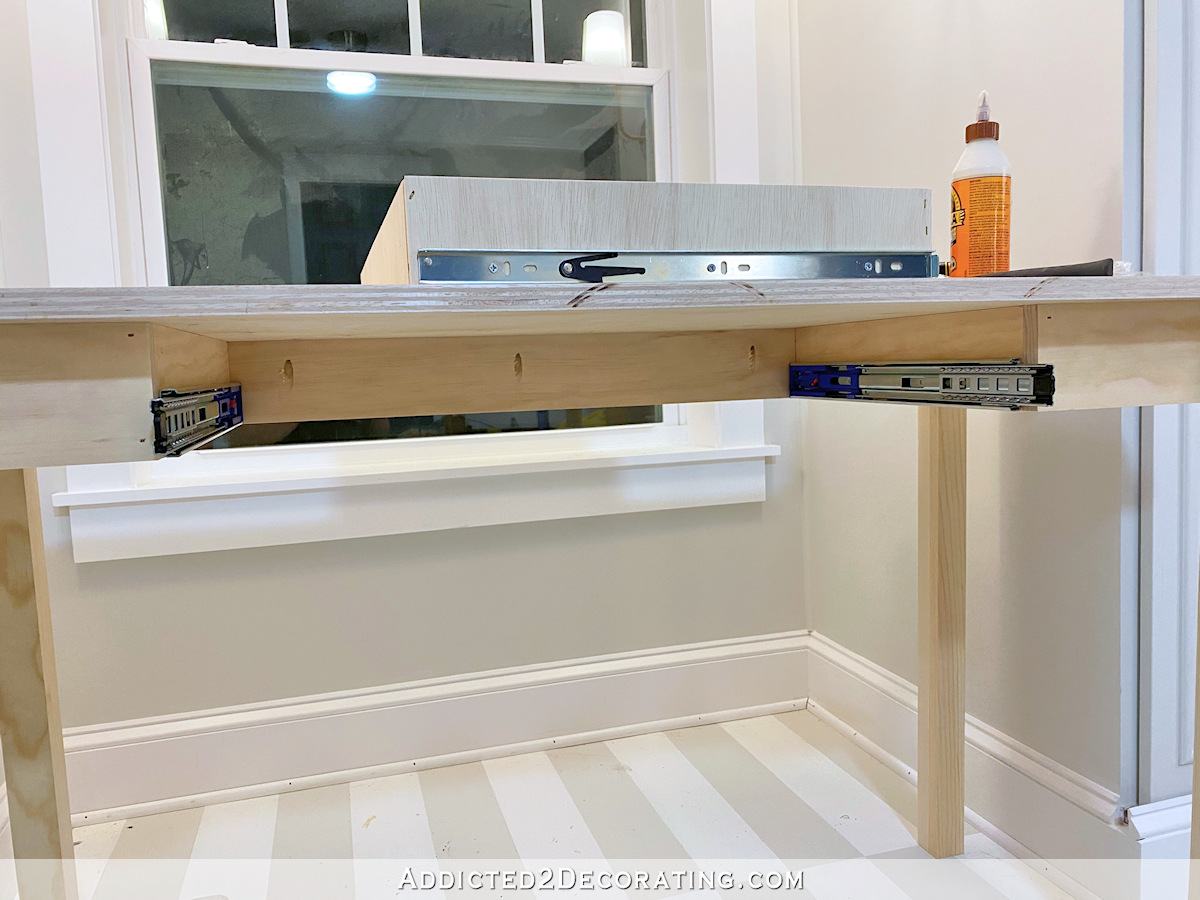
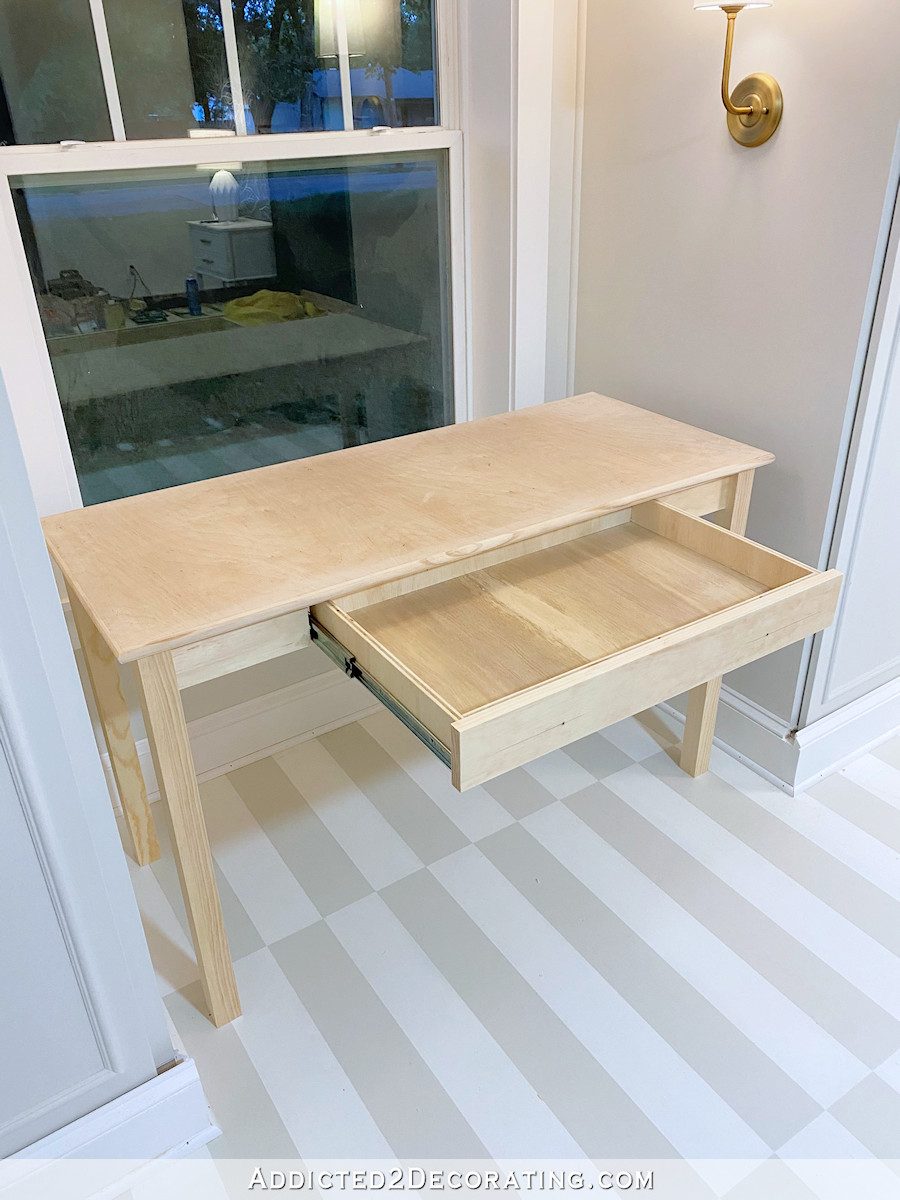
Here’s what it looked like with the drawer in place…
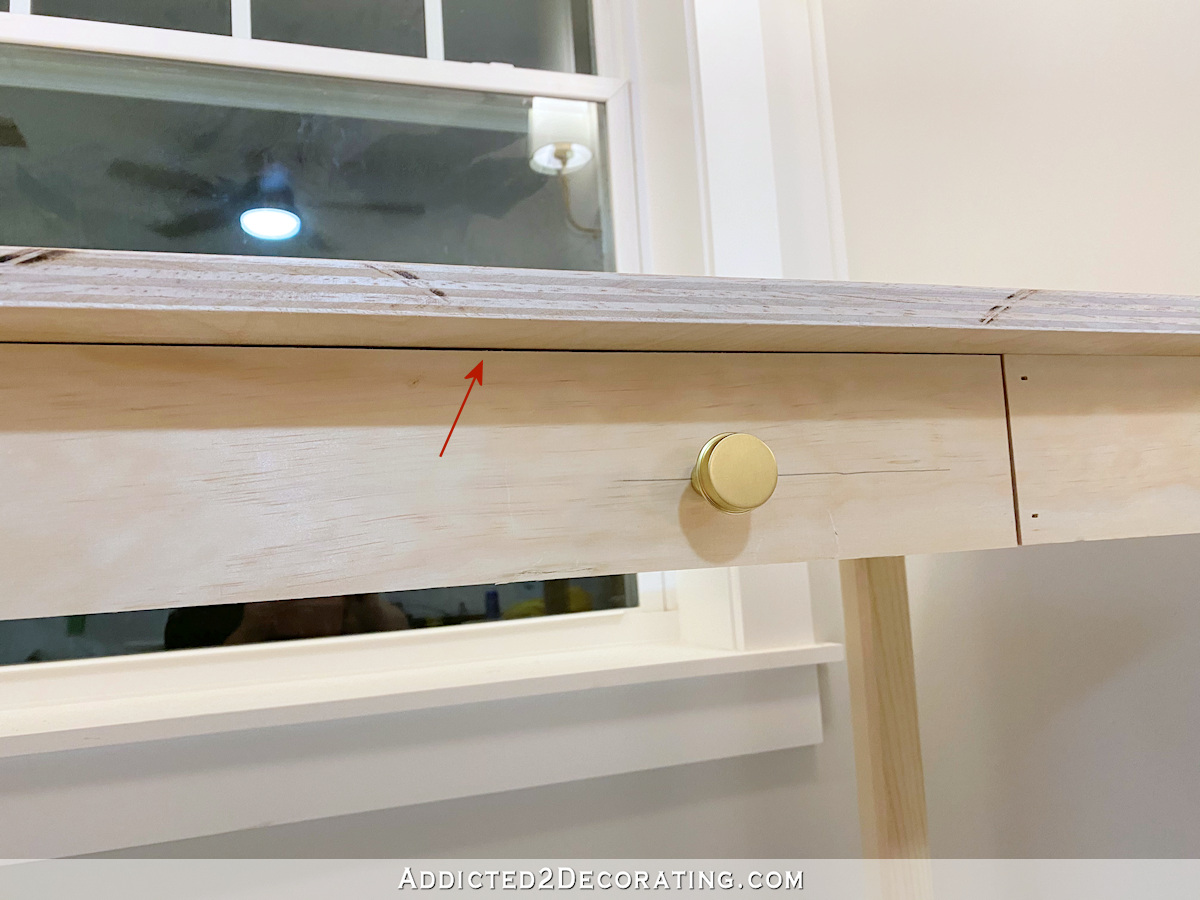
And finally, I just needed to attach that last front apron/drawer front piece to the front of the drawer. I did this using three dots of hot glue and held it in place until it was dry and secure.
After the drawer front was attached, I drilled the two holes for the knobs I’m going to use for the drawer, and then I took the drawer out, took it to my table saw, and trimmed about half of a blade width from the top of the drawer so that it would open and close easily without the top edge of the drawer front touching the underside of the desk top.
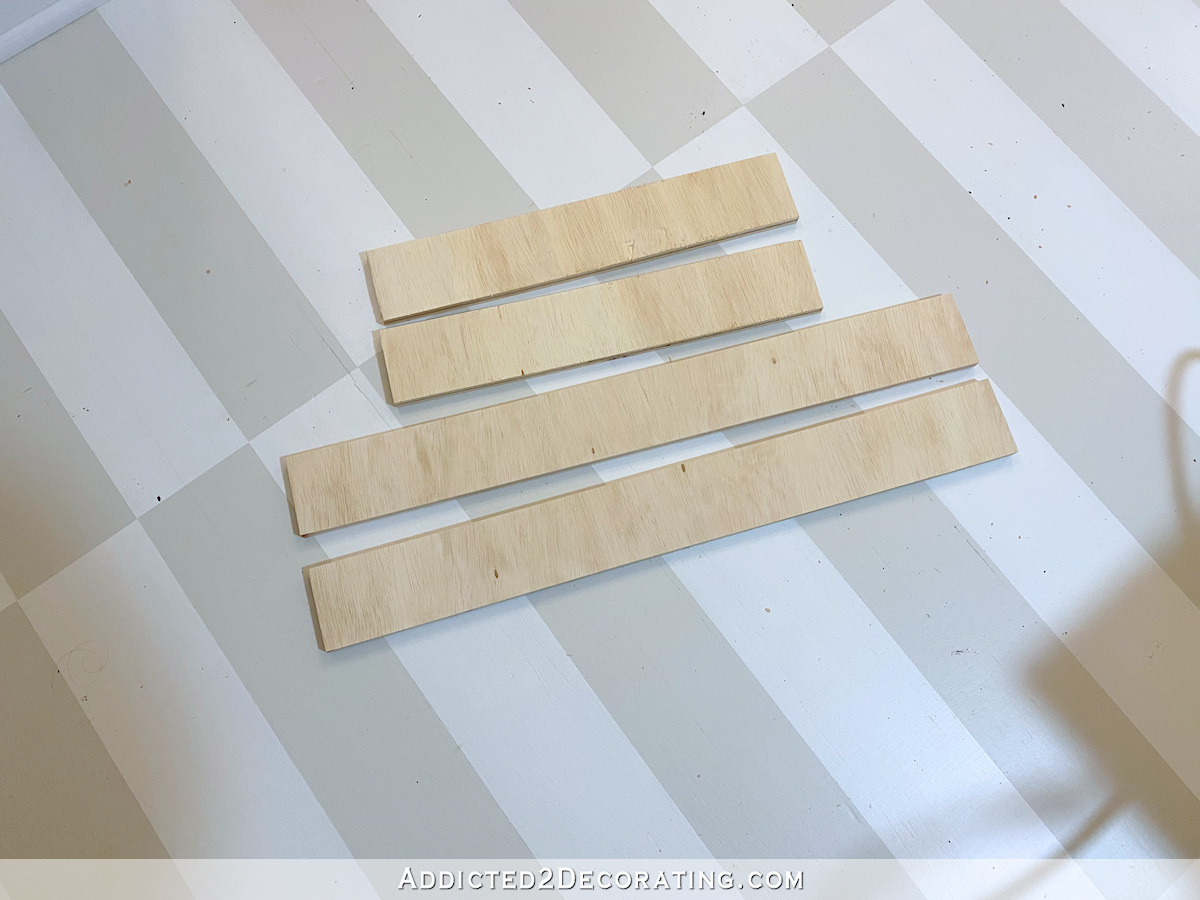
And finally, I finished off the edges of the plywood desktop by cutting some trim, mitered at the corners, and attaching those pieces with 18-gauge 1-inch nails.
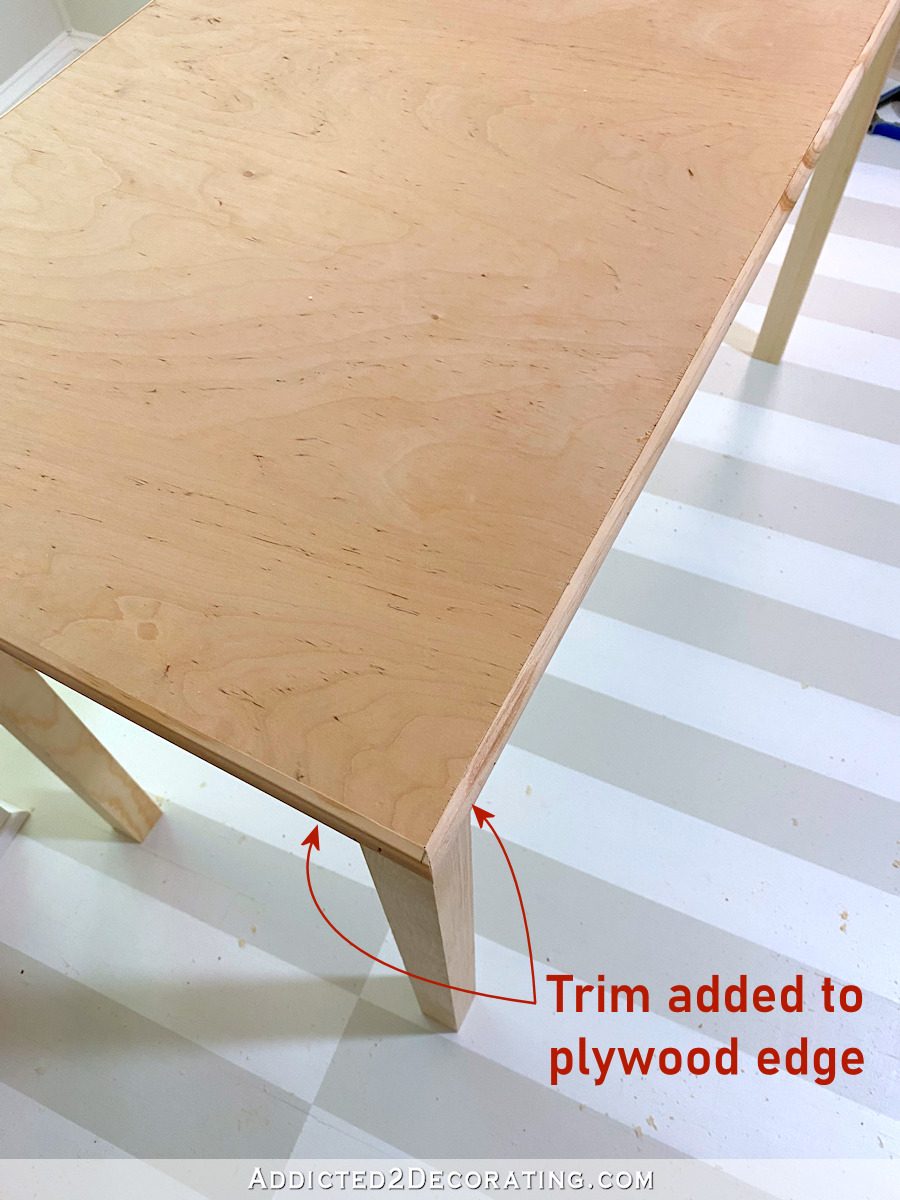
The trim that I used is one of my favorite go-to trims from Home Depot called cabinet trim, and it’s sold in whole 8-foot pieces (i.e., not sold by the linear foot). The trim is 7/8 inch, and the edge of the plywood top is 3/4 inch, so I just ran it through my table saw to cut it down a bit so that it would fit perfectly on the edge of the 3/4-inch plywood.
If the desk didn’t have a drawer, I wouldn’t have bothered with cutting the trim down. I would have just used the trim in its original 7/8-inch state. But if I had used the 7/8-inch trim on the edge of the 3/4-inch plywood on this desk, the front drawer wouldn’t have been able to open past the trim.
So that’s the desk so far. It’s really such a simple build as long as you have the Kreg Pocket Hole Jig (affiliate link).

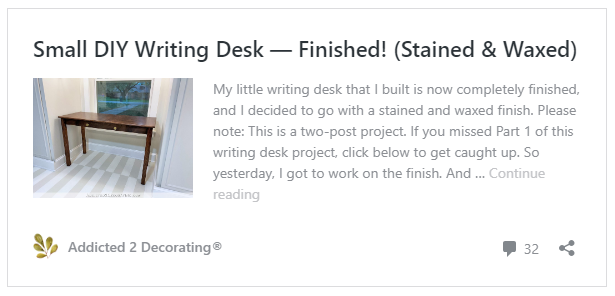
Please note: This is a two-post project. To see the second and final post of this writing desk project, click the title below.

Addicted 2 Decorating is where I share my DIY and decorating journey as I remodel and decorate the 1948 fixer upper that my husband, Matt, and I bought in 2013. Matt has M.S. and is unable to do physical work, so I do the majority of the work on the house by myself. You can learn more about me here.
It’s super pretty!
Nice job. Do you have an estimate for the materials cost? My husband is considering making a desk that will span a full wall and two windows. It might be 3x the size of yours so curious for a cost on the one you’ve done to get an estimate on the cost for doing one that large. Thanks!
I’d estimate the cost, including the drawer slides and drawer pulls, to be about $150.
Thank you!
It is a beautiful piece, Kristi. I could see it as a painted piece to give it more personality.
Sitting at my self-made desk, I just had a very critical look at it – it is a piece of MDF with 4 legs screwed to the bottom…. So no handy drawer, nor even trim to make the edges more beautiful (they are really harsh now). The latter has just become an idea, inspired by this post of yours, though – I’m quite positive that I might manage that 🙂 Thanks for the inspiring post, which is very well done and crowned by a beautiful result (as always).
amazing you can just make that yourself, painted I think since you don’t have any stained wood in that room?
This is wonderful. Two questions… could the drawer sides and back slots be done with a router instead of a table saw and if you put hinges on the drawer front, could it hold a keyboard?
Yes and yes. 🙂
The drawer pieces can be done with a router, but it’s so much easier to do if you have a router table. Unfortunately, I only have a router, but no router table. So I find it much easier to do with a table saw. You can also avoid having to do several passes if you use a dado blade set and have a table saw that will accommodate dado blades.
As far as the drawer, it would be very simple to just add a piano hinge or a couple of individual hinges to turn that into a keyboard drawer. You’d have to redesign the drawer box a bit so that it will be stable without a front panel to hold the drawer bottom in place. For the keyboard drawer, I’d recommend replacing the 1/4-inch drawer bottom that I used with another piece of 1/2-inch plywood so that the bottom is sturdier. Then leave off the front panel of the drawer box, and simply use the decorative drawer front that is hinged and folds down to reveal the open drawer box for the keyboard.
I like the idea of painting it, but if you decide to leave the stained wood on the bed, I think it would look awesome stained the same color! Nice job, Kristi!
Ditto! Need more than just the headboard stained.
Live it. My suggestion would be to paint the top of the desk in the same blue as the wall or a bit lighter. Then the rest stain to match the bed frame.
This is awesome. I want to adapt the design for a coffee table. I’ve been looking for a simple one without any bottom shelf or rungs, and this will do it! You didn’t say what type of lumber, but it looks like pine. I think this would be awesome to bring in the soft yellow/gold you did on the wall flowers!
This is all pine except for the plywood top. I think that’s poplar or something like that. I didn’t see any pine sanded plywood in the size I needed. (I just bought a 48″ x 24″ piece.)
What a great job! Every time I see the tools sitting on your new nightstands, I cringe that they will get scratched. Ditto with the desk build on your new floor. I am a freak when it comes to protecting surfaces. I am so amazed at your talent.
Definitely stain; it will add warmth to the room. Maybe a medium tone so as not to be monotonous. I love to use different wood tones in a room, as long as there aren’t too many. The only other wood tone in the room so far is the bed frame, right? And kudoes for such a detailed and simple tutorial on the build!
Kristi, Love the desk, I can’t wait to see the rest of your vision for it.
Nice! You always do such nice detailed tutorials, even for a rather simple piece like this one, with great photos to illustrate the steps you are doing. Much appreciated! And I really like the idea of a writing desk in that spot!
I’m just amazed at how well you present your tutorials. I love to try to make my own things and this has inspired me to not be afraid of trying things. This is really a very nice and clean piece of furniture. Just awesome! Thanks for sharing.
Love the desk I modified the design a little bit made the desk a little larger. I painted the rails, styles, drawer, and legs black and had a old top stained oak.
Great build! Could you please tell me what size pocket hole screw you used to join the 1 x 4s? Thanks.
Hello, I am Iranian and I saw your site. I am really interested in this job, but I don’t have enough supplies and facilities to buy them. Thanks for the very useful tutorial. You are an honorable person.