Upholstered Headboard With Nailhead Trim
Yesterday I showed you my new DIY headboard, which I’m absolutely thrilled with. But what I didn’t tell you is that that headboard was actually take two, proving once again that my sweet husband’s continual insistence that, “Kristi, everything you touch turns to gold,” simply isn’t true. The first headboard was far from gold. It was awful. Here’s how my headboard-making went this weekend.
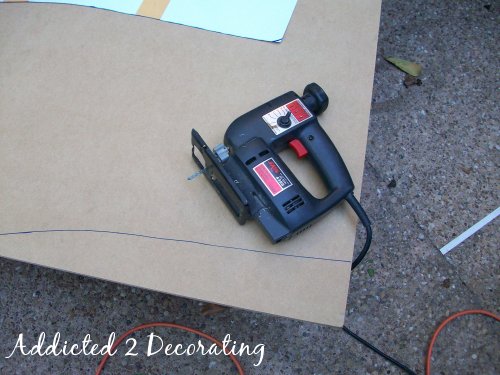
It started just like any other headboard, with a piece of 1/2″ MDF, cut to the desired shape with my jigsaw.
On top, I glued 2″ foam, and cut the shape with an electric knife.

Then the batting and fabric was wrapped and stapled.

Pretty simple so far. The headboard actually looked quite pretty just like that. Simple, but pretty.
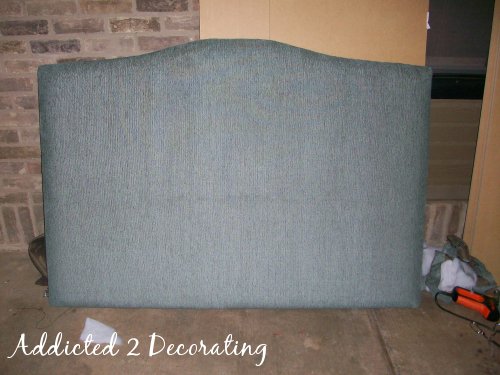
But then I added the nailhead trim, and everything went south from there. Yeah, nailing individual nailheads through two inches of foam and two layers of high-loft batting, while keeping them straight and perfectly spaced, is not only difficult. It’s impossible!!. I had purchased a nifty little spacing tool, but I couldn’t even get it to work through all of those layers. So I ended up using a paint stick to push all of the layers as flat as possible.
I got the entire top done, and one entire side. My hands were hurting so badly, the nailheads were looking sloppy, and I hated that the nailheads were set so far back with a big poofy center. It just wasn’t what I had envisioned at all. When I finally decided to stop, it was 2:00am. I decided to get some sleep and see how I liked it in the morning. So Sunday morning, I took another look. I hated it.
Next step…remove all of the nailheads one by one. Then remove all of the staples on the backside, remove the fabric, the batting, and the foam, which had been glued on really well, and start over.

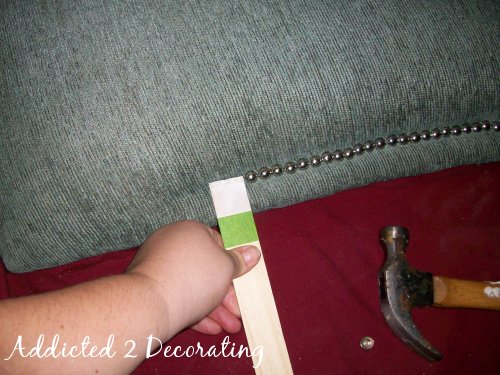
I started the headboard remake by building up the edges with an MDF border. I used blocks that I cut and glued from leftover MDF to build up the top strips.

Next, I cut down the foam so that it would fit inside the MDF border.

And then I repeated the wrap and staple with the batting and fabric.

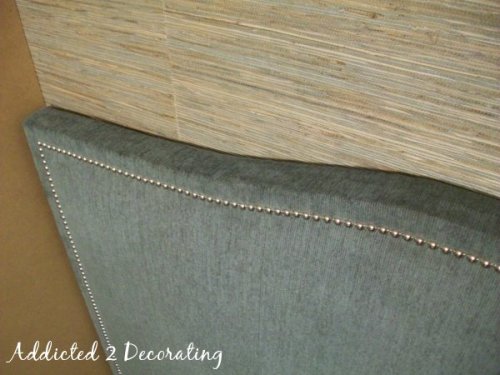
So I was back to this. It looked pretty much the same as the last one, only this time the headboard had something solid into which I could nail the nailheads.
I was able to use my nifty little spacing tool this time. The process was so much easier, and took about 1/4 of the time. And best of all, they were perfectly spaced!! I didn’t time it, but I would say it probably took about an hour-and-a-half to nail in all of the approximately 300 nailheads.

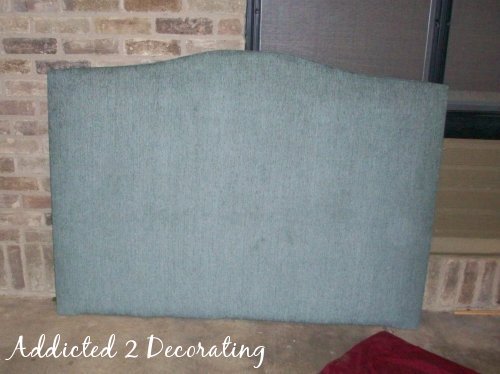
So much better.
So, it was a bit frustrating, but I’m so glad that I remade it. I never…EVER…would have been satisfied with the first headboard. And, that’s just part of the DIY process, isn’t it? We try things, make mistakes, and learn as we go. Even with the mistakes, the wasted time, the incredibly sore hands, and the late nights, I’d still rather do it myself than buy something ready-made.

Addicted 2 Decorating is where I share my DIY and decorating journey as I remodel and decorate the 1948 fixer upper that my husband, Matt, and I bought in 2013. Matt has M.S. and is unable to do physical work, so I do the majority of the work on the house by myself. You can learn more about me here.
I really love this headboard. It looks professional and beautiful. Thanks for sharing your struggles and tips! I also loved your diy tufted headboard. i am a sucker for tufting!
WOWWWWWWWWW!!! This is the most beautiful headboard ever!!! Good job Kristi!!!
It is stunning! I love it against that grasscloth.
that turned out beautiful. I love the look of nailheads on furniture and accents throughout the house.
All your hard work was worth it in the end! Simply Stunning!!!!!!
I'm not often accused of being shy (haha). I've worked with nailhead trim before and never had such a wonderful tool, and my nailhead trim never looked as good as yours. Well done. I've signed up to follow you both on facebook and through a feed. I would love for you to visit my blog and sign up to follow me, as well. I look forward to getting to know you.
Thanks for sharing this. I may actually tackle one myself with your instructions.
I just saw your post on Under the Table and Dreaming. It caught my eye because I am doing one of these {unfinished now for 4 weeks} and where I am stuck is the nail heads. I have that tool, but darn if I STILL can't get those nails to go straight. I thought for sure when I saw yours you used the ready made ones that come in a strip, that is how GOOD yours look. Awesome job, I just hope I can get the rhythm down with my tool to get the job done. I love your blog, subscribing now!
Stephanie, it definitely takes some practice. I learned a couple of things. First, I realized that the more force I used when hammering them in, the sloppier they would look. For some reason, those little heads are pretty finicky. So I used a LOT of really light taps with the hammer for each nailhead. I had great results with that method. Second, I learned that once the nailhead is in, if it's not straight or spaced perfectly, a little tap on the appropriate side with the hammer would move it into place pretty easily. I'm sure yours will turn out beautifully! With a little practice, you'll get it. I'm confident if I can do it, you can too!!
This is fantastic!! I love how you showed the fail and the final result! I am in the middle of a project right now that just isn't working – you've inspired me to rethink and figure out a way! BTW – I shared this on my FB page!! 🙂
I loved your project. It was very creative and well done. I've chosen it as one of my bookmarks for this week. If you would like to stop by and see your feature, as well as grab a button, you will find the post here:
http://www.bobbypinsboardwalk.com/2010/10/bookmarked-on-boardwalk_31.html
Over a year later, know this post is still inspiring. I made my daughter a tufted headboard and now after seeing this nailhead one and your tufted tutorial, I'm inspired to do another. My daughter's version is adequate at best. i'll have to redo hers at some point. I'll be posting her headboard to my blog, loveshalon.com soon. I've now spent two hours dreaming over your work…painted shower, faucets, and on and on. Love it all!
Kristi – I'm about to tackle my own nailhead headboard project. I'm trying to do two rows of nailhead, kinda like this:
http://www.target.com/Uptown-Headboard/dp/B000RZNEG0/ref=sc_qi_detaillink
I'm planning on using several layers of batting instead of foam.
I was wondering if the fabric showed marks where you had initially placed the nailheads then removed them? I am also using a linen-like material. Trying to decide whether to do the outer or inner row first.
Hi Natalie~
I didn't have a problem with the nailhead leaving marks, but that's because of the type of fabric I used. It's a pretty heavy upholstery fabric, and where I saw any holes, I just ran my fingernail over it a couple of times and it disappeared.
On that particular headboard that you're going to make, I would do the outside row first.
Awesome, Thanks!
Over a year later, know this post is still inspiring. I made my daughter a tufted headboard and now after seeing this nailhead one and your tufted tutorial, I'm inspired to do another. My daughter's version is adequate at best. i'll have to redo hers at some point. I'll be posting her headboard to my blog, loveshalon.com soon. I've now spent two hours dreaming over your work…painted shower, faucets, and on and on. Love it all!
Dear Kristi
I already did some upholstery work, years ago when I did not have access
to internet. Your tutorials are helping me a lot to complete my
knowledge about upholstery.
Thank you! You are doing a great job!
You can see here an old project of mine: http://www.youtube.com/watch?v=xX7lbxnml1Y
my designer blog:
http://alecnaneti.blogspot.com
Just curios how you managed to connect this to the bed? or did you mount it to the wall? Either way, how was it hung?
I hung it on the wall using French cleat hardware. You can purchase that hardware at Lowe’s or Home Depot. The one that Lowe’s carries is called Hangman. The brand of the one at Home Depot is Ook.
I just love this and now I am sooooooooooo torn as to weather to make the “TUFTED” or “NAILHEAD” headboard, uuuuugggghhhh, i will let my husband decide which one he would like in our Master bedroom 🙂
If using individual nails is a bit too difficult, you can purchase strips of nail heads with grippers that just need to be tapped in place with a hammer
It looks fantastic!! I’m considering doing something similar with tufting in the middle. Where’d you get the spacer? I can’t find one online!
I’ve just finished my upholstered headboard and it looks great. The next step was nailheads…. it occurred to me before I got started that I might have a problem. I used 1 inch foam – is that too thick for the nailheads???
I don’t think it will be, but you could try it along the bottom in an area that will probably be covered by pillows, and see how it looks. If you don’t like it, you can take them out and just have an upholstered headboard with no nailhead trim.
Beautiful! I even love the fabric color….I adore teal shades.
I found my DIY project for next week, but before i get started can you tell me where you found the nailheads and the foam ?? I found a 12 pack of them for $9.98 but you said you used 300 so thats a little bit expensive !!
Hi Chelsea~
I always buy my foam at JoAnn Fabrics using a 50% off coupon (or I purchase during a 50% off sale). The JoAnn store here in my city almost always has coupons available in the store.
I purchased the nailheads from a local upholstery supply shop. It’s been over two years since I made this headboard, but I want to say that the whole box (with either 500 or 1000 nailheads) was under $20.
Is it easy to remove & switch out nailhead trim? I am eyeing a really affordable chair on Joss & Main with silver nailheads–but I prefer bronze or antique brass. Will it be easy to just swap them out or will it mar the piece to remove. Obviously, I’m not wanting to reupholster the whole chair as I love the fabric. Thanks!
I think it would be MUCH easier to use something like Rub N Buff in the color you want and carefully applying it to the nailheads.
I’m not so sure—I’d be worried I’d rub the color onto the actual fabric (which is light), or that it could rub-off onto the fabric. Where do you get that product and does is cure/dry so that it doesn’t wear off or smudge if touched or bumped?