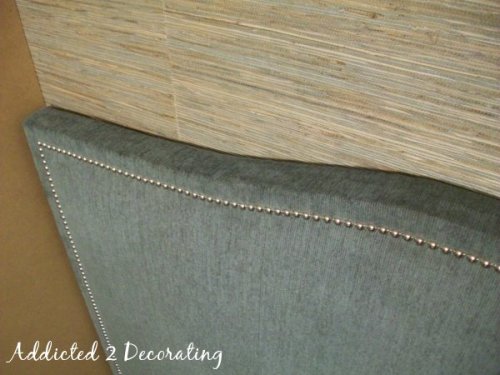
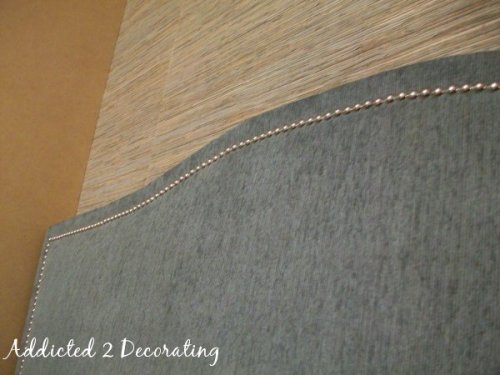
My Thousand Dollar Headboard!!
Okay, obviously I’m not being serious. If you know me but at all, then you know there’s no way in heck that I’d ever pay $1000 for a headboard. Okay, let’s be real. I’d never pay $200 for a headboard!! But that’s because I’m cheap, and I do things myself.
But after I got my headboard made this weekend, I started poking around online to see just how much someone would have to pay for something comparable to my new headboard. I was pretty shocked.
I found this one from Restoration Hardware for $795…
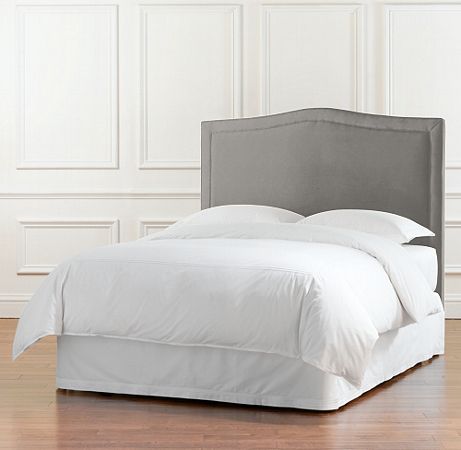
It’s pretty, but it doesn’t have a nailhead trim.
I found this one from Calico Corners.
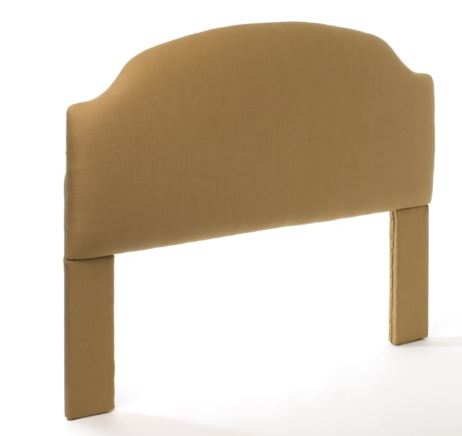
As you can see, that’s just a plain ‘ole wrap-and-staple headboard…no nailhead trim…and it starts at $695 for a twin size!! Yikes!!
This one from Bassett was my original inspiration…
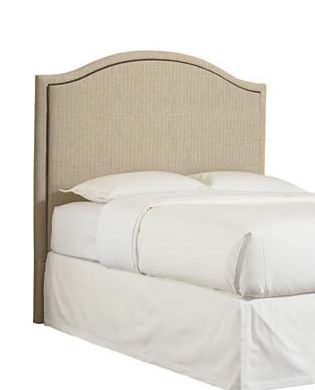
That’s gorgeous, and it actually does have a nailhead trim. The cost for a queen size is $649.
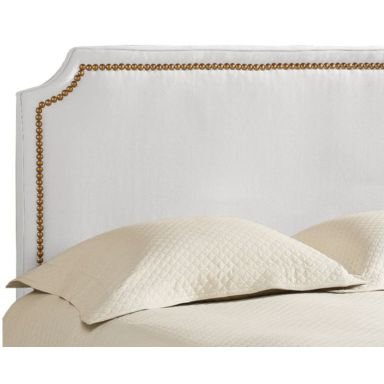
And last, there’s this one from Ballard Designs, with the price starting at $619 for a queen…
And while all of those are nice, I have to say that my version, for less than $150, is actually my favorite…


Here’s the breakdown:
Remnant fabric from local fabric store, on sale: $15
1 piece of 1/2-inch MDF: $22
Spray adhesive: $10
Packaged polyester batting, queen size: $10 (with coupon)
Nailheads: $6 (I used approximately 300 for a queen size headboard)
Hangman hardware (to hang headboard on wall): $10
Staples for staple gun: $3
Foam: $45 (with coupon)
TOTAL: $121
More bedroom details coming up tomorrow. Hey…I worked my fingers to the bone this weekend on my bedroom. You can’t expect me to show you everything all at once, now can you?! 😀
I’ve linked this post to:
- Check Me Out Saturday at A Vision To Remember
- Weekend Wrapup Party at Tatertots and Jello
- Saturday Is Crafty Day at Along For The Ride
- Saturday Nite Special at Funky Junk Interiors
- Show and Tell Saturday at Be Different…Act Normal
- The Sunday Showcase Party at Under The Table and Dreaming
- The DIY Living Weekly Showcase at The DIY Club
- It’s So Very Creative at It’s So Very Cheri
- Just Something I Whipped Up at The Girl Creative
- Making The World Cuter Monday
- Strut Your Stuff Thursday at Somewhat Simple

Addicted 2 Decorating is where I share my DIY and decorating journey as I remodel and decorate the 1948 fixer upper that my husband, Matt, and I bought in 2013. Matt has M.S. and is unable to do physical work, so I do the majority of the work on the house by myself. You can learn more about me here.


You did a great job on it! Beautiful look – excellent price. 🙂
Fabulous!! Love the fabric next to the grasscloth, beautiful! Janell
Oh yeah- I'd have to say yours is my fav too- Way to go – it is crazy how much they charge for stuff nowadays!!!! I keep saying I need to do one for my 12yo daughter's headboardless bed. Maybe one day… Be blessed, Karyl =0)
You always leave me wanting more! This is beautiful! I am in desperate need of a new headboard for my master also and would like to make one, I just need the confidence to do it! Can't wait to see the rest of the room!
LOVE IT!!! Where did you find the nailhead?
Really good site. Thank you for your effort
How beautiful! And so satisfying to make something you (and everyone else) will love at a low cost. Great job!
It is BEAUTIFUL and I like it against the Grasscloth.
Kristi, you did one awesome job, it is beautiful!!!
I don't understand this select a profile, but I'm Gillybean, ; )
Amazing, and I am so happy yo find another self-proclaimed cheapskate that likes to create expensive looks for much less!
Cassandra, I actually found the nailheads locally (surprise, surprise!!) at a place called Heart of Texas Foam & Fabric.
I'll be checking out this info as I get closer to redoing the guest room.
Ah, you are a tease…however the pics that you did reveal look great. I will definitely be stopping by again to see your room reveal.
I have always wanted one like the one from ballard, but not into that high price tag.
oh wow looks great! HOW did you get the nailheads so straight??
I had a nifty little tool that I used to get them perfectly spaced. 🙂 You can click here to see it and read more about the process.
Great job! Custom is better than store bought anyday…I can't believe those prices!
I would love to have you enter this on my party at ItsSoVeryCheri.com and then over at our other site theDIYClub.com We have a weekly DIY Living party over there.
Cheri
Turned out gorgeous! Bravo to you! Thanks for sharing. 🙂
Great job! Love it!! And the color is so fabulous!
I think it looks fabulous! What's not to love? I love the gray and the nailheads!
Very cool! It's so nice to be able to look at something and just make it yourself! Good for you 🙂
Kristi – You have done an incredible job! Looks fantastic! I can't wait to see the whole room come together. Great wall treatment too – btw! I featured this on the Sunday Showcase post. Stop by and grab a button if you like. Thanks so much for linking up. Hope you are enjoying your week! ~ Stephanie Lynn
Kristi – You have done an incredible job! Looks fantastic! I can't wait to see the whole room come together. Great wall treatment too – btw! I featured this on the Sunday Showcase post. Stop by and grab a button if you like. Thanks so much for linking up. Hope you are enjoying your week! ~ Stephanie Lynn
Turned out gorgeous! Bravo to you! Thanks for sharing. 🙂
You always leave me wanting more! This is beautiful! I am in desperate need of a new headboard for my master also and would like to make one, I just need the confidence to do it! Can't wait to see the rest of the room!
Great job! Love it!! And the color is so fabulous!
Love, love love this headboard! Enjoy reading your latest and greatest projects. It helps motivate me to get some things done around my place. Thanks a million for sharing!
I love, love, love the fabric. However I cant seem to find anything comparable in price or color anywhere. Is this upholstery fabric?
Yes, it's upholstery fabric. I bought it at a local fabric store as a remnant, so I got a great deal on it. I think I've seen similar things at JoAnn Fabric in their home decor fabric, and they generally have coupons available.