Adding Skirting To The Workshop, Part 1
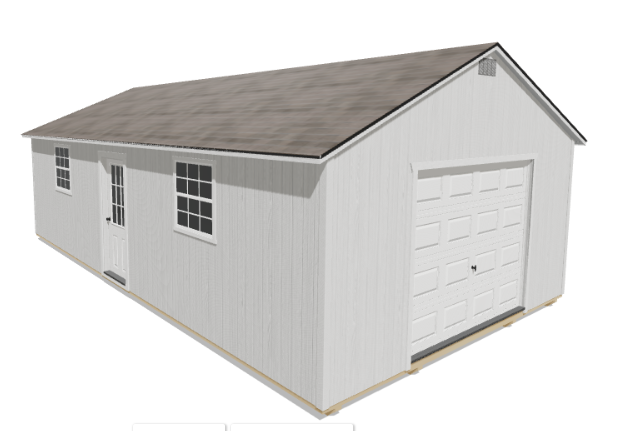
For some reason, I had this idea that adding skirting to my back yard workshop would be a fairly easy, one-day project. My goodness, was I ever wrong! The project isn’t difficult at all, but it’s definitely not a fast, one-day project, at least not for an 18′ x 27′ building, and especially when I’m working alone.
I contemplated many different types of materials to use as skirting for my workshop. The problem I kept running into was that very few materials are rated for ground contact. My initial thought (and the plan which would have been the cheapest) was to use the same siding material that’s on the building, and just carry that down as the skirting. But then I read that that siding material isn’t supposed to be any closer than six inches from the ground.
After perusing the aisles of Home Depot and Lowe’s looking for every other possibility and googling various materials for ground contact information, I finally realized that my best option was going to be PVC boards. We know that PVC is perfectly fine touching the ground because we put it in the ground with water constantly running through it. Plumbing these days is mostly PVC and PEX, and so if PVC can be under the ground with water running through it, it can certainly be touching the ground.
So that’s what I used. And purchasing enough PVC boards to complete skirt an 18′ x 27′ building wasn’t cheap, either. But hopefully, because it’s PVC, this is a one-and-done kind of project. I won’t ever have to deal with anything rotting and having to be replaced. So I’m hoping the upfront cost will be worth it.
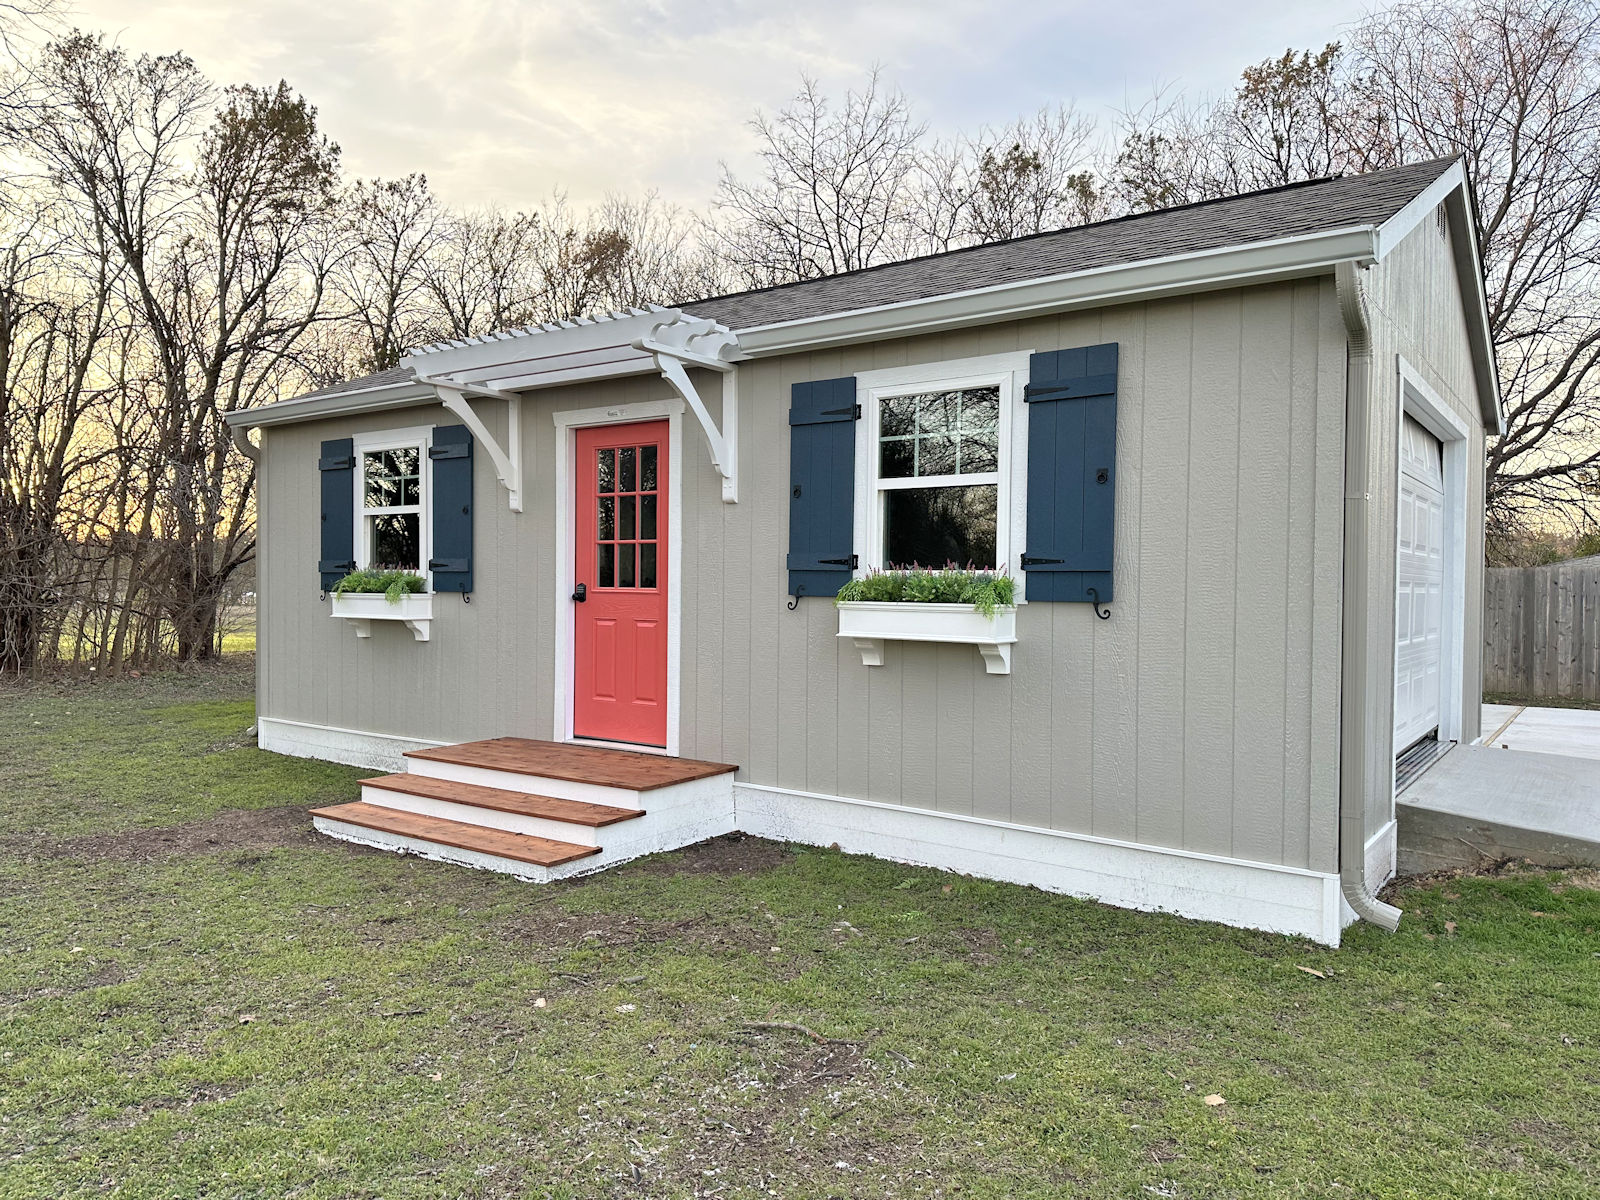
Before I show you the process and progress, let me first remind you what the workshop looks like after the first two projects — building the shutters and painting the front door.

If you missed those projects, you can see the first one here: My Workshop Has Shutters!
My building is built on four thick wood skid, and on top of those skids, the floor of the building is framed with 2″ x 6″ lumber, which is what the siding is nailed to along its bottom edge. So the plan was just to nail the skirting right to that outer 2″ x 6″ flooring frame just under the siding.

But I didn’t want the skirting to go behind the steps to the front door, which will be my next project. So before measuring and attaching any skirting, I wanted to mark off the width of the steps. I decided to make my steps extend 16 inches from the trim on the door on each side.

And then I measured from the corner of the skid to the mark I just make. That width on my building was 122 inches.

I didn’t want to put the skirting boards right up against the siding. I thought I needed some sort of transition board first. So I cut lengths of 1″ x 2″ PVC boards, mitered them for the corners of the building, and attached them flat (i.e., face up) just underneath the siding.

*Note: I will be caulking between this ledger board and the siding using silicone caulk to prevent water from seeping between the two and ruining the siding. Since I’m in central Texas, we almost never have more than one or two days of rain at a time before the Texas sun comes out again and dries up the rain. So I’m confident that silicone caulk will be enough protection from water. If I lived in an area of the country like Oregon, where there’s constant rain for months of the year, I would have used my table saw to cut an angle into the top of that ledger board to make sure rain water can’t gather there for months on end. If I find this flat ledger board to be a problem in the future, I can always pull it off, cut an angle in it, and nail it back on. But I don’t think it’ll be a problem here in Texas.
Before I attached that ledger board, I had to cut away about 1/4-inch from the bottom of one of the corner trim pieces on the building because it was too low and in the way of where that ledger board needed to be attached. I used my Dremel Multi-Max for that.

Once that excess was cut away, the ledger board fit perfectly underneath the siding all the way to the corner.

I used 2.5-inch 16-gauge nails for this.

Then I was ready to attach the skirting boards. I wanted these boards to run horizontally, and it took two boards to fill in that 12-inch height between the ground and the siding. So I decided to attach the boards together using PVC glue and pocket screws and then attach them as one piece to the building. So I marked and drilled all of the pocket holes, keeping them to about 12 inches apart.

And then I used a liberal amount of PVC glue on the edges of both boards.

And then screwed them together using the pocket holes and Kreg 1.25-inch exterior screws, working as quickly as possible so that I could get them screwed together before the PVC glue dried.

When I got the boards over to the building, I realized that there wasn’t quite enough room on the right end for the boards to fit into the skirting area. But I didn’t want to cut the boards.

So instead, I dug out a trench for the boards to fit.

And here’s what it looked like when it was attached.

I repeated that whole process for the other side of the front door, and here’s what the workshop looked like with both sides of the skirting attached on the front of the building.

I decided to do the back of the building next because I knew this one was going to be the biggest challenge, and I wanted to get it over with. This side is an uninterrupted 27-foot run of skirting. So I started by attaching the transition ledger board.

The longest PVC 1″ x 2″ boards only come in 12-foot lengths, so I had to have two joints on this side. I cut the end of the first board at a 45-degree angle…

And then cut the next board at that same angle…

That helps to disguise the joint way more than if the boards had straight cuts.

Next up was the skirting. This was the most challenging part of the day because I had to pre-assemble a 27-foot run of skirting. I decided to stagger the boards, similar to how you install hardwood flooring, so that I didn’t have joints in the top row lining up with joints in the bottom row. I couldn’t get a picture of the whole 27-foot run of skirting, but you can see in the photo below how the joint between two boards in the bottom row is against a solid board on the top row.

I marked and drilled the pocket holes in all of the boards first, and then assembled them on the driveway. The most challenging part was working quickly enough with the PVC glue to get the boards together before the glue started to dry.

And once it was all together, I had to figure out how to drag that 27-foot length of PVC board skirting over to the building. PVC boards are very bendy, unlike real wood. And I didn’t want to drag it on the concrete face down because it would scratch up the face of the boards. So I finally realized that I could use the furniture dolly on one end and then pick up the other end and pull it over to the building.

By the time I got it to the building and lined up, not only was I completely out of daylight, but I also realized that this entire 27-foot length is going to need trenching for the skirting to fit.

So it definitely wasn’t a one-day project. I didn’t realize how much digging and trenching would be necessary, and then just trying to figure out how to do that long run of skirting on the back of the building took way longer than I thought it would. But it’s a good start, and I think the white skirting looks so good on the building! So, hopefully it’ll only take one more day, but I have a feeling it might be two or three. I guess it depends on how much trenching is needed, and how long that takes.
UPDATE: The skirting is finished! You can see Part 2 of this project here: The Finished Workshop Skirting (Using PVC Boards)
Or you can see the whole process, start to finish, in this video:

Addicted 2 Decorating is where I share my DIY and decorating journey as I remodel and decorate the 1948 fixer upper that my husband, Matt, and I bought in 2013. Matt has M.S. and is unable to do physical work, so I do the majority of the work on the house by myself. You can learn more about me here.


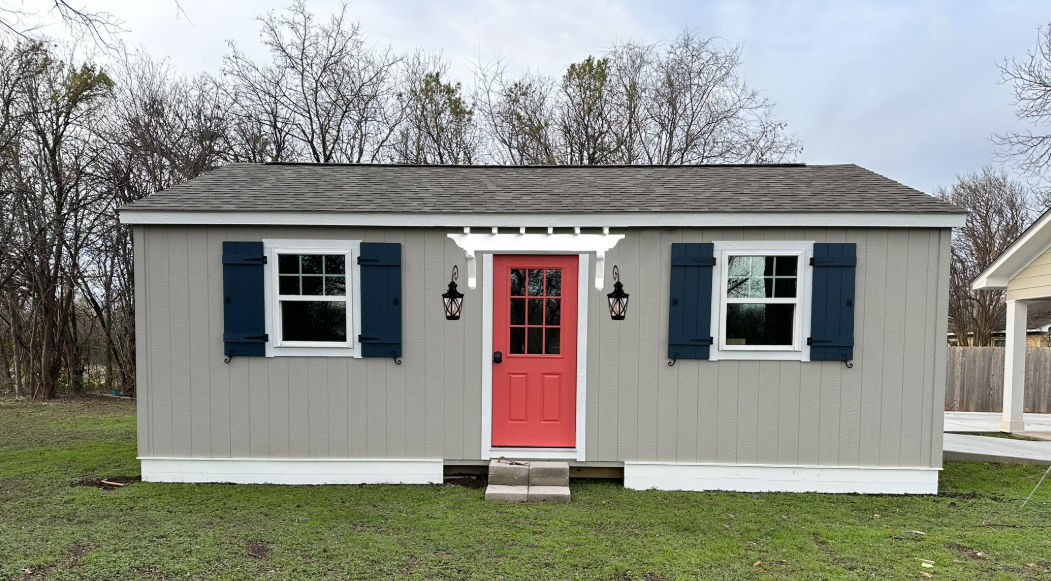
It adds so much appeal to the building. Good choice!
Good progress even if not quite as fast as you hoped 🙂 I’m not sure if you have a power tool for the trenching, but I have an inexpensive plug in black and decker edger that has a trenching capability. You adjust the blade lower than used for edging and it cuts into the soil. I’ve used mine extensively for putting 1/2″ irrigation tubing a few inches below ground. If you have an edger already, it might be useful for you – if not, the B&D is about $100.
PATTY!!! I have never thought to use my edger for irrigation trenching. I sure will be using it this spring though! I don’t know why it never occurred to me. The A2D community has such great ideas, I’m glad I read the comments!
This is a great idea!
I used vinyl lattice for a railing one time and I attached it to the wood by drilling holes big enough to allow for expansion and contraction. I used cup washers and compatible screws to attach them. Are your PVC boards like vinyl siding? I know you have temperature extremes where you are. Will your boards warp or flex? I like the idea of burying them slightly to discourage rodents.
I see that the cat is there helping you. That is so sweet. The pictures are great and I’m glad you remember to take them. The skirting definitely finishes off the storage/workshop. You always amaze me with your projects. They always look perfect. You really have an “eye” for how things should be.
I love the look of the skirting, so clean and fresh…polished! I do, however have a concern? The ledger board that you first installed as a trim piece, will that serve to hold rain and moisture (dew) along the bottom of the real wood siding of your building causing it to possibly rot faster than prior to it being there? Water would have just ran straight down and off. Now it has a place to sit and pool against the wood. I do love the finished look of the trim, its just a concern. Will caulk be enough in that area? Yes….Im a worry wart! LOL! I just adore this new workshop of yours and think its coming along beautifully!
I thought the same thing. Maybe if Kristi caulks it will provide a moisture barrier?
I came down here to reply the same thing as Tawny Lynn. I am worried that your siding will rot with that ledge there. It looks lovely, but I am hoping it doesn’t cause problems in the future.
Once I get it caulked with silicone caulk, I think it’ll be just fine. Being in central Texas, we almost never have more than one or two rainy days before our sun comes back to dry everything out. Now if I were in a place like Oregon, where it rains relentlessly for nine months of the year, I would have used my table saw to cut an angle in the top of that ledger board before attaching it because rain would be caught there for months on end.
I knew you had already considered all the relevent possibilies! I just needed to ask because I live in Michigan where it snows and that lovely ledger trim would sit covered for months. Im up here envious that youre enjoying a “chilly” 50 degree day outdoors all bundled up! LOL The workshop is looking just fabulous! Thank you for taking us all along on the journey!
I’ll be caulking it with a silicone caulk. I think that’ll be enough, and I’ll keep an eye on it each year and recaulk any spots that need it, if any.
It’s looking great! If the whole thing will be closed in once the steps are there be sure you don’t pin Tiger in too!
Haha! I thought about that! He loves hiding out under that building.
Hey Kristi! I just wanted to say that I love your new style of photos showing you actually doing the work! Especially those really-challenging-to-do-alone parts of your projects that you always manage to creatively solve for, like using the furniture dolly to move that super long board.
Oh good! That’s one advantage of doing videos. Those are stills taken from the videos I’ve been doing.
It looks great and I can see why it will be a multiple days job. Just remember to rest your body because that job requires you to use muscles you haven’t used in a while. Again it looks wonderful.
Love the white skirting! Stooping down doing the work is also difficult. You are amazing!
Great job! It looks awesome already. Can’t wait to see the final finish.
Cheers!
Your skirting board looks so finished. As usual, a flawless job.
Have you considered painting your skirting boards the color of the workshop, instead of leaving them white? An artist friend, who was framing some chalk portraits of my children, told me that the eye goes to white and light colors first. Since you likely don’t want the skirting boards to be the star of the show or the main focal point, if you paint them the color of the body of the workshop, they will fade away. But you and we will still know how precisely and perfectly they are built!
I did consider it, but I really like the white. I think it goes well with the rest of the white that I have planned. I’m going to be building something over the door, and it will be white. The flower boxes will be white. The trim is white. The risers on the steps will be white. I think it’ll all look cohesive when it’s finished.
Thank you for this! I need to do the same on my shed. Please keep us updated on how it holds up. I’m also in a dry part of Texas, but I do worry about water damage.
I cringe seeing you down on the ground, as I have not been able to do that in years! It’s a huge process getting up if I get down there, and it’s not pretty! LOL! I also am not sure I would have put the ledger board on either. It seems to me that installing the skirting below the siding would have been best, as any water would run off, and not allow wicking into the siding. Also, if you plant along there, it’s more likely to catch moisture. As long as you check it periodically, I’m sure it will be okay. It does look finished now. Just like adding a pearl necklace!
As someone who has had 2 knee replacements I say KNEE PADS! all day long. I know they are an annoyance, but when you are older, your knees will thank you. I didn’t used to use them, but I should have. Inconvenient now, but when you are old………
I need a nap after reading this project: that was a lot of work and in the cold too! It looks great, I want you on my team for sure. Curious about the total cost of the boards, is that okay to ask?
Hi Kristi, I LOVE your work shop its so cute !! I do have one concern, I don’t know anything about Texas weather, but you have talked before about movement of buildings there and cold weather, does it freeze and thaw there? So my concern is shifting of the building and the trench idea if over time it might damage the bottom boards being so close to the ground like that I’d hate to see you get it all fancy with landscaping etc and have the boards buckle or crack even though they are PVC boards, which I know nothing about LOL. Trenches have a way of filling back in over time. I live in Ohio and we have had similar problems with our Shed so just sharing some problems that we have run into.
I also wanted to thank you for taking such good care of your stray Kitty !!!!! Your a very compassionate person! Hugs to you & pet Kitty for me!
We get very little truly cold weather here. I don’t foresee that being a problem.
Tangent sort of-are you going to paint the garage door? If so, what color?
My plan right now is to keep it white.
What a nice finished look this makes. It truly will look like a sweet little cottage in the back. Love the helper on site with you too. I’m enjoying the photos as you work…is the camera on a tripod or is someone helping you taking the photos as you work? I think I love seeing you as you do the work, and the tools you are using as well.
I put the camera on a tripod. I wish I had someone who could follow me around and video! That would be so much easier and faster than having to remember to move the tripod around with me! 😀