My Workshop Has Shutters!
I have officially crossed off the first project from my 2025 list of home goals. My workshop has shutters! First, let me remind you how this workshop looked right after we had it built…
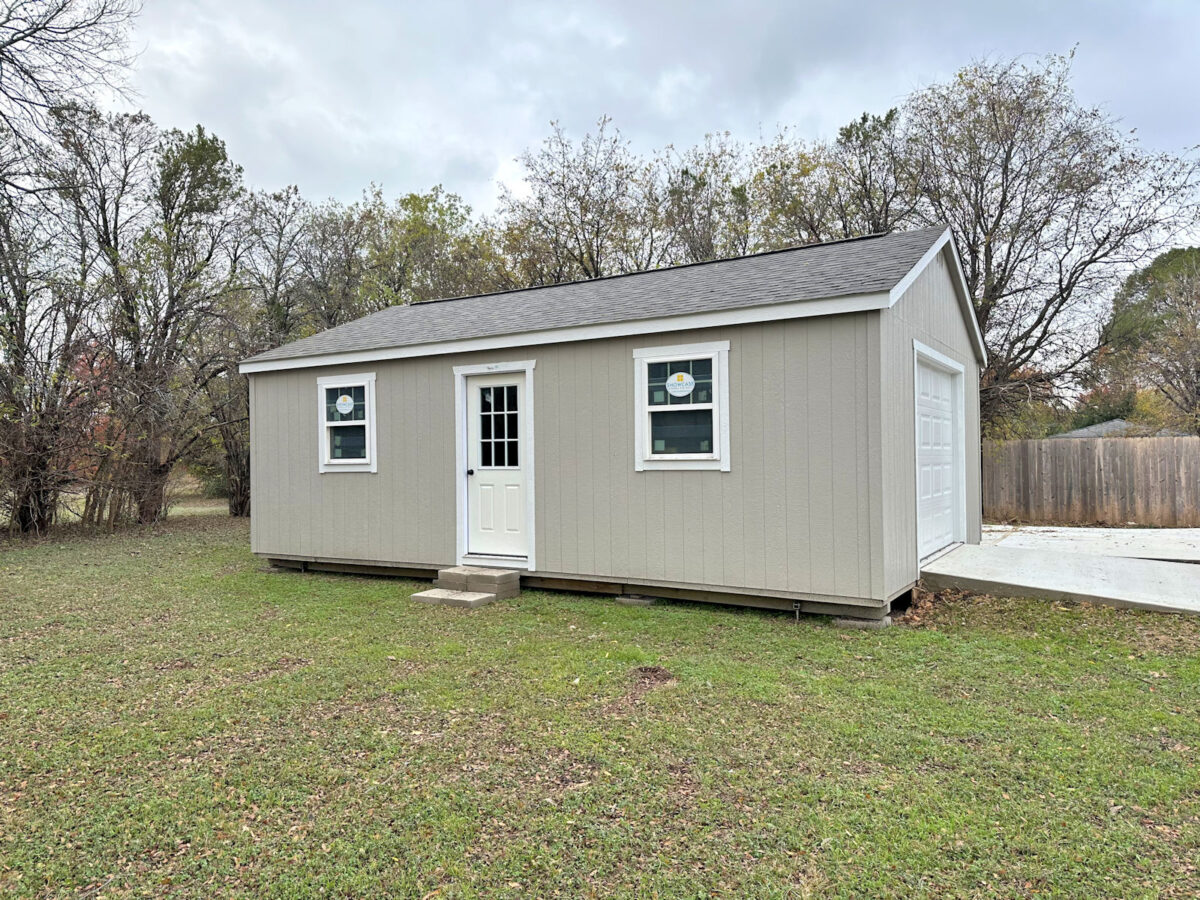

It was a very plain building with tons of potential. And of course, my goal is to turn this from a plain, drab little building into something that looks like a cute little cottage in our back yard. The first step towards that goal was to add shutters to the building.
I could have purchased shutters from the company that built the workshop for me, but I didn’t like the shutters that they offered. First, their shutters were way too skimpy for my liking — very narrow shutters that didn’t fit the proportions of the windows. They would have looked like this…

Those would have looked way too tiny on my much larger workshop. But also, I want my workshop to look like an extension of our house, and because I built the shutters on our house, I needed to build these to match. And because I built them myself, I could make them the correct proportions for my windows.
I didn’t take pictures of the steps I took to make, install, and accessorize these shutters because I’ve already covered all of those steps the first time I made them for our house. But I did do a video, and I also have a free, downloadable PDF with the step-by-step instructions. The video and PDF are both at the bottom of this post.
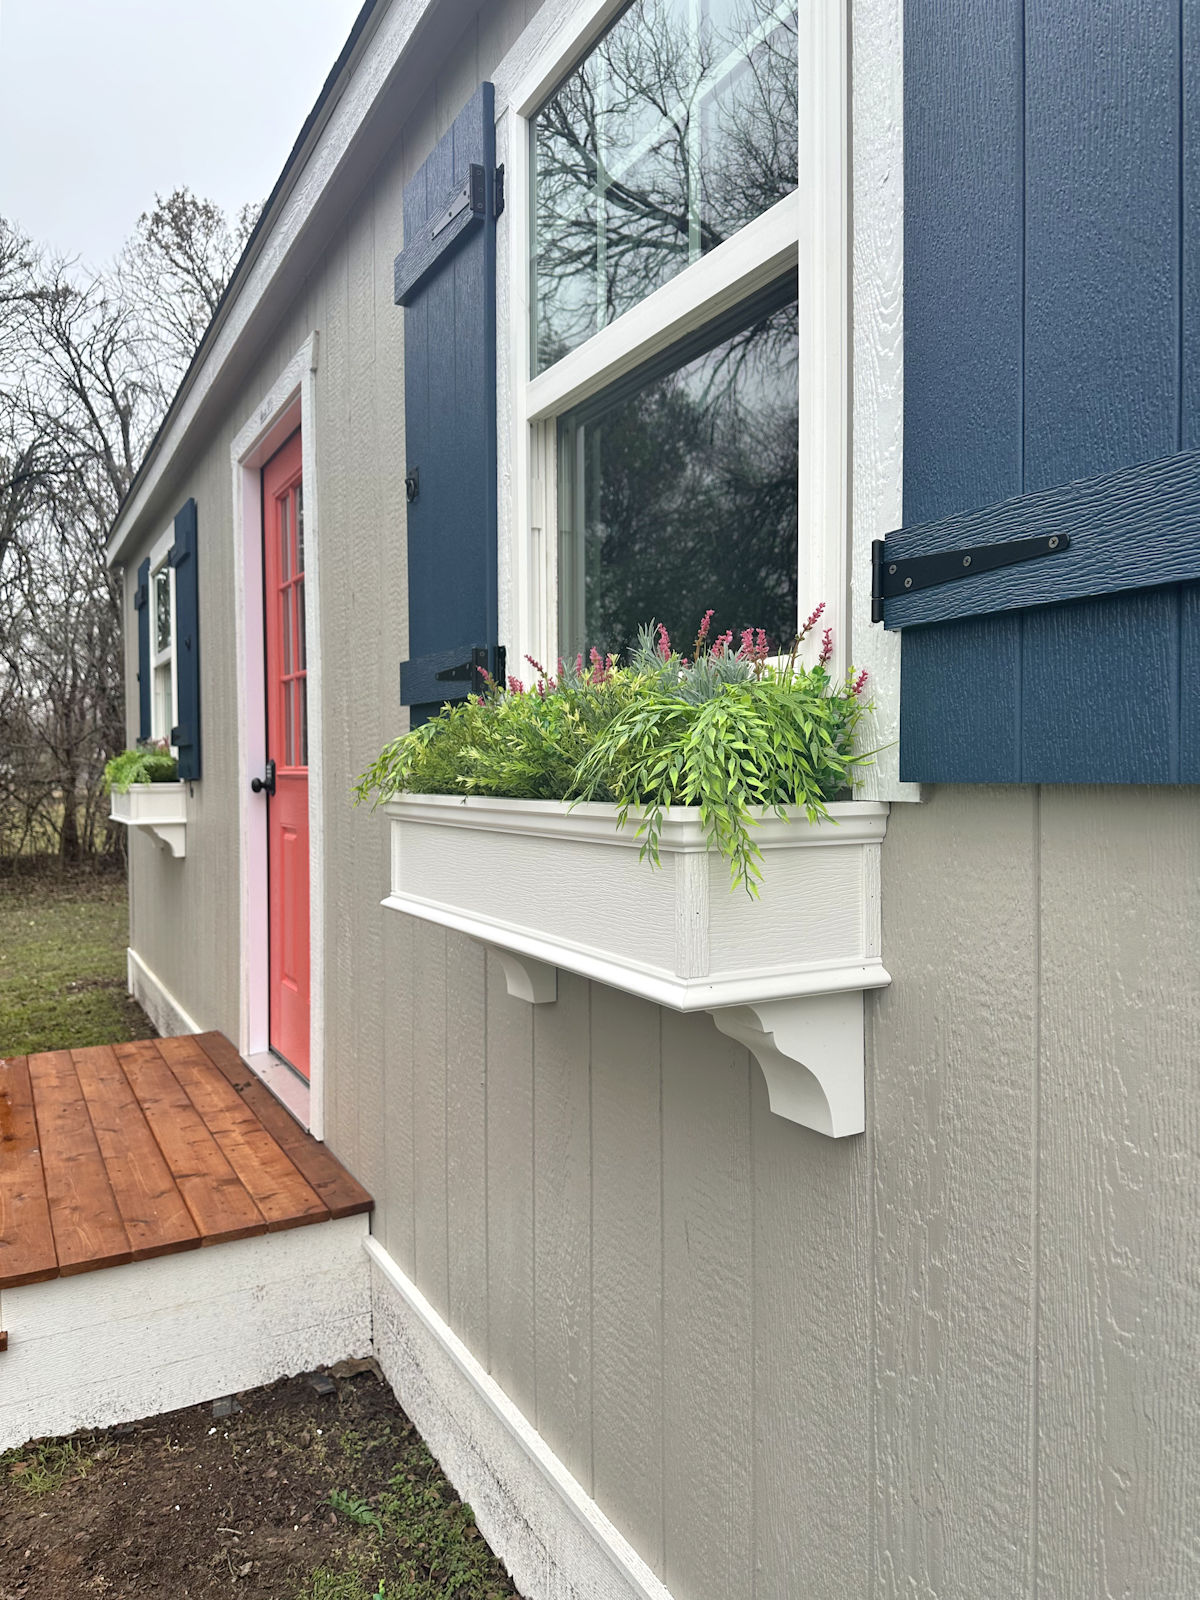
I made these exactly like the ones for our house. They’re made out of PVC boards (which I purchase at Lowe’s) so they’ll never rot. I painted them Benjamin Moore Gentleman’s Gray, which I had color matched at Sherwin Williams so that I could use their formula that’s safe for vinyl siding, which is necessary since it’s such a dark color, and dark colors that aren’t vinyl safe can warp in sun and hot weather. (To make it vinyl safe, they basically remove any black from the formula and replace it with blue.) And for the decorative touches, I used these T-strap hinges (I used the 8-inch on these shutters), these cast iron shutter dogs, and these cast iron ring pulls (all affiliate links).
If you missed the original tutorial, you can find that here: DIY Board and Batten Shutters (Decorative Non-Functioning Shutters Made From PVC Boards).
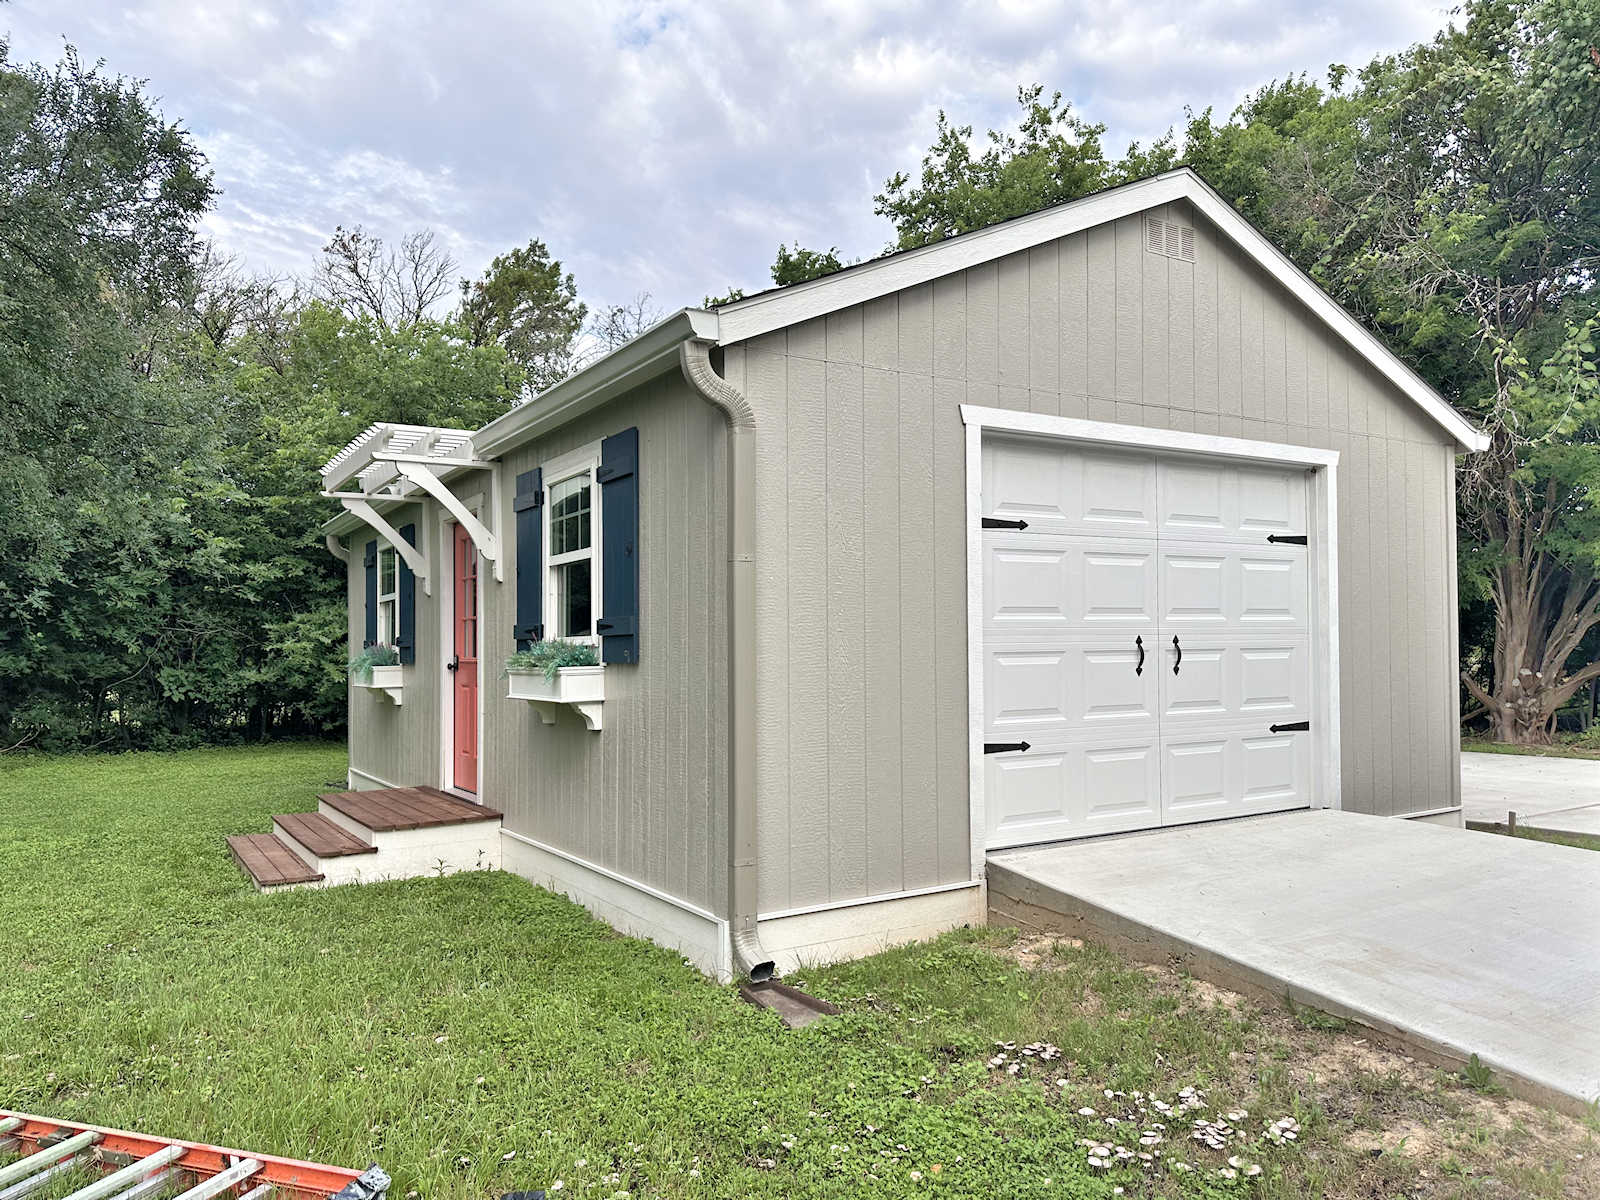
This was a four-day project. It took me one day to build the shutters, one day to paint them, one day to install them, and one day to put the finishing touches (decorative hinges, pulls, and shutter dogs) on them. And here’s how they turned out…

I love how they turned out! This is only the first project I have planned for the exterior of this building, and already it’s such a huge difference.

And here’s a look at the back of the building. I put shutters on all four windows because they’re all very visible. In fact, the back of the building is what I see the most since it’s visible from the street and from the driveway every time I pull into the carport. So the back of the building needs to look just as cute as the front.

While I didn’t take pictures of the DIY process this time, I did do videos of the whole process. So that video is coming for those of you who prefer video tutorials over written tutorials. One of my main goals this year is to focus on doing a whole lot of video tutorials for my projects. But I’ll still have written tutorials with lots of photos for new projects as well.

Here’s a close-up view so you can see the details of the finished shutters. The front hinges are only decorative, as are the shutter dogs. The shutters dogs are literally glued onto the shutters, so they don’t actually turn. But I love how those little details really elevate the look of shutters that would otherwise be pretty plain.

So project #1 for the year is marked off of the list!

And even though the weather has turned cold on us, I’m determined to get a few more projects done on this building before I turn my attention to the bedroom suite. It may be cold, but the sun is still shining (for now), so I plan to take advantage of that while it lasts.

UPDATE: I made a video showing the start to finish process of making these shutters. You can see it here:
Free, downloadable PDF instructions:
You can find a free, downloadable PDF version of the step-by-step instructions for the shutters here: https://www.addicted2decorating.com/wp-content/uploads/2025/01/How-to-Make-Board-Batten-Shutters-Out-Of-PVC-Boards-2.pdf

If you want to keep up with my 2025 list of home goals (and my progress with links to finished projects!) you can see that here: 2025 Master List of Home Goals

Addicted 2 Decorating is where I share my DIY and decorating journey as I remodel and decorate the 1948 fixer upper that my husband, Matt, and I bought in 2013. Matt has M.S. and is unable to do physical work, so I do the majority of the work on the house by myself. You can learn more about me here.


They’re perfect!
Happy New Year. You’re off to a good start.
The shutters transform the building!!! Wow. And I love the ring pulls. You are so good about paying attention to details. Thanks for sharing the links
it already looks like it belongs to you… Bravo!!!
Love what you have done so far. Looks amazing!
Look at you… Jan 5 and tearing it up! Keep going!
Better already! Amazing what shutters can do to give a more finished look to a building!
Happy New Year! Beautiful job! 👏🏻👏🏻👏🏻
So cute! It really adds a lot to the whole cohesive look of the property.
Beautiful! Love the color!
The shutters really dressed up your workshop Kristi! So pretty. I can’t wait to see how you skirt the bottom of it.
Love those! What a difference!
The shutters look great. You’re off to a great start!
They turned out perfect! Gentleman’s Gray is one of my favorites, in fact we used it on the exterior of our last house!
What is a shutter dog?
The workshop now has personality. Looks great.
Shutter dogs are used on functional shutters to hold the shutters open (against the house) when the shutters are not being used to cover the windows.
They look awesome. I love the color and how it matches the house, you really are amazing. I think I will be able to convince my husband that we can make some for our house, only ours will have to be functional. We get crazy storms up here in the mountains. Thanks for the information on the Sherwin-Williams stuff, that will be very helpful since we love to use the PVC wood for all of our projects, we have carpenter bees here that should be the Tennessee state bird. Thanks again for all the inspiration and for ticking that box so early in the New Year, kudos.
Cheers!
Dresses it up! Looks cute!
Suggestion, paint the big garage door. When left white its the stand out feature! Houses always look better when its painted the house color.
I do have plans for the door, but I hadn’t considered painting it the main color. I’ll have to give that some thought!
A decorator and a high-end house stager have both told me this, to paint the gagage door the same color as the body of the house. We have done this with our homes, and it really looks great.
It allows the garage door to recede and does not make a focal point of it, always a good thing.
Totally agree. I say that all the time…garage doors should just blend in since they are normally not a decorative item. I have seen some gorgeous ones that actually are OK standing out, but for the most part they look better just plain blending in! Love those shutters though!
Sweet! Are you going to make a porch or porch roof at some point?
I don’t think it would be considered a porch, but steps with a large landing area at the top. I won’t do anything to extend the roof, but I do want to do something over the door to make it prettier.
Looks like the beginnings of a Happy Productive New Year! Love the dramatic effect of the shutters. Will you be painting the doors or the trim around the doors?
Can’t wait to see all you accomplish in 2025!
Wishing you and Matt a happy, healthy New Year
I’ll be painting the front door. I’m undecided on the garage door right now.
The shutters made such a huge difference. Love it!
Looks great. Really elevates the looks of the workshop. Onto your next project.
Lovely!
The shutters look great!
About your video plans: Would you please be sure to provide closed captioning for them, if it’s at all possible? For medical reasons, I rely entirely on cc’ing to be able to access video content, and it’s incredibly frustrating when it’s not available.
Thank you!
I will make it a priority to learn how to do that!
Thanks so much, Kristi! I really appreciate it.
Three comments: 1) I love the castor oil balm stuff that recommended. I feel like it has improved my skin. 2) Did the contractor guy ever pick up the rest of the tools? That was a crazy story! 3) The shutters look great!
I’m so glad you love the balm! The contractor’s fan and ladder are still in my front yard. 😕
Oh my gosh! What a change in looks. Fabulouso! Are you painting the door same color as on your studio and front door? That would look really cohesive and pretty.
I am! I’ll probably end up painting all of our exterior doors that color. It’s just very “me” to have all coral doors.
Love them!! Looks beautiful on your workshop. I can’t remember if I told you in a comment that I invested in a shed last June and it was built in July. It is a place where I work on my paint projects which are primarily restoring cast off jewelry boxes with paint and relining many of them with new jewelry box felt lining. I had wanted to tell you how my shed is running on solar power, I had electrical outlets and LED lighting installed. Painted unfinished cabinets navy blue which provide lots of storage and provide a 9 ft long counter for me to work. I had the walls insulated and finished them with white shiplap paneling running horizontal on the walls and vertical on the peaked ceiling. I had white laminate flooring put down. It’s bright and just perfect for me and my projects. I had wanted to suggest to you a shed might be perfect for you to have a workshop in your back yard. I painted all summer/fall and about the time I came back to reading your blog, found that you had purchased a shed! Fabulous and an outstanding investment in your business. Wishing you a wonderful and successful 2025!
Your art shed sounds amazing! Congratulations! I can’t wait to get mine organized and usable.
So cute!! You do things right, and I so appreciate that 🙂
I’m impressed with your shutters! I’ve been wanting some like these for a while. You definitely achieved the cute cottage look!