Living Room Progress – Floral Pillows (How To Sew A Pillow Cover With Zipper)
*This post contains affiliate links.
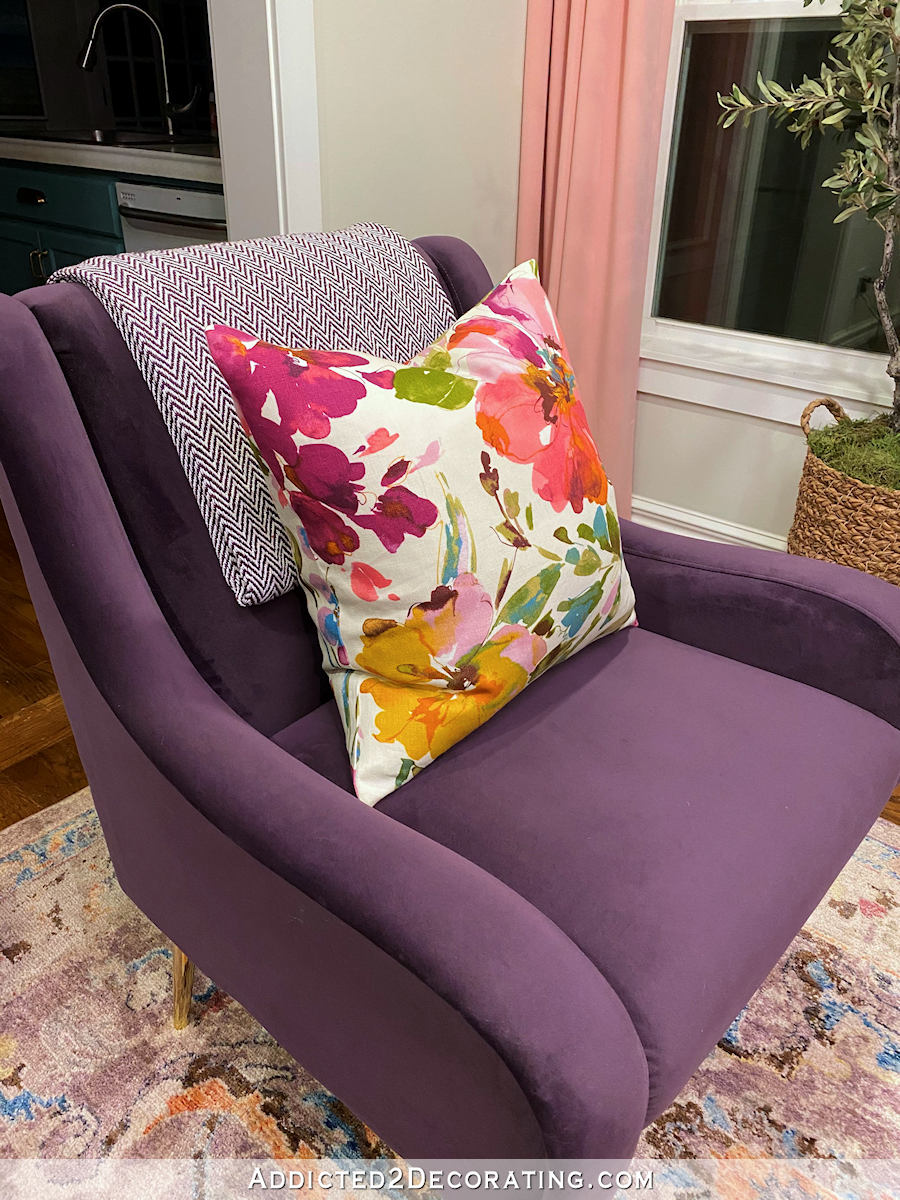
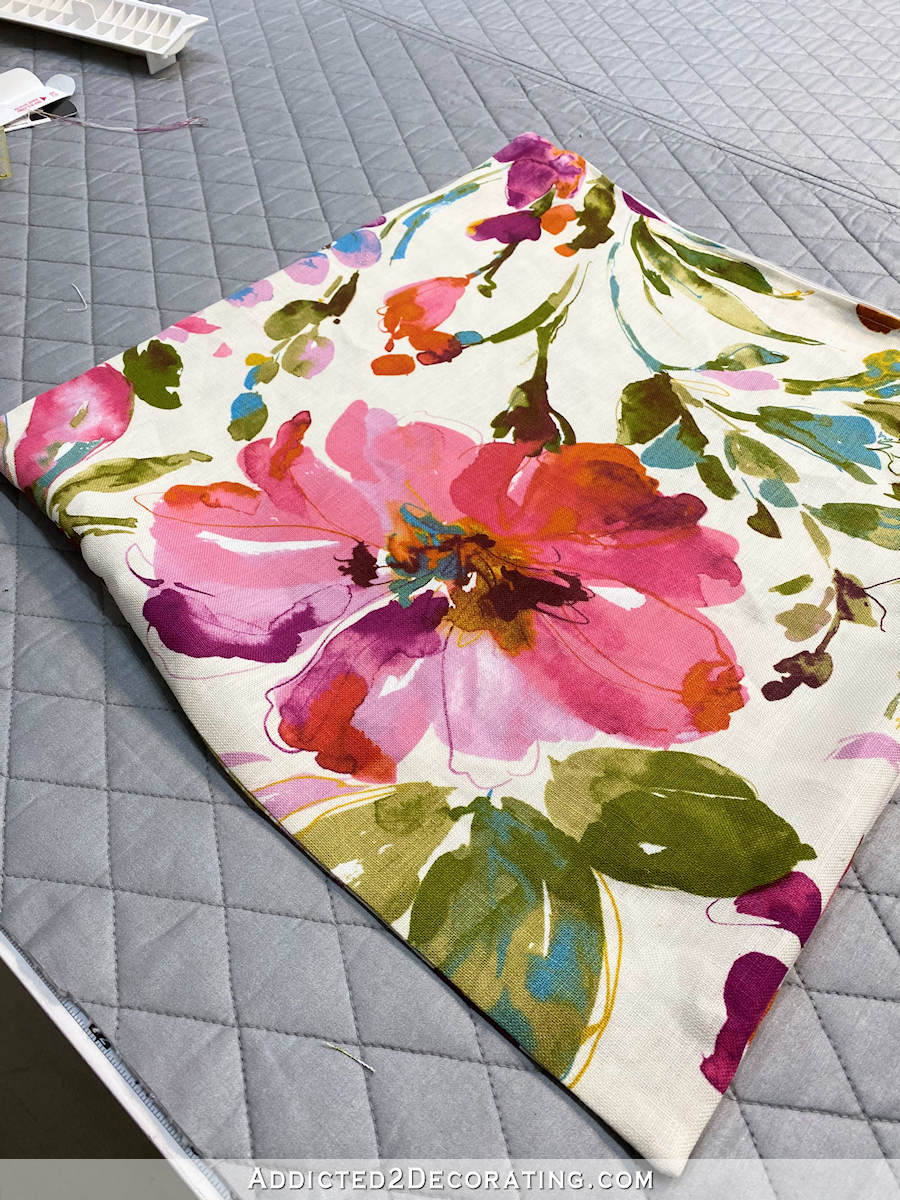
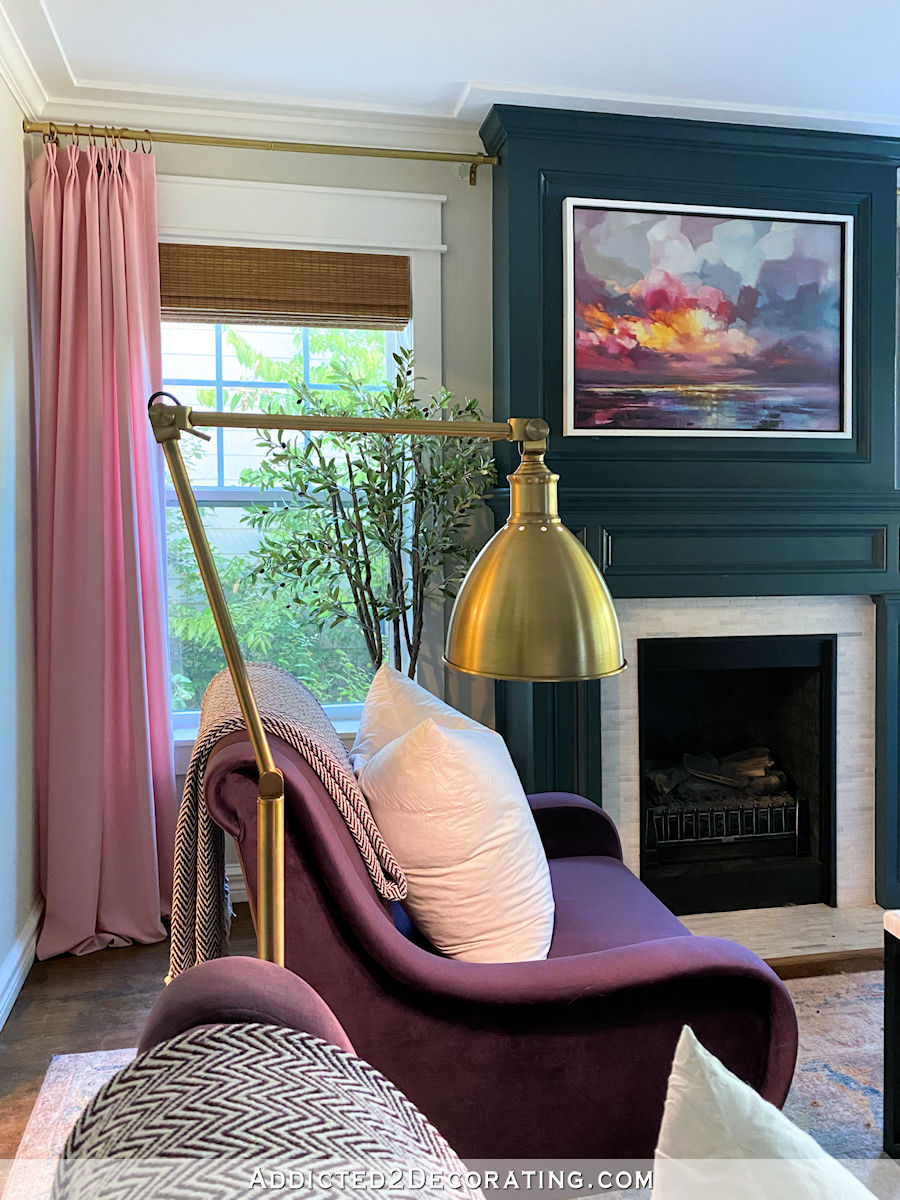
I have finally added some of my beautiful floral fabric to the living room. The fabric is by P. Kaufman, and it’s called Paint Palette. It comes in at least three colorways, and this one is called Punch. I had originally intended to upholster the backs of two chairs with this fabric, but as my plans for the living room evolved, and I ended up purchasing two new purple chairs, I had to come up with a new plan for the fabric. So I used it to make two pillows to go in the purple chairs.
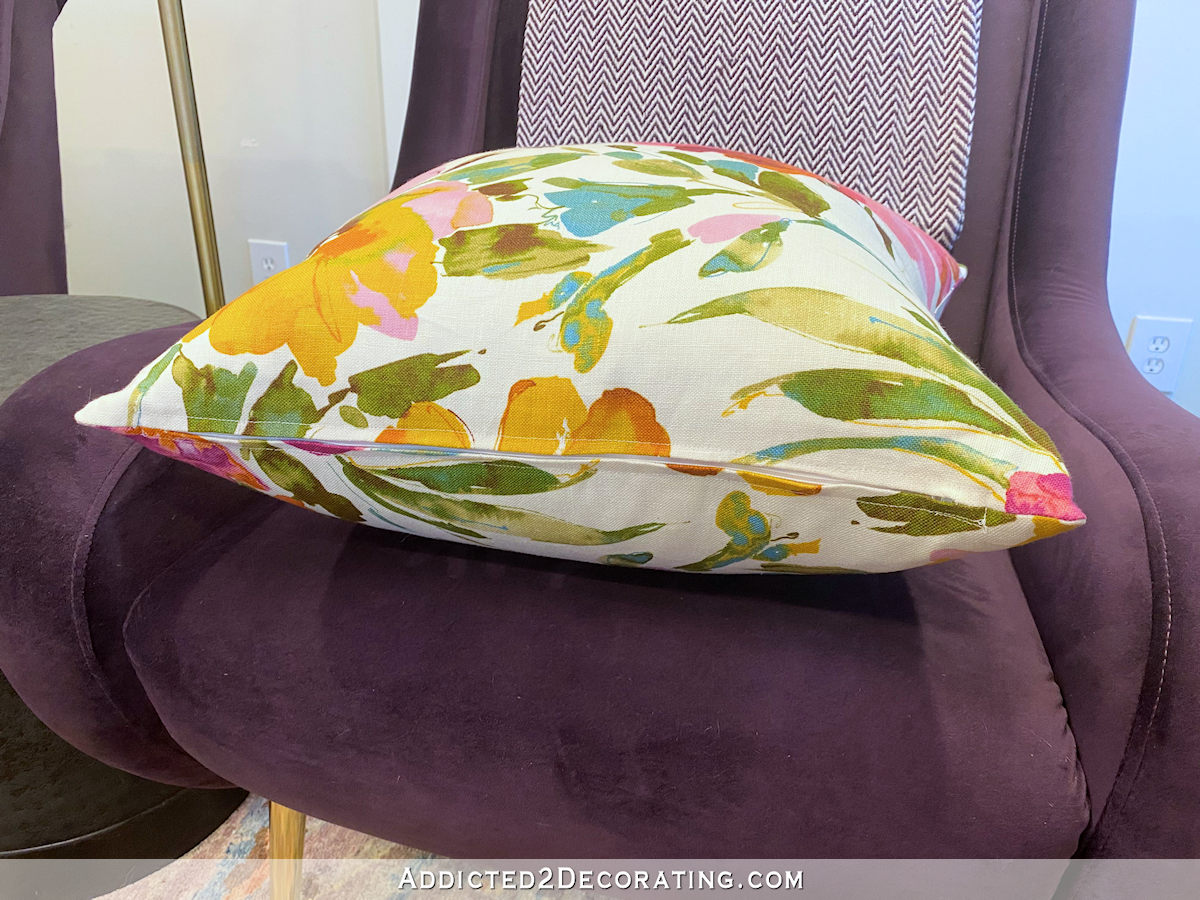
I made these with zippers on the bottom so that they can be removed and washed.
So for those of you who have never sewn a pillow cover with a zipper, I thought I’d show you the process so you can see just how easy it is. Quite honestly, I find sewing zippered pillow covers to be easier than permanent, non-zippered covers. With the covers that are sewn on all four sides to create a permanent cover on the pillow, you either have to sew the fourth side by hand, which takes much longer than sewing a zipper in, or you have to wrangle a stuffed pillow cover and smush it down enough to get the edges under a sewing machine foot.
I find sewing in a zipper to be much easier than either of those options, and then you have the added advantage of easily being able to remove and wash the pillow cover when needed.
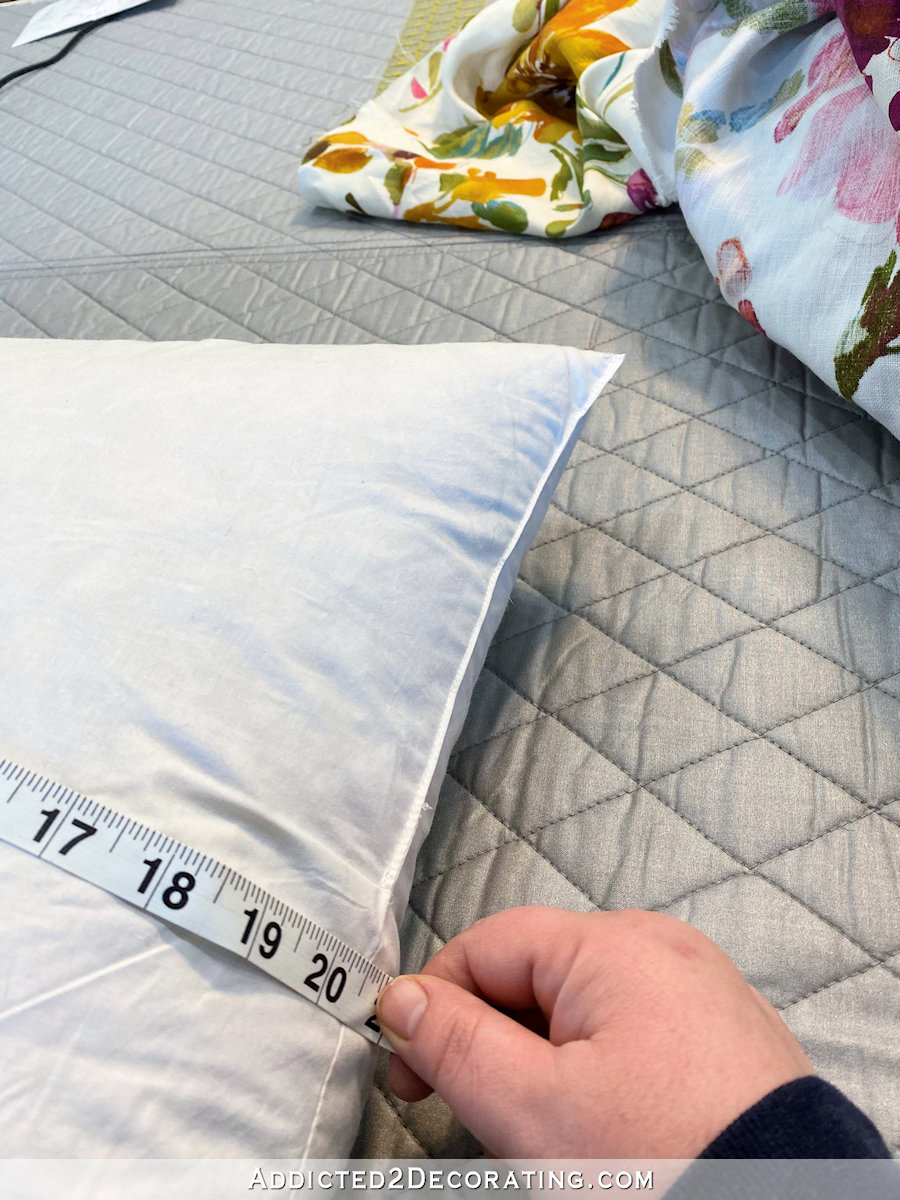
To make my pillow cover, I started by measuring the pillow from one side seam to the other.
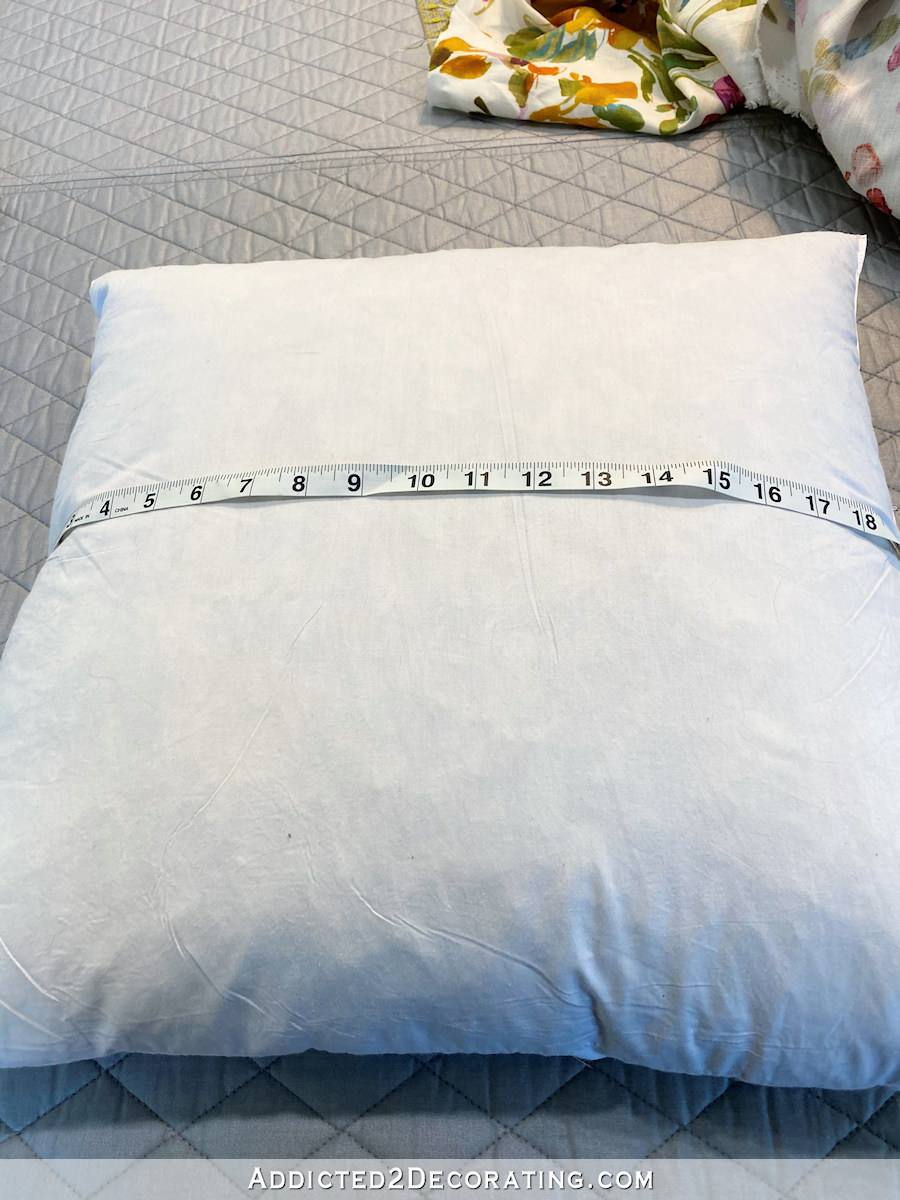
My pillow insert was 20.5 inches square.
So I cut my fabric to exactly 20.5 inches square. I don’t add to the dimensions for seam allowances because I like my pillows to be plump. So placing a 20.5-inch pillow insert into a slightly smaller pillow cover gives them that fuller, plump look.
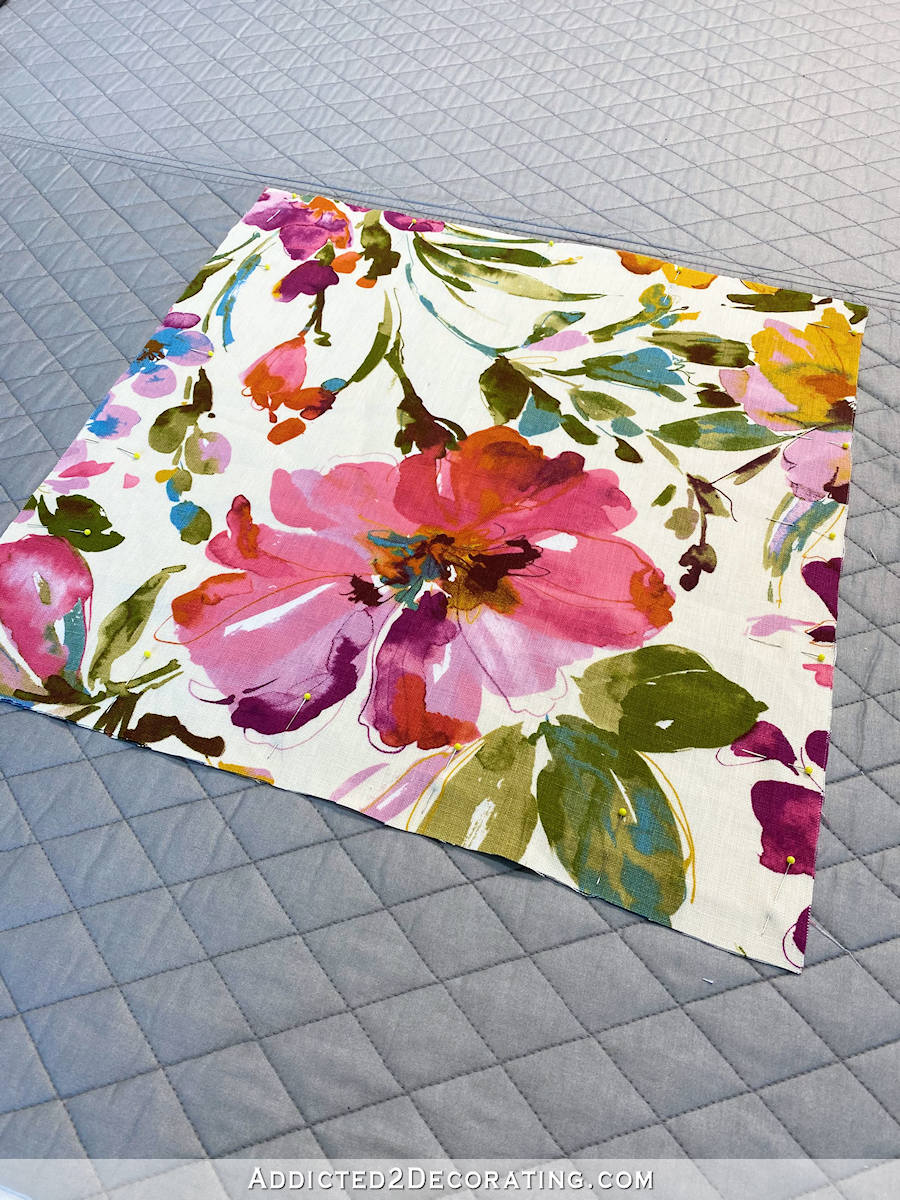
Since I was working with linen, which tends to fray very easily on the cut edges, I took each individual piece to the machine and did a zigzag stitch all around the edges. I couldn’t get too close to the edge with the linen because it would curl and gather the fabric, but at least this zigzag stitch created a stop where the fabric could not fray past that point.
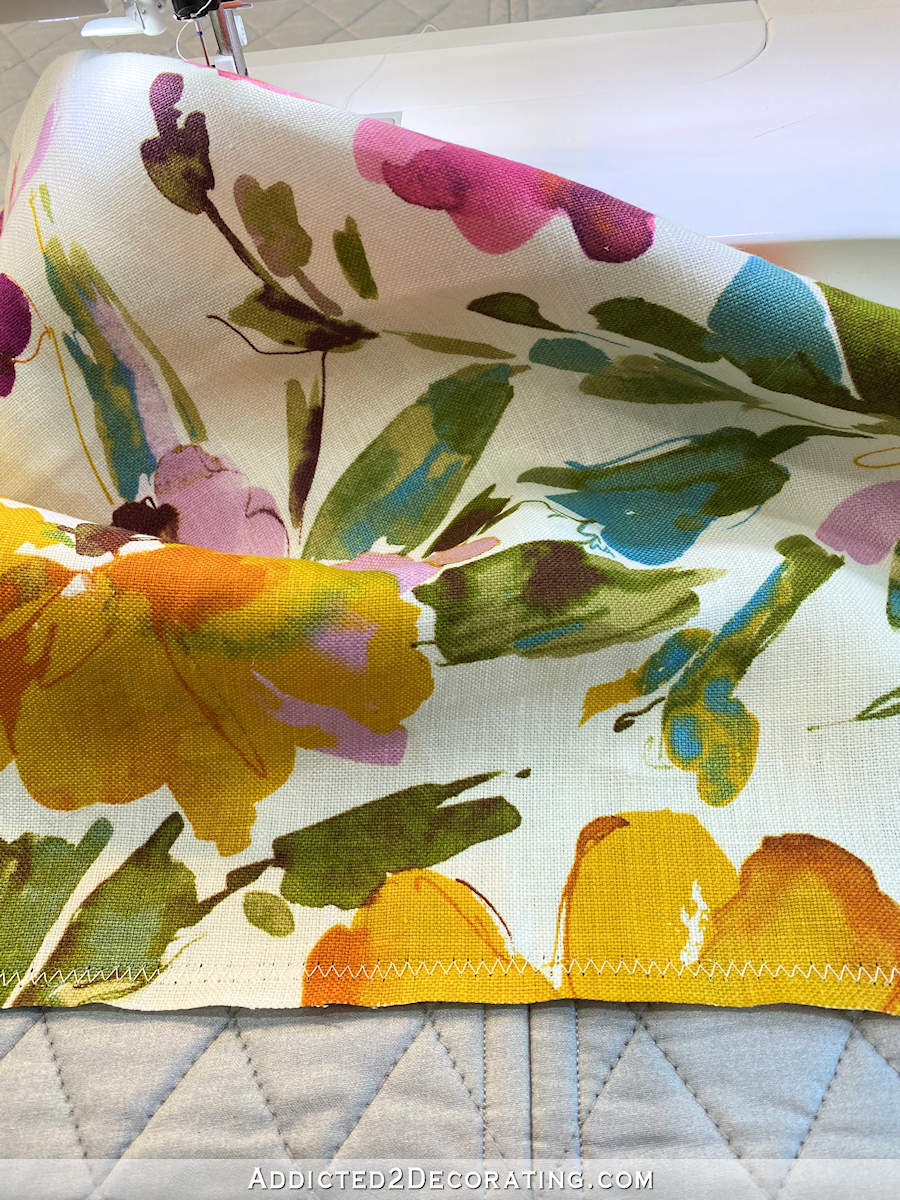
You can also use a product like Fray Check around the edges to keep the fabric from fraying. I personally find using Fray Check to be the better option, but I didn’t have any on hand. So I went with the zigzag stitch.
After zigzag stitching around all four edges on both pieces, I ironed each piece so that the edges lay perfectly flat.
Then I placed the two pieces together, right sides together, and pinned the bottom edges together.
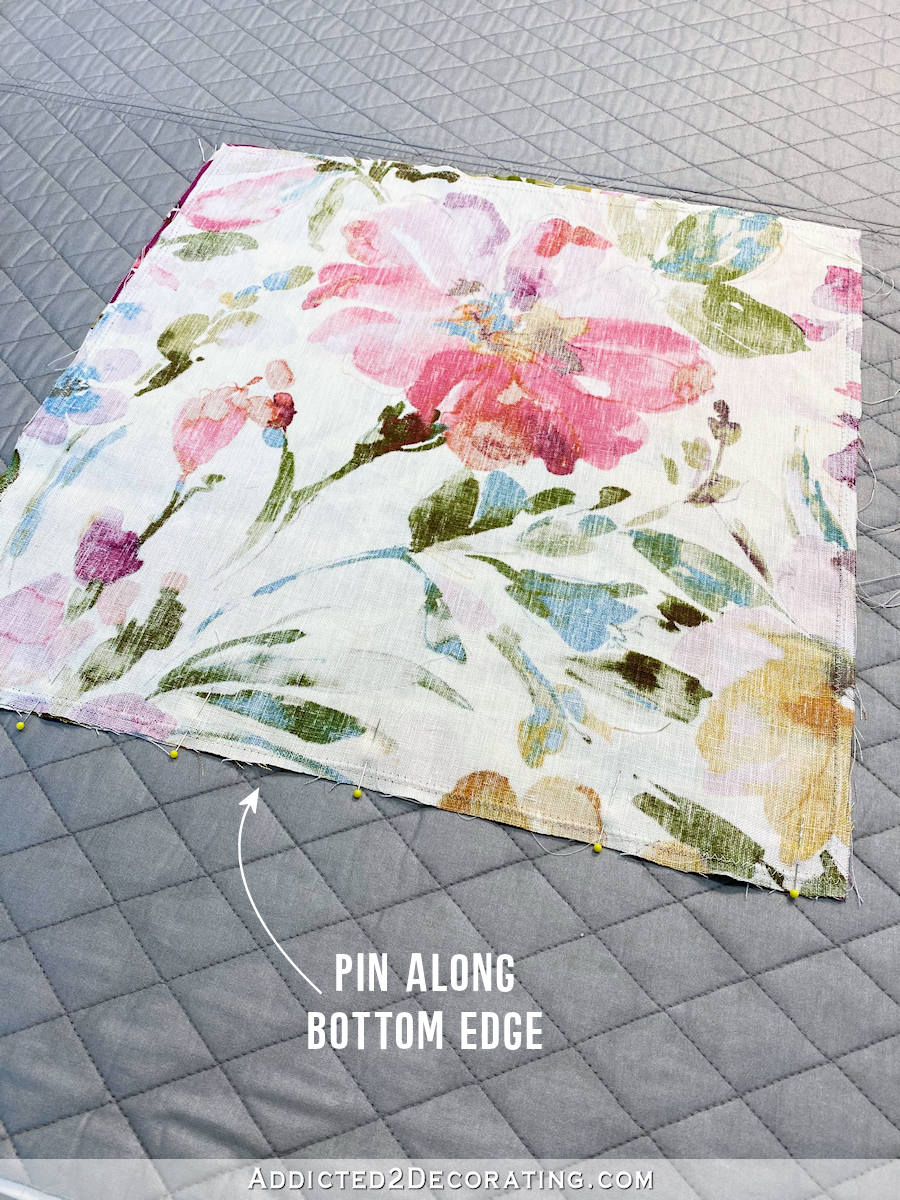
Using my ruler, I measured and marked 2.5 inches from the edge. It’s better to use a fabric marker, but I didn’t have one, so I used a pencil. 😀 This is not an advisable method of marking on fabric, so do as I say and not as I do. Use a fabric marker.
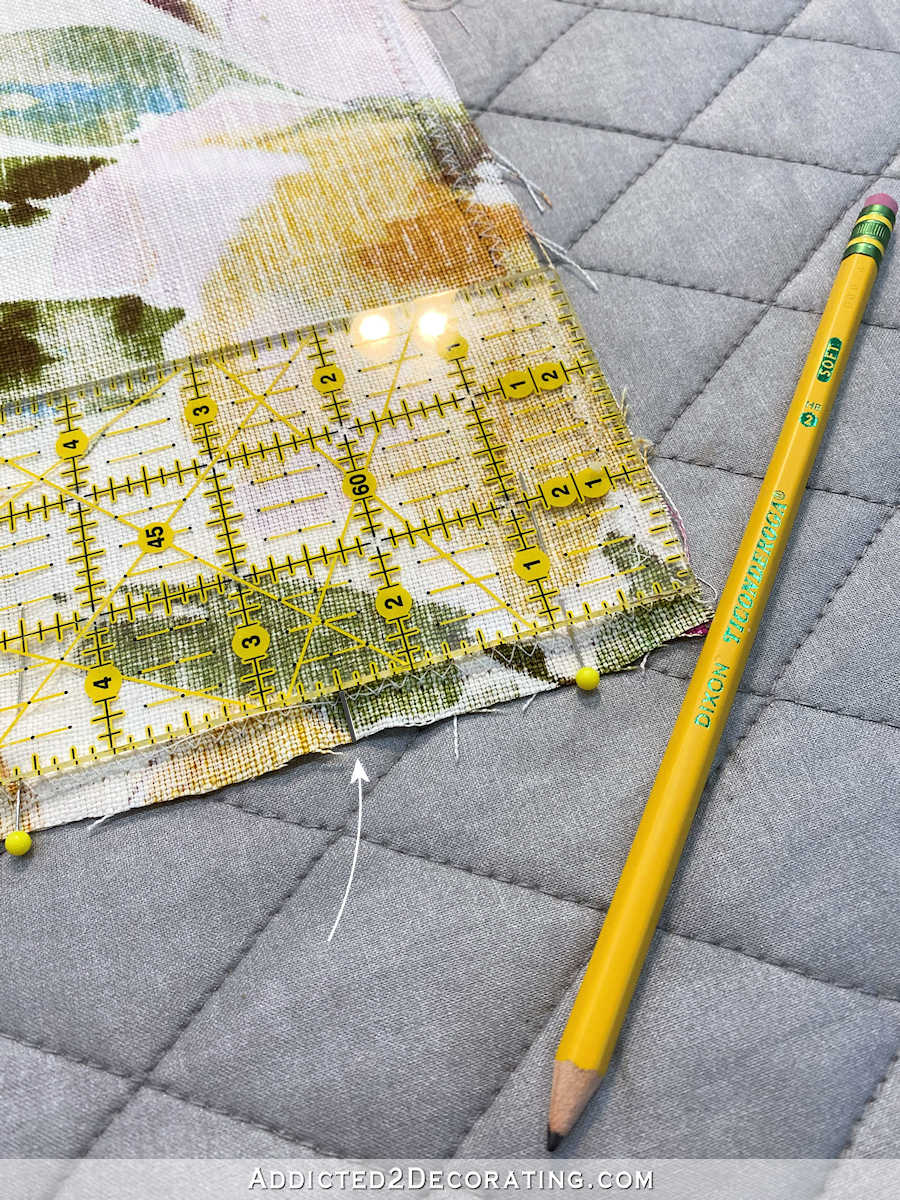
And then I repeated that on the other side.
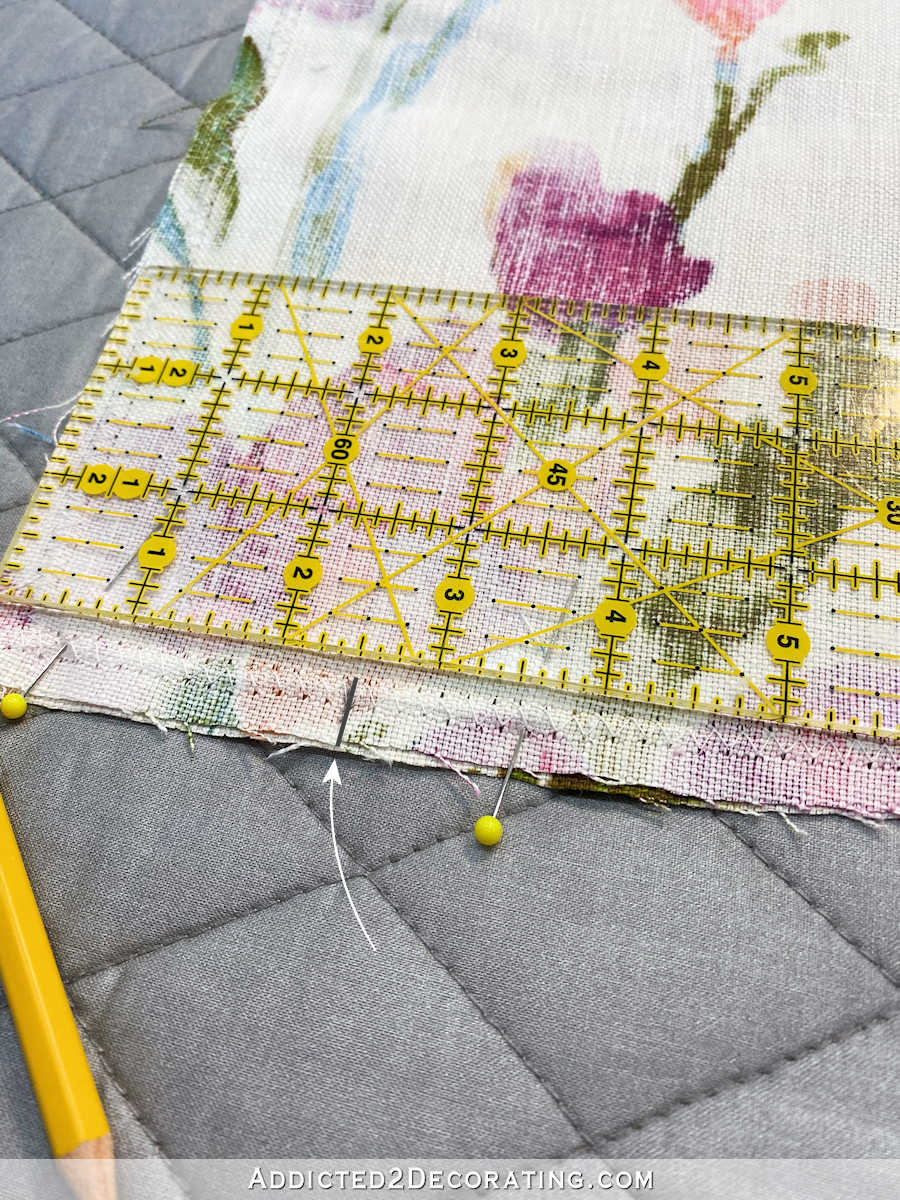
Then I was ready to take this to the sewing machine and sew that bottom edge using a 1/2-inch seam. Since this is the edge where the zipper will go, and the zipper will go between those marks made in the above steps, I sewed with a regular stitch on the outside 2.5 inches, and then used a basting stitch on the area between the two marks. I’ve added lines to the picture below to depict what I’m talking about…

If you’re new to sewing and unfamiliar with the lingo, a basting stitch is simply a large stitch, either done quickly by hand or by machine with the stitch set to the longest possible length. Basting stitches are generally temporary stitches, and the long length makes them very easy to remove after they have served their purpose.
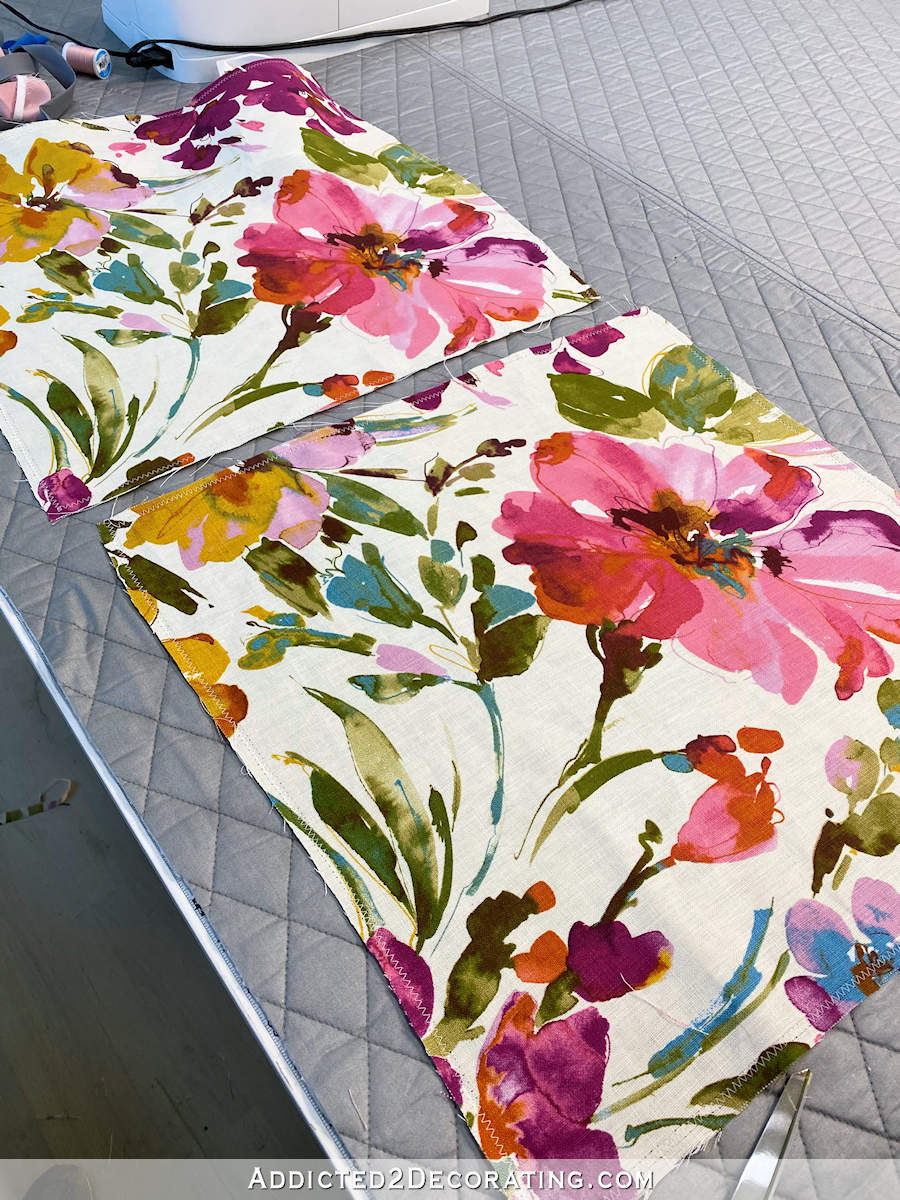
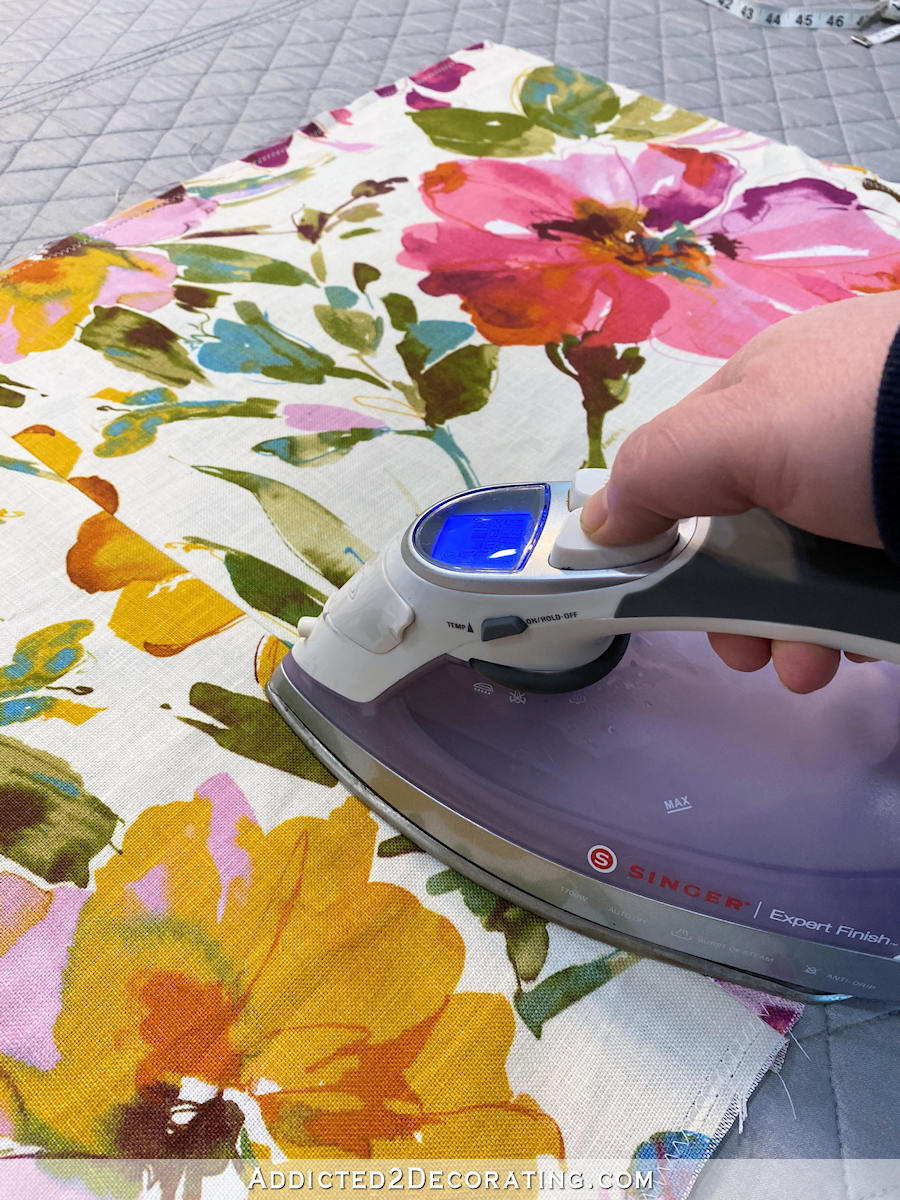
After sewing the bottom seam, I used my steam iron to press the seam open on the back.

And I always press seams open on both sides for a cleaner look, so I flipped it over and ironed the seam on the right side of the fabric.
Then I was ready to pin the zipper into place with the front of the zipper facing down.
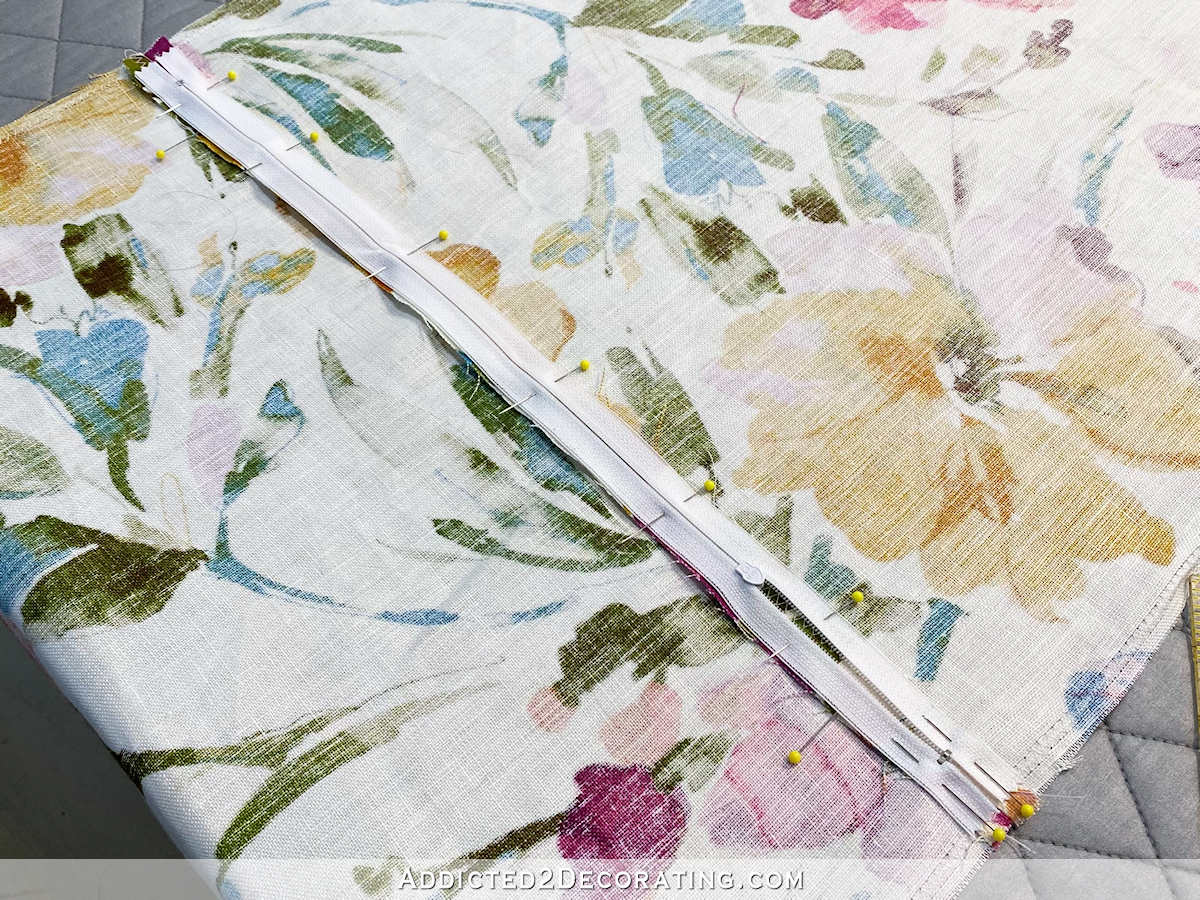
And then I took it to the machine to sew into place. Of course, it’s preferable to use a zipper foot for this, but my zipper foot has been lost ever since I took my machine in for servicing. (They didn’t lose it. I did.) So I had to make do with a regular foot.
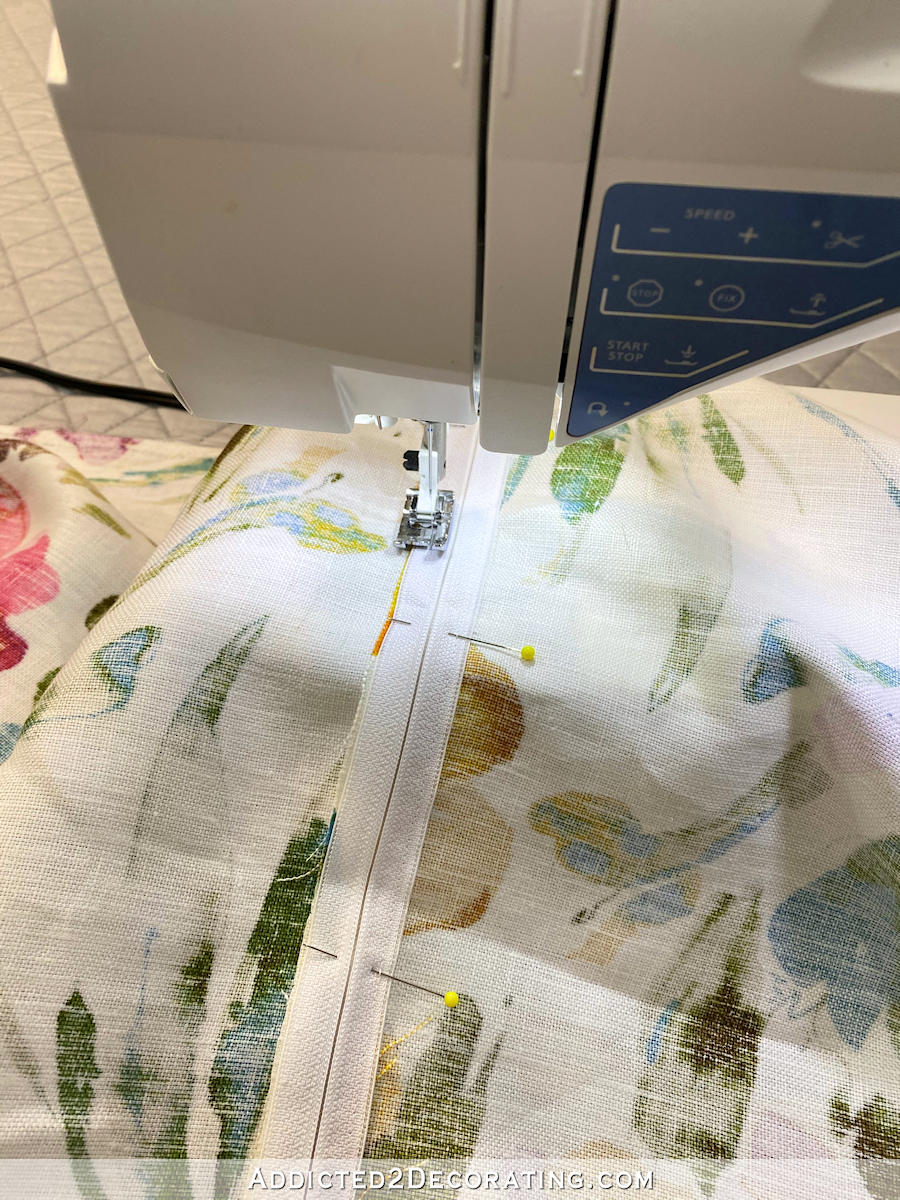
Since you can’t see my actual white stitches on a white zipper, the image below depicts where I stitched the zipper. I stitched along the edges until I got two inches from the edge (i.e., 1/2 inch past the 2.5-inch mark where I changed from a regular stitch to a basting stitch), and then I turned and stitched across the zipper, and then turned again and stitched the other side of the zipper.

Once the zipper was sewn in, I used a stitch ripper and removed the basting stitch. It takes less than a minute to rip out the basting stitch and clean up all of the little threads.
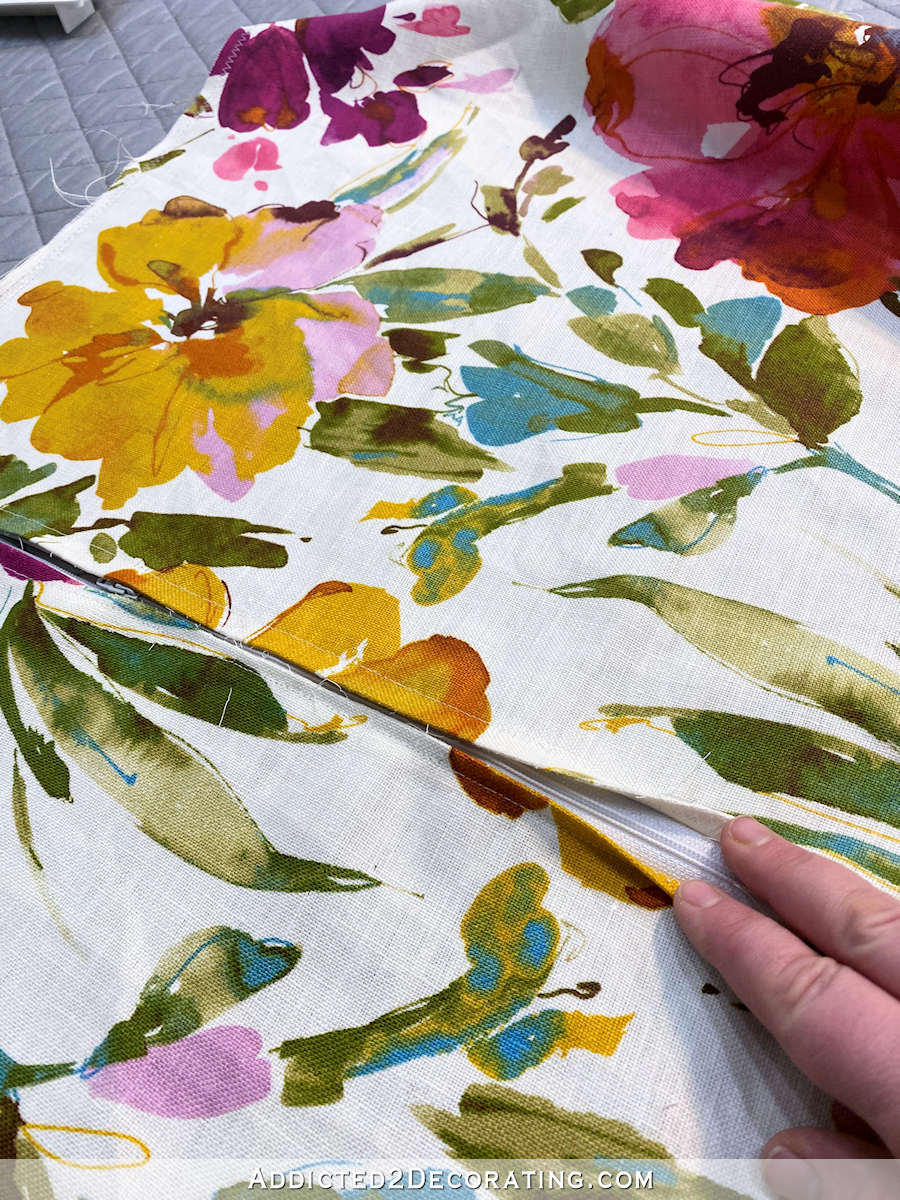
With the zipper in, the hardest part (which is really quite simple) is done!
Next I pinned the other three sides together with the right sides together.
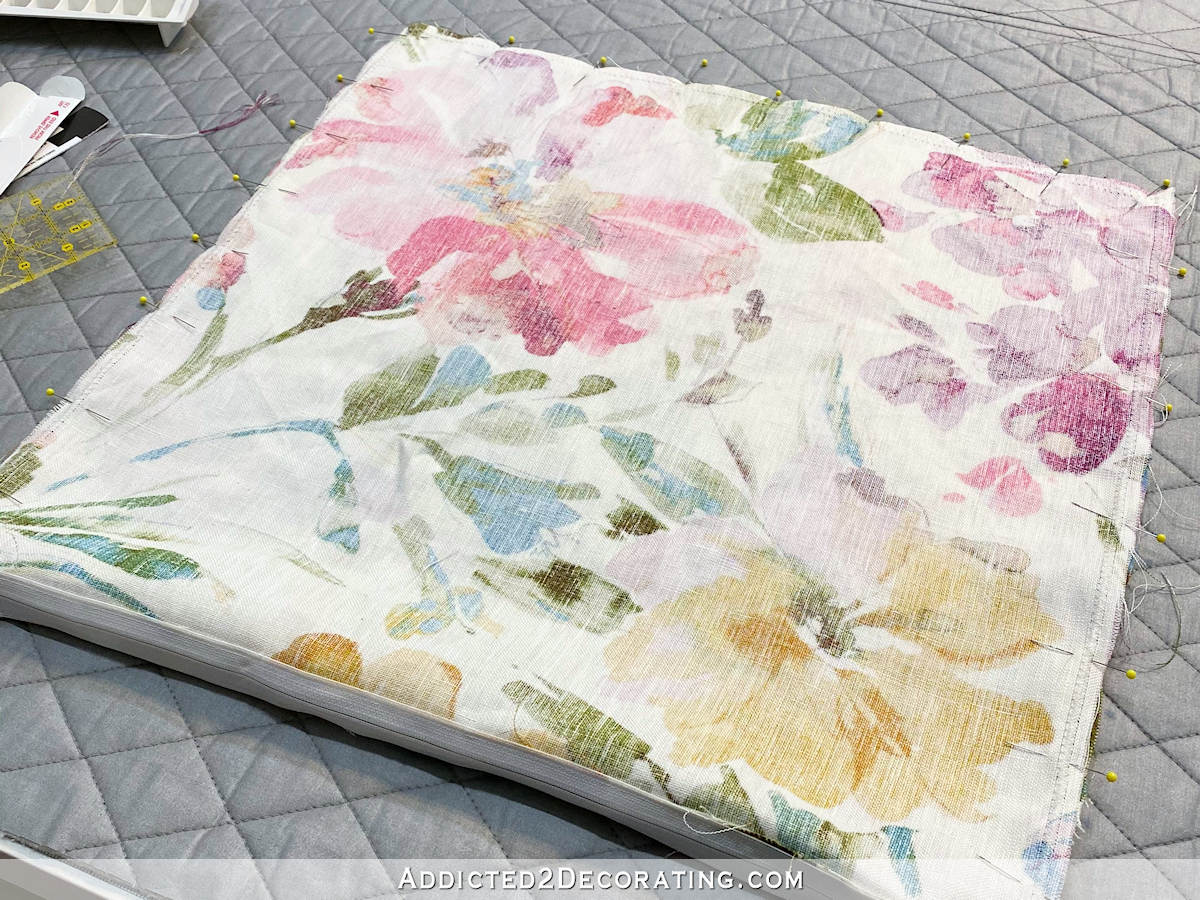
I made sure that I pinned them all the way to the edges on the zipper side.

And then I took it to the machine and sewed all three sides together using a 1/2-inch seam.
When it was sewn together and turned right side out, this is what it looked like.
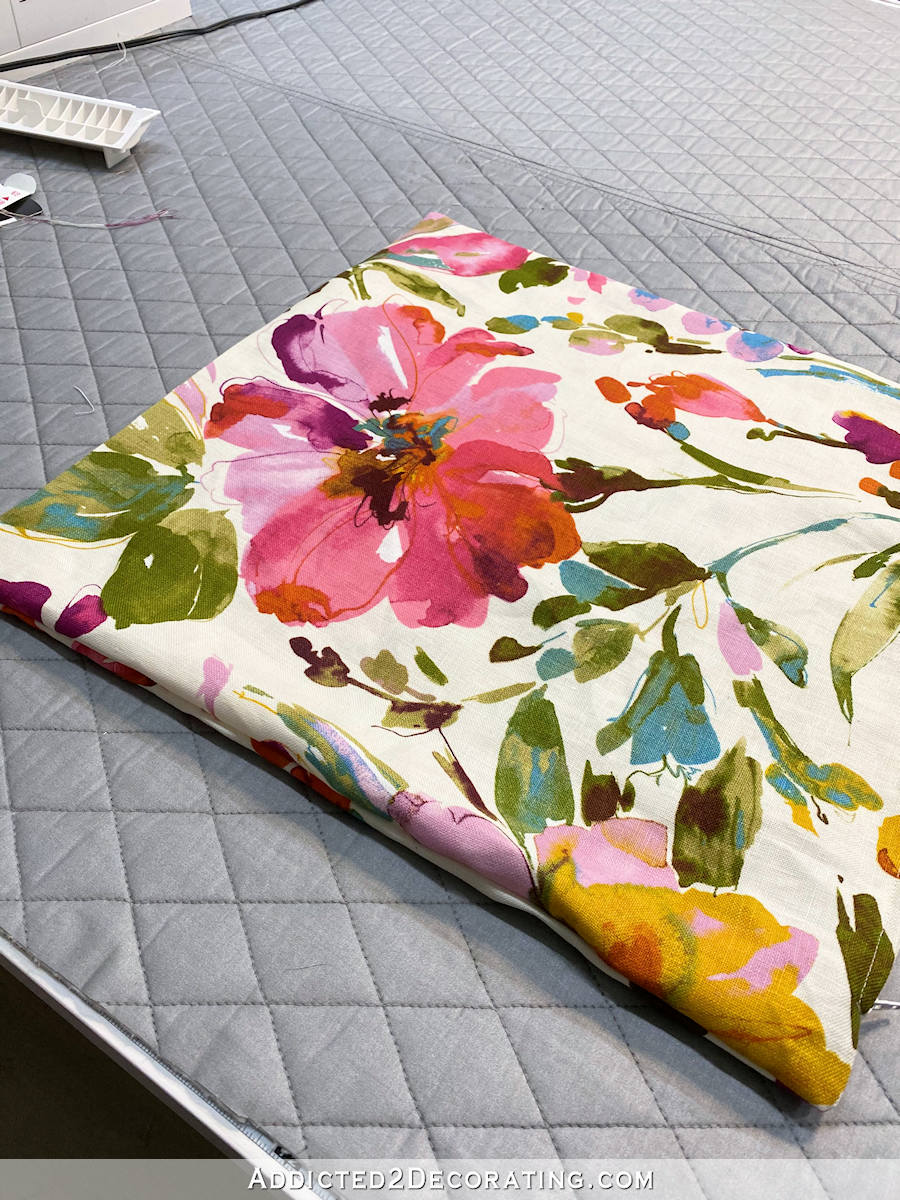
I use a crochet needle to get the corners just right from the inside. Anything long and thin with a blunt end will do to push the corners out as much as possible. You can even purchase a corner turner specifically for this purpose.
And finally, I pressed in the edge seams. It took some working and manipulating and finger pressing to get the edge seam right out to the edge as much as possible, and then I used the steam iron to press in the edge seams.
And here’s what it looked like with all of the edge seams ironed.
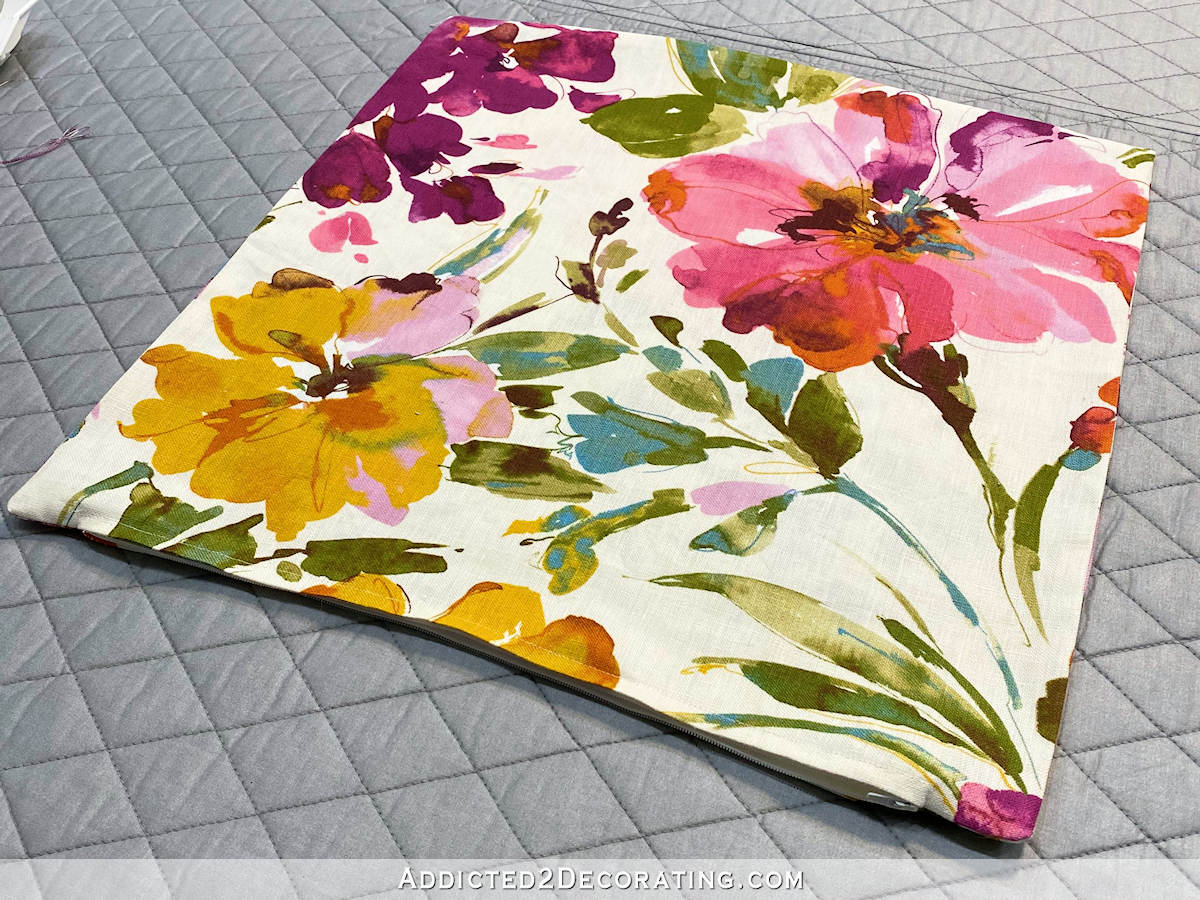
And then all it needed was the pillow insert and a bit of fluffing and making sure the pillow insert filled out all four corners of the pillow cover. (I hate empty, flaccid corners on pillow covers.)
So I got two of these done — one for each purple chair.
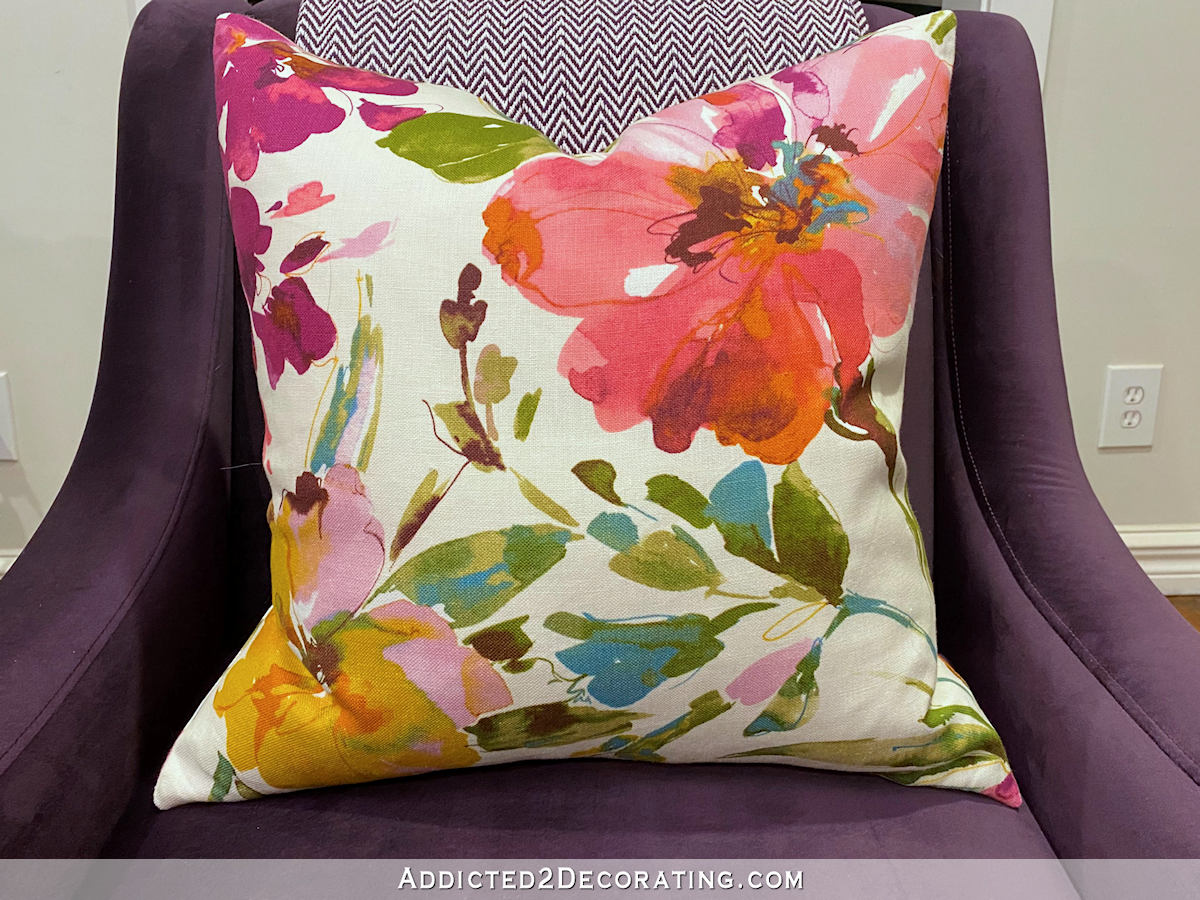
Of course, I’m waiting until the room is finished to show you the full view of the room and the chairs with their new floral pillows. I have to leave at least a little mystery for the final before and after of the room. 😀 It shouldn’t be too much longer!

Addicted 2 Decorating is where I share my DIY and decorating journey as I remodel and decorate the 1948 fixer upper that my husband, Matt, and I bought in 2013. Matt has M.S. and is unable to do physical work, so I do the majority of the work on the house by myself. You can learn more about me here.


Oh my! This is soooo much easier! And I LOVE your new pillows on the chairs!!
I bet they really pull the room together. BTW some years back my friend who designed fabrics with unique regional designs needed help getting her designs made into pillows for shipping around the country. For speed and cost, she chose the squish and smush version of putting a pillow together. I sewed thousands and frankly never got good at it. Mind you I made my own wedding dress, but this ridiculous method was incredibly hard on my hands. I have no idea how people can do it well. Eventually, she went to an envelop style. And I finally got my head back and quit that stupid job — the hardest in my life and I’ve worked in all kinds of biz and non-profit settings.
Thank you sooo much for that tutorial! I sew very little and many years ago did put some zippers in for my daughter’s clothes when she was a little tyke. But, I don’t remember it being that easy, so haven’t attempted it again. I feel, after following your instructions, that I may even attempt some pillow covers!!! Good place to start for me! BTW, those purple chairs are so glamorous looking and that pillow fabric just picks up the colors in the room! Can’t wait to see the full reveal…have a great day, Kristi!
These are so pretty! Good job getting the zipper in without a zipper foot!
Wow! Excellent tute!. and you are so right, very simple, with a beautiful result. Putting the zipper in first! DUH!
This looks so easy and it’s so logical! I could have used this tutorial about 3 months ago. I offered to make a pillow cover w/zipper for my daughter. She provided all the supplies; all I had to do was stitch it together. Made the mistake of trying to put zipper in AFTER other 3 seams – so not logical! Finally gave up and stitched that last side by hand.
I will remember this for next time.
Such a beautiful fabric for complimenting those chairs Kristi! I’m excited to see “the room” in all it’s glory.
May I ask what is the grey quilted fabric you’re using to cover your work table?
It’s actually the quilted fabric that’s used to cover ironing boards. You can purchase it by the yard at Joann Fabric, and I bought enough to cover my entire work table so that I can iron anywhere on the table when I’m working on a sewing project. One of my best decisions ever.
Such pretty fabric! Thanks for the tutorial.
These pillows look so pretty on your chairs. I really like the whole living room. Your way of putting in the zipper is easier also and will have to give that a try. Thanks.
I also wanted to let you know I’m reading your Grandmother’s book and loving it!
Love the pillows. Great tutorial – I’ve been doing a similar method for years. May I suggest that the zipper should be left at least part way open when sewing the three sides together. I had a lot of difficulty opening the zipper when I didn’t
Yes! Very true! I forgot to do that on this one and had a heck of a time getting it open. 😂
Those look great – I love how you seem to have all the colors of your room somewhere in that fabric! One tip for good corners – it helps to clip the corner fabric off a bit before you turn it.
You may have not wanted to do it with that fabric though because of fraying. It helps with other fabrics though, to keep some of the excess fabric out of that corner. Also, I have taken to buying a roll of zipper material and stoppers and tabs, in black and white – mostly can be used for everything, and MUCH more economical. It is even easier to sew in before you sew any seams, and then finish. Best tutorial at Sailrite fabrics for learning an even easier way. I no longer dread zippers! 😉
Love Sailrite’s tutorials. So thorough in their explanations.
Very timely advice as I plan to make pillows soon. I was dreading the zipper. Thank you.
I really like your fabric and enjoy your use of color.
So funny! I have a very similar patterned pillow and the same rug! Love it all. I love this rug and all the possible options.
So pretty! Thank you for the tutorial- you made it seem easy- Zippers always scared me!
love kaufman fabrics! I especially love the print you chose! Reminds me of spring all year. I’ve never sewn a zipper, for my throw pillows i just make fabric covers that are like envelopes and just fold over..=D
Wow, I wish you were my home ec teacher in the day they required students to take this class in Jr. High School. I was traumatized by mine and had to take a zipper out three times and put it back in. That was one of the reasons, I thought I could never sew, so why bother. You inspired me to give it a try! Thank you for doing so many things and making them simple looking. You are one talented lady!
I remember many years ago when you said you really didn’t like purple. This is the most gorgeous room ever.
Yep, I had an aversion to purple for many, many years. I think it was because we painted our big bonus room in our Oregon house two shades of purple, and after a while, I just started to hate it. I chose the wrong purples, and it looked like a kid’s room. Then I avoided purple for many years after that. It took a while for me to find the right purples, but now I love purple again!
Beautiful pillows, Kristi! I do it this way too. However, the last one was a large, long lumbar pillow and the zipper should have been almost as long as the pillow. It was way too short (cuz I was too lazy to go out and buy the proper size) and fabric wasn’t strong enough to take the pillow stuffing operation. Uh oh!
Thank you!! No longer will I “fear the zipper”.
You always impress me, and motivate me with how you explain things step by step, making everything seem so easy anddoable!! I love how you simply break it all down so even a non diyer thinks, “oh, even I can do that!”. One of these days, I am gonna get started, but for now, I am loving all your posts and saving the tutorials for another day.
BTW, if you ever wanted to compile a book of all your posts, I would certainly purchase it!! Thank you for everything you do, wish you had your own hgtv show- I used to watch a few ma y years ago that inspired me the way you do, but haven’t seen a show like that in years!!! We need one!!
Did you sew these in that fabulous studio of yours?!!
Of course! 😃 That studio with the huge workroom table has been an absolute dream.
You have THE BEST tutorials. I inherited my mother’s sewing machine and have wanted to learn how to use it. This might be the way to start. Thank you for the inspiration and instruction!
Wrap the pillow or cushion insert in lightweight plastic – think dry cleaner bags – and leave both ends sticking out through the zippered opening. Slide the insert into the pillow cover and remove the plastic, pulling one end. Much easier than pushing foam rubber or fabric against fabric.
Wow, that sounds like a great solution! I need to remember that tip! Thanks.
What a fantastic tutorial! I’ve never attempted zippers because they always seem so daunting – this makes it look so easy! Or at least a simple way to start and practice. Thank you so much for sharing!
I don’t sew, but those pillows look gorgeous in your living room! The fabric is great! <3
Your photos and directions are very clear and easy to follow. Here is my tip on how to avoid the dog ear look at the corners of square and rectangle pillows. Make a mark one quarter of the way from each corner towards the center of each side.) Measure in 1/2 in. in from each cut side at the corner and mark. Draw new cutting lines starting at each corner mark, tapering back midpoint mark on the cut edge. Cut along the new cutting lines. When you put the insert into the pillow cover you will not notice that the sides curve in at the corners.
They are gorgeous. You make everything look so easy. I’m a novice at sewing so it gives me courage to try things. Did you wash or wet the fabric before sewing? If so, what about drying? I’m wanting to sew a contrasting linen edge on to some linen blend ready made curtains I purchased, and I need advise before proceeding. Potential shrinking concerns me, especially being two different fabrics, and factors into how much fabric to purchase too. I have pets and would like to be able to wash them. Does linen continue to shrink with subsequent washings? Would it be best to just dry clean?
Hey Kristi–I agree with your comment about disliking “flaccid” corners–such a great use of the word! Also a great idea to make the size of the fabric pieces smaller so that the pillow is plump. I’ve seen an idea online that I found helpful, which is to somewhat curve in the line of stitching at the corners instead of making a 90-degree angle and thus avoiding empty corners even further. (I’m not explaining this very well–here’s a video, although she’s not putting in a zipper–https://youtu.be/gGPPwwvuEWo.)
I’m not sure why your link to the video didn’t create a hyperlink People can click here to find it:
https://youtu.be/gGPPwwvuEWo
The funny thing is that I absolutely love those pointy corners on my pillows. 😀 I love a perfectly square, feather-filled, overstuffed and plump, karate-chopped pillow. Not that I’m particular or anything. 😀
But if someone would rather not have those pointy corners, that’s a great tutorial, and it’s a very easy fix. It will definitely make adding a zipper a bit more challenging, but it’s doable with a little patience.
This is very helpful. Thanks!