Are you ready for a really, truly, incredibly easy project? This is it!
Some of you may remember having to make these book jackets when you were in grade school. The school would issue your textbooks, and then you’d be required to keep them covered with book jackets all year long. But for those of you who were never required to do this, let me show you how easy it is.
I love using hard bound books in decorating, but so often, the books that I find in clients’ homes (or in my own home for my own decorating) aren’t pretty at all.
The simple solution is to make your own book jackets. I used plain brown paper for the books that I used in John & Alice’s master bedroom, but if you prefer more color (or a certain color), you can get creative and use wrapping paper, scrapbook paper (for small books), and even scraps of wallpaper.
Here’s how easy this is…
 |
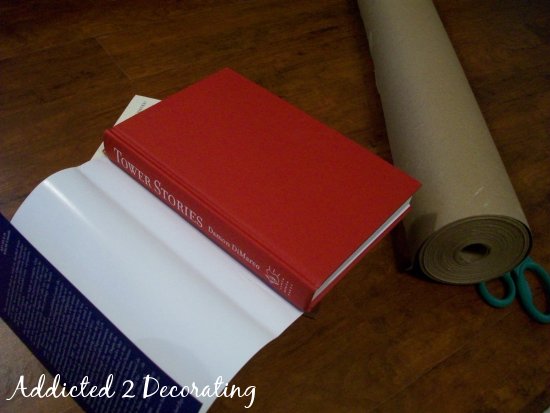
| First, remove the paper jacket that came with the book, if there’s one on there. |
|
| Next cut a piece of paper large enough that it extends about 4 inches on all sides of the book. |
|
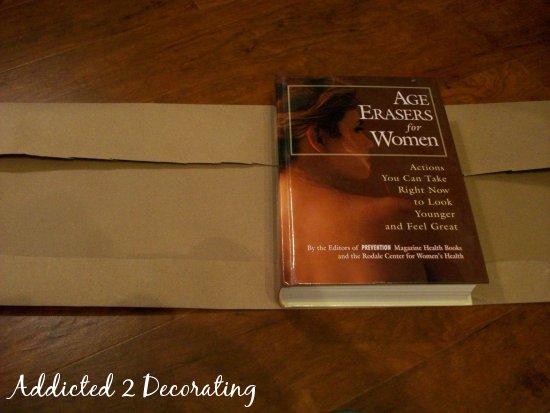
| Remove the book, and fold the bottom edge of the paper up about 3 or 4 inches to create a straight and neat edge. |
|
| Place the book about 1/8″ from the edge of the fold, and crease the top of the paper along the top edge of the book. |
|
| Remove the book and fold the top edge down to create a straight and neat fold along the top. Place the book back on the paper. The folded paper should now be the same height of the book, plus about 1/8″ on the top and the bottom. |
|
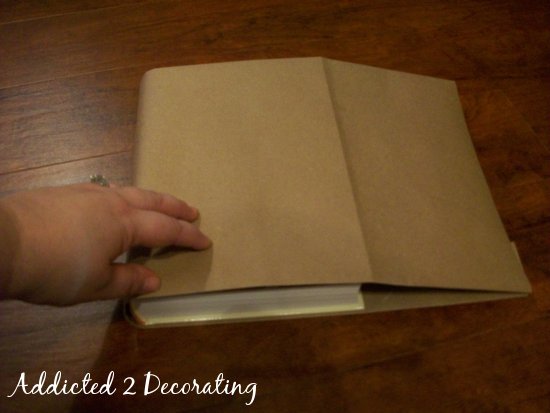
| Now fold the paper over the top of the book, and crease along the edge of the book cover. |
|
| Fold the paper along the crease, and then insert the book cover into the pocket that was just created by this fold. |
|
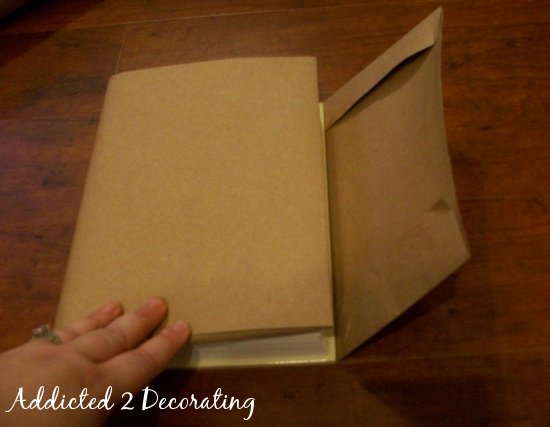
| Now close the book, and crease the back paper along the edge of the cover. Repeat the same process used on the front cover: fold, and insert the cover into the pocket created by the fold. |
|
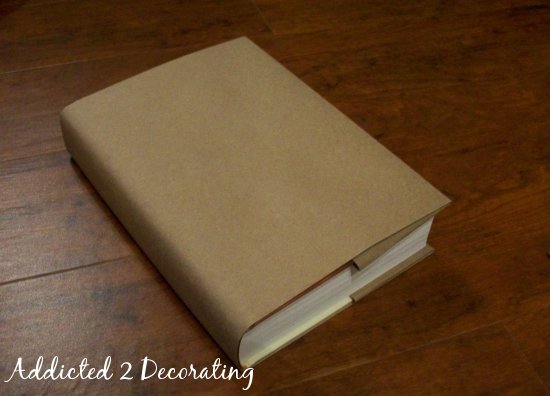
| Once it’s covered, it’ll look like this. |
|
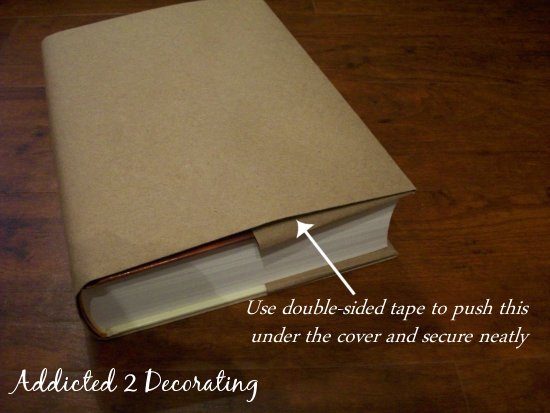
| The last thing I do is use double-sided tape sandwiched in between these layers to keep that fold pushed up neatly under the front of the book jacket. You can see that the back one is taped…the front one is not. See how nice and neat the back one looks? |
And that’s it! Easy peasy, right? So with just a few minutes of your time, and just a couple of dollars, you can turn a stack of books that looks like this…
…into something that matches your decor, like this…
And of course, the sky’s the limit when it comes to colors and patterns. Heck, you could even use some fun textures. I can imagine my leftover grasscloth from my bedroom making some really pretty book jackets.
Addicted 2 Decorating is where I share my DIY and decorating journey as I remodel and decorate the 1948 fixer upper that my husband, Matt, and I bought in 2013. Matt has M.S. and is unable to do physical work, so I do the majority of the work on the house by myself. You can learn more about me here.


This reminds me of the years of covering textbooks in high school, but what a cute idea for setting books out, too! Love it!
I used this technique to cover so many books for my kids through middle school and high school I could almost do it with my eyes closed. I got really fast at it mostly because someone would say, "Mom, I need this book covered for school today." about 10 minutes before we would leave for school 🙂 Little did I know that I was perfecting my decorating skills at the same time!
Brings back memories 🙂 I used to cover my books all through middle school in all sorts of paper designs. To make them last longer, I even add a clear plastic cover.
Great idea about using them as decor, and we can even match the design to whatever the theme for the room is. I'd probably keep mine in different black and white patterns, I am in love with that color scheme at the moment, lol. Thanks!
I remember doing this to my high school and college books. How fun! Great Job. BTW I am now your newest follower and I'd love to have you return the favor =D
http://www.bargaincornerdesigns.blogspot.com
WOW! Flashback! lol Interesting idea. However, my attention keeps going back to that bird perched upon the books! Beautiful! I am a newly obsessed bird lover!
Brings back memories 🙂 I used to cover my books all through middle school in all sorts of paper designs. To make them last longer, I even add a clear plastic cover.
Great idea about using them as decor, and we can even match the design to whatever the theme for the room is. I'd probably keep mine in different black and white patterns, I am in love with that color scheme at the moment, lol. Thanks!
The thumbnail photo on the DIY page has a bowl filled with jute balls. I don't see the same photo in the project page…..do you have instructions for making the cute little balls? Adorable!
Kristi, I just LOVE your blog! I was thinking about covering some books like when I was back in school, but using some prettier paper, and I couldn’t quite remember how we used to it. When I googled “decorative paper book cover blog”, your blog came up on the first page! Your blog is already my favorite one out there, and there you go again with another answer to my decorating needs. 🙂 Thank you!! Sharon
Awesome, Sharon! I’m so glad you found my post on Google! 🙂 I hope you’ll post your covered books. I’d love to see the pretty paper you used!
It was so easy, I just finished them! I used some grasscloth wallpaper that I had, and although it was a little stiff, it still came together quickly. Kinda like wrapping a present! I’ll do a quick post tonight about it. Thanks again! It made me smile to see your post come up when I googled this. 🙂
Kristi, I just added it to today’s A2D link party, here’s the link to the post. http://www.lilikoijoy.com/2012/05/make-grasscloth-book-cover.html
Thanks so much!
How you get this idea, Nice post my 12 yrs nephew really like it. Thanks 🙂