I’ve Paid My Drywall Dues
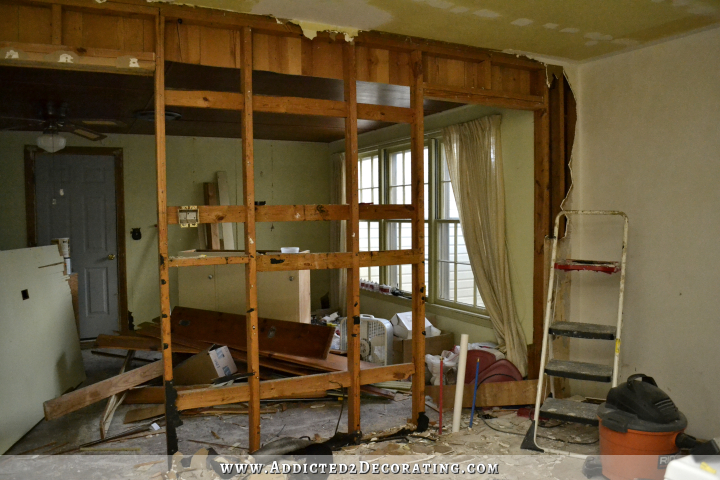
On Saturday, Bill finished up the last remaining bit of rewiring in my kitchen, and then Bill, Cathy and I put up the drywall on the ceiling. Oh, what fun we had! 😀
(Bill is my brother-in-law, and Cathy is my sister, just in case you’re new around here and wondering who the heck these people are.)
I don’t know if you’ve ever hung drywall on a ceiling before, but suffice it to say that when it comes to my least favorite DIY home improvement projects, it easily ranks in the top 10. In fact, I’m pretty confident that it would land in the top 5, right behind installing a dishwasher (something I’ll never, ever do again after my last experience at the condo), removing an old toilet and disgusting old wax ring (something I’ll never do again now that I know my plumber only charges $30 to install a new toilet), and basically any other kind of plumbing. (Do you notice a theme here? I hate plumbing.)
But then right there at #4, right behind all of that plumbing, is hanging drywall on the ceiling. After this weekend, I’ve paid my dues, and now I’m done. When the rest of the rooms need to be re-drywalled (which they will…all of them), I’m calling in the pros. It’ll be money well spent, in my opinion.
But at least the kitchen is done, and my ceiling is no longer completely open to the attic and up to the rafters.

I do still have to do all of the taping and mudding, but I don’t really mind that part.
Oh, and see all of those holes for the recessed lights? Those were cut as we went along. And every single piece of drywall, with the exception of one very small piece in the far right corner, had at least one hole that needed to be cut out.
So we installed the first piece, and Bill cut out the hole around the recessed light.
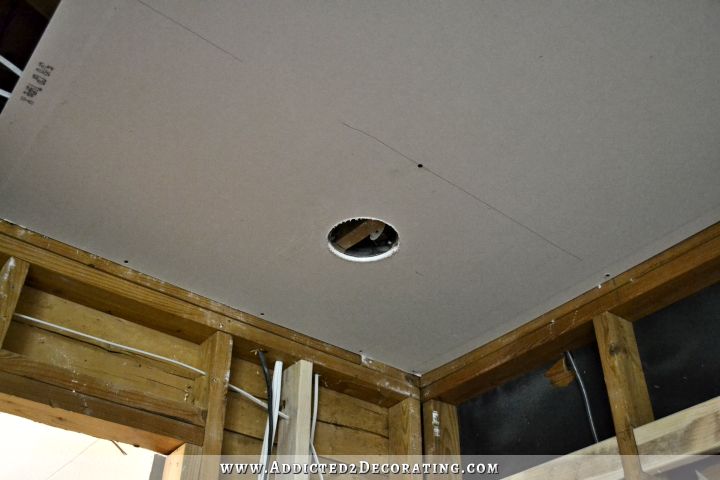
It was perfect, and he made it look so easy. (I had never used a Roto Zip tool before.)
He asked me if I wanted to do the next one, so I grabbed the tool, climbed up on the ladder, and gave it my best shot.
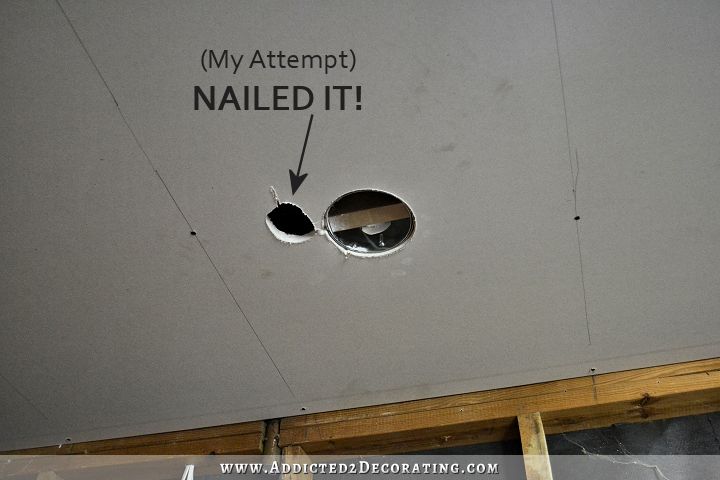
Ummm…not even close. 😀
In my defense, I think that had less to do with my lack of Roto Zipping skill, and more to do with our hastiness in measuring and marking the starting point for that particular light. But still, making such a mess of my very first attempt with the Roto Zip was quite discouraging and really made me shy away from using that tool.
And then when I tried again to use it around the plastic light box in the center of the room, and ended up melting parts of the edge of the plastic box because I couldn’t get the Roto Zip to move forward fast enough, I was ready to throw in the towel.
But I did try a third time. In this case, the third time was not the charm. I was using insulated recessed lights that have an inner metal lining and an outer metal lining, with about 1/8th of an inch in between. Somehow I managed to get the Roto Zip blade perfectly in between the two layers of metal. I did cut a beautiful round circle, but of course the drywall still wouldn’t go up around the light since it didn’t clear the outer layer. So I tried a fourth time and finally got it.
Let’s just say that the Roto Zip and I really don’t get along that great. People ask me quite often, “Kristi, is there anything you can’t do?!” Ummm….yes. There are many things I can’t do (I just don’t generally publicize those things!), and Roto Zipping is evidently at the top of that list.
Anyway, we also did the hallway ceiling. It has looked like this ever since I removed the closet back in August (with the exception of the debris on the floor), with part of the drywall completely exposed, cracking, and crumbling, and part of the ceiling still covered in polystyrene tiles and 1 x 4’s.
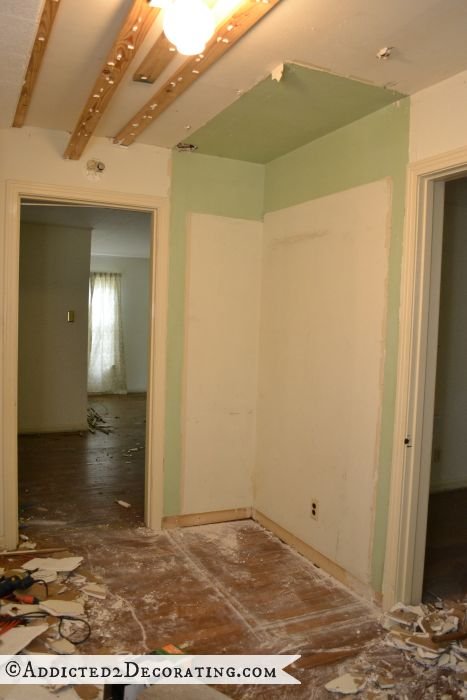
So before Cathy and Bill got to the house on Saturday, I got up early and tore down this ceiling so that we could put up new drywall in there also. And now I have a clean slate to work with.

I really was trying to avoid having to do any drywalling on the ceilings in this house, and hoping that I could salvage what was already there. But in the end, I’ll be so glad to have all of it replaced with new drywall. The fact is that even if I could repair all of it (which is questionable), it’s still only 1/2-inch drywall, and ceilings are supposed to have 5/8-inch drywall.
Sometimes it just doesn’t pay off to try to salvage what you have. There are definitely times when ripping out the old and starting over new is the best way to go.
Anyway, I still need drywall on the walls of the kitchen, but that can’t be installed until after the house is leveled this Friday. (Yayyyy!!! Finally!!!) In the meantime, I can work on the floor, sanding it and repairing holes so that I can paint it. Right now, Friday seems so far away, but I’m sure this week will fly by, and before I know it, I’ll have a level house and no more roadblocks in moving forward with my plans for this house. I’m so stinkin’ excited! I feel like a kid anxiously awaiting Christmas morning. 🙂



Way to go! We (daughter and I) ripped out and installed a kitchen counter yesterday (pre-fab from Lowes) – cursed project at every corner but after reading your Roto Zip misadventures, I think I’m kind of glad I wasn’t doing drywall!
Amazing what a bit of drywall can do!
It took much trial and errors but, I can say thru experience, the Rotozip can be mastered. It takes patience, though. An obvious shortcoming for us DIYers! Keep at it and you’ll tame the zip! Good job on the ceiling!
It’s lookin’ good!!! That Rotozip is a pain in the gizzard, but when it works right, it is an amazing tool :^)
Blessings to you,
J
Still curious (confused) about this leveling process.
How it’s done and what the reasoning is, and how you knew you needed it.
(And I’m pretty sure I’ve read everything you’ve mentioned concerning it.)
http://m.wikihow.com/Level-an-Existing-House
If you were to walk through my house, you would feel certain spots that are noticeably higher. I have one area that goes right through the the entryway from the front door and straight through the music room that is an obvious high spot in the floor. If you walk to one side or the other, it’s noticeably “downhill” from the high spot.
I think it’s a regional thing, and depends on the type of soil in the area and how stable the soil is, but in this part of the country, old pier and beam houses generally have to be leveled after a few decades of the house shifting and settling. It’s not really anything to be concerned about, and it’s very common here. But what they’ll do is go under the house with a hydraulic jack, and in the low areas they’ll jack up the floor to the point where it’s level, and then “shim” the piers at the low spots to raise up the floor so that it’s level (or as close as possible to level) again. I think the shims they use are some sort of metal so that they last longer. In some cases, depending on the particular house, they may even decide to add piers underneath the house to make it more secure for the decades to come.
Old houses such as ours generally will never be perfectly level, but they can at least remove the “hills and valleys” to a point where it’s a whole lot less noticeable as you’re walking through the house.
I’ve probably made the “hills and valleys” sound a lot worse than they really are. 🙂 There’s really only that one area that runs from the front door straight through the music room that is very noticeable when you walk on it. The rest of the house is just like any other old house — you might not notice it as you’re walking through the house, but if you were to drop something on the floor, like a can of spray paint on its side, it would probably roll away from you.
Anyway, it’s just one of those things that should generally be done on an old pier and beam house in this part of the country before you start altering or adding anything to the structure of the house. For example, the wall with the wide opening that I want to build between the entryway/living room and the music room would go right over the high spot that I mentioned. So it’s important to get it leveled before adding that wall. Same with the wainscoting, new trim around the doors and windows, installing kitchen cabinets, etc. If I were to install those before the house gets leveled, once the house is leveled I would end up with very noticeable joints in the wainscoting and trim that would then have to be filled, sanded and repainted. So it’s just better to do the leveling first.
WOW!
Thanks for the detailed explanation! Having grown up in the Midwest, the house I grew up in (which btw was built in the late 1800’s) had a basement (or a cellar under the original structure) and now living in the southwest (which I guess is also where YOU live, but in these parts) foundations are cement, so I’m really not familiar with old pier and beam houses – very interesting.
Thank you.
You may have used this, but just not mentioned it, but I would suggest renting a dry wall lift next time you do ceilings. Way easier.
Love watching your journey.
Great job Kristi. It looks so nice. You and I are opposite — I would rather hang drywall all day instead of taping, mudding and sanding. Hate, hate, hate that part. When we did our basement I convinced hubby to rent a drywall sander. It took some trial and error, and we have some strange dips in the ceiling, but oh my does sanding go by quickly. Loved the tool and it was only $40 to rent for the day.
Everything is looking great!
Agree with you on having someone else do certain work, especially sheetrock/drywall. My dad was a carpenter/subcontractor, and he routinely hired out the hanging of the drywall. Said a good sheetrock crew could get it hanged faster and for less money than paying his crew, because they did it all the time and were fast.
I am so excited for you to get the house leveled. I know it has been a roadblock, and it must feel great to get it out of the way.
My Ex and I always dd the hanging but we hired out the finishing. Your ceilings look great but it’d be the finishing I’d hire out! It’s so hard for a lay person to get it right IMHO! Glad you are rounding the corner on these rooms and in just a few more days you’ll be well on your way to finishing them! Yay!!
Wow, another job on the way. You are so brave at attempting a ceiling. I wouldn’t like to use the Rotozip,but you gave it your best. Well done. Good luck with your levelling on Friday. Want be long and rooms will be taking exciting steps forward. Thanks for sharing your journey.
Logan and I drywalled our master bath in our home in San Antonio. The walls went great, but the ceiling was a bear until we decided to cut the sheetrock in half. It was much easier to handle. I did the taping and bedding myself, and had a guy come in and shoot the texture for $100. He told me that the taping and bedding was the best he’d seen, and was surprised I did it myself. He thought Logan did it!
As for the rotozip, believe me, you can master this beast. And when you do, you will add it to one of your favorite tools. Just practice a bit.
Way to go on this humongus project.
Yay for level houses!!!
Great job Kristi. It looks so nice. I think you are a woman with true grit. I admire your tenacity and your talent. Keep it up.