Large Textural Pixel Artwork (a.k.a., The Most Insane Project I’ve Done To Date)
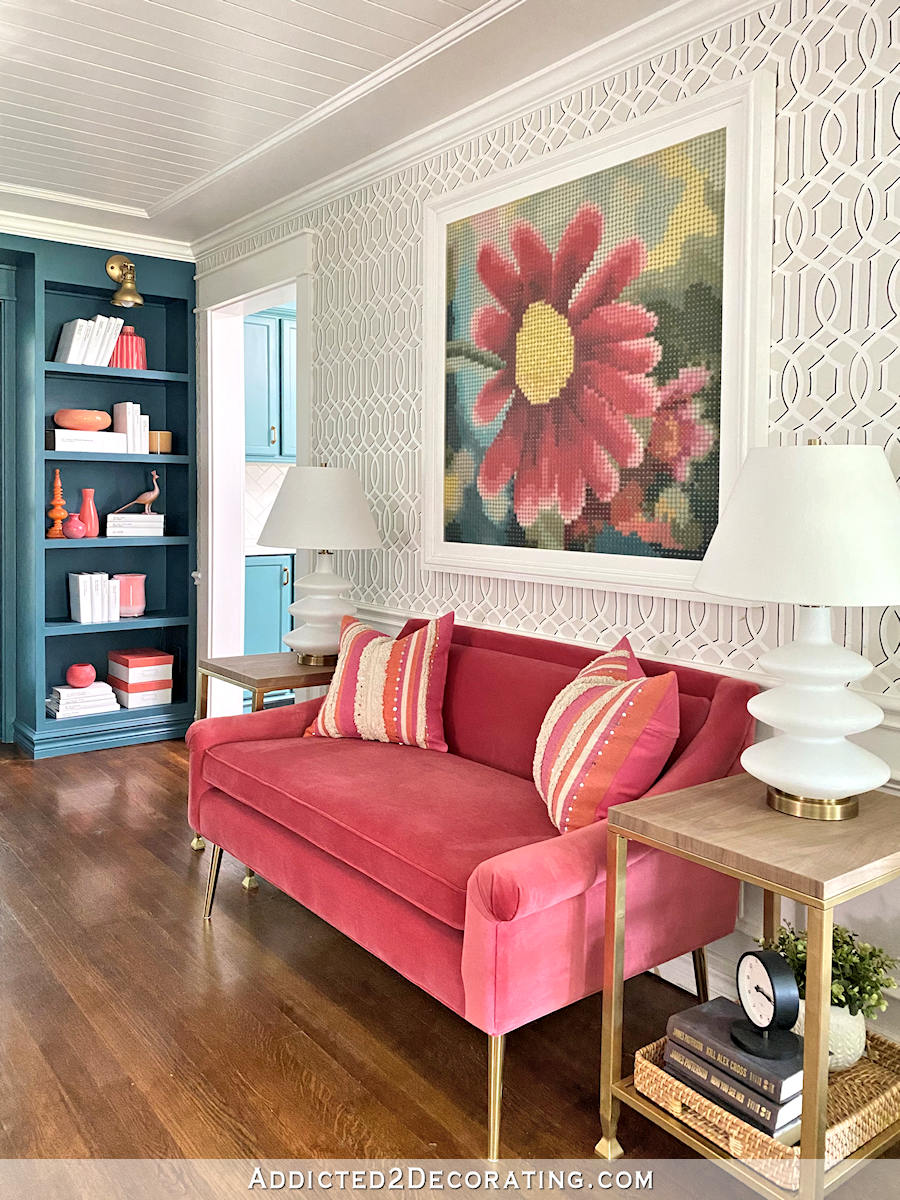
This is officially the craziest project I’ve ever done. And that’s saying a lot coming from someone who created an ombre “pinwheel” flower-inspired piece of artwork made of 800 wood spoons. This time, I wanted a large piece of artwork that was unique and out-of-the-box for the big wall in my music room, and I think this 46″ square, 6400-piece wood bead textural pixel artwork fits the bill.
So here’s how this came about. 🙂
I had been thinking for a long time about what I wanted to put on that wall. I knew I wanted one large piece of artwork as opposed to several smaller things grouped together. And I wanted something dimensional using mixed media instead of something flat like a painting or photograph. So I had been stalking the social media accounts of several mixed media artists for inspiration, but nothing really stuck.
In the meantime, I was on Instagram one day, just minding my own business and scrolling through in my daily search for colorful room inspiration, when I was shown an advertisement for an app called Pixel Art. (You can find it here.) I generally pass right by those ads for games and activities, but this one caught my eye. It looked fun to me so I downloaded it, and quickly became addicted to it. I especially liked that even with the free version, you can upload your own images (or any image you find online) and turn it into pixel art.
So after playing around with this app for a couple of weeks, I started to think about how awesome it would be to use this idea for real, actual artwork created with something textural that I could frame and hang on my wall. Believe me, I tried to talk myself out of it, but after obsessing over this idea for a couple of weeks, I realized that my brain wasn’t going to let go of the idea until I actually tried it. Even if it turned out to be a spectacular fail, I had to try it.
I searched for a picture that I wanted to use, and found a photo of a pink daisy with teal and green in the background. I uploaded it to the app and set it to the most detailed setting (which is still only 80 pixels square).
Only 80 pixels square. It’s easy to say only 80 pixels square when you’re dealing with a tiny image on a small handheld device. But when you’re creating real, actual, in-person artwork out of it, you quickly realize that 80 pixels square is a whole lot of pixels.
Six thousand four hundred, to be exact. As in, 6,400 pixels.
My biggest challenge was finding the wood pieces to use for the project. I really wanted square wood pieces, but in order for this piece to fit on my music room wall, I needed the pieces to be no larger than 1/2 inch. I couldn’t find any pre-cut square wood pieces that (1) were the right size and (2) wouldn’t cost a fortune for that many pieces, so I looked for round pieces.
I found that my only ready-made round option was wood button plugs, which are the little round pieces of wood that you use to cover up screw holes on wood chairs and other wood furniture. And the cheapest place I found was WidgetCo, where they offer bulk pricing. I purchased 6,500 of these 3/8″ maple button top wood plugs, (which I shall refer to as “buttons” in this post) which made the price $0.03 each. It still wasn’t cheap, but I couldn’t find a price even close to that anywhere else. And I guess anytime you purchase 6,500 pieces of a product, you should probably expect the price to add up a bit. 😀
I used a half sheet of plywood (48″ x 48″) as my backing, and actually wasted a whole lot of time doing a whitewash over the plywood because I thought more of it would show on the finished product. If I had it to do all over again, I would have painted the whole thing black and saved a lot of time and frustration.
Then I used any straight edge I could find (a piece of 1/4″ MDF, a framing square, 1/2″ trim boards, etc.) and clamped them to the plywood marking off one quadrant at a time. I decided to start with the center lines and work my way out rather than starting at one edge and working across the whole piece of plywood. So starting at the center point of the plywood, I glued 40 buttons in each direction. On the photo below, I’m using the brown MDF and the metal framing square as my straight edges. So the point where the two lines of buttons meet is the center of my “canvas” that I’m working on…
Then I measured very carefully, clamped on more straight edges, and glued on the outer edges of the first quadrant.
I continued gluing, and gluing, and gluing some more until I filled in the whole thing.
With the first quadrant finished, I move on to the second quadrant and did it the same way.
I continued with the other two quadrants in the same way until I had all four finished. All 6,400 wood buttons attached and ready for primer.
I sprayed the whole thing with a Rust-Oleum spray primer in white, making sure that I sprayed from all directions to get the buttons primed all the way around, and then I let it dry thoroughly before painting.
While that was drying, I mixed my paints. The great thing about that Pixel Art app is that it shows you the colors that the picture will use, and exactly which pixels each color goes on. My picture required 48 colors, and I used acrylic craft paint from Michael’s to mix all of the colors in little 3-ounce Solo cups. I numbered my Solo cups according to the chart so I knew exactly which color was in each cup. Before all was said and done, I ended up using more colors than this, but these were a great starting point.
And then I was ready to paint. I used a small flat craft paint brush (the cheap kind you find at Michael’s or Hobby Lobby), and with my phone in hand with the Pixel Art app open and at the ready, I started painting, using the Pixel Art picture as my “map” for where all of the colors were supposed to go.
Obviously this was time-consuming, but it wasn’t difficult at all. I mean, the app does all the work for you. It tells you exactly where to put each color. It’s like a big paint-by-number, only instead of painting organic- and odd-shaped areas, you’re painting dots, or pixels.
I did end up adding some colors and making some pretty significant changes to the picture after realizing that the photo I chose didn’t translate 100% from a tiny pixel picture on my phone to a huge piece of artwork for my wall.
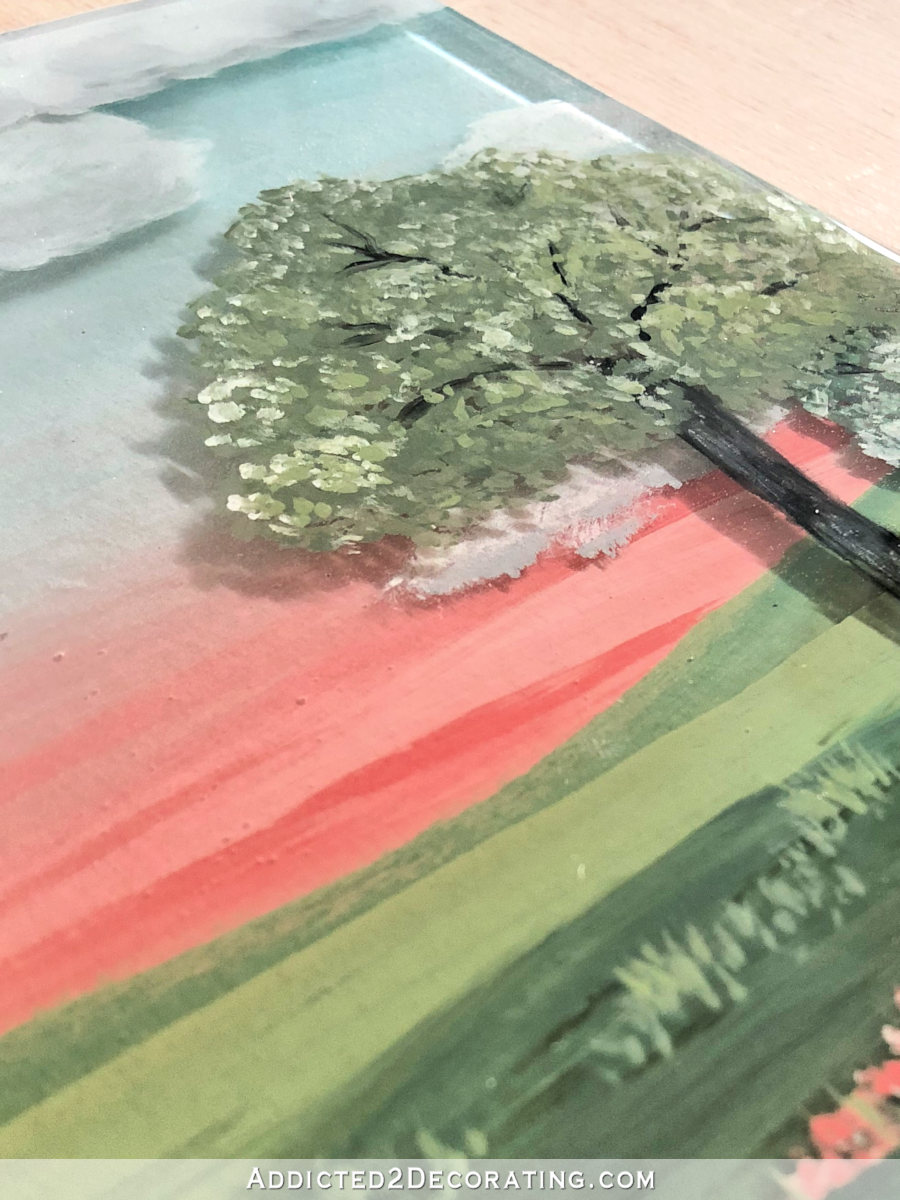
I sealed it with a few coats of Rust-Oleum clear spray. I tried a gloss finish first, and decided I didn’t like, so I ended up spraying over it with a matte finish.
To finish off the piece, it needed a frame. I used my circular saw to trim the excess plywood around the edges to three inches. Then I used 1″ x 4″ lumber, ripped it to three inches on my table saw, and cut four pieces that were mitered on the corners to form a frame right around the buttons. Then I used pieces of 1″ x 3″ lumber, ripped to about two inches, and attached them around the sides to cover up the edges of the plywood.
Yes, I had unsightly gaps.😁 Clearly I didn’t measure something correctly.
But not to worry, because I also added some decorative molding to the mix. I used base cap molding and fit it along the edges of the face frame right up against the side pieces.
And after caulking and painting the frame, it was finally finished.
Cooper seemed to approve. 😀
This thing is big and heavy, so I used an Ook Hangman French cleat (you can find them here) to hang it on the wall.
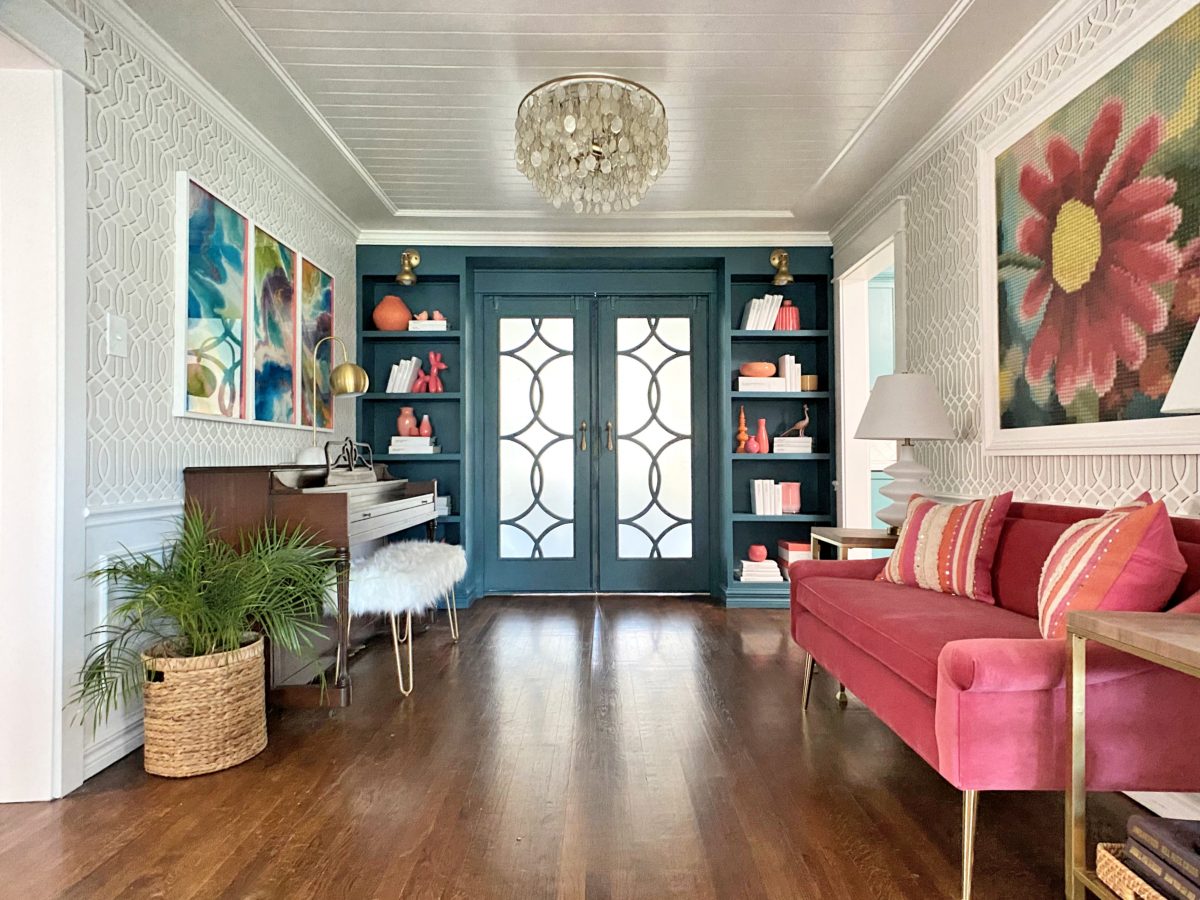
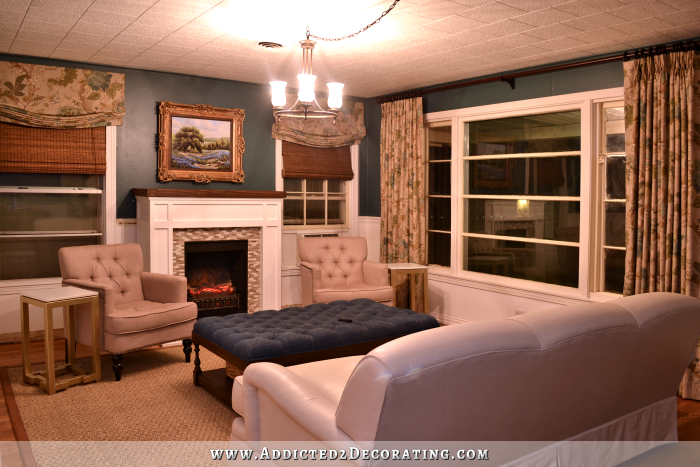
It’s really hard to tell just how big this thing is in pictures. It’s big. And it definitely added some much-needed color to my music room.
Now I can use this as a jumping off point for reupholstering the chairs and selecting a paint color for the table.
So now that this is done, I can stop obsessing about artwork and get busy with my half-finished project challenge.
UPDATE: I ended up finishing this artwork with several layers of resin over the wood buttons. It was my first experience using resin. You can see it here: My First Experience With Pouring Resin (And A Few Tips I Learned Along The Way)
UPDATE #2: Do you want to see how my finished music room turned out? You can see it here: Our Finished Music Room Remodel – Before & After
More About Our Music Room:
see all Music Room
diy projects
read all music room
blog posts

Addicted 2 Decorating is where I share my DIY and decorating journey as I remodel and decorate the 1948 fixer upper that my husband, Matt, and I bought in 2013. Matt has M.S. and is unable to do physical work, so I do the majority of the work on the house by myself. You can learn more about me here.


You’re crazy and I love it and you should make more and sell them.
I was thinking the same thing, now I want to get crazy and make one
Oh my gosh same here!!
Me too!
My gosh is that AMAZING! I am so glad she did it even though it took her around 100 hours.
Fabulous!!! Love your persistence. Really, really nice job.
She and her art are amazing!
You are amazing!! I love it. Looks kinda like needlepoint.
I thought it looked like needlepoint as well. Love it
That’s what I was thinking, needlepoint. Love it!
I fourth that comment – looks like needlepoint! LOVE it!
Ah-mazing!!! Absolutely luv!!!
That looks amazing! I am going to have to do that with our college mascot – the MSU Sparty – for my son’s room. Thank you for the idea. I love checking your blog for the next cool idea!
Wow!
You are so-o-o clever! That is one of the coolest pieces of artwork I’ve ever seen. So unique and looks beautiful in your music room.
That is insane (in a good way though)! Really brightened the music room .
I love it!
You just crack me up! Your creativity is just fabulous. I love it.
You simply amaze me. I love all your ideas and your house but most if all your work. You do amazing things. Thanks for sharing all you do.
My hats off to you once again!!! You are amazing, I am in awe of you endless talents, I only wish I lived close by so you could mentor me! You are my craft, art, construction, fabric, design, etc. etc., guru!!! Thank you.
YOUR TALENT IS SIMPLY AMAZING‼️
Kristi………..It is BEAUTIFUL !!!!! Wow…..it is absolutely amazing….the painting is beyond words… and it looks wonderful where you have it…I can not wait to see what other pieces you put in this room to go along with it. Love following along on your journey.
The outside ramp and carport are coming along nicely too.
I am just speechless….. what else you can design and manage??? what you can’t do, dear??? Just share it with us,,,, who is not so creative.
Please don’t stop!!
Stunningly gorgeous!!!!
That is so unique and I love the texture it adds to the room! Again, you’ve blown us away. Nice work!
totally brilliant!
I love the colors and everything about it! Perfect choice!!!! You are so talented!
I first tho’t it was needlepoint or heavy cross stitch! It’s beautiful & looks great in your room. You are so creative & talented.
My “new” favorite! That is absolutely brilliant!!! I want one too!!!
Can I ask what kind of harness Cooper is wearing and does it help with pulling?
It’s a Rabbitgoo no-pull harness that I bought on Amazon. When you attach the leash to the front loop (the one on his chest), it does prevent pulling. When I take him out, I put his regular leash on that front loop, and it works great. But I also always keep his 12-inch training leash attached to the back loop for quick access. He’s still learning how to behave, and he’s easily excitable and jumps when he gets too excited, so I keep that short training leash on him at all times on days when he’s super hyper (or he won’t stop harassing Peeve) so that I can grab it really quickly and calm him down. The harness is great and he doesn’t seem bothered by it at all, but I bought the one that has the reflective piping around the edges, and he had that torn off within the first three days of using it. 😀 So I don’t know that I would recommend that particular one if you have a hyper, rambunctious dog.
Kristi, you are just amazing with your willingness to just go for it. I LOVE this project and am going to have to think over where I need some pixels…
Omg, this is absolutely stunning. I can’t get over that you had the patience to see this project through to the end (have you been tested for OCD?). Really impressive. I was over the moon over your spoon project – and still am – but this piece is a true show-stopper. Congratulations, you talented woman you. Jane
I was going to ask about OCD as well. But if you ever find that is the case please don’t ever take meds for it!
I personally think you are just over the top talented and creative! And I agree with Matt it’s Amazing!!!
I’ve never been tested, and never will, but I always describe myself as “a perfectionist with OCD tendencies.” 🙂 I do thoroughly enjoy tedious projects like this, whether it’s gluing 800 spoons to make a pinwheel, or 6400 wood buttons to make a pixel painting. I actually find the monotony relaxing.
This is very cool.
Would it have been easier to paint the buttons the requisite colors before attaching them since you know how many pixels of each color are needed? I might try this on a smaller piece.
I weighed the options, and decided that it was easier to glue them on first. It’s the same issue as with the pinwheel spoon artwork I did, only with this one, it’s much worse because of the size of the buttons and the sheer quantity of them. If you paint them first, you have to hold each tiny little button while painting, try not to mess up the paint as you set it down somewhere while it’s wet, and then find a place to put 6400 button as they dry. And believe you me, no matter how careful you are with them, a few of them will roll away and just magically disappear. That’s why I ordered 6500 of them, and only had about 10 left over when I was finished. The other 90 are hiding in various places in my studio.
If you just glue them on first, you don’t have to hold them to paint them, and you’ve already given them a place to sit while they dry. Maybe that’s just the way my brain works, but every time I do a project like this I always have people suggest that I should have painted them first. But in my mind, that would make things way more complicated. I much prefer to glue first, paint after.
The exact words have left my brain for how I feel when I look at your art…
More words have left my brain for how you accomplished it….
I’m sitting here at work totally amazed at your brilliance and fortitude with creating such a stunning unique piece of art. Well done!!! 🙂 🙂 🙂
That is a very cool piece of art! It looks great in the space. You should be very proud.
You’re gonna have to lift that beautiful (heavy) thing off the wall, so you can Sharpie it! LOL! I see folks telling you to make more and sell them. I think (I think) you’re like me. Once you’ve done it once, you’re not really interested in doing the same thing again and again. On to something new! Right? But it’s great!
By the way, I want to do this in my chain link fence…..
Well, I told my bonus sister that I’d make another one if someone really wanted one and was willing to pay what it’s worth. With the amount of time and effort I put into it, I wouldn’t sell one for less than $3500. Seriously.
It is beautiful and interesting! In the pics, it resembles a needlepoint. It reminds me that my parents had a huge pic of the Mona Lisa in our entryway starting in the early 1960’s. My Dad was a “pioneer” in the computer business in Silicon Valley. everyone was amazed by it. Not sure how it was created that long ago or what happened to it ultimately…
I forgot to say it looked like it was pixels…
This is the exquisite version of 5D Diamond Painting. To heck with those cheap looking plastic gemmed kits! I want to try this! Thanks for sharing your incredible work, once again! Hope I can find your patience to make one. 🙂
Take a bow, missy! It’s beautiful!
I really didn’t think I’d like this when I started reading, but YOU.TOOK.MY.BREATH.AWAY. Yes, I my breath actually stopped and I sighed. I love this, and do not need another fun thing to do, but here I go…… (love you!!!) (Can you imagine this with a boat on a stormy ocean?)
Outstanding!
I’ve been inspired by Anthropologies Art installations using stained wine corks for a while now and I’ve been wondering how to translate something like that into my home. I think this might work to satisfy my desire to try a smaller version of that. I think the cork may weigh a little less too. But I do LOVE the look of the “buttons”.
WOW! It’s gorgeous. Like a huge tapestry, which reminds me of susanne.at.home on Instagram. <3
Oh my word-love it
OMG. That is insane. It couldn’t look more perfect in your room. Bravo!!!!!!!!!!
At first glance, I thought it was needlepoint! That project alone would have taken me all year!! Love it!
This is so amazing! You are so amazing!
As I was reading this article I thought “How did she secure and paint each of these 6,400 buttons?” I had a vision (hallucination?) of each button held on a long pin, then carefully painted and stuck in a foam sheet to dry.
Silly me; all was revealed.
Seriously, how did you paint the individual buttons without getting the different colors on the adjacent ones?
I love counted cross stitch. This resembles a complicated, oversized, nuclear-powered, amazing “cross stitch” project.
I need a similar piece featuring a huge dendrobium orchid worked in purples, whites, greens, and yellows.
Where do I click the “Add to Cart” button! 😊
Where is your piano? I thought this was the piano wall. I’m confused!
It’s on the opposite wall, with the green scalloped mirror above it.
This is so amazing! You are so amazing!
As I was reading this article I thought “How did she secure and paint each of these 6,400 buttons?” I had a vision (hallucination?) of each button held on a long pin, then carefully painted and stuck in a foam sheet to dry.
Silly me; all was revealed.
Seriously, how did you paint the individual buttons without getting the different colors on the adjacent ones?
I love counted cross stitch. This resembles a complicated, oversized, nuclear-powered, amazing “cross stitch” project.
I need a similar piece featuring a huge dendrobium orchid worked in purples, whites, greens, and yellows.
Where do I click the “Add to Cart” button! 😊
The craft paint brush that I used (somewhere between a flat and a bright, as far as the correct names go) really helped to keep the paint in the right places. But if you look closely, you can see that there are places where I accidentally got a paint color on the adjacent button. But what I’ve learned from experience is that on projects like this or the spoon pinwheel (i.e., projects with a large amount of repeated objects), small mistakes like that get lost in the big picture. So I’ve learned not to stress about those small mistakes. I fix what I can, and life with the rest. 🙂
Love, love, love this, Kristi! I always look so forward to your new posts and this one is simply amazing. YOU are amazing!
Oh my gosh! Love the artwork. It’s totally amazing. When I first saw it, I thought it was a new cross-stitch of some sort. BUt it’s way better! And by-the-by……love the blue on the chairs. If there’s no damage anywhere….I wouldn’t recover them. Just my humble opinion….. Susie
wow that is amazing and you are so ambitious and talented! wonderful addition to your music room
Love this! For some reason it reminds me most of a giant needlepoint pattern. So creative!
Now we know what you’ve been up to last week 🙂 it’s stunning and looks great in that room – and as I love doing intricate projects like that, I’m already considering this as thing to do in winter 🙂 thanks for sharing!
You are crazy, as someone said before! But, it is a good crazy. This is fantastic. I really think I might do one. You rock and are wonderful to share this.
SPEECHLESS!!! Absolutely speechless! I have been obsessively checking your site impatiently waiting for this post. I knew it was going to be fabulous the second you mentioned it. Unreal! Thank you for being you and most of all thank you for allowing all of us to enjoy the magic as it happens.
Feel truly blessed that I found your site several years ago. No idea how now, so long ago but nothing short of a miracle to get to witness your talent!
Are the colors in the photo true to real life? I was surprised you chose what appear on my screen to be pretty muted colors with your love of all things BRIGHT! Maybe it is just my old eyes and old screen though!
What a fantastic masterpiece of creativity. Glad you got to do something new and different that used your creativity and turned out pretty amazing!
Quite honestly, it did turn out quite a bit darker than I had hoped. The good thing is that now that all of the hard work has been done (the buttons attached, the image details worked out, etc.), it would be a simple thing to change some of the colors in the future and make the brighter, if I ever feel so inclined. But for now, I’ll leave it since I have a list of half finished projects I’m supposed to be working on. 😀
I’ve said it before and I just know I will say it again…and again…BRAVO! Brilliant idea and exquisite execution.
This is my favorite of all the things you have ever done! It is the perfect piece for this room. I look forward to all of your post. Just wonderful!
Holy smokes Batman, your artwork is awesome. Well done!
This is ridiculously gorgeous. Thanks for sharing 🙂
This is stunning! I don’t understand how each project you finish is my favorite one! I so enjoy your blog. There is no one else like you!
Oh my word! Your talent amazes me. What a wonderful original piece of art. (By the way….I LOVE those blue chairs…..they would be perfect for my French country décor….just sayin’ 😉 😉
Very unique, you sure have patience. I just bought my first paint by number, I hope it looks as good as yours does. I agree with others it looks like a needlepoint. Now finish the wallpaper behind it!
You are 50% CREATIVE and 50% CRAZY!!!! But 100% AMAZING!!!!! L😻VE IT!!!!
I L.O.V.E THIS!!
So beautiful. So creative. Genius idea!
I LOVE this!
My only concern is that it would make me crave Skittles or M&Ms all the time! Lol
Absolutely stunning!
I don’t think it looks too dark from my screen. It is beautiful from here. I do agree with some others though, it’ll be tough to take down to finish the sharpie on the wall behind it. That would irritate me 😂😂
Insane and fabulous! You are amazing!
Gargantuan needlepoint! Love it!
But I’m one of the rare ones who doesn’t want to do it. Makes me feel a bit overwhelmed just thinking about it.
Looks a lot like the Diamond Painting I am hooked on, but in a much larger scale!! So beautiful!!
I am addicted (see what I did there lol) to that app. I find myself going home and jumping right on it. I found another one that is more watercolor (called paint by numbers) type instead of pixels…..It’s quite enjoyable as well. Now regarding gorgeous piece of artwork you just did. All I can say is ………………………WOW WOW WOW!!
BOOM! Mind. freaking. blown.
Just amazing, Kristi! Congrats on another exceptional project!
That has t be one of the coolest pieces of art I’ve seen in a long time. Your patience and dedication to completing this project inspires me.
That is amazing! I love it. Only now I need to do one for my living room. 🙂 Thanks for sharing your cool idea!
I’d love to see the original picture you used compared to the artwork! I’d like to do something like this, but I would like to see how it transfers from a photo to the pixelated artwork.
Here’s the original: https://www.addicted2decorating.com/wp-content/uploads/2018/06/pink-daisy.jpg
What didn’t translate for me were the petals at the top of the flower that are really washed out by the sunlight, and also the areas where some of the petals are overlapping and twisting in a different direction didn’t quite translate either. If I had it to do all over again, I would choose a very clear photo of a simple item. A flower like this would have worked much better: https://www.pinterest.com/pin/221520875391996714/
I look forward to every single post! This artwork is absolutely beautiful! Your talents never end. You are a wonderful inspiration!! Love your work and your family. Thank you for always sharing and for being so real!
Seurat do lot that dot…. And now so do you!
Still remember that from the after school specials…in the 70s!
OMG! I would be in a nut house if I had tried that!!! Incredible persistence and patience! You must have a very calm brain. My neck, back and arms would be screaming, and my eyes would cross. Do you think you will ever do another? Have you considered using rigid foam instead of wood for the backing? Bravo young lady, you ARE an ARTISTE!!!
I love those blue chairs so much. Don’t change em.
Wow! Just stunning! I’m a needle pointer and the scale and beauty of this just blows me away! This goes far beyond DYI, this is art. It’s unique and beautiful and I want one too!
Wow, just stunning!!
WOW! I LOVE it! And it looks fantastic in your music room. Well done!
I love playing with the pixel art app but have never thought about using it to make art like this – it’s stunning! You know, counted cross stitch patterns already do this work for you too… hmmm… my mind is spinning with possibilities!
You are my favorite blogger- always something awesome and always keeping it real. 💕
Kristi, you mentioned that the colors didn’t translate well with your picture and you “ made some changes.” Can you elaborate on that? Do you think it’s a matter of the scale you used or the picture itself? I’m not sure how I would handle this if faced with the same dilemma
( but I’d be doing it on a much smaller scale).
Your creativity is boundless! Well done!!
I love it. It gives me the feel of needle point. You are something else!
You have a laundry list of things to do and you take 100 hours (that’s what your hubby said) to do an art project! I make a simple table runner and think I deserve applause! Wonderful job!
AMAZING!!!! I LOVE your artwork! So much so that right now I have about 800 wooden spoons waiting to be made into a picture LOL. Now I need buttons HA!
You never cease to amaze me. I love it! Gorgeous and it adds so much to the room. Not sure why but, it kind of reminds me of an old antique desk chair seat that my grandmother had done some type of needlepoint on, only not so dark and old fashion. 😛
GORGEOUS! I love the blue chairs. Can you keep the upholstery?
Immediately downloaded the app, uploaded a photo I had, and got to work. How hard was it to exactly match the mixed colors to the app colors, and did you paint just the top of the buttons or the sides as well?
I wouldn’t say that mixing the paint was hard, but they all turned out darker than the image on the actual app. So my suggestion is to mix them a bit lighter and brighter. Just remember that acrylics dry darker than they look when they’re wet. And yes, I just painted the little mushroom top. Once they’re all glued on, that’s the only part you’ll be able to reach with a paint brush.
When I first saw your post, I thought that picture has an old person feeling to it. That is not a Kristi art piece. Note: I don’t like needlepoint. But after I saw the close up pictures and the art hanging on the wall my thoughts changed the artwork it is AWESOME. Is there anything you don’t do well???
Hi Kristi,
I’ve never commented before, but like everyone else here, I’m pretty awestruck by your stamina, determination, and talent. However, one thing bugs me. In my opinion, it’s hanging wrong. The stem is going off to the left, and in my mind, it should be at the bottom. That’s certainly not a criticism, just an observation. Maybe you prefer it that way, I just cannot un-see the stem off to the the side in my mind! I’ve read your posts for years, and am amazed by your talent. Congratulations on yet another job well done.
That’s how the photo was, so it doesn’t bother me. 🙂 https://www.addicted2decorating.com/wp-content/uploads/2018/06/pink-daisy.jpg
I agree with the people who say this looks like needlepoint. I have a needlepoint rose done by my grandmother, but much smaller, and yep, looks like that.
Also, if it were ME, I would leave the chairs the blue they are (the picture picks up that blue perfectly, at least in pictures), and paint the table two of the shades of pink.
Gorgeous picture! And you’ve given me yet another idea for something for MY home.
Unbelievable Kristi!! Another great project well done!
Like everything you do, this artwork is unbelievably beautiful! It looks like a gorgeous tapestry. I’m in awe of your artistic abilities, not to mention your endurance (so impressive) and determination to get this massive piece done (I can tell it’s a big work). If I had the patience, I *might* try to tackle something similar on a much smaller scale. Blown away by everything you do!
This is absolutely my favorite art piece I have ever seen ANY WHERE !!!!
It looks like a huge counted cross stitch.
So, so, so adore it!
That is absolutely gorgeous and SO unique! The patience it took alone is worth 1000 points! 🙂 I can’t decide whether I like this or your spoon pinwheel better…they are both amazing!
Wow, Kristi, you’ve done it again. At first I too thought it was needlepoint. You have created another very unique piece of artwork and your creativity never ceases to amaze me. Well done on another fabulous piece of Art. It is simply stunning.
OMG!!!! I haven’t read the whole post yet, but I had to comment!!! This is the coolest thing!!! I love it! It kind of reminds me of a latch-hooked rug, or (obviously) needle-point. I’ll read the rest later.
I’m back! That is so cool! I would love to see the picture you started out with.
This is so gorgeous. Love the colors and it looks awesome.
This is stunning! I’m so amazed at how you looked at a color-by-numbers app and decided to make this beautiful, dimensional piece. How did you know what colors to use? Did you just guess and mix different colors in a cup until each one looked like one of the colors on the color-by-number chart or does the app give you the name of the colors used?
The app only gives the color chart that I showed. I just mixed paints until I got them close to the colors shown.
Wow! I’m even more impressed than before! Thank you for answering my questions and for providing so many details and pictures. You truly inspire me!! I’m going to try something like this using square wooden beads. I love your blog!
I may have missed someone else posting this, but I found these little wood tiles on Amazon. If you purchase 2 or more, you get a 10% discount, and they’re smaller than a half inch each. Cost per tile would break down to about $0.03 per tile. I’m going to copy you, but make one with this sellers hexagon shaped ones! https://smile.amazon.com/yuhoshop-diameter-Square-Shaped-Embellishments/dp/B07D8Z5YVV/ref=aw_od_pd_dx_ch_1?_encoding=UTF8&pd_rd_i=B07D8Z5YVV&pd_rd_r=dcfa6da0-a293-42c3-a713-bda7fa44e49b&pd_rd_w=Cp7E9&pd_rd_wg=CT5dk&psc=1&refRID=5WR52T23VFWW4CBJ6MGB
Yes SUPER crazy. But it is AWESOME. LOVE it!!! So glad I found this site.
Kristi, I kept looking at this picture and going back to it over & over again. I thought it was the biggest most beautiful needlepoint image I’d ever seen. I love everything about it from the colors to the image itself to the frame. It’s amazing and when I finish painting this house, possibly this winter I am thinking (if you don’t mind) I’ll try to copy your design and go for it. I’m not sure I could pull it off, even with the software but it’s amazing to me and I feel like I need to try it. Your style is so colorful and cheery, it just makes me happy looking at what you think of. Thanks for sharing all of this fantastic stuff and taking the time to do the tutorials! I’m in love! Thanks, Lisa
Hi there, this is a new question to an old post.
When you started painting the wood buttons, how did you managed to not get paint on the board the buttons are glued to.
I can sort of see from the photos that the back is still a different color.
Did you just paint the tops? If the buttons are touching each other, guessing maybe that how thos worked?
I’m going to try this ao wanted to ask first.
Thank you for your time?
Fiona
OMG!!!!!!!!!!!!!!!!!!!!!!
THIS is the most brilliant art!!!!!!!!!!!!! I want to try it right now. Your whole house is amazing. I stumbled on your site when I searched on “DIY kitchen cabinets bathroom vanity” and found you. I am mesmerized. I need to make sure I am following you on Instagram. I am totally blown away and your use and mix of color, pattern, DIY, just blown. away. way.
I wish you happiness in your endeavors. Best wishes for you and your family!!!!
This is the most creative piece of wall art I’ve ever seen. I absolutely love it. I want to give it a try, do you have this pattern available?