Master Bathroom Remodel — Installing A Wallpaper Wall Mural
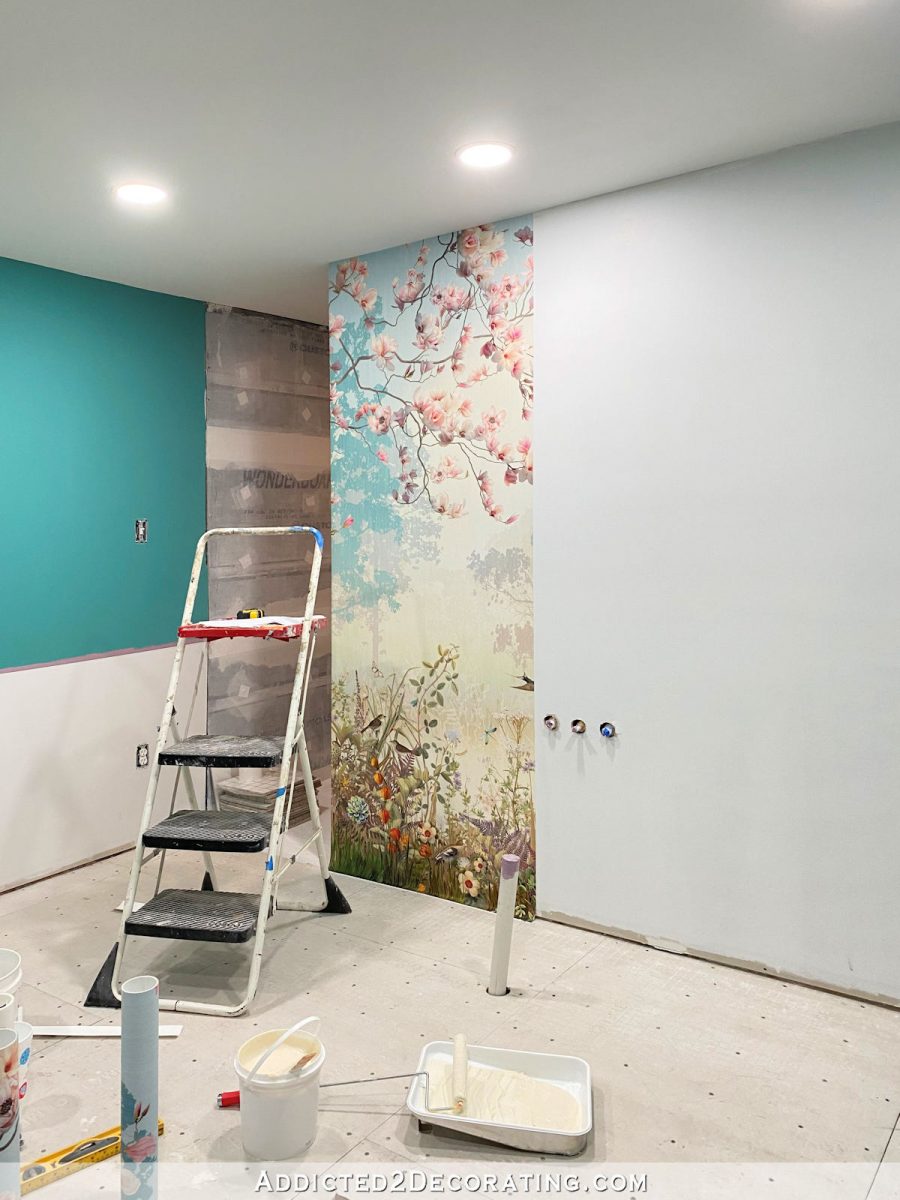
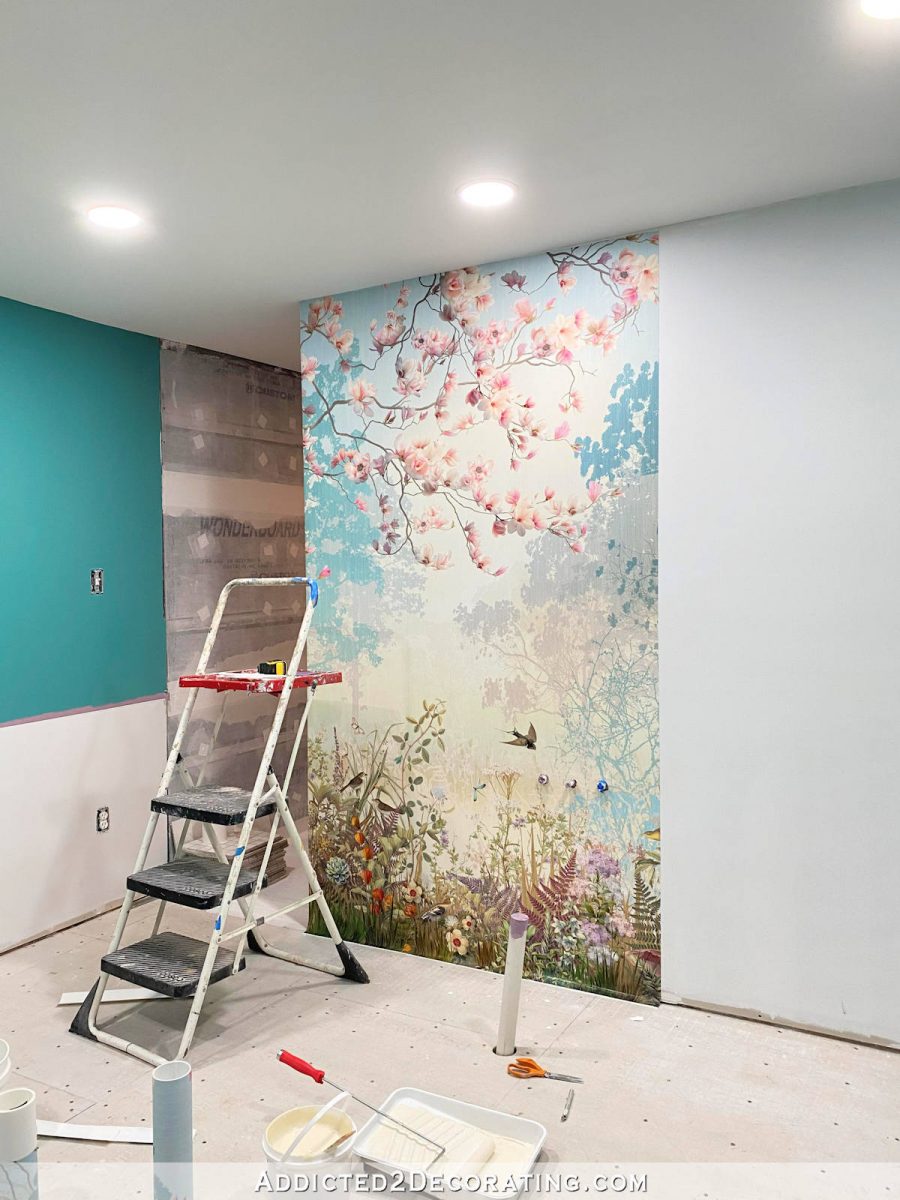
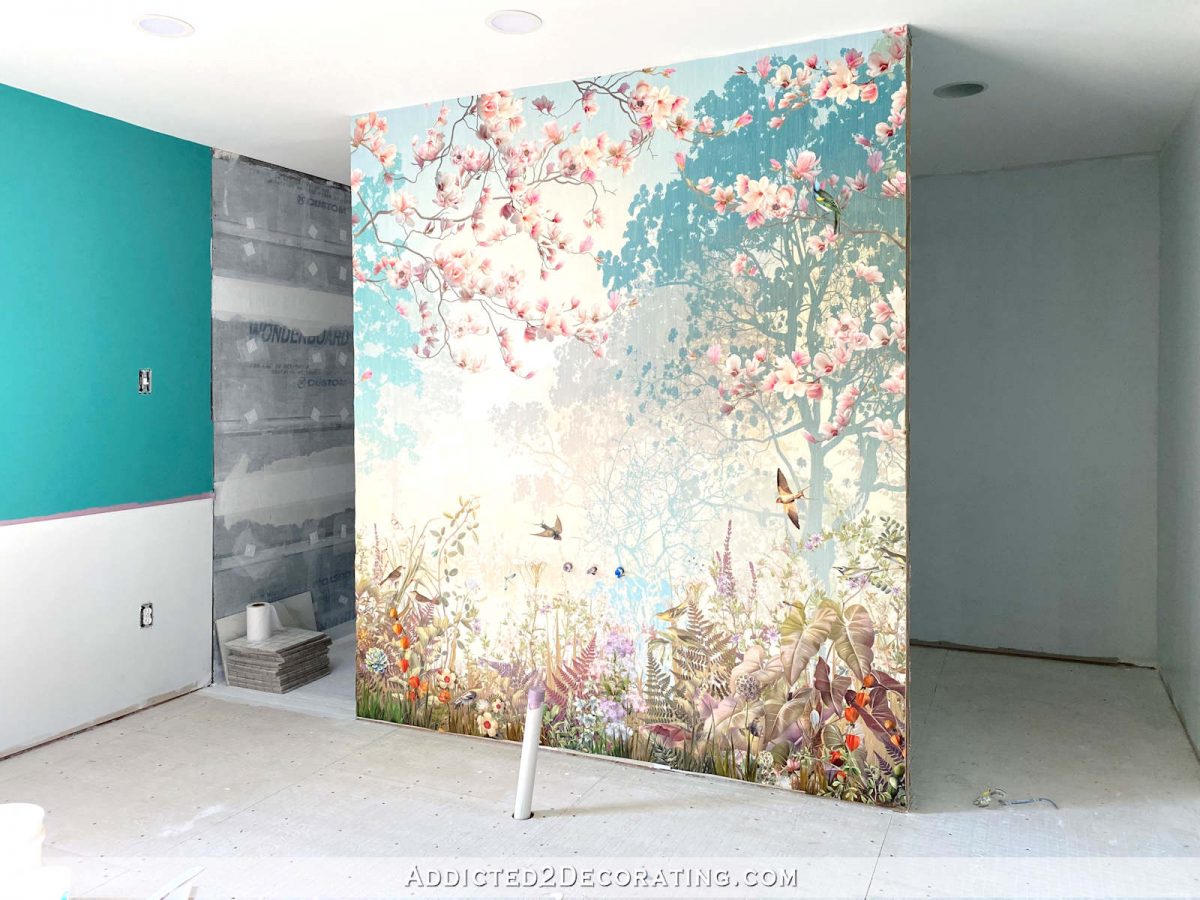
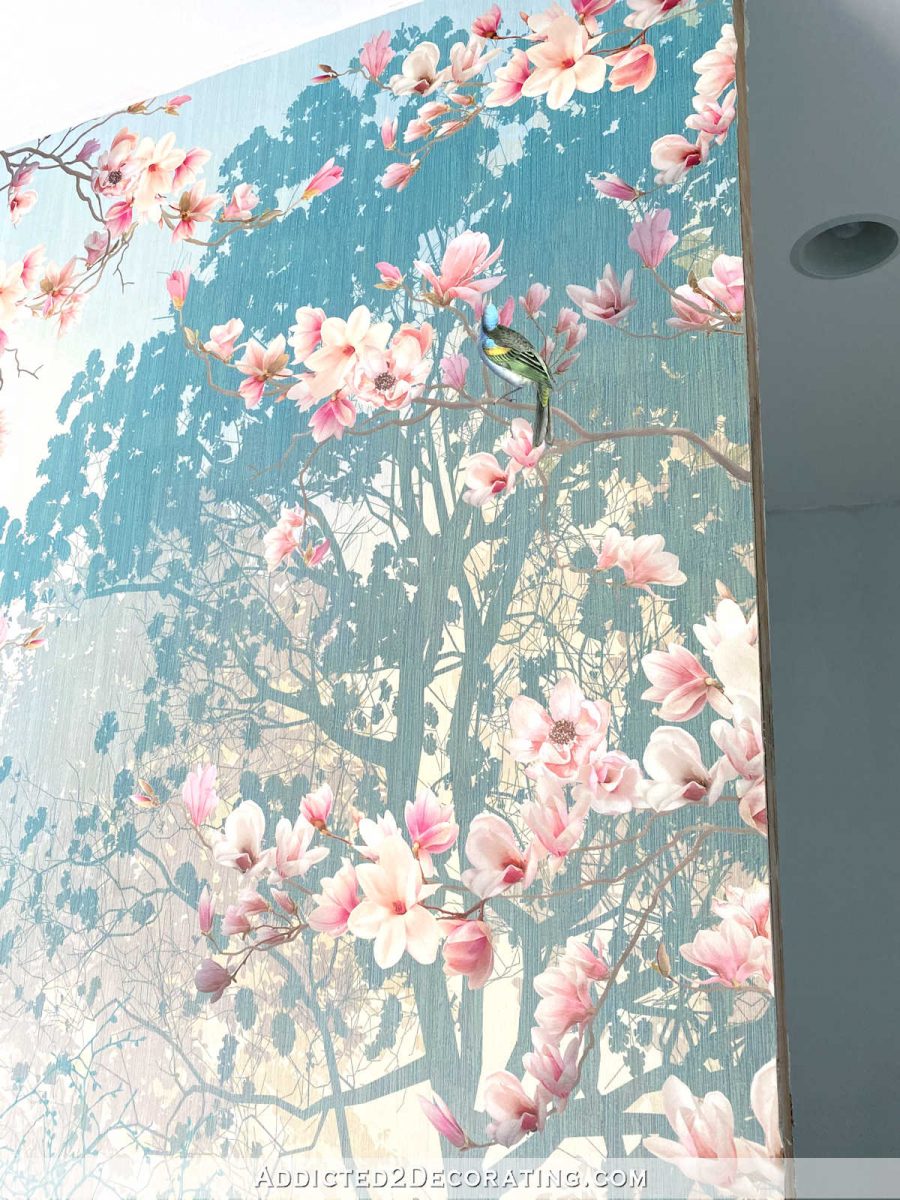
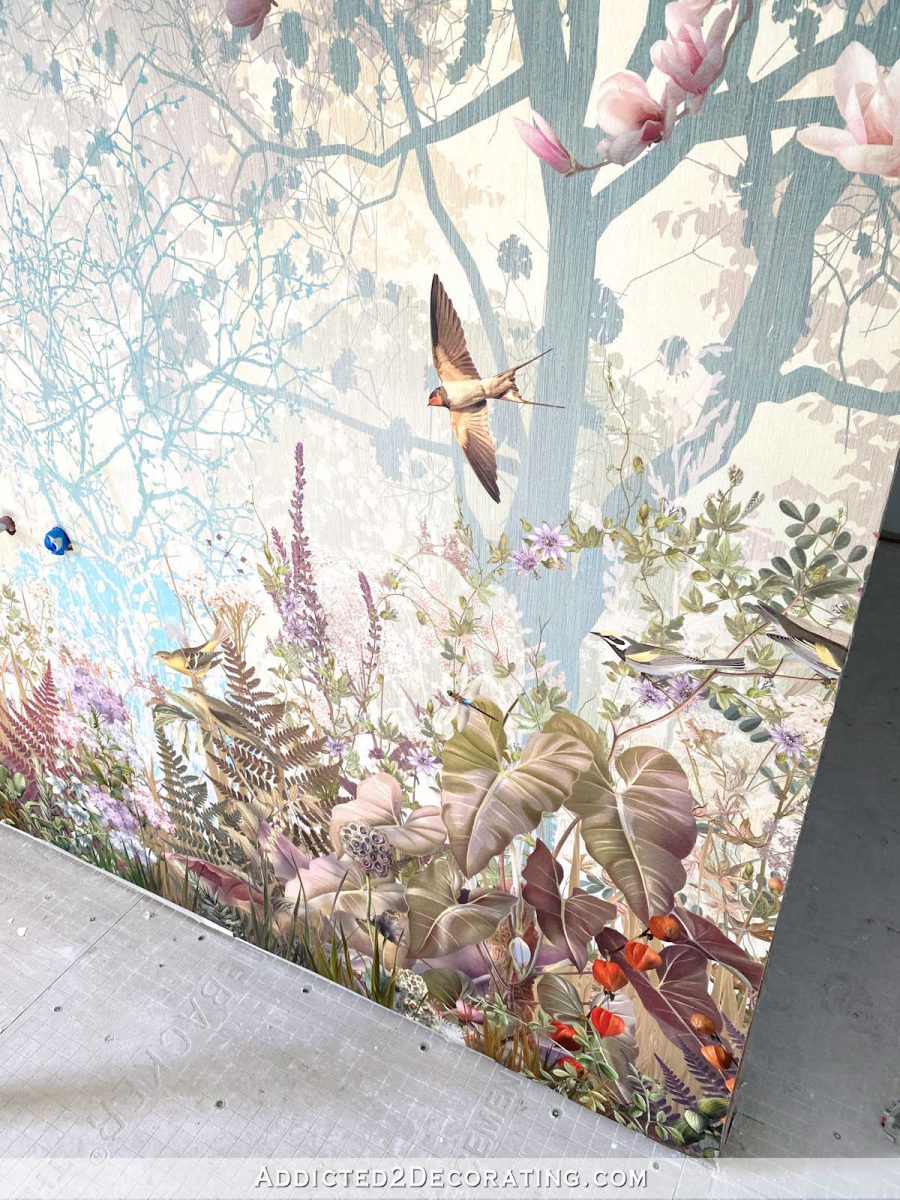
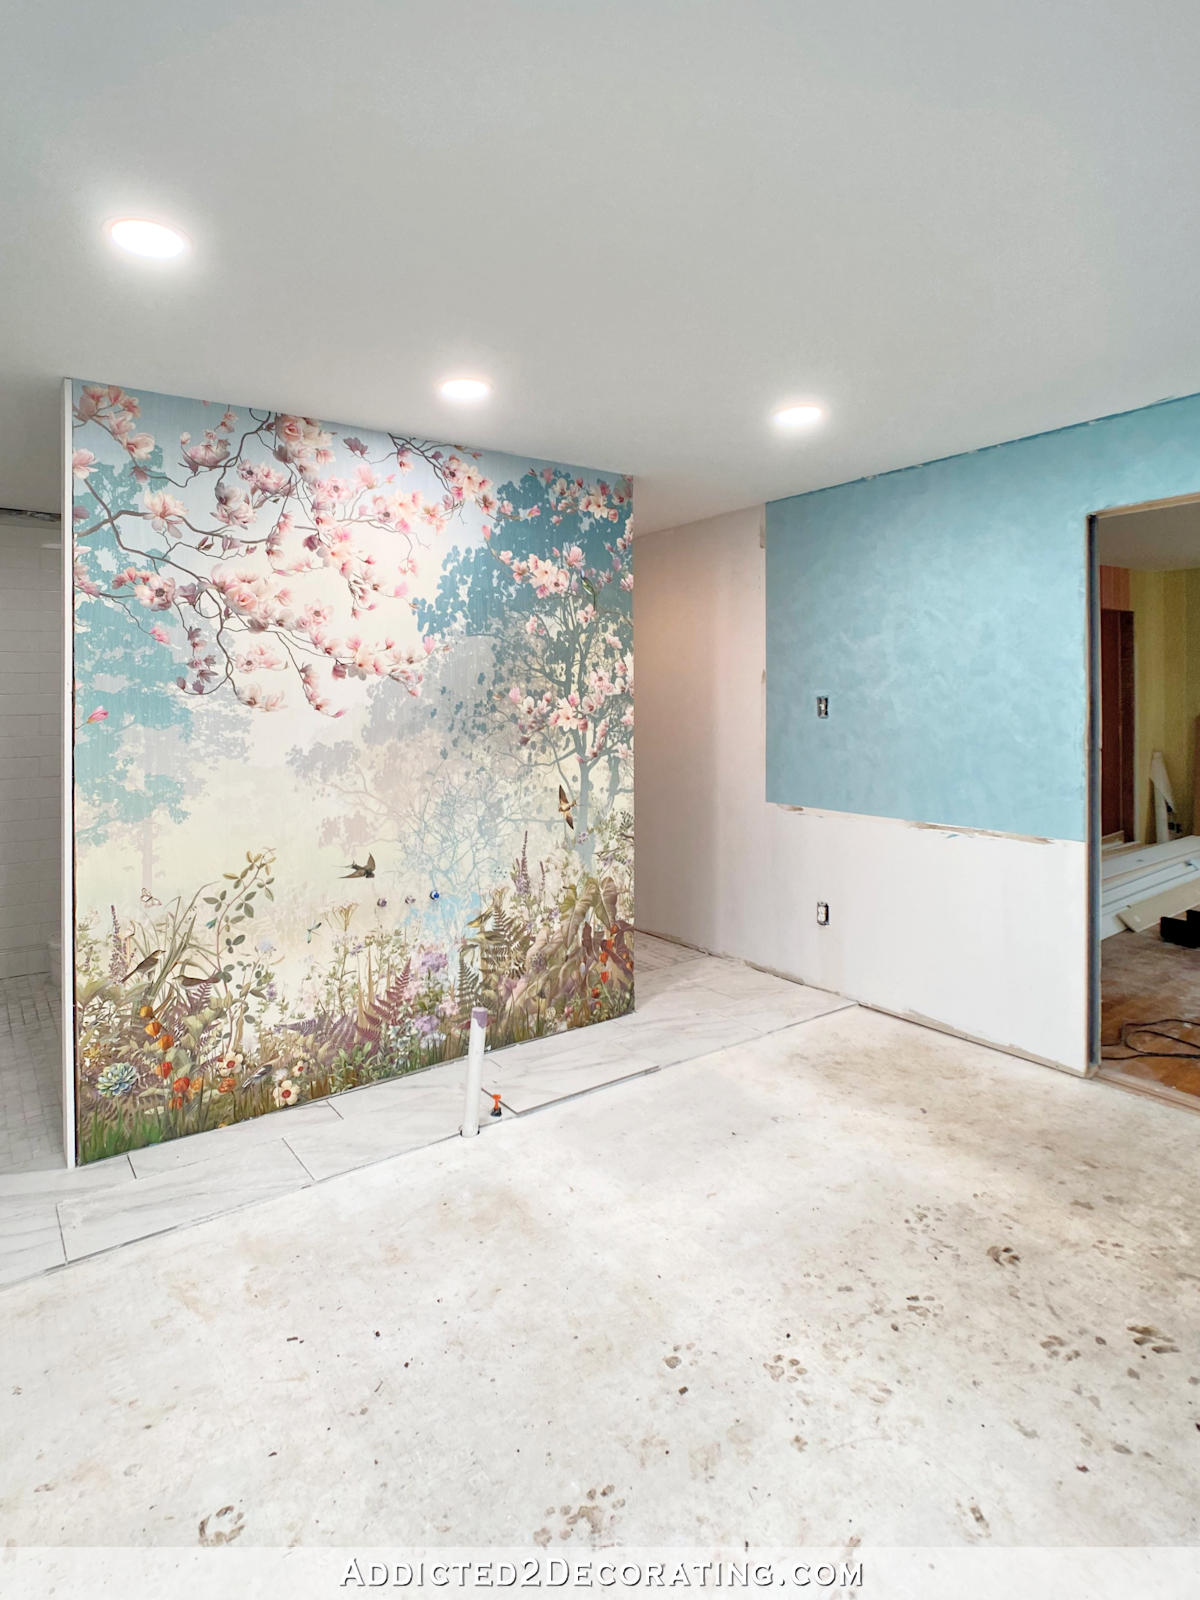
Y’all, the wall mural is up! Since I ran out of waterproofing liquid membrane and I’m having to wait for my new order to arrive, which means that all tiling is on hold, I decided to go ahead and install the wallpaper wall mural in the bathroom. And, oh my gosh, I absolutely LOVE IT!! It’s so fun to see the plan that I’ve had in my head, and have only seen in rough photoshopped pictures, actually come to life in the real room.
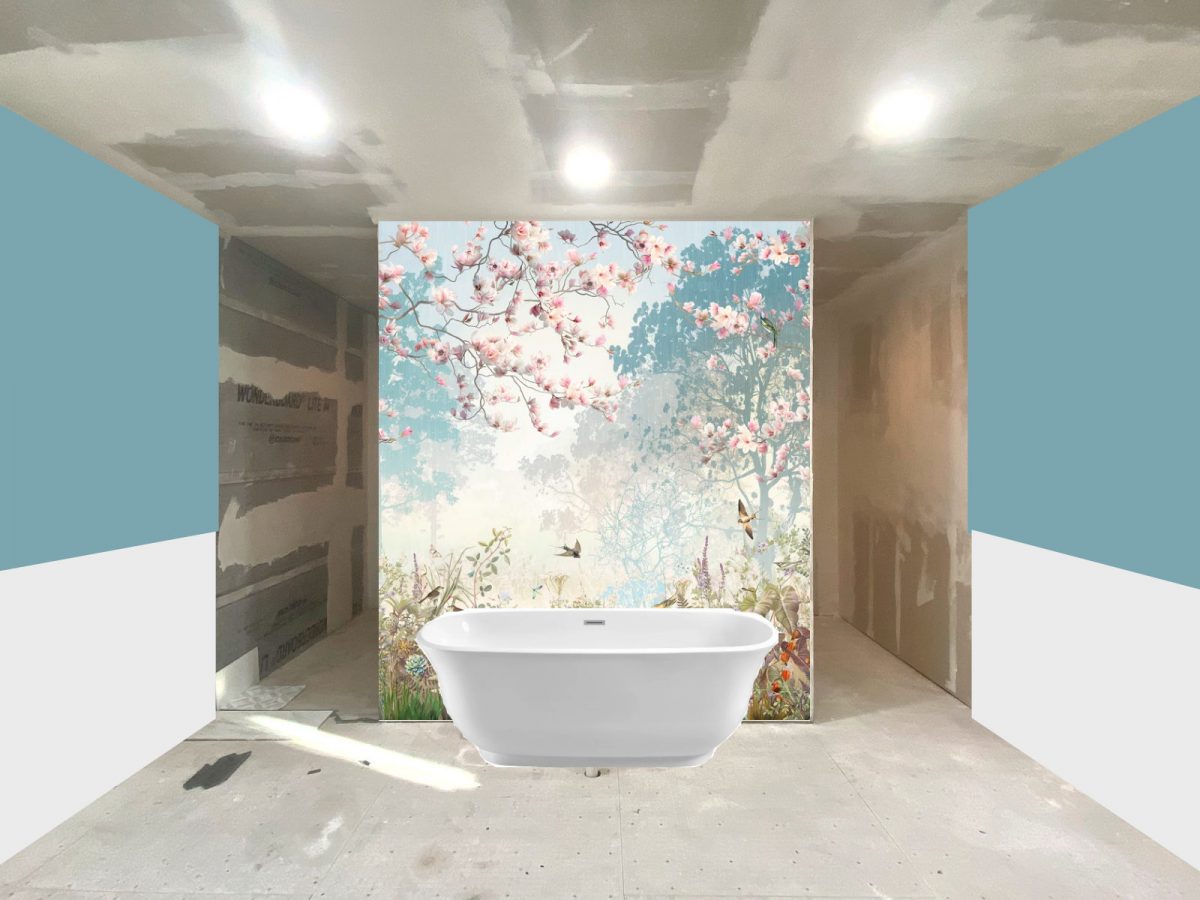
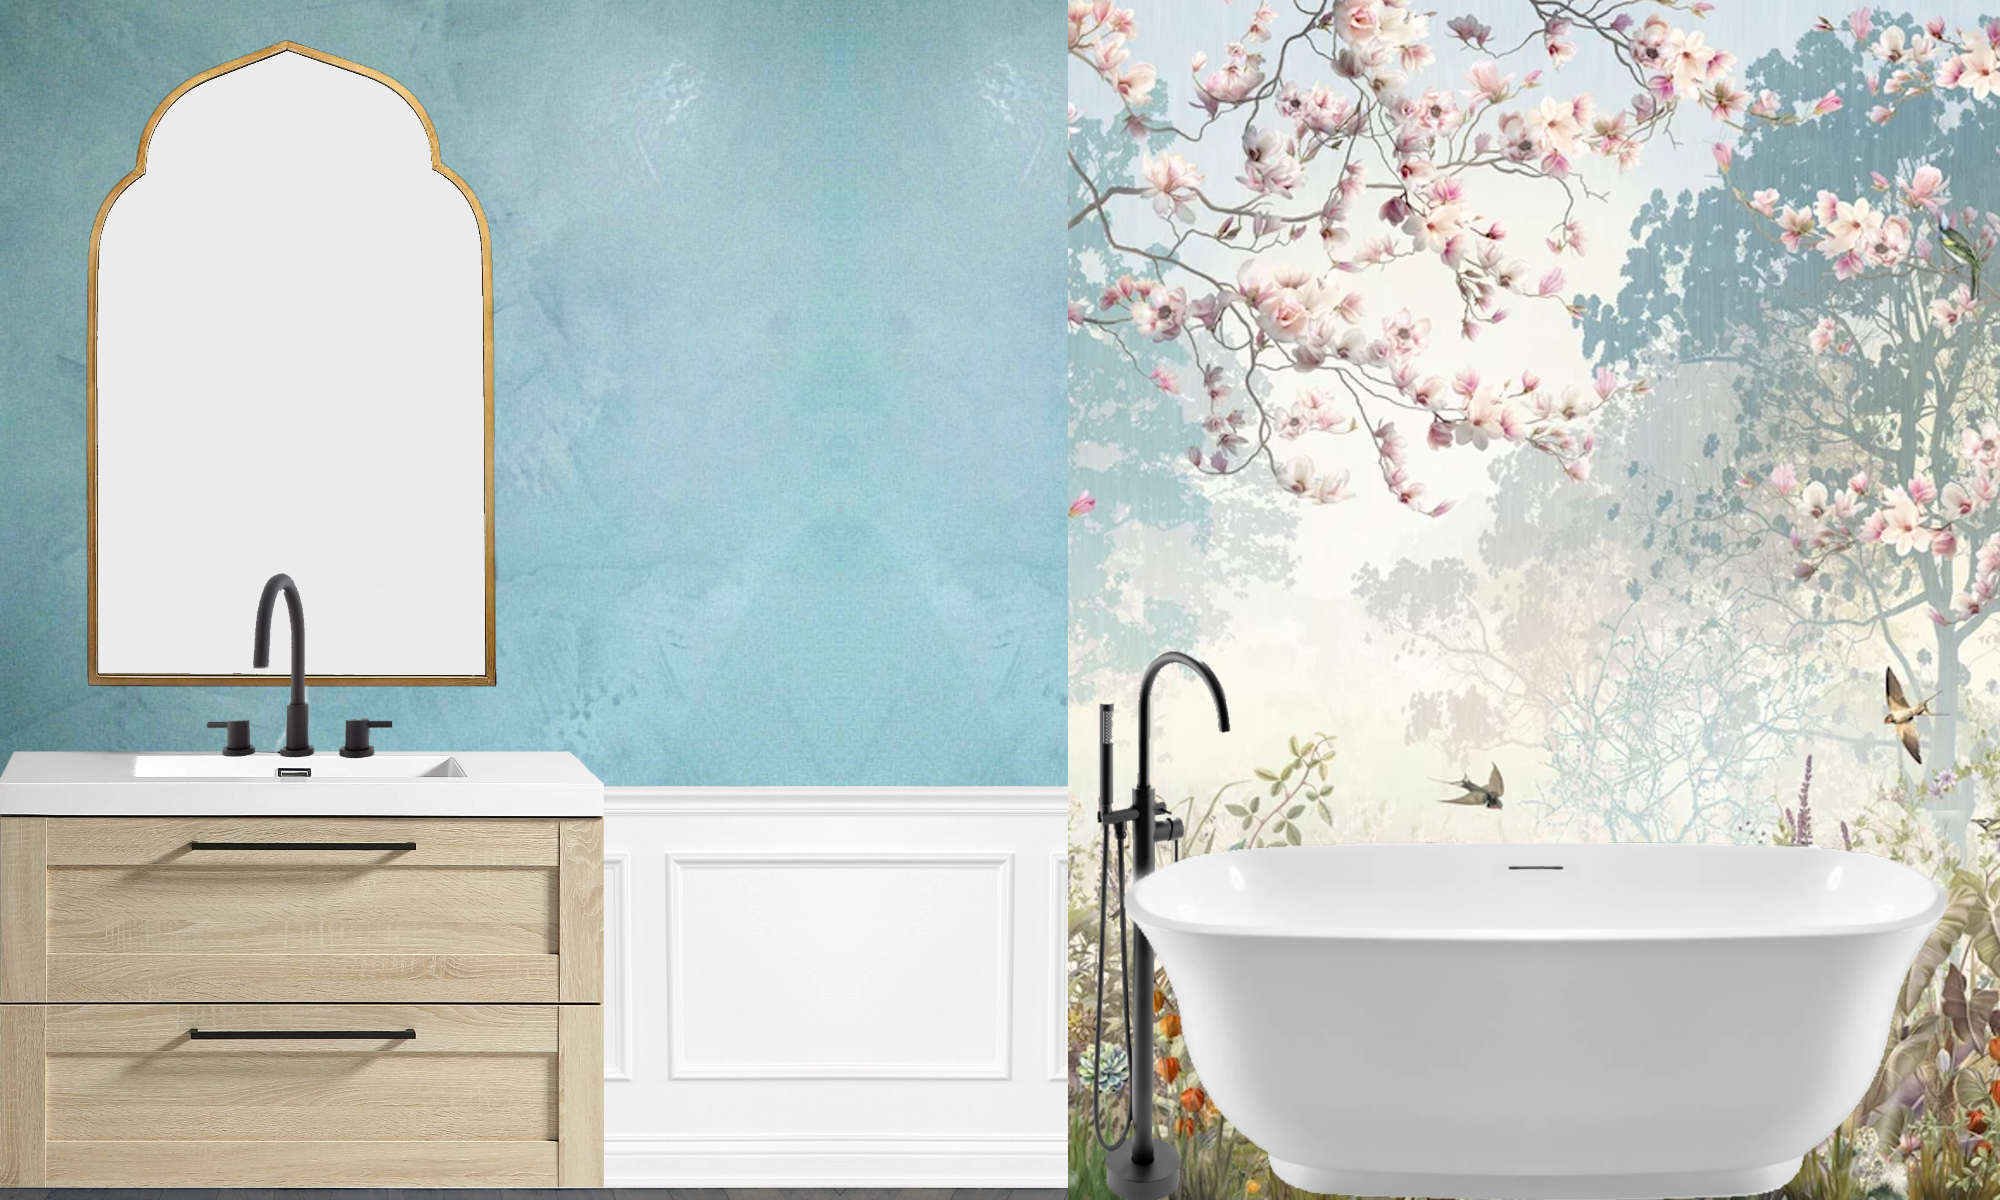
This is the photoshopped version we’ve all been seeing for a while now…
And now, here’s the real deal!
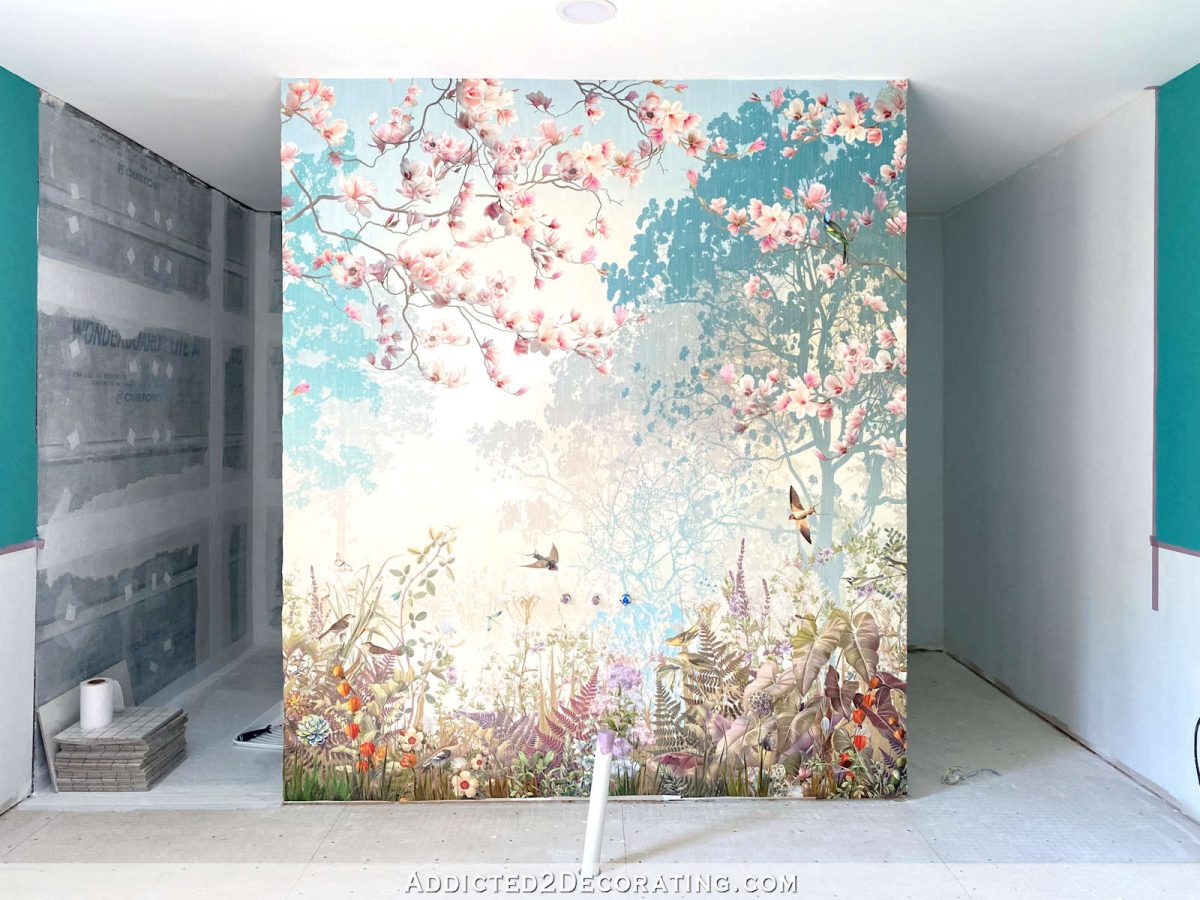
I did pretty good on that photoshopped picture, huh? 😀 That placement and cropping look almost identical!
This was a very simple project with an incredibly rewarding ending. I got the wallpaper mural from Photowall, which is a Swedish company. What I love about this company is that they have hundreds of murals to choose from, and you can crop them to fit the exact width you need. They offer a lot more flexibility on customizing how the image is sized and cropped that most mural companies do.
The printing and shipping was also very fast. I got my order in a matter of just a few days, and that’s with custom printing/sizing, and shipping from Sweden. I ordered their premium quality paper, and I’m very happy with the quality. It’s thick and very durable. The description says that it will hold up to cleaning products, and I can see how that would be true.
Note: If you’re reading this post on a website other than Addicted 2 Decorating, you’re on a website that steals content from bloggers, and is using my content without my permission. I’d love for you to join me on my actual website! You can click here to find this post on Addicted 2 Decorating.
During installation, every inch of this paper was wiped down with a very wet cloth to remove any excess wallpaper paste that may have gotten on the surface, and it held up perfectly. It’s not a vinyl wallpaper (at least I don’t think it is), but the thickness and durability of this paper make me feel completely comfortable having it next to a bathtub. There’s no way water will damage this paper. I can’t speak for their standard quality paper since I’ve never used it, but I would highly recommend this premium quality paper.
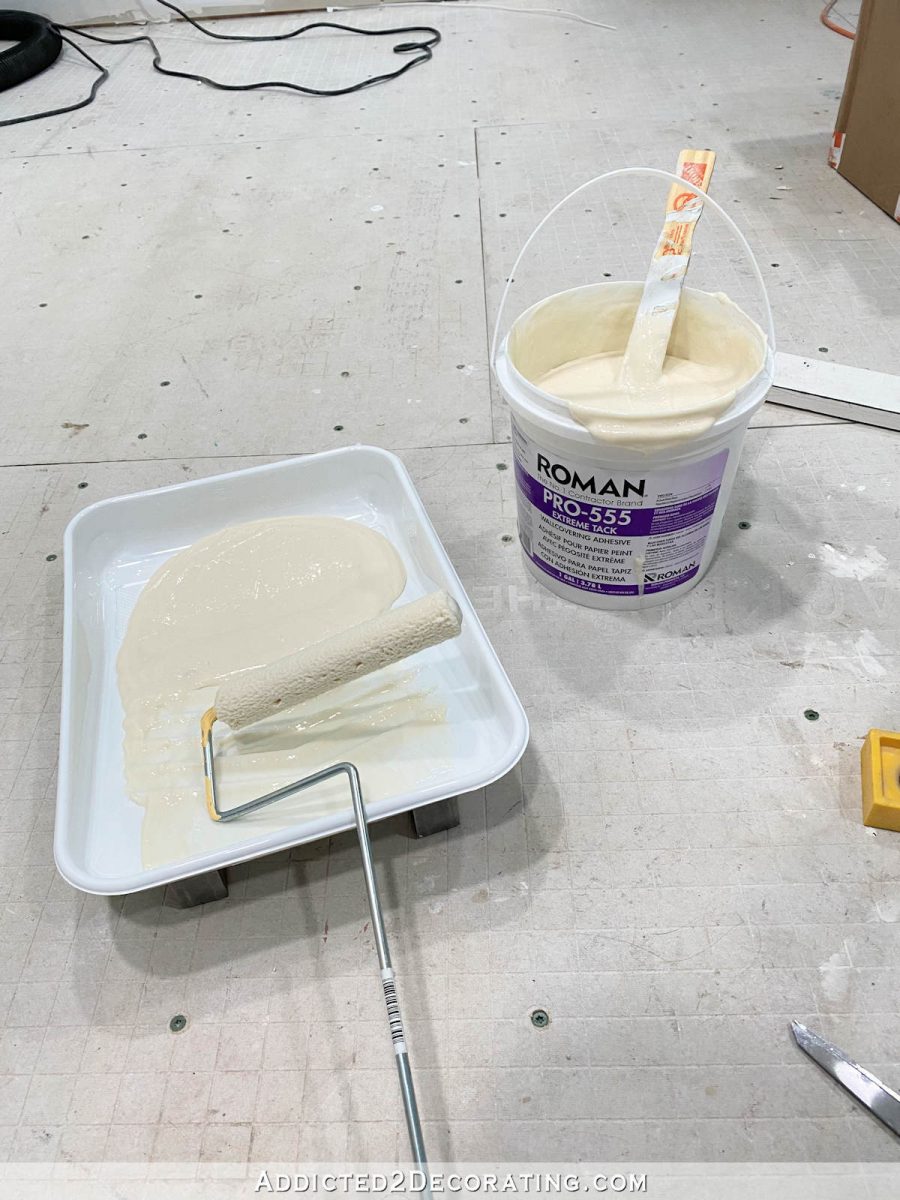
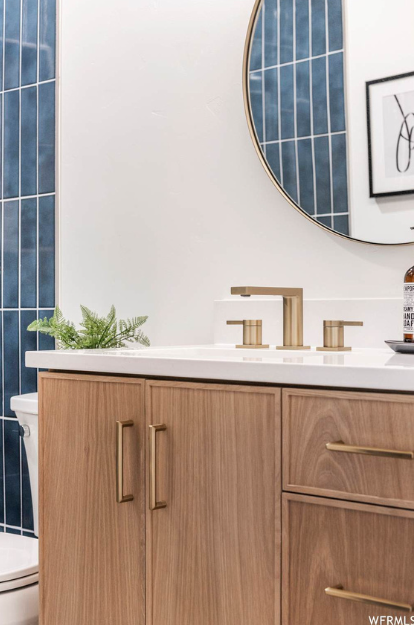
My Photowall order came with a packet of powdered wallpaper adhesive with instructions on how to mix it, but I preferred to use a wallpaper paste that I’ve had experience with in the past and know to be excellent. So I headed to my local Sherwin Williams store and picked up this Roman Pro-555 Extreme Tack adhesive.
Before installing the first strip of the mural, I used my tape measure, pencil, and laser level to mark off a vertical line about 17 inches from the edge of the wall as a guide so that I would have a plumb line guide for placement of the first piece. The strips of wallpaper are 17 3/4 inches wide, and I had ordered a few extra inches of width for the mural.
With my plumb line marked on the wall, I was ready to start the install. Since the wallpaper mural was unpasted, that made the process so much easier. No dunking the roll in water, no bookending and rolling and waiting for the adhesive to be activated. I simply poured some of the wallpaper paste into a paint roller pan, and used a 6-inch roller to roll the adhesive directly onto the wall. And without waiting (I actually tried to work pretty quickly), I then placed the first strip onto the adhesive and used a flexible plastic scraper and a wet rag to smooth out the strip and make sure that there were no bubbles.
And after that first piece was up and my nervousness subsided, I was off to the races. The rest went really fast.
On each subsequent piece, I made sure to get the wallpaper paste right up next to the previous piece. In fact, since this wallpaper is so durable, I rolled the roller over the edge of the previous piece about 1/2 inch just to be sure there were no places along the edge that were missed. It wiped off of the front of the paper just fine.
With this brand, there is no overlap at all. The pieces line up perfectly right next to each other. (As compared to Spoonflower wallpaper, which is printed so that the pieces overlap about 3/4-inch.)
The only slightly challenging part of this wall was working around the plumbing rough-in for the faucet. But it wasn’t really difficult at all. I rolled the adhesive from the top of the wall to the top of the plumbing valve, and then installed the paper from the ceiling to the valve. Then I used an X-acto knife to cut an “X” into the paper where the valves would fit through, and cut away any excess paper.
Once the holes were cut enough for the paper to lie flat (which took a few times since I didn’t want to cut away too much at a time), I pasted the areas of the wall around the valves and under the valve to the floor, and then installed the rest of that strip.
And after that slight speed bump, the rest was a breeze.
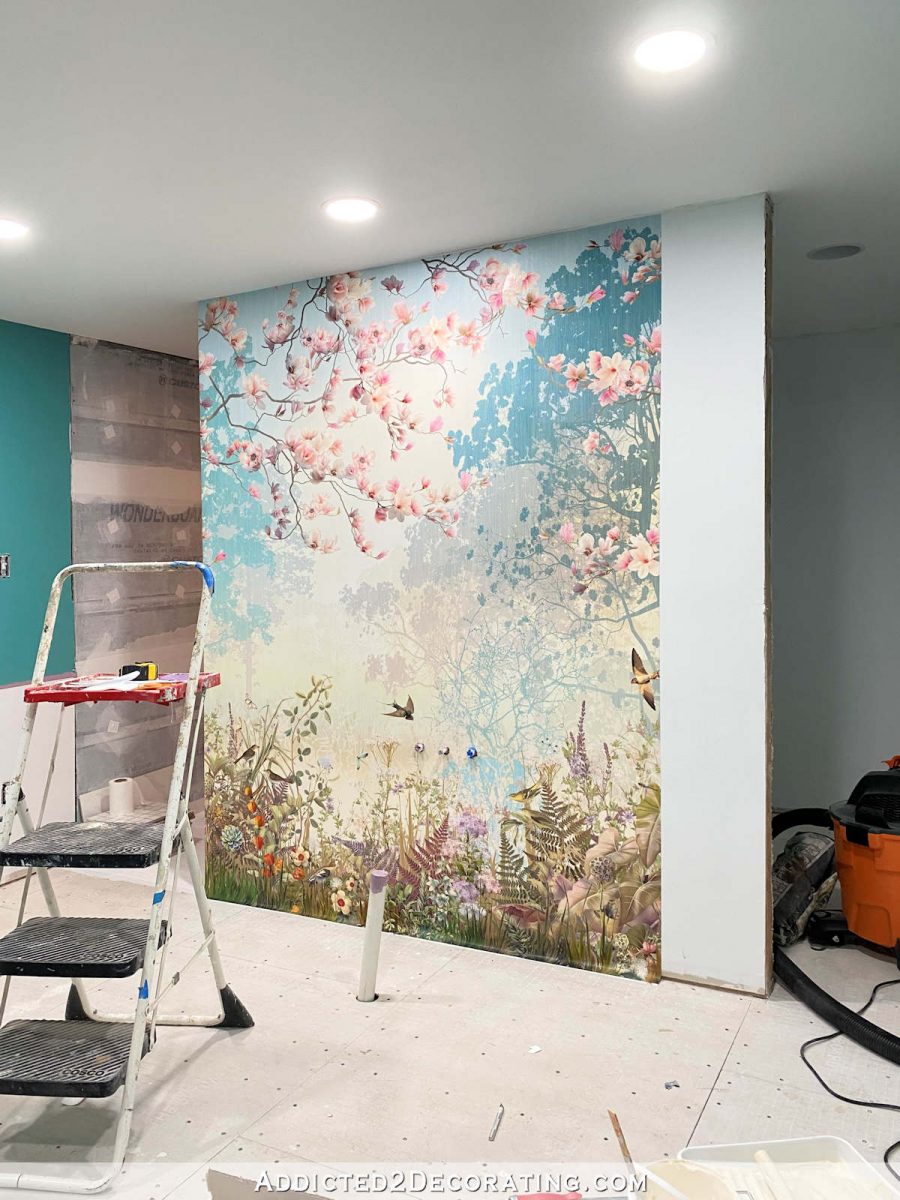
And here’s what the finished wall looked like yesterday morning after it had overnight to dry.
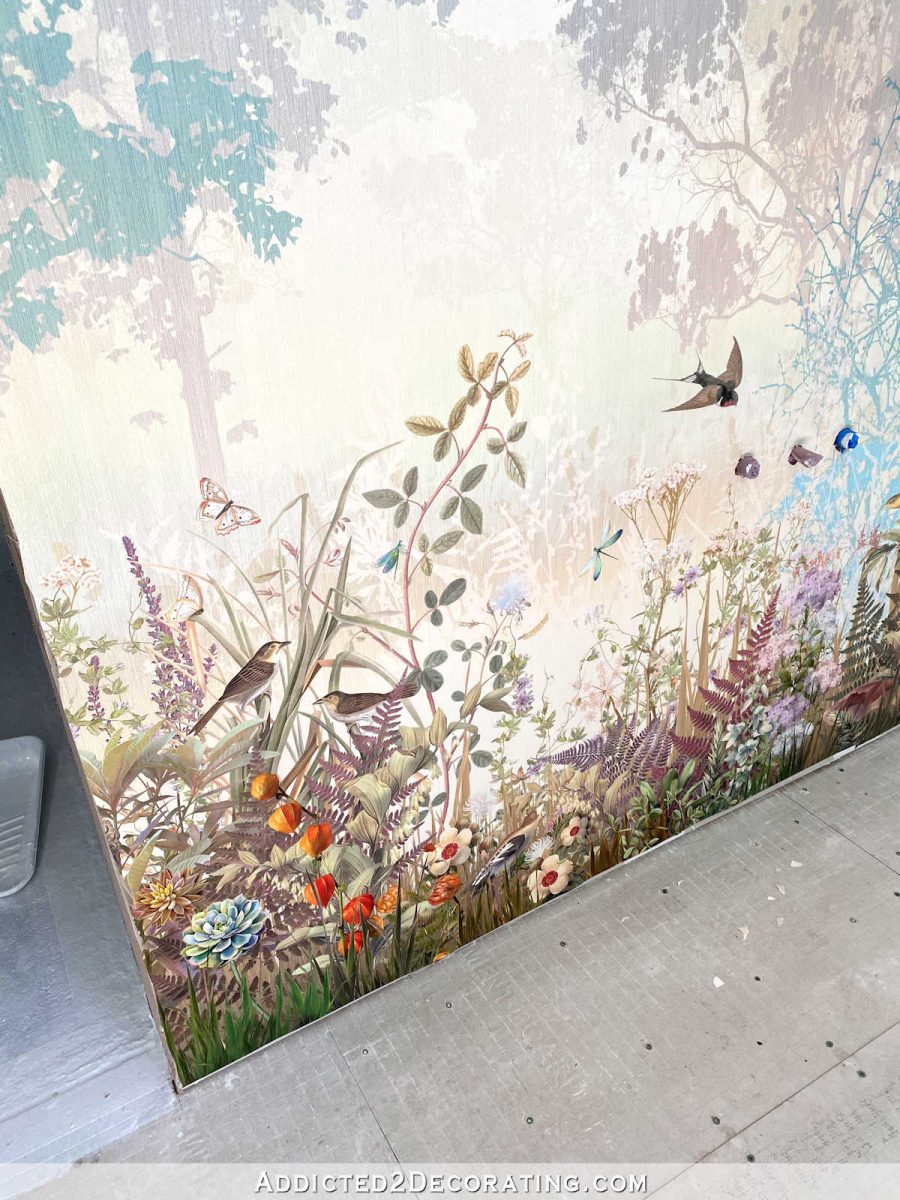
I love this so much! I can’t tell you how many times I’ve stood in that room staring at this mural and taking in all of the details.
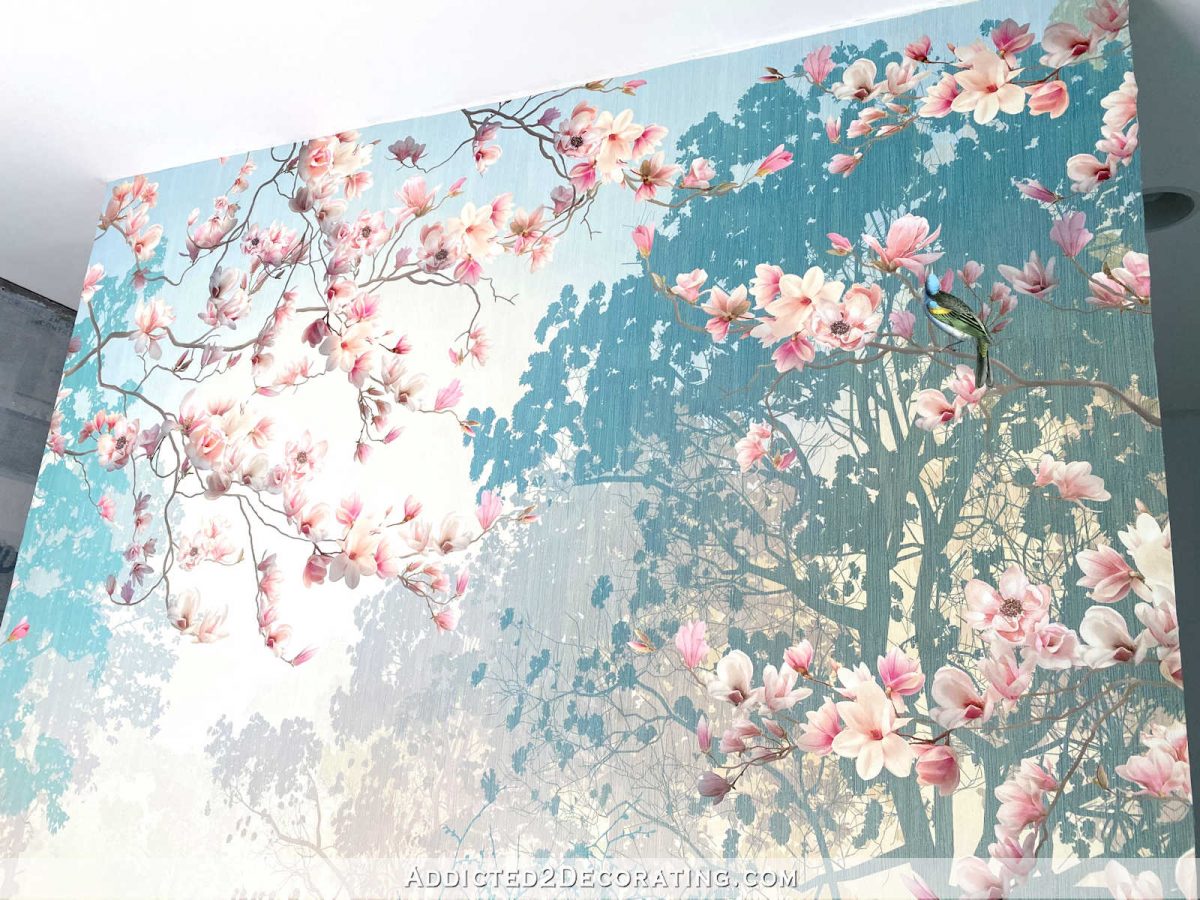
There are things on there that I didn’t know were there, like cute little dragonflies and other details I couldn’t see on the website pictures.
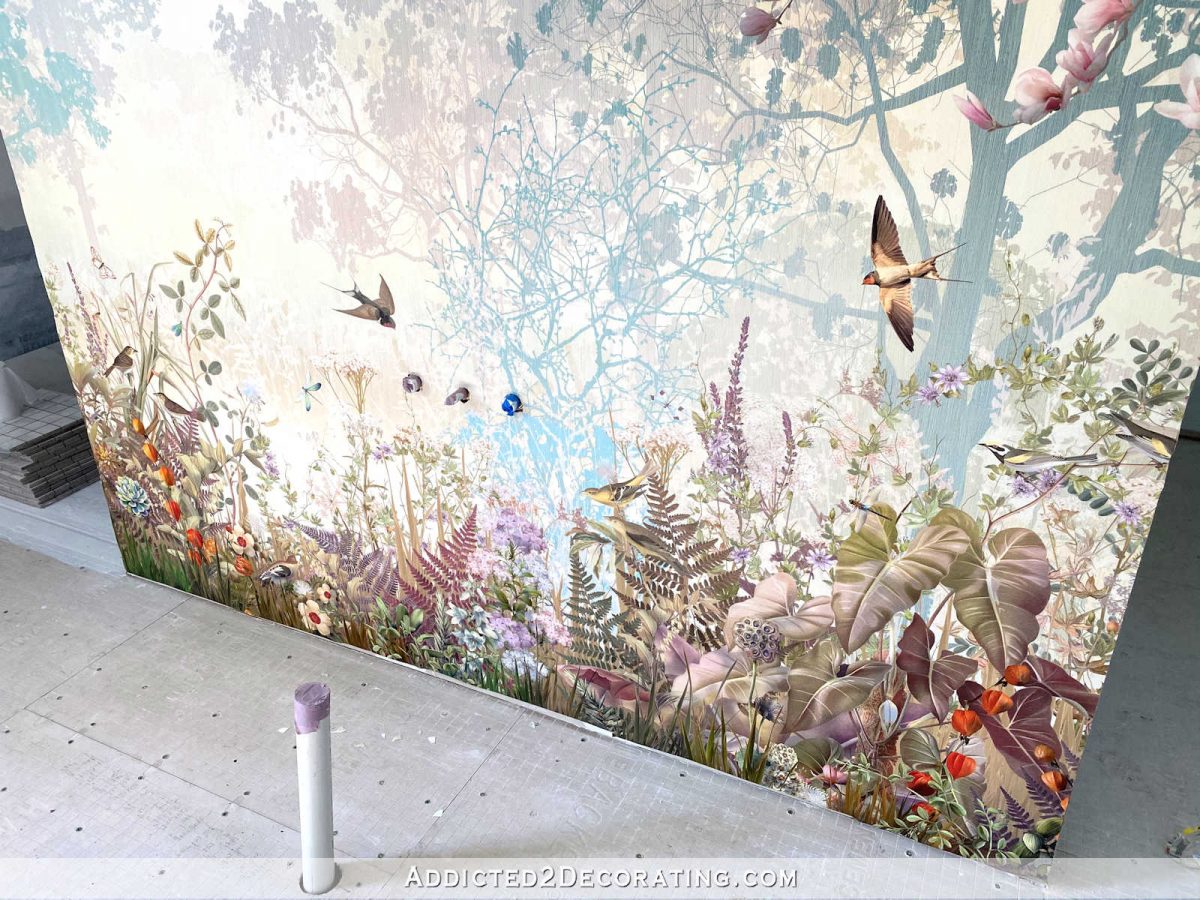
And of course, the birds are my absolute favorite. I wish there were more of them.
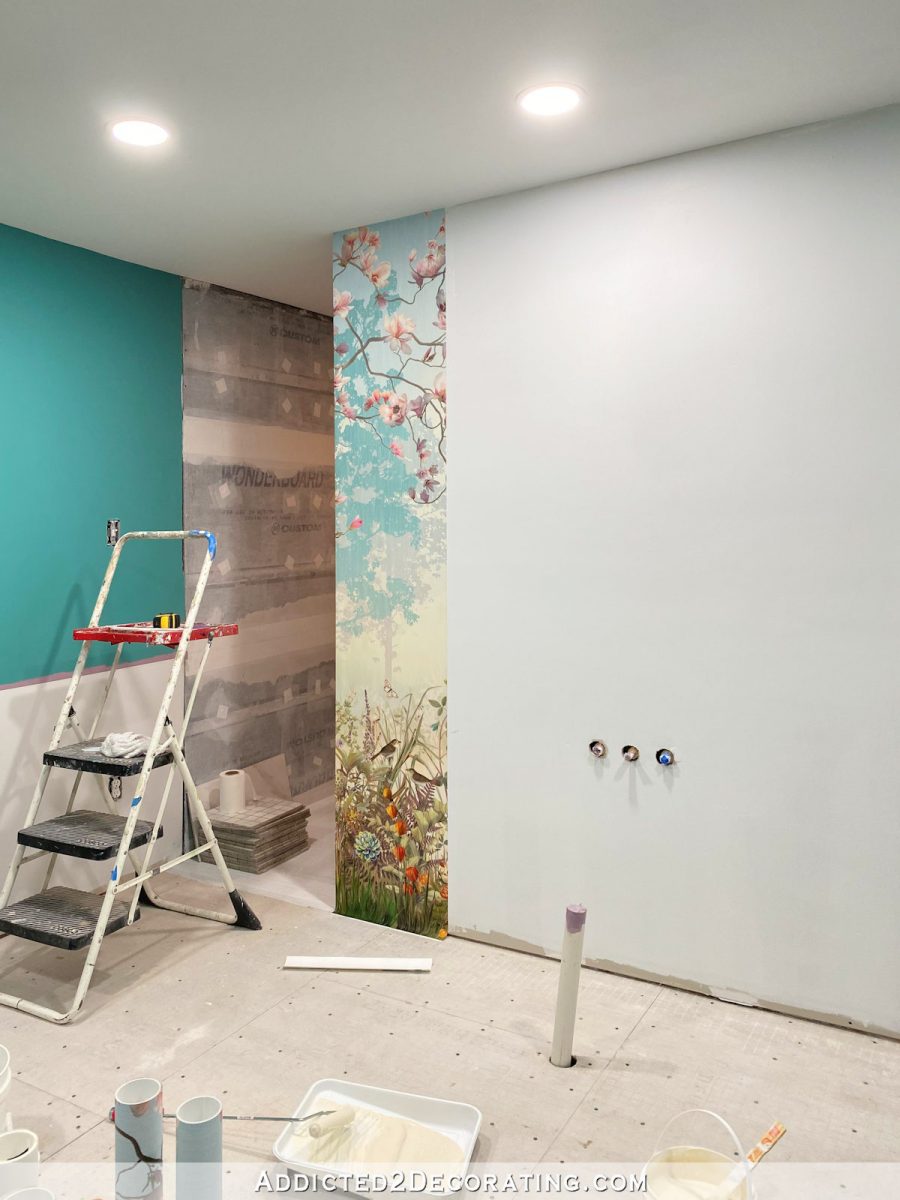
I know it was completely out of the “proper” order of doing things, but I’m glad that I went ahead and installed this so I can have this pretty wall to look at while I work on the other projects in here. And now that I know it’s durable enough to withstand being wiped down with water, and even cleaned with cleaning products, I know it’ll be just fine.

Now I’m wondering if I can start on the Venetian plaster finish on the rest of the walls. If not, I’m just in a holding pattern with this bathroom until I get my waterproofing stuff, and that won’t be here until Wednesday.
I’d rather not waste time, so I’ll probably go ahead and do at least the first coat. Or I could just sit and admire my beautiful wall for the next couple of days. 😀

Addicted 2 Decorating is where I share my DIY and decorating journey as I remodel and decorate the 1948 fixer upper that my husband, Matt, and I bought in 2013. Matt has M.S. and is unable to do physical work, so I do the majority of the work on the house by myself. You can learn more about me here.
Its absolutely stunning!
I’d say do the plaster and mask the tiled areas well. It seems it would be easier to handle the tools to not butt up on tiles in the process. My knowledge is only from an armchair, vs experience, so go with what order your research or gut says.
Kristi, on my computer, the blue/aqua on the photo shop version looks much more compatible with the mural than what is the actual aqua paint. It’s a little more to the gray, blue tone. For me, my eye is drawn to the bright aqua paint and it competes with the mural, where that doesn’t happen with the photo-shop color.
That’s not the final wall color.
Kristi, I would love to know the name of your final wall color, though you have probably custom mixed it. In that case, would you happen to know the name of one similar; perhaps one that inspired your mix or the colors and proportions you mixed? Your skills and this bathroom design are amazing!!!!!! Keep going, Girl!
I think my final wall color will end up being darker than the one in the first photoshopped picture. And it’ll be a Venetian plaster finish. Once it’s done, I’ll see if there’s a similar paint color. And we’ll all have to wait and see just how close I get to the photoshopped image with the lighter, bluer walls.
Absolutely gorgeous!
Wow, wow, wow! It’s GORGEOUS! What a fun scene to visit every morning as you get ready for the day! You knocked this one out of the ball park, Kristi!
Beautiful as always. Love it!
That looks amazing! Fantastic job!
This is STUNNING! I love this so much!
I see you installed the wallpaper to the floor vs to the baseboard. Do you plan to attach the baseboard over the wallpaper?
Yes. Baseboard and crown molding will be installed over the wallpaper.
I was just thinking that baseboard will cover a lot of the neat little details at the bottom of the mural. But maybe they wouldn’t have been well seen with the tub anyway.
Absolutely Beautiful!
Oh, my gosh, this is SO INCREDIBLY BEAUTIFUL!!!!!
GORGEOUS 😍
That is beautiful.
Absolutely gorgeous 😍
All the heart eyes!!! Go, go, go, Kristi!
That is absolutely gorgeous!!
I love 💕 this mural so much!
You are still my hero. I so admire your creativity, skills and work ethic. I look for your post first each day!
Gorgeous! I like that the florals combine spring, summer and fall bloomers, providing a combo that’s not specific to any one season. I, too, could stare at it for hours. Bring in a lovely scent and beautiful music and I might never leave.
I would never get tired of admiring the details in the mural. I love the little pop of orange.
Why can’t you tile in the toilet area? Does that get waterproofed, as well?
All of the floor will require the fabric and two coats of the waterproofing coating, at least on the joints in the concrete board. The waterproofing membrane is also a crack prevention membrane, which is very important in a house that moves and shifts as much as ours does throughout the year.
I LOVE that mural so much! It’s similar to a wallpaper and large border that Blonder Wallcovering used to make. When I worked at the decor store, I would look at it and the murals all the time, and wished I’d known of them when my girls were young. But they probably would have wanted different…they were never frilly girls, even at two! But I am loving your bathroom so much. Can’T wait for the next reveal!
Absolutely beautiful! So happy to see that you went ahead with this part of the project — I was excited to see it! The birds are my favorite part too…along with the gorgeous ferns. As always, thanks for sharing.
It’s beautiful! I was just wondering. I thought you were going to finish the exercise room 1st. Did I miss something?
The original plan was for me to work on the home gym while the guys worked on the bathroom and got it to the point where it was ready for them to hand the project over to me. I learned very quickly that I would be in their way if I were working in that room since they were using it to store tools, supplies, and they had to be in and out of there as they worked on electrical and plumbing. So I didn’t get anything done on the home gym. Then when they were finished with their part on the bathroom, I asked Matt which room was more important to him for me to finish first. He chose the bathroom.
This is going to be so magical when finished. If you play some recordings of nature sounds it will be like you’re literally bathing in a beautiful meadow of wildflowers 🙂
That is so gorgeous. Like taking a bath in the middle of the forest. I love it.
What a good tip about putting the adhesive on the wall. Less mess! and…getting those holes in the paper to match the valves is impressive. Great job. Glad you put the “soil” line of the mural at the level of the floor. It’s just like you’re in the woods.
Simply lovely! 💕 ❤️ 💗
Joyous!
So beautiful! I love love love the scene!
That is SOOOOO BEAUTIFUL!!! love it!!!
All I can say is…”How absolutely Gorgeous!!” I would stand there all day and just look…at…it!!! Just beautiful…perfect choice for a luxurious bath!!
Oh my gosh the wallpaper mural is simply stunningly gorgeous!!!
So fun! Now I want to wallpaper EVERYTHING 😂
Just lovely…
Kristi…… that is ABSOLUTELY STUNNING!…better words have not been invented to describe it..!
Just Beautiful!
One word…..STUNNING!
I am crazy in love with that paper!
That mural is just sooooo fabulous!!!!!! Great choice and great job!
WOW – when you take a nice bubble bath, it will be hard to get out! It is absolutely dreamy! An exciting day for all of us!
Amazing! You have such talent and great taste!
Pure magic. Reminds me of a secret garden tucked into the backyard…:)
Wallpaper is stunning!!!!
This was so much fun seeing each section go up! So exciting! It wouldn’t be difficult to add more birds on your own too.
Gorgeous!
So, so pretty!
Lovely! I remember having those orange lantern plants in our yard. So cool! What detail!
It’s absolutely gorgeous, Kristi! xo
It is soooo beautiful!
oh! that looks amazing! One day I will have a house of my own and I will wallpaper, thank you for sharing your journey!
So Pretty! Can you tell me where the mural has no overlap, do you just butt up each piece? I was wondering if when it dried how you avoided a slight shrinkage that shows a gap in between pieces if you don’t overlap slightly? Would love to do this in my current house. I overlapped mural pieces in my old house so just wondering…
This is so beautiful it makes me tear up. Kristi, your eye and creativity and imagination are second to none. My only fear is that no one will want to leave that beautiful bathroom to go and do other things. Kudos, woman, KUDOS!!!!
Gorgeous!!! I love it! And I love your sense of flexibility! Semper Gumby!! (Always flexible) 😀
Absolutely ravishing!
Shame you are covering it up with the bath, as it is a glorious sight to see!
Well done for having a wonderful idea that looks every bit as good as hoped.
Admire away…you deserve it!!!
Absolutely beautiful.
It is gorgeous. It is a shame that a lot of the colourful foreground will be hidden behind the tub. I hope when you are relaxing in the tub you will be able to see the birds an dragonflies beside you.
I LOOOVVVVVEEEEE It! So beautiful!!