My 72-Color Paint Swatch Cabinets – Part 3 (Framing Out IKEA Cabinets To Make A Stand Alone Cabinet)
I had high hopes that I’d be finished with this cabinet by today, but I didn’t make it. I had completely forgotten that the walls and the ceiling in that area of the room hadn’t even been painted yet, so having to take care of that before working on the cabinet set me back a day on cabinet progress. But I did make a lot of progress, and this cabinet will be finished by Monday.
So for those of you who are just now seeing this project for the very first time, let me do a little bit of review. I’m working on a huge cabinet that sits right inside my studio door from the breakfast room, and I’m using IKEA Sektion cabinets with Veddinge doors to create this cabinet. I had originally planned for these cabinets to look fully built-in and match the other built-in cabinets in the room, which are pink with gold leaf accents.
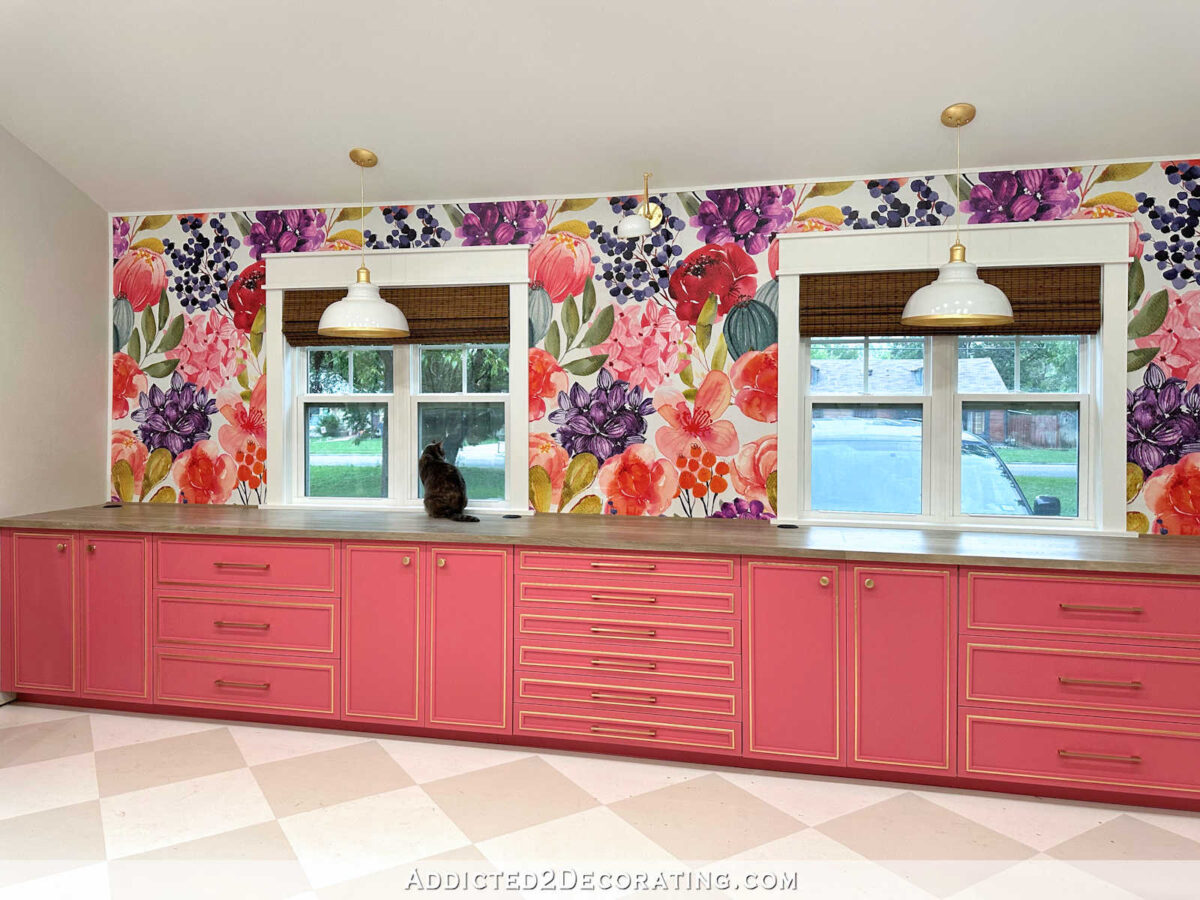
But the more I thought about it, the more concerned I got about having three large sections of matching pink and gold cabinets. As much as I love pink and gold, I thought that all three large sections of cabinets matching might be overkill. So instead, I decided to design this section to look like a separate, standalone piece of furniture, like when you go to the furniture store and buy a china cabinet. So that’s my goal with this project, and if you’ve missed the previous posts about this cabinet, you might want to go back and review those first.
Note: This is a multi-post project. To can find the previous posts at the following links: Part 1 — deciding the paint colors and placement; Part 2 — painting the cabinet doors.
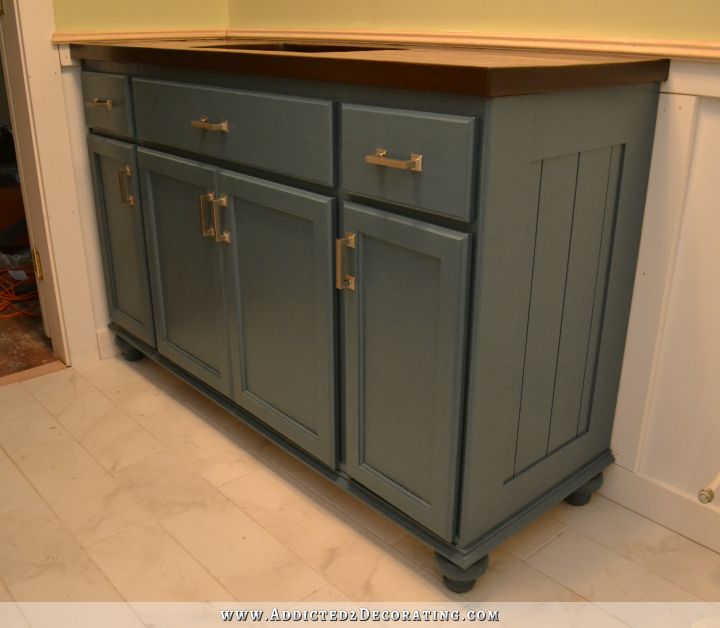
The challenge with using IKEA Sektion cabinets is that the doors are all full overlay doors. So if you’re wanting to build a standalone cabinet using Sektion cabinets, and you want that cabinet to have a frame around it, like most standalone cabinets do, you have to build that part out yourself. Otherwise, all you’re going to see from the front is doors from edge to edge. Just doors. That’s it.
If you’re not quite sure what I’m talking about, let me use the cabinet that I built for our bathroom water closet as an example. When you look at the front of this cabinet, do you see how you’re not just seeing doors going all the way to the edges? You’re seeing framing all the way around (including additional decorative trim on the top and the bottom), so that the doors are inset into that framing.

Well, I wanted that for this studio cabinet, too. I didn’t just want the front view to be nothing but doors from the left side to the right side. I wanted the doors to be framed in a similar way to that bathroom cabinet. So in order to have that, I had to build out the frame myself.
I started by stacking and attaching four of the six cabinet boxes, making sure they were secured to each other. I attached very simple box feet to the bottom cabinets to raise them up three inches off the floor. You can read more about that process here. Those feet lifted the cabinets off the floor enough to provide space for the bottom trim.
Once the cabinets were screwed to each other, I added an 8-foot-long 2″ x 2″ piece of lumber to the side, making sure that the front of this piece was flush with the front edge of the cabinet box. I still needed to put the third row of cabinets on top, but for some reason that made sense to my brain at the time 😀 , I decided to attach these pieces to the side first.

I just screwed these into place using about three screws per cabinet, screwed from inside the cabinet and into the wood piece. I always pre-drill holes with IKEA cabinets to avoid cracking or chipping the white laminate.

Then I added another piece to the back edge of the cabinets, and screwed them into place the same way.

Once I had those two pieces on, I went ahead and added the two top cabinets, and screwed them to each other and to the side wood pieces as well.

And here’s what it looked like with all of the cabinets secured to each other, and the four 2″ x 2″ pieces of lumber attached to the sides.

Next, I added a piece of 3/4″ sanded plywood to the side, making sure that the edge of the plywood was flush with the 2″ x 2″ lumber and the front edge of the cabinet box. I nailed that to the 2″ x 2″ pieces using 1.5-inch 16-gauge nails.

Then I repeated that on the other side. (Please note that I didn’t build this cabinet where it’s actually going to sit. I had to move it away from the side wall to have room to work, but when it’s finished, it’ll be centered in that space.)
I forgot to take a photo of this next step before I moved on, but I cut more 2″ x 2″ pieces and nailed those to the top (front and both sides) to give me something to nail the crown molding onto later in the process.

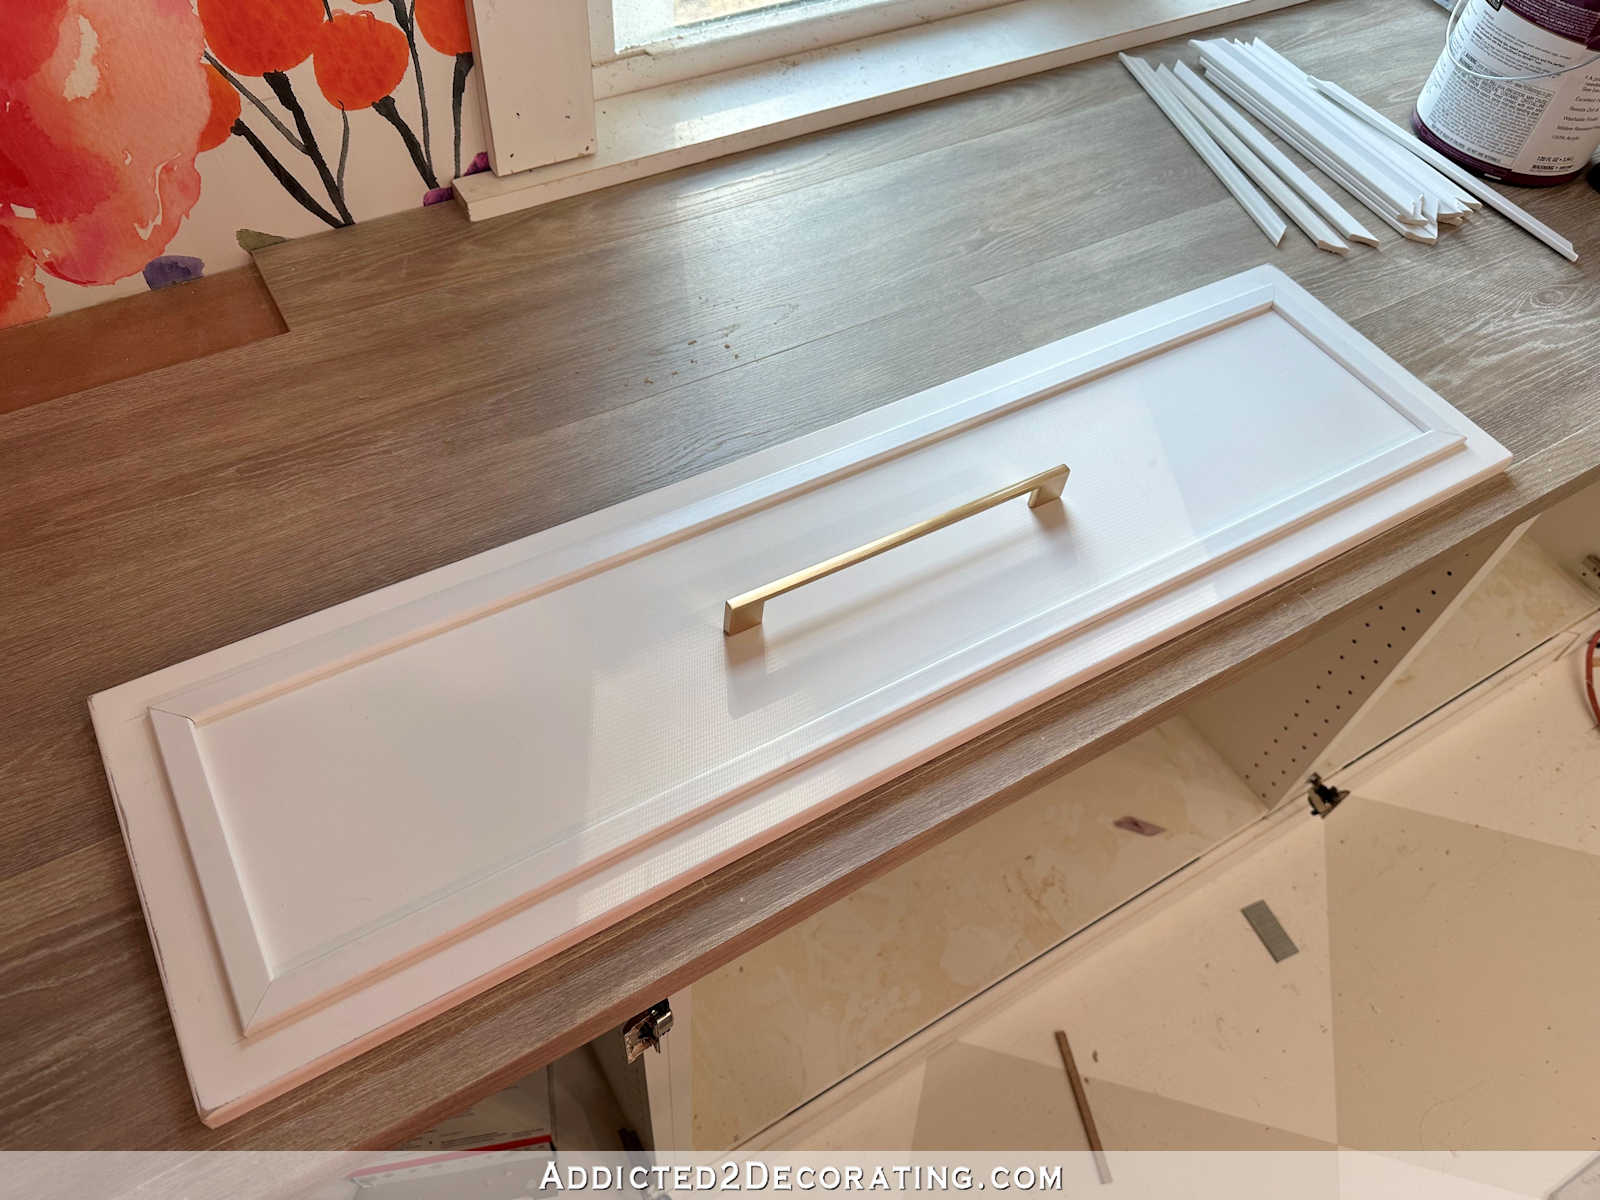
Once the sides were covered, and the top pieces were in place, I began to frame out the front. For these pieces, I had to use my table saw to rip all of them to the right width, and then I also ran all of them through my planer so that they would be 5/8″ thick (the same thickness as the IKEA Veddinge doors) instead of 3/4″ thick.
I started by adding the vertical pieces on the left and right. The key with these front frame pieces is that they cannot overlap the IKEA cabinet boxes at all. If these pieces overlap the front edges of the cabinet boxes at all, they will interfere with the operation of the cabinet doors.
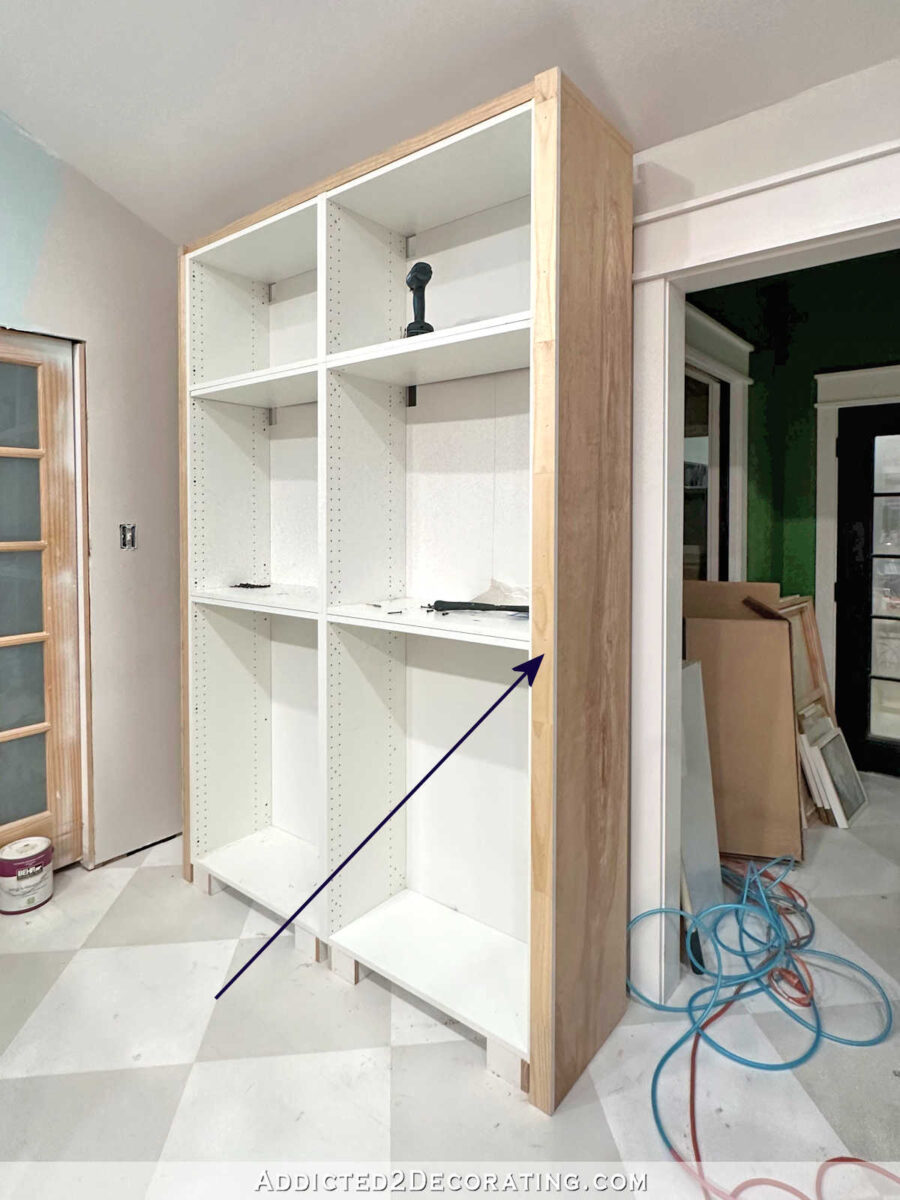
Next, I added the front frame piece along the top, again making sure that I came right up to the IKEA cabinet without covering it even the slightest bit.

And finally, I added the front frame piece along the bottom.

Now as much as I love IKEA cabinets, and have been singing their praises lately, there’s one thing that irritates me about them. My irritation is that the horizontal cabinet pieces don’t sit flush on the front edge or the bottom edge with the vertical pieces. For some reason, they’re inset both ways just a tiny bit.

That becomes an issue when you try to frame them or add trim because you’re going to end up with these gaps that have to be filled with caulk. It’s not a huge issue, but it’s just a slight irritation for me.

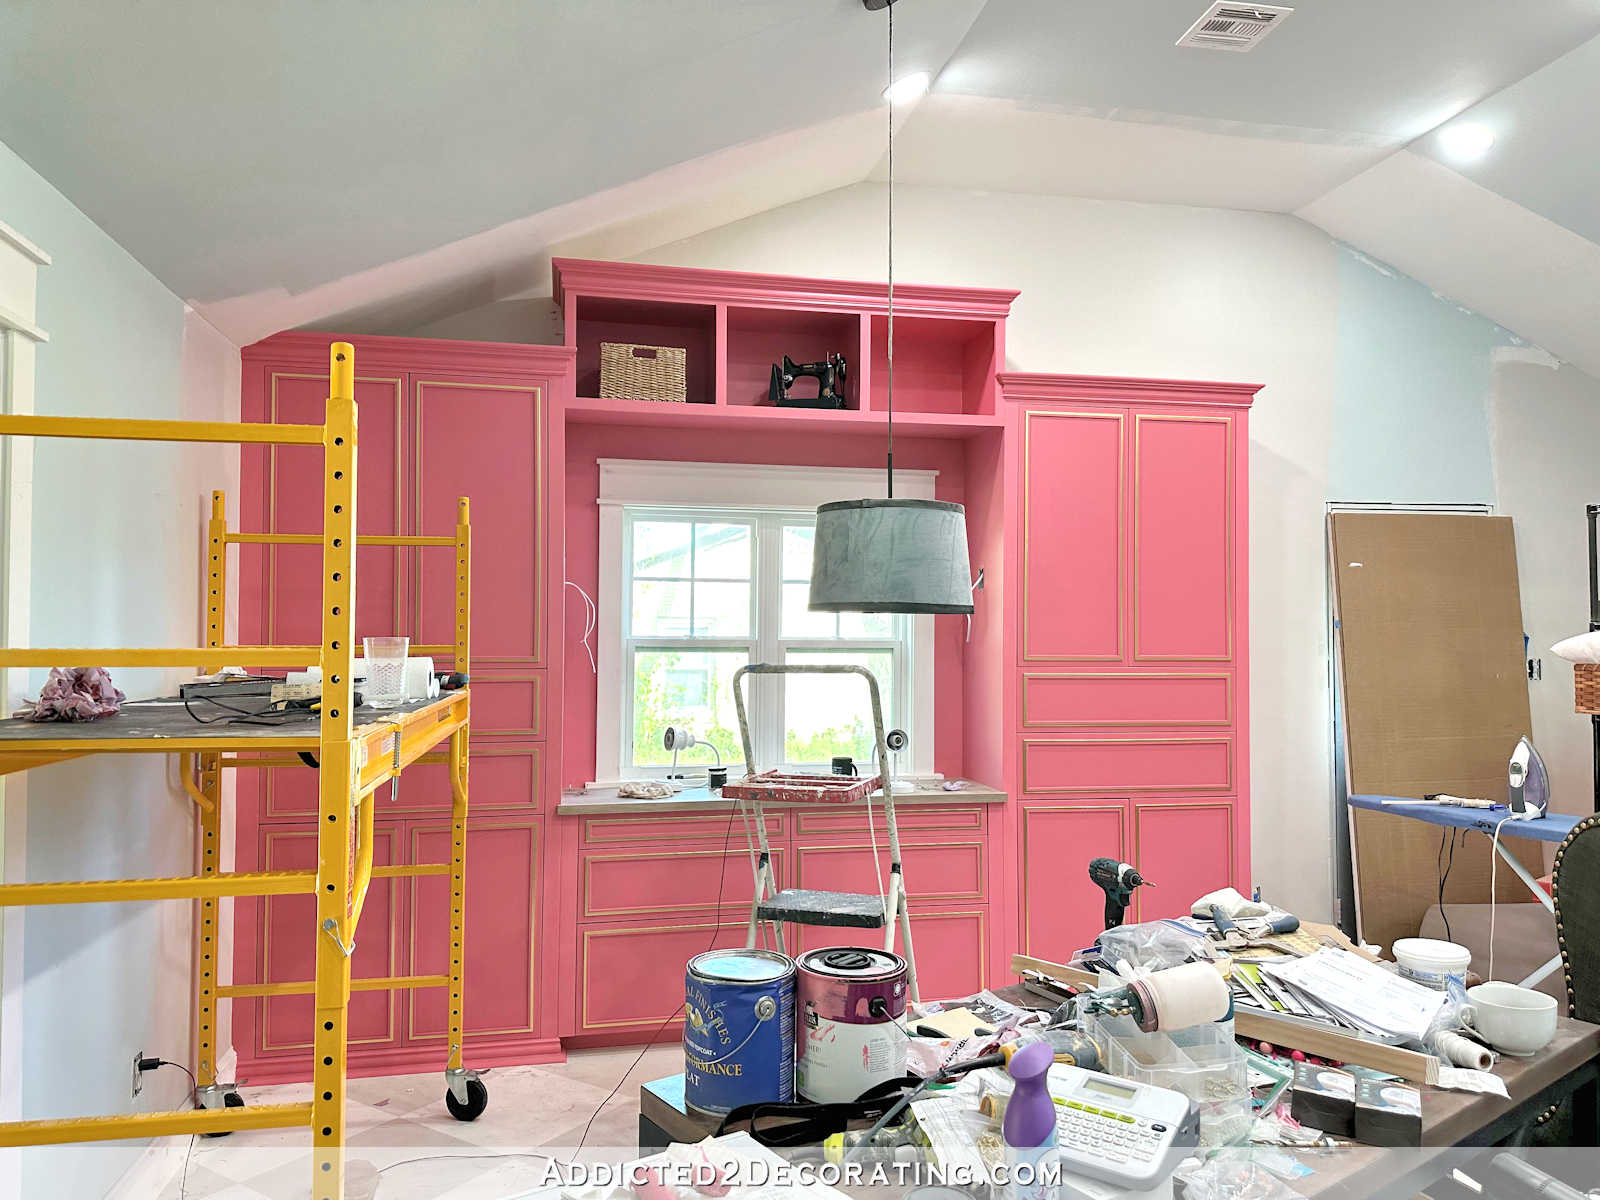
With the cabinet framed, I was ready to add the decorative trim. I started with the bottom, and added this trim on the front and sides.

Then I got curious and wanted to attach two doors to make sure everything looked right, and make sure that the doors would freely open and close without rubbing the frame pieces.

And when I was satisfied that it as all going to work out, I added the crown molding at the top.

So that’s as far as I got. The cabinet is built and trimmed, but I have all of the finishing work to do — wood filling, sanding, caulking, priming, and painting. But I feel pretty confident that I can get this finished this weekend.
See the last post in this project at this link: My finished 72-color paint swatch cabinet.

Addicted 2 Decorating is where I share my DIY and decorating journey as I remodel and decorate the 1948 fixer upper that my husband, Matt, and I bought in 2013. Matt has M.S. and is unable to do physical work, so I do the majority of the work on the house by myself. You can learn more about me here.


You sure can make anything look fantastic with the trim work. Love it.
This looks amazing! Thanks for walking through all of the detailed steps.
Agree with Debbie – you can make anything look awesome! Can’t wait to see the finished piece!
For some reason it looks larger than I had imagined, but it does look awesome!
There is just no end to your expertise. Taking six cabinets and building one large cabinet that’s looks like a $6000.00 piece of furniture is quite a project. You have made a cabinet that cannot be found in any furniture store because your cabinet is more sturdier….because you made it better. None of that cheap 1/4″ backing board on the back of your cabinet here. And all of the framing and trim you have used really creates a handsome piece of furniture. Kristi, I really do enjoy reading your blog. You may be a tiny woman, but you are fully packed full of inspiration, talent, and guts. You’re a pro.
This is truly awesome. I love how you boost my confidence so I can wrap my head around doing a project like this myself. Thanks
!!!!!!!!!!!!!! That is already looking amazing!
:waves to Felicity Smoke!: 🐱
Looks great, as always Kristi! 🙂
I haven’t bought timber (lumber) recently, read on your blog that the cost doubled but haven’t experienced it first hand until today. Went to B&Q, it is the biggest DIY shed in the UK. Bought a small piece of MDF to add a shelf in our build-in cabinet, and 3 battens I need to support the shelf. Payed £44 !!! ($53). For a shelf! That I am going to install myself! The prices are crazy.
I love everything about this. Beautiful, creative work!
Kristi,
I’m curious to know what you would think of creating an IKEA kitchen? You have mentioned a kitchen remodel with the new addition but also voiced concerns over that expense. I live near Charlotte, NC and have been thoroughly impressed with the numerous kitchen setups at the IKEA showroom there. The features and storage options they incorporate are very clever. Your skills at customization could make this a truly beautiful and affordable option.
** Plus, I would absolutely love to follow along as you create this!
If I’m actually able to redo my kitchen during or after our addition, my new kitchen will be an IKEA kitchen. I’m a huge fan! I’ll probably never build another cabinet from scratch now that I have personal experience with (and absolutely love) IKEA cabinets.
Young House Love blog did an IKEA kitchen in their current home.
I’ve always been a fan of IKEA but with Kristi’s praise of them it’s even better.
You are amazing! That piece is going to look so, so good. You just keep on amazing me, Kristi. I appreciate you sharing your journey with me, with all of us. It is truly a blessing to “watch” you work. I would never in a million years thought to clad that cabinet in wood, but it is going to look like a million bucks.
Great job! Can’t wait to see the finished cabinet!
You work hard.
Hi Kristi,
A while back you wrote about using those hooks to hang your crown molding yourself. I am in the same position. My question is, did it leave a gap at the bottom? Also, have you ever used the crown molding corners?
I think your designs are fantastic!
Thank you!
It didn’t leave a gap at the bottom. As soon as the first few nails are in, you remove the hooks and then push the crown molding snug against the wall and nail it the rest of the way. I’ve never used crown molding corners.
This is going to look fantastic!