Never Skip The Sanding!! (The Boring Part Is The Most Important Step)
I know we’re all anxious to see my closet painted, and I’m getting closer and closer to that every day. I’ve been stuck in these paint prep steps for days now, and I’d love nothing more than to see that beautiful blue-green color go on these cabinets. But all of these steps I have to do before painting really are the most important parts of the process.
Sadly, it seems like these are the steps that most people want to skip over. I’ll never forget when the Chalk Paint craze took over years ago. One of the selling points was that you don’t have to sand before painting. You could just slap that paint right over any finish, and it would look beautiful, or so we were told. And since that Chalk Paint debut those many years ago, so many other paints have come on the market with that same claim. No sanding necessary!
That drives me crazy, if I’m being honest, because the fact of the matter is that if you slap paint on a rough surface or a surface that hasn’t been prepped in any way, your paint finish is just not going to look all that great. The painted surface can only look as good as the surface underneath it. Paint doesn’t magically make cracks, holes, uneven surfaces, rough surfaces, or other imperfections disappear.
And that’s exactly why I take so much time in the prep stage before I paint anything, whether it’s a piece of furniture, cabinets, or anything else. One of my favorite people to follow in Instagram is Kayla Payne. She paints cabinets and furniture, and her approach is very similar to my own. I watched the whole process of her painting her own kitchen cabinets not too long ago, and that was almost a month-long process for her just to paint her kitchen cabinets. She did a super high gloss finish, which takes even longer and even more attention to detail that what I’m doing in my closet with a satin finish, but because of all of that attention to detail, her finish turned out amazing. Because she used such a super high gloss paint, she had to sand those cabinets up to 600-grit between coats of paint. But I loved watching that whole process and her attention to detail.
Anyway, all of that to say that I know I’m stuck in the super boring part of this project (it’s boring for me, so I know it’s boring to watch!), but it’s not a phase that I can rush through. Nor is it a phase that I want to rush through because if I don’t take the time to do these steps correctly and pay attention to the details, the finished project will look like a cheap DIY project. And that’s the last thing I want. I may be a DIYer, but I never want my projects to look like obvious DIY projects.
So yesterday, I worked all day long, from around 10:00am to 10:30pm, with a 40-minute break to make a pot of chili, and then an hour break for lunch with Matt. And I spent that whole time sanding and then doing a little more priming. And almost all of the sanding I was doing yesterday was by hand. My goal was to take off the sharp edges from all of the trim pieces. And I don’t know if you’ve noticed, but there are a lot of shelves in this room, which means that there are a whole lot of trim pieces that needed to be sanded.
I take the time to do this on all of my projects that I build for two reasons. First, I think it looks better. But second, the factory cut edges on this pre-primed lumber is so sharp that it can literally cut you if you run your hand across it fast enough. Ask me how I know that. 😀 But really, I just don’t like how it looks.

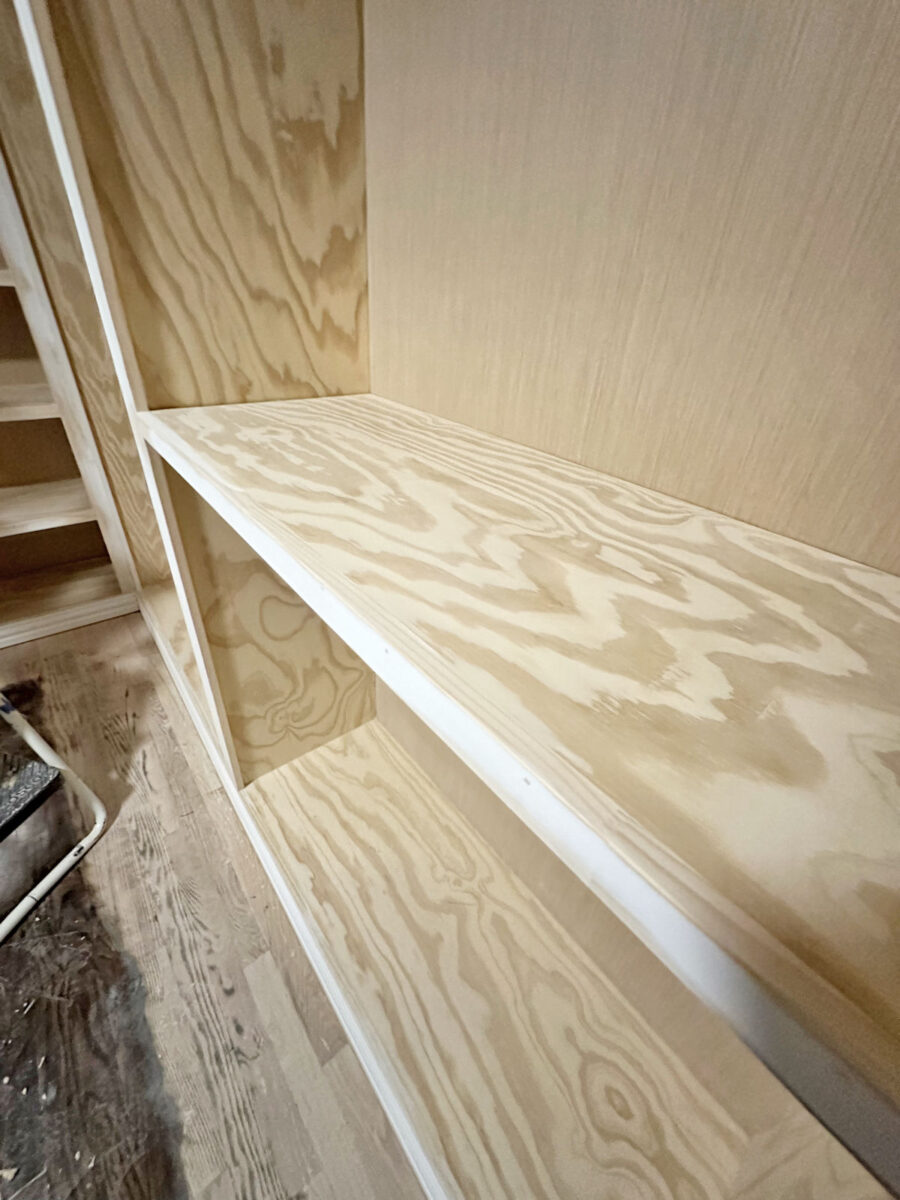
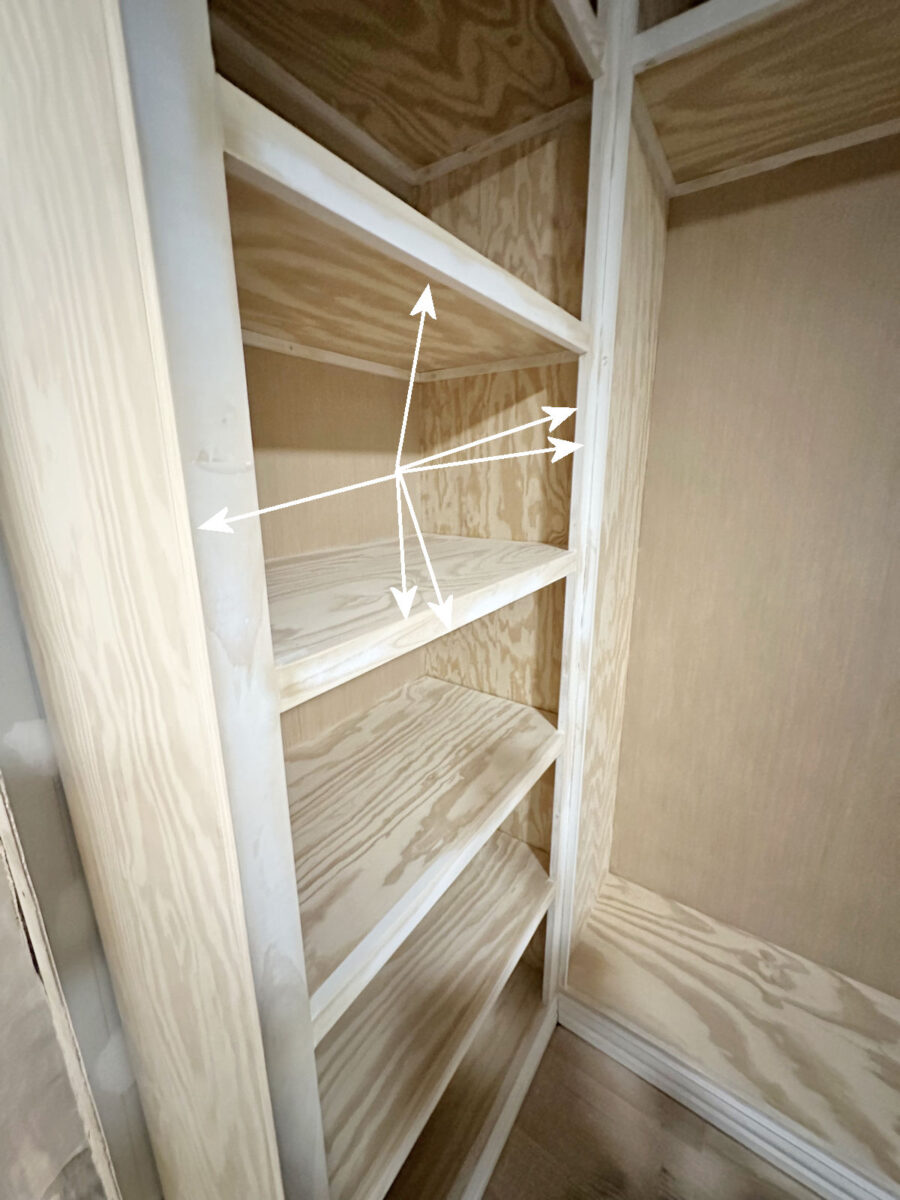
So I start with 80-grit sandpaper to knock down those super sharp corners and then follow up with 120-grit and then 220-grit sandpaper to get a softer rounded-over edge, which you can see below.

It’s one of those small details that I think makes a huge difference in the finished project. And while I may be the only one who ever notices, that’s enough for me. It’s often hard to tell the difference before it’s primed and painted. Here’s what it looks like after doing all of that sanding but before priming…
But the reason it took so long is because I do all of this by hand. Using a sander for this process can leave gouges in the pieces next to the piece I’m sanding, and it can also take off too much of the corner too fast and leave uneven corners. I have much more control if I do it by hand. And this step needs to be done after all of the shelves and shelf trim have been attached. You don’t want to round over the edges of the cabinet trim and then add the trim on front of the shelves because that will leave a gap between the two pieces that then has to be filled and sanded.
And it also took so long because there’s just so much of it. I sand every single one of the exposed edges. And again, I have a whole lot of shelves and a lot of cabinet trim in this room.
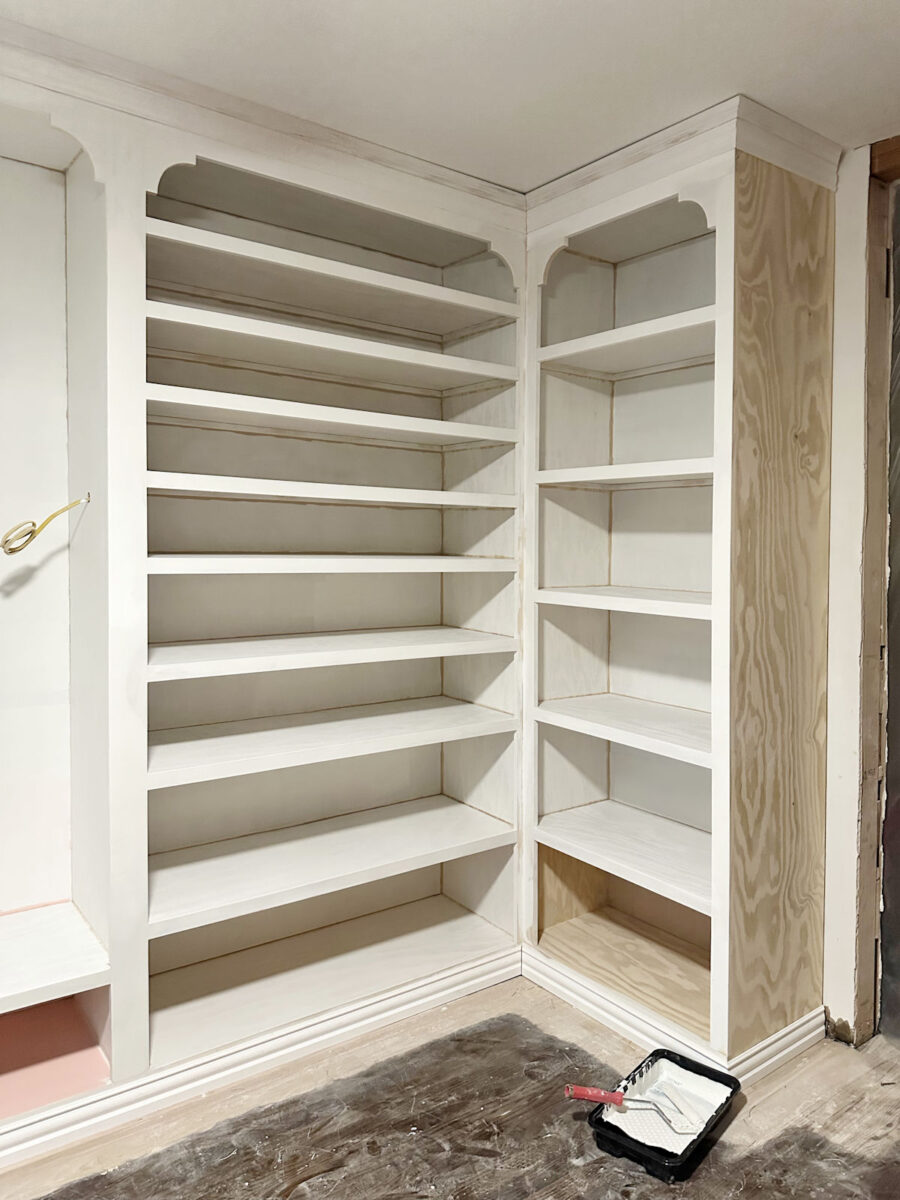
The good news is that I finally got that long and boring process finished at about 9:00 last night, and then I spent the rest of the time until I went to bed priming the right side of the room. I had to laugh because I ran out of primer before I could get that last shelf primed. I still need to prime all of the corners with a brush, but I got (almost) all of the areas primed that could be done with a 6-inch roller.

I have another full, uninterrupted workday ahead of me today, and now that all of that preliminary sanding is done, my goal is to get the rest of the priming done by the end of the day. And yes, once the primer is dry, I will sand every single bit of every surface with 220-grit sandpaper by hand before I paint. Because, again, the painted finish can only look as good as the previous finish. Once the primer is on, dry, and sanded, I’ll still need to caulk, which will probably be an all-day job with this many shelves. And then, finally, paint!
So I’m almost to the part that we all want to see, but in reality, I’m still at least two full work days away from paint, if not three or four. I still need to build my glass-top shelf as well. The glass is out for delivery right now, and as soon as I have that in hand, I’ll build the frame for it so that it can be prepped, primed, and painted when I do the rest of the cabinets.
Anyway, all of that to say that if you’re going to go to the trouble of building cabinets, don’t rush the boring steps. They really are the most important. And if you’re wanting to paint cabinets or furniture, and your first question is, “How can I do this without sanding?”, just know that your finished project is very likely to end up looking like a DIY project. In my 30+ years of DIYing, I’ve just come to realize that sanding is one of the most important steps in painting cabinets and furniture, and if you skip that step, it’ll show. It’s boring but necessary.
UPDATE: I’ve had a few people ask me why I don’t do my floors before painting the cabinets. While that would be the logical order, the Bona Red Out is on backorder, and I still don’t have a shipping date for it. There’s no way I want to hold up progress on this project while I wait for that to arrive. So I’ll continue working on the cabinets and get them painted first. I spent a good 90 minutes yesterday cleaning off all of the dust from the shelves and cabinets and getting them ready for primer, so I am definitely going to paint first. And then once the paint is dry, I’ll cover the cabinets with plastic before doing the floor so that they don’t get dusty again.
It’s not the ideal order in which to do things. It certainly would have been easier, and would have made much more sense, to do the floors first, and then clean the shelves and cabinets and get them painted. If I had all of my flooring products in hand, that’s the order in which I would have done those things. But as it stands, with one floor product on backorder, I can’t stop working and while I wait for it.

Addicted 2 Decorating is where I share my DIY and decorating journey as I remodel and decorate the 1948 fixer upper that my husband, Matt, and I bought in 2013. Matt has M.S. and is unable to do physical work, so I do the majority of the work on the house by myself. You can learn more about me here.

Sanding is such tedious work, especially when you have a zillion shelves! Definitely needs to be done though. It will be beautiful.
I agree, Kristi. It’s the prep work that makes the difference between an amateur job and a professional job. It only has to be done once, but what a difference it makes in the long run! Your closet is looking better and better each day, and will give you pleasure and convenience for years to come. I’m with you on looking forward to seeing them painted!
You are doing the hard work so I am not rushing to see the finished cabinets. One thing for sure it won’t take you 32 months to finish your project. Kayla’s cabinets were beautiful and the highest gloss I have ever seen. I wonder how she fixes scratches.
Have a great day
We can all see the progress you’ve made. It makes sense to take the time to sand. I’m enjoying the daily changes you make.
Thank you. You summed how and why I do what I do when I finish or refinish a piece of furniture or cabinetry. To me, it is not boring, dull perhaps, but never boring. Since most of what I do is stain, I use the 320-grit sandpaper in between coats of poly and Kapow, what a difference. I will be doing your matte finish for our kitchen and butler’s pantry projects, but I am really wanting to do the high gloss for our master bathroom cabinets. Thankfully, those are just small cabinets, and no one will really see them if I screw it up, if I don’t, I’ll put it on the nickel tour of the house. I just love how this room is really coming together, and I love the little corbel detail that you put on the cabinets, I am thinking about that for our closet, perhaps in an oriental style. Thanks again for being such an inspiration and great guide in all of this.
Cheers to you and Matt!
90% of life is PREP! I commend your diligence. You’re absolutely correct in saying that the sanding is what separates a scrappy job that screams DIY from a professional one. I tend to get a good audio book and commit to the task. It can be kind of therapeutic.
PS. Caulk is also right up there. My husband says I will be placed in my grave, arms folded cross my chest holding two tubes of caulk, like an Egyptian Renovation Queen.
PPS. I look forward every day to your posts about this build. It’s the first thing I read.
Haha! I can relate!! 😀
The primer really brings out the beauty of your hard work. It’s easy to imagine the paint now. It’s going to be smashing!
I knew you had a reason why you are going in that order. I just couldn’t remember what you said. Now it makes sense. Your paint job in the studio looks beautiful so I know you closet will also.
Have to tell you this funny. I have a big board on top of my normal ironing board so I can properly iron quilts and wide material. My board is old and warped so I ordered a new board. The board comes with small strips of wood on each side to sit down on the ironing board to hold it steady. The new board’s strips are only 16” apart. My solution was to cut down those strips in the big section of the
Something to think about for next time, as it seems you are finished sanding the sharp edges, is a 1/8″ round over bit on the router. Pretty sure you’ve said you don’t like using the router, but it would cut down on sanding by hand. Closet is looking great. Love the little flourish trim you have added!
I hated that chalk paint/distressed era so much. Glad I’m not alone.
Rounded edges are a must for us and a detail I always notice!! But I find it much easier, faster, and more consitent when I use a trim router. Is there a reason you don’t route the main portion of the edges first and then finish by hand in the corners?
I think she answered that question in the first part……gouging edges, taking off too much etc etc.
So I don’t know how picky you are on the source, and how much variety there is in the final product. I did find a Red Out Product in stock for a place called “City Floor Supply”. Maybe its a regional issue (I’m in another state). Also, I understand if you are ordering directly from a trusted source (been burned by imposters, or improperly stored/packed products before. I bet you can ask your flooring layer/guy if they could help source a supply as well.
I actually ordered it from City Floor Supply! I see that it says it’s in stock. It said that when I ordered it. But then they sent me an email the next day saying shipping was delayed. 😕
Shoot that’s terrible. I’m dealing with similar issues for prepared frozen meals. The wait of how much time from payment to actually shipping (not just label created) is ridiculous. I’m glad I don’t meal plan around it. Just a lazy meal option vs eating out with less healthy options. Frustrated because I’m trying to build up an eating in habit lately and I’m managing freezer space without an extra freezer.
I knew you had a reason why you are going in that order. I just couldn’t remember what you said. Now it makes sense. Your paint job in the studio looks beautiful so I know you closet will also.
Have to tell you this funny. I have a big board on top of my normal ironing board so I can properly iron quilts and wide material. My board is old and warped so I ordered a new board. The board comes with small strips of wood on each side to sit down on the ironing board to hold it steady. The new board’s strips are only 16” apart. My solution was to cut down those strips in the big section of the ironing board or take them off and move them out further apart. My ironing board is about 3 months old & is 18” wide & very sturdy. Gary’s solution was to buy a 15” ironing
board. I said “My Blog Lady (that is what I call you) could fix it in nothing flat.”
Maybe that wasn’t the thing to say at that moment. But if you need a break from sanding, you can come to my house and fix my Big Board!
Have a great rest of the week!
I love Kayla and watching her process!!! I found her because I want high gloss kitchen cabinets, which everyone thought I was crazy and spent more time trying to talk me out of it. I understand all the cons (I also want black floors…and understand all the cons of those also, but the heart wants what it wants) Anyway, after seeing her cabinets just makes me want them more, no matter the up keep! When I do mine, I’m just gonna have to go zen an sand and sand and sand some more.
Always in the time consuming and arduous prep! The satisfying, pretty part, is quick and easy
I hate to sand! I used to do furniture pieces (never used chalk paint!) and that was the part that made me quit. I just hate it THAT much! More power to you!
Great progress! It does take time and you need to be alert if you are going to be happy with all things in the end. I feel blessed that I still have a definite like for shabby but not too shabby chic look…you don’t have to be so precision oriented…LOL!