Walk-In Pantry Progress – The Wall Is Framed
I’m still at the ugly picture stage on my breakfast room and walk-in pantry, but I feel like things are starting to get exciting!
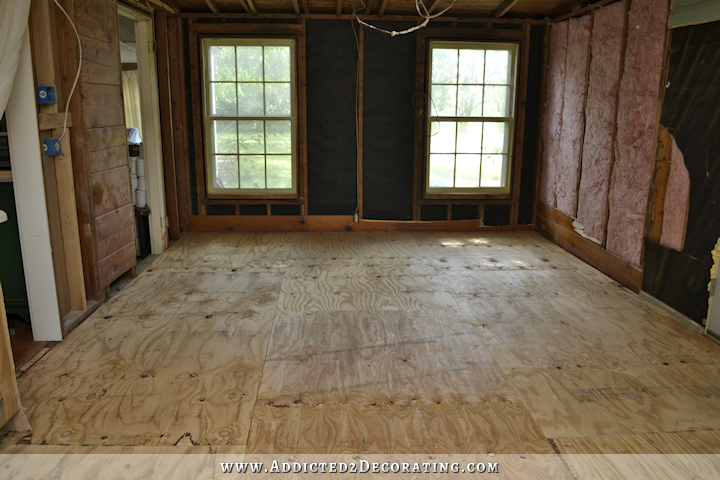
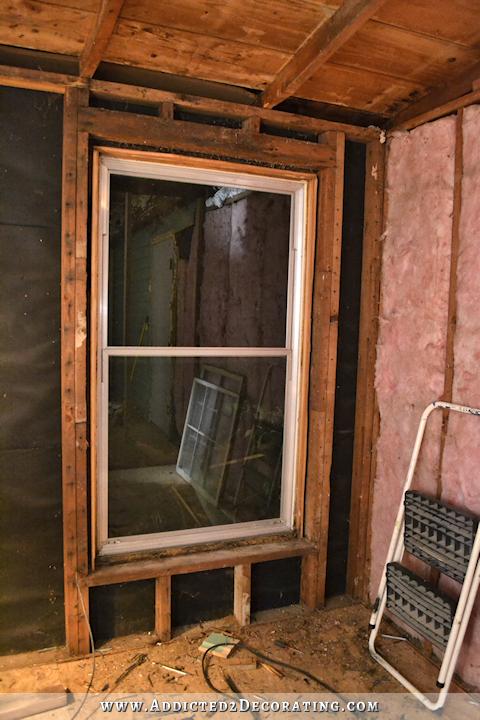
First of all, I finished up the framing for the pantry wall and doorway yesterday. That pantry is going to be nice and big!
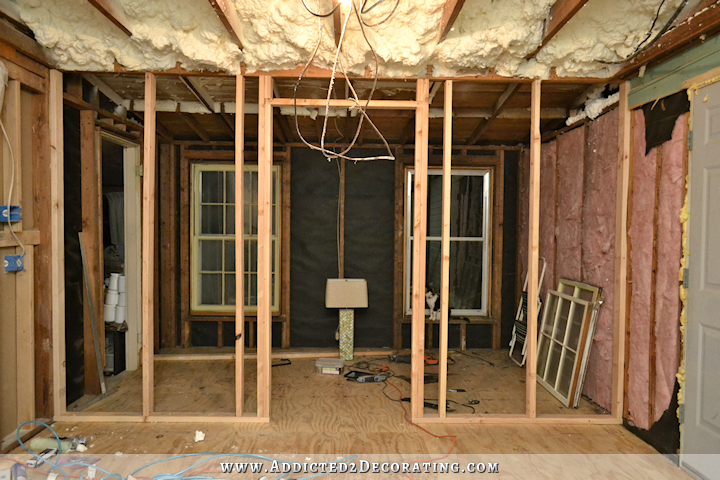
I wish I would have moved that 2 x 4 lying on the floor at the back of the pantry before taking the picture because at a glance, it gives the illusion that the new wall framing isn’t square with the back wall. Oh well. Now that you’re aware that it’s there, you can look past it. 🙂
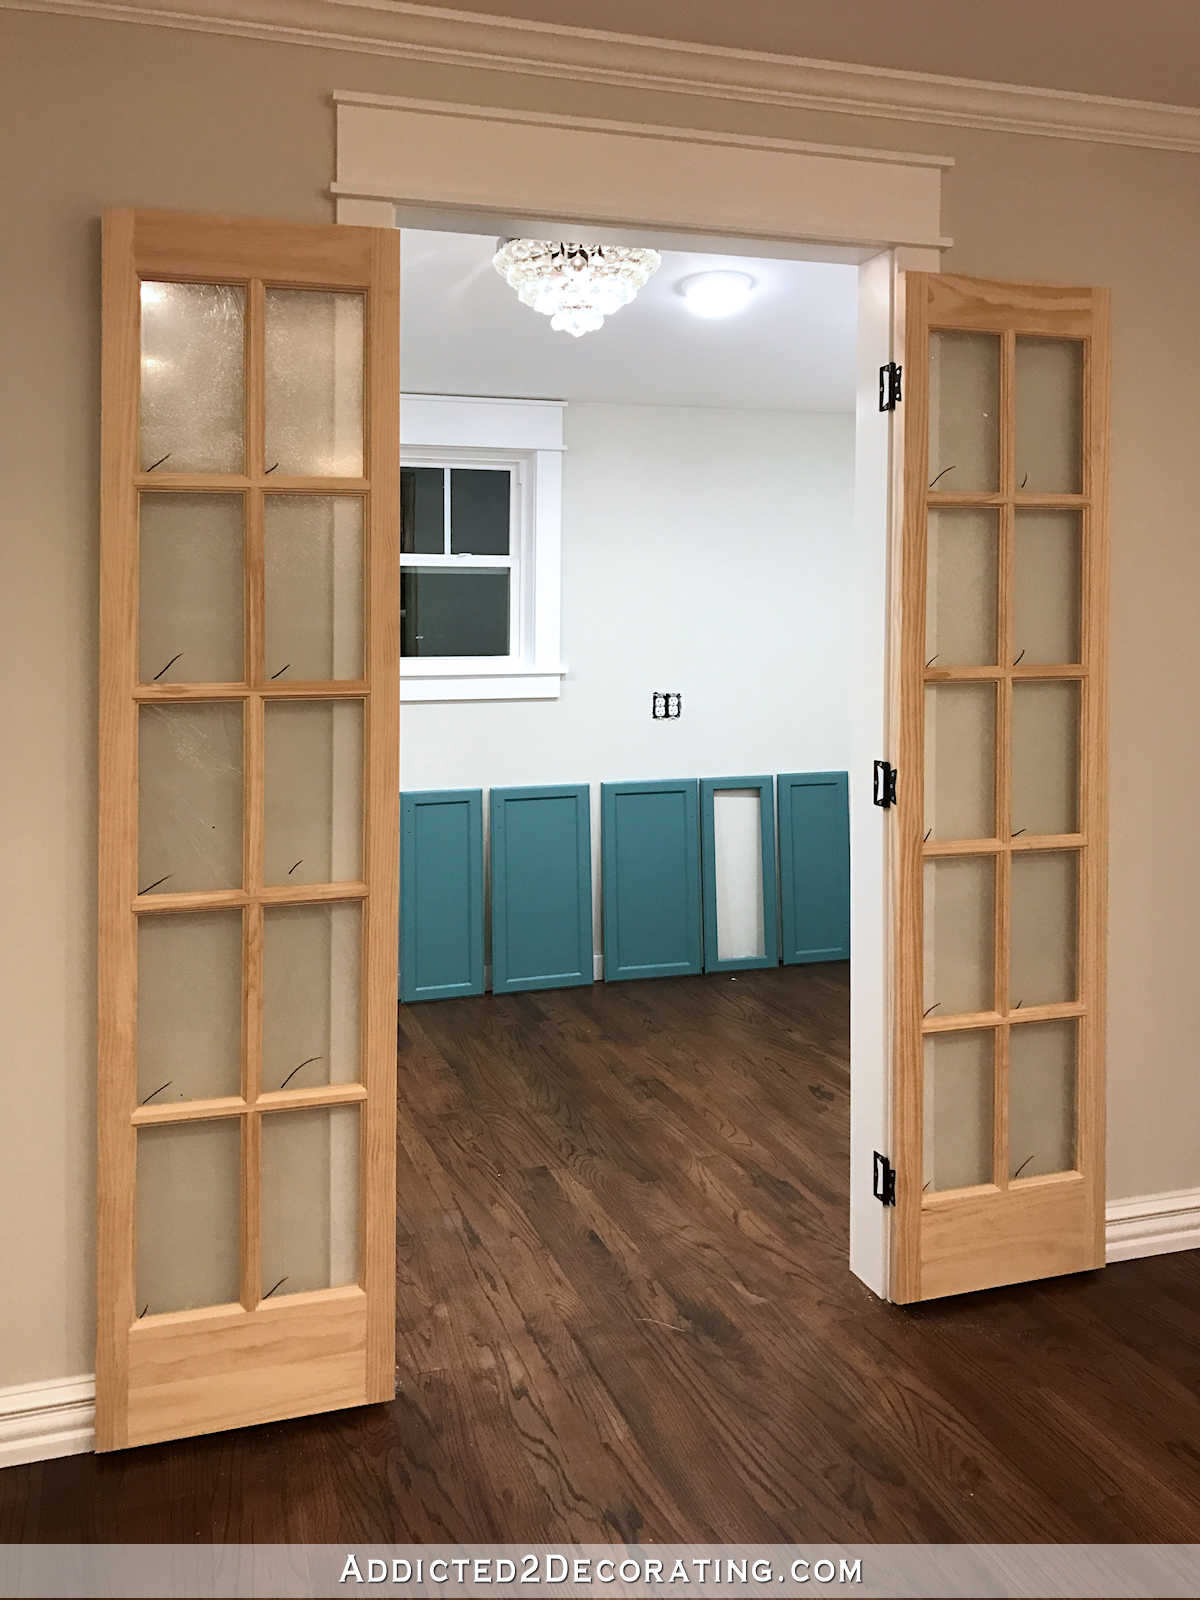
I decided to go with a 36-inch doorway, and I’m going to use the exact same double doors that I have on the hallway bathroom. I’ve never gotten a full view of those doors with the finished bathroom since they drywall in the hallway isn’t finished and I didn’t want ugly unfinished drywall mucking up my photo, but you can see what I’m talking about here…
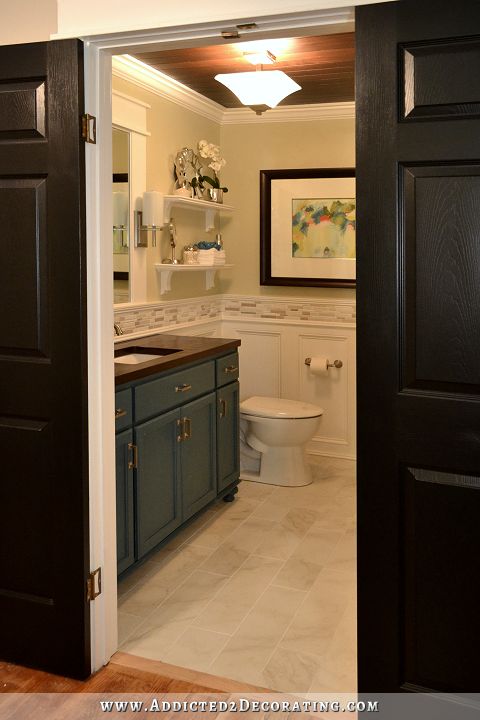
Those were bi-fold closet doors that I turned into double doors that open into the hallway. More on that project here…
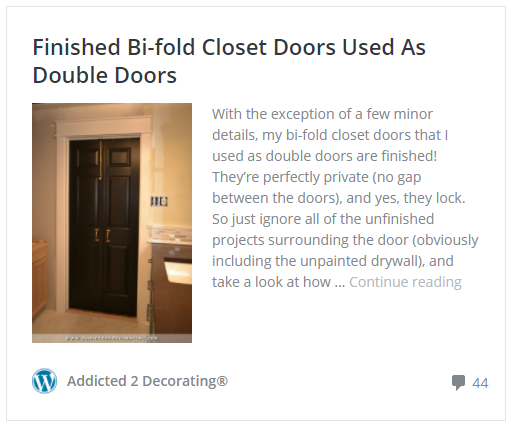
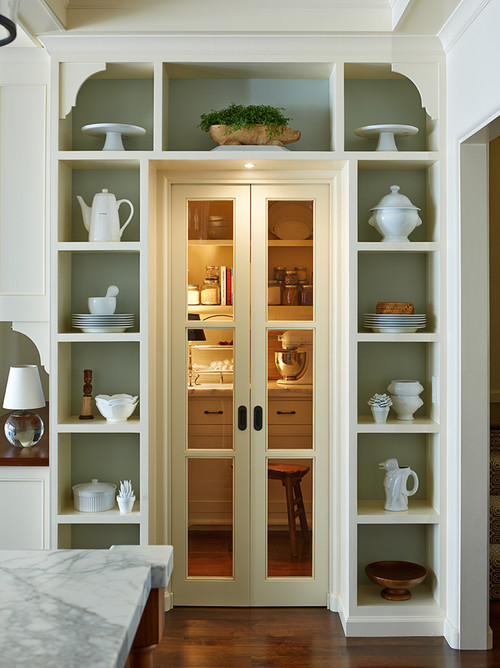
I wrestled back and forth with this decision. At first, I was going to go with a single pocket door because that seemed more practical. But I really like symmetry, and wanted double doors like this picture I showed y’all a couple of weeks ago.
So then I considered a single pocket door that looked like double doors. I didn’t really like that idea. So then I researched how to make double pocket doors that will both open when you only open one.
Well, that was a great idea, but I had a heck of a time finding hardware that you can actually purchase that will do that. In fact, I only came across one or two companies that make anything like that, and it was expensive!! So that was a no-go. I also came across some DIY instructions (a diagram, actually), but it just seemed like way too much trouble for something that could possible come loose or break in the future, which would mean I’d have to rip drywall down to fix it.
Plus, there’s the issue of pocket doors limiting what you can put on/in the wall because you have to leave all of that room for the actually doors inside the wall.
So after wrestling with it for a few days, I finally decided to stick with what’s tried and true for me. I’m going with the bi-fold doors turned into double doors, but I’m going with a 36-inch doorway for the pantry, where the bathroom has a 32-inch doorway.
And yes, I’m going to put glass in them. 🙂 That should be an interesting and fun project.
The other thing I’ve been wrestling with is what, exactly, to do about this back wall with the two windows that I’ll be removing. Here’s a better view of that wall from before I did the wall framing for the pantry.
As it turns out, I’m going to have to do this project myself. Remember that extra money Matt budgeted for this room? Well, last Friday, I spent $2500 of it on something that I’ve needed for YEARS now. I bought myself a truck!!
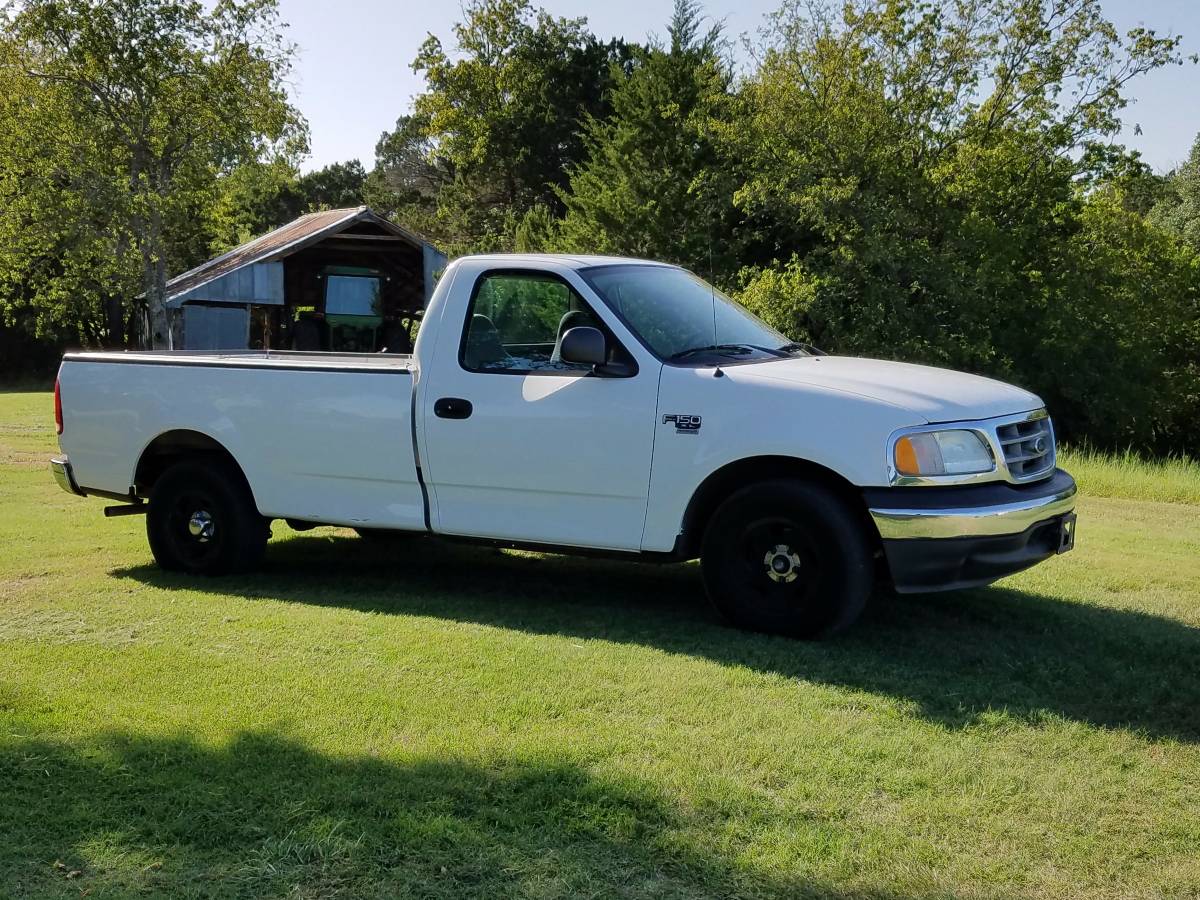
It’s nothing fancy — a 2004 Ford F-150 XL. But it has a full 8-foot bed on it!!! It’s quite possible that I’m more excited about this truck than I was about my new car I got in June. How I’ve made it this long as a DIYer without a truck is beyond me. Every time I’ve needed to haul full sheets of plywood, MDF, or drywall, I’ve had to borrow my sister’s truck. And while it’s very generous of her to let me borrow it, it just wasn’t that convenient. In addition to having to work around her schedule, it’s also a 30-minute drive to her house. So that’s an hour there and back to borrow the truck. Then I’d make my Home Depot run, and then take another hour round trip to return the truck. That’s a full two hours out of my work day just for picking up and returning the truck.
So it was about time for me to get my own truck.
Anyway, all of that to say that the extra money that Matt budgeted for me is dwindling fast, so some of this stuff that I was planning to hire out will now have to be done by my two capable hands. And really, I’m okay with that. Excited, even.
But that brings me back to this wall, and the windows…
The main issue is that on the outside of the house, we have vinyl siding. Here are those two breakfast room windows from the outside, and you can see that the back wall of the breakfast room is continuous with the back wall of the storage room at the back of the garage. That door that’s barely visible on the far left of this picture goes into that storage room…
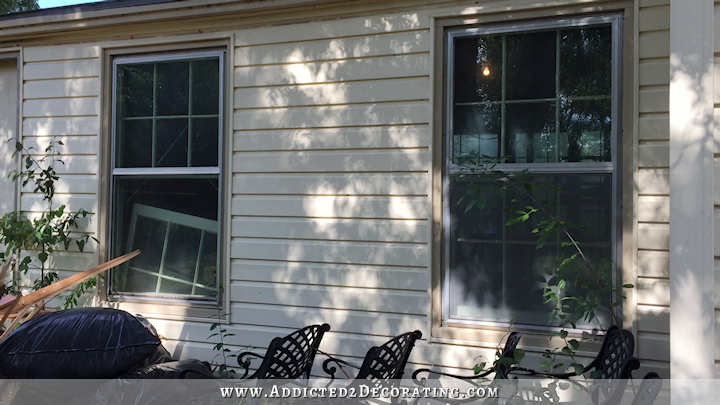
If I remove those two big windows, that will leave two huge holes in my vinyl siding. And while we are definitely planning on replacing the vinyl siding, we’re not planning on doing it right now.
So I had this brilliant idea…or so I thought. Those windows actually have two windows on them — the original wood window and then an outer aluminum storm window.

I thought that I could possibly remove the inside window, and cut the window frame back so that it doesn’t stick out past the 2 x 4 studs.
Then I could leave the storm window on, but make sure it’s water tight with lots of caulk. And then I’d insulate right over the storm window, and drywall right over it as well. That way from the outside, the windows would still be there and the vinyl siding would remain intact, but the inside would be drywalled. Of course, it would be temporary. When it comes time for us to re-side the house, the storm windows would be removed, as well as the extra framing around them, and a new regular stud would be put in its place right before the house gets new siding.
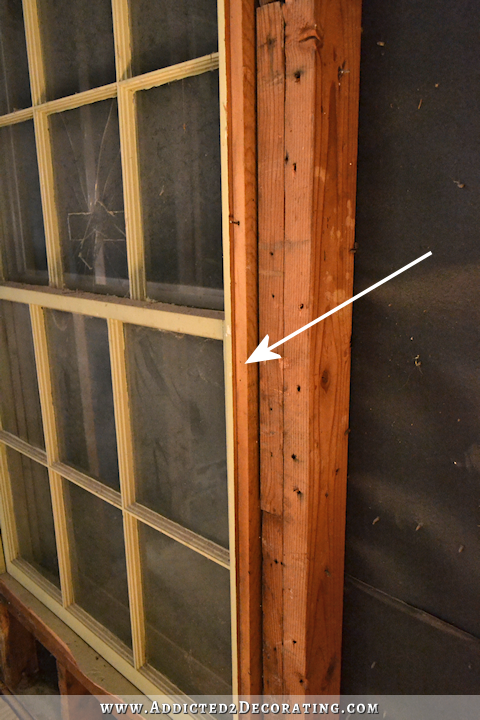
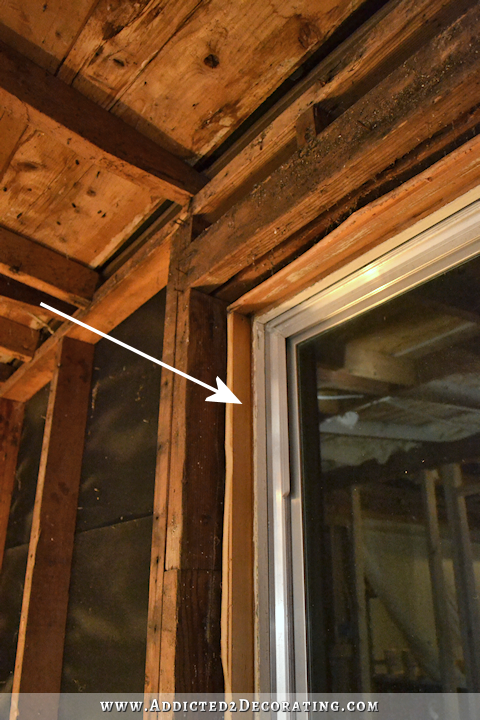
I thought that was a pretty good temporary idea, so I went ahead and removed the wood window on the right side of the pantry, leaving the storm window, and cut the wood frame back so that it didn’t stick out past the wall studs.
Here you can see how I cut the wood window frame back. I just used my reciprocating saw for that.
But I just had this nagging feeling that I was missing something. I spent quite a bit of time walking through the process in my mind of covering over those windows and adding a new window in the center. It seemed like a perfectly good plan…
…until I realized it wasn’t.
The issue is that these are the windows that I’ll be using for my breakfast room.

As you can see, they have a nailing fin on them.

Now if you’ve never installed windows with a nailing fin, let me tell you that it’s about as easy as hanging a large picture on your wall. Maybe even easier.
The prep work — framing and waterproofing/flashing — is the hardest part of window installation. Actually installing the window with a nailing fin is as easy as holding the window up to the roughed-in opening (while working from the outside of the building), making sure it’s level and centered, and nailing it to the sheathing using nails through the holes in the nailing fin.
It doesn’t get much easier than that.
Of course, then there’s lots of waterproofing and flashing to do after it’s installed, but that’s another story. 🙂
So here’s the issue. When my house gets re-sided, I want the house brought up to today’s standards. When my house was built, the process was to frame the walls, then add tar paper to the framing, which is the black stuff you see on the back wall…
Then sheathing (e.g., plywood or OSB) was installed on top of the tar paper, and the siding was installed on top of the sheathing. And on my house, at some point, a previous owner added a layer of vinyl siding over the top of the old wood siding.
So my walls, from the inside out, are framing (i.e., studs), tar paper, sheathing, old wood siding, and newer vinyl siding.
But today’s process is framing, sheathing, house wrap (e.g. Tyvek), and then siding.
So I want all of the old stuff taken off of my exterior walls, down to the studs, and I want it brought up to today’s standards. Simply taking it down to the original sheathing and then adding the house wrap and siding won’t work because then I’d have a waterproof layer on both sides of the sheathing, and if water ever found its way inside there, it would become a mold breeding ground. The sheathing has to be able to breathe on one side.
So if I install my window with the nailing fin by nailing it to the old existing sheathing, that means that when it comes time to re-side the house, the window will actually have to be removed and re-installed. It’s not impossible, or even difficult, but what if the new sheathing is slightly thicker or thinner than the old stuff? Then my trim on the inside of the window will all have to be redone. It kind of starts this domino effect.
I’ve decided it’s just better to do it right the first time, which means taking the exterior down to the studs on that section, re-sheathing it, wrapping it, and then installing the window and flashing it.
The good thing is that house wrap can be left exposed for up to about four months, give or take a couple of weeks depending on the brand. So if I wrap it, install the window, and flash it now, I don’t necessarily have to rush right into installing siding right away.
So that’s where I am on this project. It makes me nervous, but I’ve thought through the process, and watched LOADS of videos about the process, and there’s really nothing to it. Right now I’m feeling pretty confident about it.

Addicted 2 Decorating is where I share my DIY and decorating journey as I remodel and decorate the 1948 fixer upper that my husband, Matt, and I bought in 2013. Matt has M.S. and is unable to do physical work, so I do the majority of the work on the house by myself. You can learn more about me here.
![Breakfast Room & Pantry Progress [Video]](https://www.addicted2decorating.com/wp-content/uploads/2016/08/breakfast-room-progress-August-2016.png)

Looks great! Although, I’m sad to see you’re not doing the pocket doors. Just curious… Why are you okay with swinging doors that don’t open at the same time but for pockets, you’d want them to open together? Seems more or less the same compromise to me except the pocket doors would be out of the way when opened.
For the exterior and window work… Why don’t you just pull the tar paper off from the inside instead of taking the old sheathing off? There should still be plenty of air flow to the little bits left behind the framing studs. For that matter, you could have the cavity sprayed with foam (if the budget allows…I know that’s expensive) and I don’t think moisture would even be an issue since it completely seals to the wood.
I was thinking, also, could you “borrow” some siding from elsewhere on the house (is there some on the back?) and just re-side or patch the front with the existing siding? This would buy you some time and you could just buy some inexpensive light-colored siding to temporarily cover wherever you borrowed from.
In any event, I’m very jealous of your huge pantry. 🙂
I thought about just ripping down the tar paper, keeping the current sheathing, and patching over the windows, but I just wasn’t sure if that was going to last long-term. I know that ideally, sheathing should be used pieces as large as possible so that there are as few seams as possible, so I wasn’t sure if patching was acceptable since that would leave a pretty significant amount of seams.
Have you done that before, or seen it done? I could probably find a video online. I’d love to watch the process before I try it. I just want to be very sure that everything is as watertight as possible, and doing patchwork on exterior stuff always makes me nervous that it might cause a future problem.
As far as the pantry doors, I have no idea why I prefer one over the other. 😀 I just really love my bathroom doors, and don’t mind the slight inconvenience of having to open them separately. For some reason, I just can’t get as excited about pocket doors.
About the pantry doors – if you put the right type of hinges, the doors can open both ways. Then you don’t need to use your hands at all, just press them with your body to open.
By the way, my pantry, which is just a little space under part of the stairs, is going to have the same doors, as in your bathroom, I got the idea from you, thank you so much! 🙂
Up here in New England, it’s not uncommon to have houses from the 50’s and 60’s and earlier done with individual boards with big gaps (width of 1-2 coins could slip between them in many cases). The gaps are probably to allow for expansion. My house is from 1955 and it’s done that way. I’m trying to think about whether the tar paper is on the outside or inside. I think ours is on the outside, but that may have something to do with hot versus cold climates. We then have a layer of cedar shingles and the vinyl was done over it some years later.
It’s not uncommon, that I’m aware of, to patch slat sheeting with pieces of plywood. I know my father has done it numerous times moving windows and such and we’ve never had problems. I’ve also seen them do it on This Old House, I think (which also takes place in New England). It’s not the wood that really gives you your waterproofing anyway. It’s your moisture barrier (house wrap) or air gaps for drainage. In fact, I’ve even seen recent stuff on TV where they put the house wrap and then deliberately put strips of material to keep the siding away from the house wrap so that any moisture that gets behind there will run down and exit. Essentially, I think they’re letting the outside of the house “breathe” so they can seal-up the inside of the house (with spray foam or batting plus moisture barrier under the drywall).
Anyway, the moral of the story is that I think, in your case, if you want to just take the windows out, put in some studs, cover the holes with plywood, and then wrap the whole side with tyvek, and pull off the black paper from the inside, it should be fine. Mixing the tyvek outside just over the window holes with black paper inside on the rest probably wouldn’t work since there’s no way to seal where the two meet. For the new window hole(s), I think I’d use 6 inches or so of either tyvek or self-sealing membrane around the rough opening and nail the flanges right to the old sheathing. Then, when you go back to do the siding, you can overlap your tyvek with the strips around the window and seal it with tape.
I suppose another option…which wouldn’t look too good, but would buy you some time, would be to pull the windows out, add studs, then add a double thickness of plywood over the window holes and then caulk the heck out of the gap between the 2nd layer of plywood and the J-channel from the vinyl siding and hope for the best until you can go back and re-side the whole thing.
Lots of choices, I guess. 🙂
You know, that’d be a great idea for a book. A Handyman’s Book (like my favorite Reader’s Digest one) except it’d be like, “If you have this old way of doing things, here’s what you should do to upgrade it or to upgrade just the section you’re modifying.” 😉
Looks like you are moving right along! And the truck was a great idea,Molokai good for a 12 year old vehicle… Wish we had an 8ft bed…. Only have 5 ft and it is never long enough… For anything!!!!
Molokai????? Was supposed to be “looks good…” Geez….
I don’t know if you have ever read David Kanter’s bog Manhattan Nest but he has said that it was not unusual for builders at the turn of the century (his house was built in 1865) to put up “false” windows to add symmetry to a house’s facade. I think your pantry window idea is spot on. Congratulations on the truck! I love mine. It is very difficult to put 4 X 8 sheets of anything into a car.
I life his blog.
Life? *love* his blog.
LOVE seeing the progress your making, even if it isn’t the “pretty” stuff! And you were waaaay overdue for that truck! 🙂
OMG, I was breathless by the time I got to the end of this! I mean, practically holding my breath for you….I’m glad you have a brother who can lend you a hand when you need it. I’m afraid I would’ve had to seriously rethink the window plan…lol, and I’d probably have decided to leave the two windows and work around them on the interior….sigh. But that’s just me. I’m a pretty determined person 99% of the time, but over the years I have learned that for my sanity, occasionally I must pick and choose which battle I want to fight! And then, I want to get it done so I can go on to the next step. After all, at 72 I only have so many big projects left in me! LOL But I’ll be watching to see how you do on this one, Kristi
Hi Kristi,
Have you thought of using T1-11 outside as your sheathing ? It comes in 2 thicknesses. It’s a little more than plywood but is more weather resistant. We built a garage about 35 years ago & covered the studs outside. It served 2 purposes. It was our walls as well as our outside covering. We did paint it & have sold the house but it’s still there as I looked at the house a couple of years ago when it was on the market.
We have had T1-11 on our cottage for years, takes paint great and looks good. It’s easy to nail on. It would be a very good temporary solution.
Congratulations on the truck! I can only dream of such a vehicle, as there is nowhere to keep it in our household. We have to do with a car roof rack for transporting plasterboard, plywood, etc. but it would be so much more convenient with a truck.
I have a question about the framing for the pantry wall. Did you made the framing on the floor and then erect it to its current position or did you nail the battons straight to where they belong now?
I met a person that had drywalled over a window and left the outside as-is. I’m suprized I couldn’t tell from the inside when I visited them (for a cookout). I bet you can keep an eye on craigslist or ask a re-store if there is some leftover siding to cover a top half of a wall. If you can remove the vinly intact, you may be able to re-install it on the bottom half of the wall and complete the top with a few sq feet of new siding that you test paints on.
I bet you’ve accounted for it, but do note what size your freezer will be, when you design the built-ins…you’ll want room to manuver it in/out after installing built-ins. Being able to remove specific shelves, in specific areas could do the trick while still maximising storage.
I always wondered how did you get all your building home in that car! I’m so so happy for your new purchase of a truck!!!
I think the framing IS pretty stuff! Lol. Congrats on the truck! I agree with the swinging door hinges. I have that type on my butlers pantry door. I use my rump to go in and out! It would let you have your pretty doors and be functional!
Congratulations on your truck purchase! As I understand it, you are now a Real Texan. An 8 foot bed is a booger to park but great for all the things YOU need to haul.
Is it normal to have 11 ads within the text of a post? I understand having ads, but wow this really broke the post up. Some sort of advertising glitch?
I only had 3. That would be frustrating, I agree! Something must be cuckoo.
There are no ads on mine. (via email)
I didn’t have nearly that many on mine, so I’m thinking it must have been a glitch. Hopefully.
I know ads are a pain, but I do appreciate everyone’s understanding when it comes to ads. Those ads are literally 95% of my income, and I vow never to add popups or ON-picture ads (those ads that pop up at the bottom of each picture in a post and cover the bottom part of the photo — THE most most annoying ads ever, IMO). And the ads also help me make enough so that I can keep my blog relatively sponsored-post-free. I don’t know if my readers notice, but I don’t do sponsored posts very often. I think I did two all of last year, and I have yet to do one this year. I hate popups, on-picture ads, and sponsored posts, and I think most readers do too, so if I can keep my blog free of those things by adding a few more ads, I’m hoping people will understand. 🙂
But 11 does seem excessive. I’m thinking/hoping it was a glitch.
I also had 11 ads a one acros bottom of screen until I xed it out. I get to you through clicking within my email. Last several weeks I had the same problem and it was very annoying so am hoping this is not permanent . I access you on my iPhone 6 Plus so it makes for a lot of scrolling that I sometimes end up hitting the ad and am redirected to that site. I realize this is how you make money so have no mentioned it . Maybe the more you online shop the more ads come up they feel are suited to what you may purchase. Anyway it is an annoyance but still worth reading your blog.
The bottom ad that I Xed out is a changing one from Amazon
I always get a pop-up or two when I read your blog. Just now it was a butterfinger ad. Is it because I read through Bloglovin? Totally get and support having ads, I love your blog and wouldn’t want you to go without pay, but today I could barely find the content through the ads, so was wondering if something was up.
I read through Bloglovin and I don’t get pop-up ads. On my browser, I have the setting to not allow pop-ups and then I enter exceptions for the very few sites that actually still use them.
I have no problem with your little ads, but I am largely impervious to ads – I just don’t notice them. I went back up for a count up, I have 11 too.
Habitat for Humanity Restore has vinyl siding pieces. The windows are on the back where only you see. Get some there for a temporary patch.
Siding companies may have left over pieces of a box off a recent job. Calling and asking would not hurt. It is more likely you may get a closer match to your own siding this way.
Another option to consider is installing the window without the nailing fin. Ie cut the nailing fin off and install it like you would a replacement window.
I did this at my old house as I wanted single hung windows (better energy efficiency than double hungs), but couldn’t find the single hungs as replacement windows. The installers told me they could use regular new construction windows and cut the fin off and install like a replacement window. This was over 10 years ago. The windows were all great until I sold the house 4 years later. I’m assuming they are still fine.
You could also create some fake shutters to use on the outside to fill the area where the windows used to be to look like they are closed to not have to mess with the siding now and still remove the windows with just patching with OSB where the windows were and then replace all at a later time.
Wow Kristi! It sounds like youre about to jump out of the frying pan and into the fire! This project might just turn into a BIG job. Sounds like Justin has some short cut ideas for you so you can tide this over through the winter. Cant wait to see how the breakfast room and pantry turns out but the outside wall might have to take first priority.
Looks like your pantry will be nice and spacious. Lots of room for everything. I love pocket doors but understand your need for symmetry. Good luck with the pantry windows – sounds like you’ve got it under control
Wow! Reading this was like being in hurricane winds! Wasn’t sure where I’d end up! Love the plans and the truck!
I am so confused. I thought you said you were going to drywall over where those windows are and then…later…put siding over the window holes.
Why does it matter how replacement windows will work if you are not putting windows back into those holes?
If you use the right sheathing on the exterior, you can actually buy a couple of years before replacing the siding. Another idea is to check with vinyl siding companies and see if they have any excess left over that you could put up temporarily, no matter what color or style it is. I believe I’d go ahead and take those windows out right now. But you decide. What I’m really concerned about is that your double doors be able to swing both ways because, unlike the bathroom, you will have your hands full when you go in or out that door. So smart to make it 36″ as you intend to put a freezer in there. I am SO jealous over that pantry.
When I closed up two large windows at my last house, I could not match the brick. So, I did hardy plank over the window and put shutters over it. It looked good and not a after thought.
Hi Kristi
Love the new truck… that will make life so much easier!!!
I have a question – what are the dimensions of your pantry? I am in the process of drawing up a floor plan for a house that we plan on building ourselves and your pantry looks like it is a decent size…