DIY Headboard Bench Made From A Headboard And Footboard
Let’s build a DIY headboard bench with footboard sides! 🙂
Last night I was trying to sort through a file on my computer where I put all of my pictures that I take off of my camera’s SD card. I figured it was about time to do some sorting and purging since there were over 3700 pictures in that one file (yikes!), all still in their original, really huge format (which could have a little something to do with why my computer runs at a snail’s pace at times).
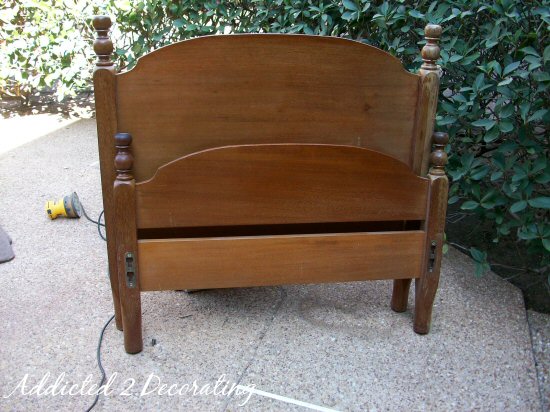
So while I was going through this file, I came across a couple of things that for some reason, I never shared with you! So this one is an oldie, but a goody–a headboard bench made from a $5 headboard and footboard that I picked up at an estate sale.
When I first brought it home, it looked like this…
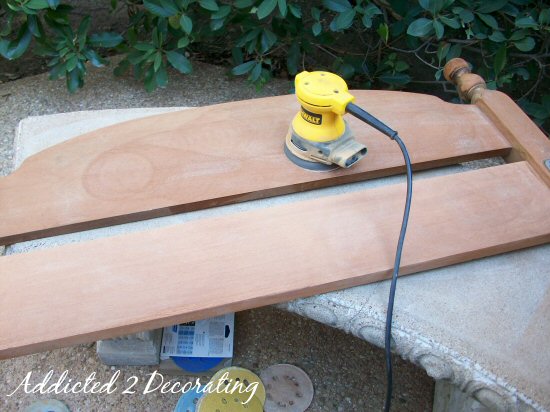
The first thing I did was use my sander to smooth out the finish, and then I gave it a coat of primer…
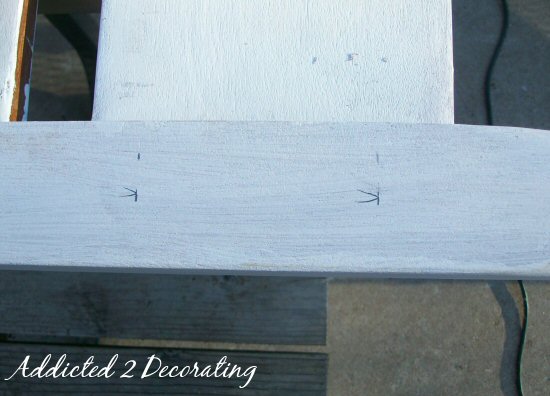
Next, on the footboard, I marked a line down the center and used my circular saw to cut the footboard in half.
Then on the newly-cut ends, I drilled four holes (two holes on each section) to place furniture dowels. These can be purchased at Home Depot, Lowe’s, or any home improvement store.
Then on the side posts of the headboard, I measured and marked the exact same spacing to drill holes for the furniture dowels.
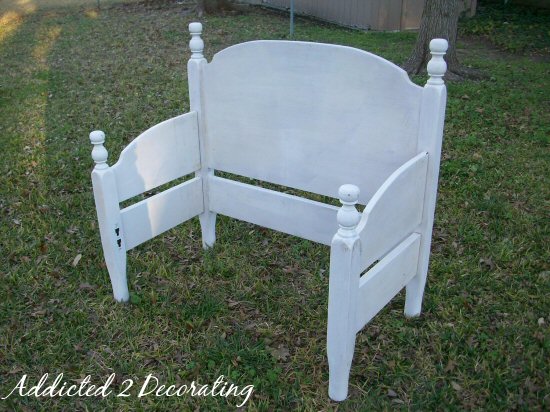
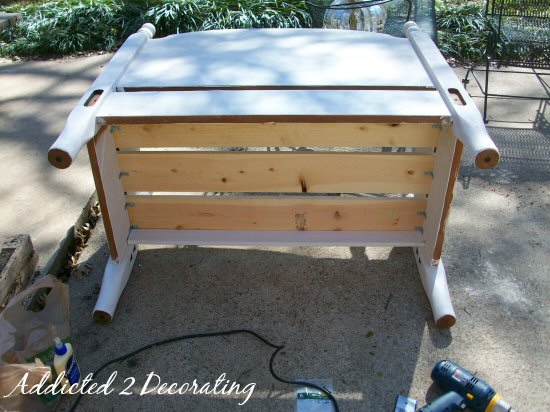
So after inserting four dowels into the holes in the footboard halves, and then inserting the other ends of the dowels into the holes in the side posts of the headboard, it looked like this. Please note that I also used wood glue, not only in the holes I drilled, but also all along the cut edges of the footboard pieces. Then I let it sit like this until the glue dried.
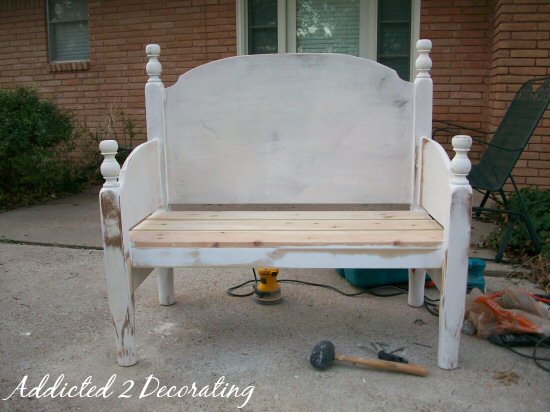
Once the glue was dried, I placed it on its back to work on the seat.
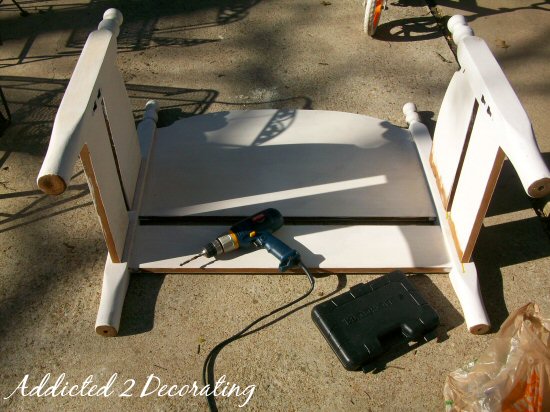
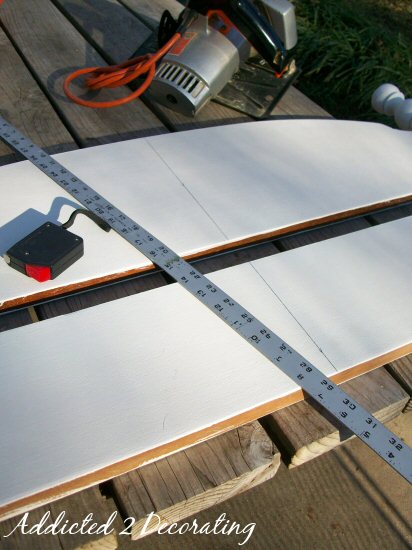
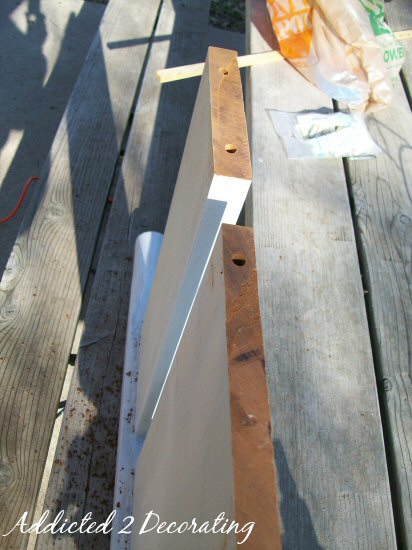
I used three 1″ x 6″ pieces of pine lumber, cut to the width of the bench, for the seat. Each piece rested on top of the lower section of the footboard halves, and I secured them with wood glue and small “L” brackets.
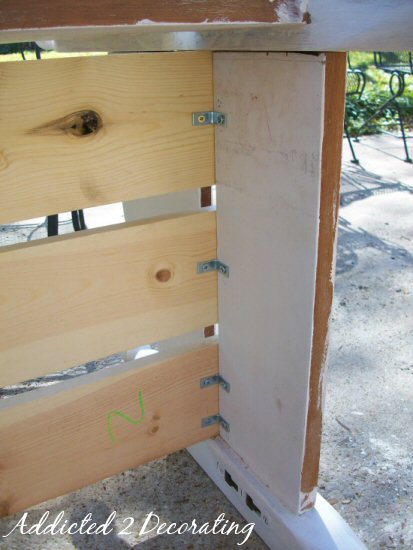
Then on the front of the bench, I added a 1″ x 3″ piece of MDF lumber across the front to create an “apron” just under the seat. Note that in this picture, the bench has been flipped over and is now resting with the front on the ground, and the back facing up.
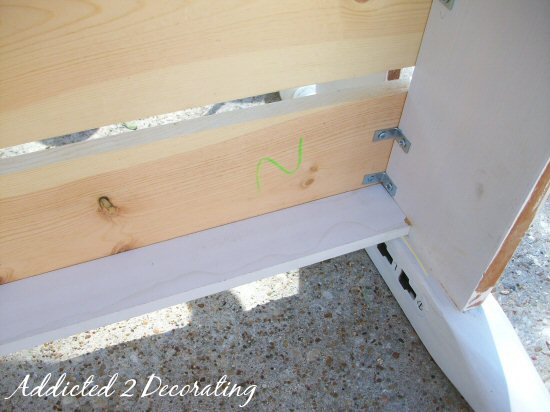
Here is a wider view, and you can see the MDF lumber positioned in such a way that it creates an “apron”, which just gives the seat a bulkier, more substantial appearance.
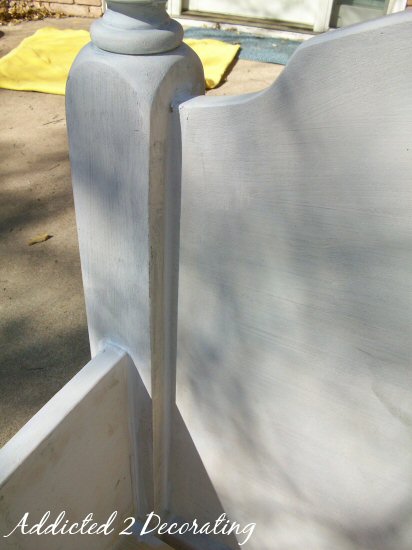
Next, I caulked all of the cracks and joints.
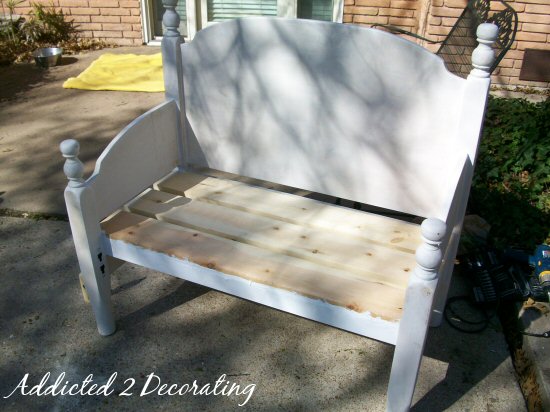
And it looks like a headboard bench!
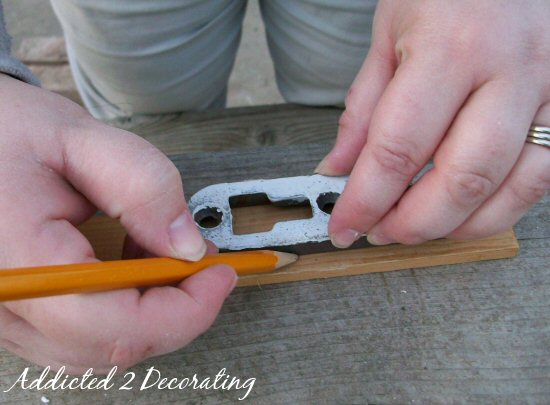
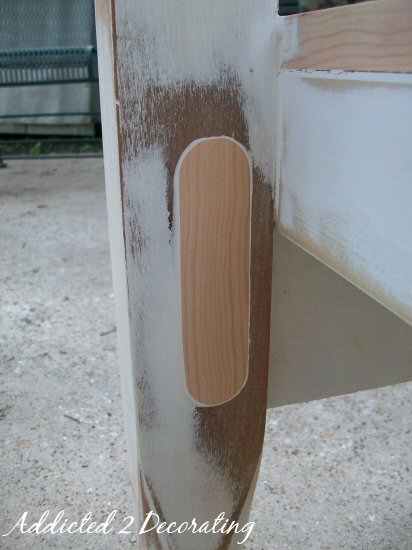
This last step is completely optional, but I wanted to fill in the areas on each leg where the metal bed rail hardware can be seen. So I unscrewed the metal hardware, and used it as a “pattern” to trace onto a thin piece of wood, and then used my jigsaw to cut it out. I needed four of these.
Then I glued a wood piece into each hole left by the rail hardware and filled in the cracks with wood filler. When the glue and wood filler had dried completely, I used my sander to sand it completely smooth.
And there it is! A pretty little headboard bench, ready for paint, perhaps a cushion, a few pillows.
Just think of how many different looks you could give a headboard bench like this. You could distress the finish and add grain sack pillows for a French country look. You could paint it a bold color and add bold, modern pillows. The sky’s the limit!!
So now that garage sale season is headed our way, don’t over look those old headboards and footboards!!

Addicted 2 Decorating is where I share my DIY and decorating journey as I remodel and decorate the 1948 fixer upper that my husband, Matt, and I bought in 2013. Matt has M.S. and is unable to do physical work, so I do the majority of the work on the house by myself. You can learn more about me here.


I just…love you…that is all:o)
That is too cool ! I love your blog .. it makes me look at things differently now 🙂 Have a great day
WOW… you are so creative.
love, love, love it!! You.are.amazing!
Beautiful!!! You should do a side-by-side Before & After 🙂
So cute, you have the best ideas!
Adorable! My eagle-eye spied a price tag on the post, so naturally I'm curious what you asked for it.
Deb, I honestly don't even remember. These pictures were taken about 2 1/2 years ago.
That's incredible!! I love the way you repurpose things. 🙂 When you primer wood, do you use a latex-based or oil primer? Does it matter?
Anne, about 90% of the time, I use Kilz latex primer, even if I'm going to paint with oil-based paint.
Now if I'm doing something small or something with lots of detail, then I use Rustoleum Painters Touch spray primer. You CAN use latex paint on top of an oil-based spray primer, but it's best to wait a few days between primer and paint to let all of the solvents in the primer evaporate.
Where did you end up using that bench. What an amazing transformation
This is a fantastic idea!! I'm going to be scouring garage sales and flea markets looking for a head and foot board that I like!
Kristi – Thanks for the tip! I've heard in the past that when painting wood it's best to use an oil-based primer, but I really don't like working with oil-based paints very much.
What I heard is that wood can soak up the latex paint and make it harder to get good coverage. Maybe that is if they didn't prime at all, though?
HOW in the world did I miss this post? I love it, you are so good at what you do!!
Love the bench, Kristi! I bought a metal headboard (without a footboard) over a year ago and I've been trying to figure out how to make a bench with it since.
I'm a Craigs list addict.. Thanks for the great idea. I've been thinking of getting a circular saw for a while.. Watch out Craigs list hear I come (again) !
You are so talented and I love all the projects you share with us!
Desde Chile, copiaré tu idea la que haré a partir de mi cama de soltera.
Muy buena idea. Muchas gracias por compartirla.
Te enviaré fotos con el resultado.
Ana María
Kristi, I have been looking for a bench with a high back to add to my bedroom sitting area, and you came up with this brilliant answer. I am now on a mission to find my headboard and footboard. This will be in my favorites. Thank you~!!!! Karen
This is one amazing transformation. Imagine something that would be put to the trash to be transformed into a high class piece of furniture. I love this bench, keep up the great work.
I have an old bed in my garage rafters waiting for a grand child. May have to use this idea!
WOW… you are so creative.
Wow, seriously? ya lost me at white paint and red upholstery
This is a great idea! It seems easy to find old head and foot boards that are missing side rails for a great price. Thanks for the idea.
Loved it all the way up until the stark white paint and red velvet tufted upholstery. Would've been prettier as an all-wooden bench painted cream and antiqued and set out on the porch or in the garden.
Great idea, though. Very creative.
Awesome!
What a cool idea!!! I have to try it!! TFS,
http://shescraffty-heidib.blogspot.com/
c'est tout simplement SPLENDIDE
what was that mahogany? congratulations you painted over beautiful hardwood. please don't decorate any more get an office job and stick to it
Mahogany? I have no idea what you're seeing in that picture, but it most certainly wasn't mahogany. Perhaps you should have your eyes checked and get new glasses, and refrain from commenting on blogs until you get your vision corrected.
That was just rude. Didn't your mama teach you that if you can't say something to say nothing at all? This is a great piece…and I find it interesting that you are not linking to anything you've refinished/rebuilt/repurposed.
I meant if you can't say something NICE to say nothing at all. Sorry for the typo!
Mahogany??? Someone needs reading glasses!!!
That is completely amazing!!!! I hope to try this….yardsales here i come!!
I'm so jealous it's beautiful!!! I'm going to save this and maybe one day tackle a project like this…Love it!!!
I would like to see the rule book for only staining wood…. guess what ? there isn't one! Love it Kristi! Where did this go? I am not crazy about the red fabric but that is because it wouldn't look good in my home but I am sure it looks just right where it is today. Dee
Thank you so much for the great instructions!! I have a head board and footboard in the garage waiting to be made over!!! I found you from Pinterest.
Good freakin' idea!
clever clever it absolutely delights me!!
Did this over the weekend.. Almost ready for paint!! I am so excited with how it looks and even better I picked up the headboard and footboard for $5 and gave it a new life… LOVE
This is absolutely gorgeous! A friend sent me this because I want to get a bench for my house. I am in love with this! Great job!
OMG!!!!! We just moved into a home that had a GORGEOUS head and foot board laying in the master bedroom, but none of the railings (I totally would have used it for our bed otherwise) I just could not throw it out, now I am totally doing a wider version of this. As a bonus, it already has a padded thinger part on the headboard!!!
Great Job. Love this idea. I have a little shop in Bomanville Ont. and this type of thing would sell well. First time I have checked out this site. I love it.
I love it!
Just stumbled across your website and you have some amazing ideas. Thank you so much for sharing your ideas!!
I’m so thankful creative people like you take the time to share you’re ideas online!! This is awesome, and just what I want for our porch. Do you happen to remember what size bed frame this was? Thanks again!!
This bench was made from a twin size bed, so the bench is about 40″ wide.
I found you through Pintrest, and I have to say I LOVE this tutorial.
I inherited my mom’s beautiful vintage furniture when she passed away about 3 years ago, and I conned my husband into using the bed frame which is a full. After putting up with it for 3 years he’s said no more and we just got a new king bed…. making no need or use for the bed frame anymore 🙁 My only choice was to put it away in the garage and forget about it. I just don’t have the heart to get rid of it! You just changed all that! We are making a bench with it! (I have been searching for a bench for our covered patio…and this is perfect! and so meaningful to me!!) Thank you!!!! I will be sure to share photos and link your tutorial in my blog posting on my makeover!
-Danie
What size wooden dowels did you use? All you used to connect the sides to the back were the dowels and wood glue?
That’s what I was wondering too!
I cannot wait to try this craft! I loved it so much that we featured you on our website. We would love for you to check it out at http://www.redeemingcreations.com/2012/03/from-bed-to-bench.html
We are still trying to get readers and more posts ready for our launch date on April 1st. Thanks!
This is about the best tutorial I have yet read on how to make a bench from a headboard. Too many of them assume that you just know stuff you do not know. Thanks for taking the time to make a tutorial.
Girl – Love your site! Thanks for all the great ideas. One piece of advice – get yourself a Kreg Pockethole jig. It will change your life! It’s a system for wood joinery that is so tight & secure, you don’t need glue (but you can still use it if desired.)
Thanks, Laura! I’ve looked at a Kreg jig so many times at Home Depot, and every time I’ve found some reason I don’t want to spend the money that day…LOL. I definitely need one.
Kristi – I thought about this after I made my comment: I bought the “cheapo” version of the Kreg jig ($45 at Lowes), and loved it, but you have to set it up on each & every board you want to drill. For Christmas this year, I received the intermediate version of the jig, which goes for around $99. I don’t need all the bells & whistles that the Master kit includes, but I am tickled pink with the intermediate jig. You clamp it to your work (or, in my case, often my kitchen) table, as opposed to each individual piece with the cheaper model. Then, you slide each piece you want to drill into the stabilized drill guide, drop the built-in pressure clamp, and away you go. MUCH faster. Hope this saves you some money, instead of doing it the way I did it. I’ve built quite a few pieces of furniture with it, and the joints are all as tight as when they were new.
I have a headboard only, any ideas on how to build a chair/bench without a footboard?
This is an incredible transformation. I am impressed by your imagination. It is an amazing bench.
Wow, this is incredible! There’s no way I could make this… but I think my husband could!
Here’s that bench I said about!
Very nice and detailed photographs of joinery wooden furniture developed by you. It is happy to see that still there are joinery experts are available.
I have two really old brass beds that are not in good enough shape to use as beds. Do you think they could be used in a project like this? I’m wondering if I would have to find a welder and use all reclaimed metal, maybe combine the two beds to make one incredibly beautiful bench. I think one is a full and the other is a twin. They are partially white and some of the brass is exposed from an old hotel. Any ideas out there?
It could certainly be done, but you’d have to take it to someone who has the tools to cut and weld metal. That’s not really a DIY project for most people. It’s way over my head! 🙂
I just love what you did with the headboard and foot board. We build furniture with wood pallets and have made one with that. We are putting draws in the front.
I do this all the time. I picked up a bed today at Salvation Army for $5. It’s turning into a bench for my cabin at the lake.
I have wanted to know how these were made for a long time! Thank you so much for the detailed instructions. You did an awesome job@
Fabuloso!! Just to think that I have a beautiful headboard and footboard sitting in my garage for 2 years collecting dust. Great idea. Thank you
Great idea! I’ve had you bookmarked for a few months now. Well I’ve finally got around to giving it a go (albeit in a much less professional-looking way) and when I finish it, (as long as it doesn’t collapse! :D) I’d like to post it onto my blog and link back to your tutorial – just wanted to check that that is okay with you?
http://madebyyourstruly.wordpress.com/2013/04/15/upcycling-from-single-bed-head-and-foot-boards-to-a-lovely-garden-bench/ Here’s my version of your wonderful idea. Thank you again!
Great project–I feel like there’s often a spare bed frame around, due to my mom having rental property in a student area. They’re easy to store and too useful to throw away, so they tend to just sort of build-up/hang around. This is a great way to put the extra ones to use. But also, I have a question: the hardware that allows a bed frame to be put together and taken apart, if you re-purposed that as part of this project, you could make a bench that could be assembled/disassembled. Might not have quite the nice, finished look that yours does, but flexibility in taking it apart, moving it more easily is sometimes a good trade-off. Was that ever something you looked at, and if so, what did you see as reasons for going with this plan?
After looking at this project–with the level of tool use, and the way it repurposed something I can readily imagine having on hand–I’m eager to see what else you’ve done. Thanks for the inspiration, and for any thoughts on the hardware question, too.
How did you attach the apron on the front? Just glue? That’s the only part I was a little lost. LOVE this idea!
Hi Angela~
Somehow I missed this question until now! So sorry!
I used very small “L” brackets and glue to attach the front apron. However, now that I have a Kreg Jig, I’d use that instead.
Just wondering how you connected the piece of MDF to the underside. You don’t mention it in the instructions. I have a queen size head/foot board that is pretty ornate that I would LOVE to turn into an outdoor bench!
Just saw the answer…sorry!
I just found a beautiful headboard in somebodies trash pile and my husband stopped to pick it up for me! I was so surprise, he never does that… I was going to use it for my garden somewhere, but now I am going to make the bench and put it by my garden. Thanks for such a great idea!
I just wanted to say thank you for the instruction on making the bench. My Momma just passed away June 2013 and I have her old bed stead, but did not need another bed. Momma loved gardens, and I have a huge back porch and I thought what would be better than making a bench for the porch to be used by the family. Thank you again! Linda
Hi, can’t see the pictures – says link’s broken 🙁 grateful if you could update!
Not sure what the problem is. I can see all of the pictures when I view the post.
That is awesome. I think this 61 year old grandmother is gonna try making this bench. It looked so easy to do. I already have the head and foot boards. Wish me luck! Thank you for sharing!!!!