How I Trim My Windows And Doors (Easy DIY Window Casings With No Miter Cuts!)
So many people hate installing window and door casings because of the dreaded miter cuts. Well, I’ve been trimming out my windows and doors in a way that I think is really beautiful (much more so than just standard, plain casings), and guess what! These easy DIY window casings require no miter cuts! This style of window casing is so easy for a DIYer, and yet it has a very substantial and custom look.
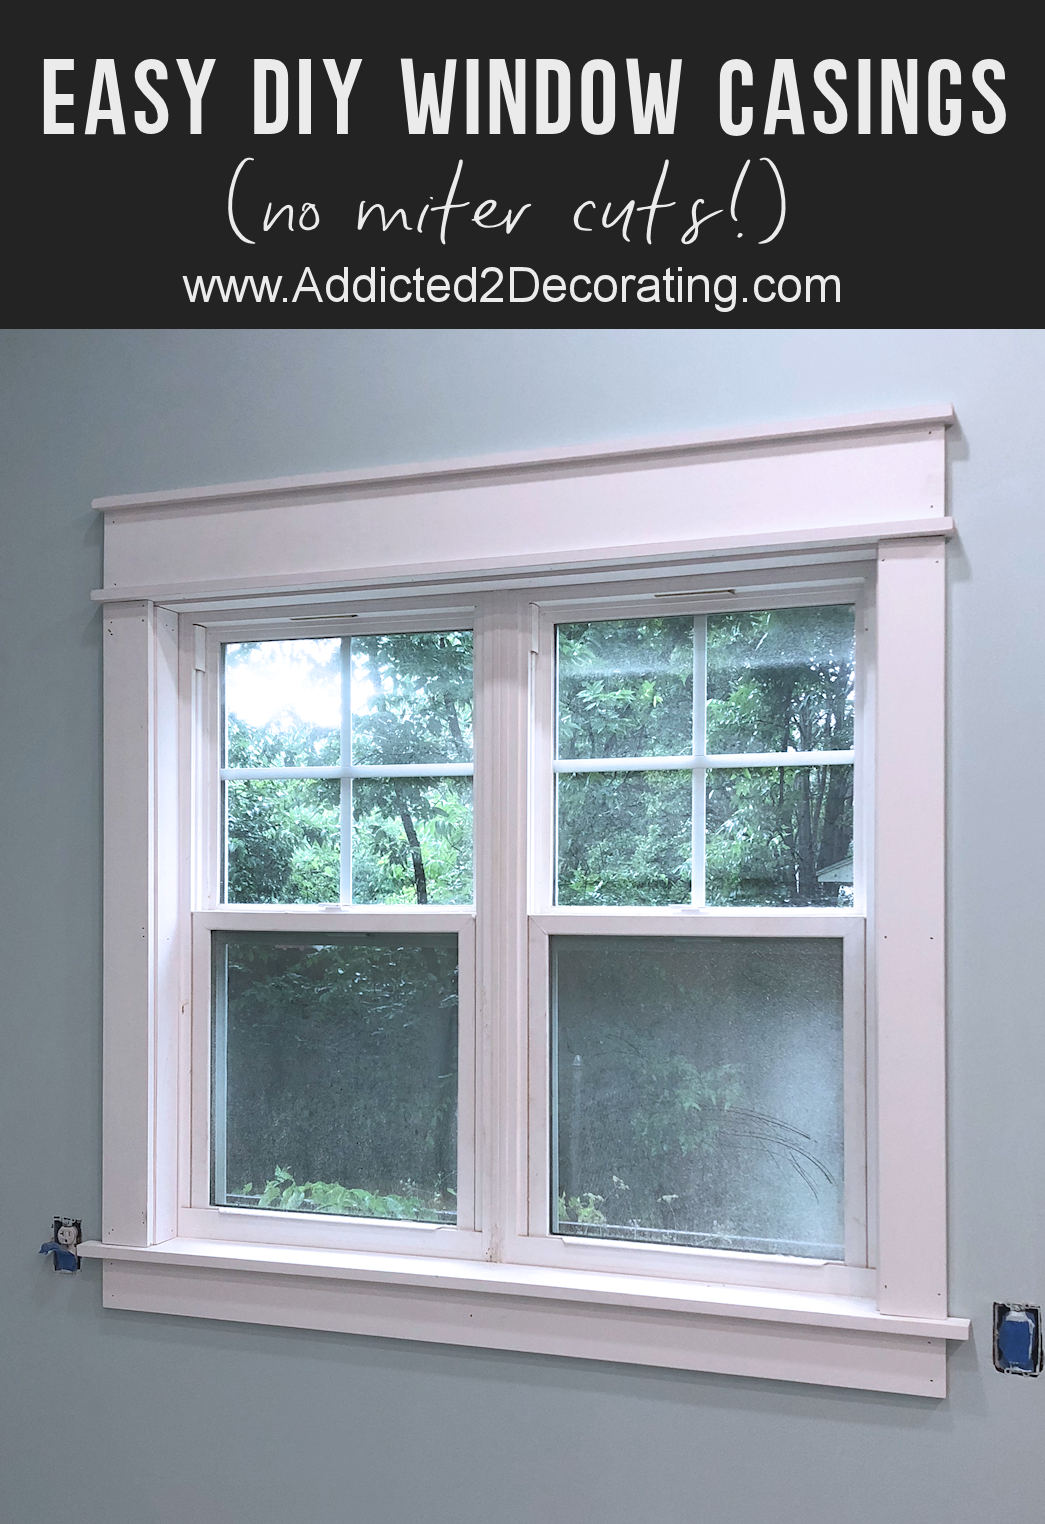
Isn’t that so much nicer than the standard narrow pieces that are mitered at the upper corners? I sure think so! So let me show you how I installed this super easy DIY window casing.
I’ll show you step-by-step how I did this, but please note that I’m installing casings on windows that have never had trim installed on them before, so that means that I’m starting from the very beginning. If your windows are already trimmed, and you’re just wanting to beef up the trim and change the style, that means you probably already have jambs installed, so you can skip ahead a few steps.
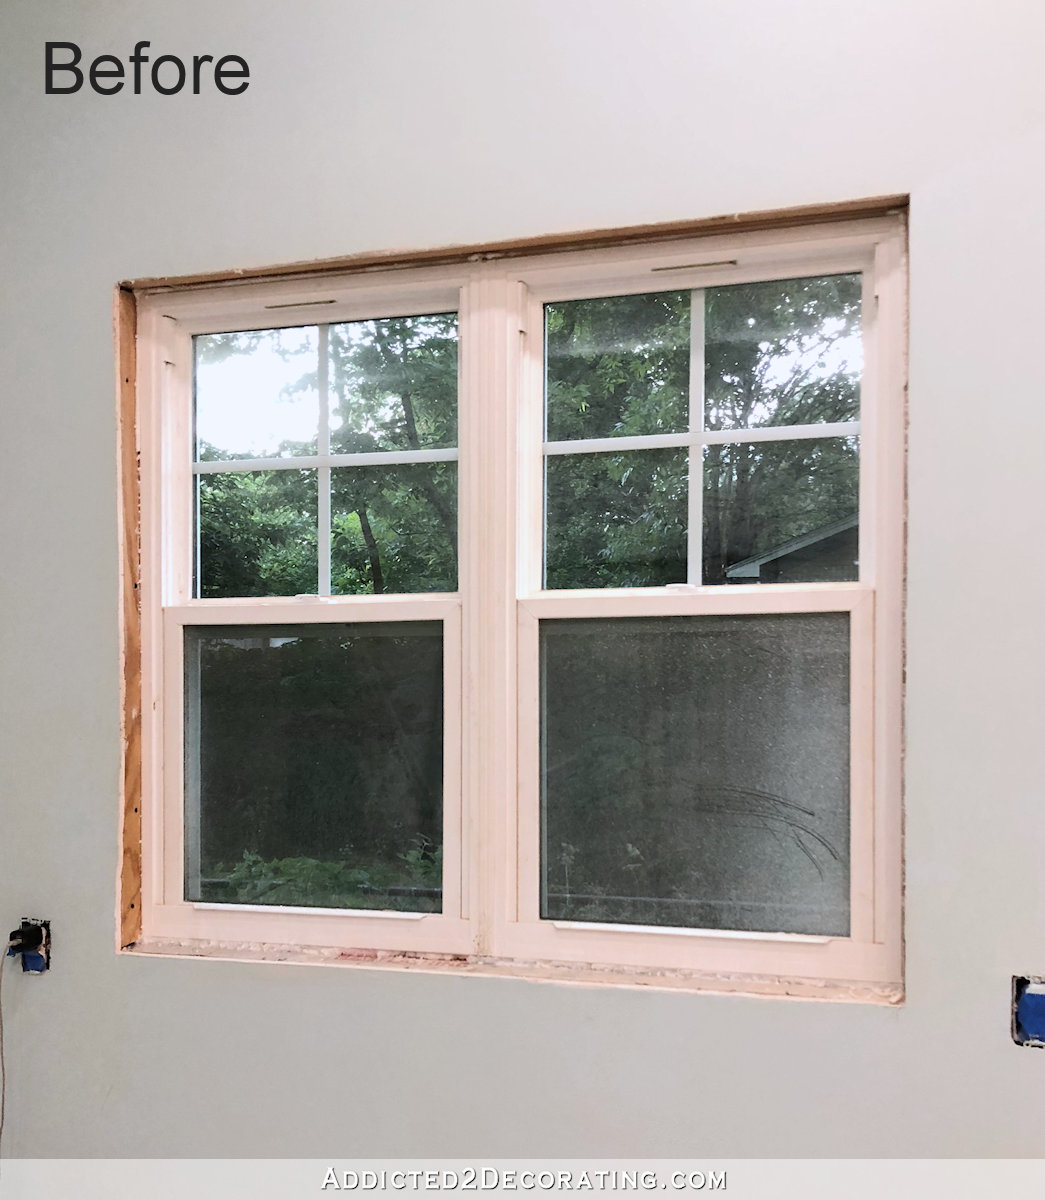
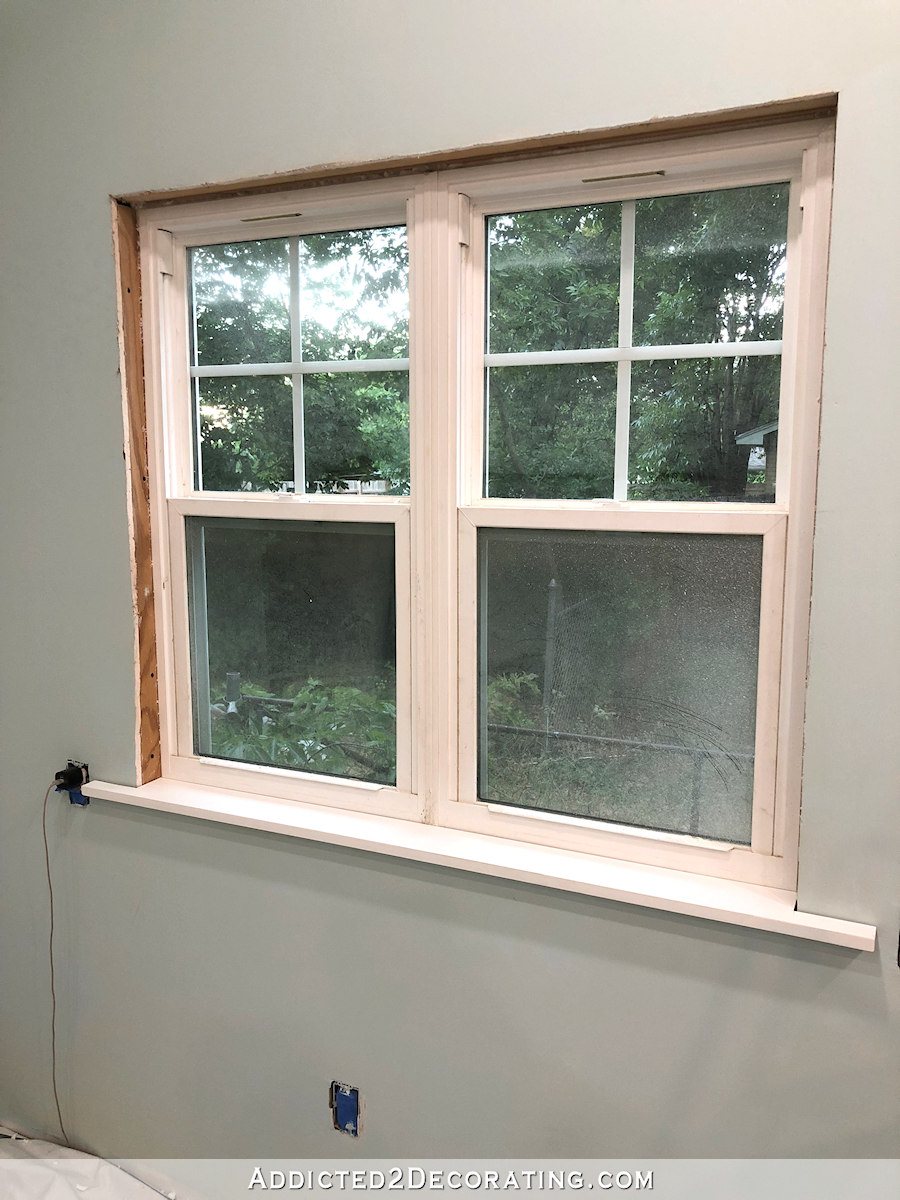
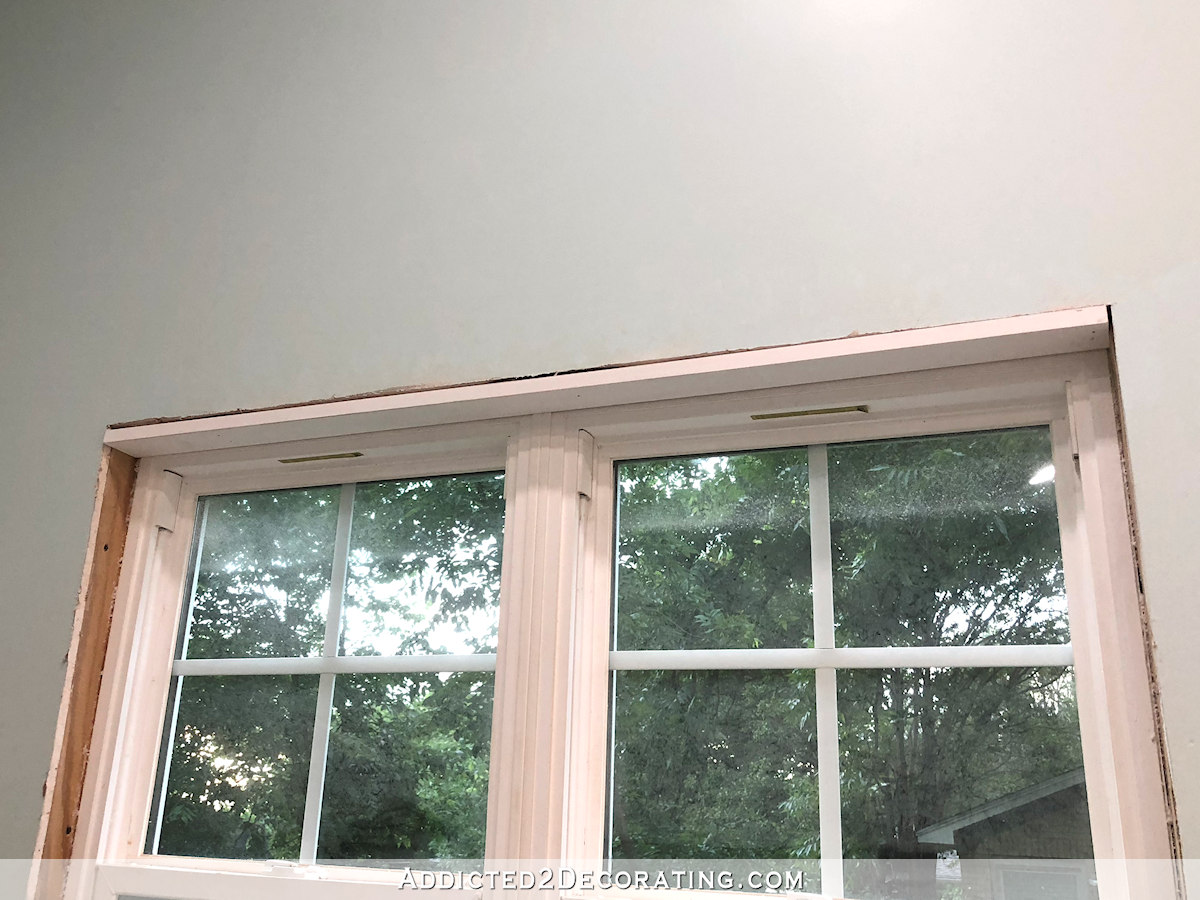
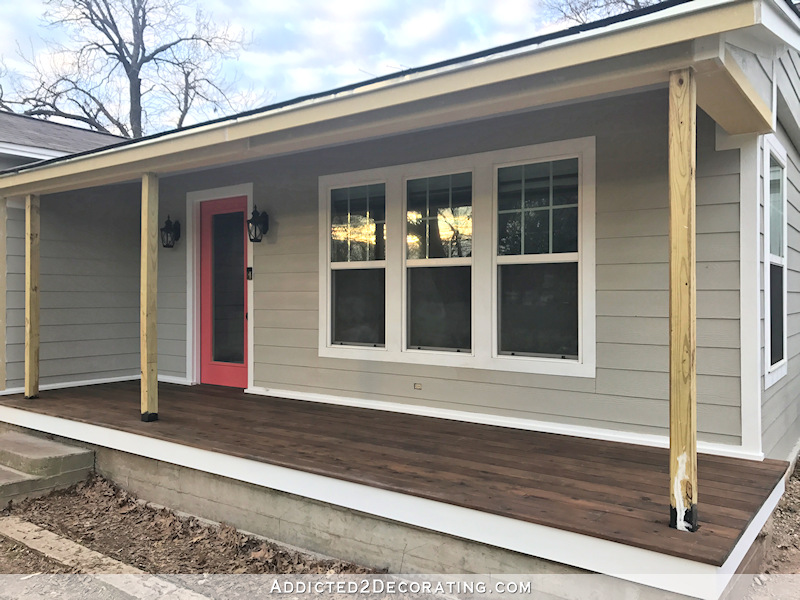
This is what my window looked like before I got started…
So let me show you how to get from that completely untrimmed window to a finished window with beautiful casing.
How to install DIY window casings (window trim)
Step 1 – Trim away any excess insulation and drywall.
If you’re starting with newly installed windows like I am, the first thing you’ll want to do is make sure that the drywall is cut flush with the framing around the window, and also make sure that there’s no excess insulation that will get in the way.
If you have excess insulation like I did, or if you need to trim away any drywall that didn’t get cut flush with the window framing, just use a utility knife or serrated kitchen knife to cut away the excess.
Step 2 – Cut and install the window sill (stool).
The first piece that will be installed is the window sill (technically called the stool). To determine the size of lumber you’ll need for this, measure the distance from the window frame to the front edge of the drywall…
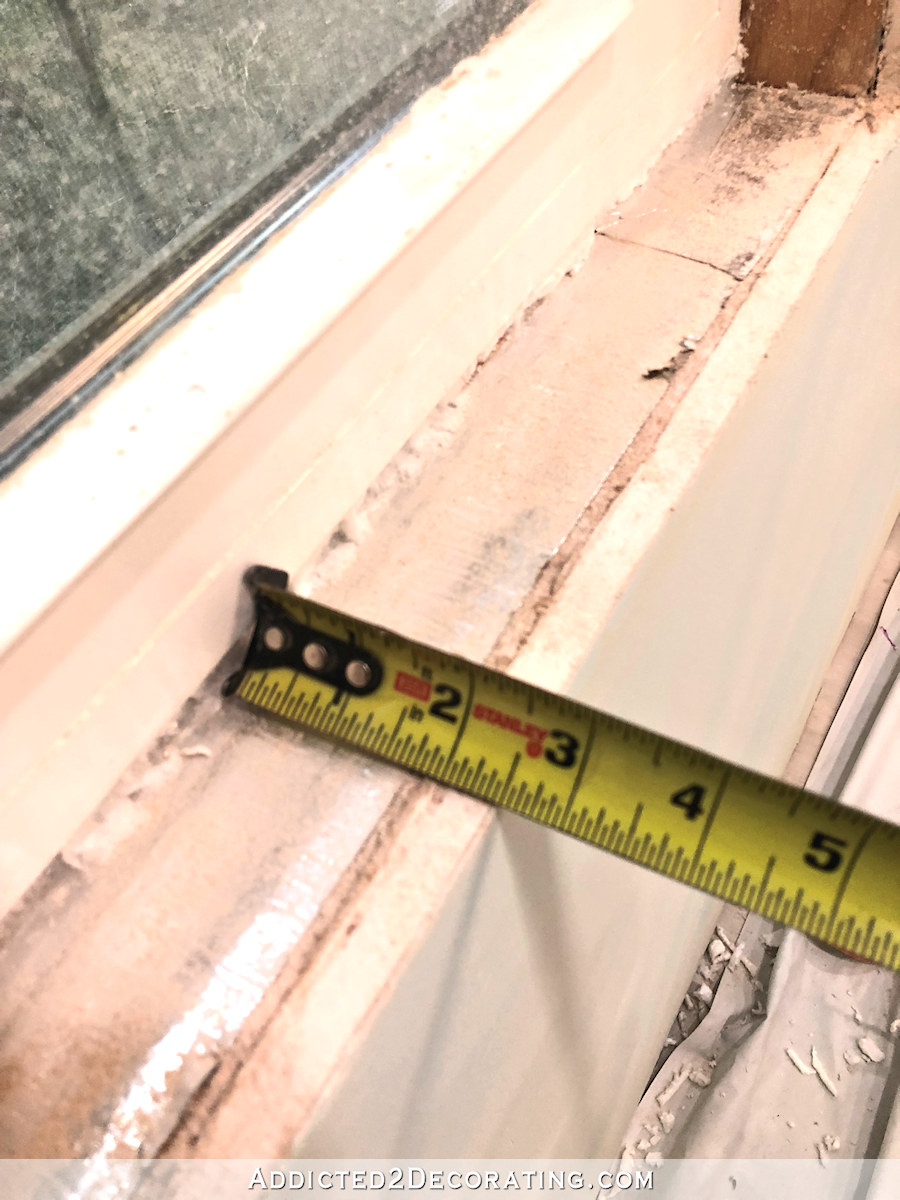
The measurement for my window was 2.5 inches. To that measurement, add 1.5 inches, which gave me a width of 4 inches for my window sill. That meant that for my window sill, I would need to use a 1″ x 6″ piece of lumber. (Remember that a 1″ x 4″ is actually only 3.5 inches wide, and a 1″ x 6″ is actually 5.5 inches wide.)
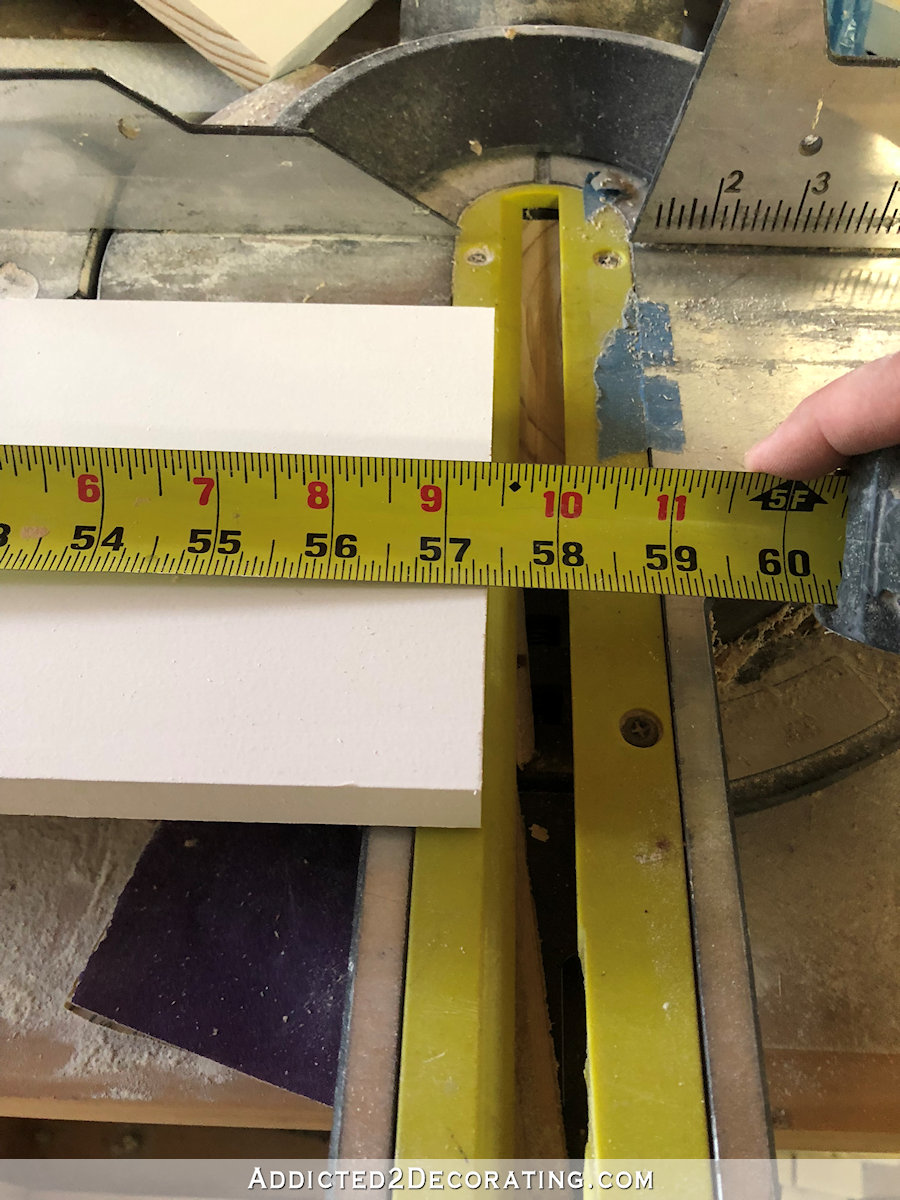
To determine the length of the piece I’d need for my window sill, I took the inside measurement from one side of the rough window opening to the other…

The measurement for my window was 48 7/8 inches. To that measurement, I added 8.5 inches, which would allow the window sill to overlap the wall past the rough window opening 4.25 inches on each side. That gave me a measurement of 57 3/8 inches, which I used to cut my 1″ x 6″ lumber for the window sill.
After cutting the length of the board with my miter saw, I used the table saw to rip the board to the 4-inch width that I needed for my window sill.
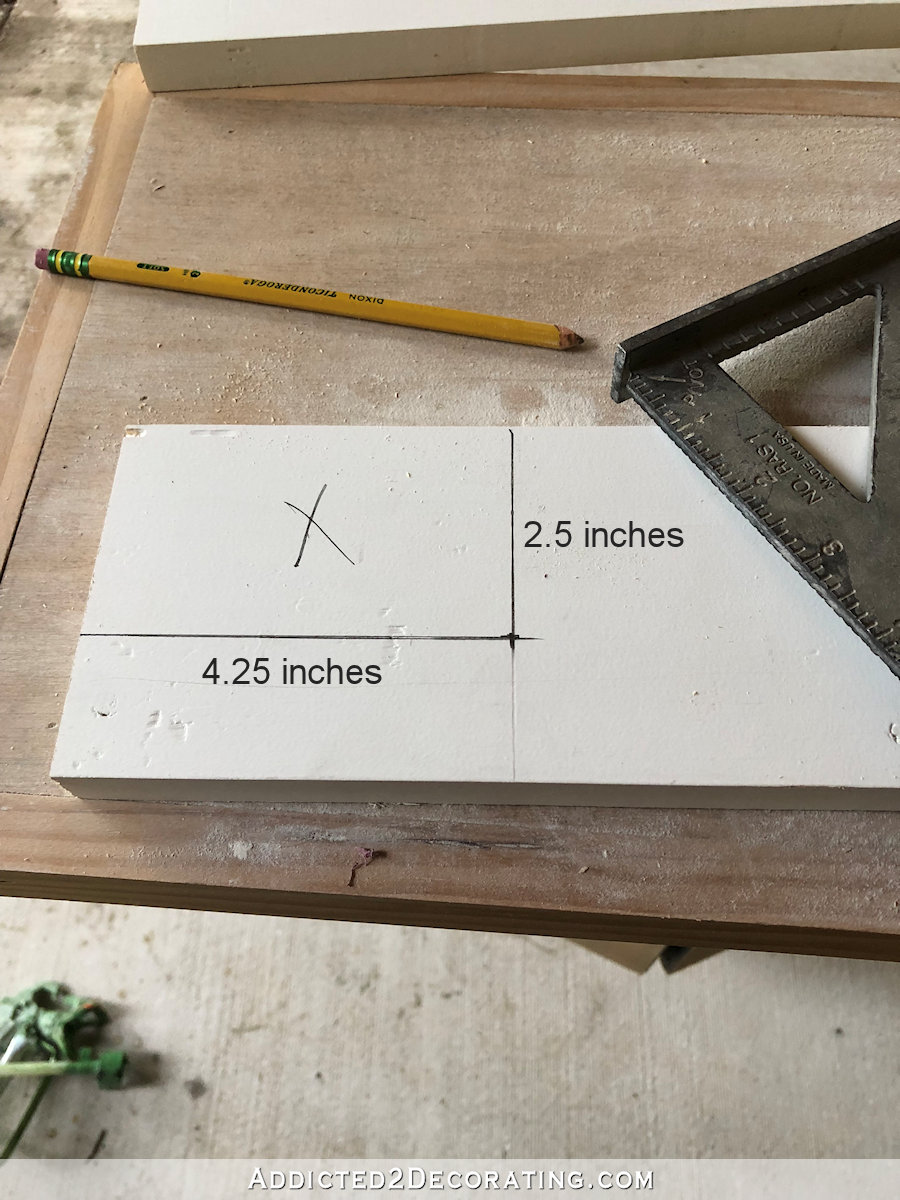
Before I could install the window sill, I needed to cut a notch out of each end for the part that extends on the wall past the rough window opening. Using a speed square, I marked the 2.5-inch measurement that I had taken, as well as the 4.25-inch measurement for the extra width that I added to the window sill board on each end.
If you have to rip a board for the window sill, be sure that the cut edge is the back edge that will go against the window, and keep the factory-cut edge on the front edge that will show.
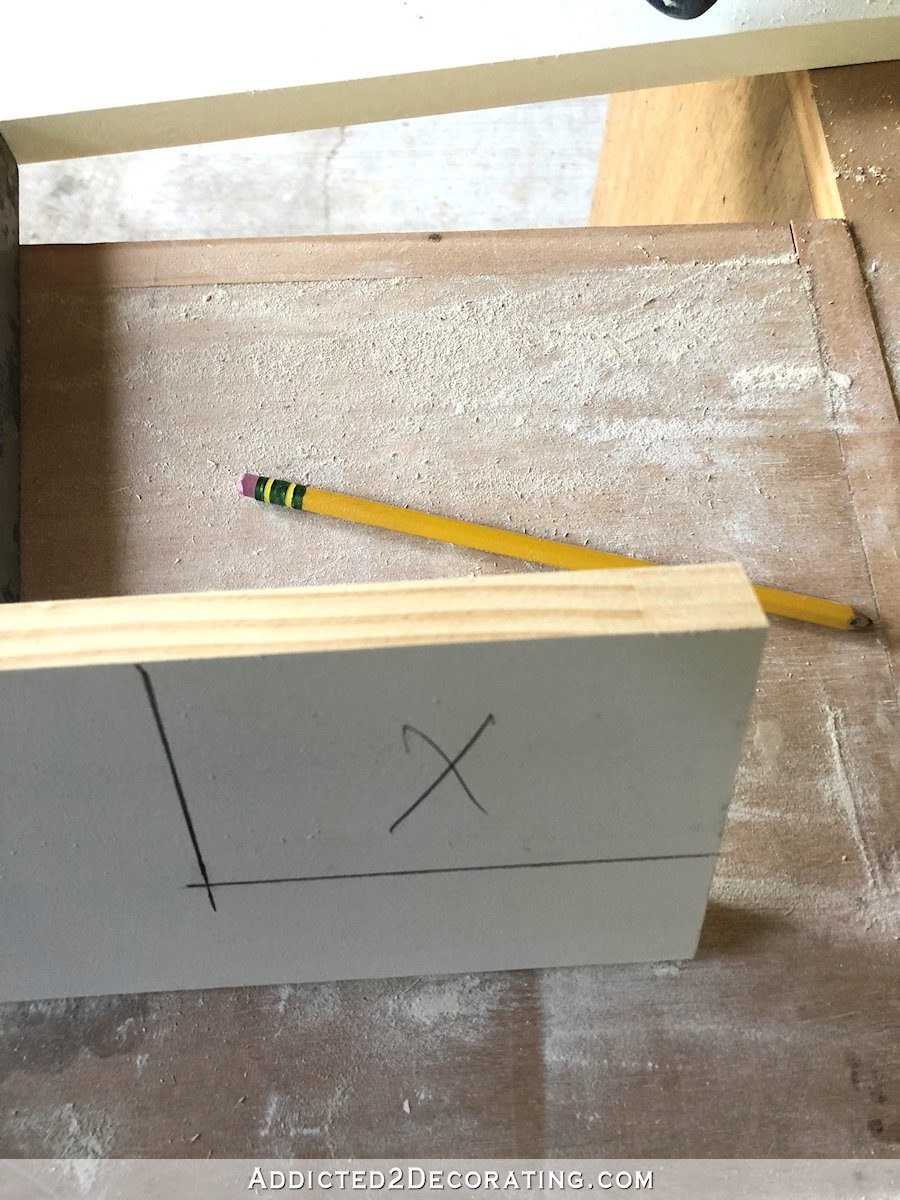
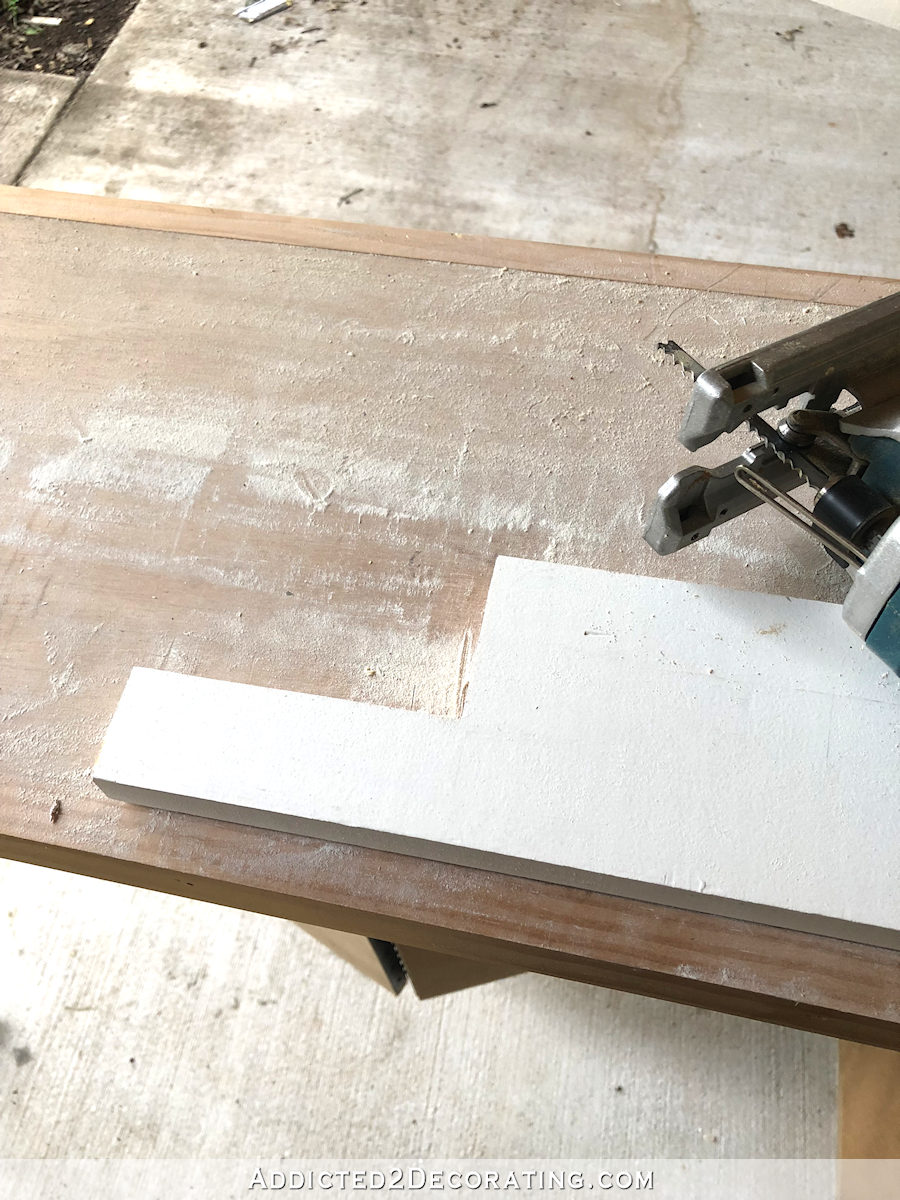
I used a jigsaw to cut the notch out of each end.
Then I put the window sill in place to check for fit…
And I want to show y’all this, because while I am a perfectionist, I’m not perfect. 🙂 I didn’t do a great job cutting this end, but things like this don’t stress me out at this stage…
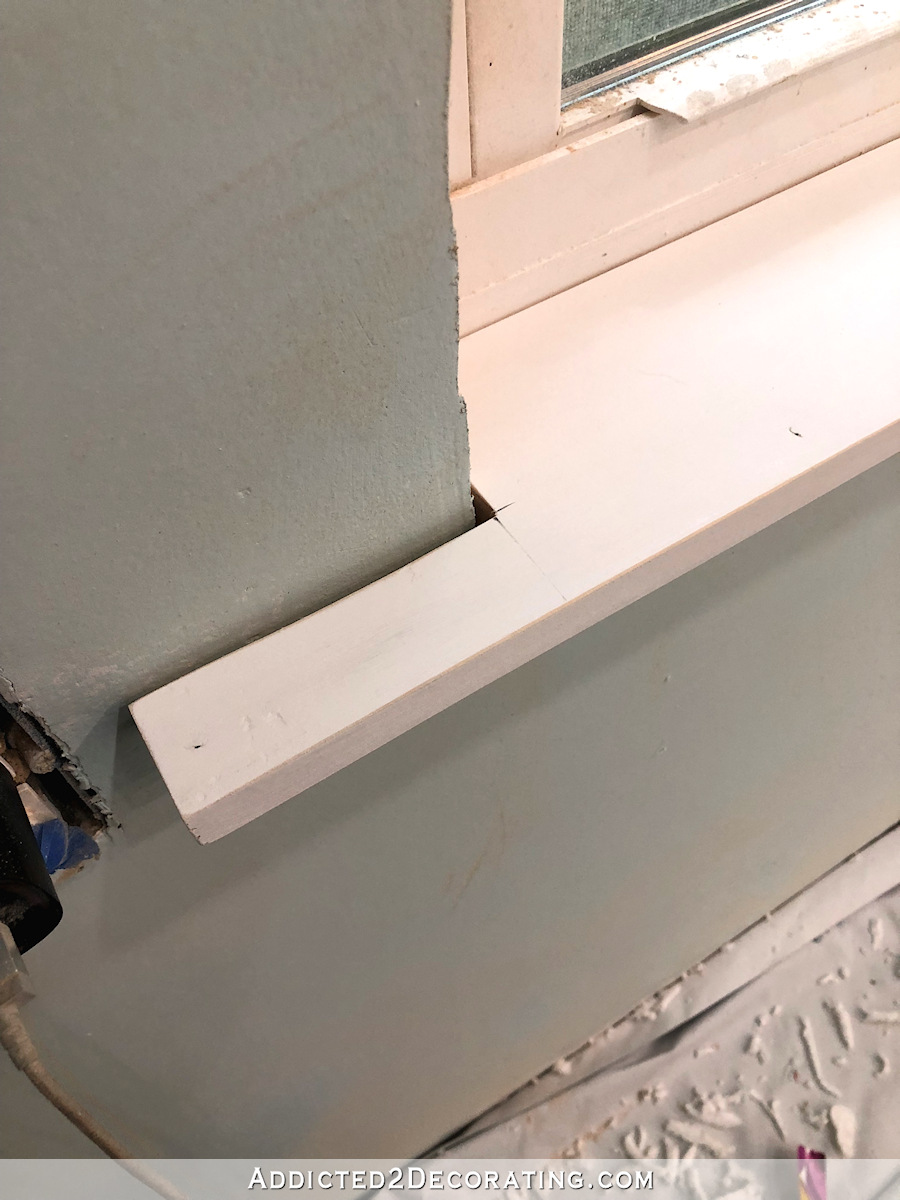
A lot of that gap will be covered up by the side casing piece, and the part that still shows can be filled with caulk before painting. Those of us who aren’t excellent finish carpenters have to rely on wood filler and caulk, and that’s something I do with just about every project I do. And I’m okay with it. 🙂 However, if you’re using wood that will be stained for your window trim, you’ll want to take extra care to cut it as perfectly as possible since caulking isn’t an option.
I did a little better on the other end, but I’ll still need to use caulk to fill in a gap there…
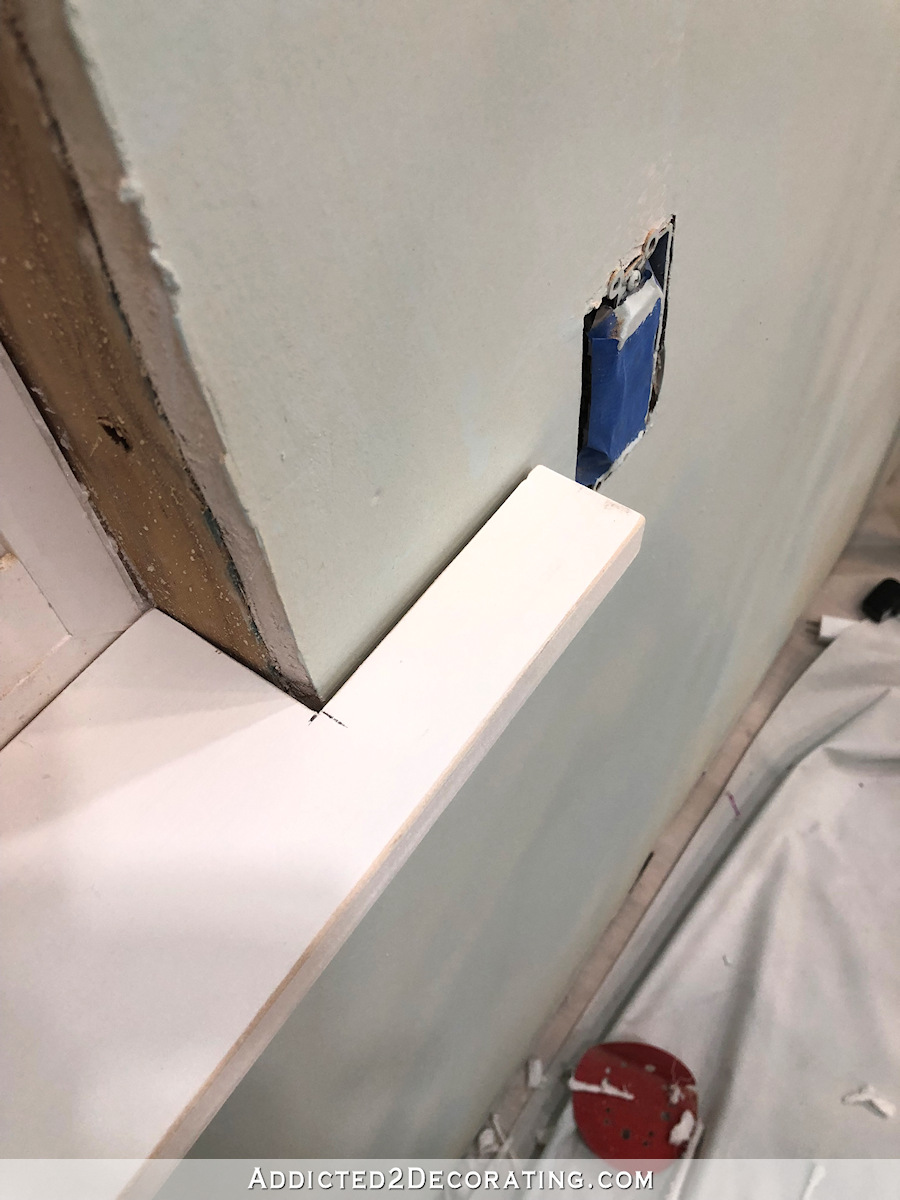
Before nailing the window sill in place, I checked for level using a long bubble level.

It wasn’t level (not a surprise), so I had to shim one end. You don’t have to have actual shims for this. Any scrap piece of wood can be cut/ripped to create a shim. I actually used pieces of a paint stir stick to shim the sill…
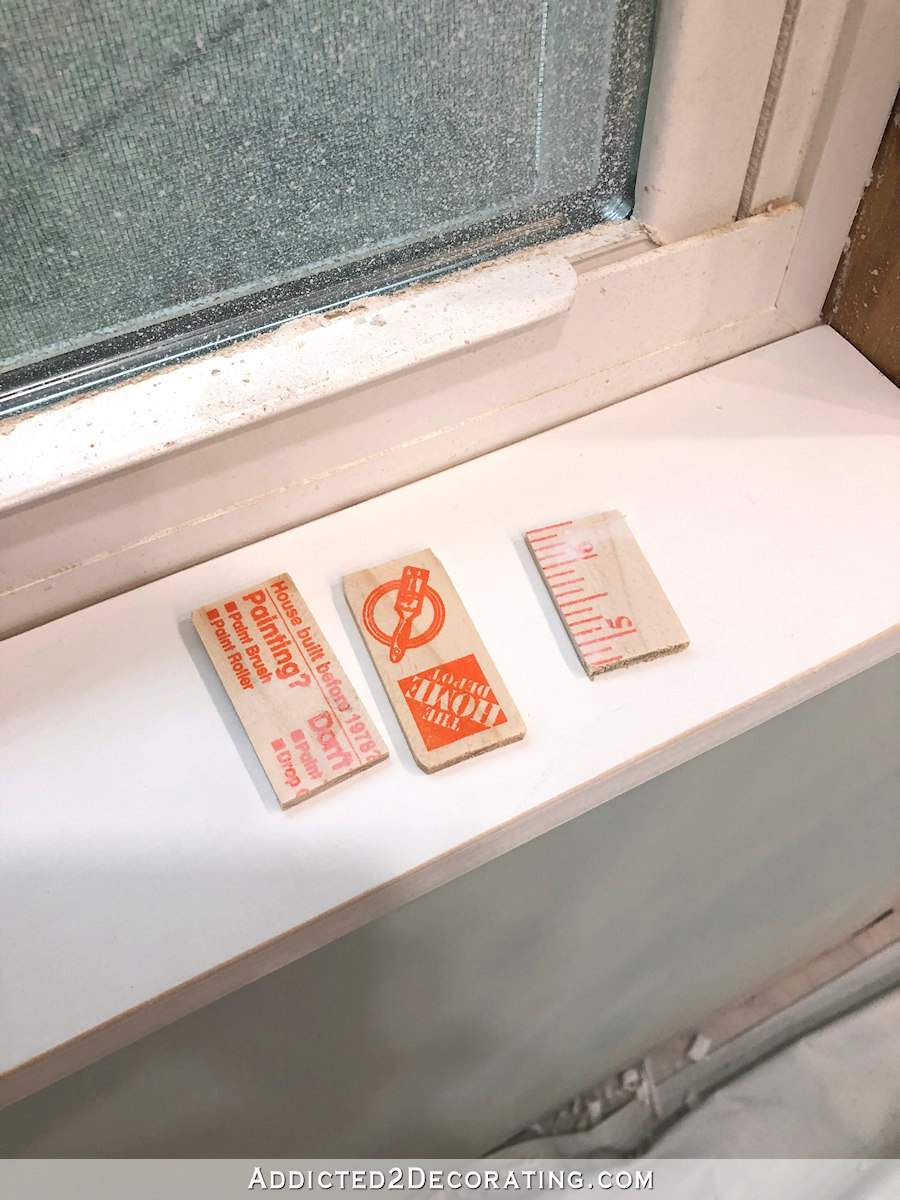
The paint stick shims did the trick, so I nailed the sill in place. I used 16-gauge 1.5-inch nails to install all of these pieces.
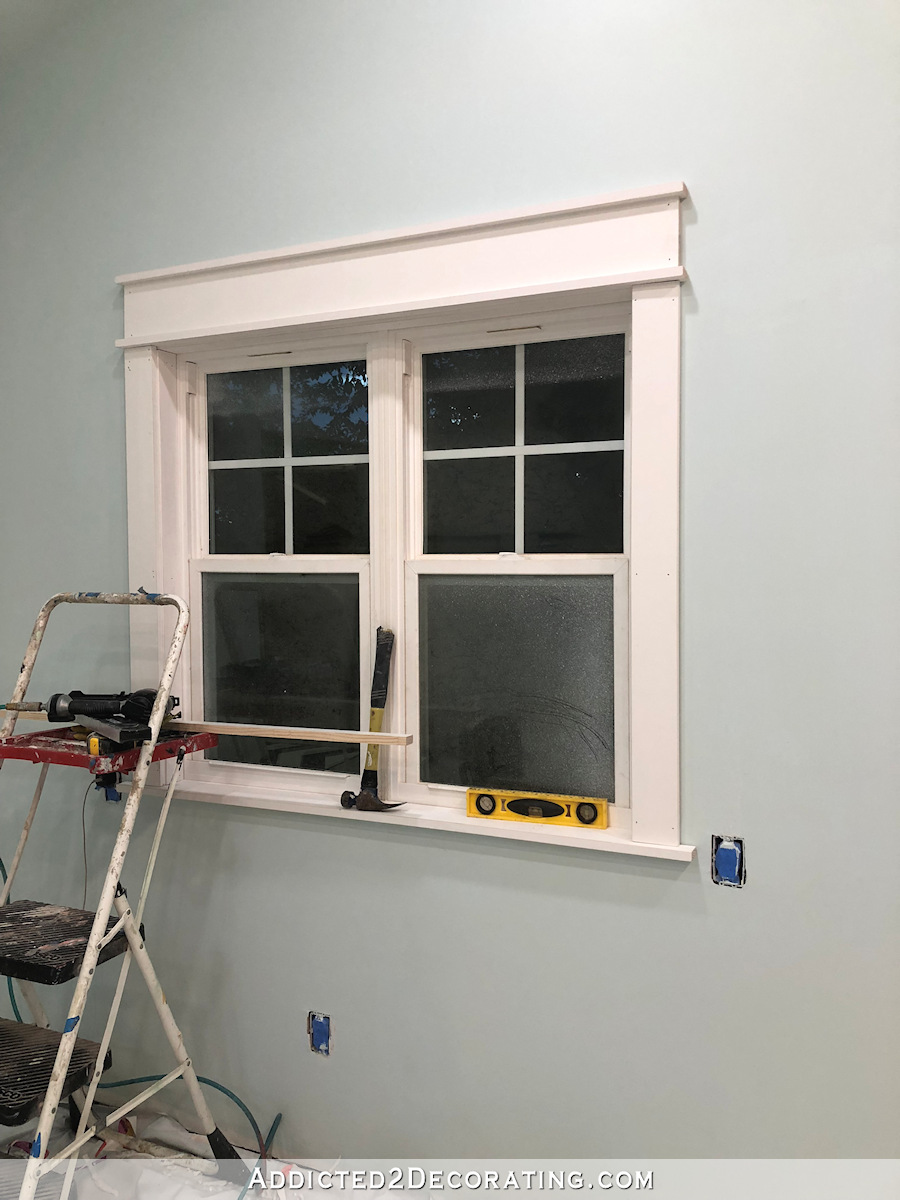
Step 3 – Cut and install the top jamb.
Next, I measured, cut and installed the top jamb. Unlike the sill, the edges of the top and side jambs need to be flush with the face of the drywall. This piece also needed to be shimmed to get it level, and then I nailed it into place.
Step 4 – Cut and install the side jambs.
Next, I installed the two side jambs. These need to be ripped to the same width as the top jamb so that the edges are flush with the face of the drywall. In a stroke of luck, mine were 2.5 inches wide, which happens to be the exact width of a 1″ x 3″. Using a bubble level, I made sure the side jambs were plumb before nailing them into place. Both of mine had to be shimmed.
As a side note, the other two windows in this room happened to be the super easy windows to trim. The windows were level, and the trim went on so easily and quickly. This window, however, is so unbelievably unlevel, like nothing I’ve ever seen on a newly-installed window. So if you’re having new windows installed, I highly recommend double checking the installer’s work yourself with your own level before any siding and drywall goes up.
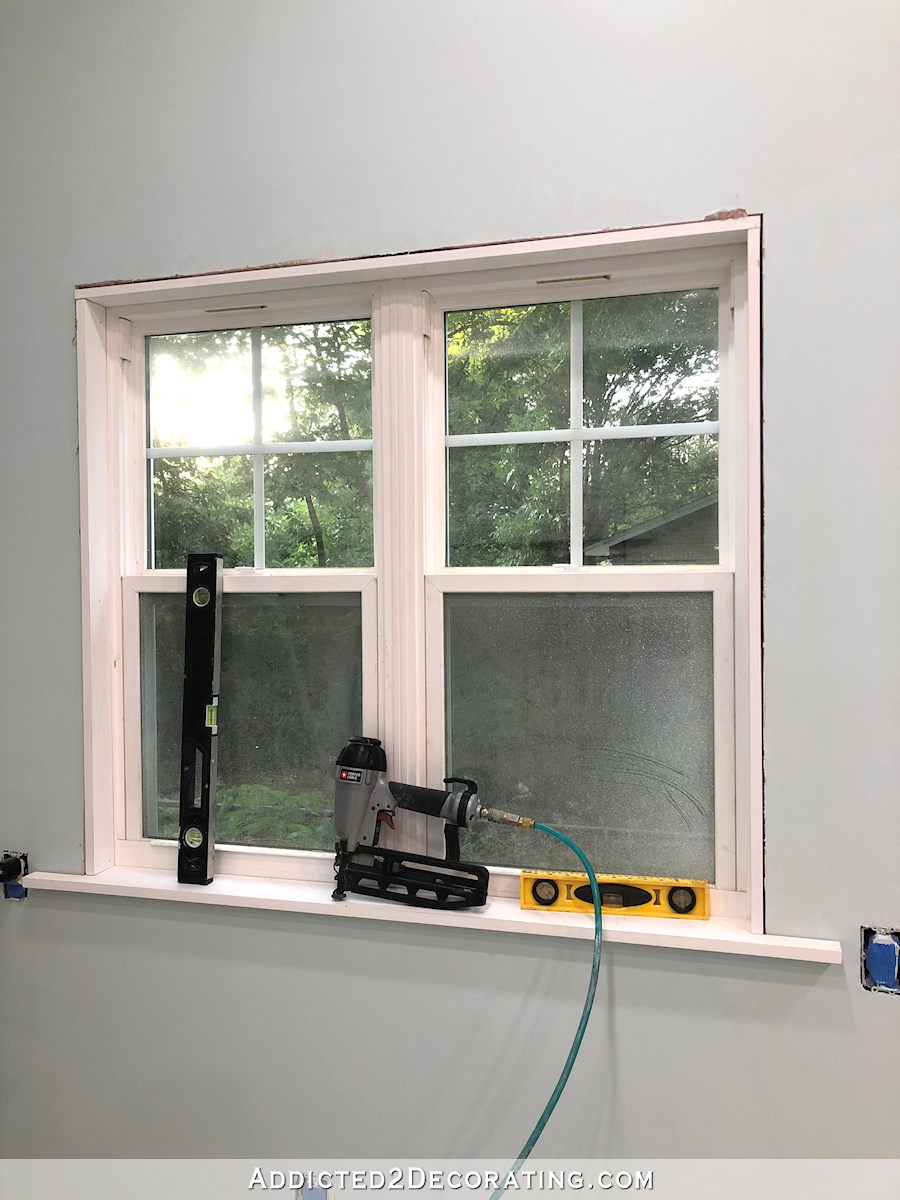
Step 5 – Cut and install the side casings.
With all the jambs installed and square/level/plumb, the two side casings can be installed. For this, I use 1″ x 4″ lumber. For this piece, I measured from the window sill to the bottom of the top jamb, and then added 1/4 inch to that measurement for the length of the side casings. Always measure each side separately, and don’t just assume that they’ll be exactly the same.
When I install the side casings, I don’t line up the inside edge of the casing so that it’s flush with the face of the side jamb. Instead, I move it over so that there’s about a 1/4-inch reveal on the edge of the side jamb. Also, when installing these, I make sure that I put at least three nails through the side casings and into the edge of the side jambs, so that the two pieces are connected to each other. I also nail the casing piece to the wall in at least three places (top, middle, bottom).
And of course, always use your level before attaching the pieces.
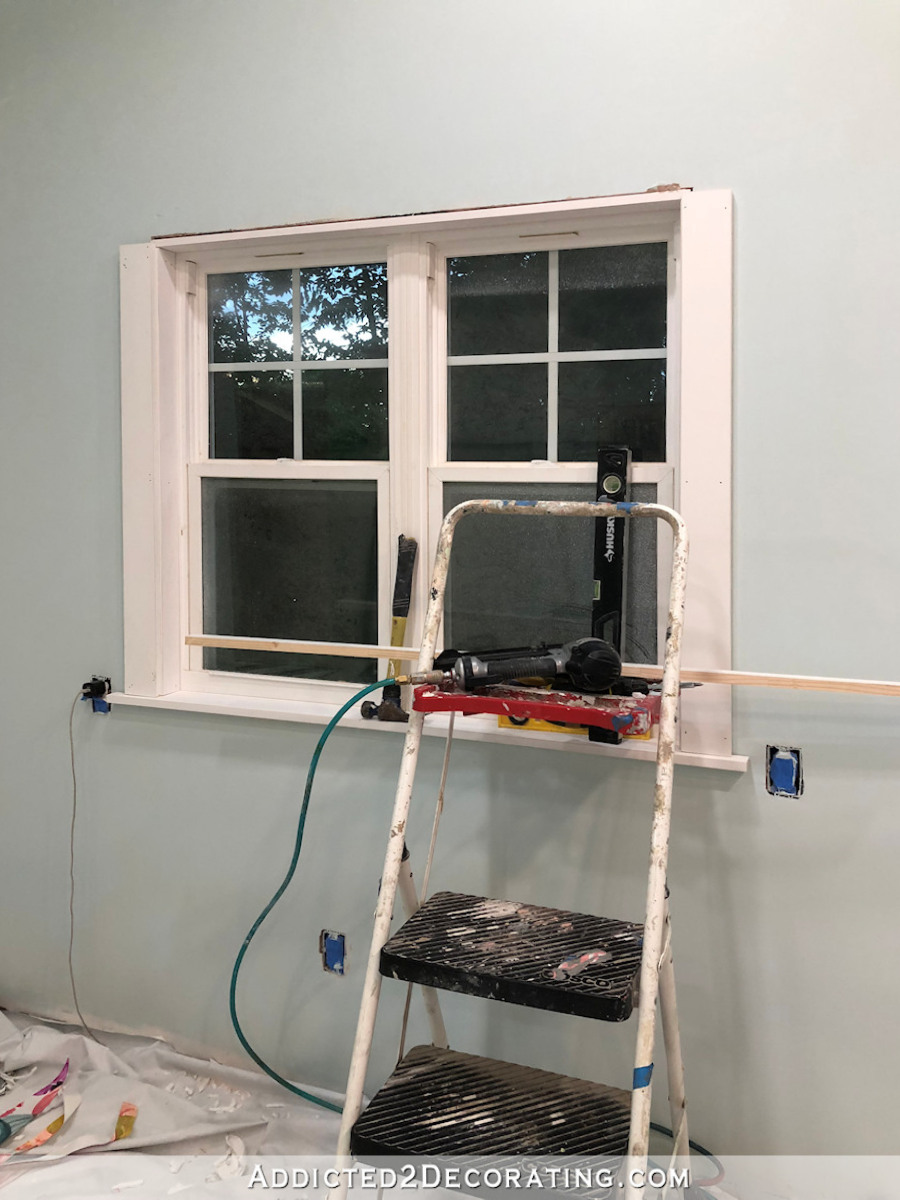
Step 6 – Build and attach the top decorative header casing.
To create the top header piece of the casing, I measure from the outside of the left side casing to the outside of the right side casing.

Then I take that measurement and cut a piece of 1″ x 6″ lumber to that exact length.
Next, I add one inch to that measurement, and cut two pieces of 1″ x 2″ lumber to that longer length. These three pieces create the top header.
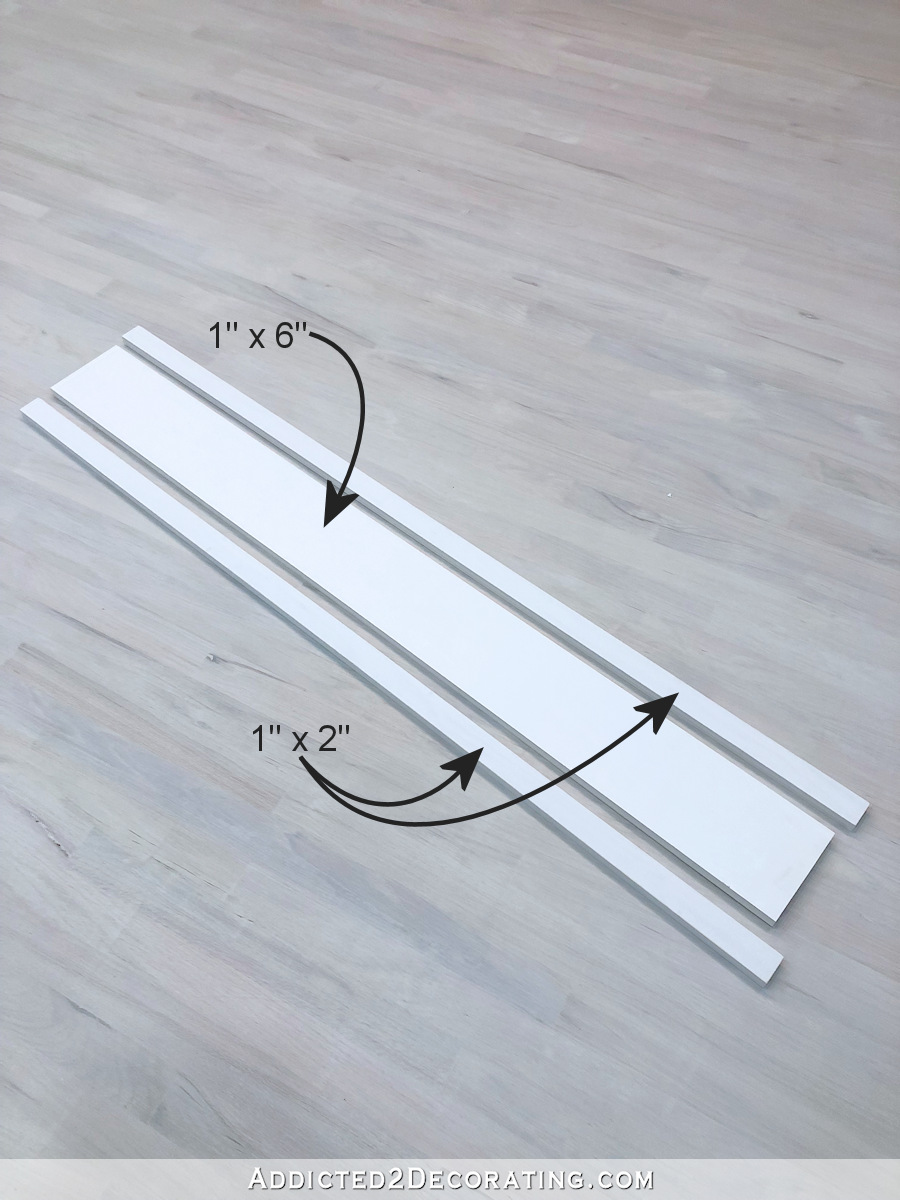
Using the same nails plus wood glue, I attach these three pieces so that the 1″ x 6″ is sandwiched between the two 1″ x 2″ pieces. Before nailing them together, I measure to make sure that the 1″ x 2″ pieces extend 1/2-inch past the end of the 1″ x 6″ on each end. I nail the pieces together through the face of the 1″ x 2″ and into the edge of the 1″ x 6″.
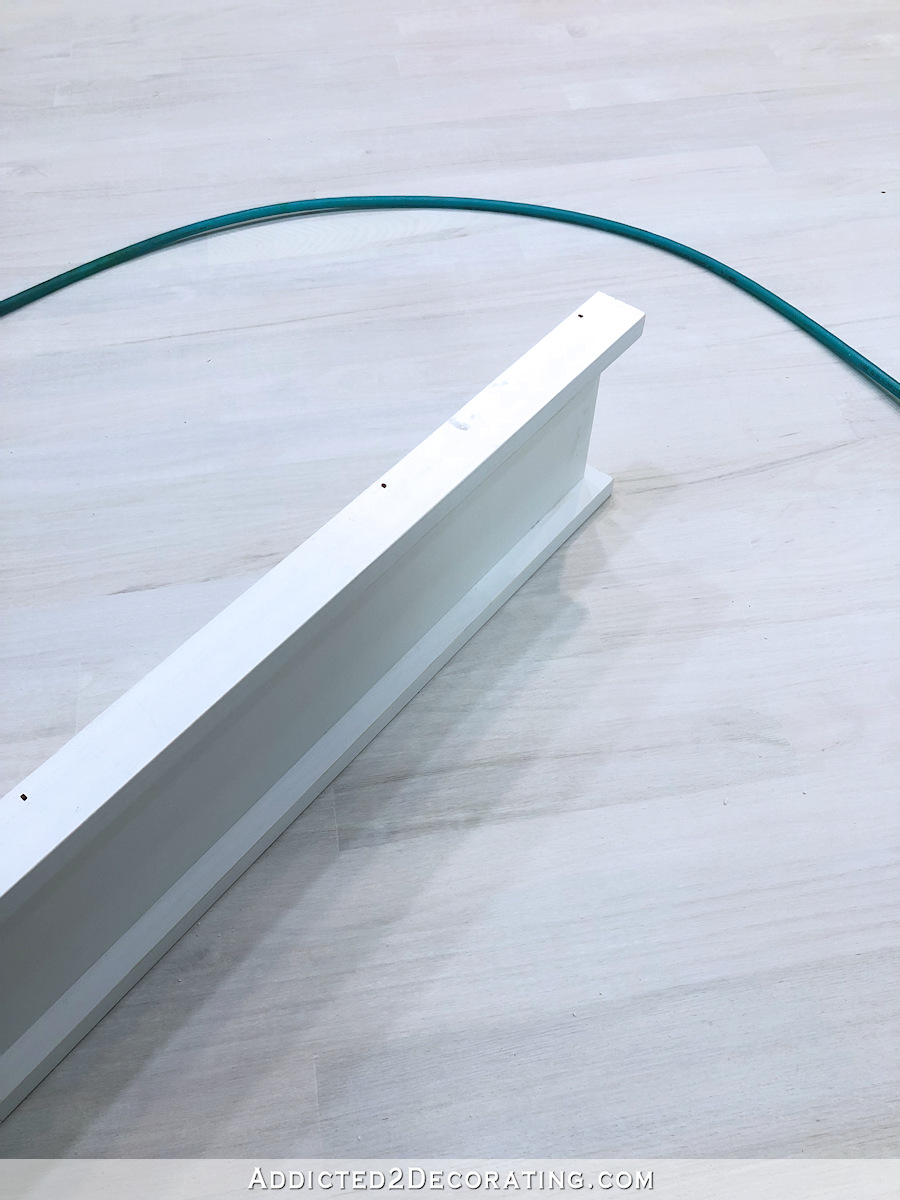
Those pieces are nailed together in such a way that the back of the assembled header piece is flat (i.e., the back of the 1″ x 6″ is flush with the edges of the 1″ x 2″ pieces on the back of the assembled header piece).
Once assembled, that large header piece of casing sits right on top of the side casing pieces, and I nail it to the wall making sure that the ends of the 1″ x 6″ line up with the outside edges of the side casing pieces, which makes the ends of the 1″ x 2″ extend past the outside edge of the side casing by 1/2-inch.
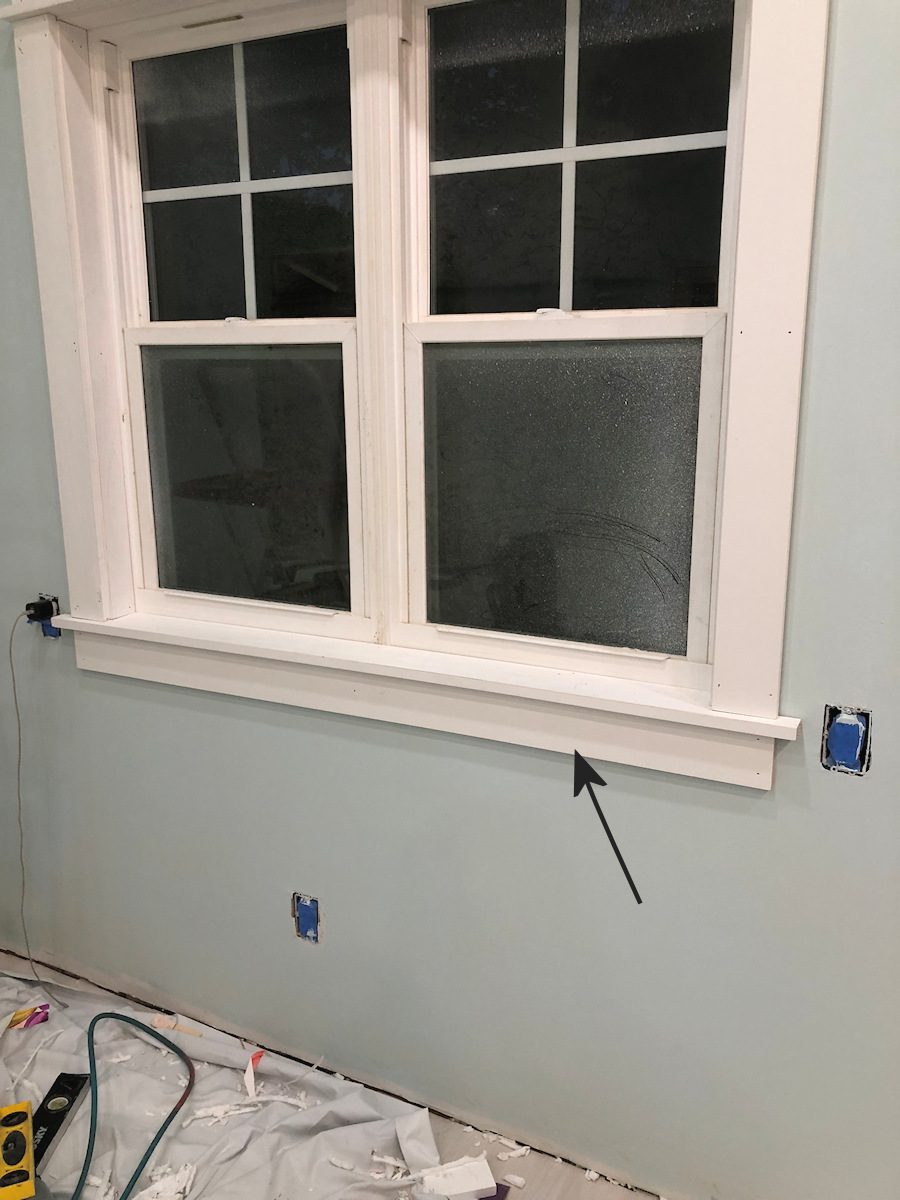
Step 7 – Cut and attach the apron.
And finally, I use a piece of 1″ x 4″ lumber to make the apron. For this piece, I take the same measurement as I did for the top header 1″ x 6″ (i.e., I measure from the outside of the right side casing to the outside of the left side casing), only this time I measure at the bottom right above the window sill. Again, don’t just assume that the top measurement will be exactly the same as the bottom measurement. Even if you try to have everything perfectly square/level/plumb, measurements can be off just a bit. So always take separate measurements for each piece that needs to be cut.
So measuring just above the window sill, I measured from the outside edge of the left casing to the outside edge of the right casing, and used that measurement to cut a 1″ x 4″ piece of lumber to use as the apron. Then using a bubble level to check for level, and making sure that the ends of the apron lined up perfectly with the outside edges of the side casings, I nailed that piece into place.
And with that, the installation is done! It still needs wood filling, sanding, caulking and painting, but the installation is done.
So again, here’s how my window looked before being trimmed out…
And here it is with it’s pretty new casing that looks way fancier than it really is. 😀
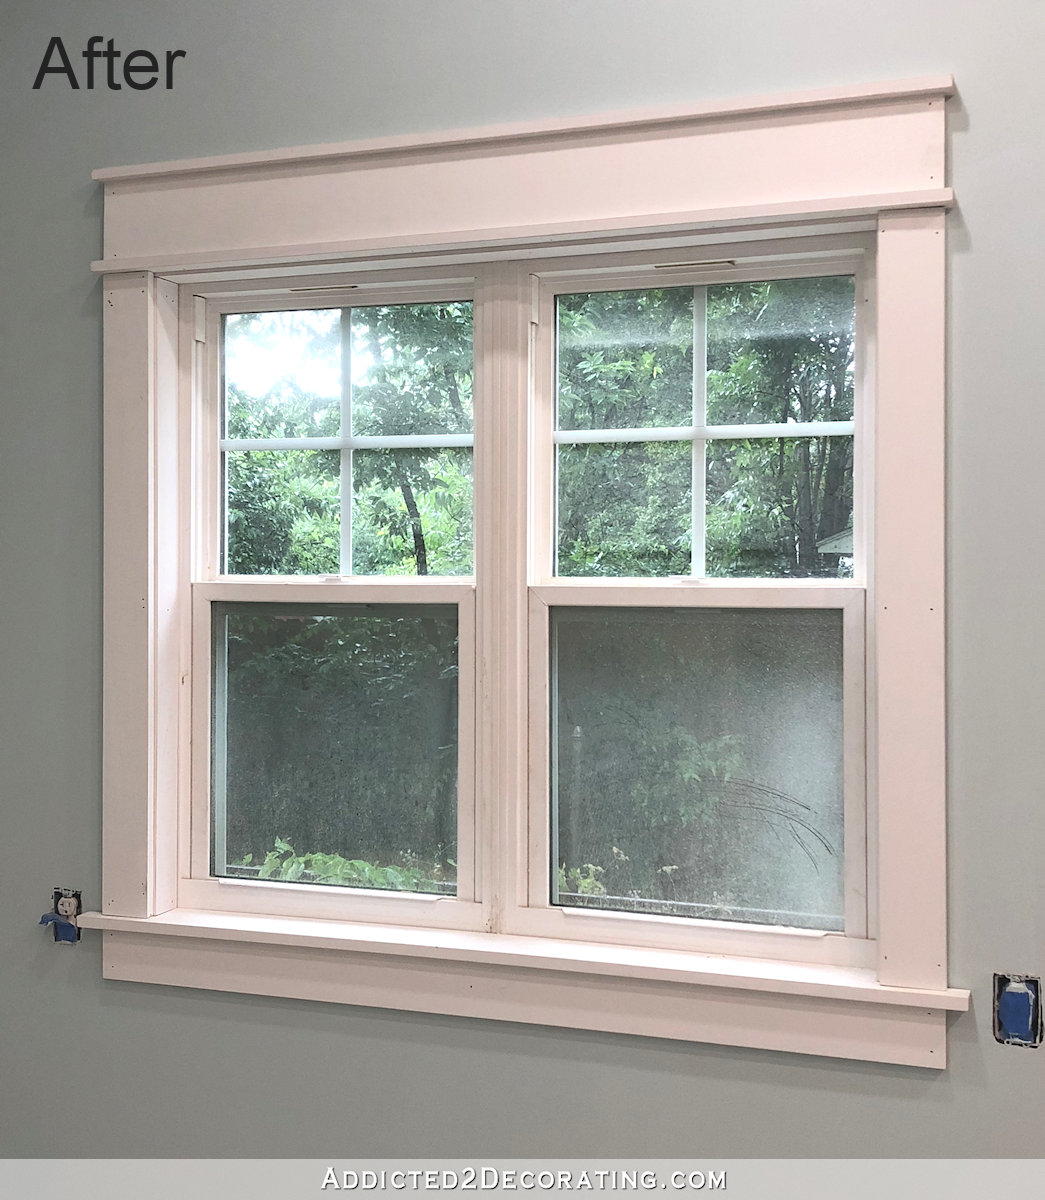
I’m so glad I went with this style of trim on my door and windows because I’ve trimmed out every single door and window in this house myself. I love that I can get this custom look with a wide casing and a fancy-looking header without having to cut even one single miter cut. It’s deceptively simple.
Helpful sources and products:
- Table saw – If you’re looking for a really good, reliable table saw, but don’t have a lot of room to store it, I highly recommend the one I have — the Dewalt 10-inch Compact Job Site Table Saw. It’s heavy enough to be durable, but small enough to be portable. And you can use the guide fence to rip widths up to 24.5 inches, which is pretty amazing for a small, portable table saw.
- Nail gun and compressor – If you need a small, portable air compressor and nail guns, I recommend the set that I have — the Porter-Cable 3-Tool Combo that includes a 6-gallon pancake air compressor, a 16-gauge nail gun, an 18-gauge nail gun, and a staple gun. While my most-used of those tools is the 16-gauge nail gun, I do use the others as well. The 18-gauge nail gun is great for installing smaller trim. The staple gun is great for some upholstery projects (easy wrap-and-staple projects, like upholstered headboards or dining chairs), and for things like attaching house wrap or securing barriers under hardwood flooring. While I use the staple gun the least, it’s still very nice to have on hand.
Please note: This post contains affiliate links.

Addicted 2 Decorating is where I share my DIY and decorating journey as I remodel and decorate the 1948 fixer upper that my husband, Matt, and I bought in 2013. Matt has M.S. and is unable to do physical work, so I do the majority of the work on the house by myself. You can learn more about me here.
You are my hero dear Kristi!! I was one of those requesting this tutorial and now I can go forth and multiply some beautifully trimmed windows in my house. Thank you.
I have very similar trim in my house but wasn’t smart enough to have the installer use MDF or anything pre-primed. I have fairly rough pine that i need to sand , fill in knots, then prime. 1) would you recommend Zinsser BIN? Is it oil based? 2) i can use water based SW paint over it can’t I? 3) rags with combustible liquid scare me. If i put them in a metal can with a lid is that sufficient to keep them from burning? Thanks Kristi
I have painted pine trim and used white Zinsser B-I-N primer. The knots bled through three coats of oil-based paint. If I knew then what I know now, I would triple coat the knots with white shellac first, then prime with white B-I-N, then paint, then pray.
My spotty trim is annoying but not as bad as what my sister has. She lives in a grand old house with plaster walls. At some point, someone tried to repair things by putting canvas with a coating on the walls and painting. Sometime in the 70’s, someone papered over that with bright blue and white paper with accents of red poppies in it. When my sister bought the house in the 90’s, she was told that she couldn’t remove the wallpaper without badly damaging the walls, so was advised to B-I-N-prime the walls before painting white, and then putting a white and light beige wide-stripe wallpaper over it. It was beautiful–for about two months. Then the red poppies began to bleed through and look like lipstick kisses all over the walls! This is in a guest bedroom with furniture and artwork covering most of the walls, so she decided to live with it.
Regarding the rags, let them dry out (outside, if possible) and then dispose of them. Don’t put them near a heat source or in direct sunlight. You will feel better knowing you have done the safest thing, rather than trying to hold onto and re-use them.
(1) My primer of choice is Zinsser oil-based Cover Stain. I use it on every wood project (cabinets, furniture, trim, etc.) that I do, and I’ve never had anything bleed through it. I’ve heard the shellac trick, but I’ve never needed it with the Cover Stain.
(2) You CAN use water-based paint over most oil-based primers. (Just don’t use water-based paints over oil-based paints. That’s different.) But with primers, it’s fine. With Cover Stain, it’s fine. But with any other brand, just be sure to read the label to double-check before proceeding. But I know for sure the Cover Stain can be coated with water-based paint.
(3) Rags that you’ve used with combustible products (stains, polyurethanes, etc.) should be submerged in water immediately after use. If you allow them to remain exposed to air when they’re saturated with those chemicals, they can spontaneously combust.
Wow! Hands down the best tutorial I’ve seen on trimming out windows (& I’ve read a TON!!!!). THANK YOU so much for taking the time to share this.
A little bit of my souls dies when I see windows trimmed out like a picture frame with no sill. These are glorious!
You say “I didn’t do a great job cutting this end”. Can you explain more about that? Do you mean you didn’t measure it right? or when you marked it, you made a mistake? or you weren’t careful to stay on the line with the saw? or …. etc.
The reason I ask is that I would want to make sure I don’t do this myself, and I know you aren’t sloppy or lazy, so I wouldn’t want to do whatever it is that happened.
I was cutting it outside as it was getting dark, so I didn’t follow my pencil line as closely as I would have liked. I was left with a larger gap between that notch and the wall than I’m generally comfortable with. I always have a tiny bit of a gap, but generally not that much. Had I been cutting it during the day with plenty of light, I would have done a better job.
Hi! I’ve been following you since you painted the couch… and reading every post since. I’m finally feeling confident to tackle this window/door trim project at my place. I love your style and the straight cuts for it as well.
I have a question about caulk. At a previous home, I caulked where my vinyl windows met the drywall. When I painted over the caulk, the paint would not adhere, the paint would bead up. What are the steps you take, and probably the product you use to be able to paint over the caulk.
Thanks so much.
Just another reader here, but I learned this the hard way too! When you buy caulk, it will say right on the tube whether it is paintable or not. Always make sure it says paintable! You can also buy types of caulk that are paintable within 20 or 30 minutes after application (again check the tube label for this info), which is nice so you don’t have to wait for the caulk to cure before painting.
Huh, as simple as just reading a label… 🙄 lol.
It sounds like you used a silicone caulk. Most standard silicone caulks aren’t paintable with latex paint unless you first prime with an oil-based primer. There are a couple of specialized silicone caulks and hybrids that can be painted with latex paint, but you have to read the labels to find those. I generally reserve silicone caulks for outdoor items that won’t be painted.
For general use caulk that can be painted with latex paint, you’ll want to use a latex caulk. My go-to caulk for general use on trim is DAP Alex Fast Dry. I get it at Home Depot and buy it by the case. 😃
Thanks for the response… reading labels – what a concept!! Lol.
I have wanted to change out my doorway trim in my house to this look. I’m on the fence only because they aren’t a necessity. I have other projects that are more of a priority. The look great, and are both classic and up to date styling.
We are re-doing our fireplace with ledgerstone, new backsplash tiles in the kitchen with a new stainless hood. Tall board and batten in the living room and dining room and a few other projects. Luckily the main one, new wood flooring throughout the house is almost done. I’m enjoying watching your progress. You inspire me.
THANK-YOU FOR THE TUTORIAL, IT IS REALLY GREAT. I AM ENJOYING ALL OF YOUR PROGRESS. IT IS AMAZING.
We just bought a house in Kingman, Arizona for our retirement (which starts December 23rd), and so many houses that we looked at (and the one we bought) don’t have window trim. What I mean is they have drywall window returns. It’s not a look I’m used to, and I don’t really care for it. I’m not sure whether to put a trim like this on the windows or not. Maybe I’d be messing with the esthetic of the house. What do you think?
My house has a similar look, except the walls are not made of drywall. When we first bought the house, I had the same thought as to whether I should add trim. The main thing that stopped me was the fact that we have marble sills, and I thought wood trim might look strange. After 5 years in this house, the trimless windows have grown on me. And, with curtains, I don’t even really notice it anymore.
Thanks, Aimee. I believe I’ll live with it, too, before making any decisions. I don’t want to change the look of the house which is in the desert—totally new to me, but I want to embrace that.
Thank you, Kristie! Your instructions are crystal clear as always. These casings are elegant and timeless. I can apply these to all styles especially farmhouse and cottage which right now people are requesting like crazy. Also, we out here in internet land, really appreciate how you keep the posts and photos coming. Blogging is a full-time job in itself! Don’t know how you do it all. (Clapping and whistling!)
Thanks for the detailed instructions to make this window casing. I really like this look! What type of wood did you use for this?
I used pre-primed finger joint boards from Home Depot.
Hi Kristi … I’m using this quarantine time to finally do this window trim project in our house! Did you use PINE finger joint boards? Home Depot has Pre-primed PINE finger joint boards .. just wanted to be sure. Thnx!
Yes, that’s exactly what I used. Good luck! 🙂
Following this guide right now! Thank you
Thank you so much for your tutorial on window trim. I love it and the trim looks beautiful! I just bought a 1960’s home that had colonial trim around all windows and doors. I replaced all the hollow-core doors with more contemporary 5-panel doors and got rid of the colonial door trim. The windows still have the colonial trim. My idea was to replace all trim with something like yours. I was looking at a huge trim project throughout the house and was feeling a bit overwhelmed! I know it will take me a very long time to replace all the trim but your tutorial makes me feel more optimistic! I love seeing women take on projects like this, so thank you for sharing and for encouraging me to try this myself!
Thank you for the awesome tutorial! Do you still use a 1×6 for the header piece on top of the doors or a 1×4 with the two 1x2s?
Yes, I still use a 1×6 for the header. I think a 1×4 would look too skimpy for my personal taste.
Do you think this would be successful with a hammer and nails? I do not have a nail gun but would like to do a similar project. Thanks for your help!
Yes, you can use a hammer and nails, but you’ll also need a nail set. You can purchase a set of three for about $10 from Home Depot. It allows you to countersink the nails so that they won’t show. It’ll be slower with a hammer and nails, but it’s definitely possible! When I was remodeling our condo, I didn’t own a nail gun for about the first three years, so I did all of the trim (wainscoting) with a hammer and nails.
Thank you! I’ve been looking at how to videos for window casings and they are all mitered corners. Your method looks better and it so much easier since I don’t have the hundreds of dollars to buy all the tools to make mitered ends. I love your detailed descriptions and how the finished window looks! Thanks again!!!