Studio Bathroom Progress (It’s Not Much, But It’s Progress!)
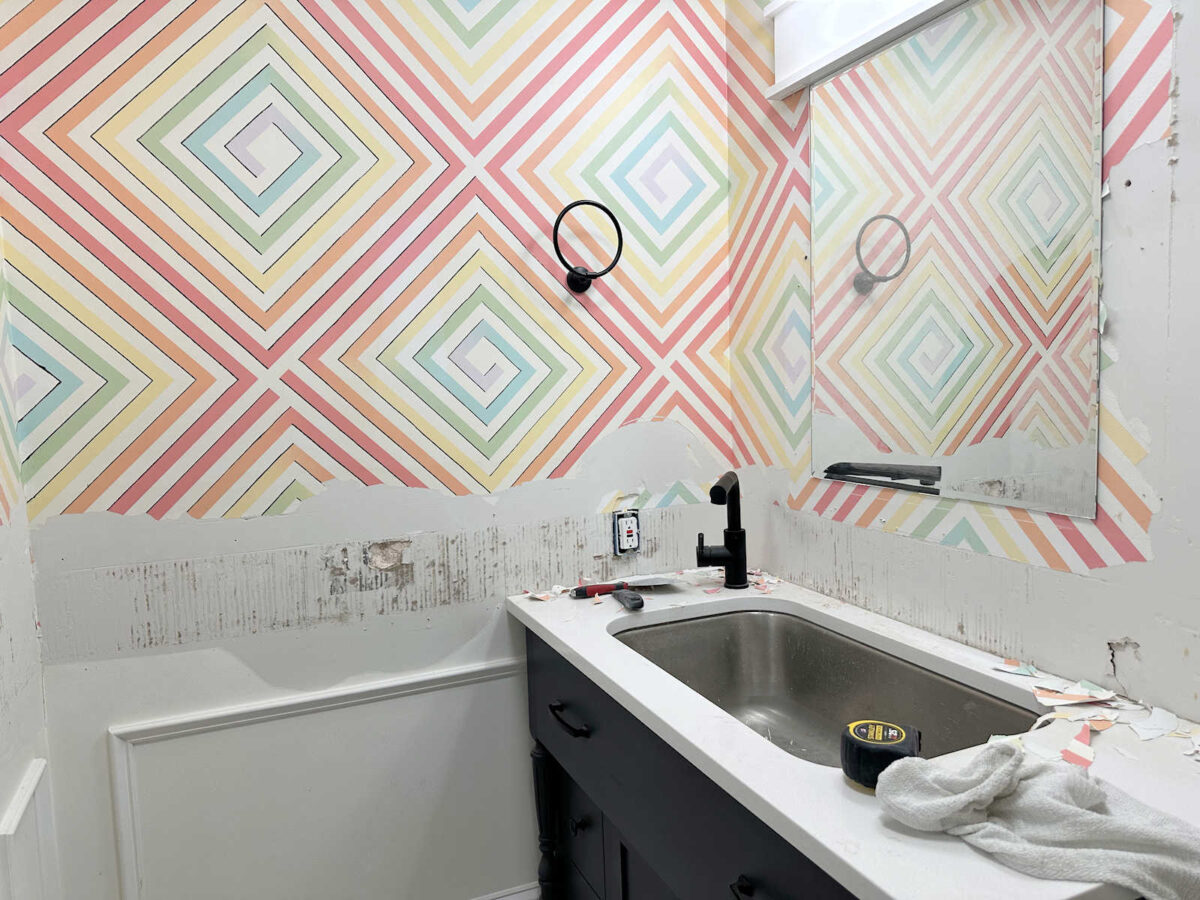
Yesterday was my first workday on the studio bathroom, and as is almost always the case when starting a new project, I ran into some problems. But at least I made some progress, so I’m heading in the right direction. 😀
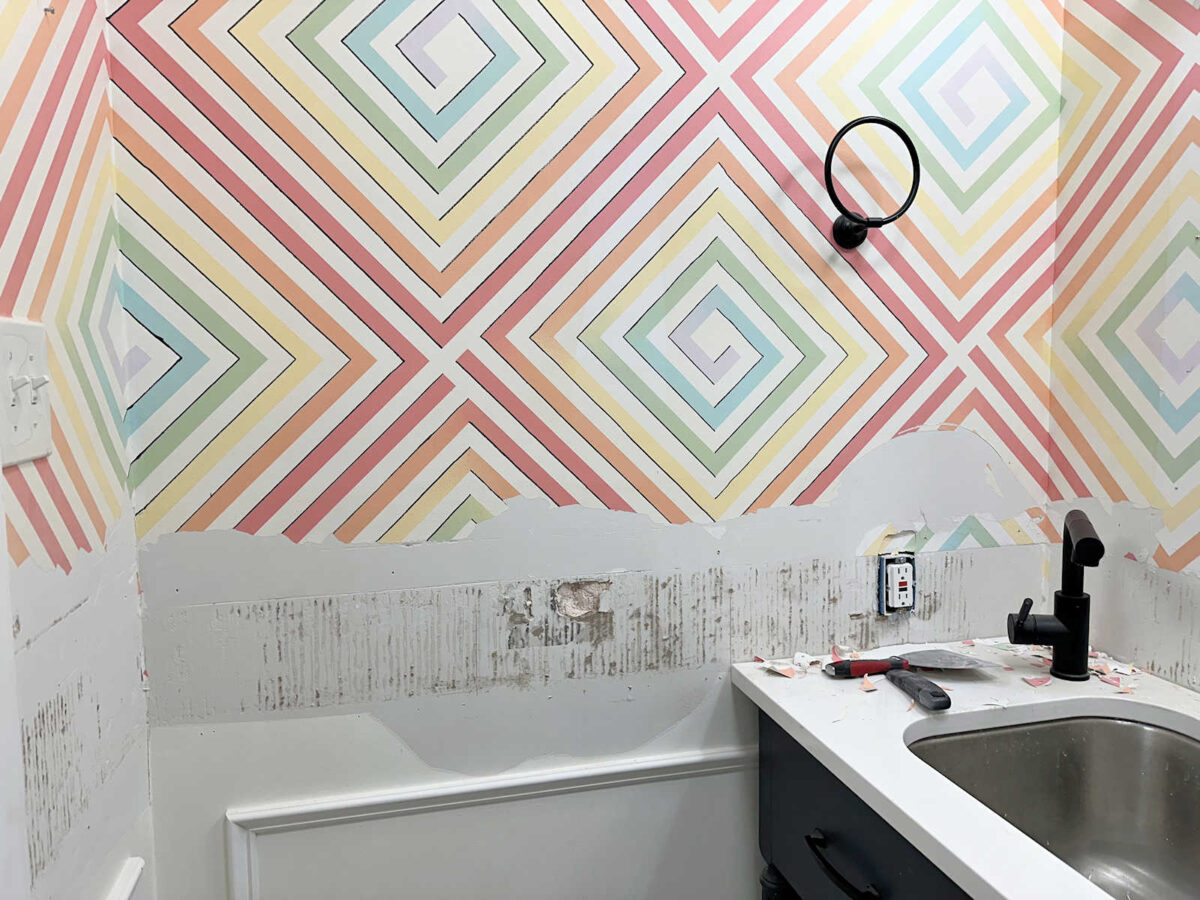
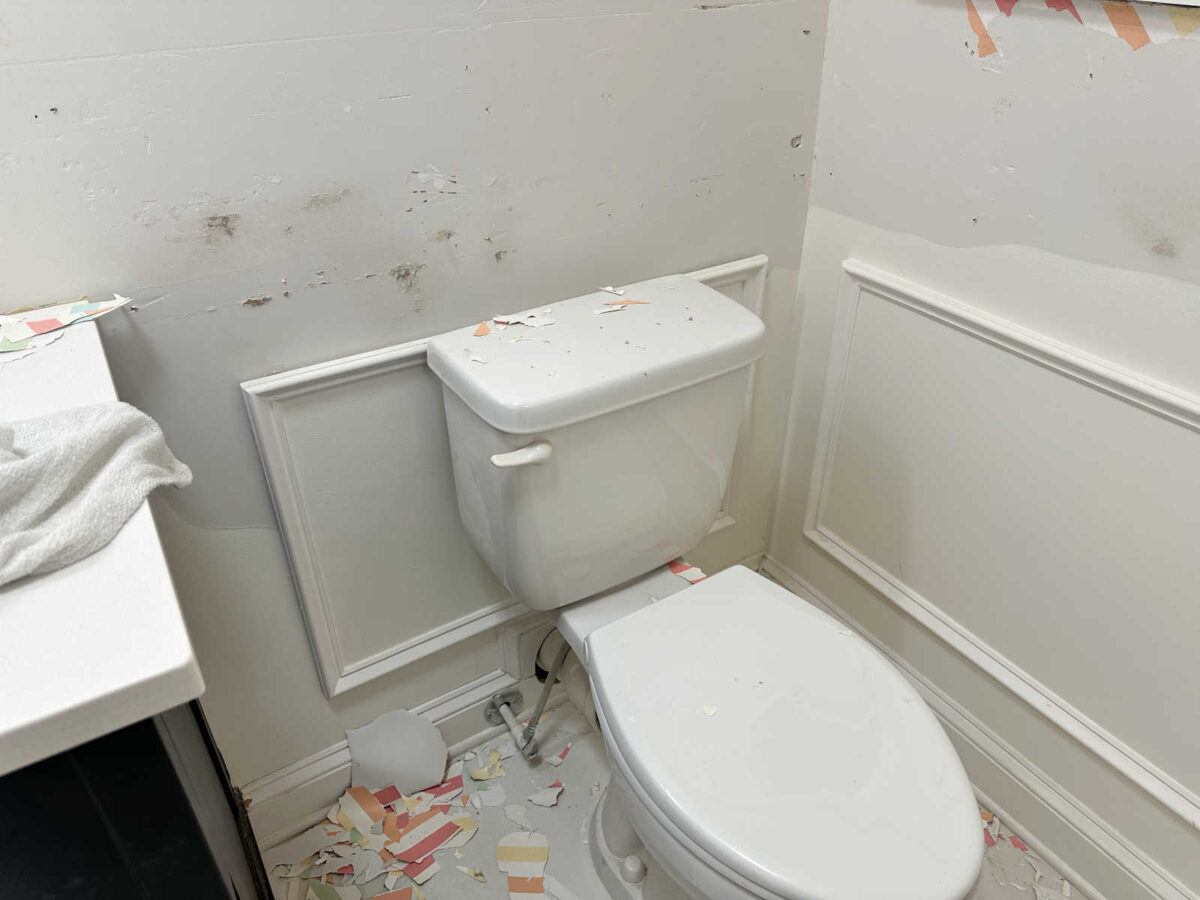
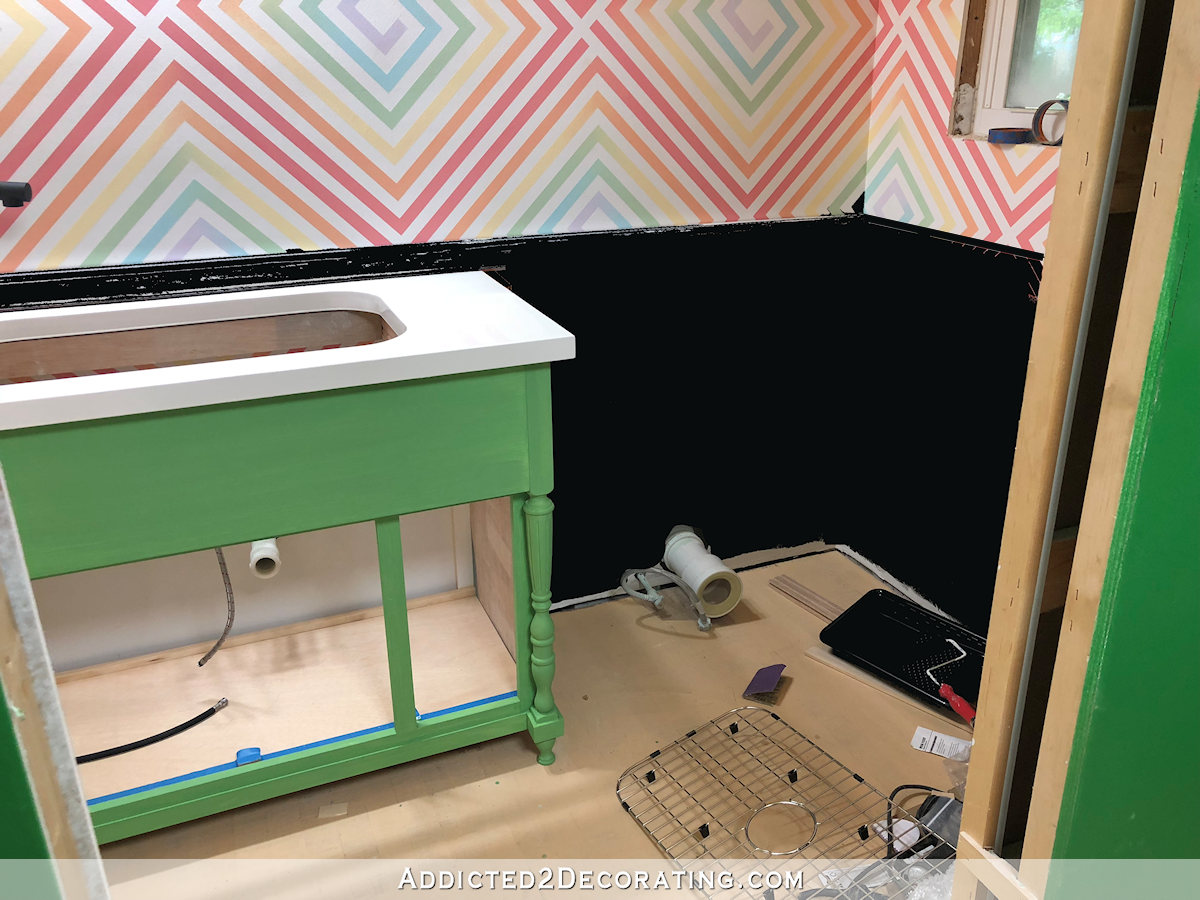
My main goals yesterday were to (1) clean out the bathroom and remove all of the stuff that was lying around on the countertop and floor, and (2) get the walls to the point where I could start mudding the rough areas left behind when I removed the chair rail and tile.
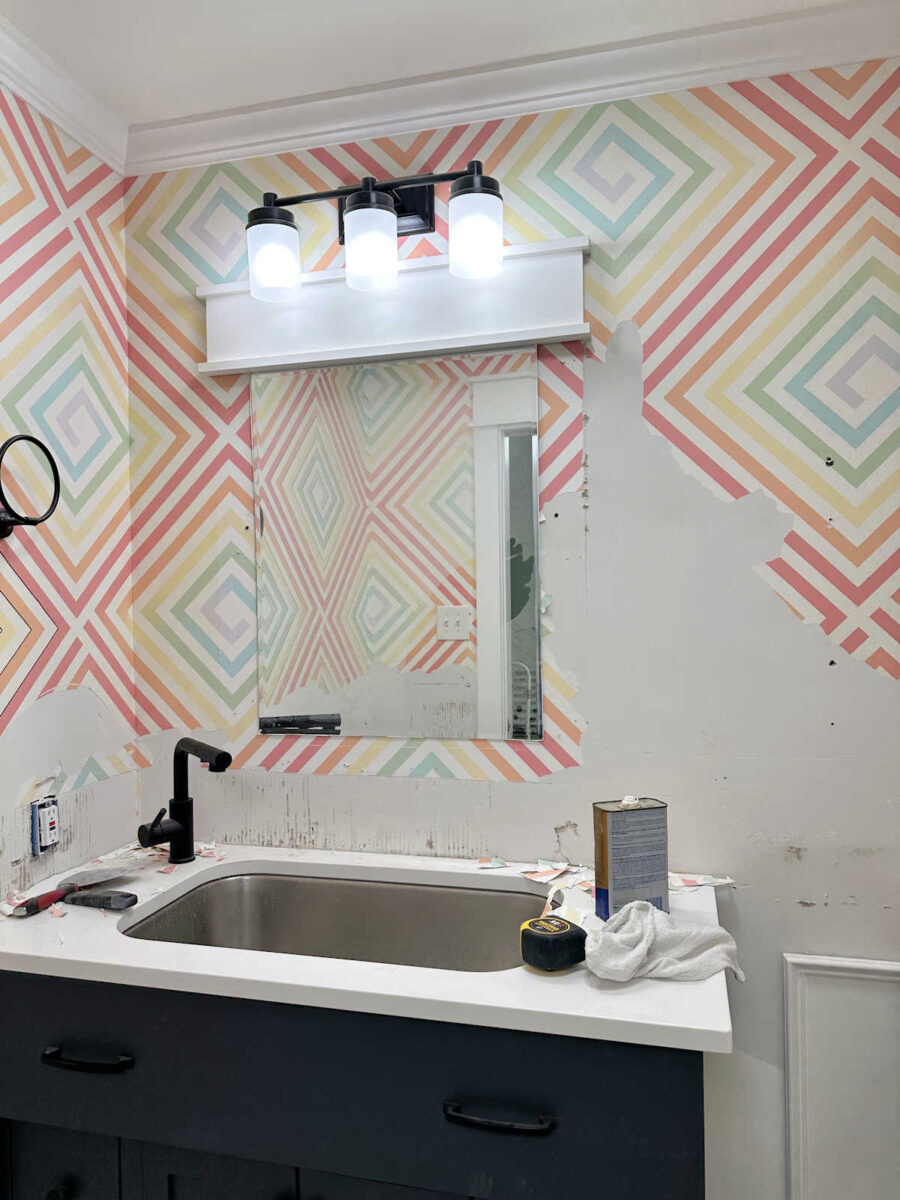
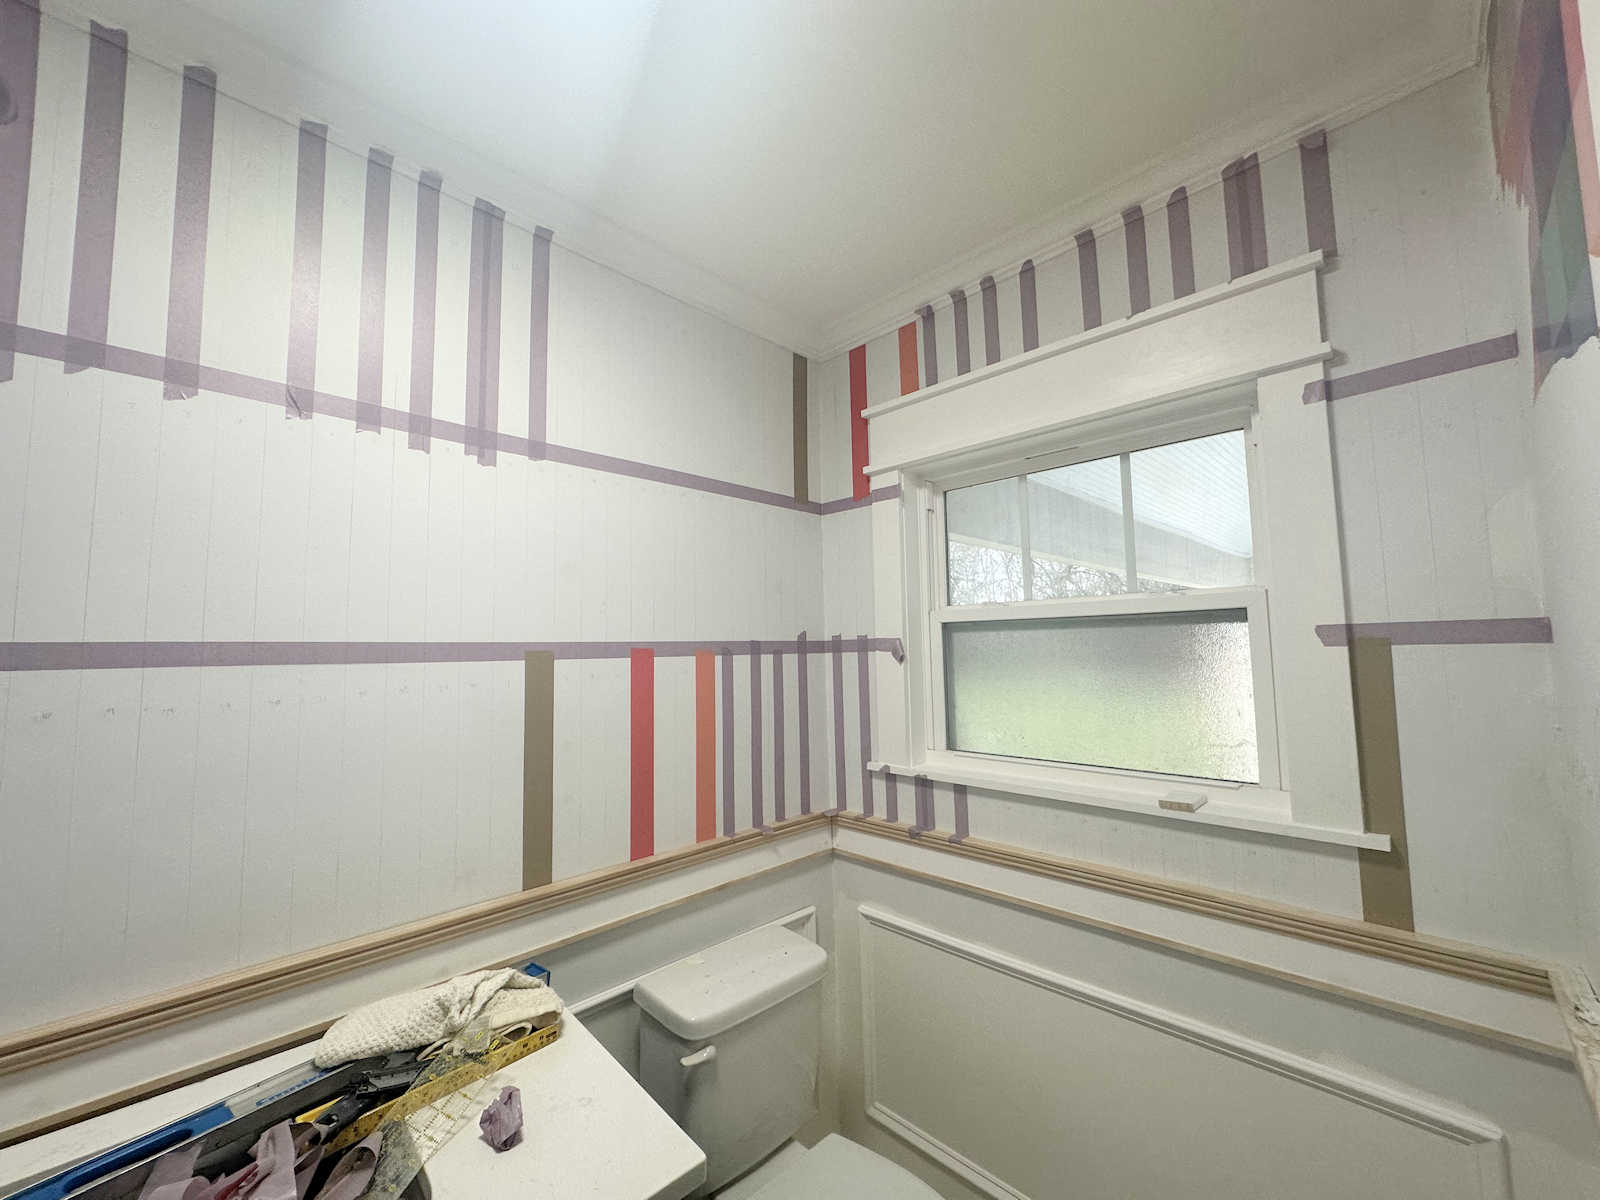
I had installed the tile using those sticky pads instead of mortar, and getting those off of the wall caused damage to the drywall. All the way around the room, it took off the primer and paint layer, leaving the primer and paint layer that remained very loose and jagged. So I needed to get that smoothed out so that I could put drywall mud over it. That process went fairly well on this area…
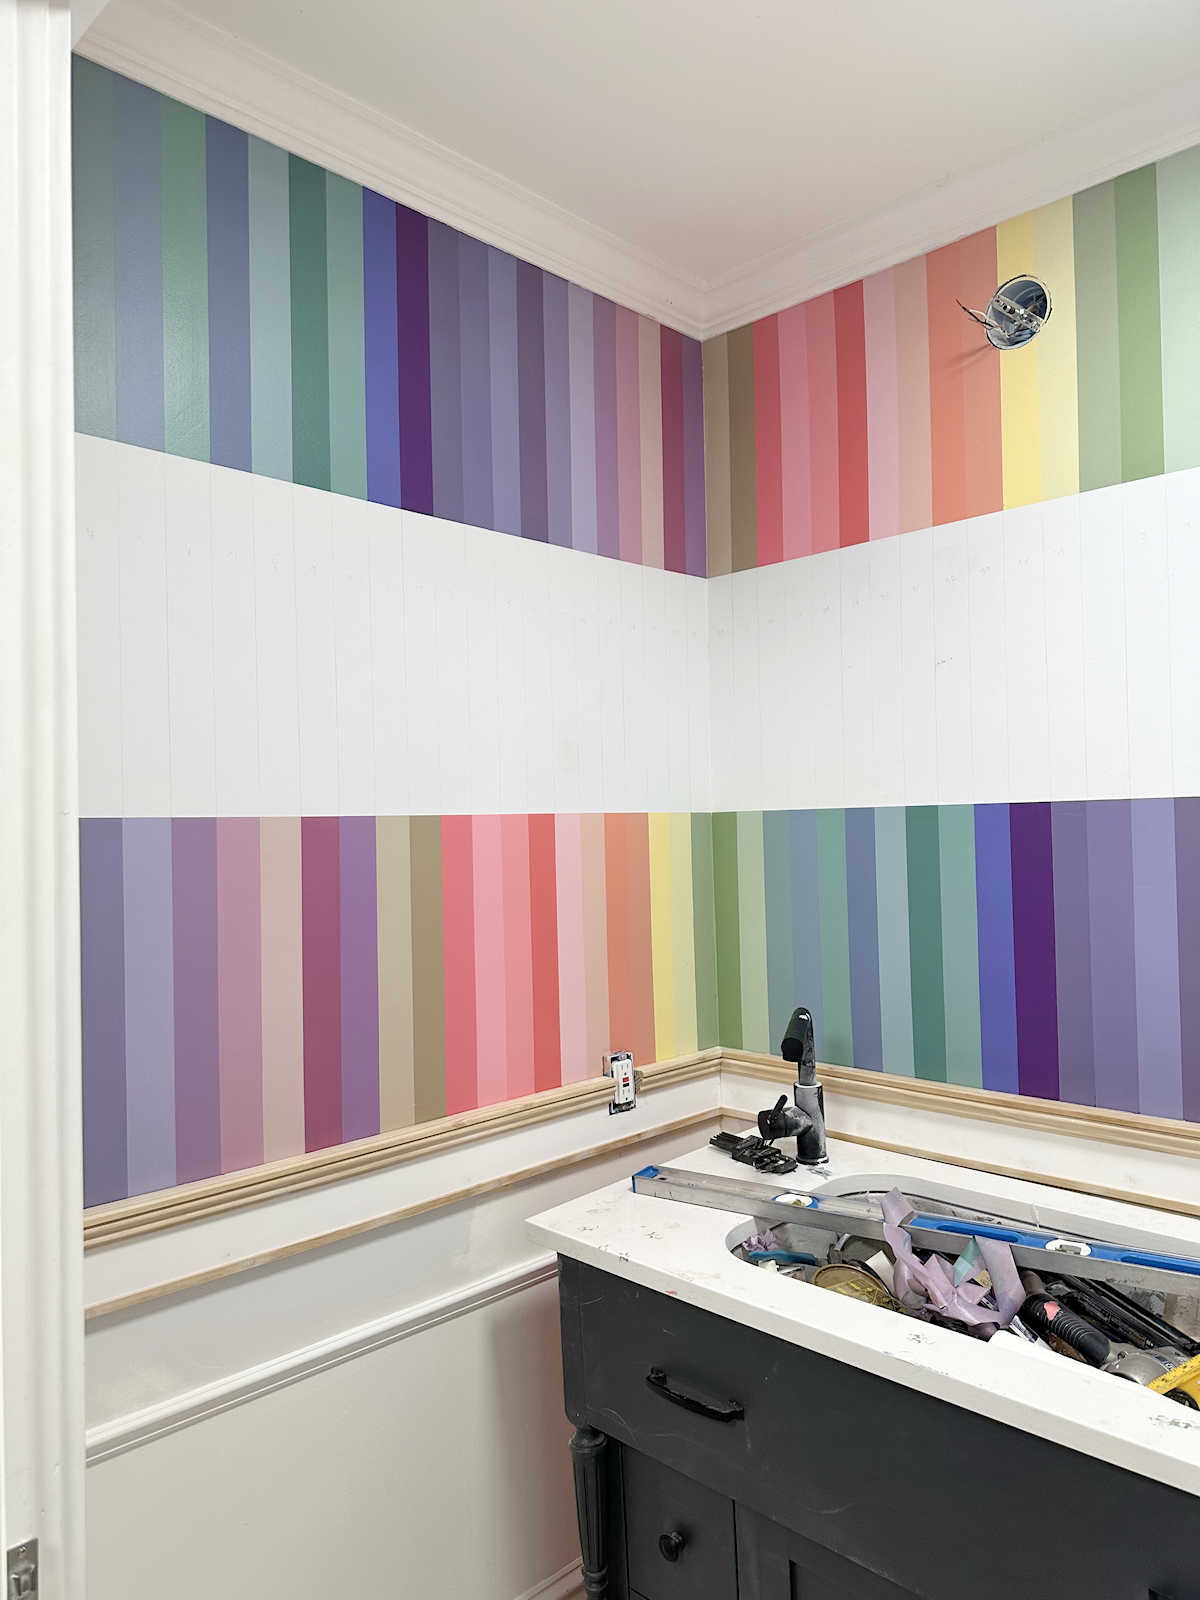
I was using a 6-inch metal drywall knife to do this, and when I got to this wall, the primer and paint layer came off like I was removing wallpaper. I’m a bit obsessive when it comes to peeling things, so I just kept scraping and peeling, and before I knew it, I had peeled this much off of the wall.
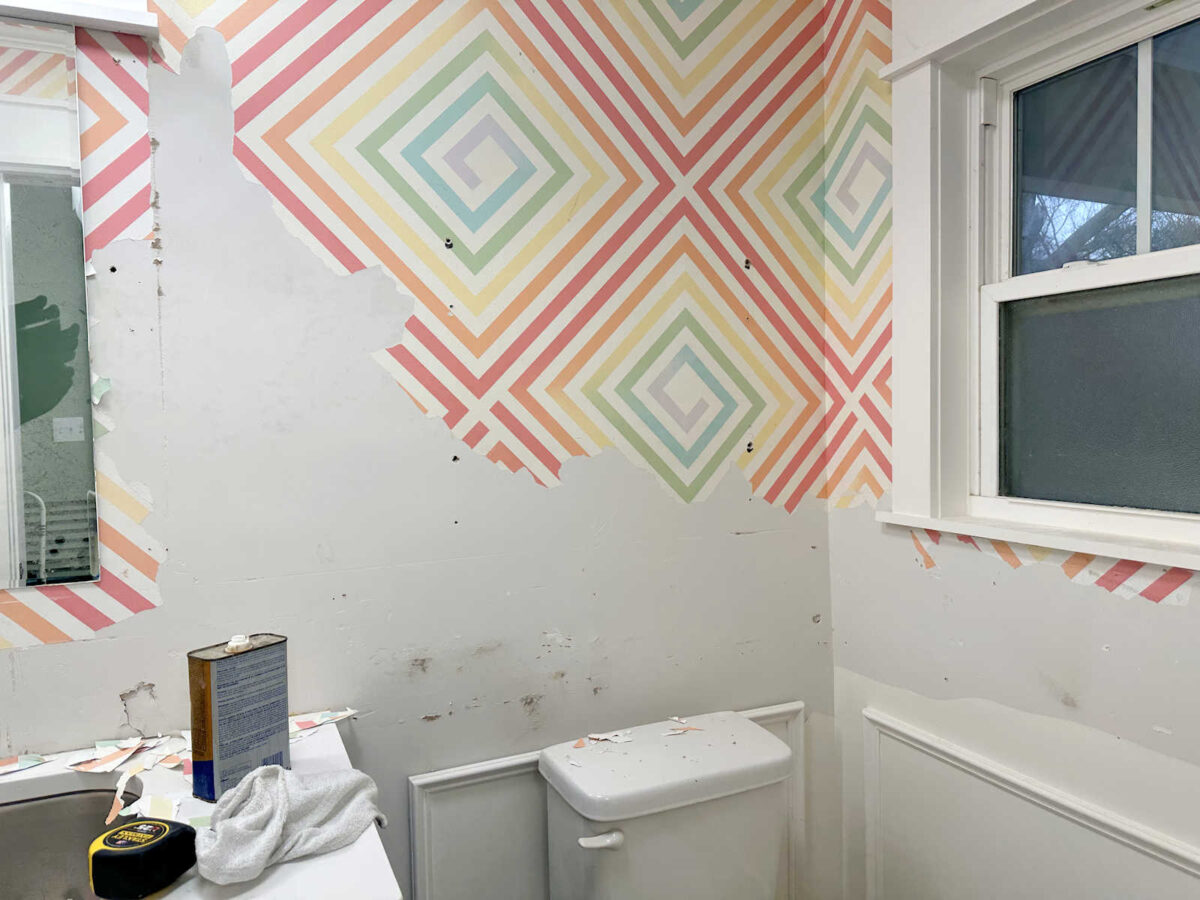
I could have kept going. I wanted to keep going because, again, I have this weird obsession with things that peel off easily. But I realized that if I didn’t find a stopping point, I’d spend the next week peeling these walls, and that would be a huge waste of time. I just needed to a stopping point where all of the edges were flat and adhered to the wall so that I can mud over the edges. I think I finally have all of the edges to that point now, and I’ll be mudding the room today. My goal is to get the walls sanded, primed, and ready for wallpaper by the end of the day today.
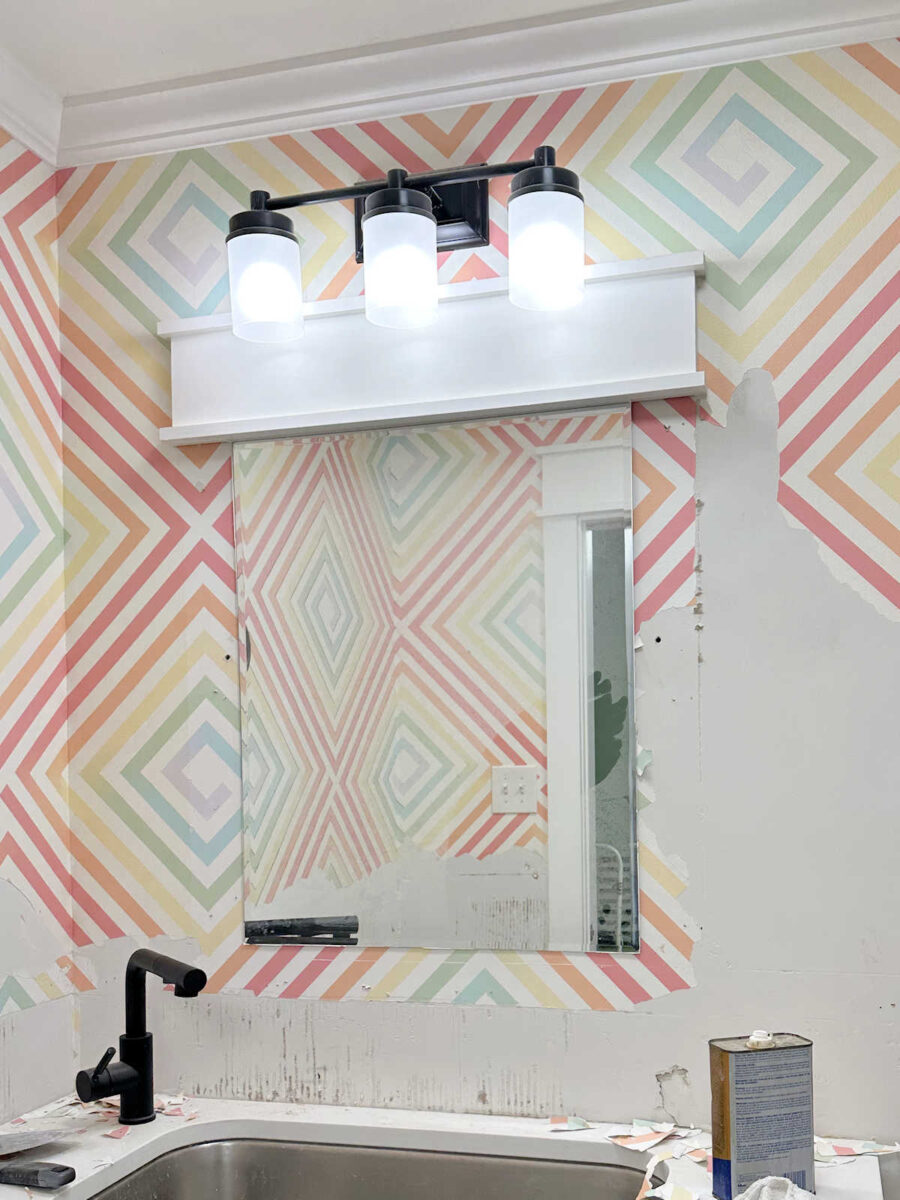
I ran into a problem with the mirror, though. I cannot get this thing off of the wall.
I used to install everything — every single piece of trim — with construction adhesive. I learned many years ago that using construction adhesive on everything is a huge waste of time and money, and if I ever wanted to remove the trim, it destroyed the drywall. But clearly, I didn’t learn that lesson with mirrors.
I know I used mirror mastic to attach this to the wall, and evidently, I used an entire tube of it for this small mirror. I can’t get this thing to budge at all. I’m not concerned about breaking the mirror since I won’t be reusing it. So I wasn’t even being gentle with it. But no matter how much I pried, and no matter what I used to shove between the wall and the mirror to separate the two, I couldn’t make any headway on it. So if you have any advice on how to remove a mirror that’s glued to the wall with mirror mastic, I’d love to hear it!
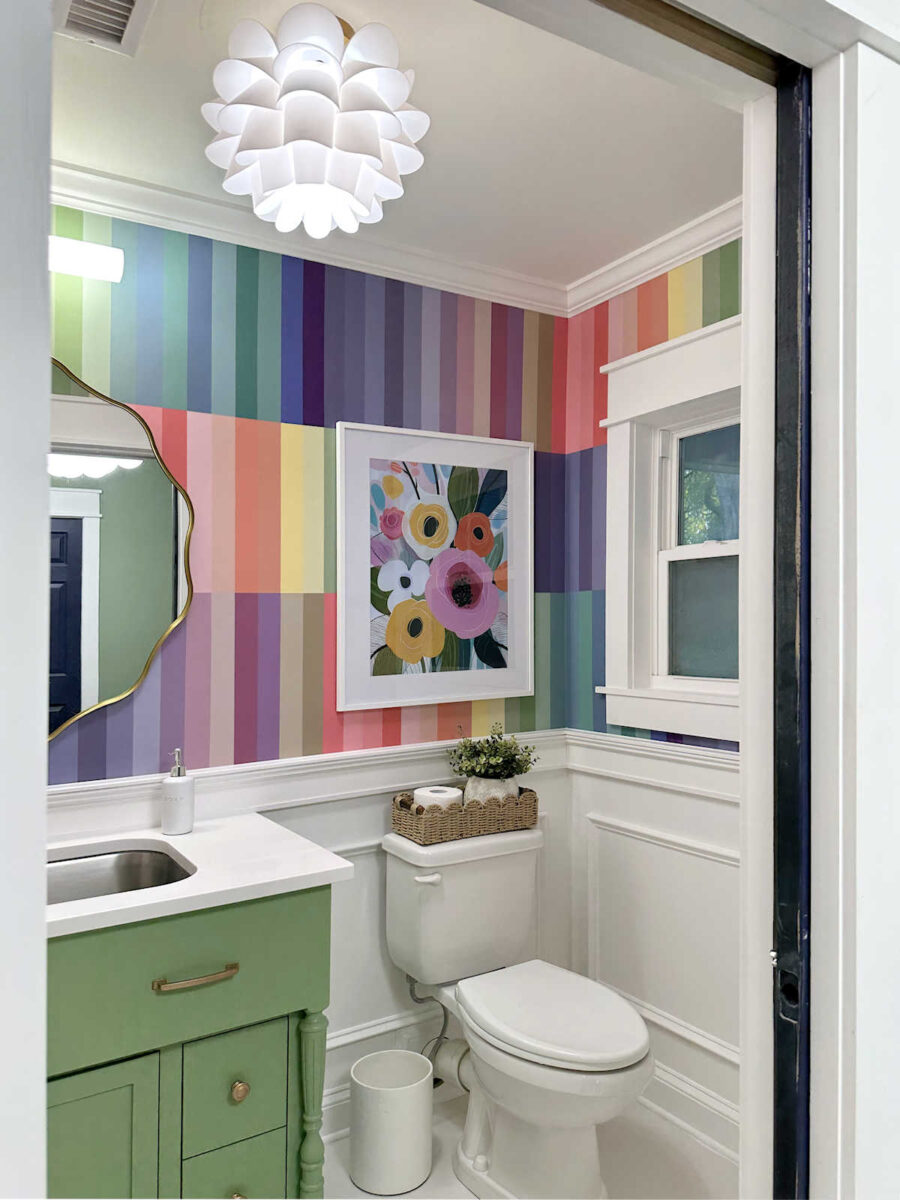
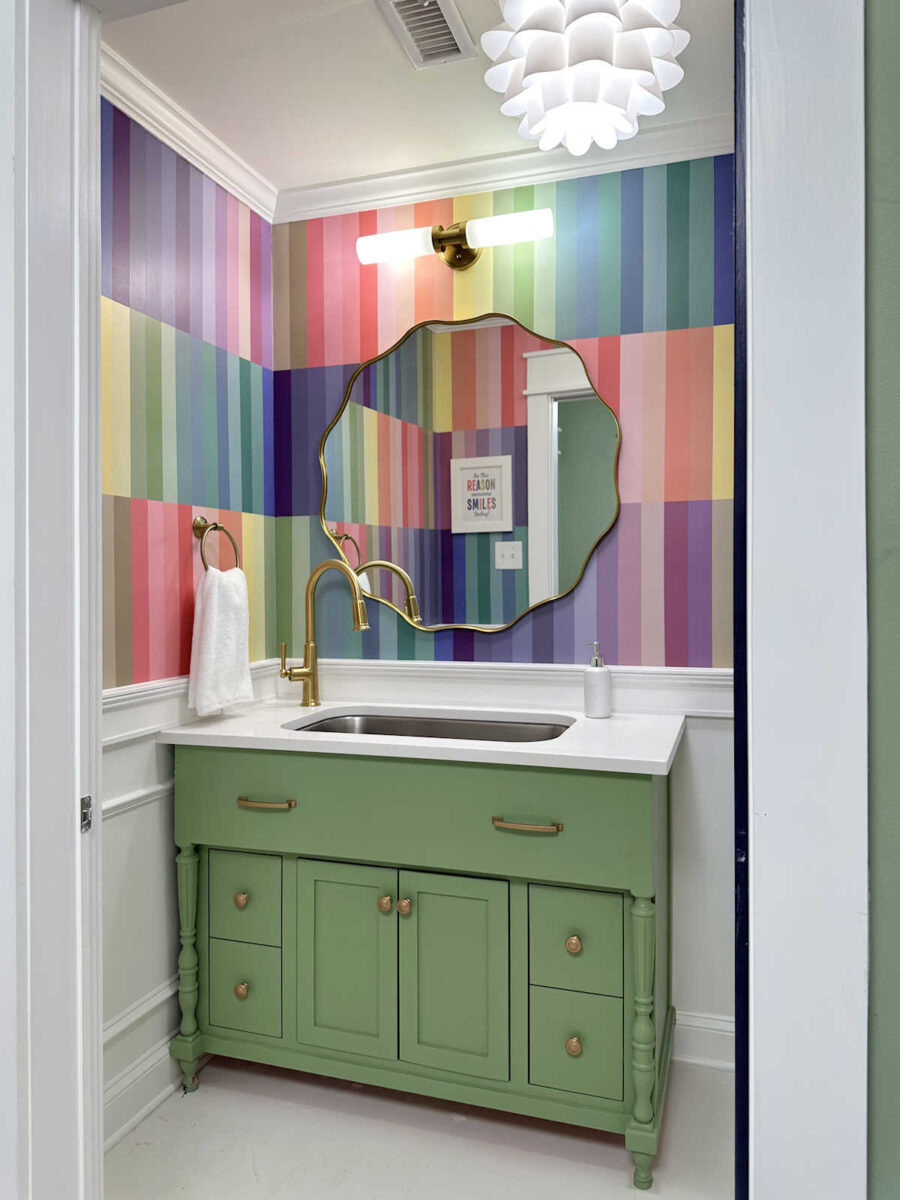
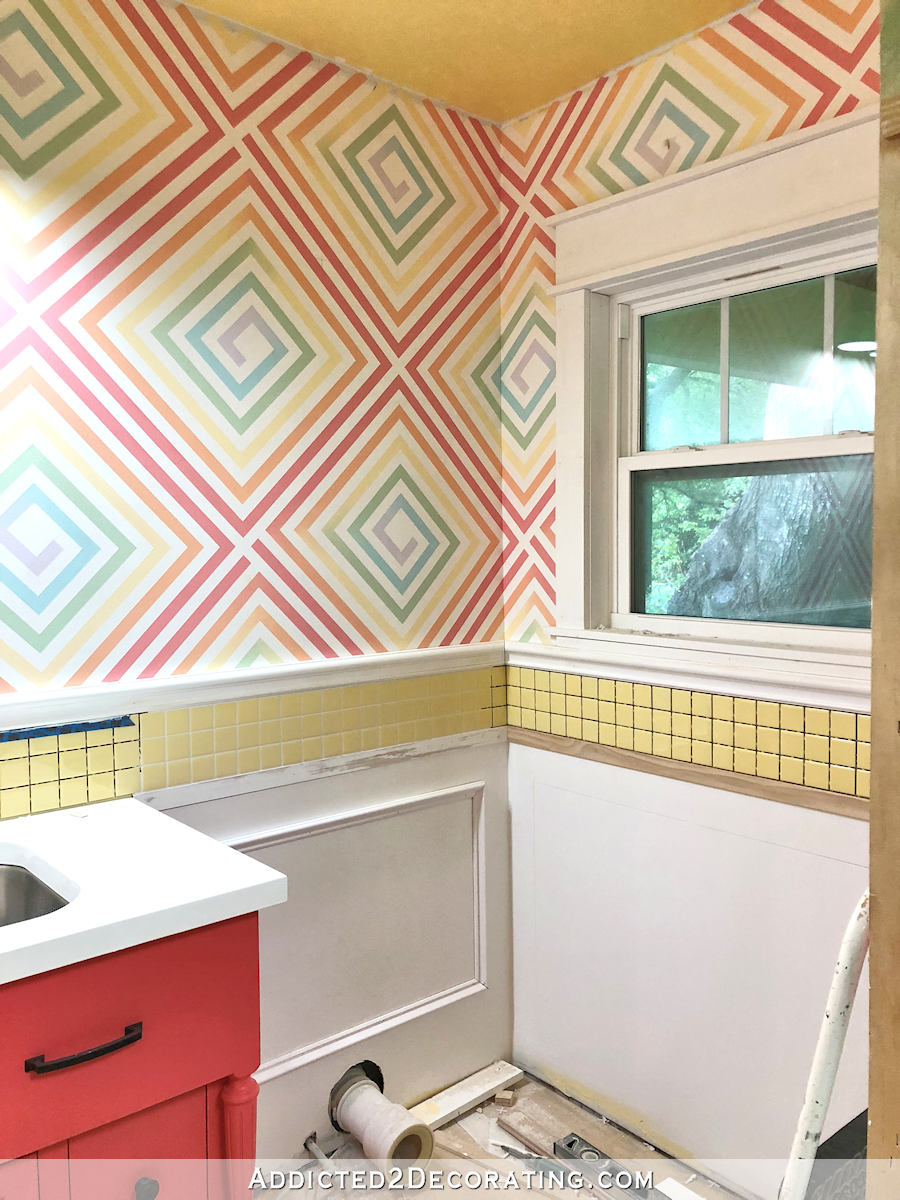
One design decision that I still need to work out is how to transition from the wainscoting to the wallpaper. In this original bathroom design, I used a row of tiles. They provided a backsplash for the sink area, and then I carried them around the room as an accent.
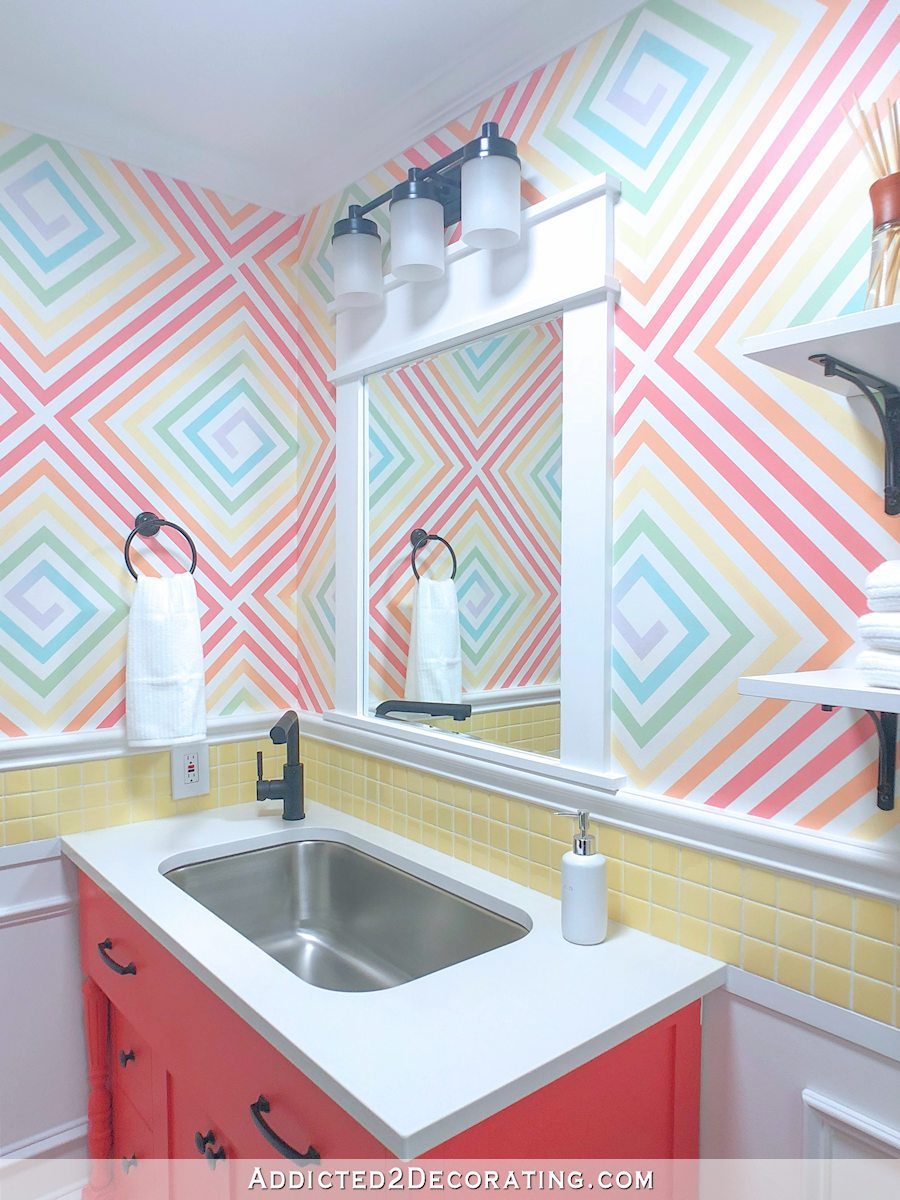
But I can’t even imagine using tiles with this wallpaper. I don’t think there’s any kind of tile that would look good with this wallpaper covered in squares.
Square tiles like I had before certainly wouldn’t work. That would be squares with squares, and that’s overkill. Rectangle tiles wouldn’t work, either. I thought about using white penny tiles with white grout, but when I try to picture that in my mind, I think it would be way too busy also.
So I think I’ll end using wood. Initially, I thought that using wood might not be the best idea since it will be a backsplash around the sink area, but people use wainscoting behind and around sinks in bathrooms all the time. It’s actually very common. And it’s really the only option I think will work with the wallpaper. I imagine finishing off the top of the wainscoting to look similar to the wainscoting in this bathroom. (Photo from Houzz. Bathroom by Rachael Liberman Design, LLC.)
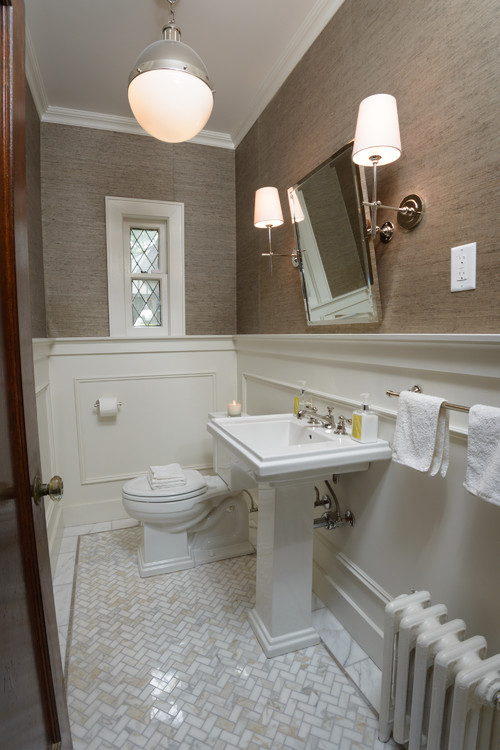
Photo by Rachael Liberman Design LLC – Discover powder room design inspiration
But in my bathroom, that top wide piece of lumber will sit right on top of the countertop. I can envision that, and I think it’s the only option that will finish off the top of the wainscoting without being too busy and competing with the wallpaper.
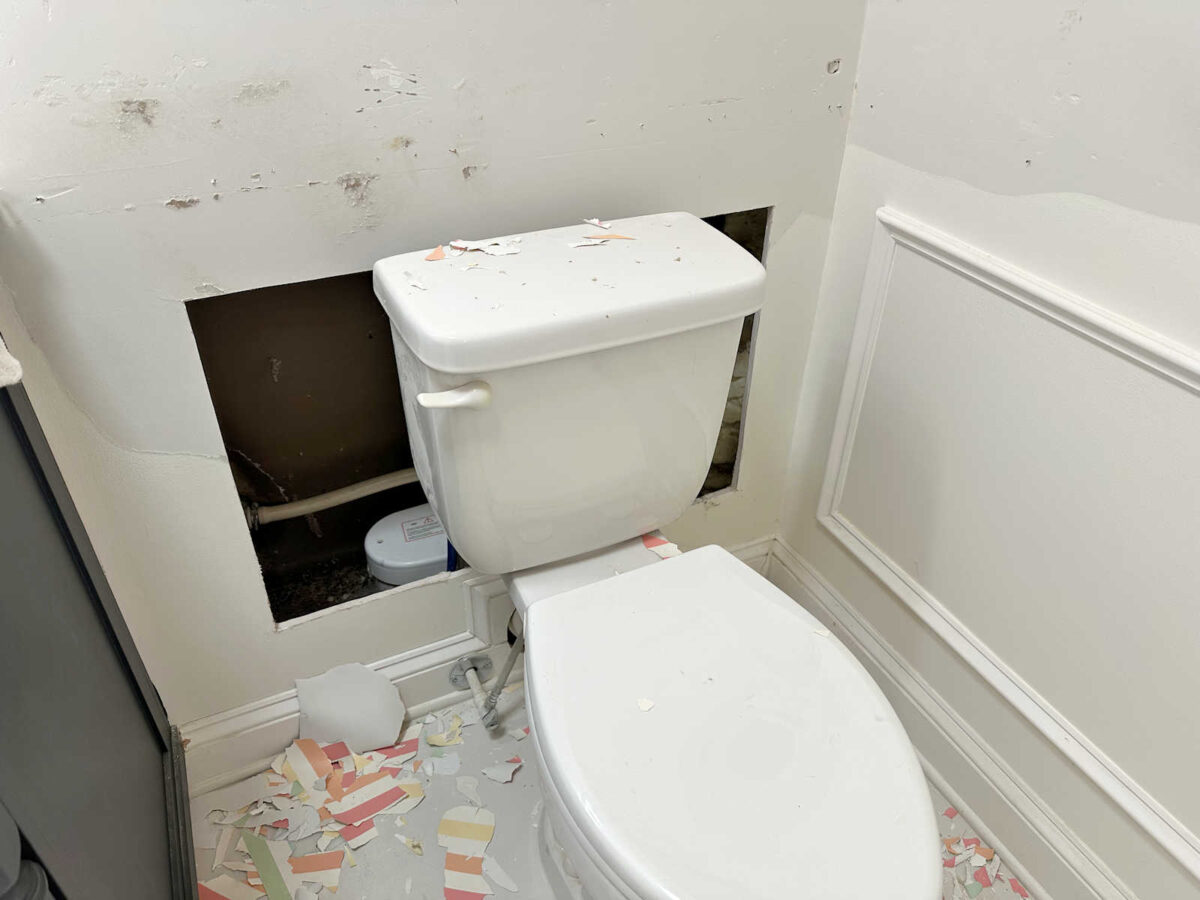
The picture frame molding has to stay exactly where it is. I don’t have the option of making it taller or swapping it out for something different because the whole reason I added picture frame molding to this room is to disguise the removable panel behind the toilet.
That panel is removable to access the pump behind the toilet. So the picture frame molding has to stay, and it has to stay exactly where it is.
So that’s the progress and the plan for now. And now that I have the walls scraped and ready for drywall mud, I’m hoping to make a lot of progress in here over the weekend. I’m anxious to get that wallpaper up!!
More About My Studio Bathroom
see all studio
bathroom diy projects
read all studio
bathroom blog posts

Addicted 2 Decorating is where I share my DIY and decorating journey as I remodel and decorate the 1948 fixer upper that my husband, Matt, and I bought in 2013. Matt has M.S. and is unable to do physical work, so I do the majority of the work on the house by myself. You can learn more about me here.

During the pandemic, my husband and I did a partial bathroom remodel. We removed huge landscape mirrors on two walls. We read youtube posts. We used shims and very carefully moved them. The mirrors were attached with blobs of mirror adhesive,but very few.
With all the mudding you are doing it may be easier to remove and replace the drywall on top half of the wall. That way you choose where the edge is for a patch. See if you can remove the drywall with the mirror on it. Take time to remember what’s in the wall first. I’m not sure where the plumbing and electrical is there. I’m overthinking how much the sandwiched screws will hold the the patch onto the studs. If that sort of yanking will shake the wall too much to cause a crack somewhere. If the removal like that can work out, you can also add blocking behind the drywall to make hanging a new mirror easier.
I would get something sticky, like contact paper, and cover the mirror with it so if (and when) it breaks, it won’t go all over. I have a saw for trimming tree branches that has a long blade attached to a kind of arched chrome handle, and I would remove the blade and slide it from the top to the bottom of the mirror back, in a sawing motion. If that didn’t work, I would cut the drywall around the mirror and replace it with a new piece. As for the trim piece, can you just stop it around the sink counter? You could give it a finished edge with a small piece turned on edge if needed. I think it would look weird to run it on top of the counter.
Maybe use some fishing line or string to “floss” between the mirror and wall to loosen it?
Heat up the mastic with a hot air gun and then use piano wire (handles on each end) to “saw” down through it? Cut out the piece of drywall it’s attached to and replace it?
Also, what countertop will you be using on the vanity? If you’re going with the same one, could you do a piece of plain white marble as the edging? If not, maybe just use a paint that’s rated for outdoor use and treat the area behind the sink like it’s an outdoor wall.
Building on your suggestion of piano wire, there are backpacking/camping saws that are a long wire with rings or handles at both ends. I can’t recall what makes the wire sharp enough to cut through wood, but it is very thin, enough so that it could fit into most gaps between the mirror and the wall. Google “wire camping saw” and several versions from numerous vendors will show up.
I’ll be using the same countertop.
AI
how to remove a mirror stuck on the wall
+8
How to safely and easily remove a large bathroom builder …
To remove a mirror glued to a wall, first tape it thoroughly, then use heat (hairdryer) and a piano wire or wood shims to slowly create a gap, gently prying and tapping the shims to release the adhesive, protecting yourself and the mirror while having a helper support it as it comes loose. Always wear protective gear
You can use sheets of peel and stick adhesive or contact paper that you make sure covers the mirror and then some. Slowly break the mirror and remove. I realize that is easier said than done but it is the only way to get a stubborn mirror off without too much damage to the wall, and yourself. We face a very large mirror in our master bath, and I will be using a glass cutter so I can have some sort of control over how large the pieces are that will be coming off. I will also be using spray adhesive on some cardboard to try and take the pieces off in manageable sizes and not send me to the emergency room. Good luck and I know how clever you are. Slow and steady wins this race.
Cheers to you, Matt and the Fur Babies!
I would try a bit of heat to warm the mastic and then place shims behind each point loosened. Even if you break the mirror hear should loosen the mastic. And a bit of Goo Gone should remove any sticky residue.
Sheila F.
Did you try heat on mirror?
Yesterday you asked for opinions on the paint color for the wainscoting and I really didn’t have a solid choice so I didn’t say anything. After seeing the picture above with the white wainscoting, I think that’s the one. It really makes the colors from the wallpaper pop.
How to remove a mirror with dental floss:
Cut off a length of floss about 6 ft long.
Wrap ends around each hand. Heavy gloves are used here since floss can cut your hands as well.
Starting at the top of the mirror, between mirror and wall, start flossing side to side, just like it was 2 giant teeth.
Floss is very strong, it will cut through the mastic easily unless you used concrete (Lol!).
When you get about halfway down, tape the upper part of the mirror to the wall so it doesn’t fall on you.
It may or may not break during this removal. You might want to put a towel over the vanity to prevent damage to it.
If the floss breaks, get another piece and keep going.
There are fine wires made to do this. Called a “gigli wire” and generally used to remove horns off cattle and goats. It has handles built into each end so no hand wrapping needed. Not sure there is one long enough for your purpose. Measure and check Amazon. The ones listed are apparently poor quality with bad reviews. Might get you through this one mirror. Problems seem to be with the handles. Not sure how thick these are, either.
A little off topic . . . I was SO happy that you used the correct form of the word ‘lie/lay’ in this sentence: “all of the stuff that was lying around on the countertop and floor”.
I hardly ever see that any more – the incorrect form has sadly become standard.
I noticed and appreciated that as well! Grammar nerds, unite! ☺️
Kristi, regarding the mirror- If you have any old contact paper, stick it to the entire mirror, then smash the mirror to pieces using a hammer. With any luck the mirror will stick to the contact paper and you will be able to pry it off the wallboard with a spatula, or a pry bar.
May I ask….why didn’t you keep the painted stripes and tile? It looked nice. And went with the whole studio pallet. I think I remember you saying you were keeping it more calm for guests, but that new wallpaper is not calm. Just curious, no judgement. Seems like a lot of extra work and destroying all the previous work.
Nevermind, I searched back and found you had said they needed to change. It is a shame you have to do all that work over again.
I’d get a piece of quartz cut to size that matches the top and use that like a traditional backsplash. Even if you trim the wall like your inspiration photo, I’d want something that is damp-proof behind the sink.
If you are concerned about a waterproof backsplash, for the piece of wood behind the sink counter, perhaps consider using pvc ‘wood’. Take a look at what Lowe’s has, and that may solve a problem for you. I believe you have used this on some exterior places of your home. I’m hoping they have some that are smooth and would match real wood.
I was thinking the same thing, use pvc trim boards by the sink in the same size as the rest of the room. I recommend priming with a bonding primer like Insl-X Stix in order to paint all the wainscoting the same color.
I too was thinking of that pvc board. We also used it in certain places. It really looks nice, and not a worry for spashes.
If you are concerned about a waterproof backsplash, for the piece of wood behind the sink counter, perhaps consider using pvc ‘wood’. Take a look at what Lowe’s has, and that may solve a problem for you. I believe you have used this on some exterior places of your home. I’m hoping they have some that are smooth and would match real wood.
An idea for the cap moulding above your wainscot paneling: rather than running it straight across the wall on the back of the vanity, have it go up and around a mirror.
Cover the mirror with masking tape or duct tape and just go for it. I’d wear heavy gloves and eye protection, perhaps a hair covering if you have one.
Good luck…maybe do this tomorrow (Saturday) just in case….iykyk😬
What? No Friday the 13th? 😁😁😁
The suggestions for putting something sticky on the mirror before trying to remove are great but consider something stronger like duct tape or packing tape. Contact paper will not be able to take the weight of any larger pieces and you won’t have much control over the size of the pieces. Although you could try using a glass cutter and cut some squares. Definitely cover anything in the room that the mirror could damage. Cardboard and towels will help a lot.
It may be quicker to remove the mirror by removing it and the wallboard and then just patch the wallboard. If you cut around the mirror in a neat square, I bet patching the whole will take a fraction of the time trying to scrap the mirror off the dry wall and then needing to patch it anyway.
Ack! Whole == Hole
Use a “cut-off wire” or a “cable saw” to get behind the mirror and cut through the adhesive. They come in different lengths.