Studio Desk Makeover – FINISHED! (Plus, Adding Wood Veneer To A Desktop)
My studio desk is finished! I had initially planned a quick and easy desk makeover, but in the end, I basically ended up rebuilding the desk. I built the original desk a few years ago. For some reason, I thought I wanted a very basic, modern desk. It had a black base and a dark stained top. But the desk didn’t look right in the studio, where I was making a point to make things lighter, brighter, and more feminine. So I set out to turn the original desk into something more fitting for my studio.
Here’s a look at how the desk looked after I built it a few years back…
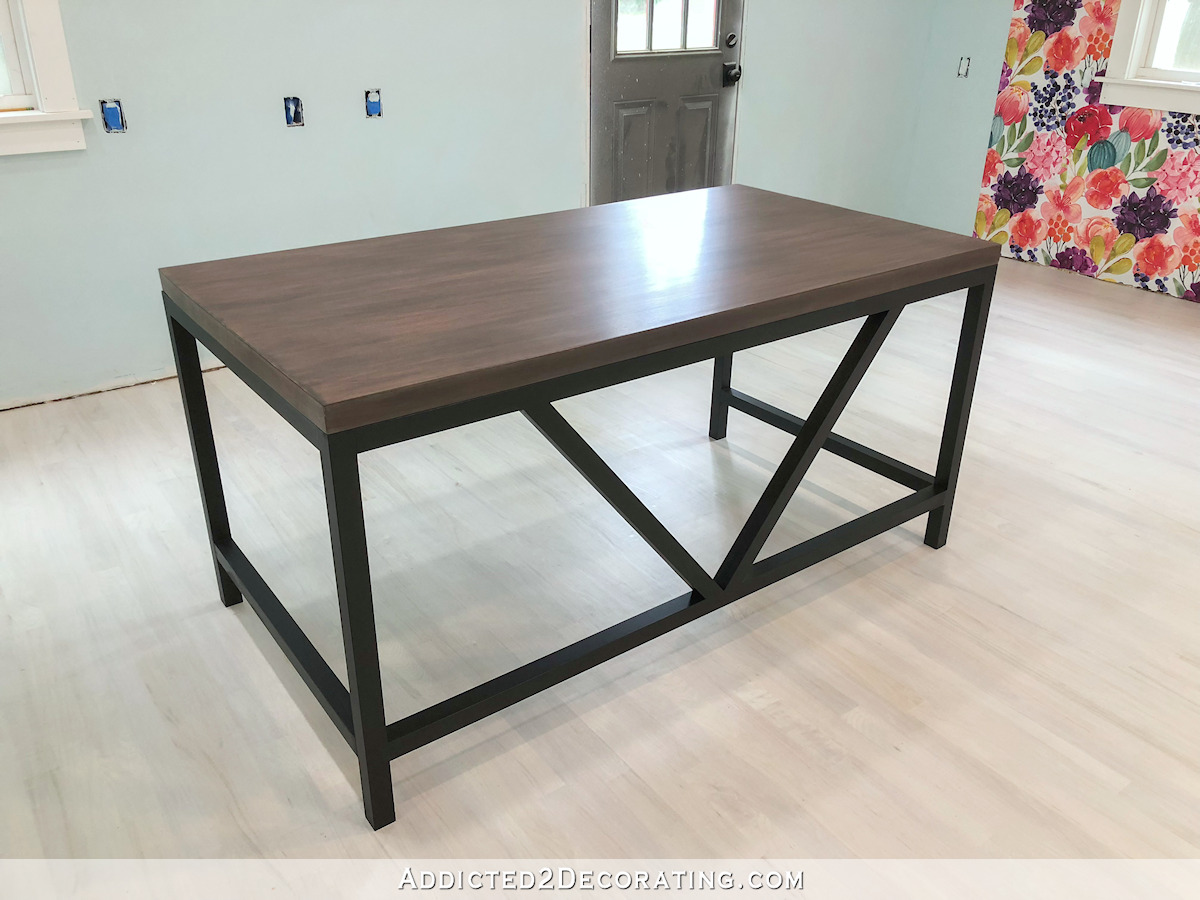
If you want to see how I built that version of the desk, you can see that post here: My Finished DIY Writing Desk
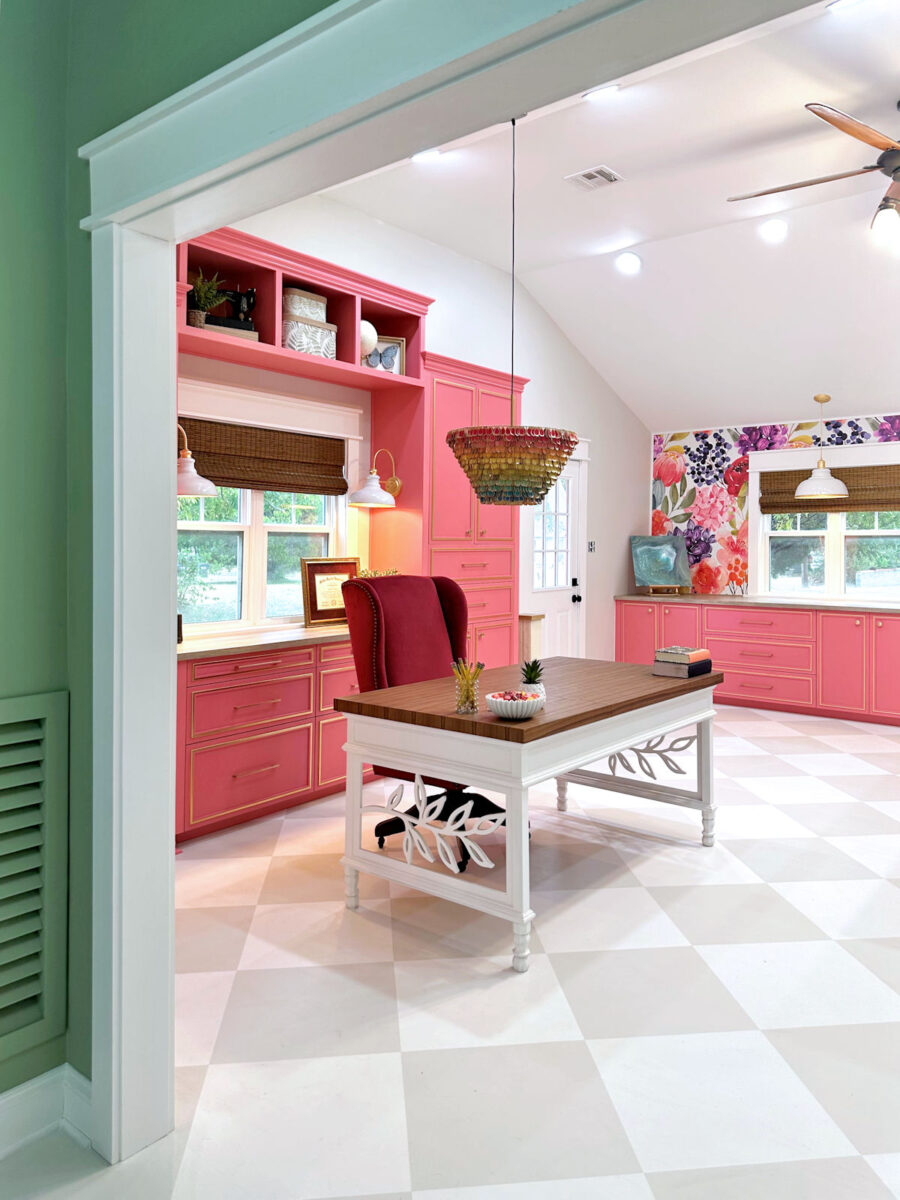
And here’s what the desk looks like now…

This post is Part 4 of this studio desk makeover project. If you missed the previous posts, you can find them here:
Part 2 – Studio Desk Makeover (It’s Just Not Quite Right)
Part 3 – Studio Desk Makeover – Adding Trim, Furniture Feet, and Other Details
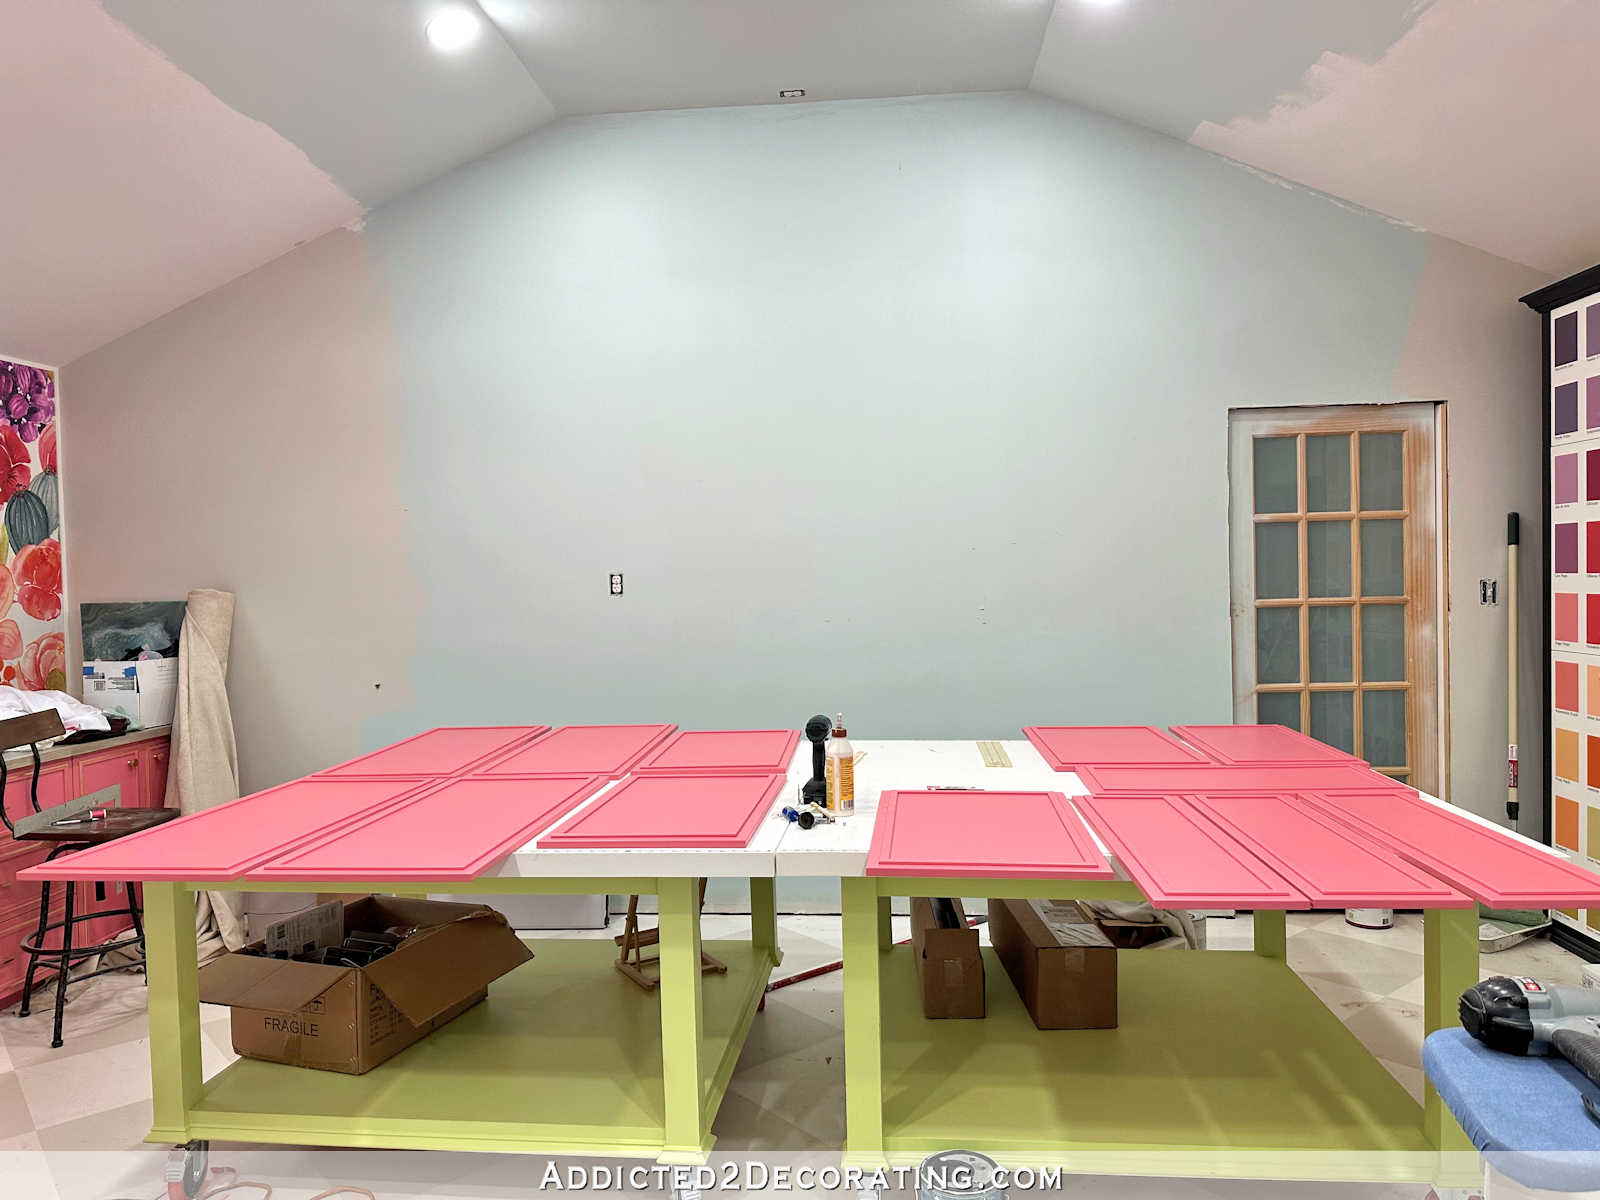
In my last post on this project, I had finished the desk base. Once it was all painted one color, it looked like this…

The next step was to finish the desktop. The original desktop was the same dimensions as the base. That gave it a modern look. But on this version, I wanted the desktop to extend past the base to give it a more traditional look. I didn’t want to start from scratch, though. The original desktop was a solid core door, which was very heavy and durable. I wanted to use it, but I needed to add to the edges before gluing on the veneer.
So I cut strips of 1-inch lumber, ripped to the correct width using my table saw so that these strips would cover the edge of the desktop. And then I nailed these strips onto the edges of the desktop using 16-gauge, 1.5-inch nails.

Here’s what it looked like with the strips attached to all four sides…

Since all of this would be hidden under veneer, there wasn’t any need to miter the corners…

But just one strip wasn’t enough. That only extended each side an additional 3/4-inch, and I needed double that. So I added a second strip to each side…

Again, I didn’t bother mitering the corners. But I did use my sander to make sure the corners where the boards met were very smooth.

Here’s what it looked like with two strips attached to all four edges.

Next, I gave the top a quick sanding with 100-grit sanding discs, not only to remove the paint and glue that were on the desktop, but also to make sure the transition from the original desktop to the newly attached strips on the edges was very smooth with no high spots.

Then I was ready to attach the veneer. I used a 4′ x 8′ sheet of quartered walnut veneer for this desktop. I started by placing the sheet flat, and then cutting off a 2.25-inch strip from the right end of the veneer. This piece would be for the right edge, but I didn’t want to attach it just yet.

Next, I cut off a 2.25-inch strip on the front edge of the veneer. This is the piece I glued on first. I attached the veneer using Weldwood Contact Cement and a 6-inch roller for smooth surfaces. I always put two coats of contact cement on both surfaces (the back of the veneer and the edge of the desk in this case), letting it dry completely between coats, and then letting it dry completely before attaching the veneer. I attached the strip of veneer so that it stuck up above the desktop about 1/4-inch. At least, that was the goal. It wasn’t perfect. Once it was attached, I used a floor roller to make sure it was securely attached, and then used a utility knife with a brand new blade to cut off the excess 1/4-inch (or more) from the top edge of the veneer.

The next piece that I attached was the top. After coating both surfaces with two coats of contact cement and letting it dry, I placed strips of scrap wood on the desktop about six inches apart, spanning the whole desktop, and then placed the veneer on top. These strips kept the veneer from touching the desktop before I was ready. I lined up the right edge and the front edge so that the veneer overlapped about 1/4-inch, and then pressed the veneer into place from right to left, removing one strip of wood at a time and pressing the veneer into place. And then I used my utility knife to trim the right edge and the front edge.

The back edge and the left edge had a whole lot of overlap. I needed to be careful in cutting off this excess because, as much as I could, I wanted to reduce waste so that I could get the grain on the edges to line up with the top as much as possible. And if I cut away too much, and had too much scrap between the pieces, the grain wouldn’t line up.

I ended up losing about 1/2 inch of veneer between the two pieces once I carefully cut off the excess and then trimmed each one…

You can see here that after I cut off the large piece of excess veneer from the left side, trimmed the veneer on the desktop, and then attached the veneer to the left edge, the grain still matched up pretty well, even though I lost about 1/2-inch of veneer in that process.

Also, sanding makes all the difference when it comes to working with veneer. This is one reason I love working with real wood veneer. For example right after attaching the veneer to the left side and trimming off the excess from the top edge, look how rough it looked…

But after burnishing it down a little more, and then sanding that corner, this is how it looked…

And then once I got the excess veneer trimmed off of the bottom, this is how that left edge turned out…

And here’s a look at the finished top, and the two finished edges (left edge and front edge), at that point…

Next, I added the right edge piece. This was the first piece I cut from the big piece of veneer, but I needed to attach the top before adding this edge. It’s a lot easier to match up a small piece to a large piece that’s already in place rather than trying to match up a large piece to a small piece that’s already in place.

And then finally, I attached the back edge (i.e., the desk chair side).

And here’s how it looked once everything was trimmed and sanded.

And here’s a better view of the desktop. Quartered veneer often has interesting patterns in it, and this piece had quite a few. Those don’t bother me, but just note that if they do bother you, and you’re wanting to use veneer on a project, you might want to look for a different cut of veneer.

To seal the desktop, I used the same product that I used on all of the walnut in our bathroom — Rubio Monocoat Oil Plus 2C in Pure (affiliate link). This stuff is AMAZING. It’s an oil plus a hardener, and it’s incredibly durable. All of the walnut in our bathroom looks just as good today as it did the day I finished it, and I’ve never had to recoat.

After mixing the two parts together in a 1:3 hardener-to-oil ratio, I wiped it on with a paper towel. Just note that this is NOT the proper way to do this. It’s so much easier to apply with something like one of those white spongy applicator things that won’t soak up (and waste) a lot of oil, and that won’t leave behind little bits of white in the oil. But I didn’t have one of those applicators, so I just used a paper towel. It wasn’t ideal, but I made it work. Here’s the difference that the oil made in the color…

I wiped oil onto the whole surface, let it set a few minutes, and then used a clean white rag to buff the entire surface. It leaves a gorgeous matte finish on the wood.
And here’s the oiled desktop. Isn’t that pretty?! I love walnut. I just love how deep and rich the color is without being too dark.

Here’s a comparison of the scrap piece of unfinished veneer on top of the oiled veneer.

And with that, the desk was done.

I’m so pleased with how this desk turned out. I love being in the kitchen and looking into the studio to see a glimpse of the desk, pendant light, and pink cabinets. Now I just need my red velvet chair!

My mom came over yesterday, and when she saw the desk with its new top, she said, “Wow! I knew it was going to be pretty, but I didn’t know it was going to be THAT pretty!” 😀

I have to agree with her. I knew it would be pretty, and I could make it work. But I think the final look far exceeded my expectations.

And I just love sitting at this desk, with my arms resting on this smooth wood desktop, and looking up to see that beautiful pendant light. I’ll be spending many hours here, and it’s just perfect.

After all was said and done, I ended up not adding drawers to the desk. I had one problem after another with that plan, so I ended up carrying the top trim all the way across the back (chair side) of the desk, and then I wrapped the other trim around just like I did on the bottom below the leaf panel.

That gives it a finished look for now, while also allowing for the possibility of adding drawers later if I change my mind.

Anyway, I’m so pleased with how this turned out. I was very happy with the original desk for many years. It was a good, sturdy, useful, utilitarian desk.

But I think the new looks is so much better. It fits the studio so much better, and it’s much more “me”.
So that’s one more big project checked off of my “to do” list for this room. I have just a few more, including some electrical work, some trim and door casings, and reupholstering my desk chair.

And then getting this room all cleaned up and organized is going to be quite the job. The thought of tackling that job is a little overwhelming right now.

But at least this one is finished. And I’m just so happy with how it turned out!

More About My Studio

see all studio
diy projects
read all studio
blog posts

Addicted 2 Decorating is where I share my DIY and decorating journey as I remodel and decorate the 1948 fixer upper that my husband, Matt, and I bought in 2013. Matt has M.S. and is unable to do physical work, so I do the majority of the work on the house by myself. You can learn more about me here.

This is definitely a dream studio…so beautiful and functional….love it. I am very jealous! You deserve this room.
Way to go. It looks fabulous! I love veneer’s and you nailed it getting them to line up, not an easy task. That room is really moving along now.
Cheers!
My eyes go from your lovely desk to your once-lovely floor, which you spent so much time on earlier. Will it magically clean up or will it need to be repainted?
One of the reasons I keep reading your posts is that you continually remind me that sometimes we just have to bite the bullet and re-do something. I’d rather eat a horse blanket than re-do something, especially if I’ve invested a lot of time in it already.
The floor is dirty, not damaged. It just needs to be cleaned.
It’s absolutely beautiful – great job! I do have a question though – did you end up using the gold-edging on the leaf details? I tried zooming in but it doesn’t appear to be there. Did that plan get changed? I missed it lol!
It’s there, but it just doesn’t show up well in pictures. It’s very subtle.
Love Love it!
It turned out lovely. Question – I’ve done counter laminate and was taught to do the sides first, then the top. Does it not matter with wood veneer? Is there no visible core as with laminate products?
Yes, with laminate, always do the sides first. I find wood veneer to be much more forgiving than laminate. With laminate, once you trim the excess, that’s pretty much it. You can use a file to get it really smooth, but it’s always going to be obvious that the top and edges are separate pieces that, and the edge of the top piece will always show. With wood veneer, you can sand them so that they kind of meld together and look solid. I’m sure a professional would have a specific protocol when applying wood veneer, but I always apply it in whichever order makes sense and makes it easier to match the grain from piece to piece. And that generally means I can’t start by doing all of the edges and then do the top. But once sanded, it doesn’t really matter to my eye.
The desk is feminine and complements the room well.
I love your desk! It would be so expensive to purchase that exact desk. I’ve gotten so use to buying items on Facebook marketplace I don’t think I could ever buy new again, so expensive, specifically new furniture. You have a nice collection of drawers behind you, beautifully pink (my favorite color besides teal) so a drawer is really not necessary.
Incredible! Looks just beautiful! I’m so happy for you to finally have this finished!
I love this desk. Really feminine and compliments the room. I was surprised you didn’t do the drawers, but enough is enough sometimes, and there are drawers close behind it. Once again a beautiful piece of work. Love it. You did good.
I don’t think I would have bothered doing the gold (I read all the posts to find out if it was there) it doesn’t show up well, and in photos, looks like the white needed a second (or third) coat. I would either paint over it or make it stand out more. Otherwise, the desk is beautiful! Some furniture person will see it and copy the design for mass production I bet! Can’t wait to see the chair with it, but I’m sure you need a tiny break, so…..I’ll wait if I must! =o)
The desk looks amazing! I am loving seeing the full studio come together.
I have one tip for organizing all of those amazing drawers and cabinets, suggested to me before we moved into our new house, and it worked like a charm! Take pictures/screen shots of your studio drawers, shelves, and cabinets head on. Use an editor on your laptop to plan and type out on the pictures what will belong in each drawer and cabinet. It gives you time to be thoughtful and think through all that you want to be able to store in the studio, without being overwhelmed by all of your things as you’re trying to place everything. Once you have the majority of it mapped out, print them out – it’s more easy to implement and follow the map!
I LOVE this idea!! That makes it feel so doable to me.
wow,Wow, WOW! It looks amazing and I’m in LOVE! What a fantastic job you did! You should be so very proud of yourself! Gorgeous and so YOU!
I totally agree with your mom! It is BEAUTIFUL and it looks perfect in your studio!
That last picture, with the desk, the light, the shelves, is everything.
It looks A. Maze. Ing! That view of the desk with the cabinets behind and the pendant light above is just lovely! I like too that the desk is now completely glamorized compared to the work tables; it makes that area look less utilitarian and more stylish. Good job, Kristi!
HINT: Instead of using regular paper towels, get the original VIVA brand. This is what we used when doing china painting on porcelain that is going to be fired in a kiln. Paints are a powdered mineral mixed with oil. You frequently have to wipe the current color off the brush and use a different color after “rinsing” with plain oil. That’s what we use the Viva for! The reason we use VIVA is because there is NEVER any lint left on our projects. That would be a mess during the firing.
Regardless of how you did it, the top is gorgeous! My favorite wood is Hickory and oak,
especially quarter-sawn oak.
Yu are so creative. You go girl & thanks for sharing.
Beautiful job! The room is really coming together.
Kristi you have transformed your desk beautifully! It is SO you!!!! Well done.
The desk is stunning Kristi. You are almost there with the whole studio! also satisfying this must feel, and such a gorgeous place to work and play.
I NEVER would have the guts to attempt working with veneer and yours looks beautiful! The trim pieces you added around the box that would have housed the drawers and the horizontal braces below the side frames holding the vines add so much interest to the desk.
Beautiful!!!!
Beautiful! You are a real problem solver, meeting challenges along the way and pushing through them to success.
An aside — colorful art in your future landscaped back yard?? The New England Botanic Garden at Tower Hill in Berlin, Massachusetts, has art installations in it’s gardens. I saw a newsletter about the most recent one, titled Flora in Flight, by artist Patrick Shearn from Colorado Springs. As soon as I saw it, I said, “Kristi would love this and could do something like this when she gets to her landscaping project! COLORFUL, moved by the wind, reminds me of your studio, too! Here’s the link if you are curious. https://nebg.org/flora-in-flight/
Kristi, your finished desk is amazing! Sturdy, functional and yet so feminine and gives an airy light feel to the room. Your talent and creativity is no surprise, but I am surprised at how beautiful it turned out from the original.
One question, why do you apply 2 coats of contact cement on the pieces of veneer and let it dry? How does it stick if it’s dry? Obviously, I have no experience with it!
I always apply two coats to each surface just to make sure the surfaces are thoroughly coated. This is especially important when putting contact cement on porous surfaces, like unfinished plywood or MDF. The first coat generally soaks in too much, and you need the second coat to get a good working coat. And since I used MDF boards to extend the dimensions of the desktop on the edges, I wanted to be sure that I had a really good coat of contact cement. You let it dry because that’s just how contact cement works. It’s when it dries that it becomes really tacky, and it will stick to itself (i.e., another surface coated with contact cement) while not really sticking to anything else.
All the time, effort and setbacks it took to get where you wanted to be…is amazing! I have some jobs that take more effort and setbacks to finish, and I hope I hang in there as you have done! Beautiful desk and I think worth the time and effort and even the setbacks! Thank you for sharing all of the story, not just the good parts!
I love it! Did you use a topcoat? If so which one? Thanks
On the base, I used General Finishes High Performance Topcoat in a matte finish. I used Rubio Monocoat on the walnut veneer top.
It looks perfectly beautiful. Once the chair is completed and the other small items are finished, you will be so excited to get all the “stuff” organized and the floor clean. Then you can use the studio for what it was intended.
It is so cute to see your animals in the pictures. They want to be right with you to “help”. My dog is the same way. She follows me from room to room.
You are getting closer and closer to the finished project. It will be grand.
I have a couple of questions about the desk top. After you oiled it and rubbed it in/off, that is it? I am so intrigued.
Does that make it oily to the touch? I mean, could you lay a piece of paper down and it not have oil stains? Also, does that waterproof as well? If something spills on it, can it be wiped up without water stains?
The Rubio Monocoat is a two-part product — the oil and the hardener. Because it has a hardener that you mix into the oil when you’re ready to use it, it dries to a hard finish. You can put paper, fabric, or anything else on it once it’s dry, and no oil will come off on those things. The product is actually sold for use on floors, so it’s very durable. It’s also very easy to repair the surface if it gets a scratch. Because it’s oil, it’ll only make the wood so dark. So additional applications don’t darken the wood even more, unlike stain. (I don’t know if that’s true of the ones with color, but it’s true of the Pure that I use.) So if I got a scratch in my desktop, I could sand it out, and then reapply the oil to that area, and it would blend into the rest of the desktop perfectly. It’s an amazing product!
I am in awe of your vision and talent to execute it all! The desk (the entire room, really) is stunning!