This Is Why I DIY (The Cost Of My DIY Upholstered Bed VS. Store Bought Upholstered Beds)
I’m still working on the bedroom and foyer, trying my hardest to get all of these small (and mostly boring) projects checked off of my list before I can call these areas finished. The one big project that still needs to be finished is sewing the draperies. I got one more panel finished (except for the hem) yesterday, so that leaves one more panel. Then I need to hem all four of them. The other lamp is almost finished as well. So things are moving right along, but they’re not fun and exciting blog-worthy projects at this point.
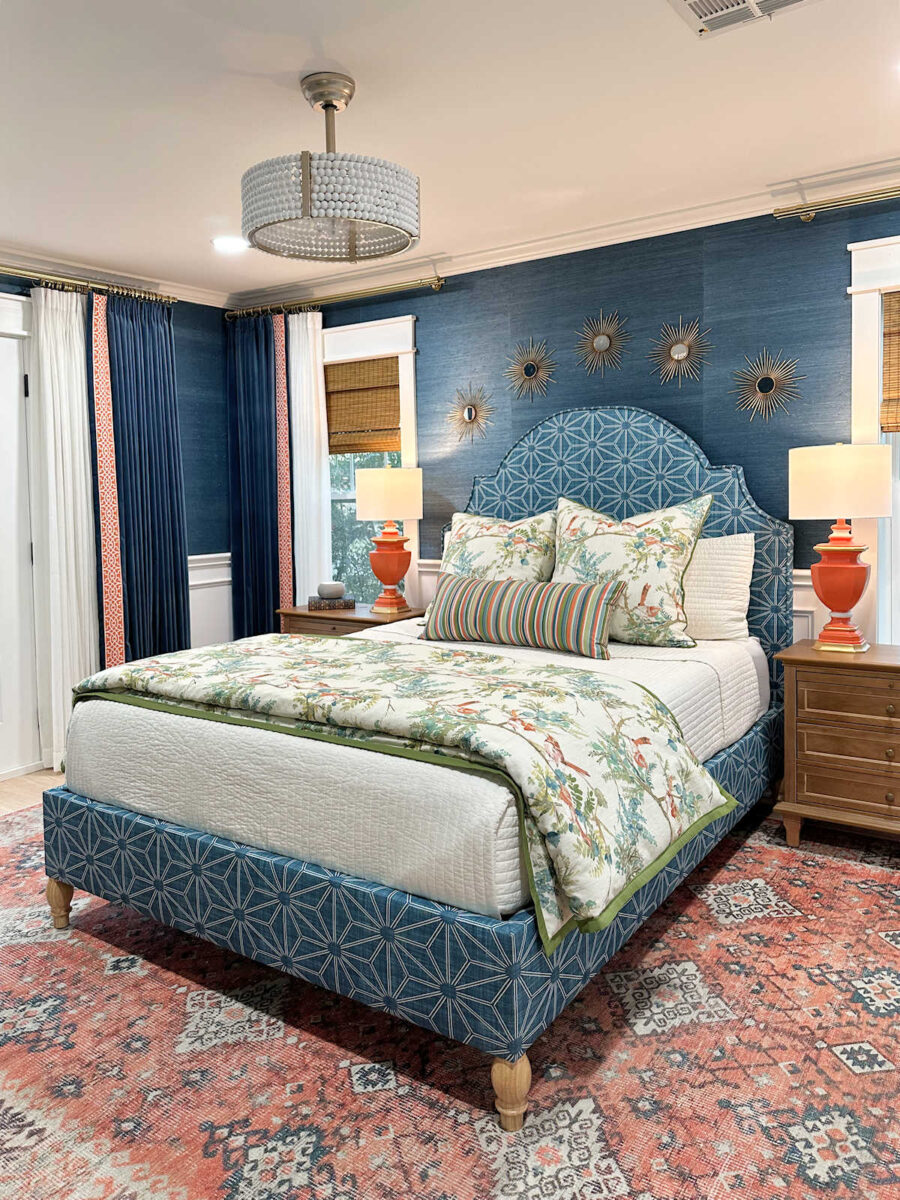
The project that I’m the proudest of in this bedroom is obviously the upholstered bed. The new hasn’t worn off yet, and I can’t even tell you how many times I walk into the bedroom just to look at this bed. It’s also visible from the music room when the bedroom doors are open (which they almost always are), so I find myself stopping in the music room as I’m passing through just to admire the bed. 😀
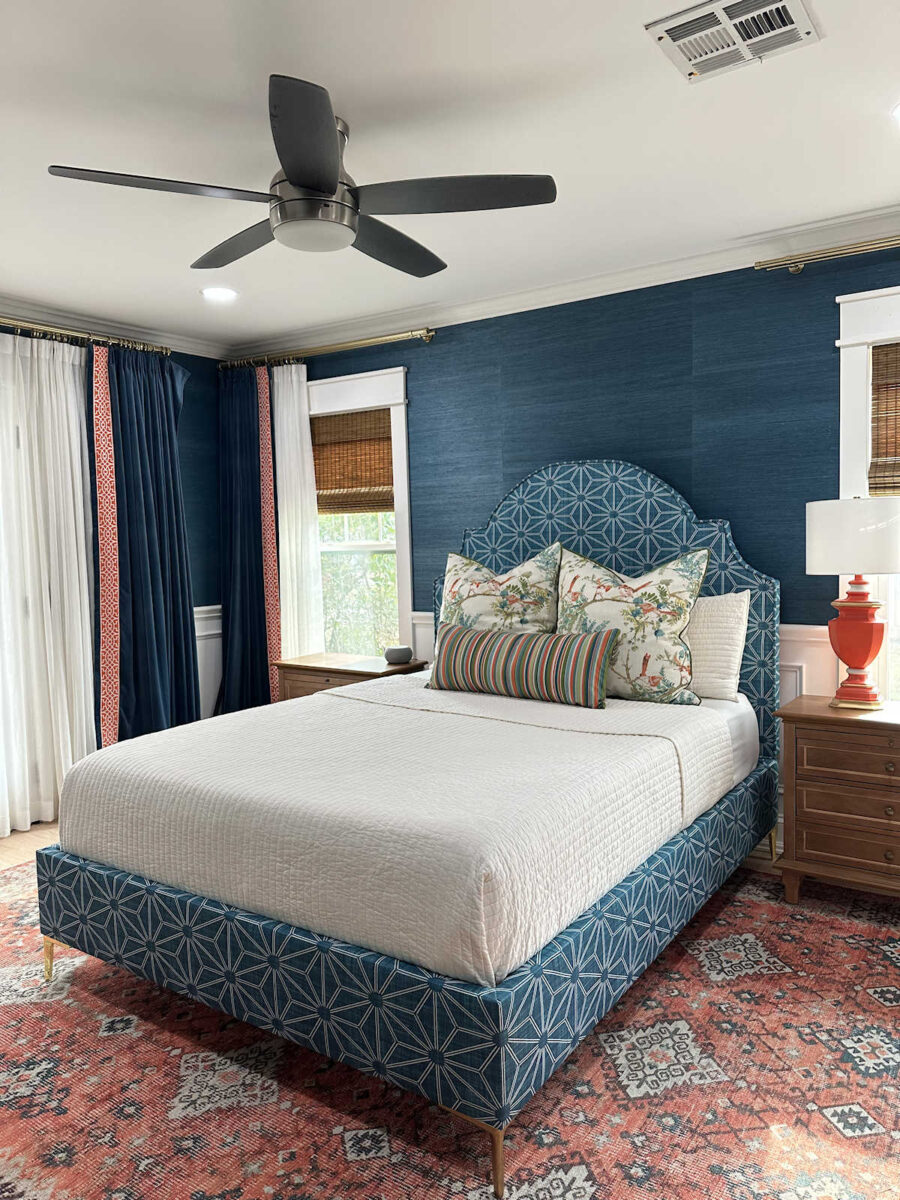
I was curious to see how much my DIY upholstered bed cost me, so I took a few minutes to add up the cost. Note that this is how much it cost ME, as a DIYer who often has leftover materials on hand from previous projects. So this isn’t how much it would cost someone who’s just starting out and has no leftover materials on hand. But when you DIY just about everything, you’ll always have a stash of leftover materials that you’ve already factored into the cost of a previous project. So when you can utilize those scraps, it’s almost like it’s free! 😀 So here’s how the cost breaks down for my upholstered bed:
- 5 yards of extra-wide fabric – $345
- Plywood for headboard – $45
- Extra wood for headboard frame – $0 (on hand)
- 2″ foam – $70
- Spray adhesive – $13
- 3 packages of high loft batting – $54
- Cording – $0 (on hand)
- Staples – $0 (on hand)
- Cardboard strip – $0 (on hand)
- Plywood for base – $0 (on hand – leftover from closet cabinets)
- Screws for base – $0 (on hand – leftover from closet cabinets)
- Extra lumber for base frame and slats – $88 (some on hand from bedroom wainscoting)
- Furniture feet for base – $31
- TOTAL COST – $646
Over half of that cost was the fabric. I could have used fabric that I had on hand to reduce the cost by half. (I have 13 yards of cream Crypton upholstery fabric that I’ve held onto for years.) But a solid cream bed wouldn’t have had the same effect of the fabric that I bought. So I was willing to pay more for a completely custom look.
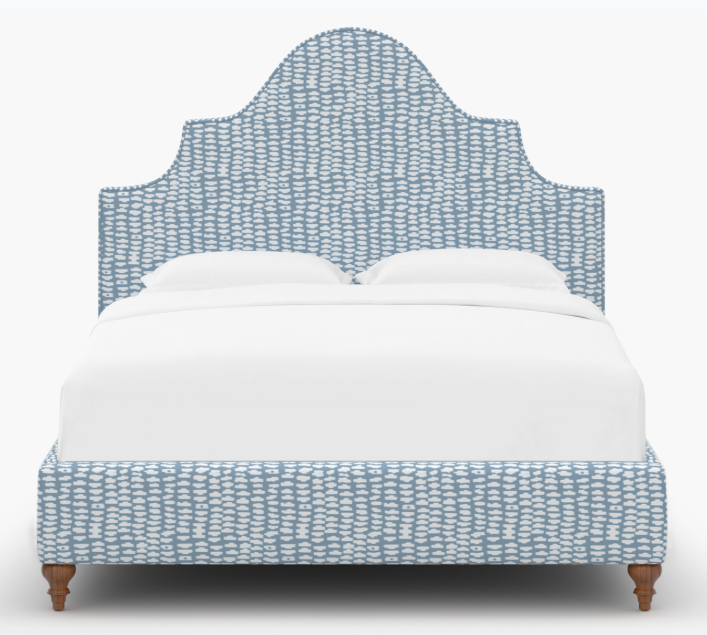
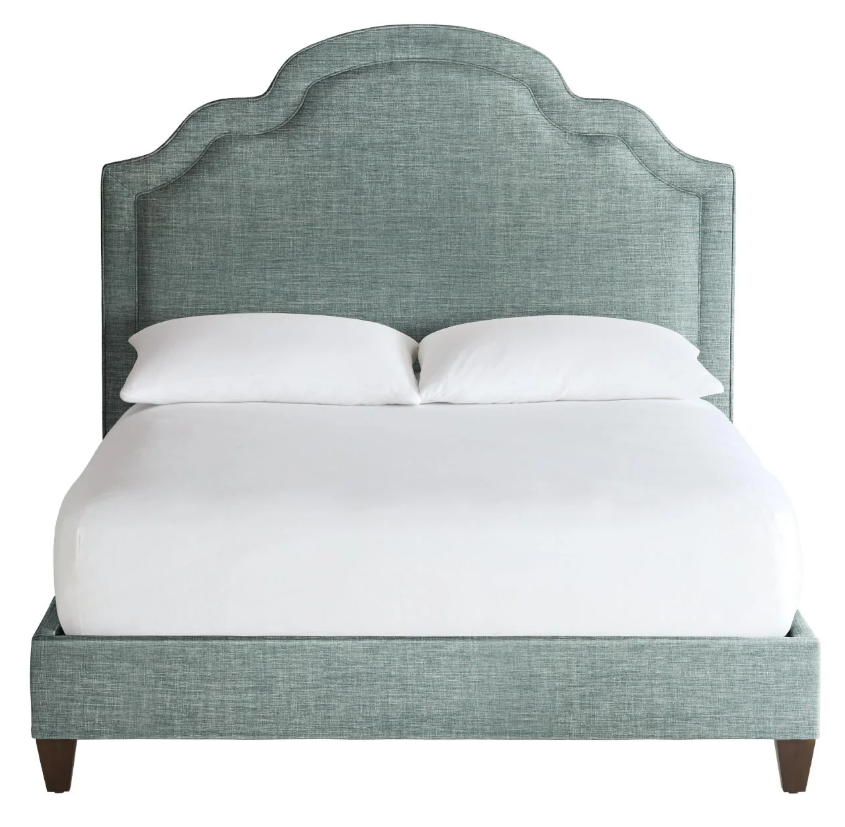
How does that compare to other fully upholstered beds with arched headboards with custom fabric options?
This Statement Bed in a queen size from The Inside (affiliate link) is $1529 plus $300 shipping. This one has almost 140 fabric options.
This Celia upholstered bed in a queen size is $1930 plus $300 shipping plus a $100 import fee. They have 125 fabrics that you can choose from. I think they’re all solid color fabrics.

This Elenora custom upholstered bed in a queen size from Ethan Allen is $2564 plus $350 for shipping. I don’t know how many fabric options they have because they don’t have them online. You have to visit one of their Design Centers to see all of the options.
I found a couple of other places that offer upholstered beds where you can choose from an assortment of fabrics that they offer, but all of the prices were pretty comparable to these. So at a minimum, I saved $1000 by building it myself. Not only that, but because my fabric selection wasn’t limited, I’m pretty sure I have a completely custom, one-of-a-kind bed. And I also have the satisfaction of being able to say, “I made that with my own hands,” each time I stop to admire my upholstered bed. There’s really nothing that compares to that.
If you missed the posts about how I made this upholstered bed, you can find the headboard tutorial here: DIY Upholstered Headboard With Piping (The Bedroom Headboard Is Finished!)
And you can find the instructions for the DIY upholstered bed base here: DIY Upholstered Bed Base
More About Our Master Bedroom
see all master
bedroom diy projects

read all master
bedroom blog posts

Addicted 2 Decorating is where I share my DIY and decorating journey as I remodel and decorate the 1948 fixer upper that my husband, Matt, and I bought in 2013. Matt has M.S. and is unable to do physical work, so I do the majority of the work on the house by myself. You can learn more about me here.

It’s just CRAZY how much we have to pay for ready made anything! Way back in the dark ages, when we had no money and two toddlers, we learned to DIY. If we had not tried to DIY, I think we would have been in serious trouble financially, and probably still be digging ourselves out of debt. We were learning in the early ages of computing, so most of our education was from books, TV, and going to Home Shows and talking with experts. This bed of yours puts our two self-made ones to shame, but I’m still proud of them! I’m sure Matt loves it, and is so proud of his Energizer Bunny wife!
When I first saw the fabric pattern, I wasn’t sure I would like it as a headboard/bed covering, buuuuuutt . . . it is PERFECT! Looks so good! Your visions are right on! Can’t wait to see the finished space.
I totally get the feeling that you made the bed and are extra proud (rightly so, it’s wonderful). And then, using up material you already have on hand from another project feels so great, right? I bought a new pattern for a jumper recently and ordered rather pricey and fancy fabric for it. And decided that because I don’t know the pattern yet, I want to make a trial version first from some leftover jersey fabric. What can I say? I am looking forward to the new jumper for sure, but the trial piece has already made it to my favourite spot – it’s great and comfy and (apart from the pattern cost) completely free of costs which gives it this extra special touch…
It’s absolutely beautiful! Be proud!
The satisfaction of building it yourself with custom fabric = priceless!
I love it! I hope Felicity doesn’t scratch the bottom of the bed up. Maybe you should have covered that with velvet! But it’s worth it to have a loving cat:) I have two and luckily they don’t scratch anything up- pure luck! I can’t wait to see your fully completed bedroom.
Oh, noooooo! I hadn’t thought about kitties scratching the bed base. Hopefully they won’t. DIYing saves money and is also a satisfying and creative outlet for those of us who enjoy building, painting, refurbishing, and sewing things. I love the shape of the headboard.
I love the bed and think it came out beautifully. I’ll be making one for my guest bedroom as soon as I decide on a fabric. I’ve got a gorgeous floral and bird print for the curtains and pillows and am using Spoonflower to match a pastel aqua-blue velvet following your Canva instructions. I love your blog because you are so helpful with so many well done instructions on how to DIY things.
I purchased an upholstered bed once, and it got sent back…it was awful…poorly made, and not worth the money…and it cost more than yours by far. SO, yours is made MUCH better, exactly the fabric you wanted, and less! Can’t get much better than that! AND, you shared how to make it, and I think most with some tools could follow. Love the bed.
The only difference between your bed and one from the factory is how many you make and how many the person in the factory makes per year. He/she has the repetitive skills from doing it for a living. You have a major variety of skills and an eye for perfection plus the time to do it right. Yours is beautiful and you will enjoy it for many years.
I got frustrated about 20 years ago because I couldn’t find a bookcase headboard that I a. liked and b. could afford. Soooo . . . I drew up what I wanted, had Lowe’s cut a sheet of birch plywood to my various widths, bought some edge banding and paint. Never looked back. Put it together with dowels and glue. I had less than $100 in the whole project. Still using that headboard as we speak! Not nearly as complicated as yours was since no fabric involved but it holds lots of books.
Kristi, I don’t comment often, but I must tell you how gorgeous your bedroom looks is! Enjoy your beautiful bedroom.
Your blog is a breath of fresh air in the often mundane world of online content. Your unique perspective and engaging writing style never fail to leave a lasting impression. Thank you for sharing your insights with us.
Your bed is awesome. Nothing compares with your workmanship.
Thanks for sharing the cost:) I had a headboard from Pottery Barn that I had gotten off FB Marketplace. After a couple years of having it, I decided I no longer wanted to use a bed skirt. I ended up buying a box frame off Wayfair, and reupholstered it, with purchased fabric from Pottey Barn. Im so glad you put a tutorial here, as I want to do another bedframe!! DIYing it will save me some $$.
It’s a beautiful piece! Your fabric choices and various textures in the room really sing together.