Three Ways To Elevate The Look Of Crown Molding (That I’ve Used In My Home)
I’m still about a week away from being ready to jump back into our master bathroom remodel (you can see the progress on that room here, if you’ve missed it), but I’m always thinking about next steps and details that I want to incorporate into that room. And I just have one more unfinished project that is standing in the way of me installing the crown molding. When I do install it, I think I’m going to add some trim to it to elevate the look of the crown molding just a bit. I want that room to look special and luxurious, so taking the crown molding up just a notch will help towards that goal. So in thinking about it, I’ve used the three ways I’ve already elevated the look of crown molding in my home as a jumping off point for ideas. I may use one of those ideas again, or I may tweak one of those ideas for something a little different. But here’s what I’ve done so far…
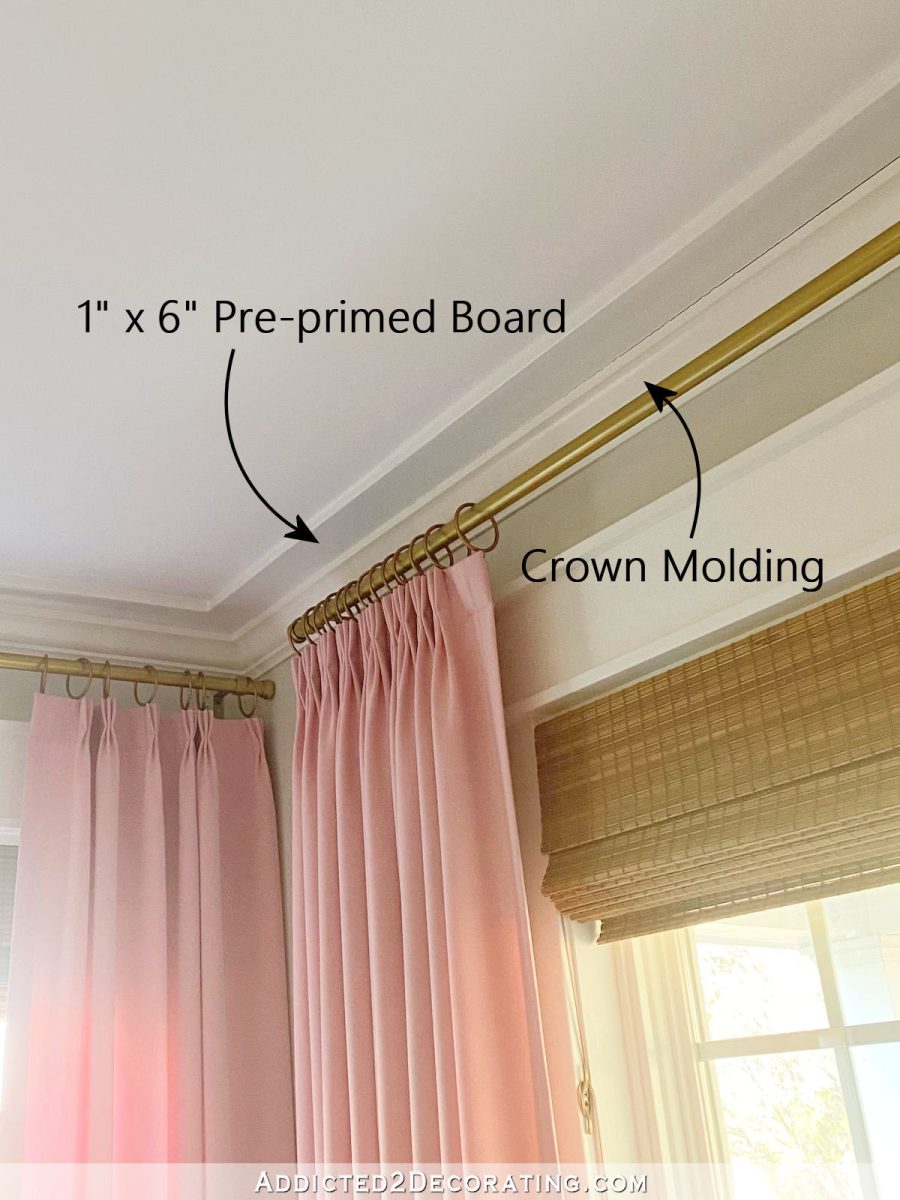
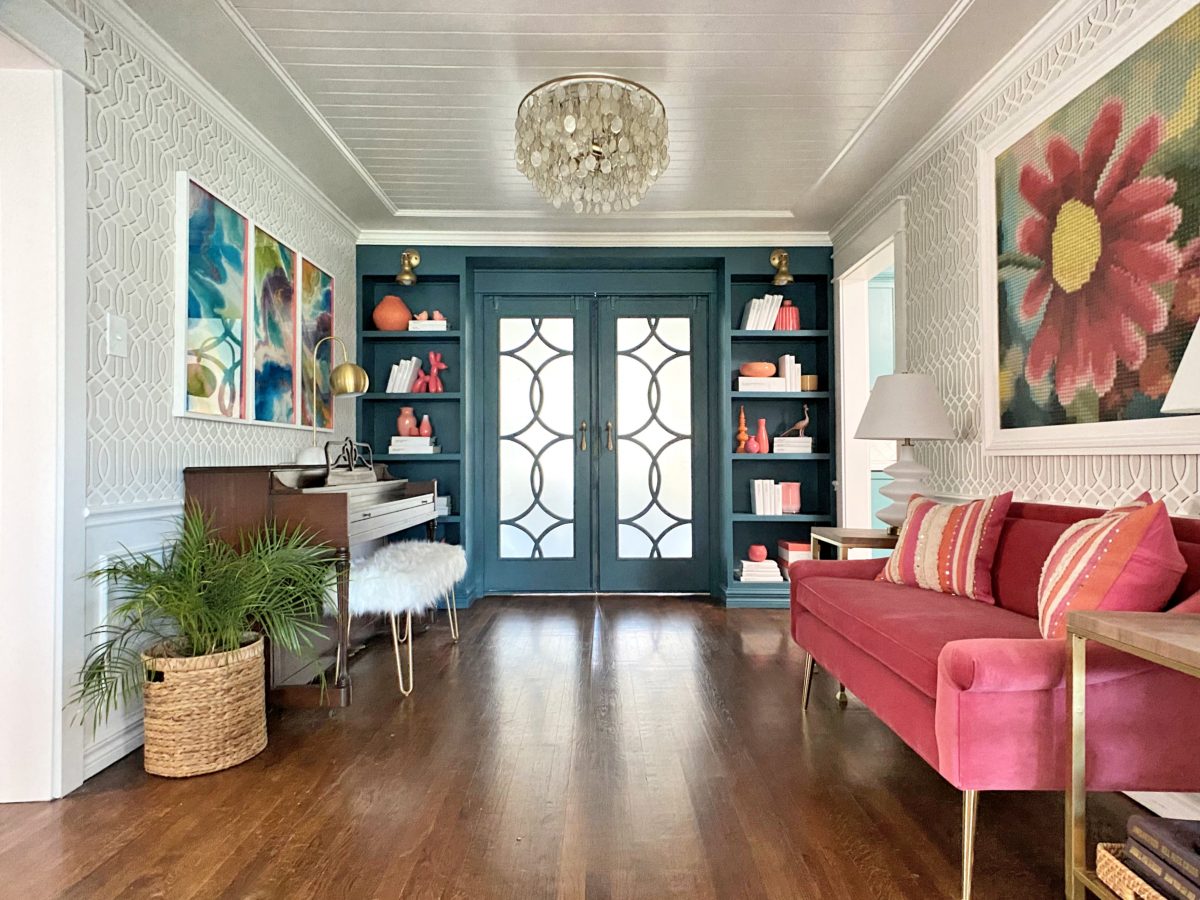
1. Add 1″ x 6″ boards around perimeter of ceiling before installing crown molding.
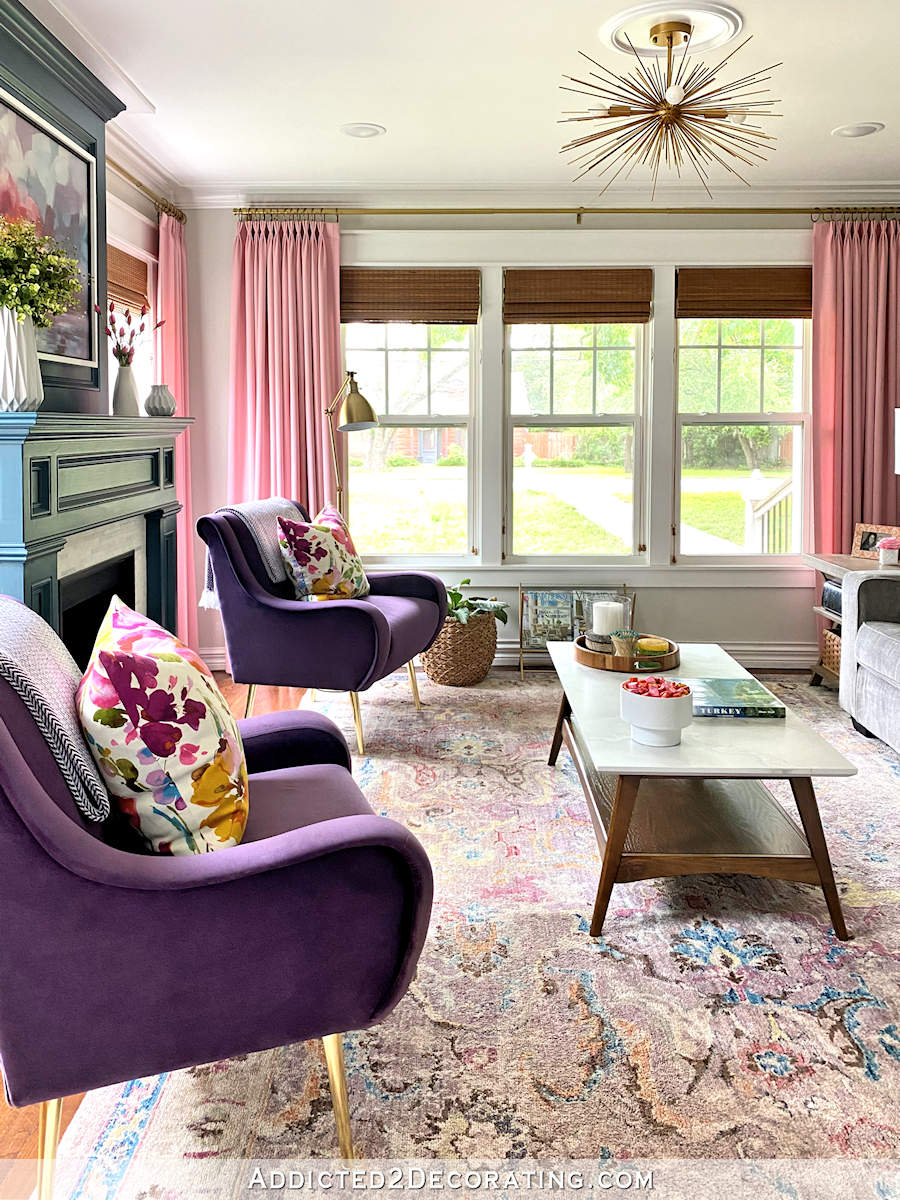
This is the idea I used in our living room, and I still love how this looks. It’s just one of those small details that really adds a special touch.
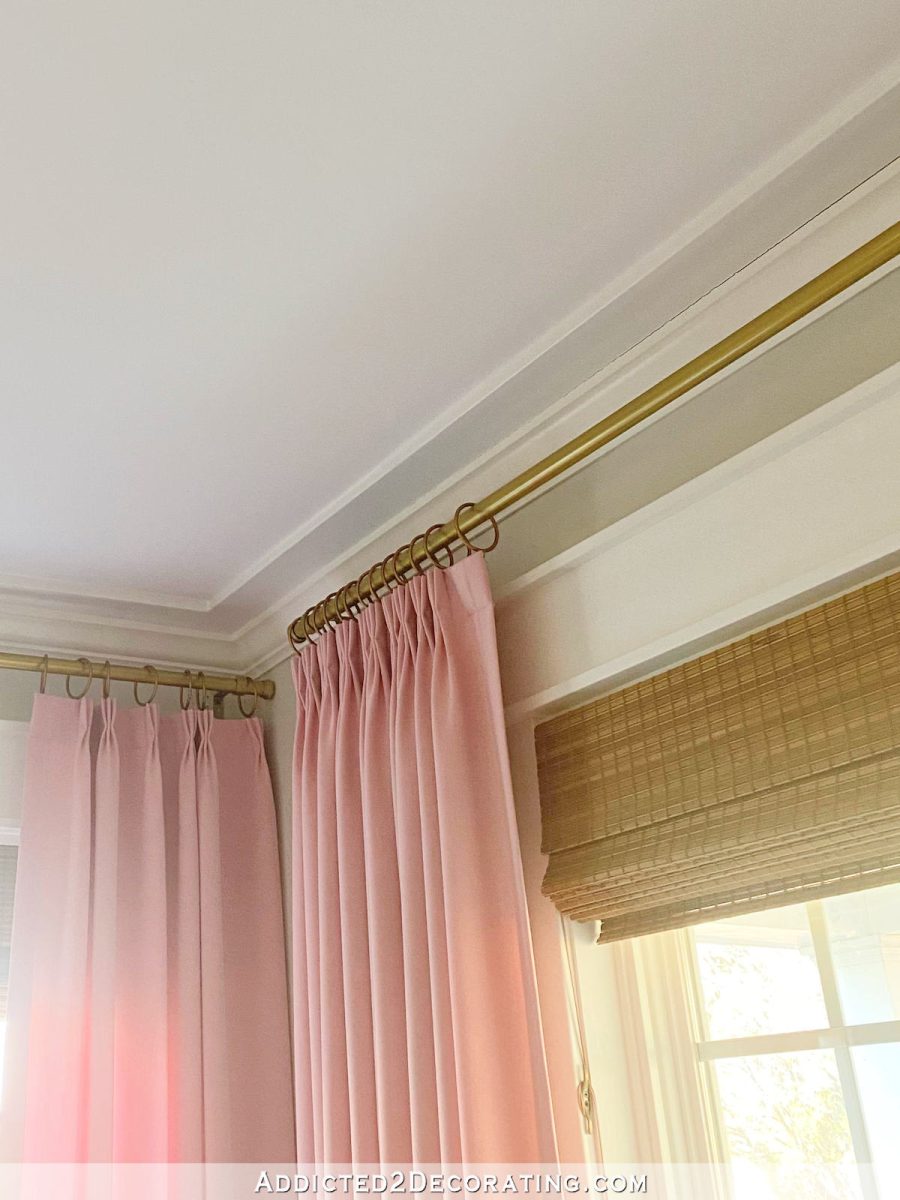
This really isn’t a difficult process, and it is especially quick and easy if you have two people working on this together (which I didn’t have, so it was a little more difficult, but a very doable one-person job). Before installing the crown molding, simply nail 1″ x 6″ lumber around the perimeter of the ceiling. You can even move it out an inch or so to make it wider. Just keep in mind how far out from the wall the crown molding will extend. Once those boards are nailed in, install the crown molding in the standard way.
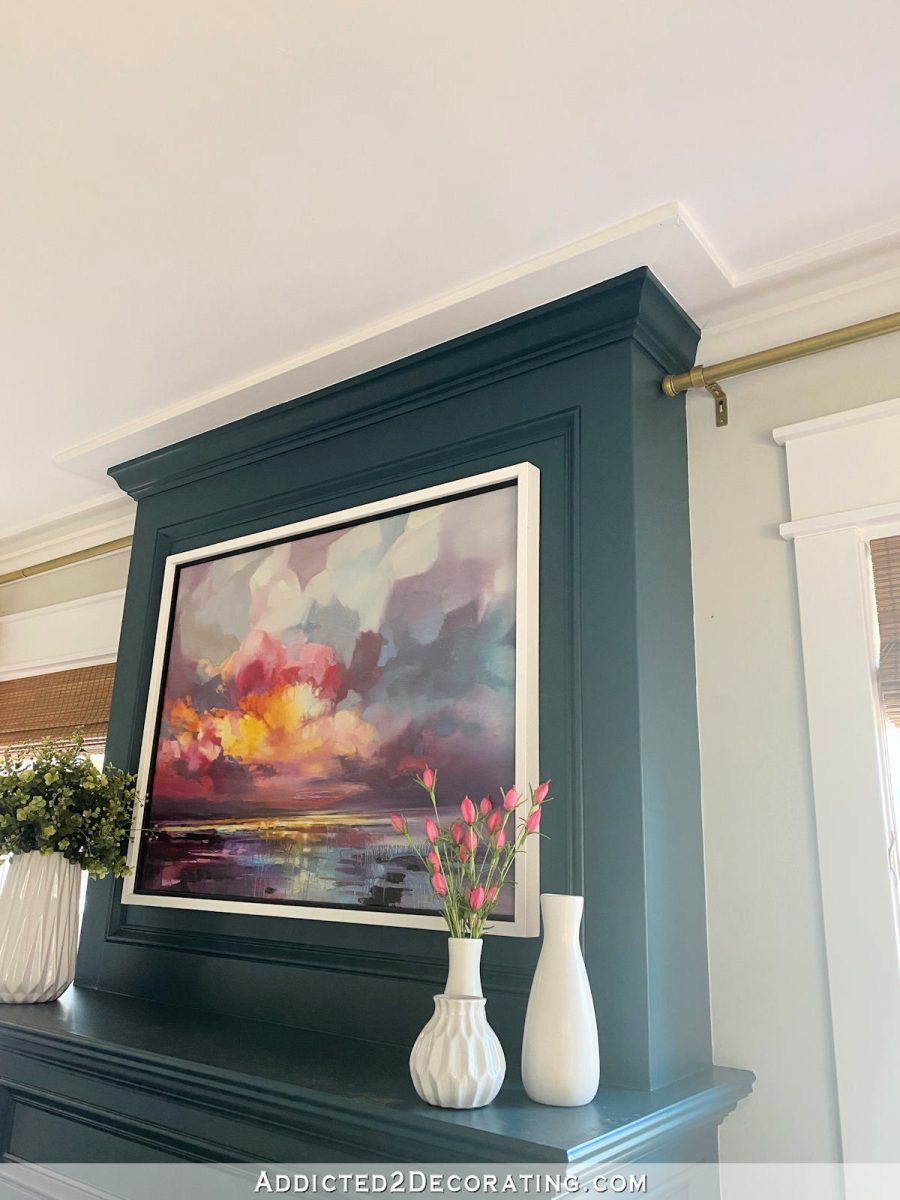
I especially love how this looks around my fireplace, where I switched from white to dark teal on the crown molding to match the fireplace, but kept the extra detail of the 1″ x 6″ board white for continuity around the room.
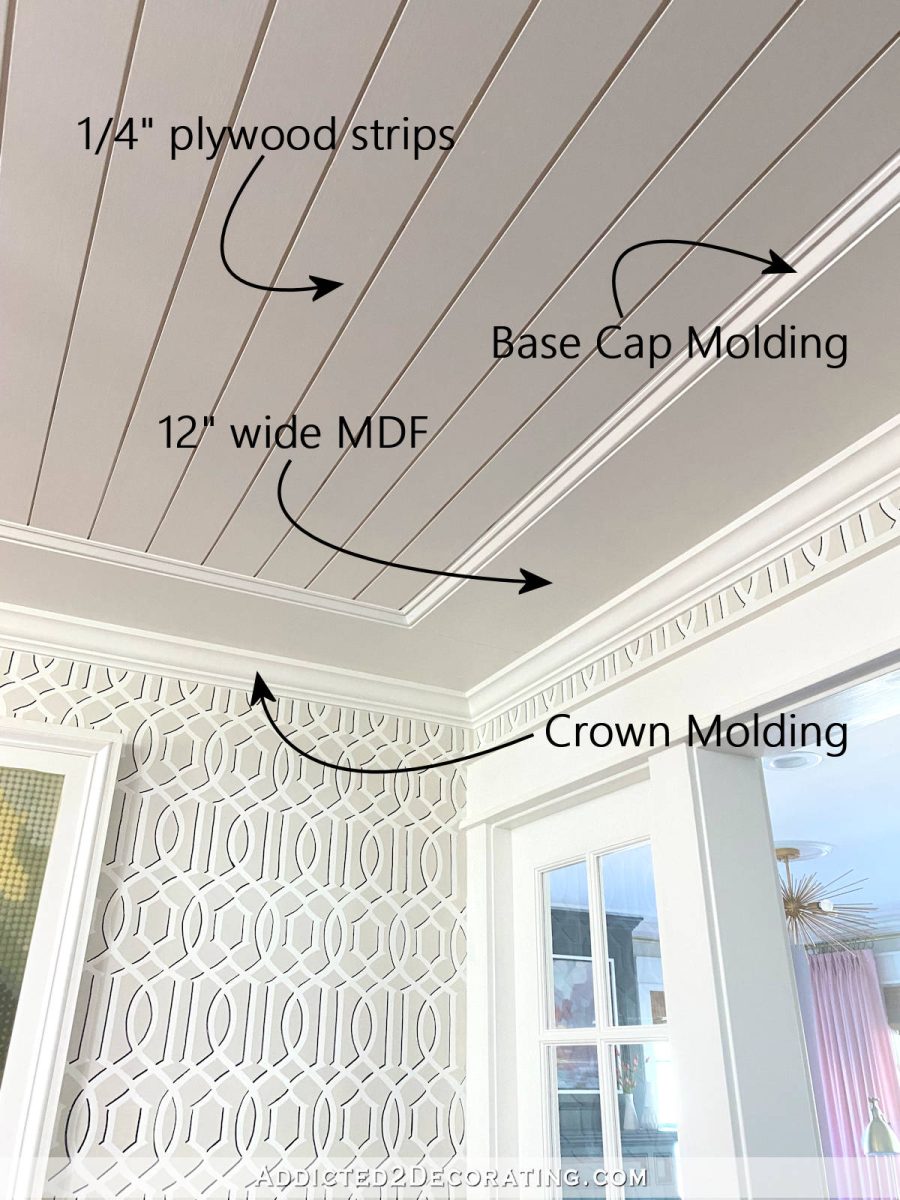
2. Use MDF and base cap for a wider and more detailed perimeter.
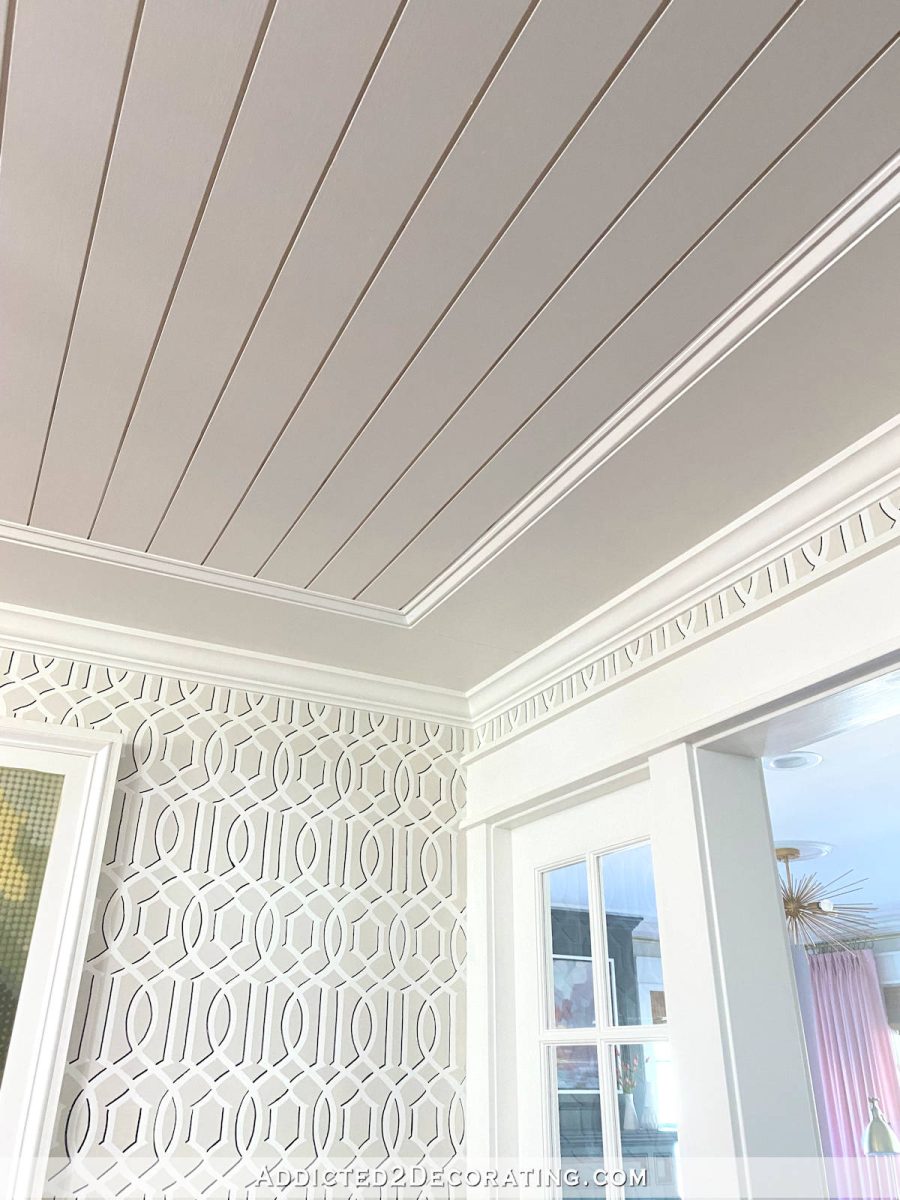
This is what I did for the music room, and when guests enter my home, this is one of the features that seems to catch people’s eye the most.
To create this look, I used MDF cut into 12-inch-wide pieces (this was cheaper than buying 1″ x 12″ boards) and attached them in the same way that I did the boards on the living room ceiling around the perimeter of the ceiling. Then I installed the crown molding in the same way. But as an added detail in here, I also included base cap molding on the inside edge of the 12-inch-wide MDF piece. Of course, my music room ceiling also has the added detail of the 1/4″ plywood strips attached to the entire ceiling. If you want to do something like that on your ceiling, those plywood strips need to be done first. But those are completely optional. Even if you leave those off, it would still be very pretty to just use the 12-inch-wide MDF, the crown molding, and the base cap molding. This idea (sans the plywood strips on the ceiling) is actually the direction I’m considering for our master bathroom right now, but we’ll see.
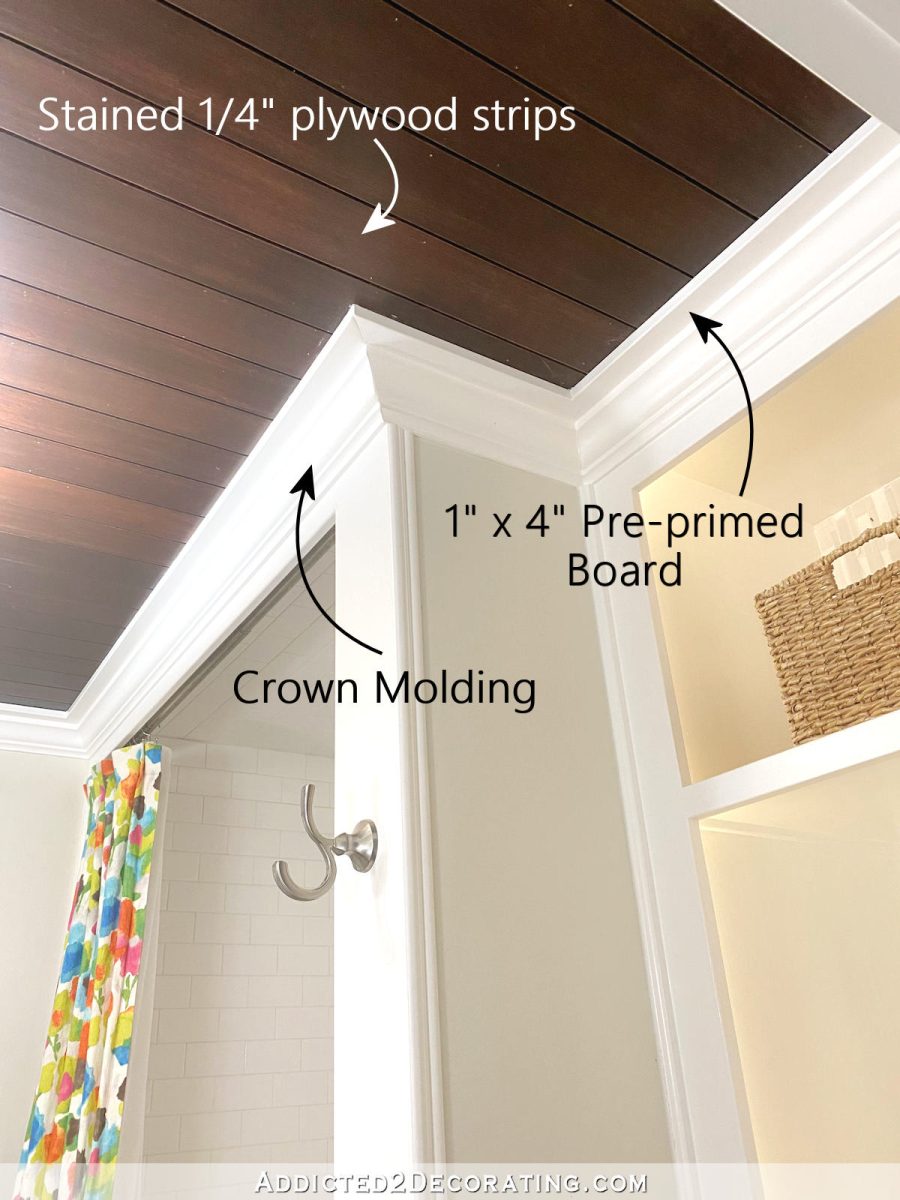
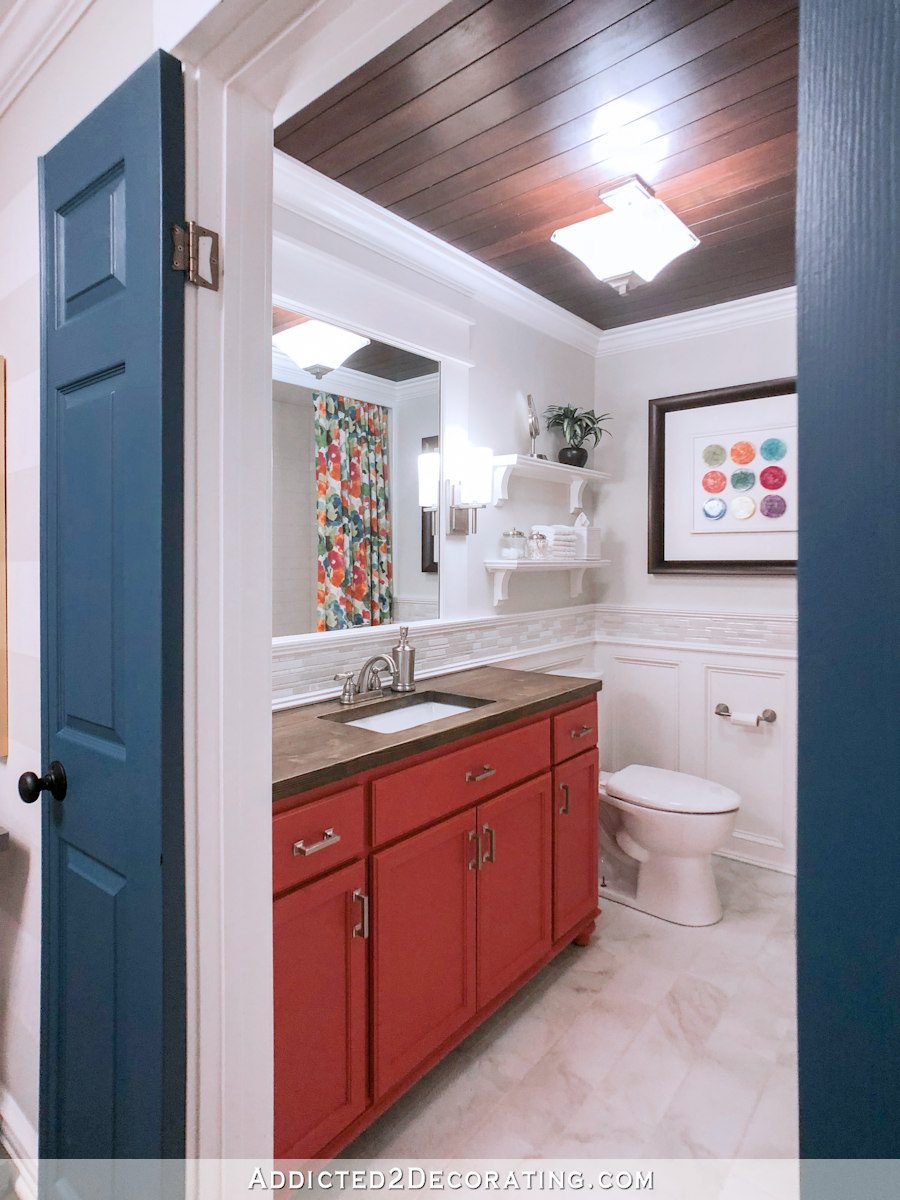
3. Add 1″ x 4″ boards before installing crown molding.
This is what I used in our hallway bathroom, which is pretty much the same idea that I used in the living room.
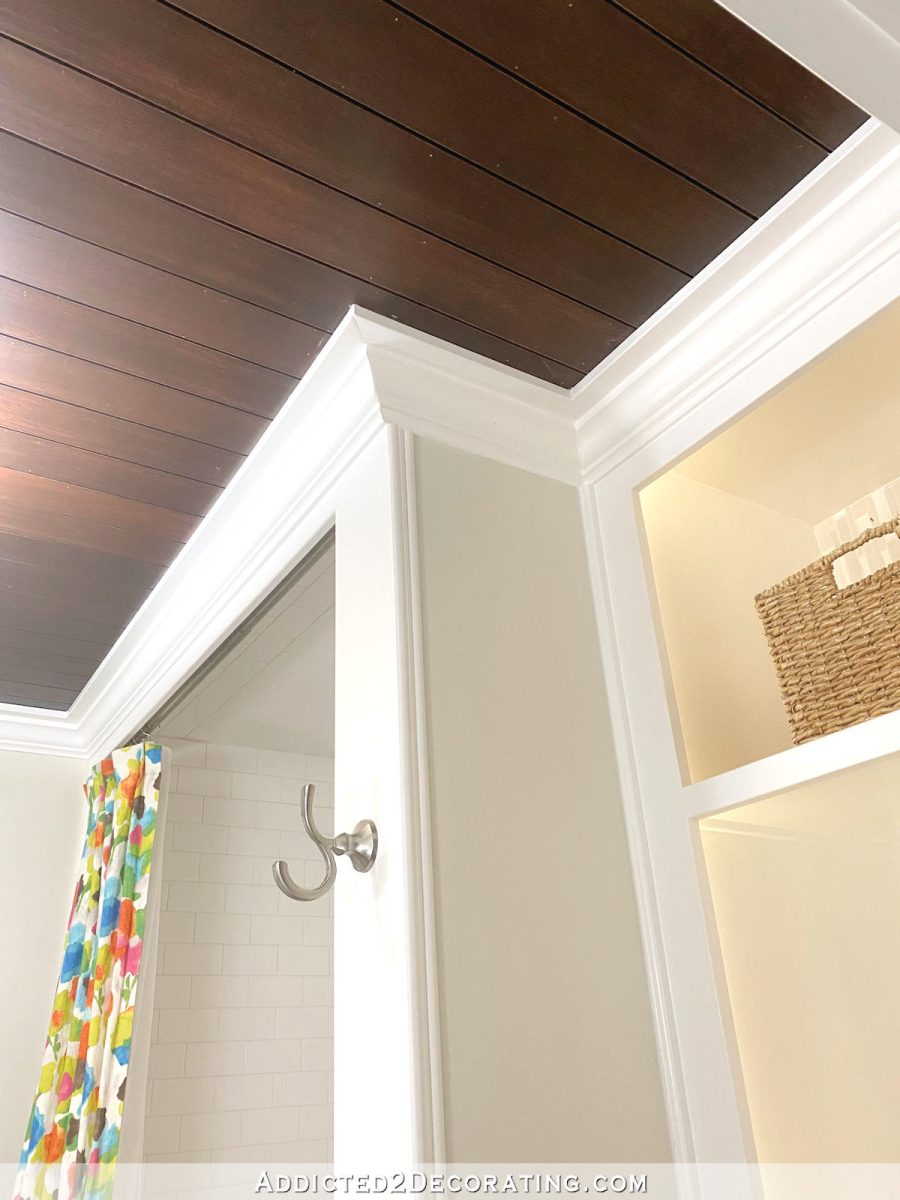
But since this is a small bathroom (about 7.5 feet square), I wanted a slightly smaller look, so I used a smaller 1″ x 4″ board to line the perimeter of the ceiling before attaching the crown molding. And as you can see, I also used a similar 1/4″ plywood strip design that I used in the music room, except that I stained these a dark brown before attaching them to the ceiling. And again, because I didn’t want too much going on in this small bathroom, I left off the base cap molding that I had used on the music room ceiling.
There are so many other ways to elevate the look of crown molding, and I’m sure I’ll use a variation of these three ideas in our master bathroom. And you don’t need tall ceilings to do this, either. I have 8-foot ceilings in every room of my house except my studio, and I love to add these details even on my low ceilings. I’ve never felt like these details make my ceilings feel lower, not even my dark wood bathroom ceiling. And these are great ways to dress up a formal room (like a dining room) or a special room (like your master bathroom or bedroom) just a little more than the rest of the rooms to give it that feel of being a little extra special.

Addicted 2 Decorating is where I share my DIY and decorating journey as I remodel and decorate the 1948 fixer upper that my husband, Matt, and I bought in 2013. Matt has M.S. and is unable to do physical work, so I do the majority of the work on the house by myself. You can learn more about me here.


WOW – everyone one of them is beautiful…never realized how different they were. Beautiful job as always.
Anything that draws the eye up makes the room feel taller – my cellar TV room ceiling has a dropped perimiter for pot lights, and people consistently ask if we raised the (concrete!) ceiling somehow.
Kristie, I am totally stealing this idea for my new house that will be starting in a few weeks. I have a 20 x 46 sq ft “Keeping room” for my kitchen, DR and LR. 9′ ceilings. Just what I need to perk it up! No hallways since everything will be wheelchair accessible.
Great post! I suggest more like this- everything you post doesn’t have to be new content. This was very informative and likely faster to write.
I’m definitely going to start digging into my archives more to see what info I can bring into posts like this. I mean, I have 16 years of projects in my archives, and for a new reader to dig through all of that can be quite overwhelming. 😀
Super creative and beautiful! Thanks for sharing and please keep sharing tips like this.
Ditto!
Love it but I can not figure out miter cuts especially in my house that is old and ofcourse nothing is square
I highly recommend a Kreg Crown Molding jig for installing crown molding. It also comes with an angle tool so that you can know the exact angle of your corner and adjust your saw to the exact measurements needed. It comes with instructions, and there are great videos on YouTube showing exactly how to use it. It’s truly one of the best tools I’ve ever bought! Before it, I had nothing but trouble trying to figure out crown molding. Now, it’s very simple and straightforward.
Here’s an affiliate link for the Kreg Crown Molding jig: https://amzn.to/3K0zKkb
The purple chairs in the living room are to die for.
Love your ceiling ideas for my outdoor Lanai near the beach in central Florida. Our constant high humidity caused the current taped seams to swell and eventually peel off even though primed and painted just 2-3 years ago. (Same thing is happening to the newly primed and painted ceiling wallboard joints in the garage but that is another project.) Any idea if your stained plywood strip treatment will work in this high humidity environment. I believe I’ve read that MDF strips wouldn’t work as MDF can swell with moisture. Sealed Tongue and Groove wood would work but is too expensive for my taste.
We beefed up our crown by adding a piece of baseboard. It’s on the wall not the ceiling, and upside down. The flat part of the base is hidden by the crown, and it gives the look of extra chunky crown for a fraction of the price.
Wow, I do like this look. Also, I absolutely love the idea you had and ran with it all the way is your ceilings being 1/4″ plywood strips. It looks so cozy and just leaves sheetrock in the dust. I am making plans to remodel my spare bedroom and I’m going to copy this idea.
I would pay for a book of your crown moulding and other designer hacks/tips. Hint. Hint. Could a book be in. your future?!?!
That’s definitely something to consider!
I love these accents! But as someone with 7’5″ (or less!) ceilings though, I’d worry that crown molding will make my rooms look even shorter (or the ceilings smaller). Do you know if there are any side-by-side comparisons on the internet somewhere? (i.e. everything is the same except the crown, so you can see what effect it makes?)
I’m not aware of a tool like that online. It sure would be helpful!
Thanks you for your postings. I always read them. I have a cheaper way of doing this, now that linear lumber is an extragence.
I own a 1928 Craftsman Bungalow in an historic area, (where I moved, across country, 12 years ago). I have completely restored this home, mostly by myself (I am in my eighties). Being five houses away from a large river, the ground around here moves a lot. In the master bedroom one corner had slipped down. To remedy this I added a trey ceiling that started with 0′ in that corner and went to 2″ in the opposite corner. I nailed 1” by 2” lattice 12″ out on the ceiling. Then I covered that with sheetrock. I added corner beading on the edge, mudded it, and added door stop on the edge to extend the 12′ trey look; and to finish it off a bit (like you did). It looked like I had added a 1.35″ by 12+” board all around the circumference of the ceiling (not the wall). On the wall I put back the crown molding that was initially there (I had taken it down, stripped it and restored it already). It was more work, but as I live on SS, I have to budget everything I do to this old house ( my third on the historic register). I wish I knew how to add pictures to this feed. I am a very frugal old broad!!!
.
I would love to see a picture of this. Sounds interesting.
I give up. You do not post my comments. I am not mean, and I do have some very good ideas to add.
Whoops, I spoke too soon, you did post my comment. One correction I said “12 feet out on the ceiling”. Nope, just 12 inches (and a bit) out. Thanks for letting my post go through, why did it say I had posted it already? This IT stuff baffles me.
I love your moldings and the boards on the ceiling. I am big on ceiling designs and wanted your opinion. Family room is being painted this week, Behr , Overcast and I wanted to put the flat frame molding like you have in the your rooms. My question is, should it be white or the gray that is on ceiling? The walls are going to be Behr Rainmaster. I was thinking of 1×6 boards.
I would paint them to match the crown molding.
I wasn’t going to put up crown molding, just the flat piece like a picture frame on the ceiling. So what color would you do, ceiling or white to match window frames?
I absolutely LOVE all the different variations of crown molding you have used throughout your home! It definitely kicks standard crown molding up a notch! Looking forward to seeing what you choose for your gorgeous new bathroom! xo
Kristi, I just love your blog. You are so creative and talented. Your home is beautiful. Thank you for sharing. I have got many great ideas and techniques from you. I look forward to your email updates.
I have been considering similar treatments to my ceilings to give a more elevated appearance to them. I have thought that a less conventual color on ceilings may add to the impression of height. Your thoughts on this are welcome.
I think you room designs are very interesting; fireplace surround and upholstery colors in the living room are unexpected and lovely. My omplements!
I am so impressed with what you’ve done with moldings … I wish I’d have found you when I was younger – because this the type of stuff I love to do … I hope I filled out the subscription area correctly – as I love decorating – and would like to follow you.
How wide are the1/4” plywood strips?
About 4.5 inches wide.
Thank you for the great post. We’ve just bought our first house and I’m VERY new to DIY projects. I really love the idea of adding crown to our (small) formal living room and think option 1 is so stunning, and would help transition the existing crown around our fireplace (which has very much been on my mind, since like yours, it’s a different colour than I want the rest of the trim). I don’t want to remove the crown that frames the fireplace though and am wondering if we can add the 1×6 board there to existing crown? It looks like you added the board first and then the crown?
I don’t think it can be done with existing crown. The board really needs to be added before the crown is installed.
You mentioned that you used “MDF cut into 12-inch-wide pieces”. What size MDF board did you get? what was the thickness of the MDF board? and was it already primed?
Spectacular! Concerning the application of the 1/4″ plywood boards on the ceiling, there is a slight space or groove between each and every board. What is that space? Did you fabricate a strip of material and glue it in between each board to maintain a uniform space and width?
Thank You.
RZ
The plywood is attached to drywall.
Love the ceiling, what is the size of the space between the plywood strips.
About 1/4 inch.
How have the plywood planks held up over the years? I’m considering doing this, but my brother-in-law had issues with his mdf cut planks ripple-ing and separating over time on the wall. 🤔 I don’t think he used any adhesive though, just hand nailed them. Did you use a protective coat over the stained plywood?
Mine have held up perfectly, and this was the only bathroom we had for years, which means that I took all of my (very hot) showers in here. Here are the details on how I did it: https://www.addicted2decorating.com/bathroom-ceiling-progress-make-plywood-look-like-beautiful-wood.html
So great!! What is the height of your ceilings? I’d love to do this or similar but I have 8’ ceilings… think it will still work? I was hoping this trick would make my ceilings look taller. Would you agree???
The ceilings in our house are 8′ as well, with the exception of my studio, which has a vaulted ceiling. But the rest of the house has 8′ ceilings.