Bathroom Ceiling Progress (How To Make Plywood Look Like Beautiful Wood)
Yesterday, I only spent about 30 minutes actually working inside the bathroom. That’s how long it took me to paint the ceiling black.
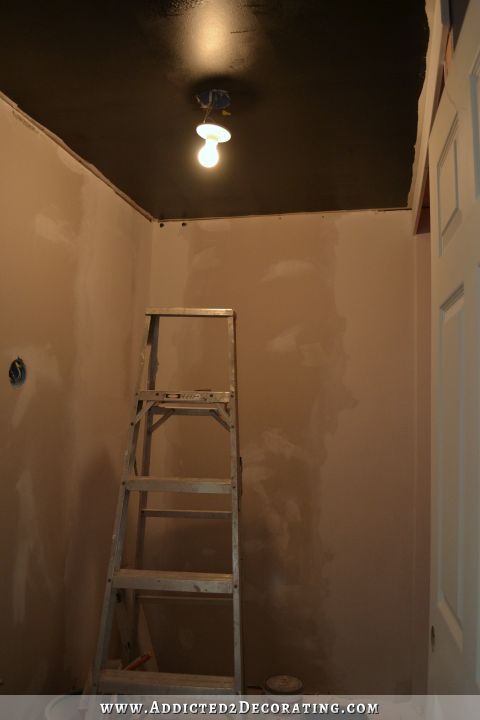
I didn’t bother with the cutting in because those areas will be covered with trim.
I painted it black because I’ll be installing my stained wood slats with a tiny space between (about the thickness of a nickel), to mimic the look of a V-groove tongue-and-groove board, and I don’t want any white drywall showing through the cracks. But this also gave me a good idea of what a dark and dramatic ceiling would look like in this bathroom. I was surprised, but it actually didn’t make the room feel like a cave, and that’s still with only one single light bulb lighting the room. I’ll have much more light in the finished bathroom. So I decided to go for dark and dramatic with the stained wood as well.
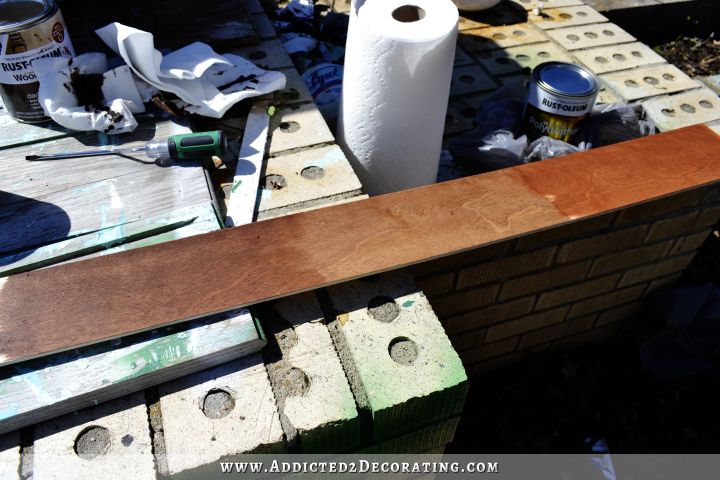
I spent the rest of the day yesterday outside in the gorgeous sunshine and the 60+degree weather working on the wood slats for the ceiling. As I told you yesterday, after looking at several tongue-and-groove products available, I finally gave up (they were all really rough wood and had way too many knots) and decided to use 1/4-inch cabinet grade plywood cut into slats for the ceiling.
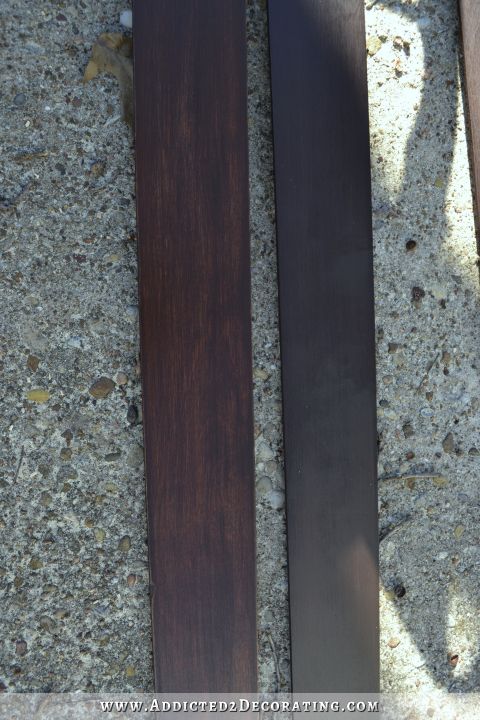
I tested out three different stain colors, all Rust-Oleum brand. (That’s the only brand I use now.) From left to right, I tried Carrington, Dark Walnut, and American Walnut.
I ruled out American Walnut immediately. It was way too red for my taste. I finally decided on Carrington. However, on my sample, I brushed on the stain using a foam brush, and then wiped away the excess with a paper towel. But when it came right down to it, I realized that this method wouldn’t work, because by wiping off the excess stain, it really highlighted the funky grain patterns on some (most) of the slats. You know what I’m talking about, right? I mean that swirly, loopy, crazy grain that seems to be unique to plywood, and that you never find on solid wood stick lumber. I definitely did NOT want to highlight that crazy grain because it just screams “PLYWOOD”.
So instead of brushing on and wiping it off, I simply brushed it on with a foam brush and left it. This left the color much more saturated and really too opaque for my taste. It also made the Carrington stain look like it had purple undertones.

So I left those in the sun to dry for about two hours.

When they were fully dry, I used 150-grit sandpaper to sand them down a bit. They needed sanding anyway because the stain made the wood quite rough. But this also toned down the color a bit, and also created a kind of faux wood grain on the slats. You can see here the difference between the unsanded slat on bottom and the sanded slat on top.
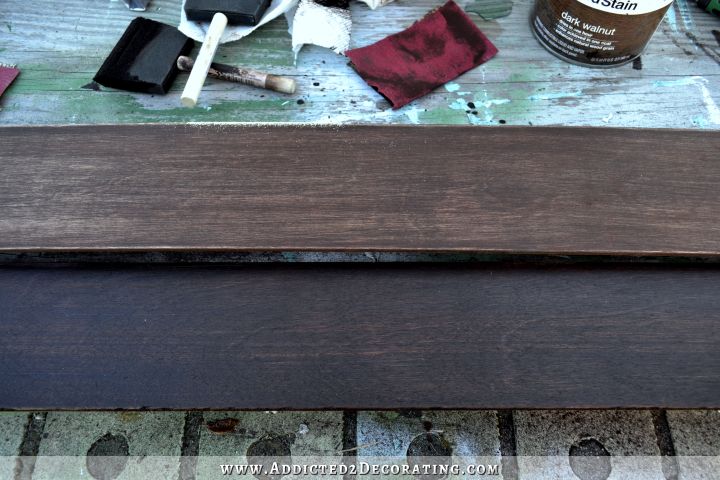
And then after wiping away all of the dust from sanding, I put a coat of Dark Walnut over the top. The two different colors used together really gave the slats beautiful depth and dimension, and the sanding in between gave the impression of a subtle, straight wood grain, which really helped to camouflage the not-so-pretty swirly grain of the plywood.
Here’s a comparison of the plain Carrington on top, and the Carrington/Dark Walnut combo (with sanding in between coats) on bottom. (The dark area in the middle of the bottom slat is my shadow. 🙂 )
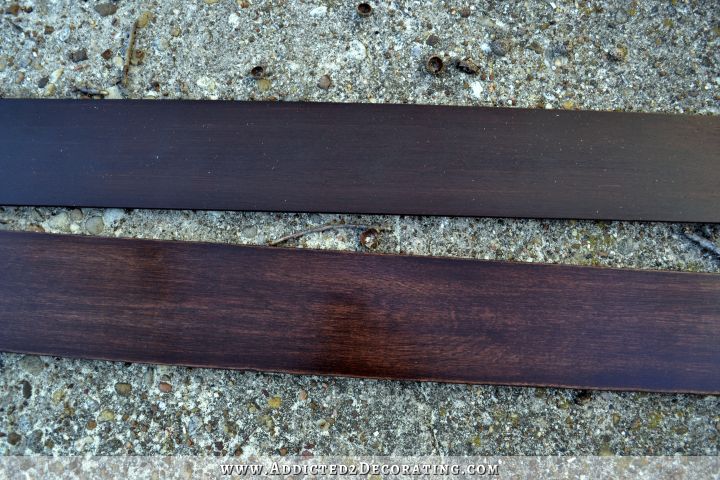
See how much more depth and dimension the bottom slat has? Here’s another comparison with plain Carrington on the right, and the combo Carrington/Dark Walnut (with sanding in between coats) on the left.
This is actually a technique you can use on any wood with less-than-desirable wood grain (for me, that’s oak and pine). But if you’re working on pine, I’d really recommend using the Rust-Oleum brand instead of Minwax. I learned long ago that Minwax turns the grain in pine an awful orangish yellow color, but Rust-Oleum doesn’t. And do remember that on your first coat, you just want to brush it on with a foam brush, and leave it. Don’t wipe off the excess.
I’ve actually seen people use a very similar technique to turn metal doors (i.e., front doors, garage doors, etc.) into doors that look like they’re made of wood solid wood. I wouldn’t recommend using a standard wood stain for that, but I’ve seen people use gel stain, or even paint. If using paint, you can either paint the first coat on solid and then sand it with a rough sandpaper to create the “grain”, or you can paint the first coat on and then use a wood grain tool while the paint is still wet. Then use a different color for the top coat, watered down a bit so that the “grain”on the first coat shows through. I’ve wanted to try one of those techniques on a metal door for a very long time, but just haven’t had the chance yet.
So now that my slats have had overnight to dry, I’ll be ready to install them today and finish up the ceiling! That will include installing crown moulding — one of the most trying things EVER for me — so hopefully I can make it through the day without chucking my miter saw across the porch and onto the concrete. 😀

Addicted 2 Decorating is where I share my DIY and decorating journey as I remodel and decorate the 1948 fixer upper that my husband, Matt, and I bought in 2013. Matt has M.S. and is unable to do physical work, so I do the majority of the work on the house by myself. You can learn more about me here.


wow love the color and I saw on facebook the light and love it. to me you give an unrealistic view of what remodeling is actually like because you are so fast. if it was me I would still be on the demolition part.
Hi Kristi,
The boards are so rich and lovely. You did a great job. It would appear that your melt down was just exactly what the doctor ordered for you! Keep up the good work. You are an inspiration for us all. 🙂
There are crown molding jigs that you can buy or make for your chop saw that hold it at an angle so that it’s just like cutting cove and quarter-round. You should definitely look into them if you haven’t already.
Wish I had thought about painting my ceiling black before putting up my beadboard because I did see white as the boards moved..and it was a 30 foot room…What a simple solution…Next time!!! AND the sun always makes things better…so grateful for the gorgeous Texas days we are having…
Once again Kristi you come through with something awesome. I love the look of the combination of stains. It creates a very expensive look.
I love the rich look of the dark wood!!! It’s going to look fabulous! My husband and I tried crown molding ourselves a few years ago and ended up calling in a contractor. That is one tough project!
Kristi, did you use a sander or sand by hand? Thank you for the useful tip, I have a built-in cabinet with plywood at the back of the open shelves, and was wandering what to do with it.
I sanded them by hand. A sander would have been way too aggressive and would have taken off too much of the finish.
The final stain/sanded finish/color looks great! I know you don’t always do projects in the “proper” order, LOL, but shouldn’t the sheetrock on the walls be textured before the crown molding goes up? Just wondering! ;c)
Why texture it? She doesn’t like the texture in any of the other rooms and will be skim coating them.
I decided not to texture. I’m really tired of dealing with texture (the condo walls had heavy texture, and now the walls all in this house have heavy texture) so I’m really liking the idea of no texture. The paint roller will leave a very slight texture when I paint the walls, and that’s enough for me.
Thanks, Kristi! Can’t wait to see your next update.
Ugh- crown moulding. So worth it but such a pain! When my husband and I remodeled our bath/laundry last year the crown moulding was the most stressful part. Good luck!
Also, it is amazing the difference your technique makes on that plywood!
Stupid question. Are you doingi this inside tub area or just the main area? Can’t wait to see this. I wait for your next post each day.
Well, I’m getting to these questions late, so you may have already seen the finished ceiling. 🙂 I just did the main part of the ceiling, and I’ll simply paint the drywall above the tub.
They turned out so beautiful! When you did the coat of dark walnut did you brush it on with foam brush and leave it to dry too? Or did you wipe that coat off ?
I just brushed on the dark walnut, and didn’t wipe any off. But if you want more of the faux grain showing, you can wipe some of it off, and even do multiple coats/more colors for more dimension and variation.
Since it’s plywood. Isn’t using it on a bathroom ceiling going to cause it to warp and separate from the moisture and humidity?
I’m getting to these questions kind of late, so you may have already seen that I polyurethaned the boards before installing them. I don’t anticipate moisture/humidity problem since I’m generally the only person using that bathroom.
Gorgeous!
I have a question about sealing the stained wood. I realize no one is going to come along and put a cold glass of water on your ceiling, but there will be floating moisture from hot water in the tub/shower. Clearly you don’t think you need to seal the wood with some kind of top coat so I’m wondering if the stain have this protective quality incorporated?
Most wood stains do have a protective quality to them, but I did seal the slats with polyurethane (both sides and long edges) before installing them.
Kristi, your technique for the plywood really looks great. You put a lot of work into it and it really was worth it. The change is beautiful. Can’t wait to see it when it is up. Blessings
Kristi you are a freaking genius!!!!!! YOU JUST SAVED ME!!!! OMG! I’m so freaking excited. Okay I’m calming down now… and I’ll explain.
So I really haven’t been keeping up with your site because I’m in the middle of trying to open a wine shop…. lots of work especially when I also have a demanding full time job… anyway. I hated the idea of the common retail counters that are sold …so I came up with what I thought would be a nifty idea and use regular base kitchen cabinets with a nice countertop…butcher block or granite…I’m not sure yet. But I’ve never done anything like this by myself and my dad, a construction worker, has a bad back and can’t really help me. Anyway, I’ve been looking around to see what I can do about covering the back of the kitchen cabinets (the part that customers would see). At first I was thinking covering with stained pallet slats, but decided that was too consuming. Then I started looking at sheets of just regular plywood…but I didn’t like the grain and was afraid that it would look awful and I don’t have time to make mistakes. I’ve been in the middle of this dilemma of trying to figure out what to use for the past couple of days and hot-damn! I open my e-mail this morning and I see your post!! Again you are freaking genius!! Now I just have figure out how to put everything together…haha. wish me luck! 🙂
Good luck! I’d love to see a pic when you’re done. And congrats on opening your own shop! How exciting!
GEEE-NEEE-USSS!!!! What a great technique, you nailed it again! One question, will you be sealing the backside of the slats before installing? Looking forward to seeing the finished ceiling!
I’m running really late in answering these questions, so you’ve probably already seen the answer. But yes, I did seal the back sides, as well as the long edges, of each slat before I installed them.
I love it!…Thanks for sharing once again on how you got the perfect shade of color you were wanting…That is going to look fabulous!…You know how to work your magic Kristi.
Have you tried the CUT-N-CROWN jigs for crown molding ? You can see a demo on line. We use them to keep from running screaming into the night when putting up crown molding.
I agree with Karen. CUT-N-Crown is the way to go. I am getting ready to do the crown in my house and this is what I will be using.
I didn’t find anything called Cut-N-Crown, but I did find a Kreg Crown-Pro, which I’m sure is pretty much the same thing. It’s awesome! Really takes the guesswork and frustration out of cutting crown. And no coping saws needed. That’s the part that always intimidated me.
I’ve loved everything you’ve done so far (especially your kitchen) and this bathroom will be as spectacular. Did you save your shower head? you can use it for a yard flower later https://www.facebook.com/ReScapedotcom/photos/a.140815909418413.31776.139558599544144/435894193243915/?type=1
Oh WOW! that board looks AWESOME!!!!
I never knew you could layer stains. I would have thought that they would bleed into each other. But it looks fantastic and I thought painting the ceiling black was a great idea. But how are you going to keep the ply from warping? Can you polyurethane the short sides too?
I did polyurethane the long edges and both sides, but I didn’t do the short ends. I don’t think there will be enough steam/moisture generated in this bathroom to cause damage to the plywood.
While I love the concept, is no one else concerned about the horrible likelihood of mold and mildew building up on the wood, and worse, underneath it, from the moisture of the bathroom? Mold and mildew are problems even in a well- ventilated bathroom with lots of windows.
Yikes! I didn’t think about this – MOLD! Just the idea that there could be black mold caused by having dark enclosed places for moisture to congregate would scare me out of doing that wood ceiling! Do you have a good exhaust fan Kristi?
I don’t yet, but I will be installing one.
I’m the only person that uses this bathroom regularly, and I just don’t generate that much steam. I’ve never had a mold problem in here, and there’s never been an exhaust fan in here. I’ll be installing one over the tub, so I don’t anticipate a problem at all. Most people who use this bathroom will simply be using the toilet. I just can’t imagine any kind of mold problem in this bathroom. Now if we had a large family and/or were constantly hosting overnight guests, and this bathroom was in constant use from people taking hot, steamy showers, then it might have been a problem.
Hi Kristi,
Wow! Absolutely gorgeous results!
I have noticed in many previous post where people are ultra concerned about you not having a window in your bathroom. I have four bathrooms in my house and three of them do not have a window. Honestly, it is not something that I ever think about.
The one bathroom is a powder room and I painted it dark brown…no issues! I also have a question, which might sound silly, but what are textured walls and what is the purpose? I follow some other (U.S.) blogs which mention this as well. I am in Canada and have honestly never heard of this. Thanks! Tina
Most walls in homes here are textures after the drywall is installed, and the seams are mudded and sanded smooth. The texture kind of hides any imperfections in the drywall. Here are some pictures of commonly used textures. Some of them are kind of old and outdated. The two most commonly used ones in new construction in my area are the first one called Knockdown, and the one five pictures down from that called Orange Peel.
http://www.drywallschool.com/textures.htm
Thanks Kristi!
Interesting, we only have ceilings textured here.
Otherwise just paint over the tapes/ mudded/sanded drywall.
Tina
That staining process came out beautifully! I love it and it will be great on the ceiling – I love wood on the ceiling. it adds another dimension to a room and should hold up well in your bathroom. Excited to see it complete.
Wow! I love this technique! Very creative and the finished product looks very rich, has depth, and does NOT look like you used plywood. lol
Lady, I could not agree more about Rustoleum wood stain. I am in love with this stain. I used to get frustrated with Minwax and started using General Finishes (which I like), but it is a long drive to pick up more stain (obviously H.D. or Lowes do not carry them). I started using Rustoleum stains a few weeks back and am amazed at how easy and fast this stain works. Their top coats are amazing, too! I am hooked on the matte finish. 🙂
Julie…..glad to read your post..
I have been looking for a new stain……great to hear you like them, too.
To all concerned that the plywood can warp, develop mold, etc. – there is exterior grade plywood, which can be used in wet environments, it is also fungi-resistant. Such plywood is used on yachts, so it certainly would survive in a bathroom.
Most days I am totally jealous of your mad decorating skills, but today, I am more jealous of your beautiful weather! Sitting here with 10 inches of snow and negative 4 degree temps. This too shall pass.
Kristi….
OMGOSHES GIRL!!!!!
After crawling off scaffolding yesterday to stencil a ceiling….I seriously thought about you on my drive home……wondering how your day was going.
Your slats are FABULOUS!!!!!!, I have never used cabinet grade plywood before…..it look FABULOUS!!!!! Can you here me screaming that?
Way to go !!!!!!! It look so fine and so beautiful……the two stains look wonderful.
I love mixing and using more than one stain on less expensive wood!!!!!
You continue to AMAZE us all….can’t wait to see the finished bath!!!!!
Hang in there…..big *five doll!!!!!!!
You are my new hero. This is the most awesome thing I’ve ever seen!