Tiny Bathroom Makeover – Day 2
Definite progress has been made on the tiny bathroom in my condo! If you missed how it started out, you can see it here. It was beyond disgusting, but I’m working hard to remove the disgusting factor, and replace it with new finishes.
I got the two layers of old, gross vinyl floor removed, and installed the same groutable vinyl floor tiles that I have in the rest of the condo. I also installed a bit of trim, and primed just enough of the wall so that my father-in-law could install the new toilet.

You can see that I also tested out a paint color — the same Rich Cream (light yellow) that I have on the walls in the family room/kitchen/breakfast room. I’m still not sure what color I’ll go with, but I really don’t want to use white. White just seems so boring. And since this is the smallest room in the condo, and yellow is the brightest of all the colors, that just made sense to me. But we’ll see.
I also took the advice that a couple of you gave me, and I removed the door from the shower. I’ll use a shower curtain instead. It’s really amazing how that opened up not only the doorway to the shower (the frame on the door took up at least five inches of the already-very-narrow doorway width), but it made the whole room feel a bit more spacious.
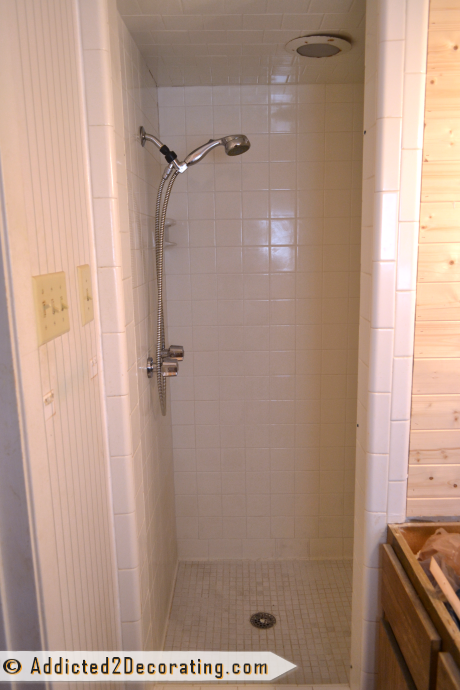
And then I spent hours….HOURS…cleaning that shower. I mean, I cleaned, and cleaned, and cleaned.
First I used Lime Away on the whole thing. It still looked dirty and dingy. Then I used just pure bleach (while wearing a painters mask for the fumes). It still looked dirty and dingy. Then I scrubbed the entire thing with a mixture of baking soda, vinegar, dishwashing liquid, and a Magic Eraser. It still looked dirty and dingy. Then I scrubbed every single grout line with a firm brush and a mixture of baking soda and hydrogen peroxide. It still looked dirty and dingy.
So, knowing that the grout was clean, but was just looking like 30-year-old white grout does, I decided to use Polyblend Grout Renew in bright white on the grout lines. It made an amazing difference!
You can see the difference here. The left wall has the Grout Renew applied to the grout lines. The right wall doesn’t.
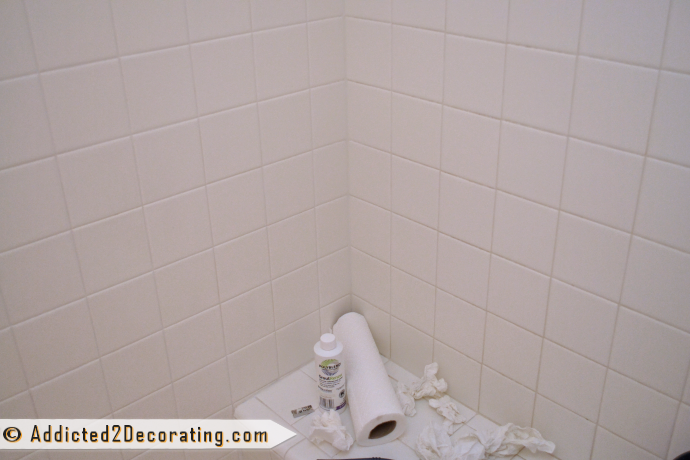
And here’s another view of the difference…
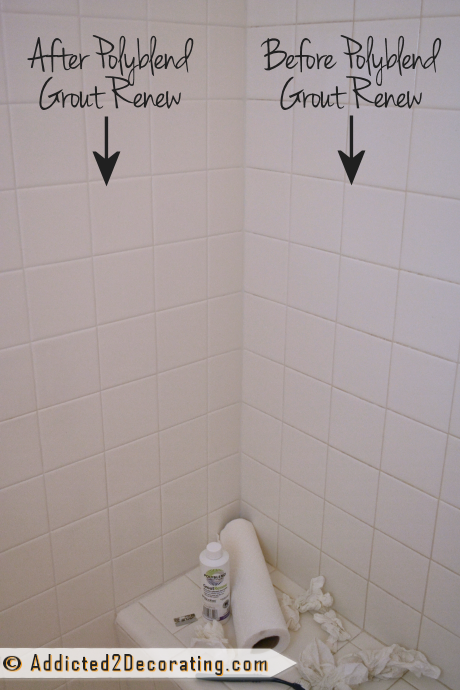
It’s a big job, and I’m only about halfway done, but it makes such a big difference! Unfortunately, I don’t think it shows as much in pictures as it does in person.
So that’s where my bathroom makeover stands right now. I’ve also been working on my living room bookshelves (they’re all wood filled, sanded, and caulked, and one of them has been partially primed), so the progress on the bathroom has been slower than I had hoped. But that’s okay! As long as I’m making progress somewhere, it really doesn’t matter which room the progress is in, right? 🙂
THREE WEEKS TO GO!!! And my in-laws left on Saturday, so I’m on my own again. Of course, my mom has offered to help me whenever I need it, and also my brother just moved here this weekend, so I might recruit him to help me also. 🙂 We’ll see how it goes.
Three weeks, y’all! I’m actually feeling pretty good about it. Tomorrow I hope to have the finished bookcase wall to show you!!

Addicted 2 Decorating is where I share my DIY and decorating journey as I remodel and decorate the 1948 fixer upper that my husband, Matt, and I bought in 2013. Matt has M.S. and is unable to do physical work, so I do the majority of the work on the house by myself. You can learn more about me here.

Looks good! I’m still free in you want painting help on Saturday lol.
I do see the difference, even just with pictures! I know how satisfying it is to finally get it looking like new! I’ll note down this stuff if I ever need it in the future. I kinda don’t really want to go through the trouble in my rental apartment that we’re probably leaving in a year, though it would really satisfy me, it’s kinda horrible, as is the caulking job. I mean, how hard is it to get a smooth caulk line?!?! It’s impossible to clean when there are tons of little crevices. Anyway, sorry for the rant here. Good job, I’m sure it will make a difference for prospective buyers, I know I’d be turned off if the grout looks dingy. Too bad you can’t show them a before and after!
The bathrooom looks wonderful! You have a lot to show for such a short period of time…The bookcases are also looking awesome can’t wait to see the final!
OMG Kristi, you are persistent with a capital P. The grout looks great, is the product like a paint for grout? I had this problem in my last house and made a mess of the grout paint but I’m not sure of the product I used.
I totally agree with removing the shower door, what a difference!
It is kind of like paint, but it’s a bit thicker than paint. And you just use a toothbrush to scrub it into the grout lines. There’s nothing difficult about it, but it’s definitely time-consuming.
I love the look of the wood. what type of wood is this and about how much does it cost? I have to totally tear out our 2 baths and change the layout. the hall bath is huge with a lot of wasted space and the master bath is much like your tiny bathroom. (which doesn’t make sense to me that the master bath is a pit)
I need grab bars in both baths and an open shower type in one to make it easier for my husband.
The wood slats make it look like a spa to me. And I can see the difference in your grout.
I haven’t tackled this project yet because of the cost. I want to put in a jetted tub in the master bath and I’ll need to hire a plumber to move pipes. But other than that we can do the rest. Thanks for posting your projects. I need inspiration.
I got the wood planks at Home Depot. They come in packages of five or six planks, and each package costs around $15. My tiny bathroom took about six packages.
This product is definitely many times more expensive than the 1/4″ hardboard that I had cut into strips for the faux wood plank wall treatment in my other bathroom, but since I’m in a hurry, I didn’t have time to cut all of those strips for this bathroom. If I had more time, I’d definitely go with the hardboard cut into strips, just because you get a similar effect, and it’s so much cheaper.
What exactly is the groutable tile? i would like to use this product in my laundry room. It’s amazing how good the grout looks in the shower. Great job. I’m so impressed by how much you do alone. I live alone and I always think i can’t do stuff by myself. You are an inspiration.
I got my groutable tile at Home Depot. It’s the peel-and-stick tile, but it’ll say on the package if it’s groutable or not. I have it in my entire condo, and I absolutely love it. Peel-and-stick tile has come a long way in the last 20 years!!
Love your website and all your ideas!! WOW!! How very blessed you are with creativity. I found a link to your site through a search engine when I was researching the groutable tile.
We just bought this same vinyl tile from Home Depot and plan on starting a project in our kitchen & laundry room tomorrow. I wondered what SHADE/COLOR of Grout did you use? I really loved how it looked on your floors and I was thinking of using Alabaster, but liked the little darker look you had.
Thanks again for your hard work. Also – LOVE all the scripture you use in your home. It is a blessing as well!
The color I used is called Sandstone. The floor in this bathroom that you see in the pictures in this post isn’t grouted yet. The color you’re seeing is the concrete between the tiles.
I know this is a small project for you but my wife and I are VERY interested in seeing how the paint covers on the knotty pine(ish) horizontal boards.
When we bought our house 3 years ago, it came with a HUGE living room that was essentially done-up to look “rustic lodge style”. We have a big stone hearth and the previous owners had covered the 1960’s sheet paneling on all the walls with tongue and groove knotty pine that’s clear-coated in a matte finish. It’s a fairly expensive look and most people who come to our house absolutely love it. We don’t. It’s just not our preferred style.
Unfortunately, there’s no drywall underneath both sets of paneling, the electrical outlets have already been extended once for depth, and the insulation could use improvement. On top of that, drywall and mudding are my absolute least favorite home improvement tasks (as in I suck at it and hate doing it). So, the room is not getting a full renovation until we have the money to have someone come in to hang drywall. In the meantime, we’ve been wondering how it’d look if we just painted the wood. It will definitely look “cottage style” but I think that’s more to our tastes than the knotty pine. I’m just not sure how bad the knots will show–even if properly sealed with primer. Also, it’s hard to visualize that much horizontal paneling and there aren’t a lot of examples I’ve seen in magazines and online. Most seem to go vertical.
The knots in knotty pine are definitely a pain. A good primer should do the trick, but sometimes the knots have grooves around them that will still show once painted. I’ve seen people go to the trouble of skimming all of the knots with wood filler and sanding before priming and painting, but it sounds like that would be quite a job for you!! I’m so NOT a fan of knotty pine paneling, though, so for me the effort would certainly be worth it.
Krisit, you now have the cleanest shower in the entire Western hemisphere! Not only is it so clean you could perform open heart surgery in there, but those renewed grout lines make it look like freshly installed tile work! That bathroom is going to look amazing when you are done with it. The walls already look awesome and they’re not even finished yet. I’m so seriously impressed with your ambition and energy level.
Open heart surgery…LOL. 😀 That gave me a chuckle!
That grout renew stuff is pretty amazing. I’ll have to look for it as our grout looks its age also. : ( The bathroom is shaping up nicely and I love that you’re thinking of using yellow, one of my favorites and it always looks bright and fresh in a bathroom. You might try a bright pop of color with red accents in the rug and maybe a frame or two. Just a thought…
Isn’t Grout Renew amazing?? When we moved into our house, the bathroom had grey grout in creamy/golden floor tile. It just looked dirty. I used Grout Renew and changed the grout to the color of the tile. It was a lot of work, but definitely worth it. It’s been about a year and is holding up perfectly. Your bathroom is looking good! I like the idea of taking off the shower door. It really does look bigger. Can’t wait to see the finished room!
I’m so glad that you removed the shower door. It does make such a difference. I’m glad to hear about the grout renew because I could certainly stand my grout looking cleaner. Looking good Kristi!
You are movin’ and groovin’ in there! The floor is way better than what was in there and taking out the shower door made a big difference. The shower tile is looking great too.
You are such an inspiration. I so look forward to each and every one of your post. You have so motivated me into action. THE bathroom is half way done. Floor down, bead board up, primed and painted, new vanity in, top on, mirror up. Sooooooooooo what is left? wallpaper maybe tonight. Doors have been sanded and stripped, restained, and finished. Who knows? I may finish when you do! A great inspiration to me and all who read about your accomplishments.
Wow! Congrats on all of your progress!! You’ll have to send me a picture when it’s all finished.
Wow you are making so much progress – I am so excited for you!! I have never heard of the grout renew – definitely checking that out! Everything looks great and I’m always so jealous that you are doing this carpentry basically on your own – jealous of that talent and those skills! Can’t wait to see it finished!
Wow! G rout Renew looks like a miracle product! I’ll have to find some. I’ve tried everything, even a bleach pen in all the grout lines, and they still don’t look as clean and bright as yours! I love your blog – so many wonderful and creative ideas with instructions! I just recommended it on Hometalk this morning, to a woman who wants to redo her galley kitchen. I sent her the link to your kitchen, knowing that she probably couldn’t do it all but that the cabinets and use of space would give her some wonderful ideas! Thank you for taking the time to share your talents with us! Hugs, Leena
can’t believe you are not getting rid of that horrible cabinet above the toilet! It would also help open the room up.
Well, believe it, ’cause it’s staying put!
haha! 😀 ok then I have to ask, why?
Lookin’ really good! I love the pale yellow, it really brightens up the room. I see a new cabinet top in the future? I don’t think the cab over the toilet looks bad, and once it’s painted, it will look better and give some much needed storage in the tiny space. Since it’s in the corner, it doesn’t seem as obtrusive as the one in the other bath. Isn’t it funny that when we go to sell our homes that we do things we wish we had done years ago so WE could enjoy it?
I love the planked walls! My husband and I were considering the same thing in our kitchen. That is until I saw your other bathroom using the hardboard. I showed my husband and he is still not convinced. He is concerned with the board swelling. Certainly a bathroom would have more humidity than a kitchen. Was swelling a concern for you? The real planks are just too expensive for the space we are trying to cover. Thanks for your help. I cannot wait to see what is next!
A) Using this site you understand that no part of the Minecraft game is actually served from our servers and that you are playing the official game streamed directly from minecraft.
net.
I love the wood paneling idea. It gives the bathroom a whole new look that you can’t get with paint or wallpaper. Congratulations on another successful DIY project!