Rough-Hewn Wood DIY Fireplace Mantel
I decided that John & Alice’s fireplace needed a mantel after all. Rather than just use one of those Home Depot fireplace mantels, I made a DIY fireplace mantel to look like a rough-hewn chunk of wood.

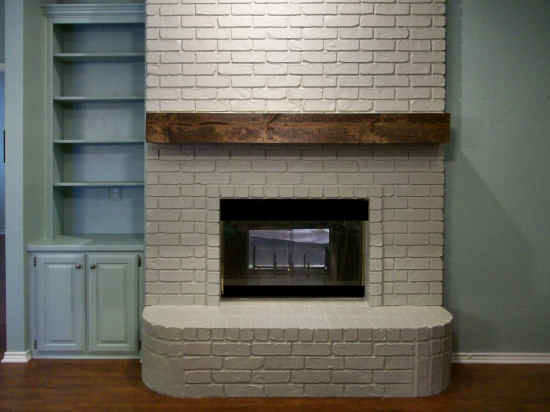
I’m really glad I changed my mind and decided to add a DIY fireplace mantel. I think this mantel adds some very needed warmth to the fireplace wall. (And no, I still haven’t painted the screen. I blacked out the brass for the first picture so that it wouldn’t be distracting.)
The mantel also helps to break up the towering height of the brick. And once the mantel is decorated, the impact of the brick will be reduced even more.

Of course, the real thing…a real chunk of wood that size…can cost anywhere from $200 for the most basic, up to several hundred dollars. So naturally, I chose to make my own. It came in just under $25.

The construction was quite simple…1” x 8” pieces of lumber, cut to 6 feet long, and then a couple of pieces for the ends.

I’m really pleased with how it turned out, and can’t wait to decorate it!


Even without it decorated yet (and with the screen still unpainted), this fireplace has certainly come a long way!

Want to build your own rough-hewn wood mantel? Here’s how…
How To Build A Fireplace Mantel – DIY Tutorial
Project Cost:
Approximately $25.
Tools & Materials:
*These materials and instructions are for a mantel that measures 8″ x 8″ x 6′ wide. You’ll need to make adjustments if your mantel needs to be wider or narrower.
- Two pieces of 1″ x 8″ lumber, six feet long,
- One piece of 1″ x 8″ lumber, 8 feet in length,
- Two pieces of wood veneer, approx. 9″ x 11″ each,
- Wood glue,
- Wood stain,
- Polyurethane,
- Nail gun with 1.5″ finishing nails (if you don’t have a nail gun, you can assemble the mantel with finish nails and a hammer),
- Miter saw,
- Utility knife,
- 150-grit sandpaper,
- Paint brush,
- Rag for applying stain,
- Items for distressing wood (hammer, nail, flathead screwdriver).
Instructions:
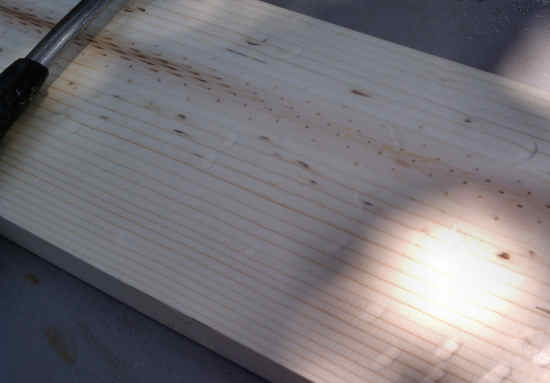
Because I wanted my DIY fireplace mantel to look rough-hewn, I actually looked for lumber that already had some marks, knots, cracks, etc.
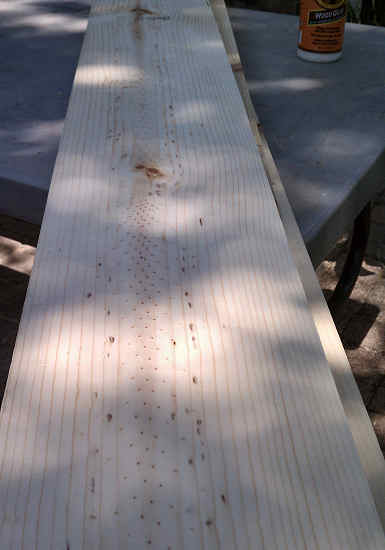
Using my miter saw, I cut my 8-foot piece of 1″ x 8″ lumber down to 6 feet, so that I had three pieces that were each six feet long. I then used a random assortment of tools to distress the wood.
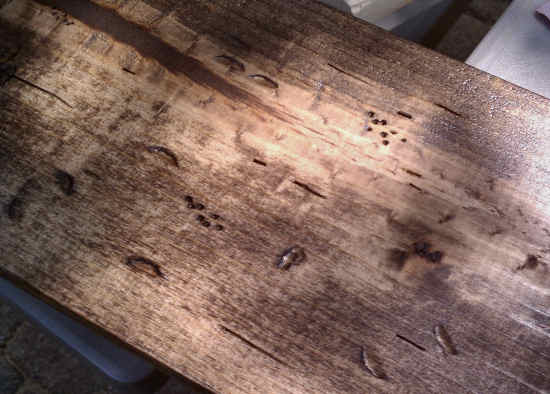
After the wood was distressed, I stained each of the three 6-foot pieces of 1″ x 8″ lumber. The stain really brought out all of the distress markings that I had made.
With the front, sides, and ends of each piece stained, I then stood two pieces on their edges, and placed one piece on top, as shown below. Using wood glue and my nail gun, I secured the boards together as shown.
I then used the piece of 1″ x 8″ lumber that I cut off of the 8-foot piece to cut smaller pieces for the ends. This cut measured 5 11/16″. (Double check your own measurements. Please don’t go by my measurements without measuring.) I secured these pieces to the ends using wood glue and my nail gun.
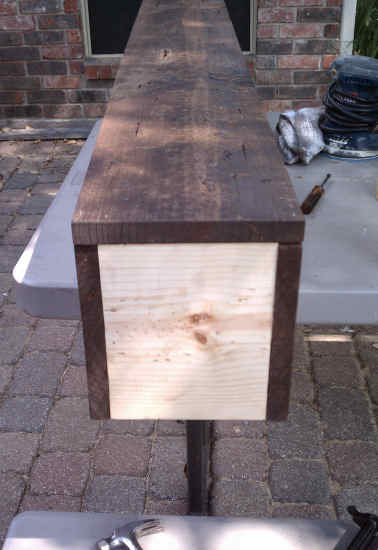
I stained the end, and clamped it while the glue dried.

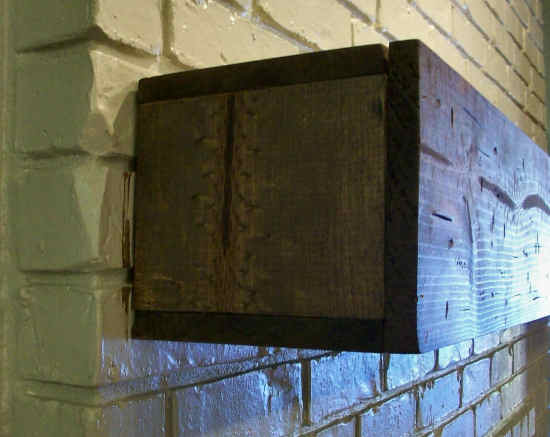
At this
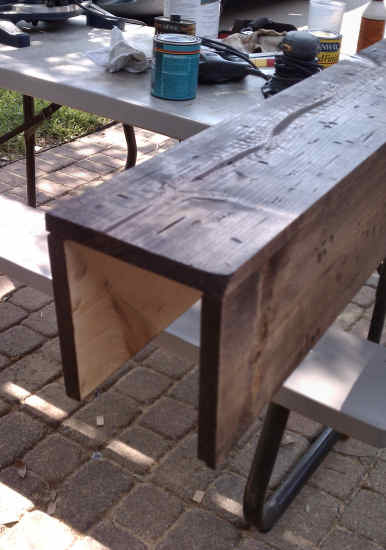
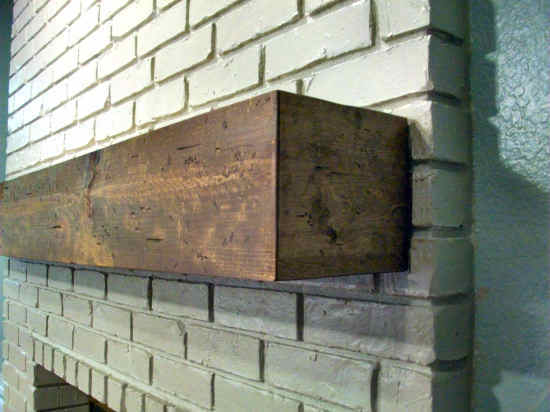
At that point, the mantel looked like this. I could have opted to leave it like this, and it would have been fine. But I was hoping for a more finished look, and I wanted the mantel to look more like one big chunk of wood.
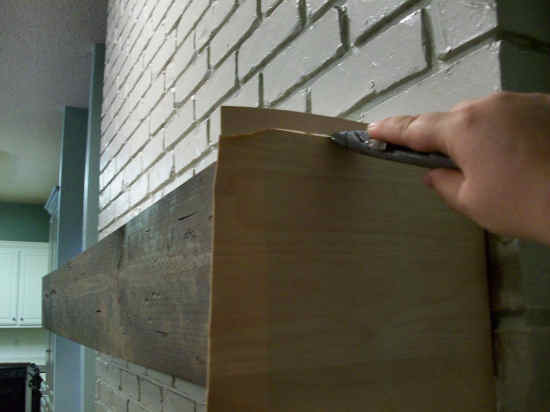
So I used pieces of wood veneer to cover the ends. The wood veneer I had came with adhesive already on the back. I simply had to peel away the protective paper and stick it into place.
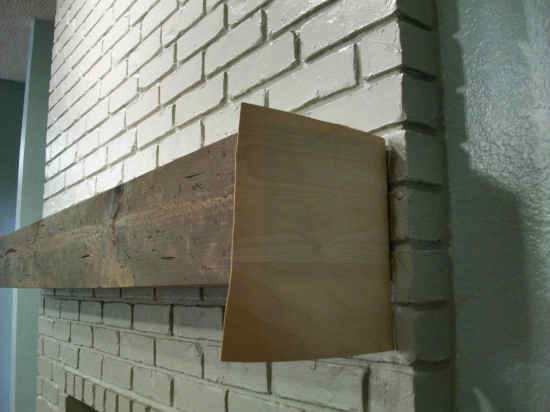
Using a utility knife with a new (very sharp) blade, I cut away the excess veneer.
I then used 150-grit sandpaper to sand away the edges of the veneer so that it would blend into the other pieces and give the appearance of one solid piece of wood.
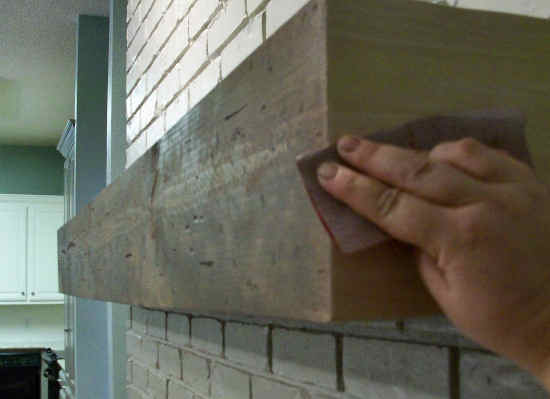
And finally, I stained the ends, and then applied polyurethane to the whole mantel.
Here is a view of the other end, done exactly the same way. The corner on this end had a dented corner, so I cut the veneer accordingly.
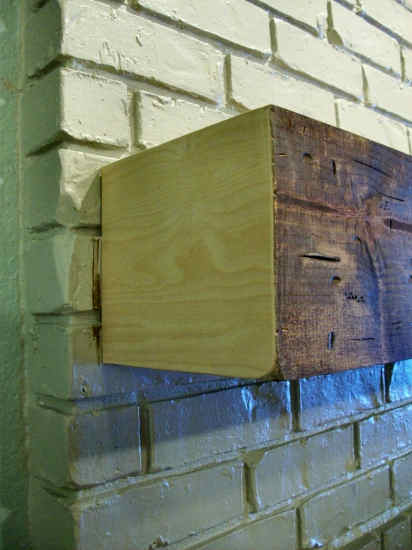
And here’s how it looked after it was stained.
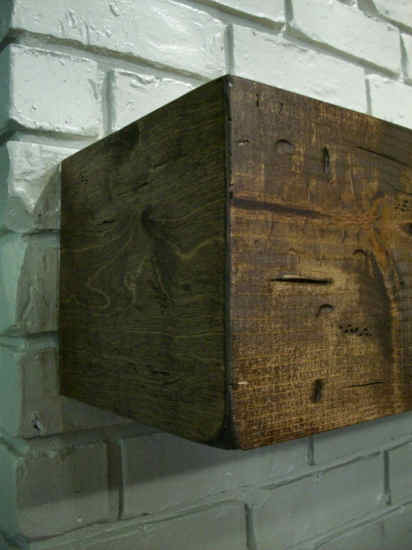
The finished product is a chunky wood mantel that adds warmth to the room, and breaks up the large expanse of brick.
And after everything is dry, the fun part can begin…the decorating!
Psstt…click here to see this room completely decorated.
Helpful Hints:
- Be sure to purchase the straightest boards possible. Warped boards will ruin a project.
- Double check your measurements before cutting. Please don’t just go by my measurements.
Variations:
- You could take the veneer a step further and add veneer to the top and the bottom, covering the edges of the 1″ x 8″ lumber, and really giving your mantel the appearance of one solid chunk of wood.
- Rough-hewn corbels could be added to give the mantel an even chunkier, more substantial look.

Addicted 2 Decorating is where I share my DIY and decorating journey as I remodel and decorate the 1948 fixer upper that my husband, Matt, and I bought in 2013. Matt has M.S. and is unable to do physical work, so I do the majority of the work on the house by myself. You can learn more about me here.

beautiful! great job!
It looks awesome! I have always loved mantel decor but unfortunately we don't have a fireplace! I can't wait to see what you put up there!! A sunburst mirror, perhaps?! 😉
I am making this mantle also! Where did you buy or order the adhesive backed veneer? I’m having a hard time finding it?
Amazon is your best bet. Search “PSA wood veneer”. PSA is pressure-sensitive adhesive. If you can’t find it there, just google that same term and you’ll find lots of online sources.
For anyone having difficulty finding wood veneer for the ends, I found a small package by Cricut at Michaels (Natural Wood Veneer, Maple). It comes with 2 sheets, one sheet is more than enough for each end. There’s no adhesive backing so you’ll need to just use glue to attach it.
Wow, Kristi, that looks great! It doesn't look "built," it looks like one solid piece of awesomeness.
Looks good! And I am so glad you painted out the shelves next to the fireplace. They look so nice!
You did a great job! Looking forward to seeing it all finished now.
I had a question recently on my blog about how to make an inexpensive mantel. This is great. I hope you don't mind but I am sendinging that reader to you blog. This is great.
For whatever reason, adding the mantle also makes the bricks go from reading as "sterile white" to "warm grey" which is just lovely. I think I say this about once a month, and it's about time for me to say it again…I wish you lived near me!!
You're so funny! Of course you would make your own!!! It's beautiful, of course, like everything you do.
I might be developing a bit a design crush on you…..
Looks awesome, and I love the new DIY button!
Wow! That mantel looks great. I'm trying to picture how you did it. Did you paint it to look old? I can't believe the change from the original. I bet the home owners are ecstatic. Love your blog!!!
This looks fabulous! When you were talking about a mantel, I couldn't really envision it, but I whole-heartedly agree with your choice. And, I think the bookshelves are great now — they blend in more but still provide interest.
Any plans to paint the gold accent on the fireplace doors? I recently did ours by taking them off and taping off the glass. I just used a black matte high heat paint after sanding down the gold. I *love* the transformation, too! They seem to just fade away 🙂 Keep up the great work!!
It's already been painted. 🙂 I just didn't have time to do it before taking these pictures.
LOVE this!!! How did you attach it? I would love to know because I am trying to make a floating shelf like this. Thanks! Angie
Just click on the DIY button at the bottom of the post for all of the details. 🙂
This is beautiful. I love the color of the stain. Please stop by http://www.laughloveandcraft.com and link up to my Share the Wealth Wednesday Link Party! I'm your newest follower!
That's turned out really nice. 🙂 I'd love for you to link this up over at my {wow me} wednesday link party going on over on my blog right now. 🙂 Following from Fingerprints on the Fridge. 🙂
Ginger
gingersnapcrafts.blogspot.com
We have the best resources for ridgid tools. Check it out for yourself. Best ridgid tools site, right here.
http://www.hardwoodflooring-prices.net/ridgid-tools.htm
Love this! I want to do something similar with our fireplace, including some sort of shelving on the left side like you have. This is great inspiration! Visiting from the DIY Showoff. 🙂
thanks for sharing
Thanks for sharing here.
i LOVE this mantel!!! i have a brick fireplace and have been contemplating leaving it and doing a white mantel or something similar to this. you just sold me on the painted fireplace and distressed mantel!!! LOVE this style!! do you have a step by step on the best way to clean and paint brick???
thank you!
katie
I don't have one yet, but since I've had several people ask, I'll move it to the top of my "to do" list. 🙂
lol, thank you!!! i showed my husband the mantel "how to" and we are definately going to attempt this project!!! 🙂
LOVE IT! I am about to start this project but I can’t find the wood veneer that THIN anywhere. Where did you get the adhesive wood veneer for the end caps? Home Depot & Lowes only sell 1/4″ thick. Any help would be appreciated.
THANKS!
Did you ever get a response here. I’m having trouble finding the veneer as well.
Thanks!!
I too need help finding the veneer. What did you find?
Me too! I can’t find it at Lowes.
Great tutorial. I like the way you made it go almost completely side to side. And the veneer pieces on the ends make all the difference! Very clever.
Thanks for telling the rest of us how to do.
hi there. just wondering if you could give me the name, and color of the stain you used? LOVE IT!
thanks. -andrea
Hi Andrea~
I think I used Special Walnut (Minwax) on the mantel. It’s always my go-to color, so I’m pretty sure that’s what I used.
thanks for getting back with me. we went and got all of our supplies (except veneer- ive checked ace, home depot, lowes and can’t find it anywhere here in good ol’ vegas) and we are going to attempt it tomorrow.
just a quick questions… as we were looking over the pictures- after you stained it- and you sat it all up before you nailed it- where did you put the nails in? it doesn’t look like there are any nail noles in the top. are the nails noticeable from the front? thanks so much! i appreciate you getting back with me.
I have the same question about the nail holes! It doesn’t look like there are any nail holes in the front of the mantel. Can you explain how you did it? Thanks!
hi- did you ever get a response..i’m curious about the same thing.. thanks!
We finished this project yesterday and used a tool to to hit the nails far into the wood…then used a touch of stainable wood filler to fill the holes. Looks great!
My husband and I just made this mantel and love it! However, we cannot find veneer anywhere. Do you mind telling where you bought it? Thanks so much!
SUCH a great tutorial!!! I’ve been wanting to do this to our mantel and never even thought to add the veneer to the ends. That makes it look so much more authentic. Thanks for the great post:):)
You are a genius!!!
Just found you — well a couple of days ago, and gosh if I haven’t been glued to my computer ever since!!!
Thank you, thank you!!! for your generosity in publishing your knowlege, and how-tos.
WOW!!! So impressed.
Thank you! You just made my day! 🙂
Great idea, be sure your fireplace is decorated so, thanks!
Where did you buy the wood veneer pieces, or did you have to purchase the whole role?
I had purchased a whole role of it for another project, but I have since found it on Amazon in smaller pieces.
Could you post a link to what you found on amazon? I want to make sure I get the right stuff as I am not familiar with this product at all.
Something like this will work:
http://amzn.to/1NHuNxO (affiliate link)
There are many species available if cherry doesn’t work for your project. The ones labeled PSA have the pressure sensitive adhesive backing like the one I used.
Could I ask where you bought the wood veneer? I can only find edge banding or 2’x8′ sheets that cost ~$50. Any advice would be appreciated. Great addition!
Everything about your place is so beautiful. Thank you for sharing it all!!!! Keep doing what you’re doing!
This was a really great project! I decided to copy the project myself, however I went with an ebony stain to contrast the white fireplace (picture links below). We were really happy with the results. For anyone having trouble finding the veneer wood pieces, my wife and I actually found them at Michaels (I believe Hobby Lobby has them as well). Lowes and Home Depot only seemed to carry the long rolls that you have to iron on. Hope this helps!
Before/After 01: https://scontent-a-dfw.xx.fbcdn.net/hphotos-prn2/1383339_10151929329685991_810702478_n.jpg
Before/After 02: https://scontent-b-dfw.xx.fbcdn.net/hphotos-prn2/1394445_10151929329695991_1276915445_n.jpg
That looks fantastic! Great job! And thanks for the info on the veneer at Michaels.
Any tips on applying the polyurethane? I have never done it before. I have built a mantle with the help of your tutorial but I’m a little afraid to attempt the last step! Thanks!
Would you mind telling me what stain you used? I really like the color.
I think I used Minwax Dark Walnut.
Can you please tell me how many coats of stain you used as well as what type of lumber?
Thanks for posting your process! It was helpful in creating my own mantel: http://623designs.tumblr.com/post/73229199939/diy-fireplace-mantel-part-3
Love your rough hewn mantel. Where do you recommend buying the peel and stick veneer? I can’t find any
I would suggest searching on Amazon. The last time I looked for some online, that’s where I found it.
Love this makeover! Can you please provide the “light gray” color you used on the fireplace? It’s fantastic! Thanks in advance. 🙂
can u please tell me the name and brand of stain. great job looks amazing
I used Minwax in Dark Walnut, but I now prefer Rust-Oleum wood stain.
Thank u for replying
The way this was constructed it seems like you would see the edge of the front board on the top and bottom of the mantel. Did your lumber have a finished edge or is the stain darker there? What kind of wood did you use?
The wood veneer can be used to cover those seams. It’s what I used when I recreated this project.
Can you give some tips on your method of distressing? Mine always looks pretty bad.
For those who are asking about veneer, there is another cheaper way if you have a miter saw. You simply miter the corners of the front board and the two side boards and sand the corners once you’ve put it together just like she did with the veneer. No veneer needed that way and you don’t have to worry about the veneer coming lose when the heat from the fire hits it. It also will ensure a perfect match with the wood and probably will look better.
This mantel turned out beautiful! Is this cedar wood you used?
We used these plans as a guide to make our own and it turned out great! We are very happy with it. Thank you for posting!
I want to make one of these. Do you think if i ripped a 45° mitre cut along the length of the boards they would come together to look like a sold single piece of wood?
Yes, that would work.
What is the gray paint used on fireplace?
Looking at duplicating this look, including wood mantel.
Thx
I would love to add this to my “Pinterest” but the image is not working. I absolutely love this DIY mantel, it’s just what I’ve been looking for. I also plan to use this idea for my dining room for a double shelf above my canning cabinet using 1X6s. Thank you!
We used your AMAZING tutorial on our fireplace makeover & sent credit your way!
Here is the post if you would like to see!
https://sugarmintinteriors.squarespace.com/blog/2015/5/25/diy-white-washed-fireplace
Thank you so much for this great tutorial!
Looks great! What kind of lumber did you use? Hickory, Poplar, etc?
It’s pine.
Just about done with my mantel. Thank you for your tutorial. It totally makes my fireplace pop. One question… I went to Michaels and bought a sheet of the uber thin birch veneer and have trimmed to fit and put two coats of stain on prior to gluing it. How did you distress the veneer? I’m concerned that I’ll go right through it if I try even a modest amount of distressing (it’s so thin I can cut it with scissors).
Thanks, again!
– Ed.
I don’t really remember doing a whole lot of distressing (if any) on the ends, but I did use sandpaper on the ends, especially around the edges of the veneer to make them blend with the other wood better. The square cut veneer ends are very visible, but if you give them some sanding, it’ll round the edges slightly and make it blend in better. But I wouldn’t really worry about distressing the ends.
I’m getting so frustrated! I have my mantel finished and can’t find wood veneer sheets. I see where Amazon has them but they are 2×8 for the smallest and pretty expensive. I went to michaels and hobby lobby and looked at their online inventory as well. Are they maybe called something else? It wasn’t that long ago that you posted about buying them at Michaels.
Hello there,
I love this mantel and want to give it a whirl this weekend! I had a question which I saw a couple of others had but don’t see an answer to it. You said after staining you stood it up and nailed it but there doesn’t appear to be any visible nails in the front. Are there? What type of nails did you use that they aren’t noticeable from the front? I don’t have a nail gun so I’ll need to use the good ol’ hammer!
Thank you!!
My husband and I are just finishing up building our mantle – we are so happy with how it looks so far!
I have a question in regards to a few very thin (but noticeable) gaps between the top of the mantle and the wall. When we have put the mantle up to see how it fits, we have noticed the gaps. We’d like to fill them and stain them too, but what do we use for that? Is there a caulk that is stainable? I’m not sure wood filler would work – seems too messy?!? Please help!!
Thanks!
Hello! I was wondering if you could give some more detailing about how you did the distressing of the boards before you stained them? They look great, and I’ve seen multiple methods online but I love the results you got.
Also, in order to get straight boards, did you purchase them from a lumber yard, or were you able to buy them at a Home Depot-ish place?
Thanks for your help!
Any issues with sticking veneer to the end grain? Thanks.
Can you share the link for wood veneer? I’m having a really difficult time finding it.
I am looking to make this mantle this weekend, but I can’t find the DIY button to find out how you mounted it to the 2×4 posts. Any suggestions?
Thank you! 🙂 The design you did on that whole house is pretty much what I am doing in my own home. Love your page! 🙂
I think I used glue and finishing nails.
Hi! I am in process of making this but have not been able to find the wood veneer any where. Do you mind sharing where you purchased? Thanks!
Google “PSA backed wood venner.” There are lots of options.
Can you share with me the paint colours for both the fireplace and the shelving/walls beside?? I love the combination!! Thanks!
It’s been so long that I can’t remember. That info is buried in my blog somewhere.
Hi- LOVE the mantle. Will attempt it.- question for you- i don’t see nail holes or screws on the front side of mantle.. did you fill with wood putty and stain? thanks!
Yes, I used wood filler before staining the entire thing.
Not exactly sure how this came to $24… once you find this magical wood veneer from an obscure online retailer, you’re over $50-60.
Try the non-magical kind from a local retailer. It’s cheaper. http://www.homedepot.com/p/Utility-Panel-Common-1-8-In-x-4-Ft-x-8-Ft-Actual-0-106-in-x-48-in-x-96-in-833096/100535208?AID=11556741&PID=8190887&SID=0500ie46ppdk&cm_mmc=CJ-_-8190887-_-11556741&cj=true
This is beautiful! I’d like to do this to my fireplace but have a question. My current one isn’t brick but is drywall and the current “lip” that sticks out is falling apart because of heat. I wish I could attach a picture to explain this a little better….Anyways, do I need to cover this with something that is heat resistant? Is there any concern about the wood getting overly heated and catching on fire? Thanks so much!! Beautiful fireplace!
A mantel on the outside of your fireplace shouldn’t get enough heat to be a concern. If your fireplace is drywall, the I’m assuming that you have an enclosed fireplace? (i.e., a gas insert with a glass cover over the front) If you find that the mantel area is getting so hot to cause concern or damage, then that means you have some serious structural issues with your fireplace that need to be looked at before using it.
Hi! What color stain did you use? It came out beautiful!
Either Minwax Special Walnut or Dark Walnut.
Just completed this project using 1×6 instead of 1×8. Looks great and Mrs is extremely happy. We used a 2:1 mix of minwax espresso and red mahoganystains to give nice warmth and depth to the wood. Had fun experimenting to find the right color for us.
If you cut all edges on a 45* angle. You would not need any veneer. A much more professional look!!
That is true, and very doable for anyone who has a table saw. I didn’t own a table saw when I made this, so that wasn’t an option for me.
Hi, I’m building the mantel today, so excited!!! Many of you have not been able to find veneer, I found some st a cabinet supply store, FYI! Thank you Kristi for the tutorial!
EXACTLY what I was looking for. Mounted mine with a French Cleat, easy peasy, and it lifts right off!
Pine from Home Depot, found straight, but plenty of funky knots. Simply beat the wood like a rented mule. I’m also doing some contouring of the surfaces/edges with the aggressive use of a belt sander.
Can’t wait to stain, going to try ‘differential’ staining. Dark down in the gouges, then several layers over with a charcoal gray weathered look stain.Couple simple corbels too.
Bottom line, VERY EASY, low cost, PLENTY of room for imagination and customization. Highly recommended.
What kind of wood did you use for mantle? Looks like pine? Was veneer also pine?
Yes, it’s pine. Honestly, this was so long ago, and I was still learning so much about DIY, so I don’t know if I would have ever thought to specifically buy pine veneer. It was probably birch or something like that.