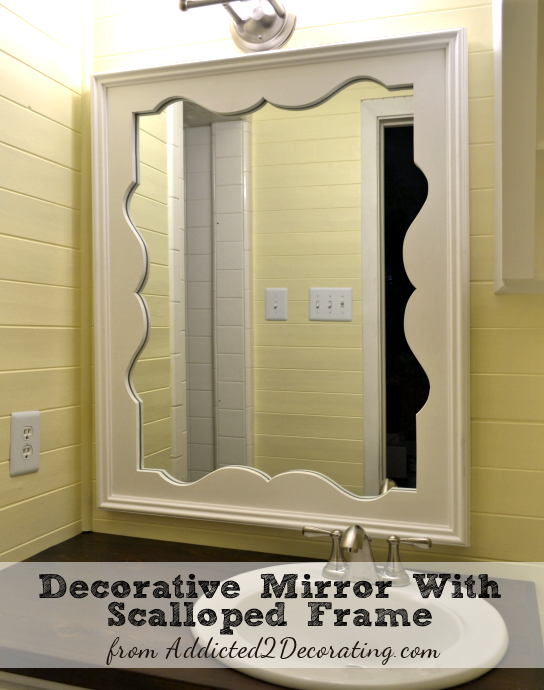
DIY Mirror Frame With Scalloped Design
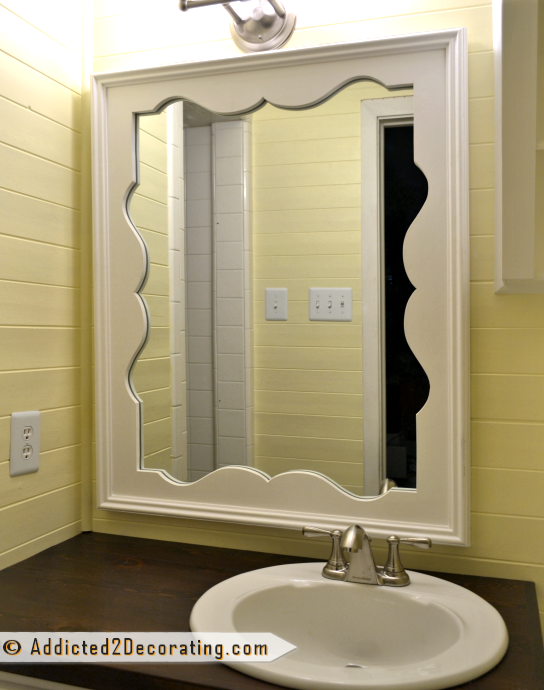
I was finally able to get the original mirror cut down to fit into the new frame for my tiny bathroom. So here it is! My new DIY mirror frame with a scalloped design.
I was inspired by this mirror that I saw on Joss and Main. I would have just purchased this one, but it was the wrong size.

😀 Yeah, right!! If you know me at all, you know that if you ever see me spending over $300 on a mirror, hell has officially frozen over (and you might want to check the sky for those flying pigs).
No, I would never spend that kind of money on a mirror, especially not one that’s this easy to make. Mine ended up costing about $25, and that includes the $10 that I spent to have the original bathroom mirror cut down to fit into the frame.

Part of the reason it was so cheap is because I had just about everything on hand already. All I had to purchase was the decorative moulding and mirror mastic. So if you make this yourself, and you don’t have a supply of scrap MDF lying around, then it will definitely cost you more than $25. But even if you have to purchase an entire sheet of MDF, that would only add about $25 to the cost. That’s still a far cry from $334!! If you don’t have a mirror you can use, you can always check at Habitat for Humanity ReStore. They generally have a few on hand.
So if you don’t have any of the supplies on hand, I think you could still make this for around $75. Not too bad, right?
Let me show you how I made it:
Step 1: Cut 1/2-inch MDF to finished mirror size
First, I used my circular saw to cut a piece of 1/2-inch MDF to the finished size of my mirror, minus 1/2-inch in each direction. (Example: I wanted my finished mirror to be 30.5 inches wide by 38.5 inches tall. I cut my piece of MDF to 30 inches by 38 inches.)

Step 2: Create scalloped design on a paper template
I used a piece of thick paper (I used watercolor paper since it’s what I had on hand), tore it in half lengthwise, and I cut the length to half of the width of the shortest side of my MDF. The shortest side of my MDF was 30 inches, so I cut my paper to 15 inches in length. Then on one end, I marked a 45-degree angle.

Next I drew on a decorative scalloped design. I used a one-quart paint can to get me started, and then freehanded the rest of the design. You can see that it took me several tries to get it just like I wanted it. And of course, you can make the design anything you want. Just keep in mind that you’re drawing only half of the design.
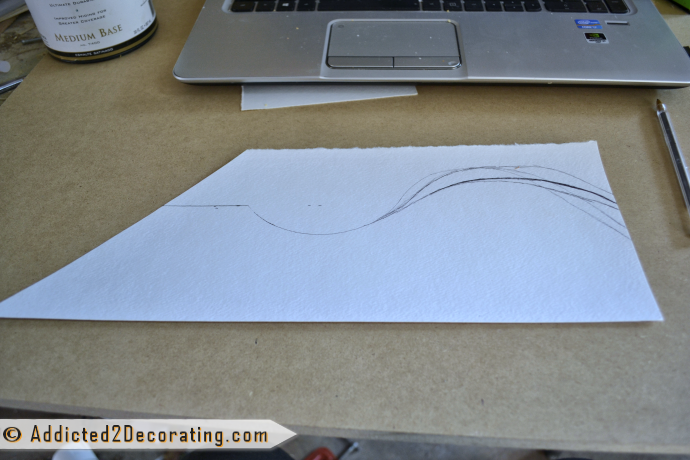
When I had the design just like I wanted it, I cut it out, and then aligned it on the edge of the MDF.
Step 3: Trace pattern onto the MDF
Tip: Mark the center of the MDF, and align the pattern from the center, rather than from the outside corner.
Then I traced around the pattern.

Then I flipped the pattern and traced the other half. Doing it this way ensures that you have a perfectly symmetrical design. Then I repeated that process on the other short side.
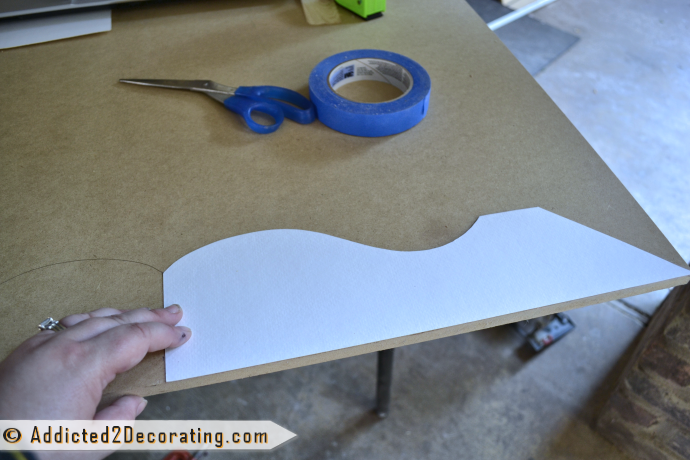
The longer sides of my MDF were eight inches longer, so I just added a four-inch extension to my pattern and repeated the tracing process on the longer sides.

Step 4: Cut out scalloped design with jigsaw
With the design finished, I used a 1/2-inch drill bit to drill a hole somewhat close to the lines. This would allow a starting place for my jigsaw blade.

I made very sure to use a jigsaw blade designed for cutting curves. When using a jigsaw, it’s always important to use the correct blade for your project. If you use a blade intended for very quick rough cuts on a project like this, you’ll end up with a complete mess. These blades designed for curves are smaller and have finer teeth.

I took my time when cutting out the design with my jigsaw. I mean, I went very slowly to avoid any mistakes or slips of the blade. After it was cut out, I sanded the cut edges with 150-grit sandpaper to make them as smooth as possible.

Step 5: Attach trim to back of MDF
Next I cut and attached some 1″ x 2″ strips of wood to the back of the MDF. This created the rabbet that would hold the mirror in place. I attached these with wood glue and a brad nailer.
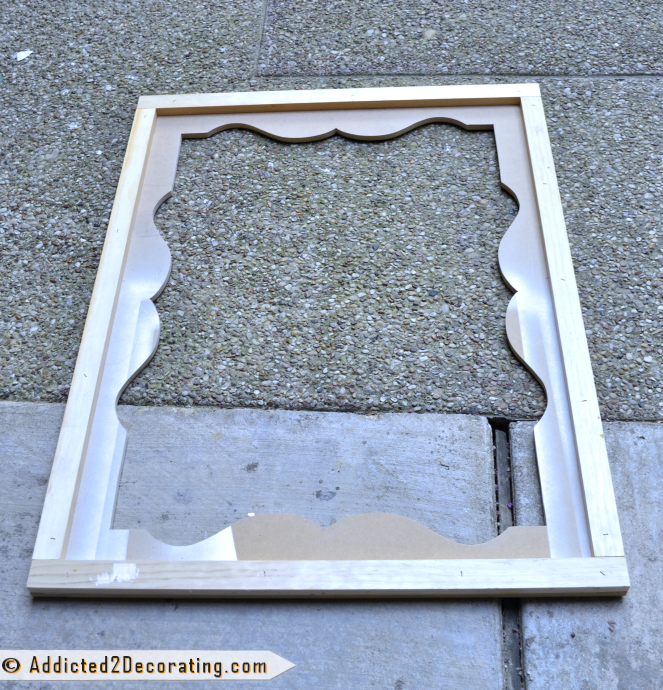
And as you can see, I didn’t take the time to miter the corners. This will be against the wall on the back of the mirror, so no need for mitered corners.

Step 6: Add trim to the front of the MDF and edges of frame
On the front, I added decorative moulding around the edges of the MDF. I attached these also with wood glue and a brad nailer.
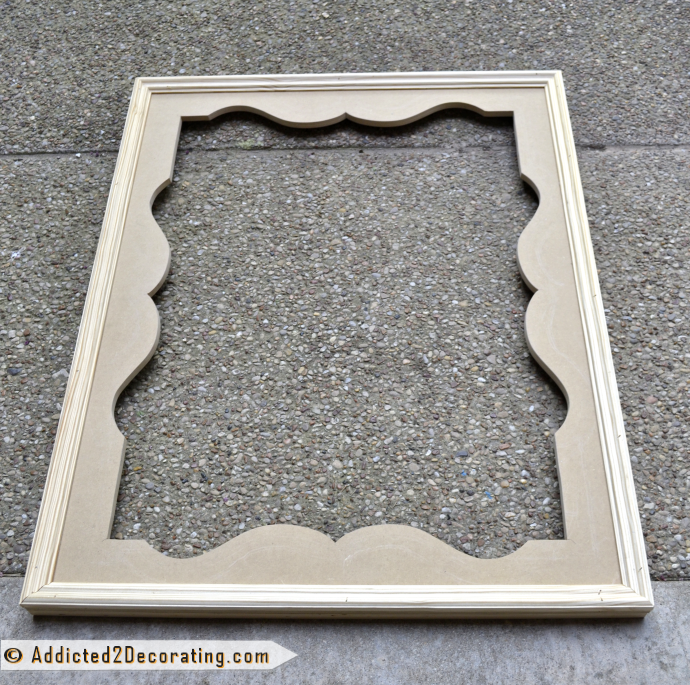
And of course, since this is the decorative side, I did miter the corners.

Now at this point, this is what the edge of the frame looked like. You could see the three layers – 1″x2″ wood on the back, 1/2-inch MDF in the middle, and the decorative moulding on front. Obviously that doesn’t give a very finished look, so I added strips of lattice on the sides to cover the edges.

Here’s what the lattice looks like from the front, and it covers the edge of the frame. Once it’s caulked and painted, it looks like one solid piece.

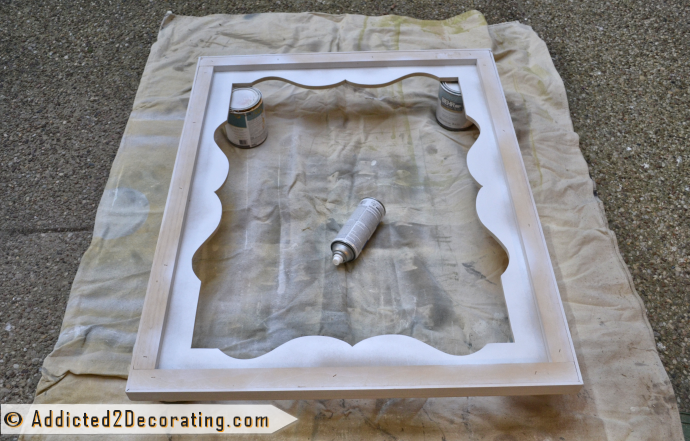
Step 7: Finish frame with wood filler, caulk, primer, and paint
And after it was all caulked and all of the nail holes were covered with wood filler and sanded, it was time to prime and paint.
When making frames for mirrors, don’t forget to prime and paint the edges on the back (at least an inch in) that will be right against the mirror!! That part will be reflected in the mirror, so if you forget to prime and paint, it WILL show. Ask me how I learned that lesson. 🙂
Step 8: Add mirror to the back of frame
And here’s my finished mirror. I love the look, and I love it even more knowing that it only cost me $25!!

I attached the mirror using a thick bead of mirror mastic just inside the rabbet on the back of the frame. It takes a few hours for it to set, so you have to be patient (something I’m not very good at).
And the most-asked question I get when I make a project like this. “How do you hang the mirror, Kristi?“
Well, I’m glad you asked! 🙂 Any time I hang something large and heavy, from mirrors to upholstered headboards, I use OOK Hangman French cleats.
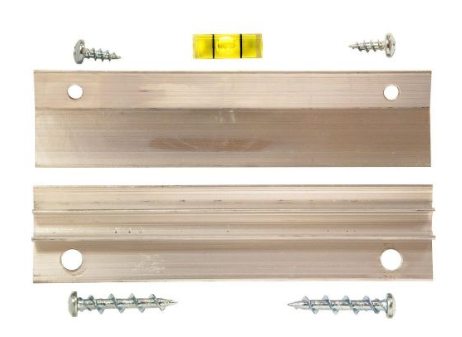
They come in different sizes depending on what you’re wanting to hang, and you can get them at Home Depot and Lowe’s. And they’re awesome and incredibly easy to use.
EDIT: I’ve had a few people tell me they were confused about “lattice”. I wish I had taken a better picture, but I kind of got ahead of myself when making the frame. However, I found this picture on the Home Depot website. This is what lattice looks like:

It’s just a very thin, narrow strip of wood. In my Home Depot store, it’s located on the aisle with the decorative molding (baseboards, crown, quarter round, etc.), and it’s in the section where the trim is sold by the linear foot. My Home Depot carries two sizes. The one I use the most is 1/4-inch thick by 1 5/8-inch wide, but they have another one that’s 1/4-inch thick by 1 1/8-inch wide. The strips are really long (maybe 10 or 12 feet), but you can cut them to the length you need.
Update:
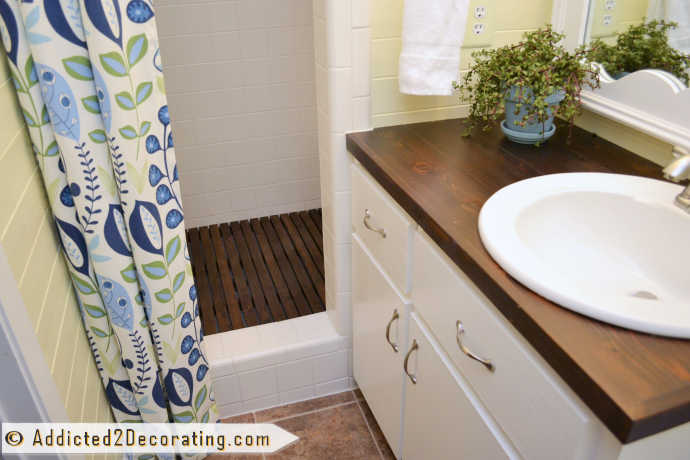
This bathroom is finished! You can click here to see the before and after of this tiny bathroom.

Addicted 2 Decorating is where I share my DIY and decorating journey as I remodel and decorate the 1948 fixer upper that my husband, Matt, and I bought in 2013. Matt has M.S. and is unable to do physical work, so I do the majority of the work on the house by myself. You can learn more about me here.

I can’t believe how perfect that mirror turned out! You did an amazing job and saved some big bucks!
This mirror is beautiful! And you didn’t have to pay $300 for the one that inspired you. Also, painting that cabinet on the wall made a world of difference. Can’t wait to see the finished bathroom.
Again, you are amazing. Love this!
Love this mirror. Totally going to copy.
REALLY nice! You could sell that, it’s super polished and elegant 🙂
You are so freaking awesome!!!
Perfect for your bathroom! I love your step-by-step instructions and will totally give this a try when we redo our small bathroom. You’re in the home stretch…
I’m not sure whether I’m more impressed by the final product or simply your results with the jigsaw! I wondered when I first saw the final product where you found that trim. Never dreamed the whole thing was cut out of a piece of MDF. Well done keeping all those curves consistent!
I was actually a little doubtful that I’d be able to pull it off because I have a tendency to let jigsaws get away from me when I’m using them. I generally end up with at least three or four places where I’ve gotten off the line, or cut into the area I want to keep — things that can’t be fixed with sanding. So when I say I went slowly on this, I mean that a snail’s pace would be fast in comparison. 😀 I was determined to make it work!!
You are amazing…
Fantastic job. I had no idea about a curved jigsaw blade. How do you find out about these things. I have no clue as to what ” strips of lattice ” are? is that like a thin veneer?
Looks great, well done you.
Cheers from a wet winters day in Brisbane.
Hi Beverly~
I had several people ask me about the lattice, so I’ve edited the post to include a picture. Hope that helps!
Oooh, this is so pretty! Love how you did the design – looks better than the inspiration piece. Fabulous!
Kristi,
I think all of your readers wish they lived next door to you (at your new home…don’t want to have to move twice.) You know so much, you see so much, you try so much, you learn so much, you save so much, you have such talent…we’re all inspired by that as well as your Texas “can-do” attitude and your obvious love for making a house a home. Well done again!
Aww, thank you, Anne. 🙂 I’d LOVE to have all of you as neighbors!! Wouldn’t that be fun?! A street full of neighbors who love DIY, power tools, and decorating as much as I do. Sounds like a dream!
You are amazing! Creative, innovative, and just talented as all get out. I could see you having your own show at least one of those You tube channels. Guess you could just fit that in your free time.
You are just amazing! I started following you a few months ago and every time I see one of your projects completed I am simply AMAZED! You have inspired me to add cabinets and that fabulous counter in my front porch/room. Thank you for your inspiration.
Wonderful, Debbie! I hope you’ll send me a picture of your cabinets when you’re finished!!
Fabulous!!!
Do you mind if I call it a mustache mirror? That’s what I see…and I think it’s perfect for the bath.
You had too much fun with this project. Yes?
Haha! I love that name! I didn’t see the mustaches until I read your comment. 🙂
Just beautiful. You never cease to amaze me with your projects!
Oh, that is so inspirational! Great job and beautiful mirror. Can’t believe the DIY price.
You are amazing. I am constantly impressed!
You are sure one talented lady! This is such a fabulous knockoff!
I agree with everybody here. It turned out perfectly beautiful. You’re such a creative woman!
I’m most excited that you showed us how to hang the mirror!! We have a giant plate mirror that, if I can get it off the wall in one piece (skeptical), I want to have cut down and frame it. But I was concerned with how we’d hang it back up. Thanks for the detailed instructions!
Kristi, You did a great job with that jigsaw. I have to tell you that you are a truly creative individual. I’m always amazed at the things that you come up with. And the fact that you did it first. I love how you use unconventional methods to get the job done. Just because things have been done a certain way for a long time, it doesn’t mean that its the “only” way to do something.
Gawd you are my hero <3
Great job, fantastic tutorial, very inspiring.
I *love* this! Beautiful work!
I just read your dreaming/random post, and I think the week-end rental idea for your condo is perfect. We travel a lot all over the world (am actually leaving this afternoon for two weeks in Europe), and we would love to stay in a place like that. One recommendaiton – leave the furniture, linens, kitchen stuff, books, but not personal items, photos, etc. We travelers don’t like to see those things. You could probably easily collect a month’s rent from one football week-end.
wow, you are the queen of that jigsaw! This is so fantastic and of course I am amazed that you did it at such a low cost. Gorgeous.
I love it. I have such a bad hand with the jigsaw.. I always fall off the line. You did a beautiful job!
I generally let it get away from me too, Kim. I don’t think I’ve ever cut out anything before where I didn’t get off the line. But this time, I was determined to get it right, so I just went incredibly slowly. And it worked! 🙂 I think a jigsaw (especially for intricate, precise cutting) is just something that takes a lot of patience and practice. Goodness knows I’ve had the practice, but until I decided to make this mirror, I had never had the patience. 😀
This is one of the best and prettiest DIY I’ve seen, thank you!!!
Very nice! I’m guessing the mirror attached to the wall before removal for cutting was found to NOT be glued to the wall. I would like to do a similar project with existing mirror over vanity but I am not sure how it is attached. This could be a problem if I pull and learn its glued on! Any tips on removing existing mirrors to avoid damaging wall?
Hi Kim~
In my experience, those mirrors are almost never glued on. Gluing is definitely not the norm. In fact, in the bathroom that I did about three years ago with the massive 3-piece plate glass mirror, even those weren’t glued. There was some caulk around the edges that I had to score with a utility knife before the mirrors would come off, but no glue.
These mirrors are generally held on with two or three little clips at the top that you just have to unscrew. Then once you lift the mirror up and away from the wall, you’ll see more little anchors at the bottom that can be unscrewed from the wall.
Thank you. I’m feeling braver!
*smiles* I’m impressed– Nice job, indeed.
Its gorgeous!
I seriously want to replace my bathroom mirror with one like this! Thanks for the inspiration!
Where did you have the mirror cut down to size? Beautiful job, by the way!!
I just took it to a local glass and mirror shop, and they cut it for me. They charge by the cut, so it’s really inexpensive.
This is incredible. Thank you so much for sharing the instructions. Did you use spray paint to prime and paint the mirror? If so, can you share the brand, color and finish that you used. I want to copy this exactly!!
Hey Kristi! I tried to find my answer elsewhere so I wouldn’t bother you, but I couldn’t – sorry! Do the screws for the French Cleat need to go into a stud/wall anchor?
They don’t have to go into studs. And whether or not they need wall anchors depends on the style/brand you bought. The old style of Ook Hangman cleats came with screws and plastic wall anchors for the screws. The new ones come with a kind of screw called a Wall Dog. It’s basically a screw and a wall anchor all in one, so no separate wall anchor is needed. But everything you need should come in the package.