J & A Kitchen and Family Room Updates
Hello! This morning I wanted to stop in and share some quick updates in J & A’s kitchen and family room. First up, the bookcase and fireplace.
When I last showed you, this is what it looked like. Most of the fireplace had bright white primer on it, but the hearth hadn’t been primed, and the bookcase was still the original orange-brown oak.

So I painted the bookcase in the wall color, and gave the fireplace a coat of very light gray. Here’s how it looks…

Quite an improvement, right? The bookcase is definitely less of a distraction now that it’s painted in the wall color.
Now see how the hearth is a slightly darker shade of gray than the rest of the fireplace? That’s because the hearth only has primer on it and hasn’t been painted yet. But when I stepped back and looked at the fireplace at this point, I loved it. I really do like that slightly darker color on the hearth.
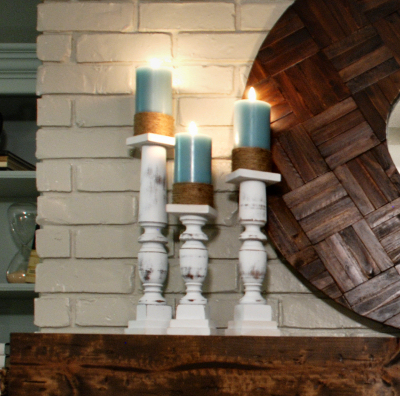
So then I had this brilliant idea that I would also paint the bricks that frame the fire box in the same darker gray. It looked great in my head, but in reality, I don’t love it…

Hmmm…I just don’t know. It’s very subtle, which I like. But it’s just not what it looked like in my mind. What do you think? Oh, and in the picture above, you can see at the top of the fireplace (where I couldn’t reach) where it’s still white. See how light and subtle the gray color is? It’s a really pretty, soft gray.
Painting the fireplace actually went pretty quickly. I first used a roller on all of the flat(ish) surfaces, using the biggest, fluffiest roller cover I could find…

I mean, that thing worked amazingly well, getting down into all of the little pits and crevices in the actual bricks. Unfortunately, it didn’t get into the spaces between the bricks, so those had to be painted by hand. It really wasn’t that bad, though. Now if I can just find a ladder that’s tall enough, I can finish the job!
Now I know a lot of you suggested that I put a bookshelf on the other side of the fireplace to balance it out. Well, that’s not possible. It wasn’t visible in the pictures I previously posted, but you can see here that that’s where the door to the garage is. (I have no idea why the sunlight turned the wall purple. I promise, it’s not purple.)

Anyway, let’s move on to the kitchen progress, shall we?
The granite and the backsplash are in now. Woohoo!! The kitchen is inching closer and closer to wards the finish line.


Sadly, I had to take pictures with my cell phone, because I accidentally left the SD card for my camera plugged into my computer. Boo. But of course, when everything is finished, I’ll get my awesomely talented photographer to take really super nice pictures of the kitchen. ‘![]()
A couple of you asked how they were going to deal with the drywall that was really beaten up after removing the tile backsplash.

There are actually two ways you can deal with it.
First, here’s what they did. They used a really sharp utility knife, and cut away (to the studs) the damaged drywall, which you can see on the left. Then they added backerboard in place of the drywall, which you can see on the right. Then they were ready to install the tile.

The second option would have been to install new backerboard over the top of the original damaged drywall. Of course, the first option is preferable because the backerboard is now screwed directly into studs, rather than into damaged drywall.
Well, I’m headed out again. Today, the plumber will come and hook up the sink, the oven will be put back into place, and the outlet covers will be installed. Oh, and I’ll install the lower cabinet doors! I’m so excited to see those installed, but boy am I glad that the granite guy suggested that I wait until the granite and backsplash were finished. Unfortunately, I forgot to remove the drawers, and now I’ve got some touching up to do. Oh well…it’s a process.
Have a great day!

Addicted 2 Decorating is where I share my DIY and decorating journey as I remodel and decorate the 1948 fixer upper that my husband, Matt, and I bought in 2013. Matt has M.S. and is unable to do physical work, so I do the majority of the work on the house by myself. You can learn more about me here.


It is turning out so beautifully! I love the grays and soft whites – just charming!
Thanks for the tip on the re-tiling! And I totally like the gray around the edge of the fireplace, keep it!
It's looking great, can't wait for more pictures.
I like the gray around the edge of the fireplace too, but I'd wait until the mantle is install to get the full effect (unless there isn't a mantle, then it might depend on what is hung on the fireplace).
Lookin' good, girl! Keep it up!
Its looking wonderful! I can't wait to see the draperies up & the whole thing all tied together!
really beatifull
Very nice. It's always fun to see progress in stages.
Big improvement painting the bookcase! I like the slightly darker hearth also. May I suggest painting the brass fireplace surround/screen if you hadn't planned on that already?
I like your new fireplace.Yeah your right it's totally improve 🙂
I love the fireplace colour! The grey is perfect!
I like the firebox painted the darker color. Perhaps you don't love it yet because of the brass of the fireplace screen? I have a feeling you've got some clever spray painting thing up your sleeve; maybe it'll all work better when that is done?
The kitchen is look fabulous as well!
Oh, I'm definitely planning on it. 🙂 I just have to figure out how to get the darned thing off! I looked at it quickly, and couldn't figure it out.
Hmmm…I hadn't considered that. Maybe it's the brass that's throwing me off. I don't know how clever it is, but I had just planned on painting it with high temp black spray paint. That's what I did in my mom's family room, and the differenc was dramatic!!
I think I've decided against a mantle because it blocks the view to the door. When I took the old mantle down, I was shocked at how much it opened up the room. So I've got to think of something clever to decorate the massive expanse of brick.
I think it is a positive attitude when you are addicted to decorating. It is fine and for good.
I think its a huge improvement but have to ask,is there ay way to remove paint frombricks if you have made the wrong decision?
I'm sure a very determined person could remove the paint, but it would be a major headache, and take way more time than the average DIYer would be willing to spend on such a project. The easiest thing to do would be to re-paint. There are several decorative painting techniques that could be used to make it look like unpainted brick again.
Really nice and informative post…I really like the Way you Describe you thoughts1 keep it up!
ellison blankets outlast
If you can't get it off, just mask it off and spray in place!
The bookcase and the fireplace do have great updates! In the dry wall side I consider more effective to install new backerboard over the top of the original damaged drywall than using a really sharp utility knife, and cut away the damaged drywall.
NJ Movers, Moving NYC – American Movers moves everything from homes and offices to trade shows and cars. Our years in the business makes us one of the most trusted NJ and New York movers. We also offer the best prices in the market.
nj moving | new jersey moving company | moving companies in nj
Residential Movers – Look no further for the right NJ NY moving company. We are the best movers in the area and we offer smooth and efficient services to our valued customers.
new york movers |
nj movers |
movers new york