My Almost Finished Stained Wood Slat Bathroom Ceiling (And New Ceiling Light!)
Disclosure: This post is sponsored by Kichler Lighting & Del Mar Fans & Lighting. All opinions are my own.
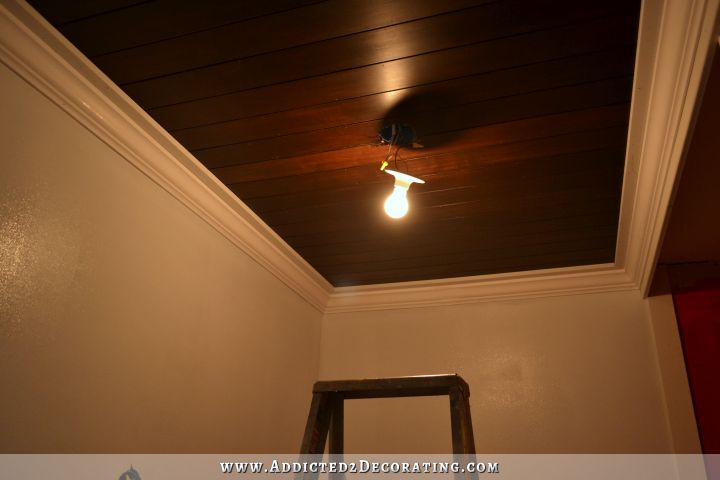
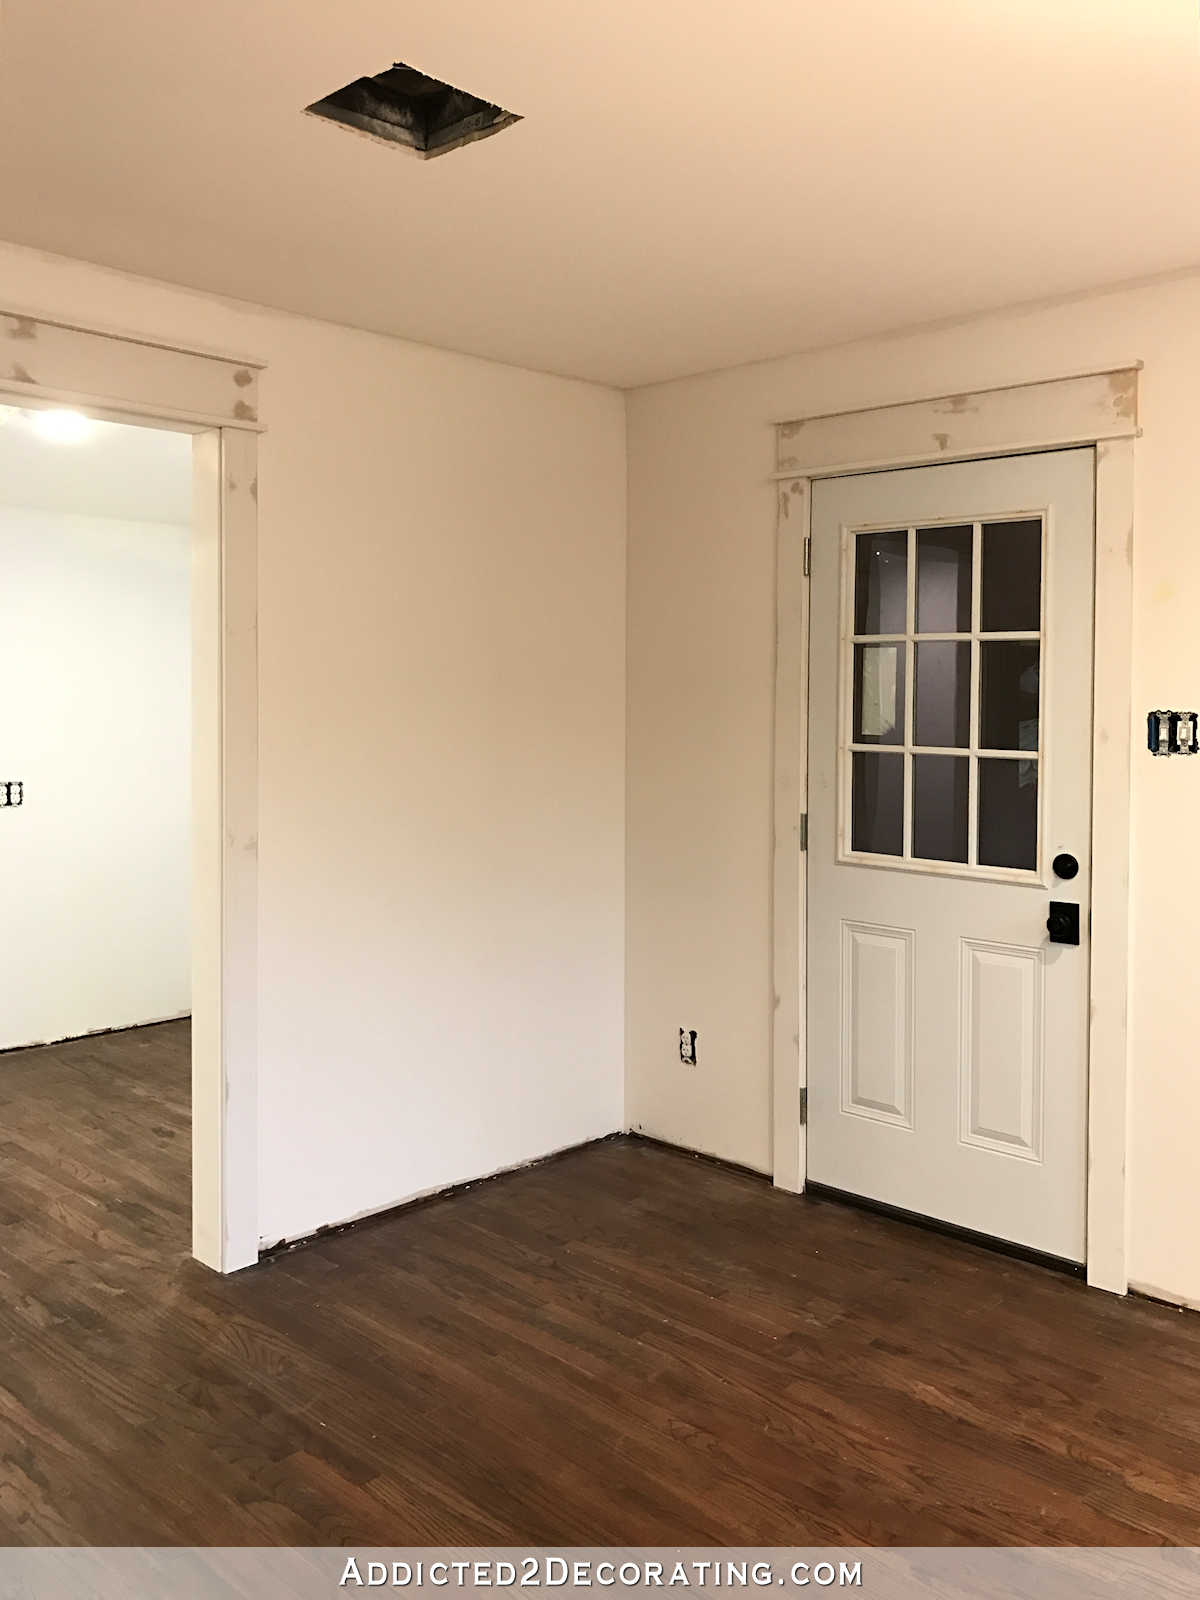
My bathroom ceiling just about finished! I still need to do some caulking, trim painting, and touch ups on the ceiling, but I’m almost there! The process is taking way longer than I had expected, but I think it’s so worth it. I thought the dark ceiling would make the room look and feel so much smaller and closed in, but that’s not the case at all. I was surprised! And I really love the warmth that stained wood adds to the room.
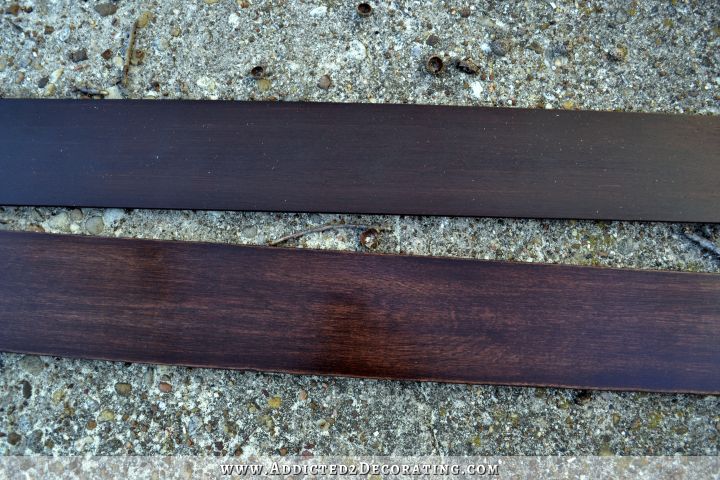
Yesterday I showed you how I used a two-stain process to give the plywood slats some depth of color, and camouflage the crazy grain that plywood has.
I had also painted the ceiling black since the slats would be installed with small gaps between them, and I didn’t want white drywall showing through.
I thought at that point I was ready to install the plywood slats, but after giving it some thought yesterday morning, I decided to polyurethane the slats before installing. That way I could coat both sides of the plywood, as well as the edges, really well to protect them against any moisture in the room. I gave the stained side of each slat a quick sanding with 220-grit sandpaper, and then used Rust-Oleum polyurethane in a satin finish, applied with a sponge brush. It dried very quickly, and then I was ready to install the slats.
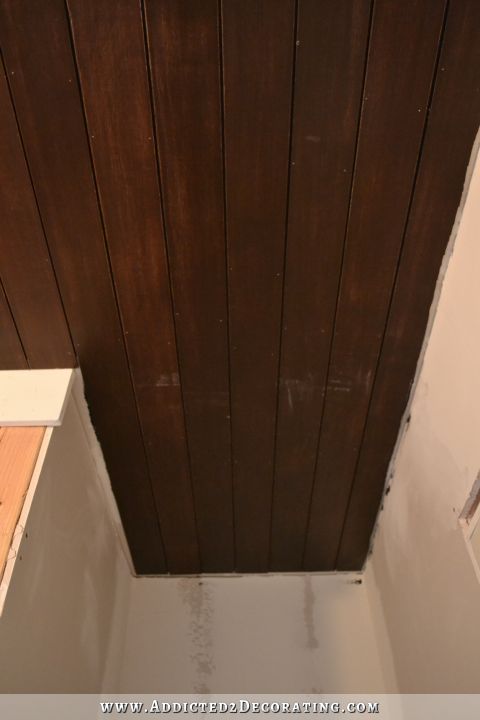
I didn’t take a picture during the process because I kind of had my hands full. But I used a generous amount of heavy duty Loctite construction adhesive on the back of each slat, and then nailed it to the ceiling with 18-gauge finishing nails in my nail gun. I used a scrap piece of 1/8-inch plywood as a spacer between the slats. To install the pieces around the junction box in the ceiling, I held up the pieces and marked the circle with a pencil, and then used a jigsaw to cut the hole for the junction box. Then I installed those two pieces just like the others.
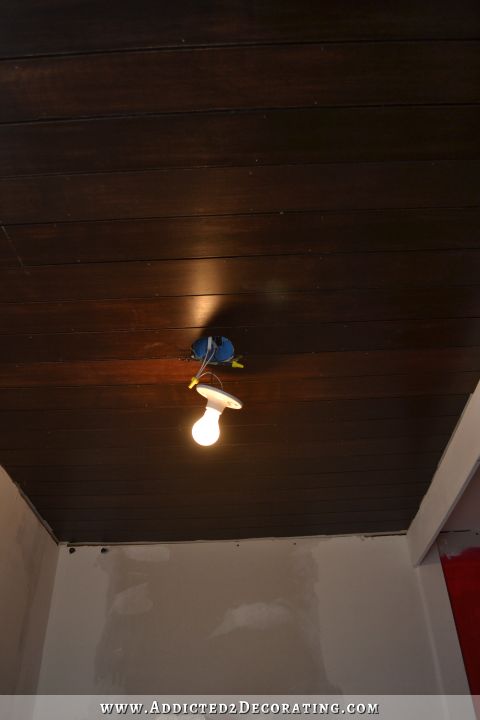
The nail holes will have to be touched up, but I’m not in a hurry to do that just yet. I want to try a couple of different things on a scrap piece first to see what works best before touching up the ceiling. So for now, it looks like specs of dust on the ceiling. I also got dust on the slats during installation, but because they were polyurethaned ahead of time, they wiped clean very easily when I was finished.
Next I installed pieces of 1 x 4 to “frame” the dark ceiling. I just cut the pieces to size, and mitered the corners, using my miter saw.
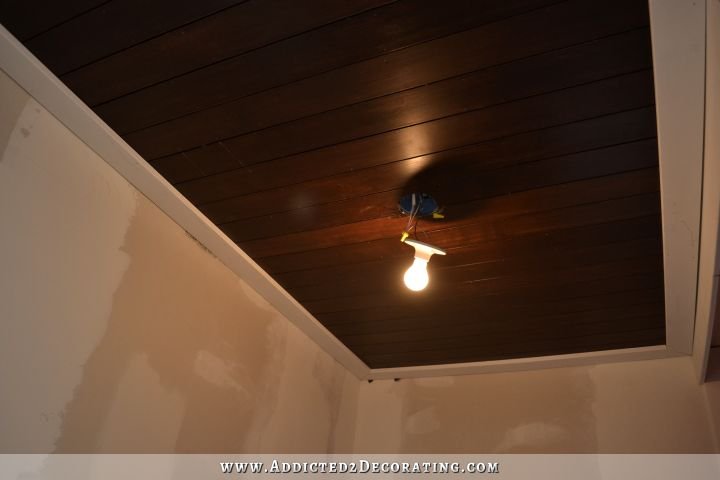
And then I added crown moulding. I finally got a Kreg Crown-Pro, and it made cutting the crown moulding so much easier! (And somewhere along the way, I also primed the walls. So that’s just primer, and not the paint color I’ll be using. I haven’t quite decided on a paint color yet.)
I had originally intended to add another moulding (base cap moulding) around the inside edge of the 1 x 4 frame, but after cutting and installing one piece, I decided it was just too much. I really preferred the look of the clean, squared edges of the 1 x 4’s against the dark stained wood slats.
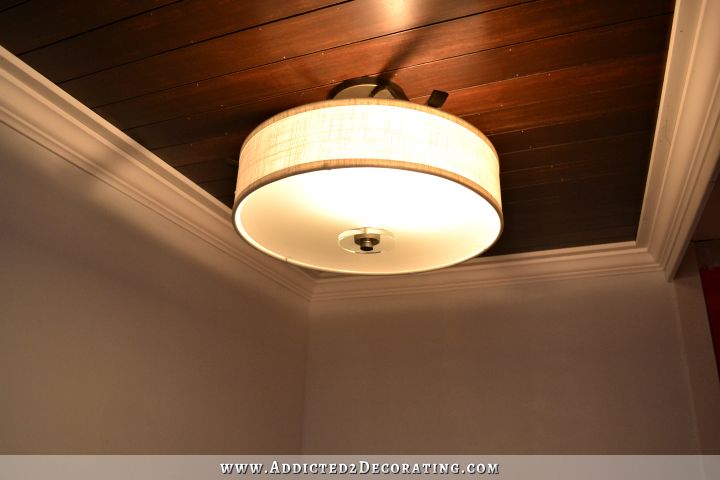
With the ceiling and trim just about finished, and the walls sanded and primed, I was finally able to install my new ceiling light! This is the Kichler Lighting 42486OZ.
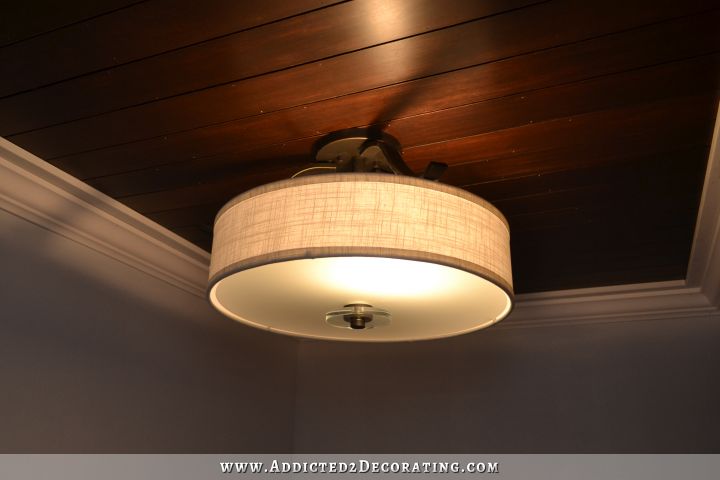
I’ve been so anxious for this, not only because I was super excited to see this light against the dark ceiling, but also because I’ve grown very tired of working by the light of a single bulb. From here on out, I’ll have much better lighting in here as I work, although I’ll probably remove the shade until I’m finished with the room so that it doesn’t get dusty.
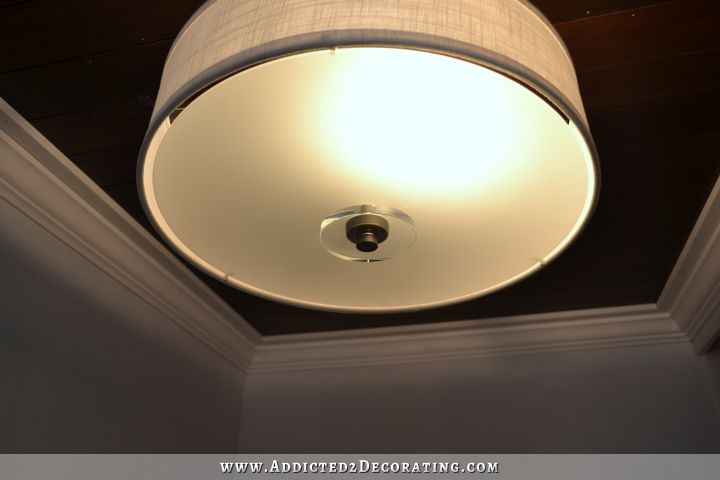
I love this Kichler light, and it’s the very reason I wanted a dark-ish ceiling in this bathroom. I didn’t want that beautiful linen drum shade getting lost against white drywall. I wanted a nice contrast that would really show off the light.
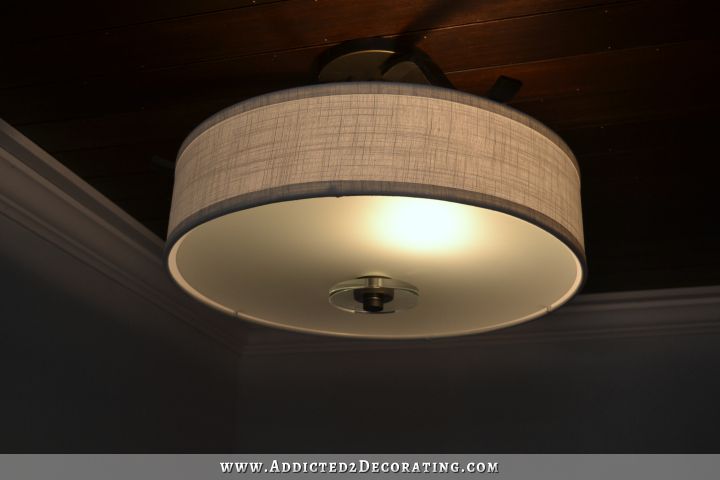
And my absolute favorite feature of this whole light — the reason I chose this one — is this very understated, yet very classy, crystal accent in the middle of the diffuser.
I’m so excited to finally have this Kichler light installed. It’s been packed away in a box, sitting in the corner of my music room for about three weeks now. And on two occasions, when I had just about had all I could stand of rubble and construction debris, I’d unpack the light just so that I could look at it and be inspired to continue. And now it’s up! I was only able to put one light bulb in to take pictures (too much light made the pictures so washed out you couldn’t see the light!) but the light holds four bulbs. I like a really bright bathroom, and this will be great light to work by from here on out. Plus, it’s pretty to look at. 🙂
But I am considering installing a dimmer switch and dimmable LED bulbs for those occasions when I’m just in here soaking in the tub. I don’t need quite so much light for that, but I do love the option of having plenty of light when I’m in here getting ready to go somewhere.
Now that the ceiling and trim are just about finished, I’m thinking I’ll finish up the tile on the tub surround, and then move on to the floor tile. Things are coming together! This is the fun part for me!
(Note: Regarding your questions/concerns about moisture and mold, I will be installing an exhaust fan somewhere on the ceiling. I just wanted to get the light installed first so that I can strategically place the exhaust fan where it’ll be hidden by the light. And since we don’t have lots of people using this bathroom, and very few overnight guests, I don’t anticipate any kind of moisture/mold problems with this ceiling. If we had a large family and/or were constantly hosting overnight guests, and this bathroom was constantly in use with people taking several hot, steamy showers each day, I probably would have considered a different design plan.)

Addicted 2 Decorating is where I share my DIY and decorating journey as I remodel and decorate the 1948 fixer upper that my husband, Matt, and I bought in 2013. Matt has M.S. and is unable to do physical work, so I do the majority of the work on the house by myself. You can learn more about me here.


Wow, Kristi! That ceiling is gorgeous! Thanks so much for the tips you gave yesterday about hiding funky plywood woodgrain. I’m not sure how I’ll use that info, but it’s good to know!
Kristie I love the ceiling it looks wonderful How do you deside which way to run the boards I noticed you went side to side instead of front to back
I looked at lots of pictures of planked ceilings to see if there was a “correct” direction for them to be installed, and I realized there wasn’t really a right and wrong way to do it. So then I just determined which direction would be better for my particular room. With this running this way, I was able to deal with shorter boards, which was easier since I was working alone. But also, if I went the other direction (from the door to the far wall), I would have to make very sure that they were perfectly centered between the tub and the vanity wall, and then that would accentuate the fact that my light isn’t perfectly centered in the room. It just seemed like the side-to-side direction would be easier, and potentially camouflage the fact that the light isn’t perfectly centered.
I wasn’t sure what to expect when you started working on this, but it is so pretty! I really love it. You have such a creative eye, I can never picture some of the things you come up with and then it’s done and it looks great!
It looks beautiful, Kristi! So much for trying it out and changing it if you didn’t like it. Also glad you left off that last piece of trim. As you said, it would have just been too much. Anxious to find out what paint color you will use. How will you decide?
It’ll need to be something that coordinates with the accent tile I bought — the one I’ll use as an accent on the wainscoting. I want a neutral color on the walls, so that I can use a bold color on the vanity, and a patterned fabric on the shower curtain. I’ve narrowed it down to a couple, and I’m leaning towards one called Chocolate Froth by Behr.
WOW. Just wow. The ceiling is beautiful. You are amazingly talented.
This looks phenomenal. You continue to inspire. I love that you look moments to look at your pretty light, as a reward for all the hard work. Its important to know what will keep you motivated!
I’ve been following your stuff for a while now, i love your humour!
As for those pesky nail holes and small scratches on the wood… a brown sharpie on the nail holes, and even pencil crayon work well.
I love the wood on the ceiling, we had a cedar walled bathroom in this house when we bought it, but it was way too much, so we took it off the walls and reattached it to just the ceiling, still feels cottage-y, but not as IN YOUR FACE!
Absolutely gorgeous! You are truly an inspiration for all DIY. Can’t wait to see the whole house finished.
Wow, the ceiling and crown look amazing. Great job.
Sigh……..So dreamy 🙂 I can imagine long soaks with the light dimmed and a few candles at the end of a hard day! I hope tis becomes your own little sanctuary 🙂
Beautiful! I will be following your tips for the ceiling for my walk-in master bedroom closet.
Amazing, I love it!!! Trying to think of where I could do a wood ceiling in my house now 🙂
What about the exhaust fan being over the tub? It looks like you’ve sectioned it off so it wouldn’t be seen and could suck the moisture very quickly from the shower.
I agree that is where mine are and no problems . I think they were the kind designed to go over the shower.
Great idea! I didn’t realize that was up to code, but I just researched it, and you can do it with certain fans rated for above-the-tub use on a GFCI circuit. I love that idea so I don’t have to mess up my wood ceiling!
speaking of tub ceiling- are you tiling it or just painting the drywall?
I’ll just be painting the drywall over the tub.
I built a surround around my shower and I left a 1/2″ gap from the ceiling so the moisture could come out the top and go to the exhaust fan. But what I found was that with the surround it was a bit dark in the shower with just the one ceiling light, so I installed a waterproof recessed light in the ceiling of the shower. It was one of the best things I ever did in my remodeling designs. I probably should have done this a long time ago even before I built the surround. But what is nice with the surround is that you can’t tell there is a light in the shower so I doesn’t distract from the aesthetics of the room and it’s really a functional feature.
I really love how the ceiling turned out. The color is rich and nicely offset with the white trim and crown. Great job as usual. 🙂
Love it!
LOVE the idea of the 1 x 4 on the ceiling before putting up the crown mold…Makes a much nicer statement….Has me looking up at my 10′ ceilings with my crown and shoe mold below wishing I had that additional 1x 4 for impact…I feel like a “groupy”…Can’t wait for your posts…Good job…
WOW! I’m in the “I wasn’t sure how it would look” group, but that is beautiful! Looking forward to seeing the next ‘pretty’ thing you complete. 🙂
It looks wonderful!! It turned out even better than I thought it would, and I have complete faith in your design abilities. 😉
Just adore the ceiling and now you have me thinking about our wood ceiling we left natural. Since we are remodeling our bathroom, I’m thinking why not?! I LOVE drum lights, they are classic, classy, formal and informal at the same time. There are so many new designs out there. We have a drum for our dining room and it is amazing how much it changed the look of that room. Oh my, you have new ideas brewing for our master bath! Things are starting to come in, the new medicine cabinet came yesterday, the vanity, counter and sink come Monday, the floor as well as the faucet are coming Monday, the vanity mirror is coming today, we are using a dark oak, but not the orangey tone it used to have, this is a nice dark tone, like your ceiling with multi-dimensional tones to it and a black granite counter. I can not wait to get started. I am so excited about this remodel. It is stuck right now in the very early 80’s which is when is was added 🙂 I don’t think hubby is gonna like me much when I tell him I might want to stain the ceiling,lol, but the wood ceiling was his idea 2 years ago, haha! 😀 Your bathroom already looks fabulous! I can’t wait to see it finished.
WOW. Love it! Simply stunning.
It looks great! I like that you went crosswise on the ceiling. For some reason I was picturing lengthwise, but this is just perfect and certainly much more easily handled than long pieces. So glad you took the time to coat each area on each piece with the poly. That will definitely keep the moisture out of it. The light is lovely, I can see why you like it so much. This will be a lovely main bath for your home, with your special signature on it. Might you consider this ceiling treatment in another area of the house? I think it would be really cool in the sunroom with a lighter finish. It is a shame you still have to put up the sheet rock before installing the wood. Could you use a lighter (weight) product, like perhaps sheets of inexpensive paneling instead of sheetrock? You would not have to mud and tape those if they are butted against each other. I know it is not the “proper” way to do it, but it might be easier on your body. Once again you have wowed us with your creativity. Blessings
The ceiling looks gorgeous, Kristi. Enjoy working on the fun stuff this weekend. Cheers, Ardith
That ceiling is truly gorgeous and shows of that light exceedingly well! Truly awesome design, Kristi!
Kristi,
I love how your ceiling turned out. I especially love the built up molding. We had beautiful molding in our last house and I can’t wait to have it again in our new house. Fantastic job. Can’t wait to see the final product.
Your ideas always seem to come out of left field….but you always create a beautiful end product out of something that many of us probably thought was a little nuts when you suggested it. Super impressed with your work, as always. *clapping*
As usual….BRAVO!
Truly breathtaking Kristi. I can not wait to see how it all comes together:)
ON a side note. I had gotten a table saw for Christmas, and finally assembled it last night.
I DID not even attempt to put on the guard. I thought, if Kristi can not do it….there is no chance for me:)
And I still have all of my fingers, so that is a good sign!haha
I don’t think you will have to worry about mold or mildew. I have a husband and for kids and we have never had a problem. I can’t imagine you would. The only time we ever turn on the exhaust fan is after my husband eats chilli if you know what I am sayin.
General Question on Crown Molding – what options should you think of for picking out the molding? Example – should it be consistent with the baseboard (mine if builder issuer) or can I go with whatever I like?
I personally think you should just use what you like. 🙂 Now obviously, if you only have 8-foot ceilings, then the biggest crown moulding you can find might be overkill. Or if you have 12-foot ceilings, then the smallest, cheapest crown moulding might look really skimpy. So I do think that needs to be considered.
I have followed your blog for some months – in fact since 07/08/2014 and have gone so far as to use some of your ideas on my own projects here in Durban – South Africa. Thanks and keep the ideas going.
Love it! And I love following your work. Thank you.
Gorgeous and as always, very innovative. Love that about you. Why would ANYONE want a plain ceiling in their bathroom now… Lol and the light is perfect.
What I’m really jazzed about is the Kreg crown jig?? Any info from you onthat having used it?
Nice to get to the pretty stuff finally, huh? 🙂
I definitely recommend the Kreg Crown-Pro! It was $30, easy to put together, and simple to use. I just went onto YouTube, and looked for an instructional video, and after watching the five-minute video, I was cutting crown moulding like a pro! 🙂
You need sparkle on your countertops to play with that crystal accent! How about Quartz?
It looks simply spectacular! You can pat yourself in the back.
Looks beautiful! Great job Kristi!
You ROCK! Great job!
That is so pretty! I like the way the 1×4 frames the wood slats above the crown molding. A nice finished look and a little bit different from the norm. I really love the beautiful lamp too! Good work and I’m glad you’re feeling better!
Krisit it looks amazing. I”m thinking of doing my kitchen ceiling. There is a hallway attached to kitchen. How do you decide which direction to put the boards. If I put them long ways across the kitchen then they will be short going down the hall. Thanks for your advice
Karen, I just answered a similar question here: https://www.addicted2decorating.com/amost-finished-stained-wood-slat-bathroom-ceiling-new-ceiling-light.html#comment-1096767
Basically, they can go either direction, so you’ll just need to consider your particular room, and the things you’ll need to work around (light fixtures, etc.) and determine which direction makes the most sense to you.
If a ceiling-mounted exhaust fan seems too intrusive on your beautiful ceiling, how about a WALL-MOUNTED exhaust fan?
Just beautiful!
Beautiful…can’t wait to see it finished!
Don’t put the fan in that portion of the ceiling…get a light/fan/heater combo and put it over the bathtub, many on the market…my preference is the broan.
http://www.broan.com/products/filter/heaterfanlights-0c994319-baff-4918-96fd-b12fb92bfa56
Congratulations on your lovely ceiling. You did a wonderful job with that plywood! I like dark ceilings because they visually recede and make a room look taller.
Our first house had one small bathroom with both of us showering daily. We never had a mold or mildew problem, and there was no exhaust fan. Speaking of which…did the slatted wood floor in the condo shower pose a mold problem?
When I saw the photos of the black painted ceiling, it seemed awfully dark to me, but now that I’ve seen the wood with the crown molding and the light fixture you chose, I’m totally digging it. Beautiful work!! Can’t wait to see the rest of this room take shape!
Kristi,
It is beautiful. I was very curious how it would turn out, and it’s gorgeous. I love the depth of the stain, the soft gloss of the wood, and your choices for crown/trim are perfection. Way to go!
1. LOVE the ceiling! It looks great!
2. I’m glad you sealed the boards front and back for moisture control. Even though the bathroom doesn’t get used much, the humidity in Texas is pretty rough on wood. Good call.
3. The light trim looks amazing. Love it.
4. Could you put the exhaust fan over the tub area? It would show but if you stained it the same color as the ceiling, it wouldn’t be quite as showy.
5. The light fixture is really pretty and I’m sure with 4 bulbs it’ll give off plenty of light.
Have a great weekend and a well deserved soak in your new tub!
it’s looking great!! Re the mold/mildew: My father installed wood in our family bathroom (4 people living there, no window) and it took about 3 decades for minor deterioration around the edges which only showed because the wood is a light colour. So I guess you shouldn’t be too worried now that you polyurethaned the wood!
Have a fun weekend and some relaxing time as well!
i love that ceiling. The wood looks beautiful. I am loving the light also!
Oh my goodness, I LOVE the dark ceiling in the bathroom! It’s so elegant! I am definitely tucking this idea away for future use in our future bathroom!
Yay for the “pretty stuff”! And it sure s pretty!
So beautiful! Absolutely amazing! I really appreciate the tips on making plywood look gorgeous! We have been considering using plywood as temporary flooring. Our currant flooring is 70’s linoleum and 80’s carpet. We plan to completely change the layout of our kitchen and take out some walls but I know that will take years. So I wanted a temporary flooring solution that didn’t break the bank and that I wouldn’t care if it got damaged or ruined. I think your tips have really made up my mind! Thanks so much!
I had my doubts about the dark wood ceiling, but it’s beautiful. Were I doing it, I’d have taken the easy way out and would have bought a box of Bellawood in some dark finish. Given what a messy… MESSY… painter I am, I wouldn’t dare install the crown molding and then paint it. A bunch would slop onto the beautiful dark wood were I painting the crown in place!
By the way, your technique for that fascinated me because I live in a 1925 Craftsman bungalow that has ceiling molding eerily like what you just did. I had been wondering how those old-timers did it! GREAT job!
Love it! Love it! Love all of it!
Looking beautiful!! I’m a single homeowner of a house that needs a lot of work and a so inspired by your site, but was wondering if you already have a post, or would consider doing one on how you got started down this road, where.you learned skills etc.? I’m motivated but a little overwhelmed at where to start. Thanks!! 🙂
Wow! Just wow!
You should never be hard on yourself when things don’t go as planned. You do more in a couple days than most of us could accomplish in months! Great work. I love it.
I wondered why you were “framing” the ceiling when I knew you were going to use crown molding, but when I saw it, I understood. The “framing” actually makes the crown look deeper therefore the ceilings higher. But then I guess you knew that already 🙂 This really is beautiful.
One day, when your house is done, you should have a ‘house warming’ and invite all of your followers. Charge us each $25 for a ticket. You will make a fortune adn we would have a ball. We’d all be walking around saying “I remember when…”, or “It’s more beautiful in person”, or simply walk around with our mouths wide open. I’d fly in for it. Have fun this weekend, I know what you will be doing.
AWESOME as usual! You rock Kristi! I love the things and ideas you come up with and try out. You just never know until you try something out. I just finished building the platform bed like you built for yourself. I built it for my son and he wanted it strained ebony. Wow it is so pretty even if I do say so myself I put it on my facebook page for my friends to see. Thank you Kristi for telling all us followers that we could do it ourselves. I’m doing it slower than you are for sure, but if I hadn’t of started following you I’d of never tried. I love your guts and what you put into all that you do. Your ceiling is beautiful and I love that light.
Absolutely beautiful Kristi! It’s also so lovely to read the happiness in your post. As a reader you can feel the shift in your outlook as the fun stuff is getting going. It’s a joy to observe! Well done, and thanks for sharing with us. Your journey is truly inspiring.
Liz x
Your ceiling is absolutely beautiful!!!! Do you think I could adopt you and Matt?
Wow this is looking great. Love the trim around the ceiling, and that light is simply stunning.
In love with the ceiling!
You already know this but … Gorgeous!! I hope this inspires others to try this. I appreciate the tips about staining with multiple colors to give more depth too!
This. Is. GORGEOUS!!!!! You are so talented!!
omg!! This is why I love your blog!!! That ceiling is freaking awesome!!! and who knew you could do this out of plywood lol!!! You are so inspiring….can’t wait to see the finished space.
O.M.G.!!!
That’s gorgeous!!!!
I love it – looks amazing. I’m such a fan of your work that I think I will start a blog called addicted2addicted2decorating.com 🙂
That’s funny. I’m addicted too. The ceiling really did turn out classy looking. I can’t wait for Mondays installment. I wouldn’t be surprised if the whole bathroom is finished!
Now THAT is a beautiful ceiling. Well done!
Beautiful ceiling, beautiful light fixture!
Your bathroom will be gorgeous! LOVE the ceiling.
Wow! I had never considered a dark ceiling before but you have made it beautiful with your creative design. And thank you for the info on the kreg crown pro. I love crown and I always paid someone to install it because the job was intimidating but I can’t wait to add the pro to my tool box. Thanks, you are so inspiring and I can’t wait to read your blog daily!
Love,Love,Love. This will be perfect in my bathroom. For some reason someone painted all the walnut in my 100+ year old bath. Every other room is stained but not the bath. I love mixing the wood and white . Perfect! Oh and I LOVE the light!
Sheila
Love the ceiling dark toned and love love love the drum light. But I have to say….OMG that was expensive! Someday I want a beautiful bathroom like that….but I have to figure out how to DIY the light.
Your ceiling turned out beautiful! Love the trim and the color!
Hey Kristi,
I was looking back at posts from earlier to check out your built ins in the condo, since I want to do something similar in my living room, and I realized its been a while since I saw anything about the condo.I know you mentioned before that sometimes you cant get over there if Matt is having a rough time and that lately things had been hard, but I am just curious if you have been able to go over and get some small things done. That condo is gorgeous, you put so much work into it I cant wait to see it go on the market and right now is the perfect time to get it up, I am sure it would sell in a snap. Just curious right now if you have been able to sneak over once or twice to get some stuff done.
I haven’t done any more at the condo, but no because of Matt. It’s because I started the bathroom remodel, and I really want (need) to see it through to completion before I get sidetracked with something else. 🙂 But Matt is doing much better lately, and I do feel comfortable leaving him home alone for long stretches at a time. So as soon as the bathroom is finished, I’ll turn my attention back to the condo and get it finished and on the market. I can probably get my mom and brother to come help me so we can get things done faster.
Yowza!! What a ceiling. I hope to someday copy this terrific idea…. it’s just the best.
Congrats on another step toward getting your bathroom redone.. and on getting your ceiing and light in place.
It’s loaded with wow.
Suz
Kristi,
You’re such an inspiration!! I love to restore furniture and paint/design rooms however, I don’t have a creative eye like you. Awesome job!
I liked this idea from the beginning, but it turned out even better than I had imagined!
The ceiling is so gorgeous! Our guest bathroom is similar in size. I have 2 quick questions, please:
(1) Where can I purchase cabinet-grade plywood slats?
(2) What is the estimated cost for boards and stain?
So glad I found you on Pinterest! 🙂 Do you make house calls?!
SO beautiful! Can I ask how tall your ceiling is? We have 8ft tall ceilings and I’m not sure if the ceiling will look too heavy with it being so low… What do you think?
My ceiling is 8-feet high. I don’t think it makes it feel low at all. In fact, quite the opposite. It looks taller to me.