An Important DIY Skill – Learning To Hide Mistakes
Last Friday, I shared my finished music room bookcases with you. What I didn’t share during that whole project was the pretty major snafu that happened while I was building the bookcases.
At first, I didn’t think it was really significant enough to share, but after thinking about it, I decided that since mistakes are just as much a part of the DIY process, and learning to deal with those mistakes is a pretty important skill for any DIYer to learn, then I needed to share this. I don’t ever want people thinking that all of my projects go smoothly from start to finish. I make plenty of mistakes, and I have learned to just deal with them and move on rather than wallowing in frustration and disappointment about my project not being perfect.
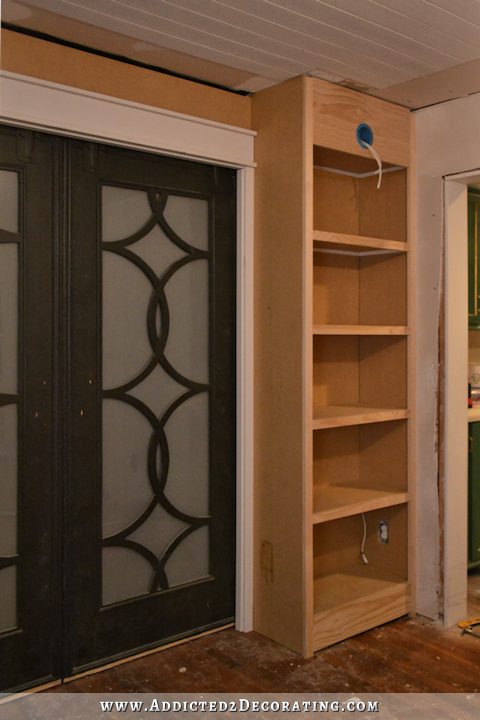
You can see my mistake here in this picture…
Can you see it? It’s there on the side of the bookcase towards the bottom.
You may remember from the building process that the sides of each bookcases are MDF, and because of the design, each side is a different width. The side that goes against the wall is 12 inches wide, while the non-wall side of the bookcase is 14.25 inches wide. Well, as I was building the bookcase on the right, I needed to cut the hole for the electrical outlet on the piece that went against the wall before putting that piece into place. So I measured and marked the placement of the outlet on the MDF piece, and then used my drill and jigsaw to cut out the hole. Then I nailed it into place against the wall.
Then I went to look for the 14.25-inch piece so that I could add it to the other side of the bookcase, and I couldn’t find it anywhere. That’s when I realized that I had just cut the outlet hole in the wrong piece and nailed it to the wall.
Any time a mistake is made, you have two obvious choices: (1) start over, or (2) salvage it. I almost immediately got in my car and headed to Home Depot to get more MDF, but then I decided that I could probably salvage this. So I finished building the bookcase, and then found the piece that I had cut out for the outlet. I used lots wood glue around the edges, and stuck the piece back in the hole. To make sure that it lined up perfectly, I put a piece of wax paper on each side (outside and inside the boockase) and nailed a scrap piece of wood to each side on top of the wax paper.
I left it alone to dry for about 24 hours, and then removed the scrap board and wax paper. It wasn’t pretty, but it was a good start at fixing my mistake.
Then I loaded that thing up with wood filler, left it to dry overnight, and sanded it down with my sander and 150-grit sandpaper. It was kind of smooth, but I could still see and feel ridges of wood glue around the edges. So as a final step to get it as smooth as possible, I put a coat of drywall mud over it, let it dry overnight, and then sanded it as smooth as possible with 220-grit sandpaper, being careful not to sand it down so much that those wood glue ridges would be exposed again.
The drywall mud did the trick. Drywall mud sands so smoothly, and it covered the slight ridges left by the wood glue. And now, with the bookcase primed and painted, I don’t think that anyone would ever notice.
Mistakes are going to happen. If you DIY as much as I do, they’re inevitable. In my opinion, learning how to deal with the mistakes is as important to the process of becoming a skilled DIYer as learning how to use power tools.
Addicted 2 Decorating is where I share my DIY and decorating journey as I remodel and decorate the 1948 fixer upper that my husband, Matt, and I bought in 2013. Matt has M.S. and is unable to do physical work, so I do the majority of the work on the house by myself. You can learn more about me here.



![How To Wood Fill, Sand, Caulk, and Paint Trim — My Process and Preferred Products [VIDEO TUTORIAL]](https://www.addicted2decorating.com/wp-content/uploads/2019/09/how-to-wood-fill-sand-and-caul-wood-trim-thumbnail.jpg)


This is a very helpful post. It shows that yes mistakes happen, but they CAN be fixed. No one will ever know that there was a mishap. Perfect resolution!
Another “great save” from Kristi. This example is one of the reasons I admire you so greatly…you’re not afraid to admit a mistake…and thanks for showing us how to fix the problem.
I have always enjoyed that your blog is down to earth and friendly. Nice save on that one! It’s going to be another lovely room when you’re finished.
Since we’re talking about DIY fixes, do you have a tutorial for how to caulk? You always have the tiniest bead in the corners and it’s so clean, and I can never get it to look that perfect. What’s your secret? 🙂
Good save. I am curious why the design worked out in a way that the two pieces of mdf would have to be different depths.
Sure, dealing with mistakes is a part of life period, and how to do so successfully is one of the best subjects! I’m also a crafter as much as a DIYer, and being able to make mistakes look like a beautiful, intentional part of the design is totally what tests my level of expertise, in my opinion!
Just remember if you get mad, don’t kick the bookcase!
Hahaha!
Yup. Stuff happens. You always make lemonade out of lemons and this is a prime example! No waste and the end result is perfect. Well done.
Thanks for sharing “the ugly” side of DIYing and not just the beautiful! What method of painting did you use for the bookshelves? They are stunning;)
That’s what we love about you Kristi, you make DIY real and that it is not all smooth sailing and easy! Thank you for showing us the mistake and the remedy. And if you didn’t show us, you’d never know the repair was there.
That is so cool! you can’t even tell!
Thanks for sharing. I love that you do this, share things like this mistake, so we can all learn that if we ever make mistakes it can be fixed like you did.
Drywall mud, thank you, would never have thought of that. Love your blog, can’t wait to see what you do next.
Would not even know there was ever a hole there. I love that you aren’t afraid to show us your errors, Kristi. It makes me so much braver in attempting my stuff. Thank you.
I did exactly the same thing with a piece of drywall and didn’t have enough to use another piece. I patched it like you did… and was annoyed at myself!
Great post and great save, Kristi!
So glad to hear that others make mistakes, just as I do. With every project, I desperately try to minimize them, but inevitably something always happens. Glad to know I’m not alone!
Oh Kristi, when I built the fireplace, like the one you built, I made a lot of mistakes. If I had not repaired them I would of been running to the store several times a day. Thank goodness for wood filler glue etc. Thanks for posting this now I know even the best makes a mistake. I love watching you remodel your home and love the fact at you show and tell us all the steps. I’m now working on a pair of lamps like the ones you made. I’ve already built myself a pair similar to yours.
Hi, Kristi!
Feel free to delete this after you read it (as it really isn’t connected to your post).
Did you see Houzz yesterday? They’re calling for ppl to submit their bathroom remodels.
Not that you’re short on readership, but it would be a great place to be featured and if any effort deserves a Houzz mention, YOURS DO. Bet you’d pick up even more admirers!
Regards!
Em
Being the non-builder that I am, I don’t get what purpose the waxed paper and scrap piece of wood serve. Is it simply to hold it in place? and waxed paper so it wouldn’t stick to the glue? Sorry for being dense.
The scrap wood keeps it perfectly lined up in the hole, flush on both sides, and the wax paper keeps the scrap wood from sticking to the bookcase if any wood glue seeps out (which it did). Wood glue won’t stick to wax paper.
Great post!!
Wax paper is my lil’ buddy, too.
Love the drywall mud idea!