DIY Pocket Door Bookcases – Finished!
I can now check off a third major project from my music room “things to do” list because I’ve finally finished the pocket door bookcases! I finished painting them late last night, and since things in my house seem to take so long to dry lately, I’ll probably wait a while to put anything on them. But here are my finished empty bookcases.
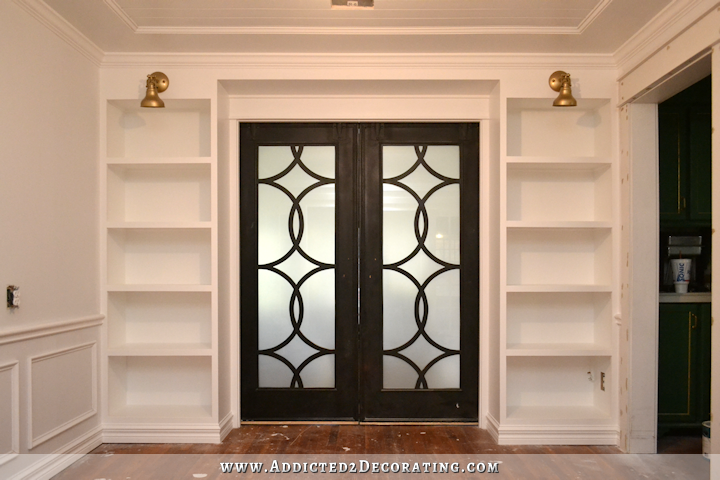
I used the same Behr Polar Bear paint color on them that I use on all of my trim.
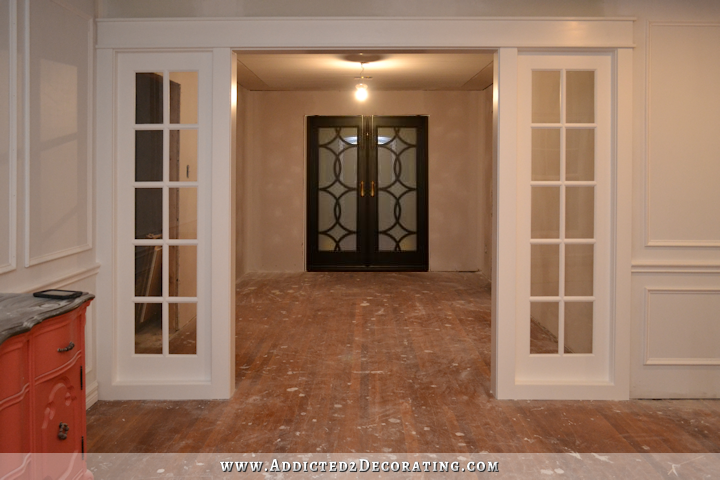
Now if you’re new around here, and wondering why I’m calling these pocket door bookcases, it’s because those doors are actually installed using barn door hardware, like this…
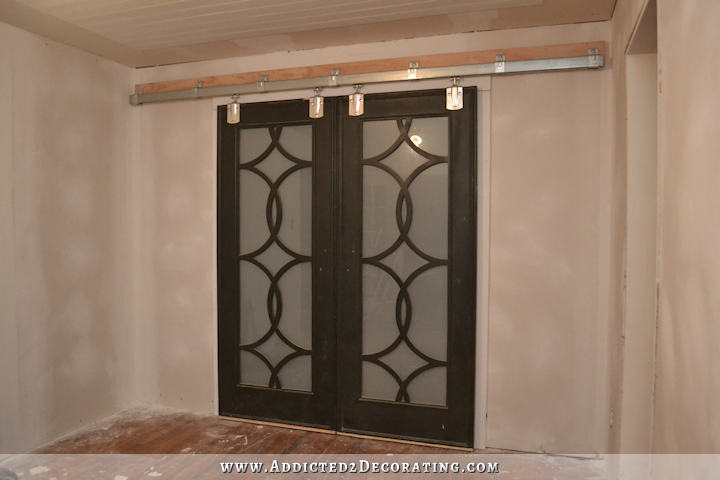
And then I built the bookcases and the header above so that it stands away from the wall about four inches — just enough for the doors to slide behind the bookcases when opened. So now, those doors are basically pocket doors.
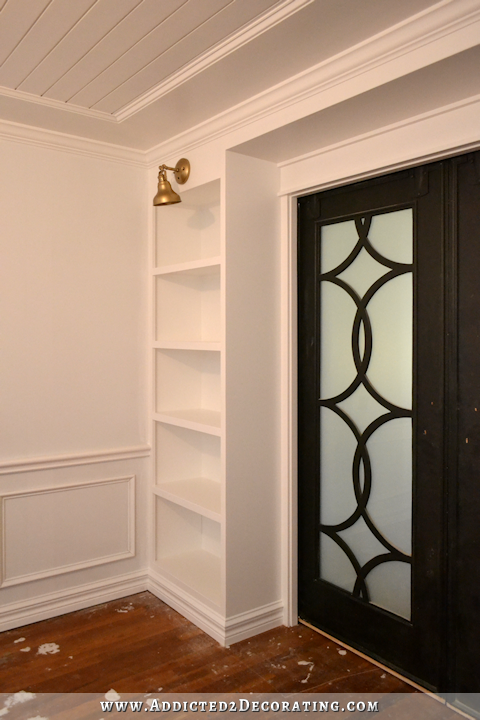
I love bookcases with decorative lighting attached to the outside (as opposed to utilitarian lighting inside each shelf), but I had a heck of a time finding something that I liked, and that was within the price range I wanted to spend. I’m not generally a big fan of the picture lighting style of lights, but that’s what I originally looked for. The problem is that every time I found one that I actually liked, it was way out of my target price range. This picture light from Circa Lighting was my absolute favorite…
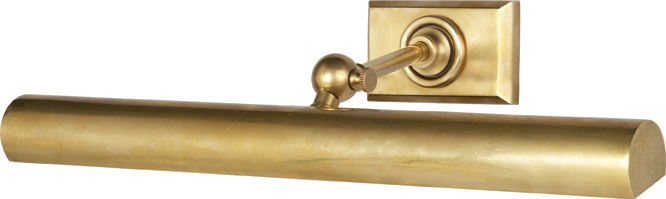
But that light was just under $300, and I needed two of them. That wasn’t gonna happen. But after seeing that light, all of the picture lights that were within my target price range looked cheap and ugly to me. In my opinion, there’s just no budget option that comes even close to that gorgeous picture light.
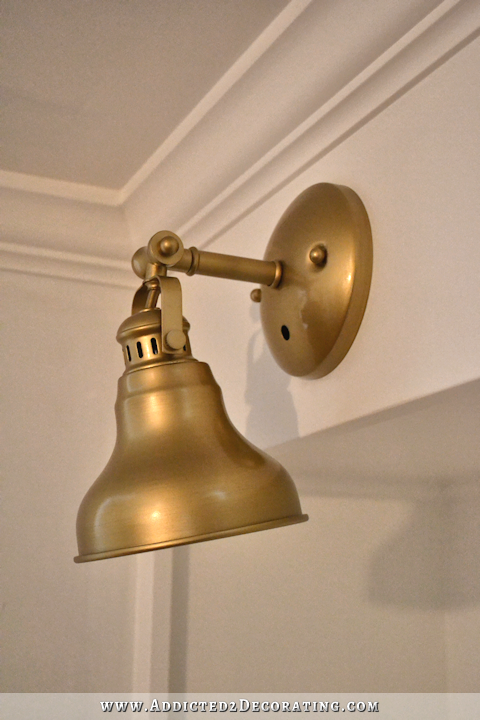
So I abandoned that idea, and looked for sconces. Again, all of the ones that I really liked were very expensive. But then I came across this single light wall sconce when I was in Lowe’s, and I decided I could work with it.
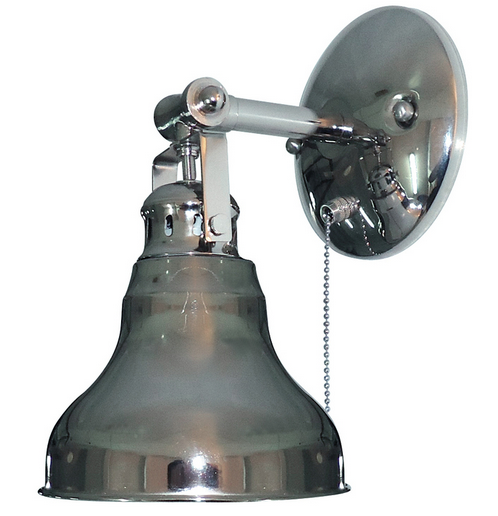
It was $35, and what I really liked was that the shade can swivel back and forth just a bit, so the light doesn’t have to shine straight down. Since this was going on a bookcase, I liked the idea of the light shining back towards the bookcase just a bit.
So I used some 150-grit sandpaper and sanded everything down so that it wasn’t quite so smooth, and then I gave it several coats of Antique Gold paint. I got this at Michael’s, and the color is identical to the antique brass sconces that I have in the kitchen.
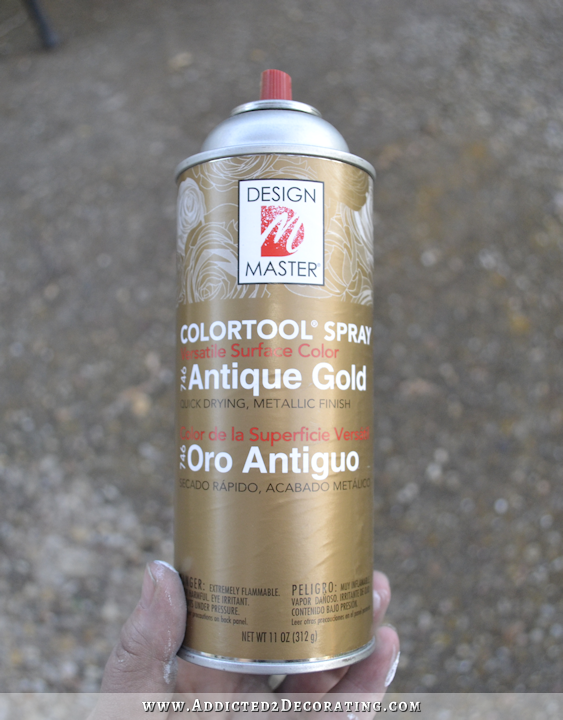
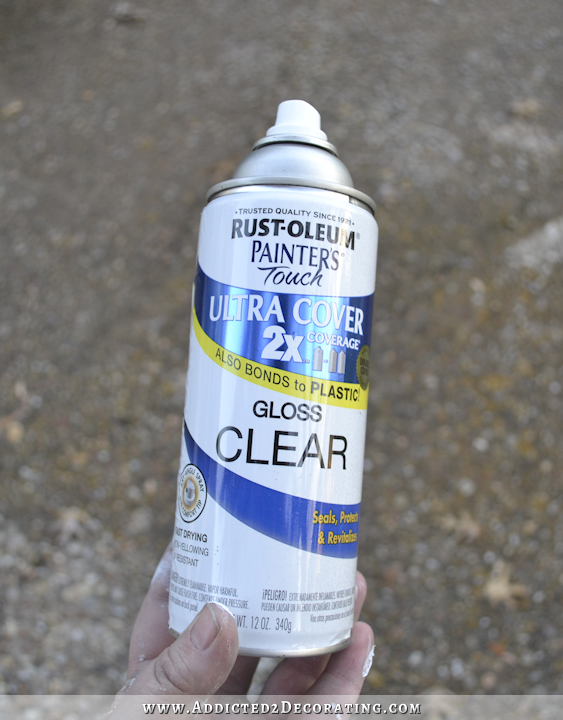
You have to be VERY careful when using this spray paint because it’s very thin, and it runs easier than other spray paints I’ve used. And when it runs, it’s very ugly and noticeable (much more so than with most spray paints). The first time I painted the shades, they both had runs on them, even though I thought I was being careful. So after sanding them down, I tried again and I did many really, really thin layers, and it worked perfectly. After it dried, it was so close to my kitchen sconces, but the ones in my kitchen looked more like lacquered brass, so I added a couple of coats of this clear spray.
It was perfect!
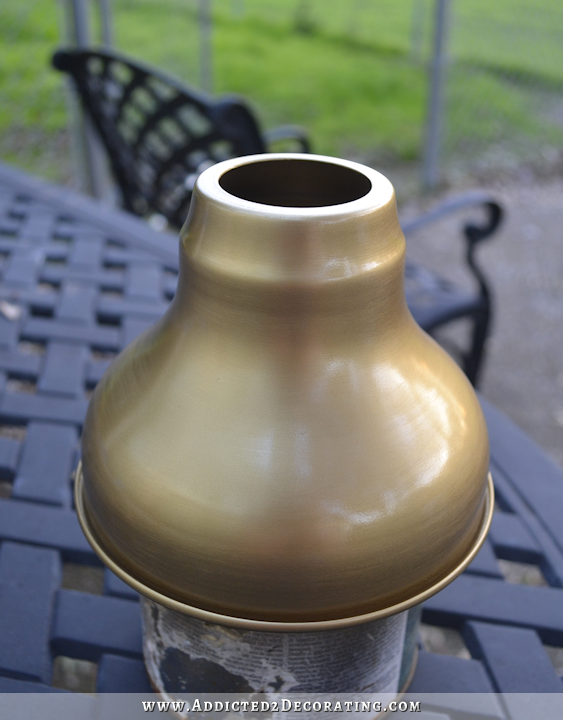
One thing you might notice is that the base has a hole in it at the bottom. That’s because this sconce has an optional pull chain. Obviously I don’t want to use the pull chain here, so I removed them, but then I completely forgot to paint the little hole covers. So as soon as I get those painted and clear coated, those holes will be filled.
And after I installed them, I realized that I didn’t have any extra light bulbs. So I’ll have to show you in a future post how they look with the lights turns on.
I’m really proud of how these bookcases turned out, and how the doors actually look like pocket doors. And I think they really help this room to look like more than just a pass through to get to other rooms. It actually looks like it has a purpose now!
If you want more info on how I built these you can check out these posts:

Addicted 2 Decorating is where I share my DIY and decorating journey as I remodel and decorate the 1948 fixer upper that my husband, Matt, and I bought in 2013. Matt has M.S. and is unable to do physical work, so I do the majority of the work on the house by myself. You can learn more about me here.


Stunning can’t wait to see your door handles back on with these lights!
Wonder why you don’t put paper down on floors to protect them instead of redoing them over and over. Just wondering. Trying to suggest ways to stop redoing so much and often. Onward!!!!
I’ve thought the same thing
More than likely because she hadn’t done the floors over and over.
stunning
LOVE IT!!!
I am so impressed! So professional…beautiful job!
Love the lights! ( I would like the pull chains)
I’m amazed with every post! your projects look so professional. I still can’t get a grip on finishing the trim molding around a prefabricated door . . .
Absolutely stunning! You do such good work, and I love the change-ups.
A thought on the speed of paint drying – is this the first time you’ve painted anything since installing new windows?
… and new HVAC
Amazing! I can’t wait to see a picture from the front door to see how it’s all framed with the panels. As always this just blows me away!
This project fantastic. Very elegant, and I like the non-fussy light fixture you evolved out of the basic one. You must be so excited to see these excellent bookcases!
This room turned out gorgeous!!!…You should be very proud of your self! Such detail and great trim work, I love it!!!
It looks awesome! Great job!
Absolutely phenomenal, Kristi. Everything you have done with this room is impressive. Those sconces add the right gilded touch to those gorgeous bookcases and the room overall. Well done you. Cheers, Ardith
Wow! This room is going to be awesome! Love your solution to the lighting. I would never had known they were spray painted. Can’t wait to see everything completed. You must be so excited😀
Cheers
These are just lovely. I think this is really a shining example of your “style”.
Absolutely gorgeous. Can’t tell you enough how impressed I am by your work.
I get so many ideas from you – my hubby hates it 😳😳😳😳😳. Too bad for him…
Another home run for Kristi!
Perfect!
Absolutely wonderful! Now I wishe I had a place thatI wanated pocket doors! They are pretty perfect! Love your work. I love the art light. Will remember that when I am hanging art in my home.
The gold lights are really pretty. It’s just my taste, but I think something darker, closer to the color of the doors would have been a perfect choice. I do think your home is becoming a beautiful place and even the pictures make it look inviting.
Don’t forget though that she has those amazing brass peacock door handles for the black doors that will look great with the sconces. 🙂
But how are you going to fill the holes?
Love the room, by the way. Beautifully done.
Absolutely beautiful!
Gorgeous- one of the prettiest things you’ve done! Love it!
Fabulous job Kristi! Your pocket door bookcases look magnificent!
You do amazing work. You are such an inspiration.
Those lights are fantastic and this looks like it has always been there, beautiful work again Kristi! Thank you for sharing your talents.
What a gorgeous room this is turning into!
High end look! Really love what you’ve done here. Excellent job!!!
Wow, absolutely gorgeous!! That wall now looks a lot bigger with the new bookcases on it, than in the photo without them. You are such an inspiration Kristi and I love your ideas and work. You never cease to amaze me with your creativeness. Awesome job….well done!!!!
Love it and pinned it for future reference 🙂
Wow…beautiful…..you totally need a show on HGTV….you would rock!!!!
I didn’t think I’d like the bookcases. I was wrong! You’ve done a magnificent job, and I’m so eager to see the finished room.
Amazing! Bravo Kristi!
Stunning work of art!
Re: extended paint drying time. Did you have a humidifier added with the new HVAC? Just a thought.
Bookcases and doors are FAB!!!
Simply mahvelous, Dahling! What a fantastic job! I love the lighting choice, too. I was initially afraid that the shelving was going to detract from those gorgeous doors, but instead, they frame it and make it even more of a focal point.
You rock, girl!
I don’t often comment but I just have to tell you that this is absolutely stunning and probably one of my favorite projects that I’ve seen you do! WELL DONE =:)
Absolutely gorgeous! I don’t think you mentioned it in this post, I know you used the sprayer to paint your kitchen cabinets and prefer using a brush for furniture, so which method did you use on the bookshelves? I hate painting with both but love how your projects always look so profesional! Great job;)
You’re amazing! Enough said.
Stunning is exactly the word. But I’ll throw in a “drop dead gorgeous” too.
Magnifico!!!!!! Absolutely stunning!!!
Once again you have done an A M A Z I N G job. Can’t wait to see what you’re going to do with the walls. My vote is to go ahead and do the stencil black on black treatment. It will look fabulous!
Love it ! But I miss the peacock door handles.
That really finishes off that area nicely, Kristi. A room with purpose! As always your craftsmanship is excellent, and the design is simple but elegant. Great surround for those doors.
Your talent amazes me. Everything is perfect. wAnt to come to my house for a visit😀.?
I’m reading a book right now about Sister Parish…the great decorator who worked with Jaclie Kennedy during the restoration of the White House back in the 1960s. I’m reminded of how much of good design is purely instinctual…you r so talented
Who could have imagined at the beginning, even before the rolling doors, how beautiful this would turn out? It’s an amazing transformation and well worth all the angst and delays. Great job!!!!
I hope you are as pleased as we all are! I can’t get over the difference you made in those light fixtures.
They look great! I like the lights and was going to ask from whence they came, but then you filled us in! I have used that spray paint and it is like spraying water. It really can run if you are not careful. About the pull chain hole. Can’t you find a little jiggy who at HD that looks like the other two screw things and just gorilla glue it in place? A lot easier than sanding filling and painting. I am sure there must be something out there that would fit the bill. Looks like your next move might be the trim on the kitchen door. That and the hallway door frame would finish up the room, no?? Oh I know you have to deal with the black/not black paint issue, but other than that, it should be just clean the floors and put the piano back. Woot Woot, a whole room finished before Christmas? Gather round the piano for singing….what fun – Blessings
Kristi, you are the queen of millwork! I love all the molding in your house; it’s smart and classy and wonderful, and I am over the moon green with envy that you have it AND built it yourself!
I’d be dragging strangers in off the street to show off what I did.
Amazing! Had to show my husband this and explain to him that ONE WOMAN did this all alone! !You are remarkable! Give yourself a huge pat on the back.
At first I thought that the room was too small for bookcases, like you said a room that is just used to get to the other rooms. (paraphrasing) But now it looks like a room of its own! It’s interesting that your web site shows related posts and in all the pictures from past posts, the black doors are and have always been the focal point of this room. Your light fixtures turned out very professional looking, like you bought them brass colored. They will look good with the peacocks.
WOW…I am speechless. They are amazingly beautiful. I can just imagine how you must feel when projects are done and you stand back and say..I did this! I DID THIS! 🙂
Your rooms are truly magazine worthy.
I love what you did with the sconces. Please show us how you fill those holes. That seems like a tricky task.
Great work, looks absolutely wonderful. I’d love to see the doors open.
Gorgeous as usual. Just curious as to when and why you changed the way your doors were hung, was there a problem or was it a design choice that made you rethink how your DIY barn door were hung? We’re getting ready to undergo a similar project and had thought about using your DIY barn door hanger tutorial.
Wow that looks great! What a creative way to set up the doors. Awesome!
When I’ve painted bookcases in the past and couldn’t wait until the paint totally cured (a week plus), I put down wax paper on the shelves before loading them up with books, etc. It kept everything from sticking and marring the paint. Of course, if your shelves aren’t white, the wax paper is visible. When I was ready for my first re-styling of the bookcase — off came the wax paper. BridgetG
Whenever I come to your blog and see your amazing DIY projects, it always me wonder if these are really DIY 🙂 They look so professional and stunning!
Once again, you amaze! I love that you break this down into baby steps and make me (almost) believe I can do it as well. I think you’re brilliant in figuring things out, in making mistakes appear almost purposeful, in working with what you have. I’m envious of the results but not of the process; I’d want it done in a week! DIY is not for the impatient. Keep at it!
Oh!!! I didn’t know your blog, and I love it!! This post in particular… The bookcases totally change the room’s entrance. It looks so different and so, so nice. Congrats!
xo,
thecozypad
Can’t wait to see it done!
Absolutely stunning! What a creative solution and so beautiful! Thank for sharing!