Bathroom Vanity Light Makeover – From Plain To Custom
I’ve been searching for the perfect bathroom vanity light to go on my studio half bathroom, but I had no luck finding one that I liked, and I looked at hundreds of them. Out of those hundreds, I did actually find one that I really liked and was ready to click that “buy now” button. Unfortunately, it was out of stock everywhere except one place, and that place said that it would ship from the warehouse in eight weeks. Eight weeks? Seriously?
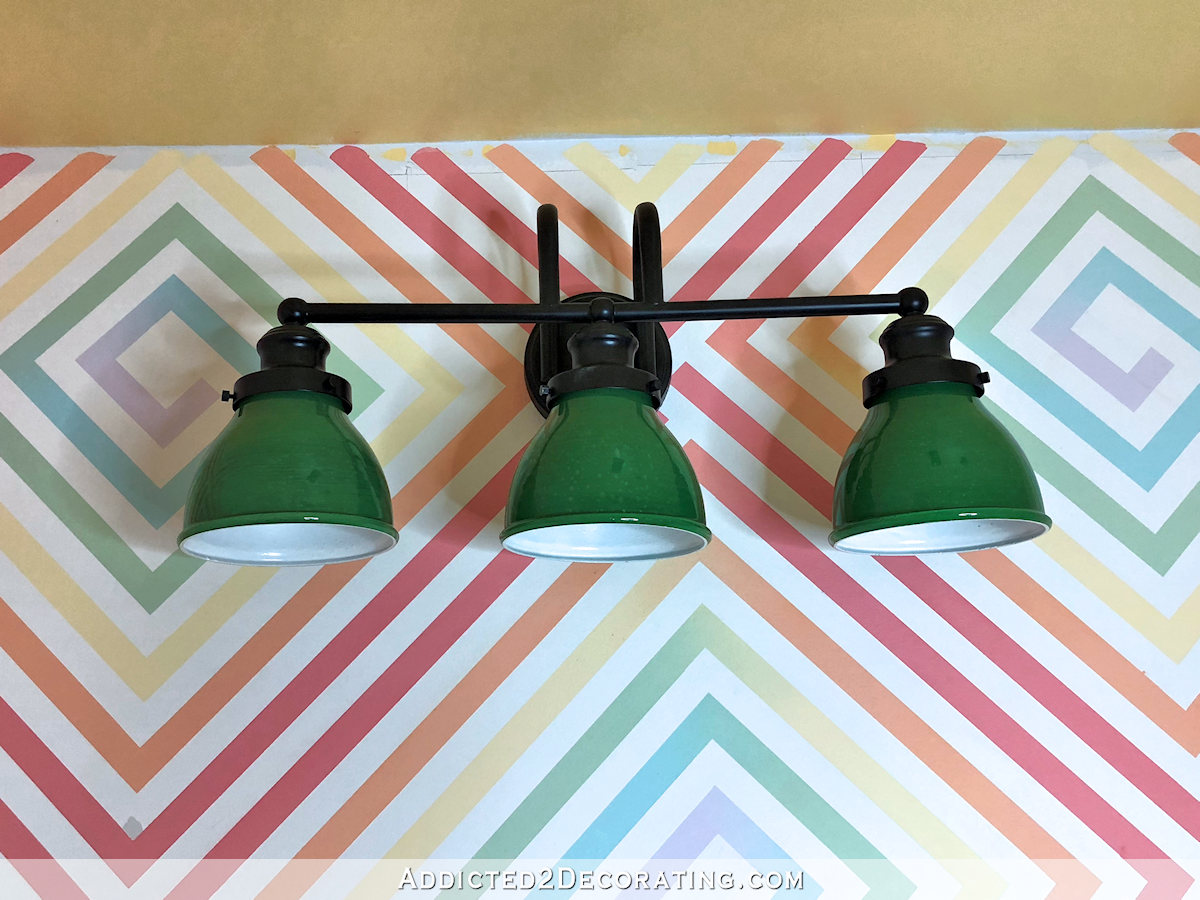
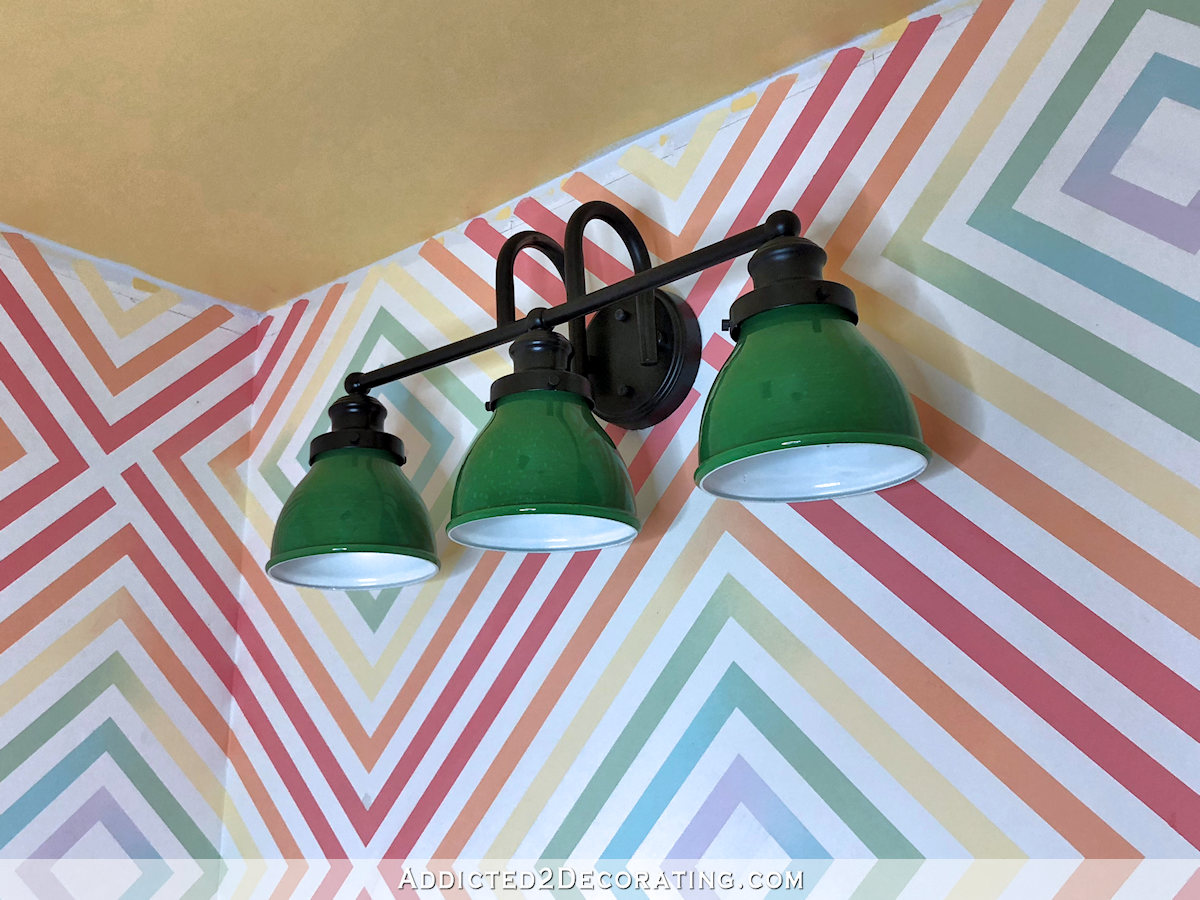
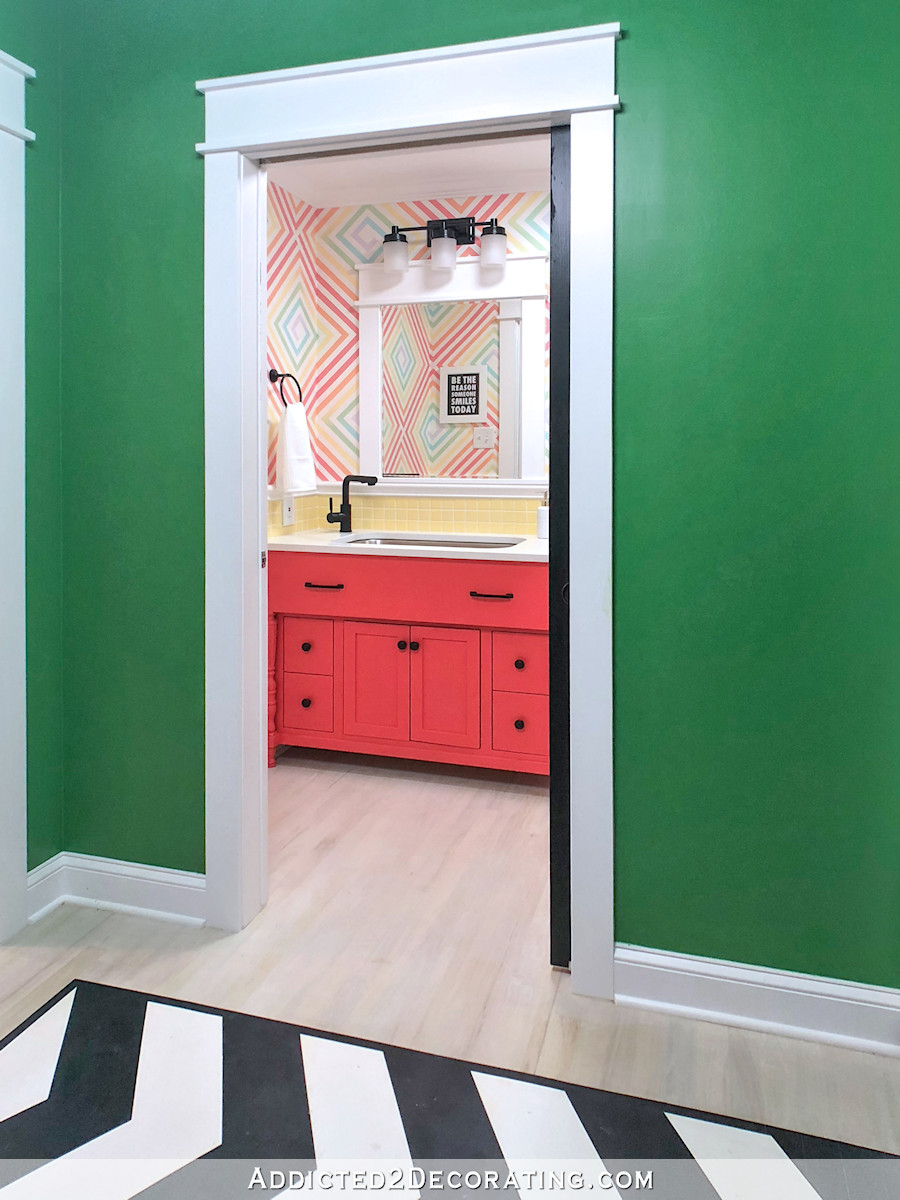
So I had to take matters into my own hands. I decided to find a light locally at Home Depot or Lowe’s, and then customize it so that it was more “me.” I started with this light from Home Depot, and then used both latex paint and spray paint to customize it. Here’s a look at the before and after…
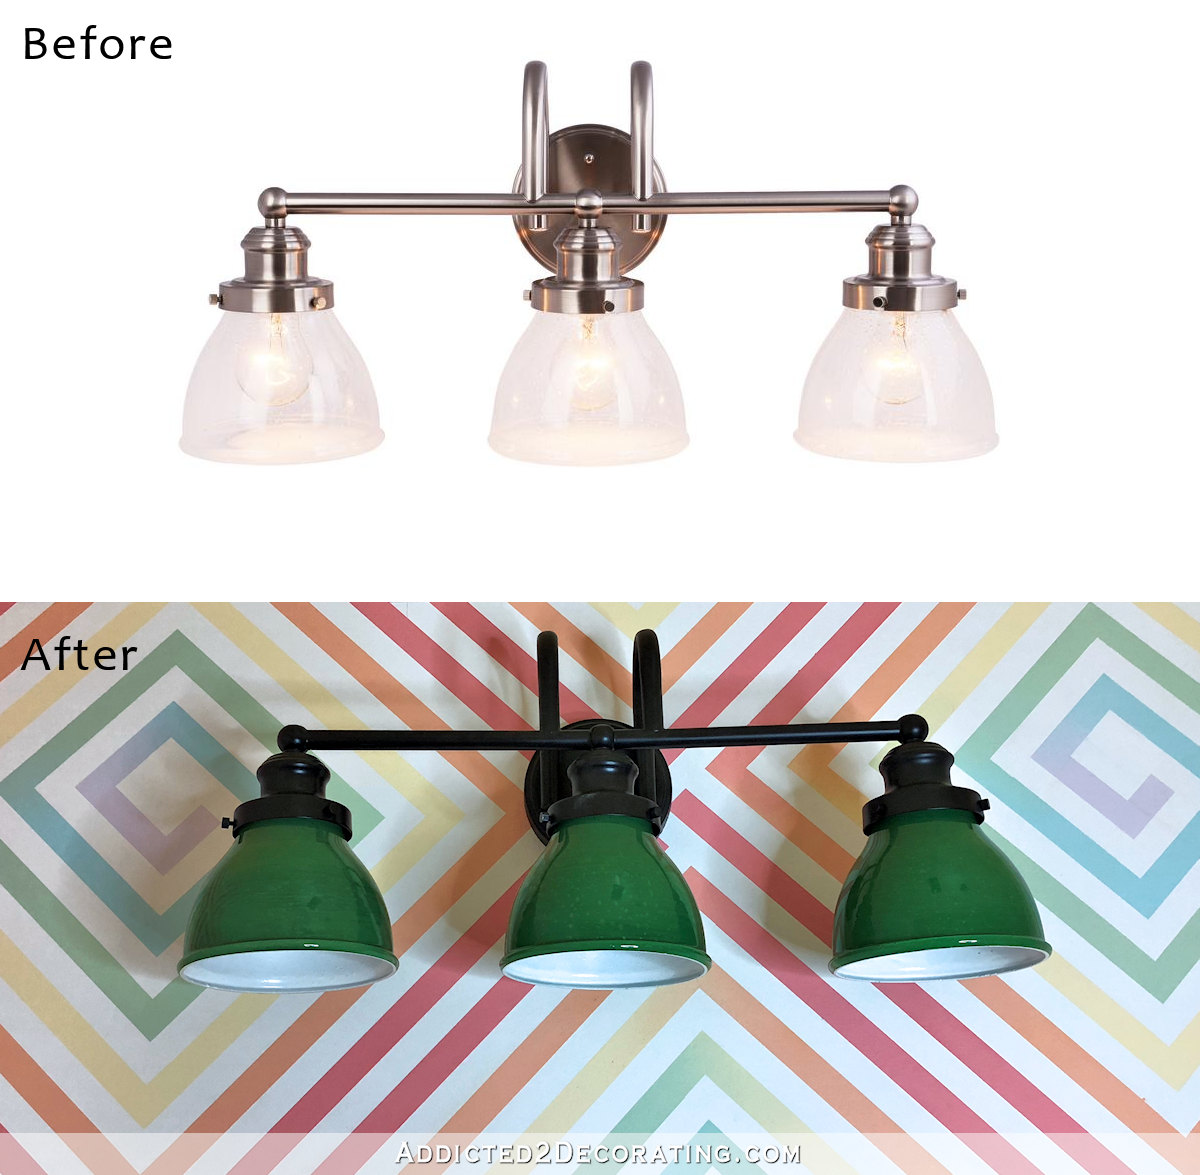
It took several attempts for me to get the look just like I wanted it, but I finally landed on this one and really liked it.
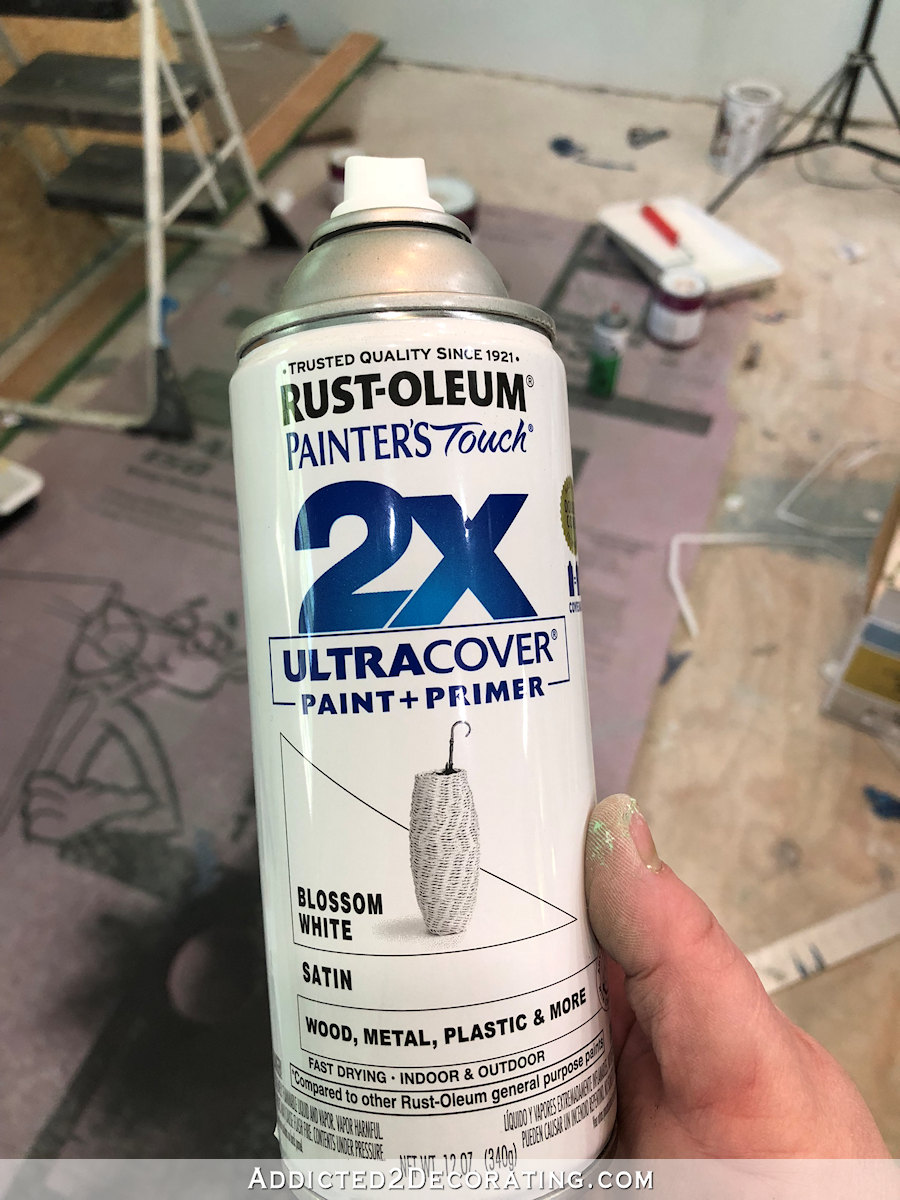
I knew that I wanted the metal parts of the fixture to be black. That decision was easy enough, so I used this spray paint in a matte finish.
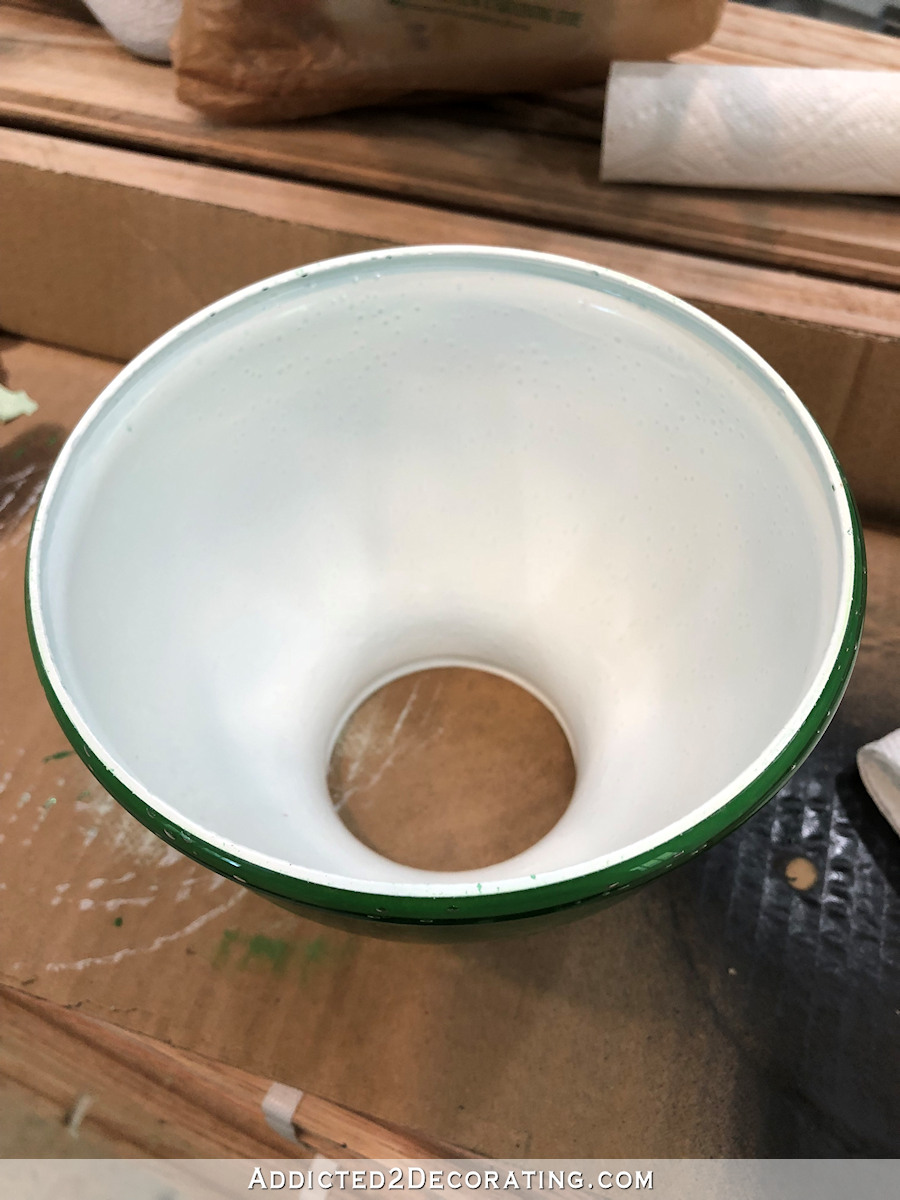
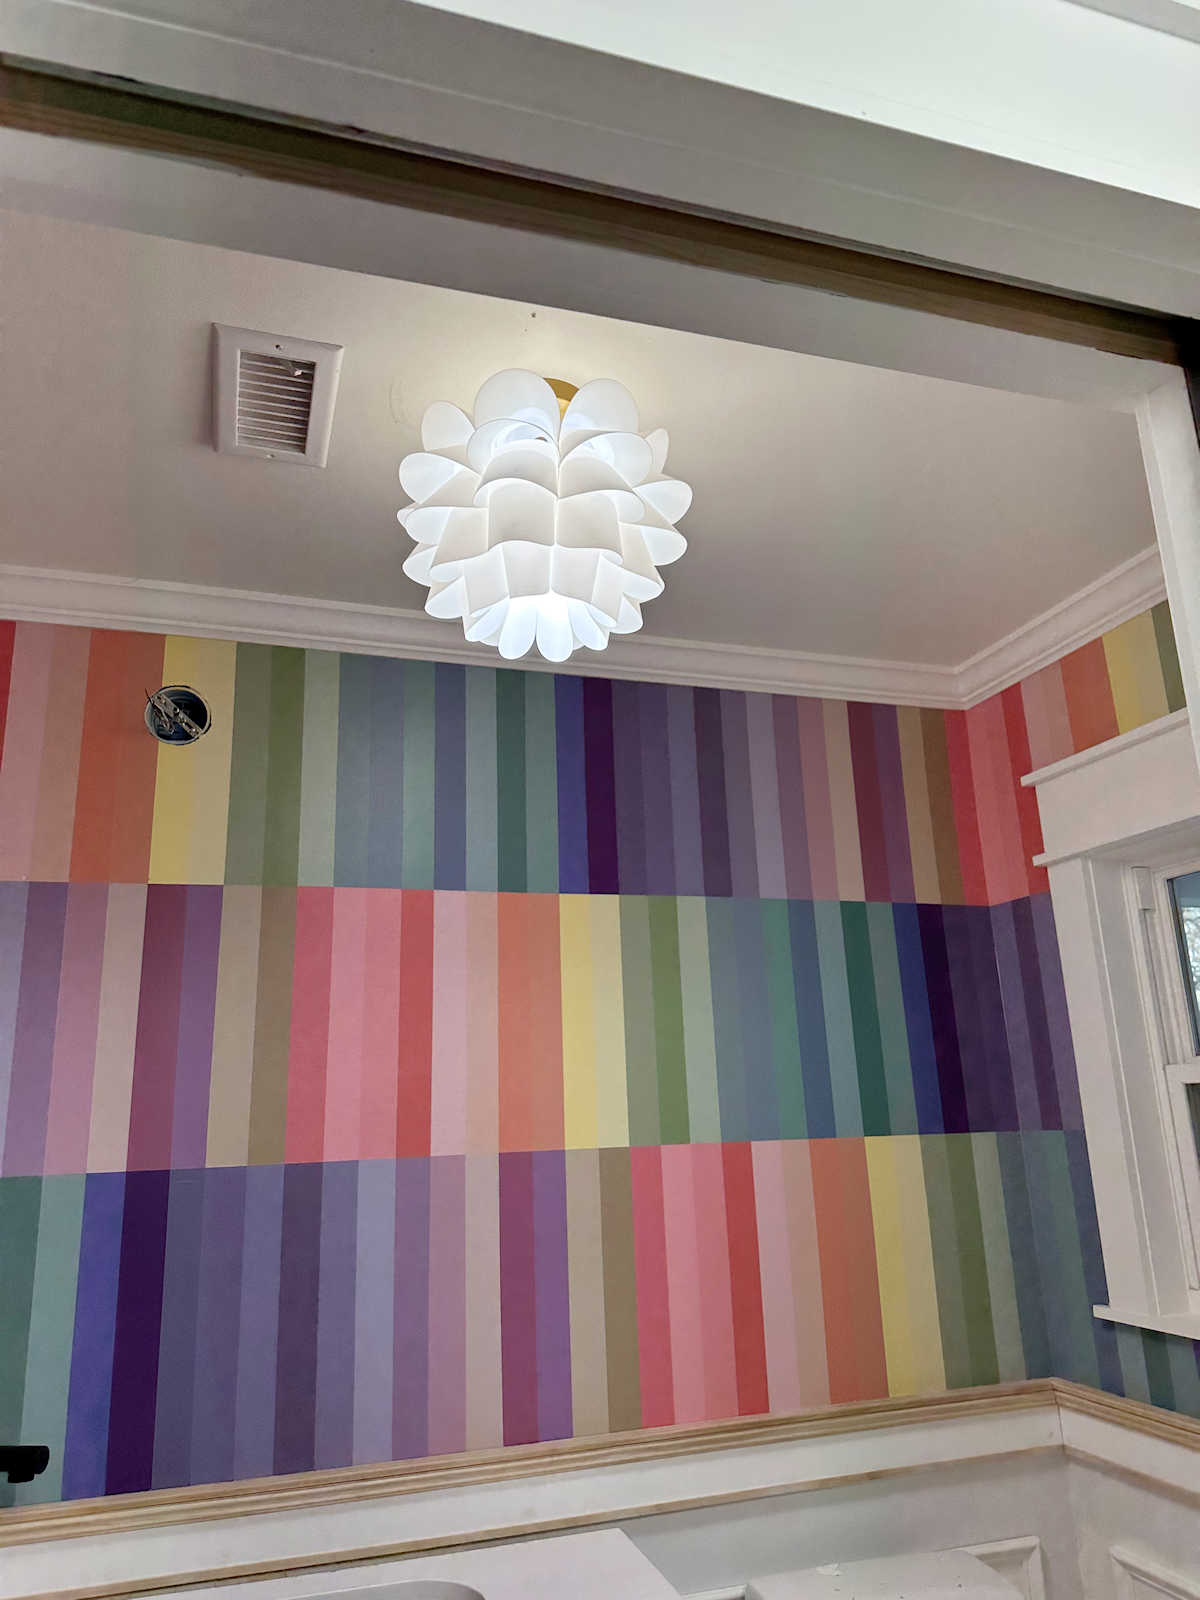
The glass shades were a bit more challenging, but here’s how I got the final look. First, I mixed some of the green latex paint that I used on the back entry walls (Behr Hills of Ireland) with a very small amount of white to lighten it up a slight bit. Then I painted a very thin coat of that paint on the inside of the glass shades.
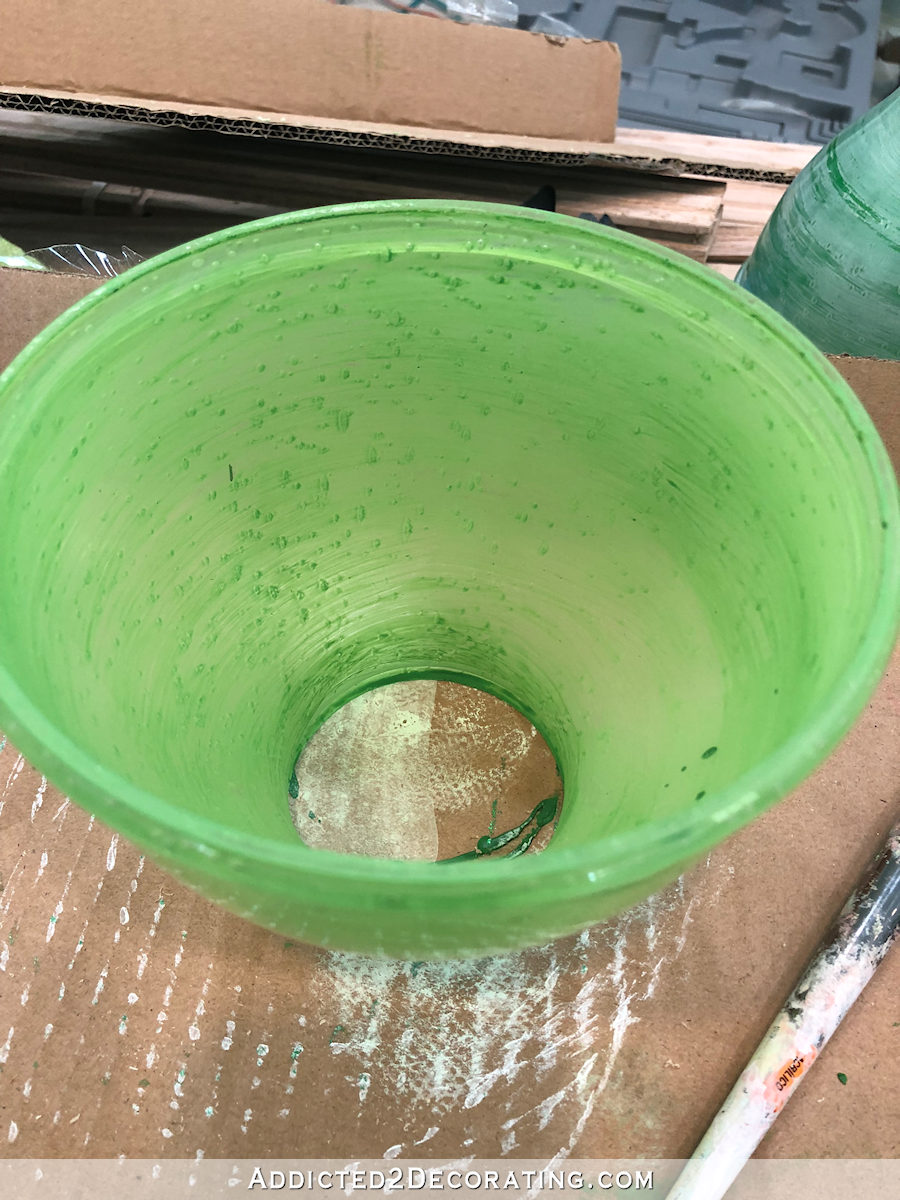
I tried to keep the brush strokes going all in the same direction, and as even as possible.
When that was dry, I used a spray paint that was almost identical in color to my back entry walls. I had to laugh at the fact that it turned out to be John Deere green.
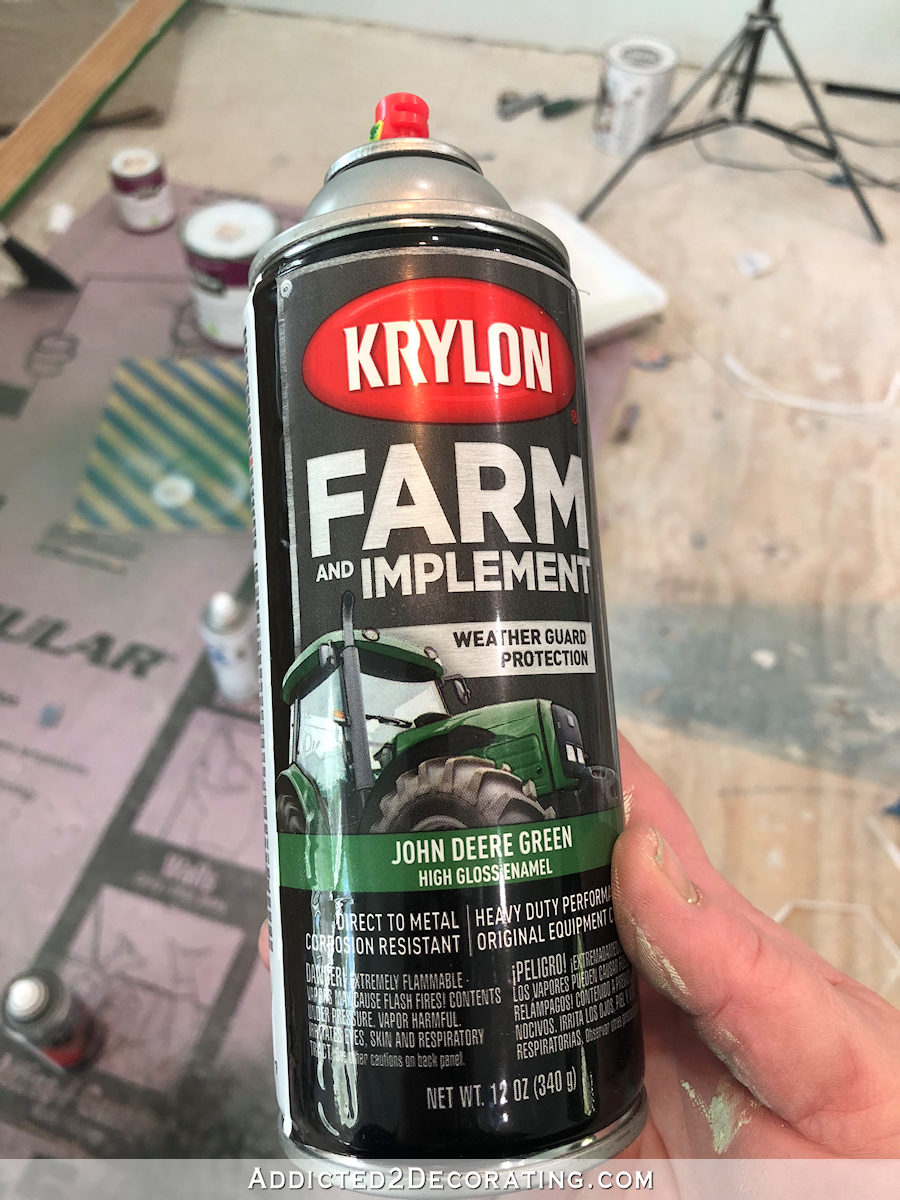
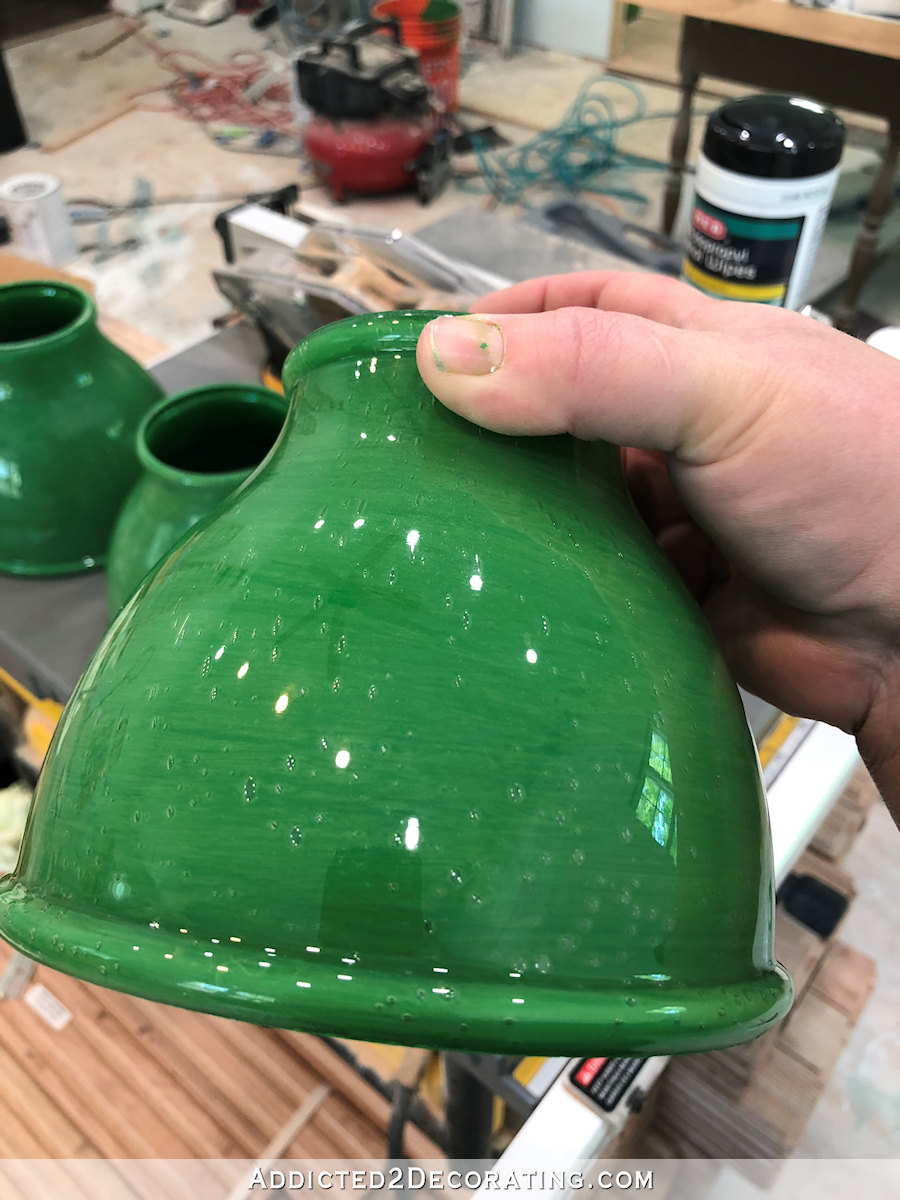
I sprayed several coats (three, I think) of the green on the inside of the glass globes. The combination of the slightly lighter brushed-on paint and the darker spray paint gave the shades a subtle depth of colors. I thought it would be more interesting, and look more like art glass, than a single solid color.
I would have liked it even more had I not been working with seeded glass, but I had to work with what I had. And I preferred the shape of these glass shades more than the shape of the other clear ones that were available locally, which all seemed to be that very ubiquitous tulip shape.
After the green was dry, I sprayed the inside with a couple of coats of white.
This way I could have pretty green glass shades, but the light coming from the fixture wouldn’t have a green cast to it.
After everything was sprayed, I put the glass shades outside in the sun to “bake” for a few hours, and then when they were good and dry, I used some isopropyl alcohol wipes to clean up any overspray on the outside of the glass shades. And then they were ready to install.
I love turning something plain into something that looks custom, and it’s even more satisfying when I can do it at a bargain. The closest thing I found to my light is this one with a $370 price tag…
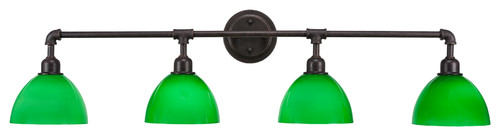
I like mine better, and it came in at about $100 with the fixture plus the paint.
Not too shabby for a custom look!
Please note that I only ever use LED lights anymore, so heat is never a consideration for me. If you use a standard incandescent light bulb, the heat from the bulb will probably destroy the integrity of the paint over time. Also, I do expect the paint on this glass to last indefinitely just because a glass shade on a wall-mounted light fixture isn’t something that’s handled often. Or ever. But if you want to paint glass on an item that’s handled more often, like a vase that you actually want to use regularly, you can add a coat of clear resin over the dried paint and the finish will be very durable once the resin has cured.
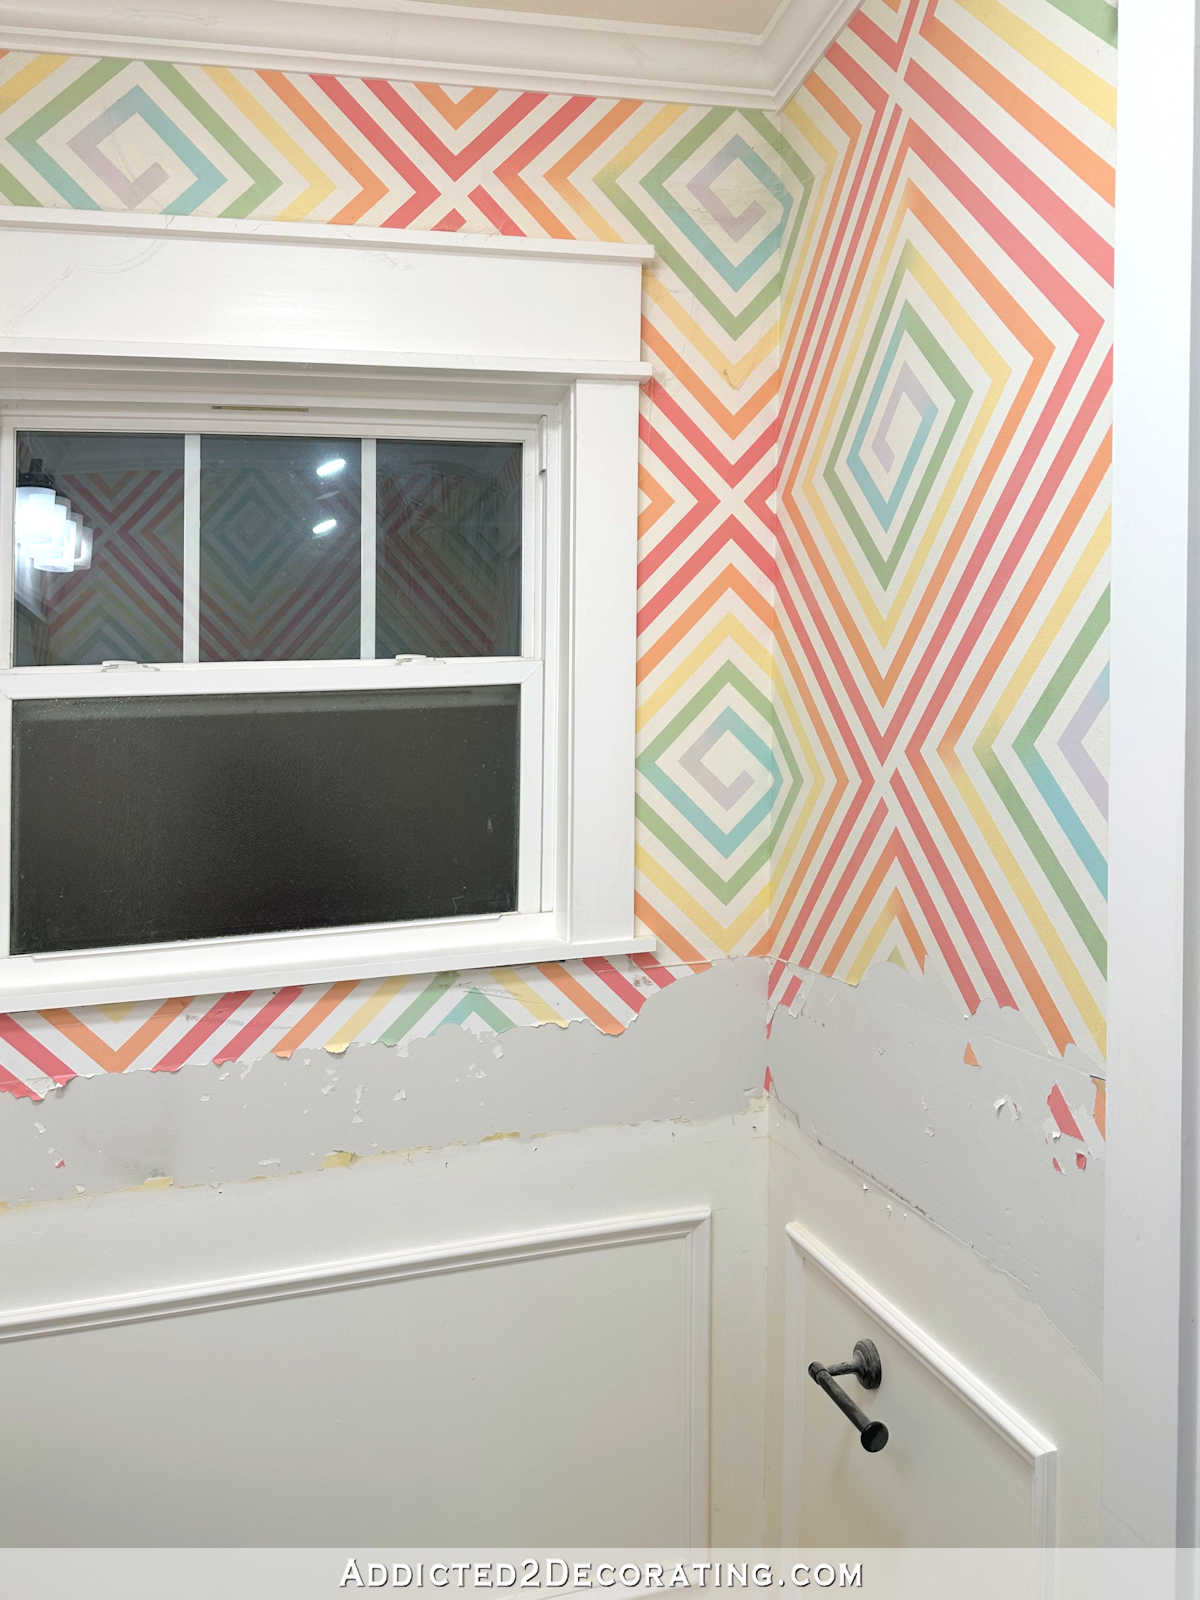
I’m still working on getting the flooring installed. I have the back entry finished, and I have about 2/3 of the bathroom flooring installed. The rest of the pieces are cut and just lying there, so they just need to be nailed down. It’s a challenging room to work in since it’s so small, and my flooring nailer is so big. Once I get to within about a foot from each end of the room, I can no longer use the flooring nailer, and I have to switch over to a regular nail gun, which isn’t nearly as easy or convenient or fast to use.
But it should be installed today, and then I can work on finishing that flooring, painting the design on the back entry, and then I’ll be ready for door casings. Things are moving right along!

Addicted 2 Decorating is where I share my DIY and decorating journey as I remodel and decorate the 1948 fixer upper that my husband, Matt, and I bought in 2013. Matt has M.S. and is unable to do physical work, so I do the majority of the work on the house by myself. You can learn more about me here.

Oh, I love the little bubbles in the glass. It give a handblown effect! I am going to steal this idea!
Just absolutely love how you work your magic and turn something ordinary into something unique! At the same time inspiring others to do the same!
Great idea and execution as always Kristi!
Love it. How did you get the edges so perfect?
The shades have an edge on them around the bottom, so I used an isopropyl alcohol wipe, and just very carefully wiped off the overspray right along that edge. It was really much easier and faster than I expected it to be.
Burst out laughing to see that you used John Deere green. Can’t say that I would choose a color the same as my lawn mower. 😁 But it works!
great job! I love the custom look. It truly has a blown glass feel to it.
Nice! I’m a huge fan of customizing lighting. DIY finishes last a long time on things that dont’ get touched! Half the fixtures in my house have been spray painted matte black, as I often find things on clearance that have the wrong metal color but otherwise suit my criteria. I haven’t been bold enough to paint inside clear shades though, as I haven’t trusted that the end result would look even enough with light shining through it.
These have so many layers of paint inside that the light doesn’t really shine through it. 😀 It’s basically the effect that you would get with metal shades. The light does shine down, though.
What a great color idea to pull in the back entry wall color! Delightful 🤗
Looks terrific and I do like the seeded glass. It adds and interesting texture. Nice job. I have a bathroom light fixture that I do not like so I think I’ll try your technique. If it doesn’t turn out I can always replace it, anyway.
Looks amazing! Love it! I’m starting to see it all come together now. This piece helped a lot.
ooooo, Kristy, I feel your pain, and I’m not surprised that you came up with a custom solution. I too spent many futile hours locating light fixtures (our entire house–every room!– needed updating), and I found the situation exactly as you described. I’d make a choice, and then the finish I wanted was out of stock, or worse, discontinued. Or the one place that had the fixture had marked up the price so high, I just couldn’t pay THAT when I knew I could have had it somewhere else for half. Or the delivery time was unspeakable. I eventually did replace virtually every light fixture in our house, but with great angst and way more time than I wanted. Congratulations on figuring out exactly what you wanted and how to get it. I wish I had thought of your solution. I can think of three fixtures I could have had simply by buying quite inexpensive standard ones and doing something to their shade or finish. Drat.
Wow! I love that you customized what you bought into what you wanted. The John Deere green is perfect with your wall colors. Well done.
You have given me a great idea for some lights in two of my baths that I despise. I am going to try this and see how it works in (in blush pink for one bath, coral for the other). I have some “Glossies” paint for glass which can be baked in the oven on low temp, so I am going to try that. Yours look fantastic — like something that cost far more, as you showed in the comparison photo.
Yours look so much better than the expensive one. Love your shade of green. Winner!
Beautiful! Are you concerned about heat and safety? I know we’re are using low wattage bulbs now but I just wondered.
I use LED lights. Heat from bulbs is never a concern of mine.
Well that is just the coolest!!
Just when I think you have done it all, you surprise me with a new skill.
I just want to say, you have inspired me over and over again to use my own creativity.
I like the seeded glass too, and I like the fixture you got much better than the other. And, it saved a bundle, so win-win. Congrats on your solution, and all the progress!
Do you sand the metal of the light fixture before painting or just go for it? I have the same light fixture that you have in the pantry and I want to paint it black, but I’m wondering… do you paint it with all the tiny little hooks attached, or paint them separately, then attach them after?
The only time I sand metal is if it’s rough and needs to be smoothed for a better finish. But there are so many spray paints these days that are made for spraying metal, so sanding it first to give it “tooth” so that the paint will stick really isn’t necessary, especially on something like a light fixture that isn’t handled.
Oh, and I didn’t take the metal parts apart on my pantry light before spraying.
Love the light! I like the seeded glass…even before your finished it.
You have the coolest ideas!
I swear girl, I feel rather secure in my DIY abilities, ingenuity, etc. till you show up!!! lol This light is phenomenal and would would never have thought of it! Well, if I had I probably wouldn’t have tried for fear it would look like heck. Anyway, I am so proud of this project. What a great job you did both in creativity and execution!
Beautiful
I love that idea and the fixture looks fantastic! Thank you sharing your creative knowledge with us.
These are GORGEOUS!
I’m even more excited now to see this room finished. The light fixture with the walls is gorgeous!
I have a lighting addiction and have never thought to paint the glass shades. I know what I’m doing to the lighting in my bathroom now. Well, once I know what colors I’m going to use.
I keep coming back to look. Everything you do is amazing, but there’s something about this light, I can’t stop looking at it.
I think what you created is actually nicer than the “ready to go” version. I know I’m biased, but I had to re-read it to make sure I was looking at the right one. It looks really nice. I don’t understand how it works with the walls, but holy cow you made it work. THAT is why your journey with stuff is just so fascinating. I would never have taken the chance before I found your blog. Thank you for sharing.
This was a genius solution, especially painting inside the glass shade. Don’t know that I would have thought to do that but it’s what makes it such a success.
What can I say? Amazing like everything you do!
You look like a teenager after the diet!
I was just thinking, “I LOVE the bubbles in the glass…looks so hand-blown or something!” just before reading your line, “I would have liked it even more had I not been working with seeded glass…” LOL Well, you may not love it, but I think it adds something great.
Awesome idea, and I may copy. I’ve been wanting new light fixture in our bathroom for the 6 years we’ve lived here, and everything at the box stores seem so builder grade blah, but other stuff seems waaaay out of our price range. This really is super.
Thanks, Kristi!
Did you paint the outside of the glass shade at all? I’m confused about painting inside the glass shade. It’s absolutely beautiful tho!
No, I just paint the inside. I still wanted it to look like glass with the super shiny finish, and if I painted the outside, I would have covered that up.
Gorgeous – if you hadn’t shown the before and after I would have believed they just came that way. A little bit of paint and a lot of creativity!
Mark
Since you use this entry instead of your front door, when you get it completed—it is going to give you such joy every time you come through the door or go out.
Kristi, I love seeing preview pics pop up on my email. I also get such wonderful surprises when I open notifications from you.
I love these lamp shades. They just pop and keep on popping. I love the seeded glass too. I know you aren’t entirely happy with that but I think it really adds a sense of depth to the shades.
Oh my, Kristi! This turned out soooo pretty! (But of course!) I love that shade of green! Reveal day can’t come soon enough!
I am impressed! Never knew you could use regular paint on glass. I figured it would just bead up! I know they sell glass paints at hobby stores ( like Michaels) but why bother if this works?!!! Fantabulous!
Fantastic project, love this!
Love it!!! so nice to see someone using a lot of color…..tired of the same old neutral rooms… your green cabinets in the kitchen is what started me reading this blog in the first place.