How To Become A Fearless* DIYer
Work on my bathroom remodel is progressing, but it’s slower than I had hoped. I hope to have progress to share with you tomorrow, so today I wanted to share my thoughts on how to become a fearless* DIYer.
I often get comments from readers wondering how I learned to do the things I do, and how I learned to use tools. I also get lots of comments like, “I wish I knew how to…,” and “I wish I had the talent to…” So let me share a few tips that have been a part of my own DIY home improvement journey, and which may help some of you have the courage to jump in as well, and to go from being merely a spectator of other people’s DIY adventures to being the main participant in your own DIY adventures.
1. Start small and gradually build on your new knowledge
I’ve said this before, and I think it deserves repeating. I didn’t start off knocking down load-bearing walls, and ripping out rooms down to studs and floor joists. In fact, twelve years ago when Matt and I were moving into our first home after we got married, I never would have imagined that I’d be doing these things today.
I know that there are DIYers out there who just jump straight into the deep end of the pool, without even testing first to see if they know how to swim. My own father was one of those people. With absolutely no prior building experience (he had never even so much as built a bird house or a dog house!), he decided one day to cut the roof off of the family home and started building a second story.
That’s more than just a little bit insane, and definitely not the norm. Most of us start off in the kiddie pool, dipping our toe in to test the water, then wading in and splashing around a bit. It takes a while to finally make it over the deep end.
That’s exactly how I was. My introduction into using tools came at a young age when I used a miter box saw and staple gun to make canvas stretchers and stretch canvases for my mom and her oil painting students. Power tools came a few years later, when I acquired my grandfather’s wood working tools (lathe, table saw, drill press, etc.). And then at some point in my late teens, my parents gave me a scroll saw, which I used to make decorative wood items, and which I turned into a side business into my early 20’s.
I loved to decorate from an early age, including sewing and tackling a couple of upholstery projects with my mom, but the first actual home improvement type of project I remember doing (other than painting walls and decorating) was installing crown moulding and baseboards in my bedroom at my parents’ house in my late teens.
I really didn’t do much more home improvement (I mainly stuck to decorating, sewing, upholstering, etc.) until Matt and I moved into our first house after we got married. There, I tackled removing ugly carpet from a bonus room, installing wood parquet floor, sanding down the floor (which I did with a palm sander) and refinishing it, and tiling a countertop and bathroom floor. I also did a few outdoor projects, like building a privacy fence and a raised flower garden with a retaining wall.
With each project, my confidence grew a bit more, and I felt like I could take on bigger challenges. And from there came the condo, and then this house, and if you’ve followed me through those then you’ve seen the progression of my DIY abilities and the increasing difficulty of projects that I’m willing to take on. But it has all been a process, and it has taken many years to get to the point where I’m comfortable removing load-bearing walls and ripping out rooms to the studs and floor joists.
The first key is that you have to start. If you’re just starting out, I would suggest purchasing a miter saw and a finishing nail gun with an air compressor. You’d be amazed at the number of projects you can do around your house with just those two tools!
The second key is that you have to gradually challenge yourself to tackle bigger and more difficult projects. If you only ever stick to those basic projects that can be done with a miter saw and nail gun, your DIY abilities won’t be stretched. Challenge yourself, and continually force yourself beyond your comfort zone.
2. Educate yourself
Knowledge is power, my friends! And what an amazing time we live in where knowledge is right at our fingertips, and we can have information about pretty much any topic in a matter of minutes!
YouTube is my go-to site whenever I have a question about anything home improvement-related. I would guesstimate that I spend at least three hours each week watching YouTube videos about different home-related topics. I love it because you can find videos on just about anything on there!
Just over the last weekend (since Friday), I’ve watched videos on how to fix a broken toilet flange, how to fix a rocking toilet, how to tile around a toilet flange, how to install a new toilet, how to install a Wink Hub, how to clean grout haze off of tiles, how to set tile on Hardiebacker, how to tape joints on Hardiebacker, how to make a wood countertop, how to rub out a lacquered finish, and on, and on, and on.
And when I want information, I’m like a dog searching for a buried bone. I don’t just watch one video and move on. I watch every single video I can find on the topic. And you’ll notice that some of the videos I’ve watched in the last four days are projects that I’ve actually done before (installing a toilet, building a wood countertop, installing tile on Hardiebacker, etc.), and some of those are things that I don’t actually need right now (fixing a broken flange and fixing a rocking toilet) but I’m always wanting more information, more knowledge, more options. I guess you can say I like to “stockpile” information and knowledge for future use, and if someone can show me how to do something that I already know how to do in a better or more efficient way than I’ve been doing, then I want to now for “next time.”
YouTube is always my first stop, but a couple of my other favorite go-to sites are This Old House and Family Handyman.
These days, you can be as educated as you choose to be…and it’s free! Take full advantage of that.
3. Befriend a licensed contractor
If you’re taking on a whole house remodel, or you’re embarking on some DIY home improvement projects that deal with anything structural in which local building codes will be involved, calling on a local licensed contractor to act in a consulting role can be a tremendous help.
This is exactly what I did when we moved into our house, and in the last year, I’ve had that contractor over twice to give me input on various projects I was considering — vaulting the ceiling in the dining room (which I ruled out as a DIY project), and removing the wall between the kitchen and dining room. I’ve also sent him a handful of texts throughout the year to ask various questions about building codes and such.
When this contractor came over to give me advice on removing the kitchen wall, he spent about 20 minutes here, and walked me through the entire process, from beginning to end, in a very detailed manner. Then he allowed me to ask any questions I had, and he even drew a couple of diagrams and left them with me. I had already watched every video I could find on the topic, so I had at least a foundation of knowledge about it. This helped so that he wasn’t having to start from scratch in educating me on the process, and it saved us both time.
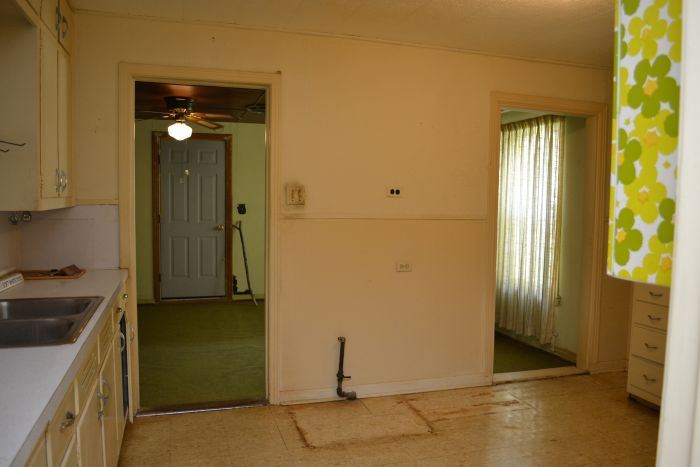
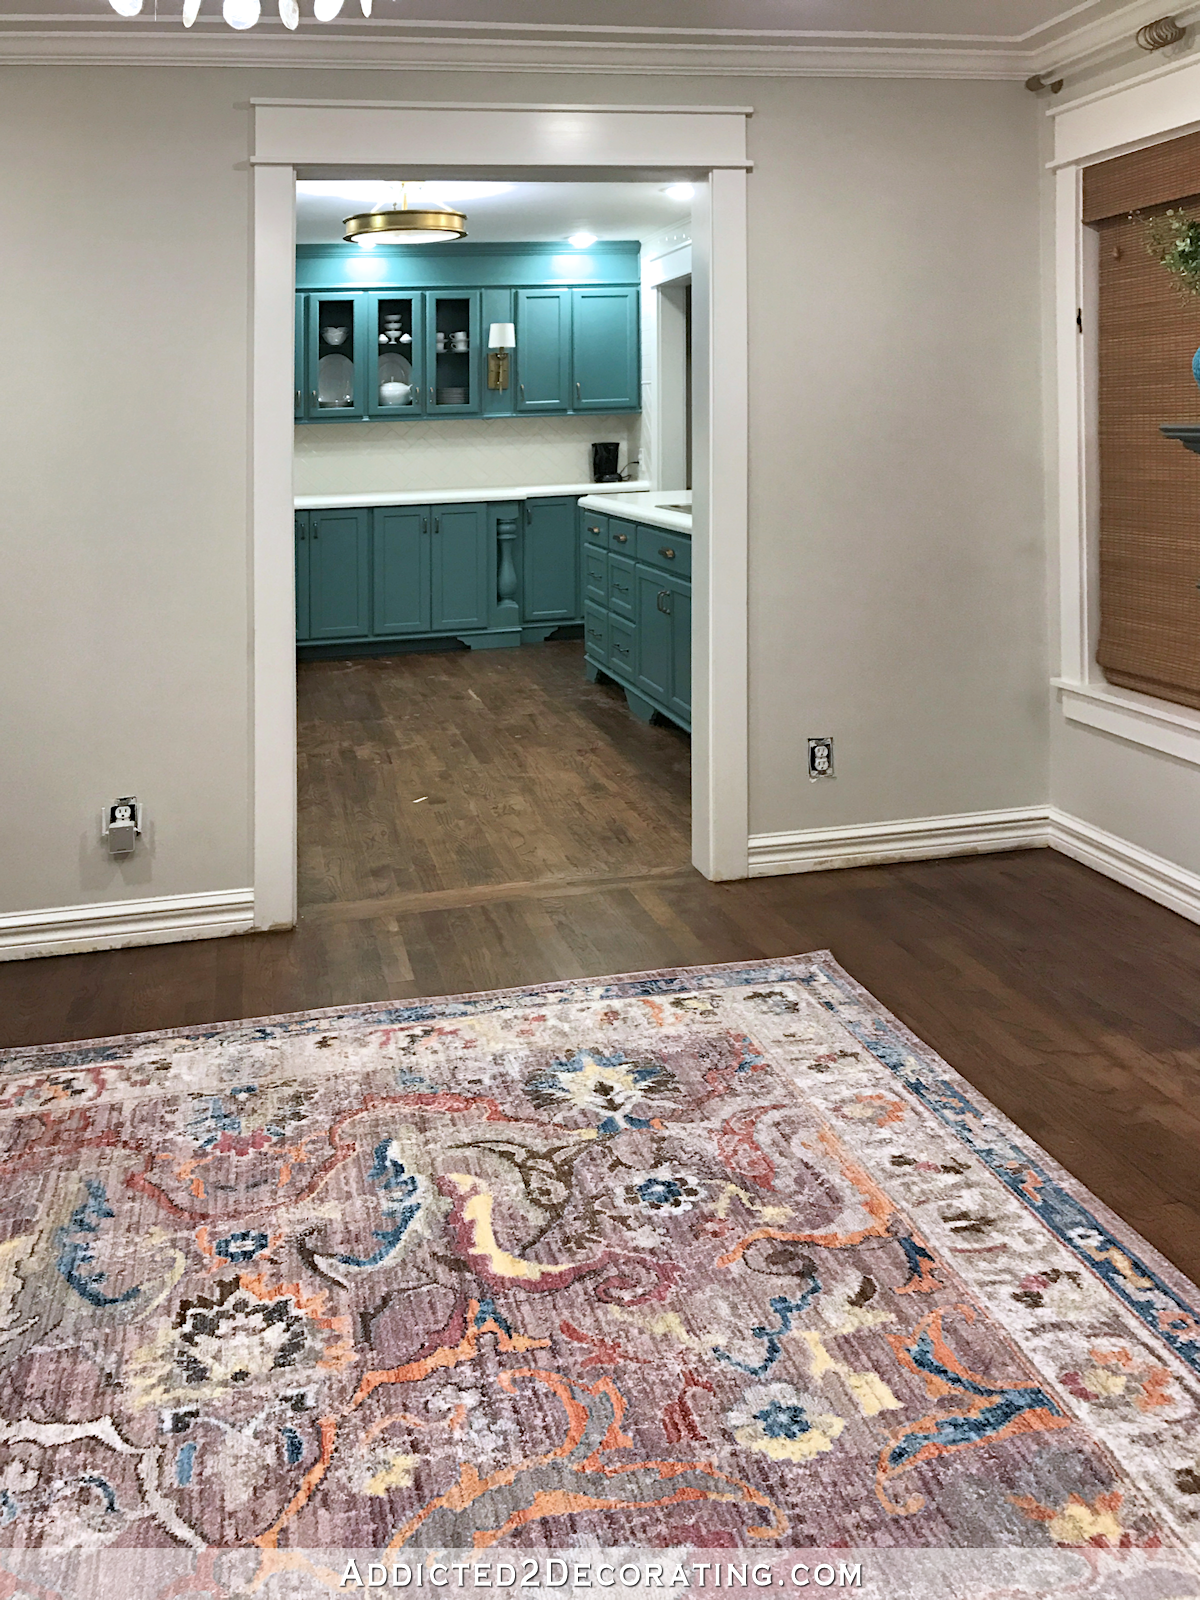
One of the biggest advantages of consulting a local licensed contractor over watching YouTube videos and finding info on home improvement websites is that local contractors are knowledgeable about building codes that are specific to your area. I found this to be tremendously helpful, as I had the peace of mind knowing that the finished product was up to code in my city. So with his detailed step-by-step instructions, I was able to confidently turn this original exterior wall…
…into this…
Now just to be clear, I’m not at all suggesting that you find a contractor and monopolize his time, or take advantage of his kindness. Licensed contractors are generally very busy, juggling several projects at a time, each with different subcontractors, clients, budgets, etc., to worry about. Their time is valuable, so I think it’s important to be mindful of that. In fact, I would even suggest working out an hourly fee that you will pay for his consulting…if he’ll take it. The contractor I consult refuses to take payment from me even though I’ve offered and even insisted, so I just make sure that I keep my requests to a minimum so that I don’t become a nuisance.
But even if you do pay an hourly fee for consulting, you’ll still end up saving loads of money by doing the project yourself, and you’ll be able to do it with the peace of mind that it’ll be done correctly, and up to local building codes.
4. Understand how your particular house is built
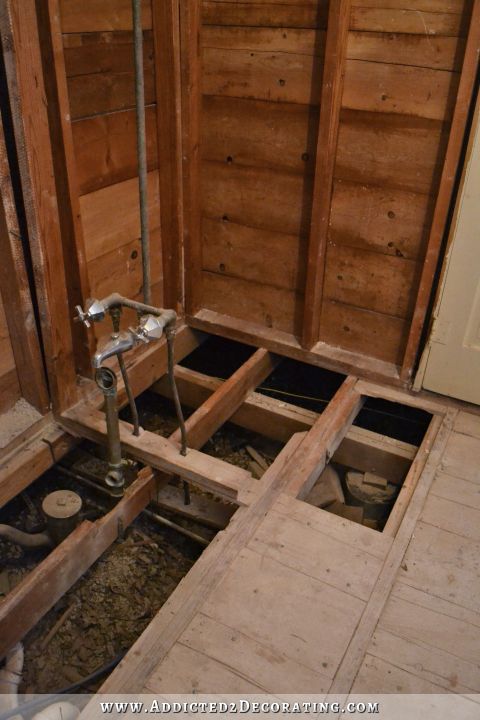
I’ll admit that at times, I can feel panic wanting to take over when I’m working on some of my projects. Most recently this happened when I was breaking up the tile floor in the bathroom and I broke through the subfloor. Seeing this…
…and then getting to this point where I could just see the ground below my house…right in my bathroom…
…was definitely more than just a little bit unnerving to me at times.
But in those times when panic wanted to set in, I just reminded myself that it’s just subfloor, and subfloor is just wood which can be easily replaced. And below that subfloor are the floor joists. And below that are beams, which sit on concrete piers. There’s nothing terribly complicated about this structure. It’s all just wood, and it’s all fixable with nothing more than a circular saw, some construction adhesive, a drill with a screwdriver bit, and screws. That’s it. There’s nothing here to panic about.
Having that knowledge about how my house is built saved me from a full-blown panic attack and helped to keep me calm when things looked at their very worst. Again, knowledge is power, and educating yourself about the structure of your house (type of foundation, how to locate and recognize load-bearing walls, the type of roof structure your particular house has, etc.) can help you have the confidence in moving forward on your home improvement projects. This is a case when ignorance definitely isn’t bliss.
5. Welcome the mistakes
I think one of the things that scares people the most, and causes them to be spectators rather than participants when it comes to DIY home improvement, is the dreaded “M” word — mistakes. And the fact is that if you’re going to take on home improvement projects yourself, mistakes are inevitable. It’s important to change your attitude towards mistakes from one of dreading them and being paralyzed at the thought of them, to one of accepting them and looking at them as opportunities to learn and grow.
Yes, mistakes can be very frustrating. They can cost time and money (like when I blew through about ten feet of crown moulding during my kitchen remodel because I couldn’t get the angle right to save my life), but I learned from it. Shortly after that frustrating experience, I did finally learn how to cut crown moulding. (And now I have a Kreg Crown-Pro — so simple!) But as frustrating as it was, it was a valuable experience, and helped me learn and grow in my DIY abilities. And believe me, I have these “learning experiences” just about every single day. It’s just part of being a DIYer, and I wouldn’t be where I am today, tackling the projects that I tackle today, if it weren’t for these opportunities to learn and grow. And I certainly wouldn’t be tackling full-on room remodels if I let myself be held back by a fear of making mistakes.
So those are my top tips for becoming a fearless* DIYer! If you’re an experienced DIYer and have more tips for people who are just starting out, I’d love to hear them!
*By the way, I’m not fearless. Not even close. People have used that word in comments to describe me, but I always laugh a little at that description, and think to myself, “Ha! If they only knew…” I definitely have fears, as I described above, but I try to face those fears head on. I’ve come to realize over the years that fear is only a bad thing if you let it hold you back.
Addicted 2 Decorating is where I share my DIY and decorating journey as I remodel and decorate the 1948 fixer upper that my husband, Matt, and I bought in 2013. Matt has M.S. and is unable to do physical work, so I do the majority of the work on the house by myself. You can learn more about me here.





This is such an encouraging post! I’m 29 and we just purchased a 101 year old farmhouse on 5 acres. Youtube has become my friend and I’m excited about all the work ahead. My problem in wanting instant gratification. I’m learning the value of taking my time and doing it right the first time.
What a beautifully written post. But it’s not just that you appear fearless, you are optimistic, inquisitive and tenacious. Plus, you are so humble and so likable. Thanks for sharing your knowledge with all of us. You’re my hero!
I second that – well said and a true Kristi post! Thanks for the encouragement over and over again!!
Great encouraging post, thanx! We call you fearless because lots of us don’t bother to face our fears, plain and simple. And for the record, the average teenager does NOT tackle installing trim work, especially crown molding. You rock. That is all! 🙂
Five years ago, x tore the whole house apart, knowing we were separating. He tore the electricity, plumbing, walls, roof, … His thoughts were to get all the renos done at once while perfectly knowing that he would never do any of them. I found myself a single mom of a large family with a house that looked like a disaster zone. I started renovating things little by little. I have learned so much since then and still have so much to get done. Over the weekend, I was building a set of bookcases in the dining room and using my hand saw. Obviously, this was taking some time so I went to the store and bought myself an electrical saw. I kept telling myself: If Kristi can use one, I can to. Well, I did not actually have to use it since my 13yo son refused to let me even touch it and did all the work himself (he gets like that, wanting to learn and do everything himself. He has been learning right along side with me) but still, I will use it because there is still so much work to get done. The biggest part though is done. Only the fine details left.
Hey Julie! I don’t know you but I am so proud of you! Tackling something as huge as a house and being a mom is more than a notion. Keep it up and I am moved to tears that your teenager helps and protects you too! How wonderful to read! Keep rocking out!
I agree with Sukina!
I agree, too! Being a single mom is difficult enough w/o having to tackle doing renos, too! Love that your son is protective, as well.
I just wondered when reading about your GC contact. Have you gotten a price from him on drywalling the ceilings?
My tip for aspiring to be a fearless DIY’er is don’t be afraid to ask someone who knows, like the peeps in your local Home Depot. I will tackle building anything, absolutely anything, but I HATE plumbing and electricity. Electricity because you can’t see it (so to speak) and plumbing because after electricity frying you or your house, water damage can be catastrophic to your home and expensive to repair or mitigate mold.
BUT sometimes there’s just no way I’m paying $50 just for a call out fee, plus a minimum hour to fix a spigot that just needs to be cut off and replaced, which I just KNOW has to be simple.
So I go to Home Depot, ask who can walk me through a plumbing repair and take some notes, gathering the materials as he helps me. I go home Google and you tube it, then do it.
Now I solder pipes, love sharkbite and am far less afraid of plumbing for basics. I still hate electricity though, but I’ll get there 🙂
Chez, I Liked your comment. I just searched shark bite and learned something new.
Kristi, you are such an amazing writer! You need to get with a publisher. There is a great book in these posts.
I’ve thought the same thing before, and this post sealed it!
I third this notion! I can just see the details, photos and love. It would be a instant best seller! Kristi if you are reading this! We so need a ebook or real book any time you ready. Your loyal followers are more than ready to buy and support you!
Perfect post for me to share something I got introduced to just this morning. Here in Minnesota, I follow Reuben’s Home Inspection Blog. Today’s post on controlling window condensation may not apply to you in TX, but it links to a highly informative site on the topic of whole house ventilation, and understanding how ventilation works in your home. Since I know you are adding an exhaust vent in the bathroom, I thought you might want to add this as a source (links below). Reading it made me go cross-eyed, as I don’t enjoy technical stuff, so I basically skimmed for the concepts. If you haven’t already consulted with your contractor, given all the structural changes you are making, front elevation/roofline, additions, etc., I thought some info on ventilation systems as part of your HVAC planning might be helpful.
Reuben’s blog is here: http://www.structuretech1.com/blog/ I find his explanations to be very clear and free of bias, and he often helps explain the merit (or lack thereof) of things some specialists who are trying to sell you things may say.
The Ventilation link Reuben provided today is here: http://www.jlconline.com/ventilation/choosing-a-whole-house-ventilation-strategy_o.aspx?dfpzone=general
Morning, Kristi,
What a great post. I am going to keep this one for the daysI need a pep talk. I have found, tho, that as much as Home Depot can help, there are times when you can be deceived. I wanted to remove a large lit base from a much needed ceiling fan. It is a Home Depot brand. I went in, seeking the brass plate to cover the fan opening. The lighting specialist told me it was ‘impossible’ as they were a ‘factory ceramic molded assembly’. I would need to replace the entire fan…$$$ I had a licensed electrician working to update our home to today’s code . I told the electrician about my problem. He came the next day with a cover, unscrewed the light fixture, removed it, and covered it with a base plate. I guess it plans to really investigate, and not take no for any answer until you have exhausted all sources.
Great column, Kristi, as always. I learned a lot from watching & working with Bill Greggs many years ago. I find my confidence level has gone down considerably when I consider tackling things on my own. Thanks for the encouragement1
Kristi, if I can figure out how to get your blog to show up when you post, may I add your blog to my website at http://www.SWColoradoProperties? Or do you charge for that? I was just thinking that many people buying homes are looking for fixer-uppers. If it’s not appropriate, just let me know.
Thanks!
Bonnie
I had to go back and finish your article because I got distracted when you mentioned the Kreg crown Molding thing… OMG! That is SO FREAKIN’ COOL!!!! oh yeah- awesome article as usual. <3 😀
And I had to read this comment to remember to go look it up! Lol! Thanks!
Kristi, Every time I see your new kitchen, I want to tell you to go to the QVC website, look at Temptations Stoneware and look at the newest line design in the exact colors of your kitchen. It’s a perfect match and you have to see it!
Great post, Kristi. You are a great “diy” role model for us women, especially. Though I’ve done some diy projects in the past, and like you, Kristi, I usually do extensive (obsessive even ) amounts research–I then usually try to get my husband to do the work, LOL! However, you are inspiring me to try and do more myself–I get so tired of waiting around for my dear husband, who has the tools and the ability, but not the motivation, to beautify the house that I do! You do such a great job with your projects, and finish them so quickly, too!
Someone above commented about asking for help at Home Depot. I work at Home Depot, I can attest to the fact that, though we do receive training and ongoing education in our dept, some folks there definitely know more than others. Some folks just “think” they know. You know the saying about “a little knowledge can be dangerous”…..If you aren’t sure if the person you were talking to there really knew what they were talking about, go home and double-check what you learned at the big box store info via good internet sources (even Home Depot and Lowes’ websites have good, reliable diy videos.) I have also found that professional contractor’s forums that welcome diy’ers questions can be especially helpful for those tricky issues that come up.
I work in the flooring dept, and find that even many of the general contractors who come in to do the occasional tile job also don’t necessarily know what they are doing when it comes to tile! (And I also have many customers come in who have to rip out and replace those incorrectly installed tile jobs when they fail!) A tile job on a floor or in a wet area like a shower really needs to be done correctly or you will likely end up with water issues, cracked tiles, mold, etc. Tile setting standards of good practice have changed over the years and some contractors aren’t even aware, for instance, that “green board” (a type of drywall) is no longer an acceptable substrate for tile in a shower! (A kitchen backsplash is much, much easier project and more forgiving, however. I don’t want to scare anyone off) Hope this helps someone.
By the way, Kristi, I love your choice of bathroom tiles! I immediately recognized “our” floor tile when you first posted it, and have been “bragging” to customers that a popular decorating/diy blogger just chose that for her bathroom remodeling project! And that tile has such a nice, slightly rough surface to keep you from slipping when you get out of the shower with wet feet!
Thanks so much for sharing your story on how you began your “journey” . I am a single home owner and try and do a lot of stuff around the house myself *words of encouragement* (and wisdom) 🙂
I do the same with YouTube videos…I swear, I think there’s nothing you can’t learn there. But what I really want to tell you is that looking (for weeks) at your posts on the built-in bookshelves in your condo gave my Dh and I the nerve to build our own built-in shelves and window seat in our master bedroom. They aren’t perfect, but they’re darn good looking and useful and I’m proud of us and them…so, thank you!
WOW, thank you Kristi for that bit of wisdom.
My biggest fear IS making a MISTAKE! But a BiG part of that fear is because dh smacks down just about every “idea” I have. sigh.
Because of your easy plans, I made my own bedside table last year. My 15 year old son and his friend were there to help me, and my husband ended up doing some of the sawing. I was all finished with it (only need to paint it but the weather forbids that here in Michigan) but my husband wanted a more finished look to it so he went out and bought me some nicer edging. He and our son cut it and nailed it on front. I’m rather proud of our family project. He has more wood available (he and our son are building bunk beds for our soon-to-be adopted son) so I may very well make more shelves/bedside tables.
Your web site is my addiction, by the way.
Thank you for sharing your background! I have wondered many times where you got your skills. Wonderful post! Thank you!!!
Kristi, I really liked your link to your 2013 blog about your family’s 2 year project building your home addition. 1970s! What a walk down memory lane!
Don’t sell yourself short: You are fearless, brave, smart and have the soul of an adventurerer! I am in awe of the projects you take on and your results are amazing each and every time. Do I like everything you do? Not always but personal taste comes into play and we all like different things so we can’t expect that we like everything. Keep up the great work Kristi!