Closet Progress — It’s Starting To Take Shape! (Plus, A Design Change Based On Your Suggestions)
My walk-in closet is starting to take shape! We’re finally getting to the exciting stuff as my drawings and mockups are starting to become reality. I still haven’t installed any trim or molding (which, of course, is when the room will really start to go from ugly basics to pretty), because I realized that I was kind of getting ahead of myself. Before I can start adding trim and molding, I first have to get all of the shelves and dividers in place.
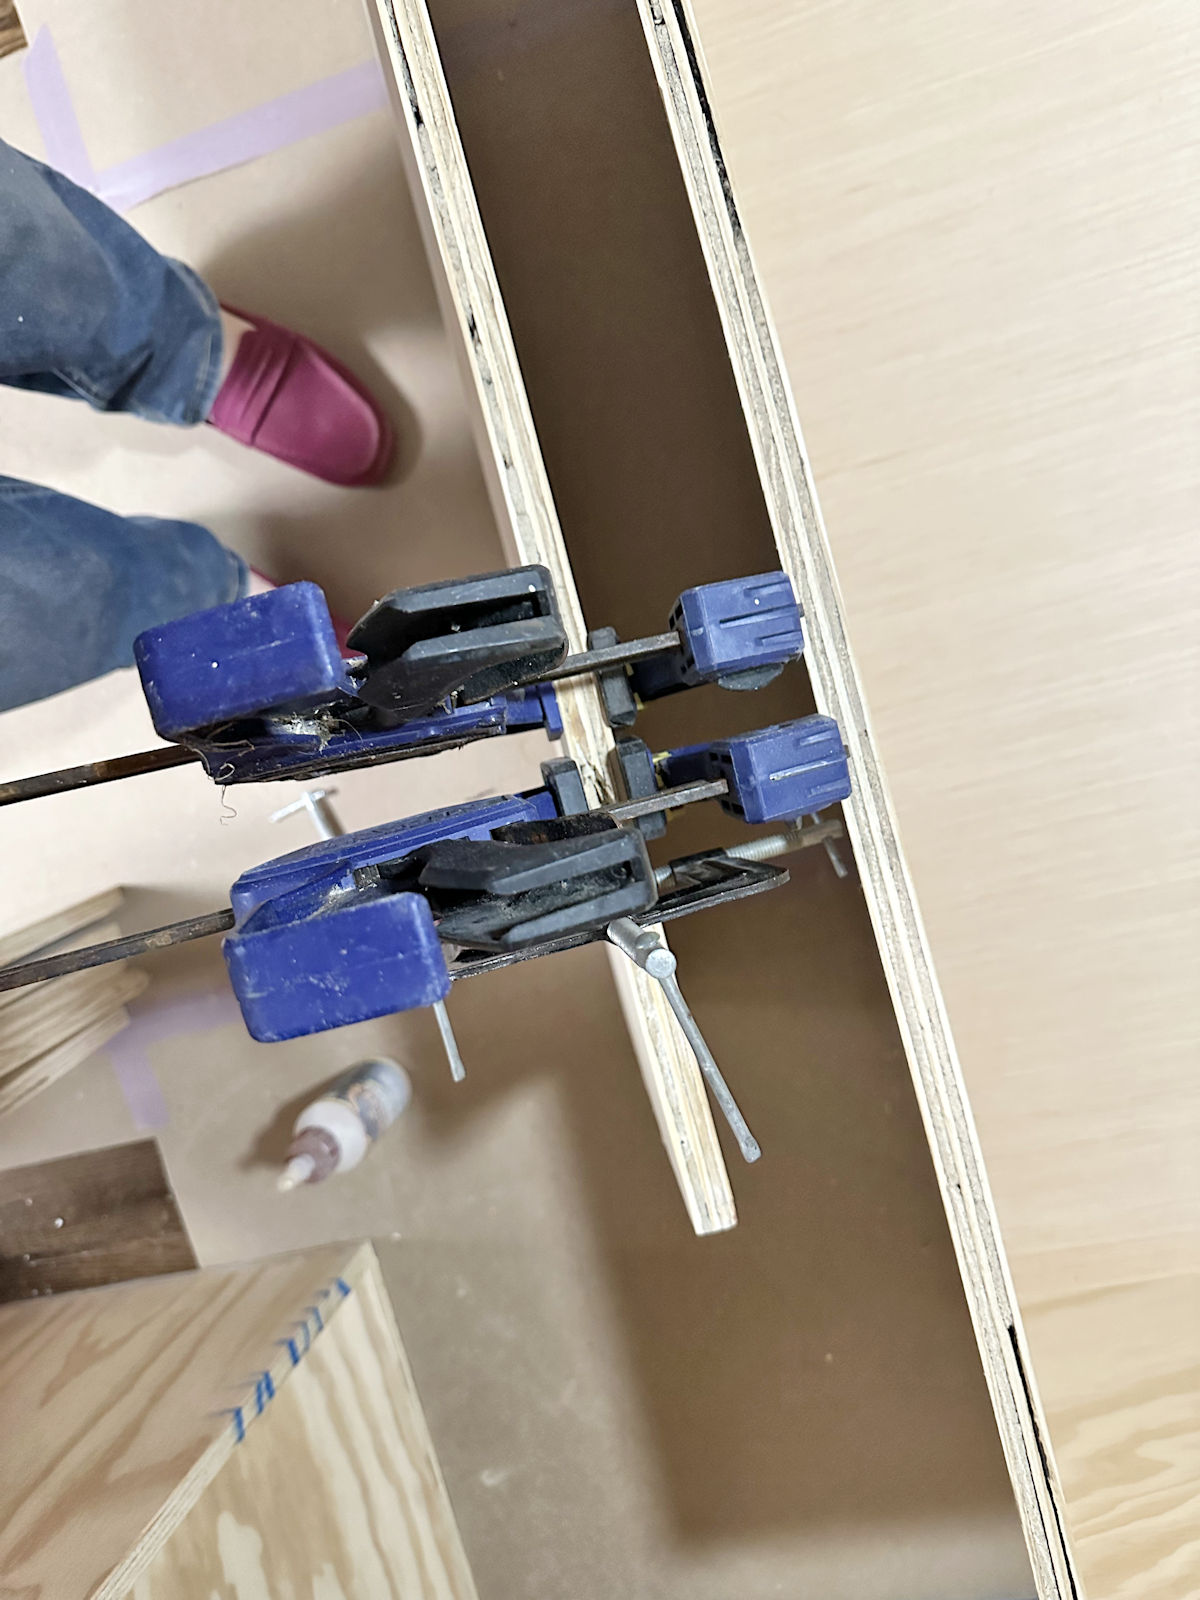
So I spent my entire weekend cutting plywood for shelves and then doing all of the wood filling and sanding on those shelves (which I have to do because I used a lesser grade of plywood in an effort to save money).
This is only one part of what will be a very long series of posts on my biggest built yet — my walk-in closet and laundry combination. If you missed the previous post, you can find that here: Week 1 Of Building My Walk-In Closet (Plus, Your Questions Answered)
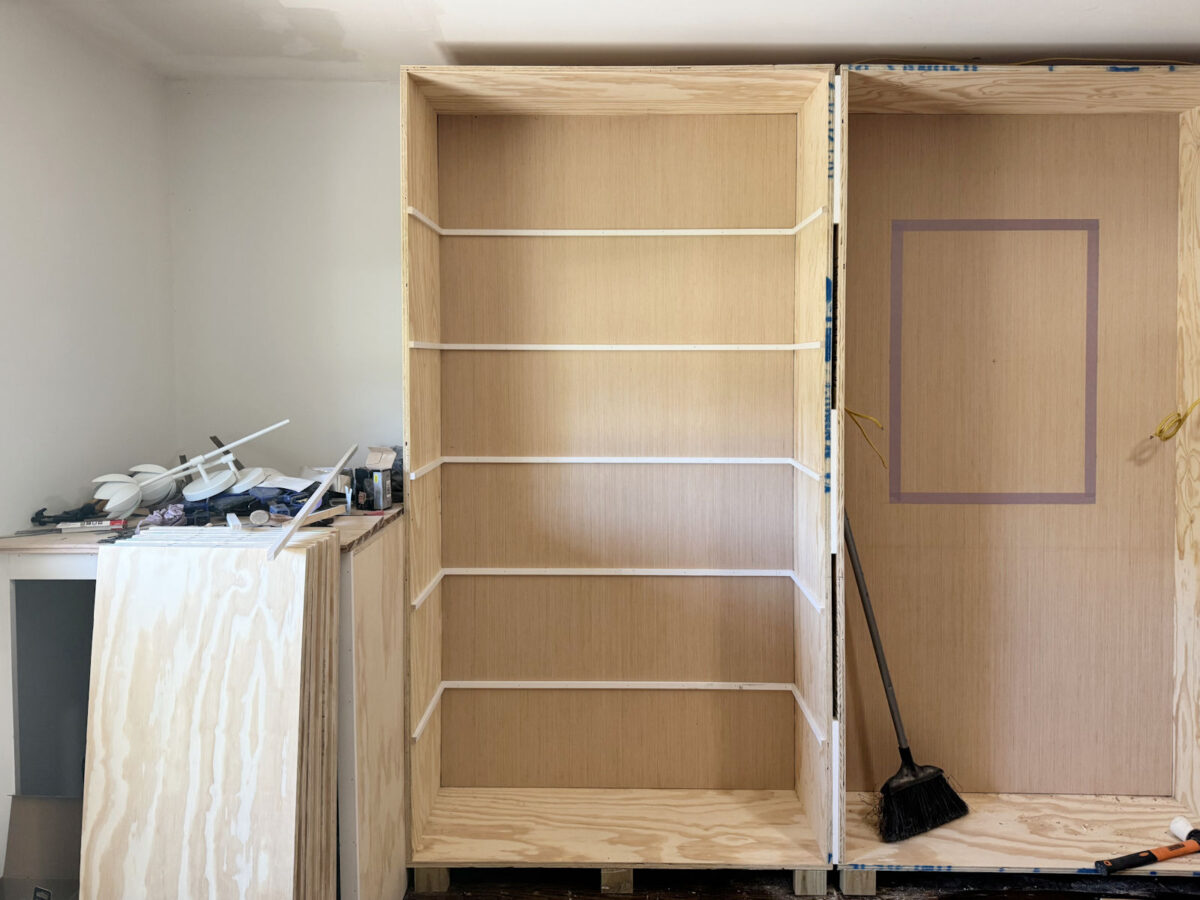
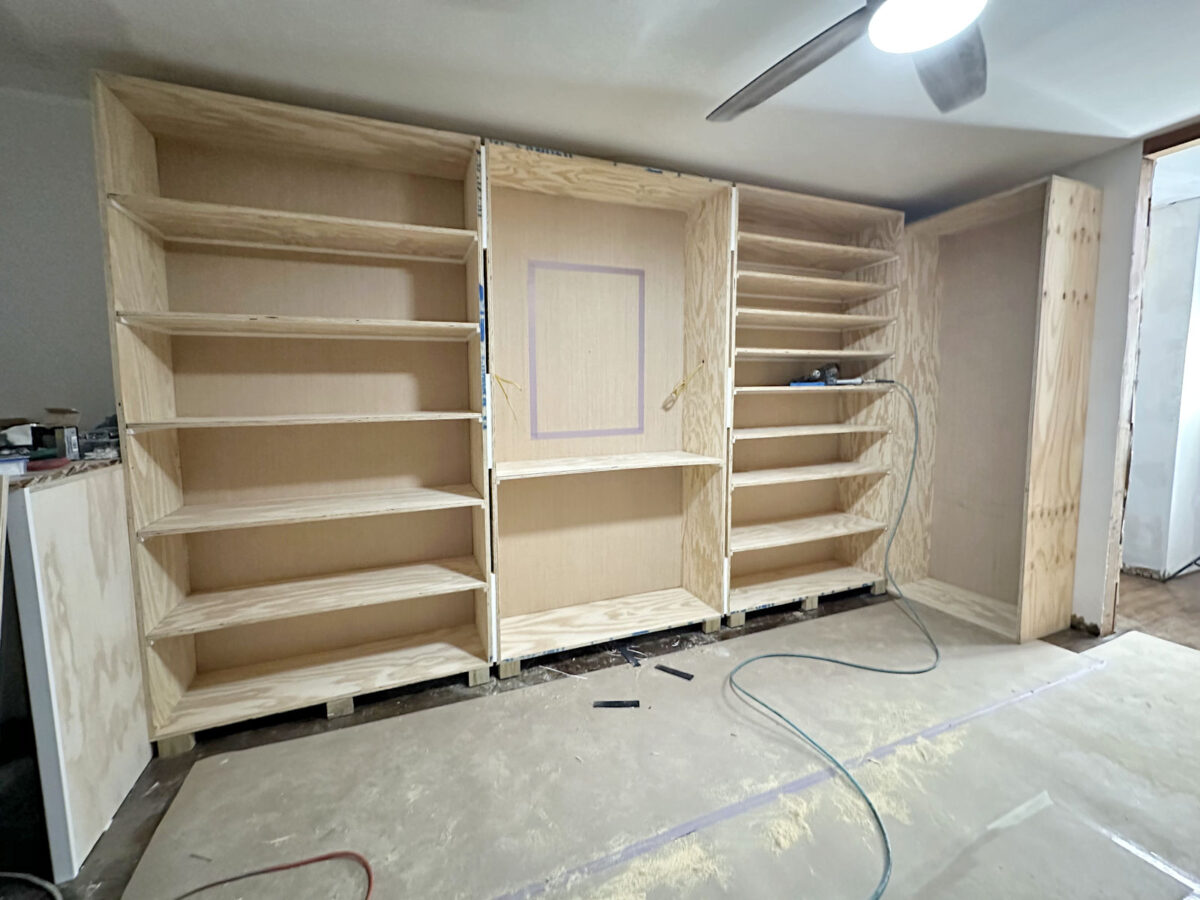
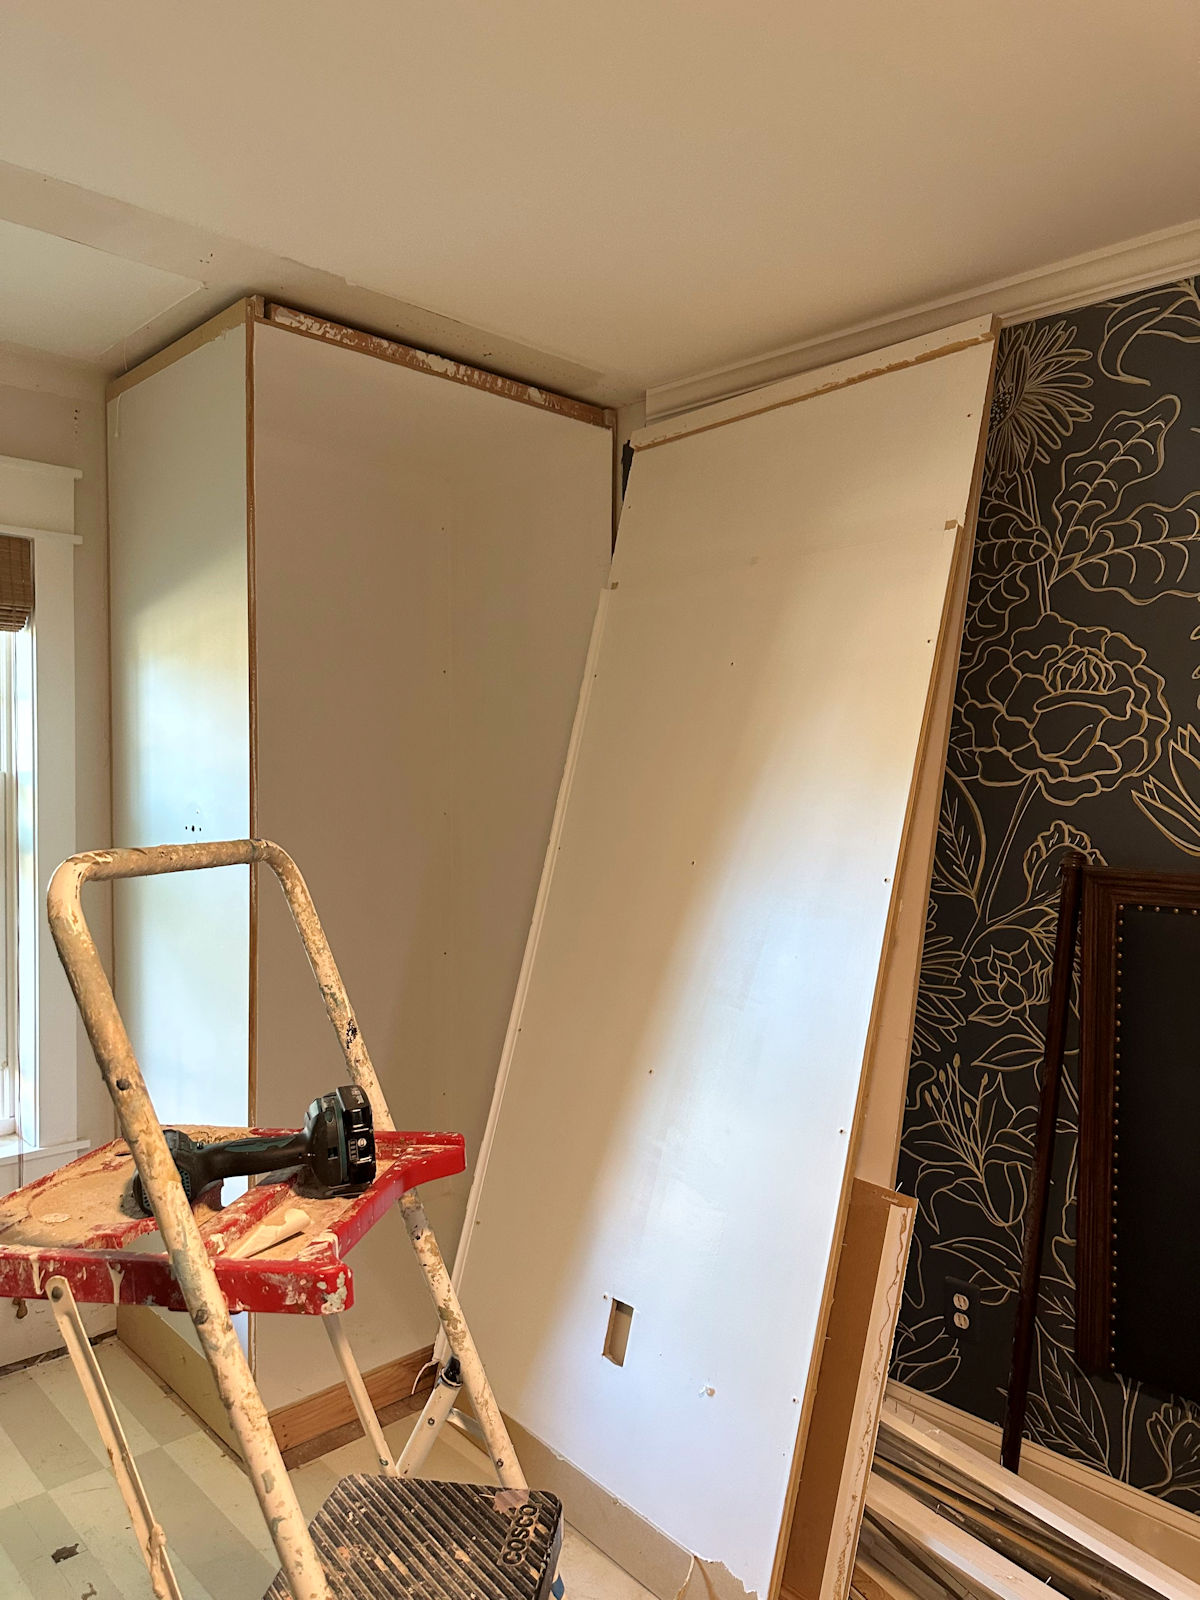
Last Friday, which was the last update I showed y’all, I had all but two of the cabinet boxes built. On the right side of the room, I had two of the boxes in place and screwed together, but the other two looked like this…
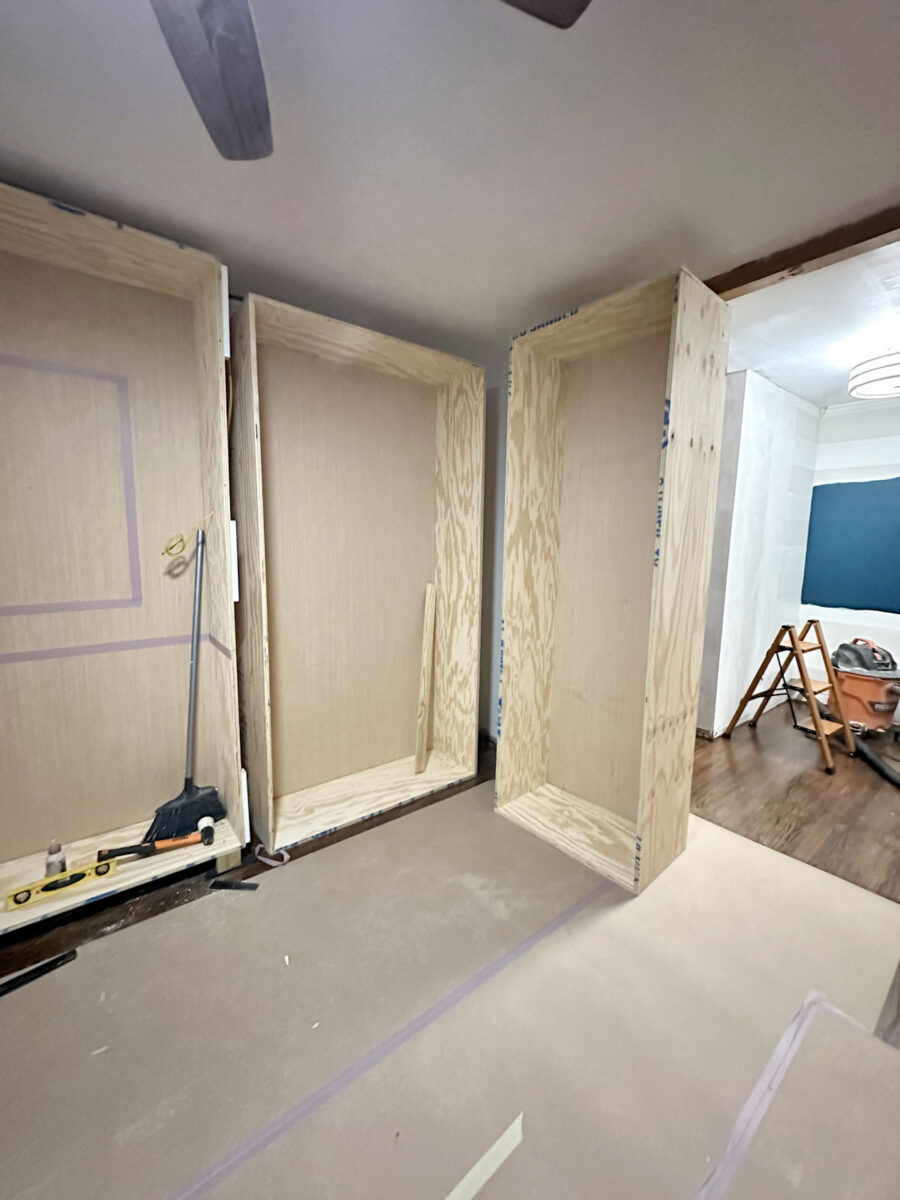
So I started off my weekend by building the other two cabinet boxes for the left side of the room, as well as building the cabinet surround for the dryer. I built this in the exact same way that I built the cabinet surround for the washer, which you can see here: Closet/Laundry Room Progress – I Finally Built Something! (Building A Washer Cubbie).

And then I got the final two cabinet boxes built for the left side of the room.
So now all of the cabinet boxes are built. I still don’t have feet on several of them, and the cabinets on the left side are still not screwed together. But at least they’re built and in place for the most part.
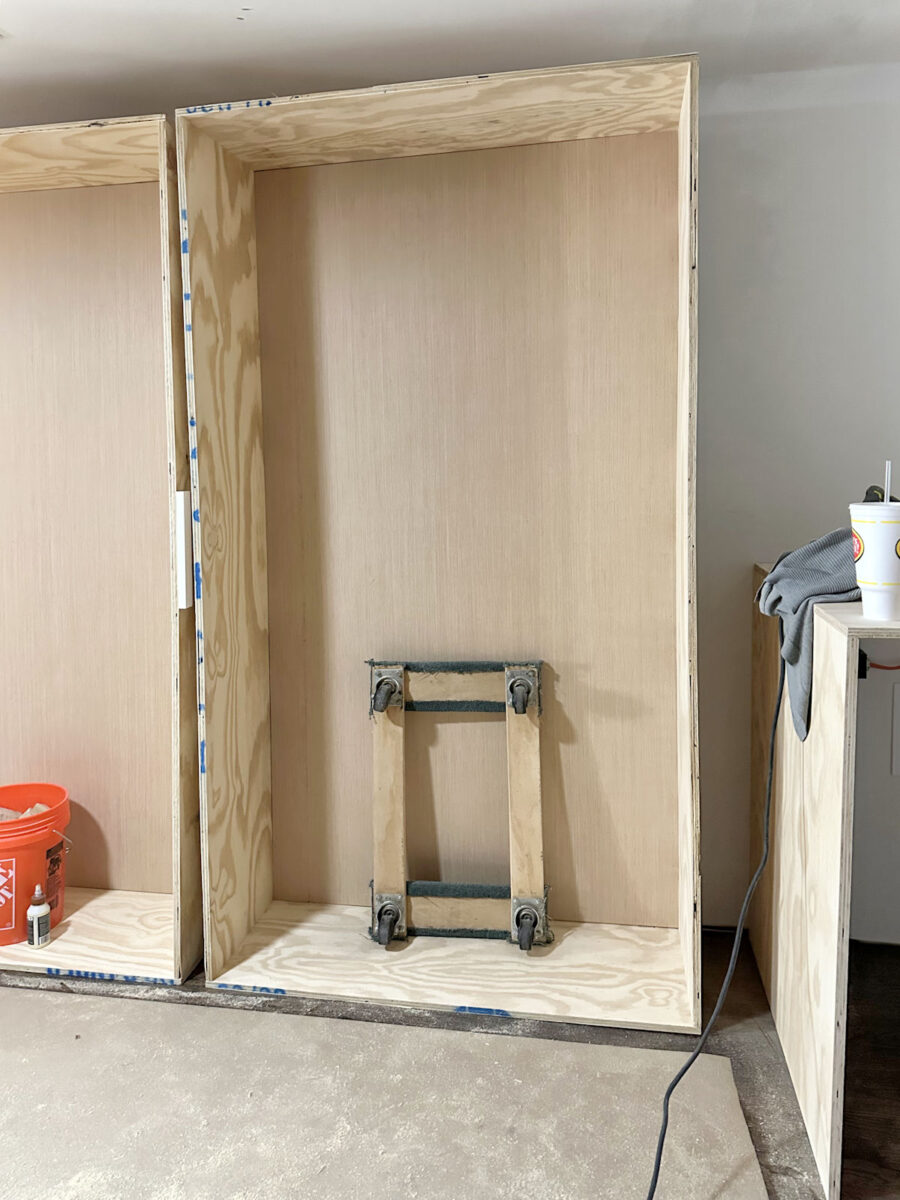
With all of the boxes built, I was ready to start adding all of the shelves. I started with the right side of the room because that’s the side that has the most shelves, so I wanted to tackle that side first.
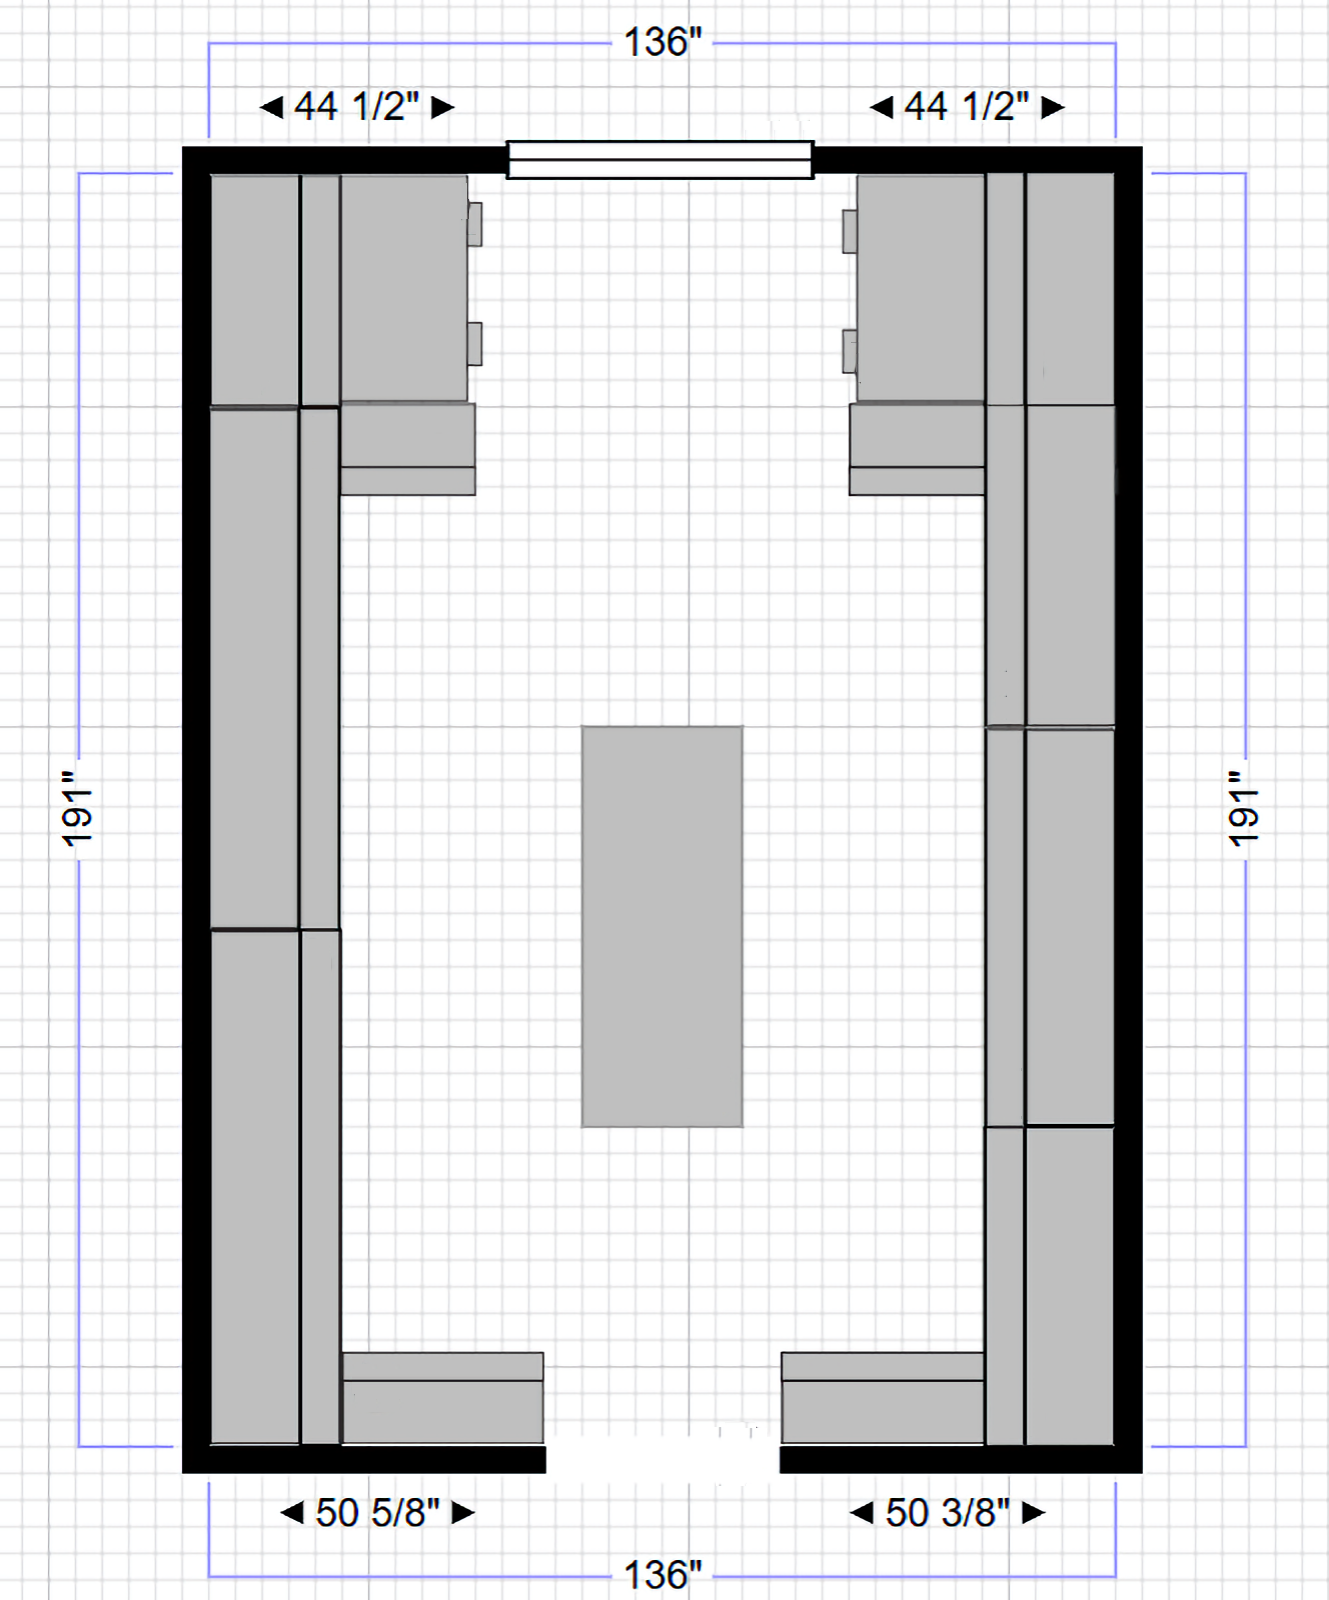
I started with the cabinet closest to the washer. To hold the shelves in place, I ripped strips of 1″x2″ lumber (which is actually only 3/4″ thick and not 1″ thick) to 3/4″ x 3/4″ using my table saw, and then I cut them with my miter saw to the right lengths. I attached those strips using 16-gauge 1.25″ nails to form the supports for the shelves, and I spaced these 14 inches apart. These shelves will be for handbags and folded clothes. By this point, I had already designed my center island (which you can see here: Designing My Closet Island), so I had already decided that the bottom section would not have drawers. This cabinet will be all shelves.
And then with the supports in place, I added the plywood shelves and nailed them into place using the same 16-gauge 1.25-inch nails, starting with the bottom shelf and working my way to the top. I nailed the shelves in place by nailing through the top of the plywood and into the supports at a slight angle towards the sides and back of the cabinet.
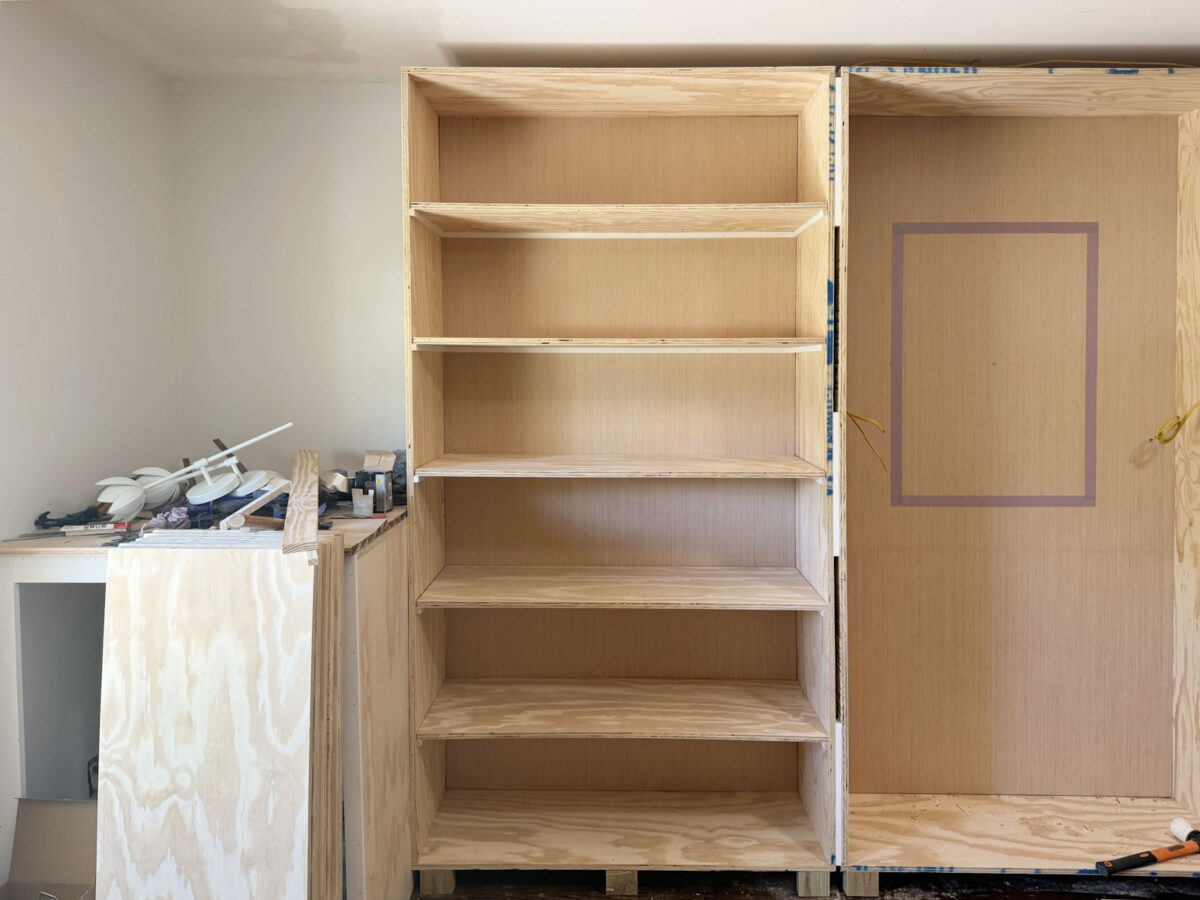
Next, I added the plywood for the countertop in the middle section, and then I added the feet to the third cabinet, got it screwed into place, and added the shelves to that cabinet in the same way.
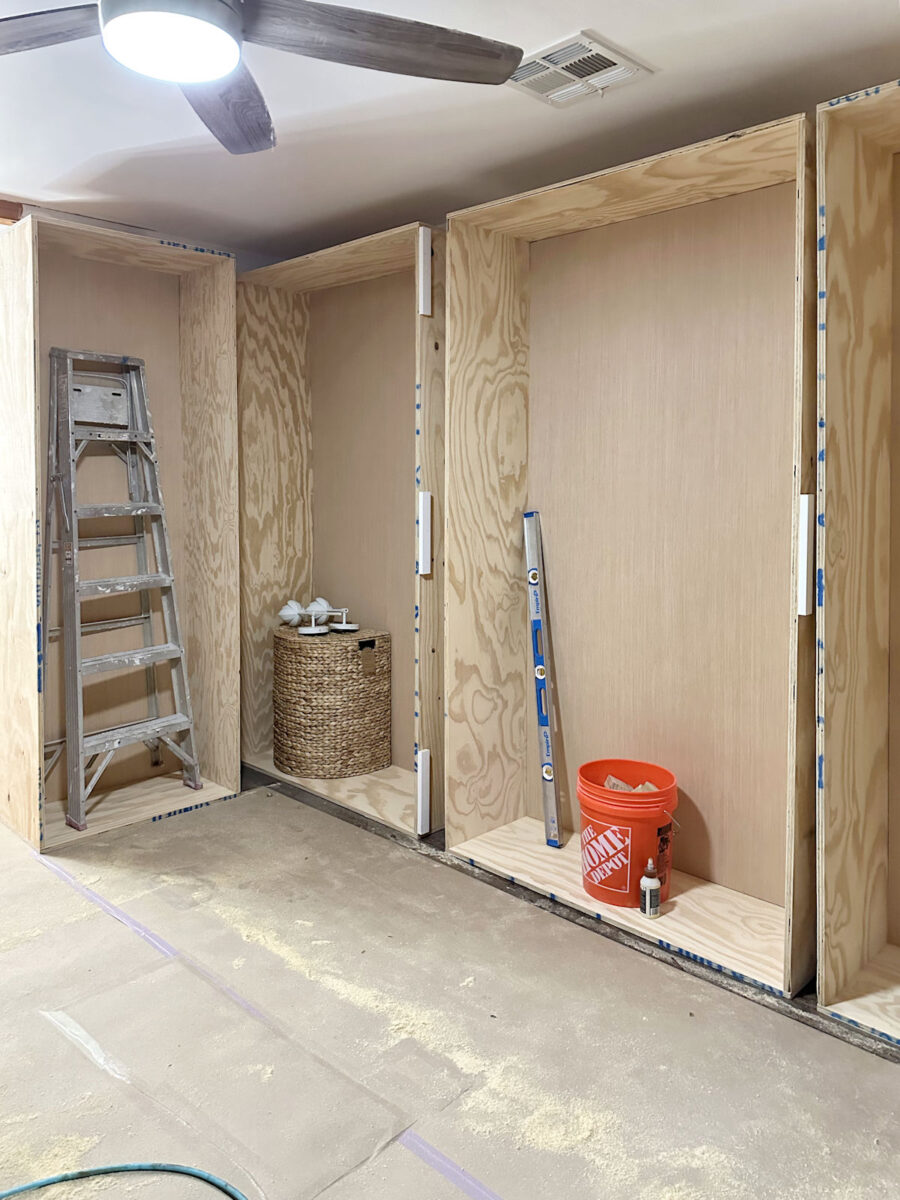
That entire right cabinet is going to be shoe storage, so after taking lots of measurements of my shoes, I decided to put two taller 14-inch shelves on bottom for taller shoes like boots, and then I did two 10-inch shelves for shoes with higher heels, followed by two 8-inch shelves for shoes with smaller heels, and then three 7.5-inch shelves for flats. Once the trim is on the top of the cabinets (and if I did my math correctly, which is always questionable 😀 ), those three shelves at the top will look much more equal in height.

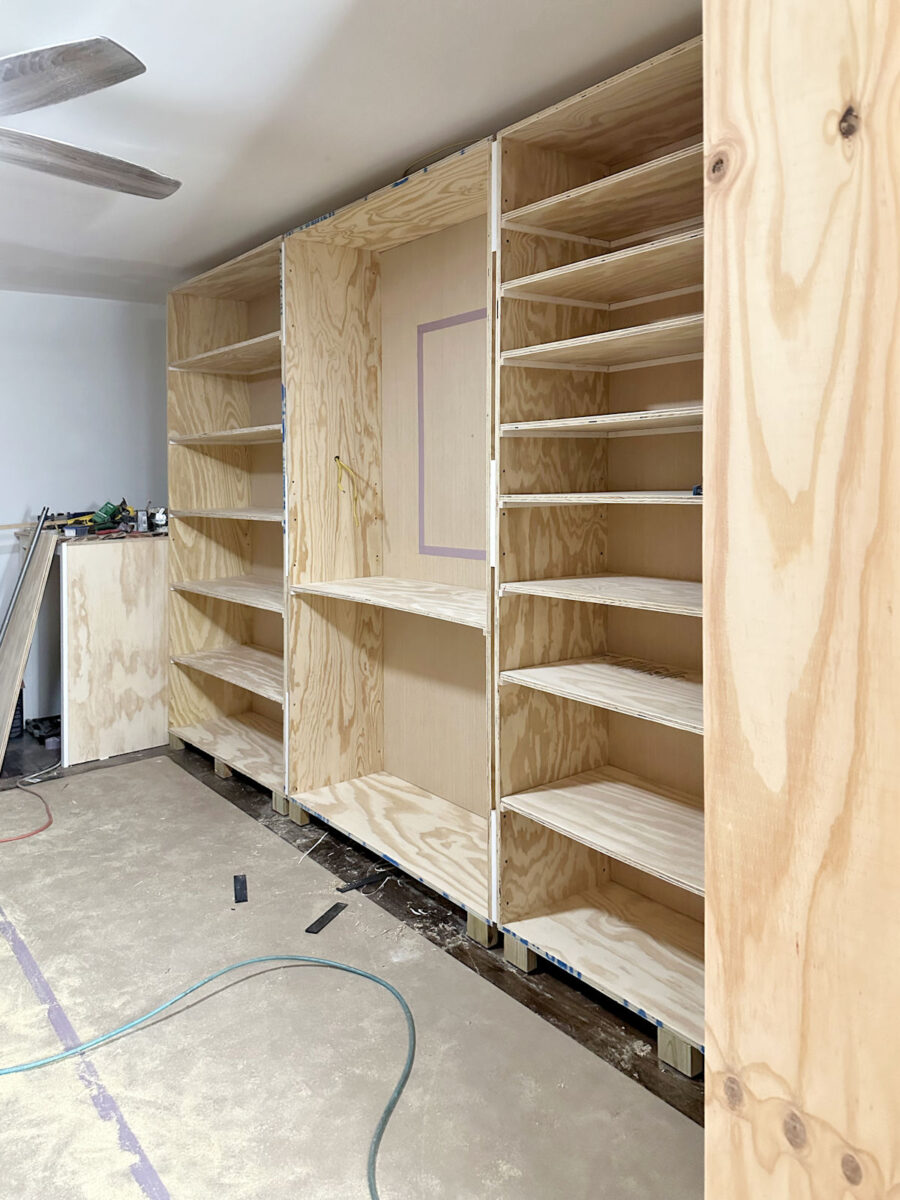
So here’s how that wall looks as of last night…
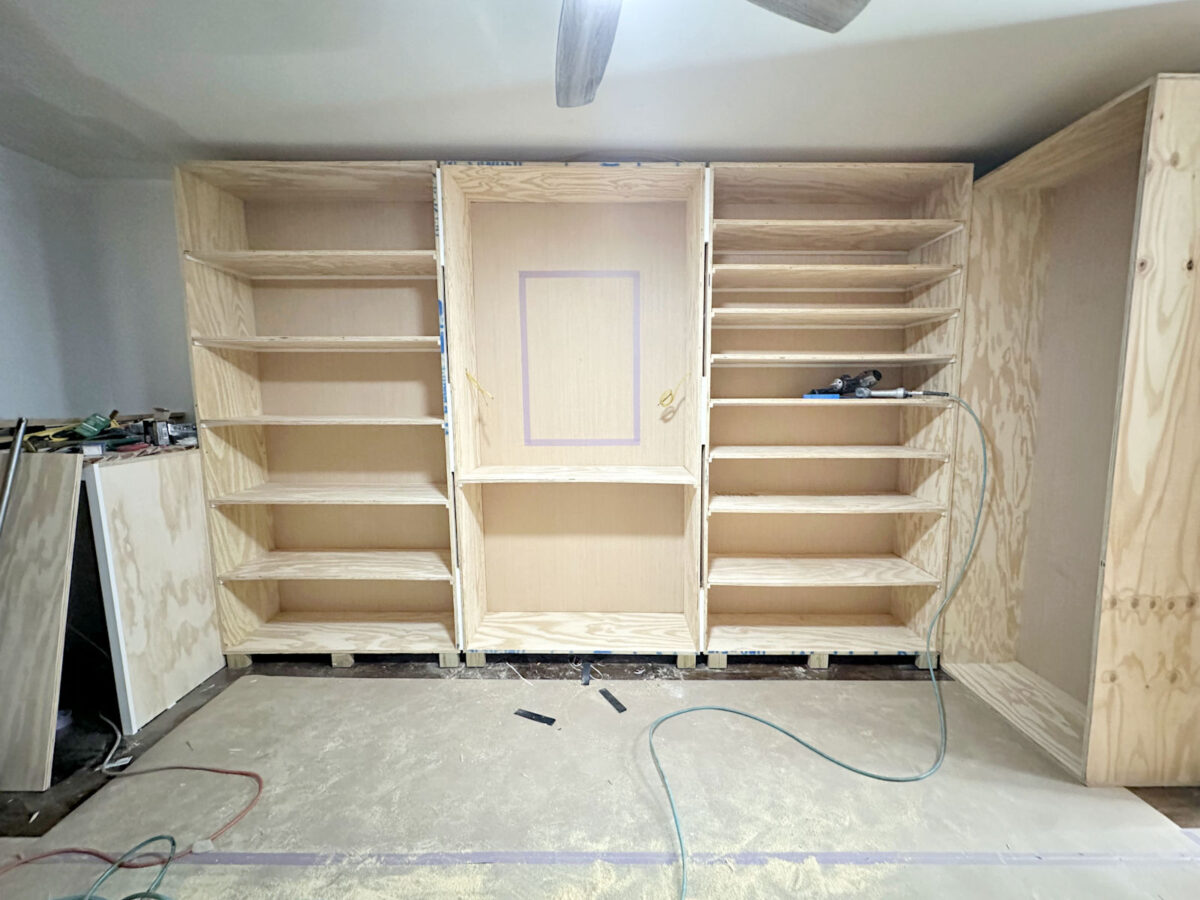
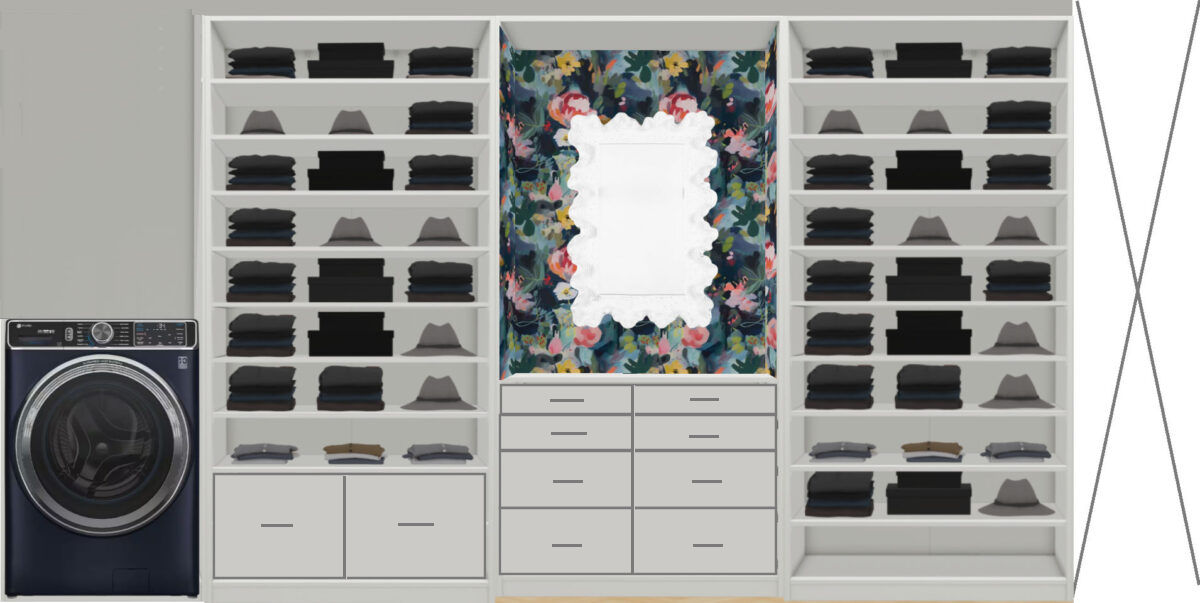
But in the meantime, I was reading all of your comments and feedback on yesterday’s post about the closet island design, and I decided to remove that shelf in the middle section where the mirror and wallpaper will go and add my glass top jewelry drawer in that section with my necklace bar just below it. The necklaces still won’t be at eye level, but I do think some of you made a very compelling argument that having them on that wall with the mirror makes much more sense. And I’m very short, so I don’t think having them just below the very shallow earring/ring drawer will be a problem for me.
And since I’m going to have that earring/ring drawer there with the necklace storage/display just below, I’m just going to add a shelf at the bottom of that section also. So basically, every bit of the drawer storage in the room will be concentrated to the island, and all of the side walls will be hanging and shelf storage.
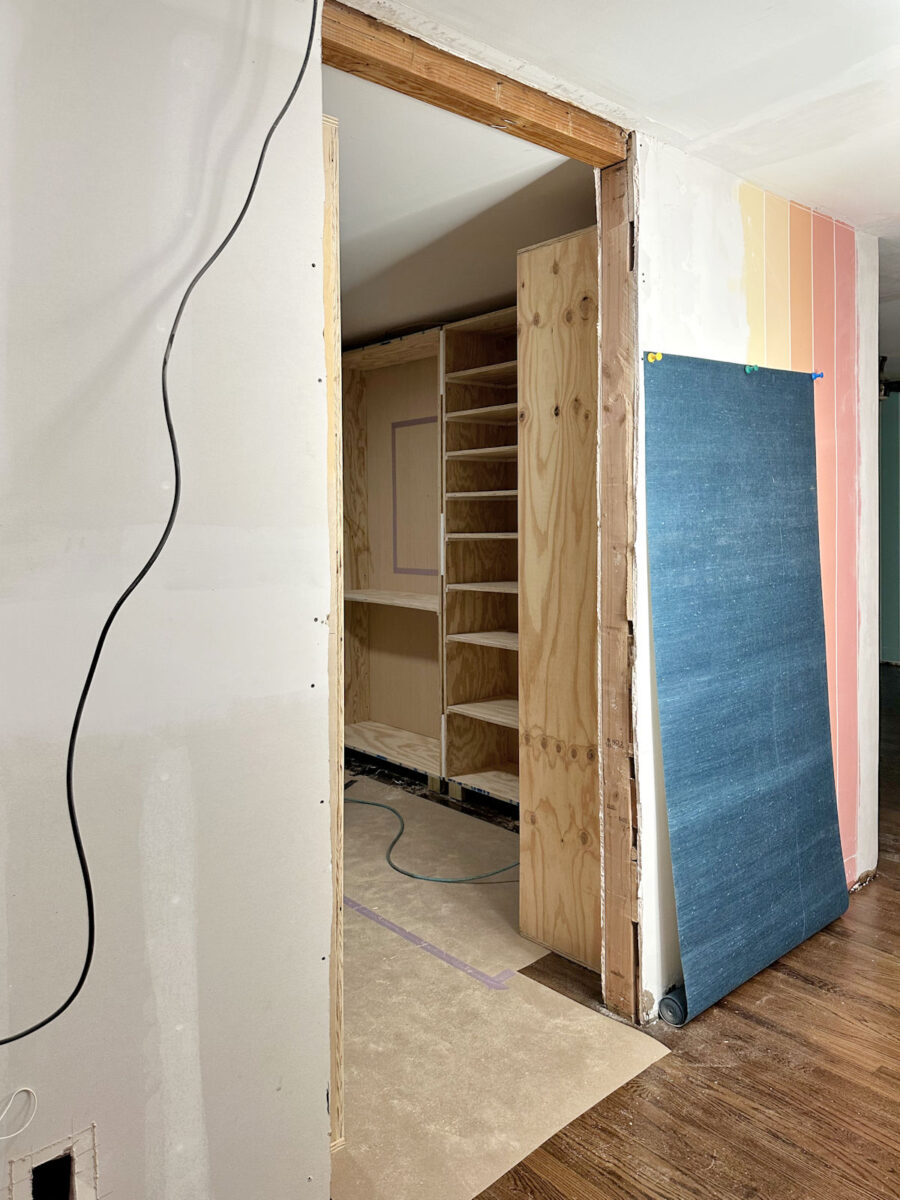
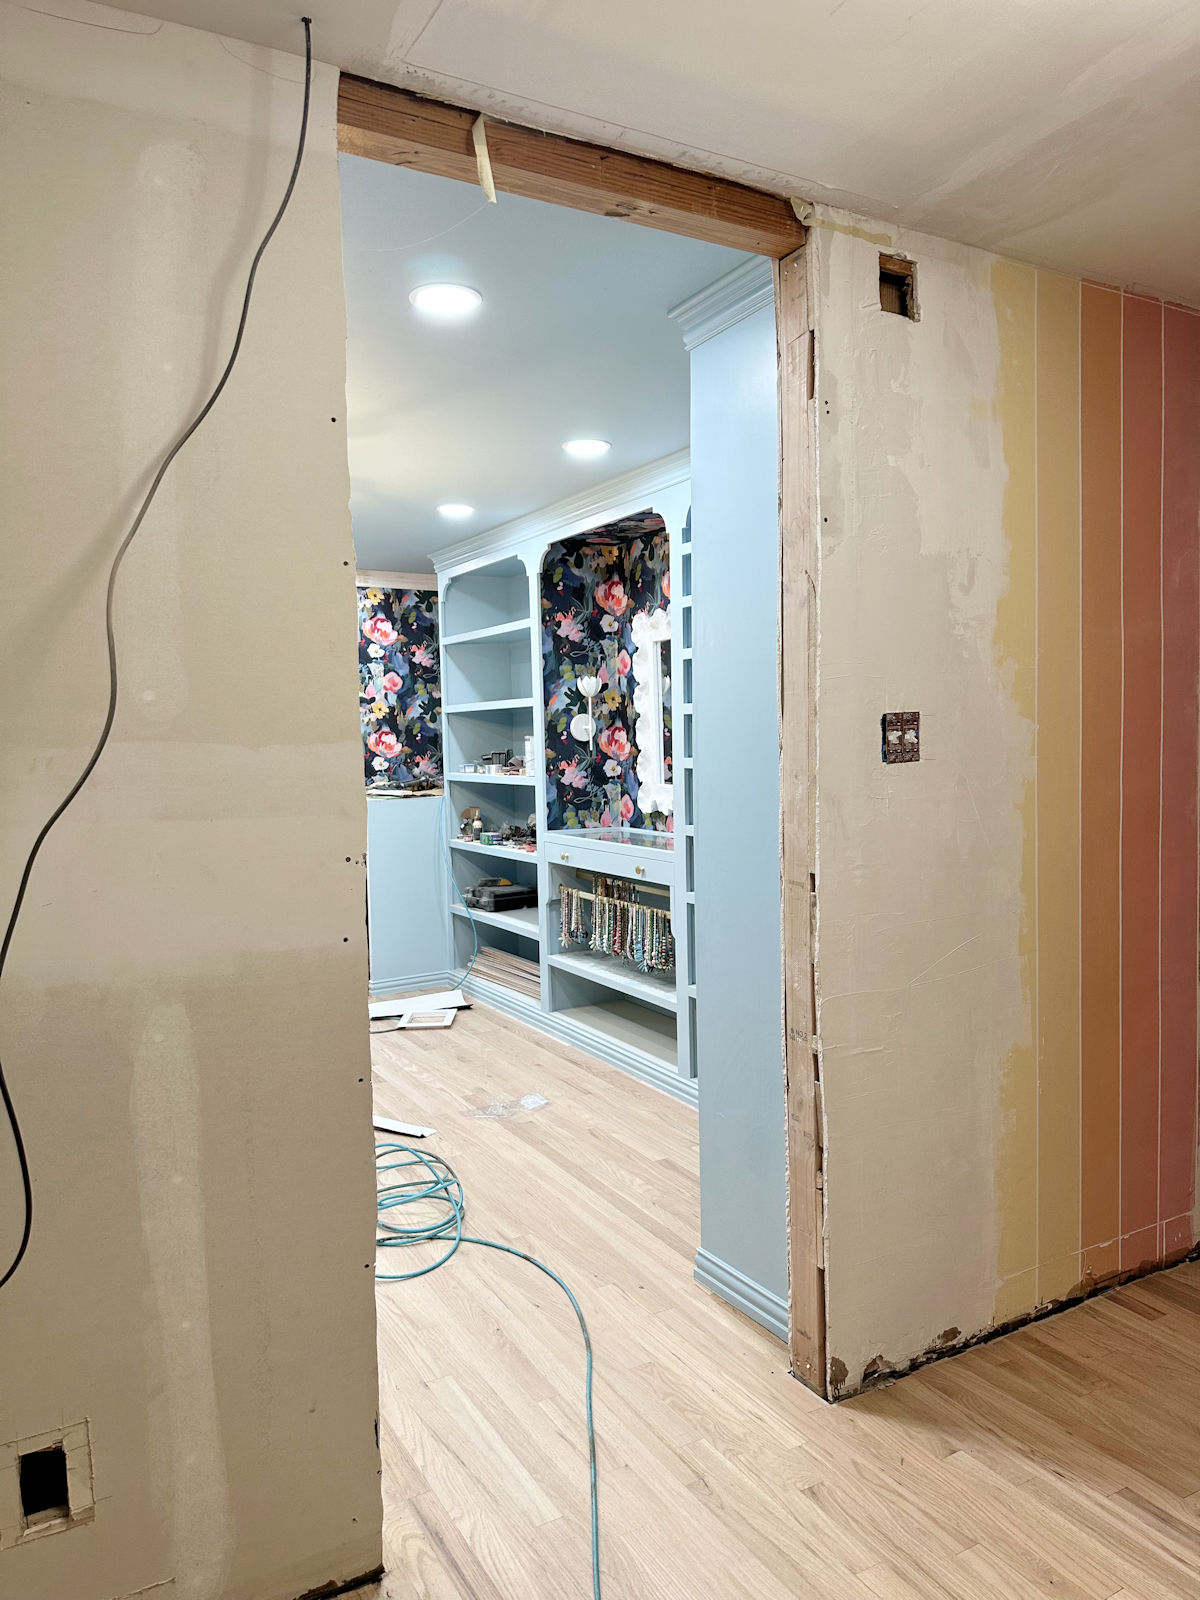
Here’s a peek at what it looks like so far from the doorway of the bedroom suite.
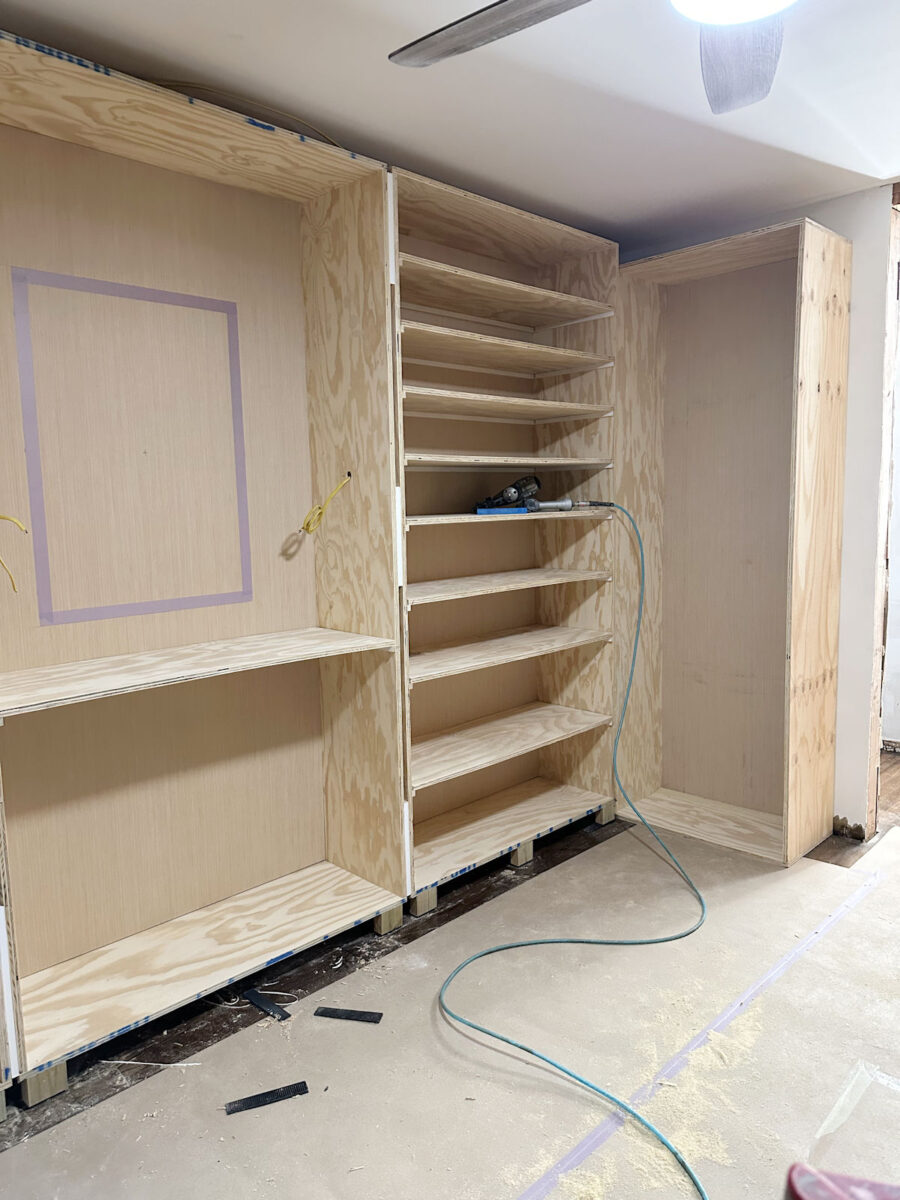
I’m pretty excited about the progress, and it’s so exciting to see this room become a reality. I have lots more shelves to cut, wood fill, and sand before I can get to the trim. But thankfully, the left side of the room only needs four shelves and one vertical divider. That will take a lot less time than the 14 shelves required for the right side of the room.
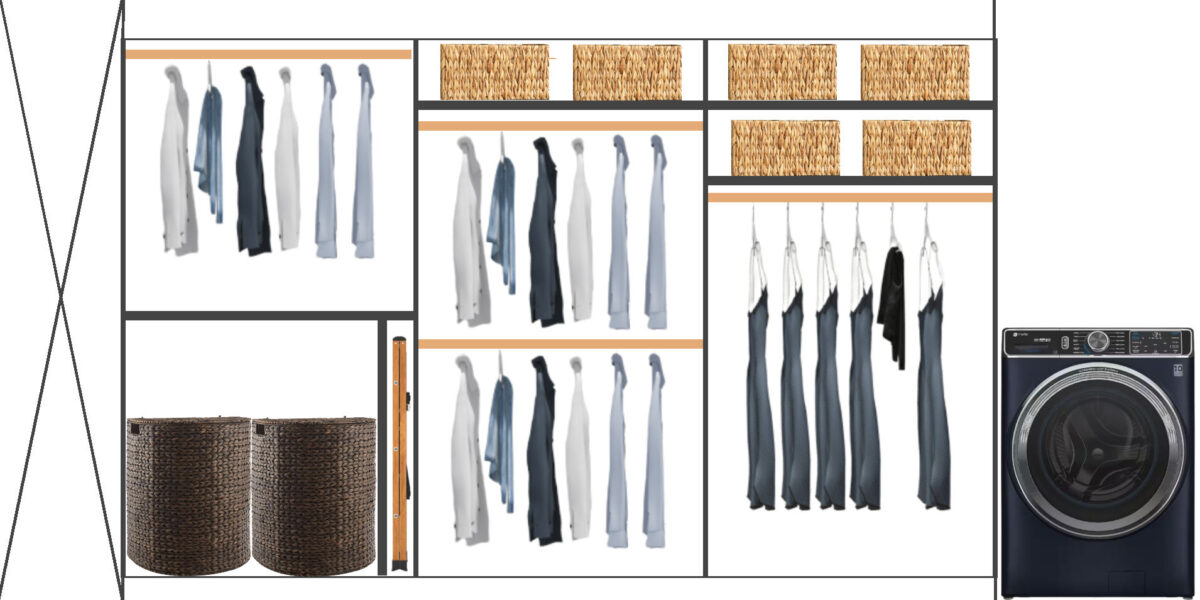
And then I’ll need to cut and finish 10 to 12 shelves for the two cabinets flanking the door. Those two cabinets will have doors on them so that I have some closed storage in the room.

So I’m only about halfway finished with adding the shelves, but I have another uninterrupted workday ahead of me. I’m hoping to finish the rest by the end of the day. I may not get them completely finished today, but I’m going to try my hardest to get as much done as possible.
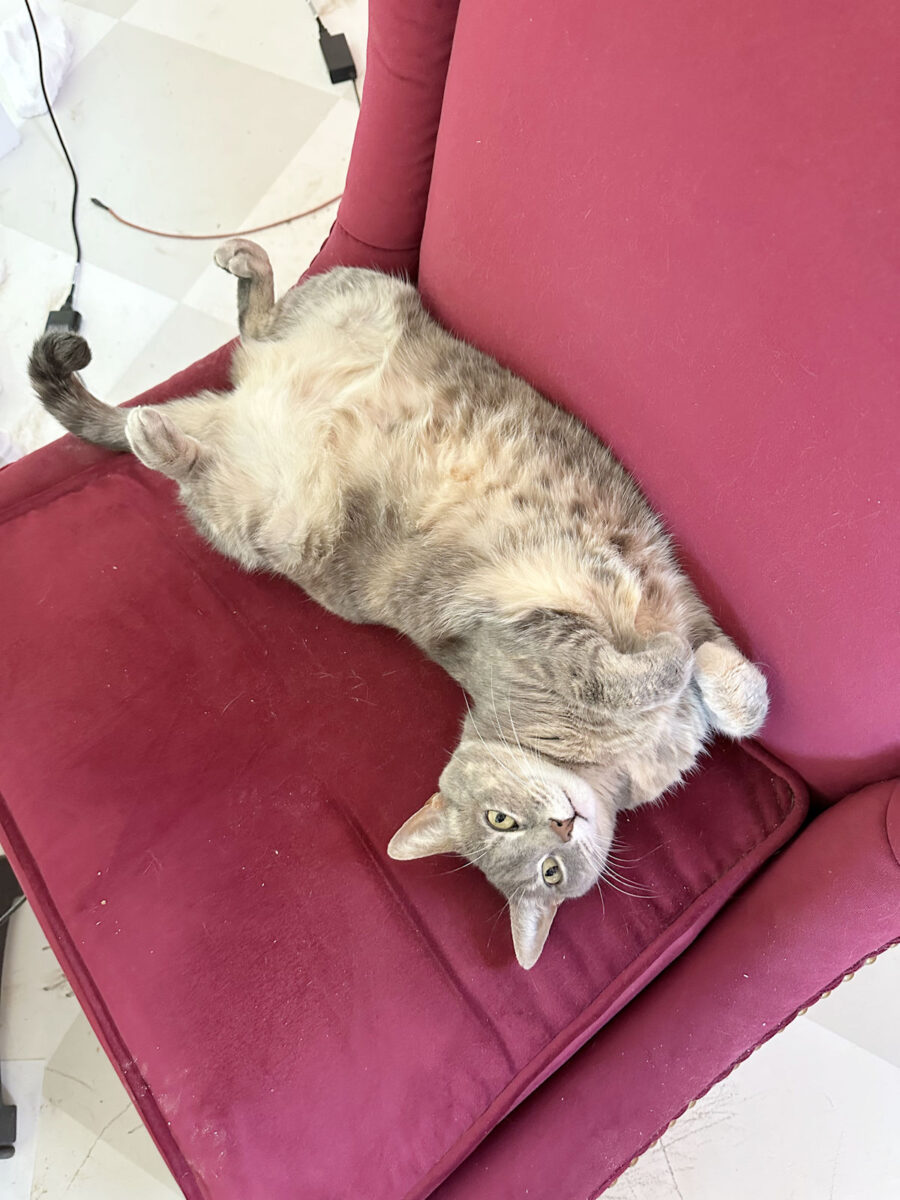
I’m tired, y’all, but I’m also feeling quite motivated to get to the pretty stuff. I’m so close! But part of me wishes I could trade places with this sweet girl for a day and just lounge around the house and eat and play. 😀 But there’s no time for that right now.
The A2D Daily:
You can find the next post in this series — building my dream walk-in closet and laundry room combo — here: Closet Progress – The Basic Build Is Finished!

Addicted 2 Decorating is where I share my DIY and decorating journey as I remodel and decorate the 1948 fixer upper that my husband, Matt, and I bought in 2013. Matt has M.S. and is unable to do physical work, so I do the majority of the work on the house by myself. You can learn more about me here.


I’m going to recommend you roughly cut your holes for the electrical outlets… The recorded information is fresh. It keeps you from installing a shelf across a plug. Mostly I just hate electrical work, its like a game of twister, not a refreshing yoga session to reach some places with tools. Part of me wants to stretch thinking about it. I am prone to analysis paralysis/overthink. Especially this month, work is a little over-simulating right now. If I’m too course do ignore it and I apologize. I think I remember you mentioning it was uncomfortable with the plugs wiring them for the studio. Other than that It looks really great.
I wonder if you would be happier with your handbag display visible from the doorway, instead of shoes.
Too late now! 😃 There’s no way I’m redoing all of that. But I actually like shoes much more than handbags.
Like the new direction! Makes a lot of sense. Love the glass top idea.
Hi, Kristi- The closet looks gorgeous. A couple of small points- How do you plan to store all the squishy stuff? I have 8 deep drawers just for socks, underwear, nightwear, bathing suits, etc, and four pullout bins for leggings, sweatshirts, workout gear, etc. That stuff does not fold nicely on a shelf, and frankly I don’t spend time folding nightgowns, etc.
Belts? I have a slot like you have for your stepstool with a pull-out belt hanger. Very tidy looking and very convenient.
I think some adjustable shelves are a good idea. After living with my closet for a while I found that I needed to move some shelves around.
All of that stuff will go into the drawers in the island. I store my belts rolled up, so a drawer will work for those, too.
Everything is looking great and moving right along. I keep thinking that there are too many shelves and not enough hanging areas. Have you measured your need for clothes hanging and future buying of clothes?
I’ve measured everything…several times. 😊
Suggestion: put the section with the hampers next to the washer/dryer end of the room.
I wrote a plenty lengthy explanation of why I placed them there in a comment on a previous post. I’ll see if I can find it.
WOW!!! It looks super awesome, and I love how it is all coming together. Looks amazing and I love what you are going to do with the jewelry, great place for it.
Give Felicity a big belly rub for me I do so miss our kitties, but I have chickens now and that is almost the same, almost.
Cheers to you and Matt!
I picture the foyer going into the suite as a lovely, somewhat formal area with the grass cloth, wainscoting, large mirror and bench. I’d want a door to close off the closet/laundry.
I’m going to great lengths to make this closet/laundry area look like a beautiful jewel box with the prettiest things showing from the door, rather than a utilitarian closet and laundry room. I don’t want it closed off. I want it to be seen.
I totally understand your desire to be like your kitty! You have made such great progress so don’t take a day off just yet. However, sometimes a day of rest can really recharge my batteries. Great job! And as always, thank you for sharing your process.
it’s a bit late to make this comment, but wouldn’t it be easier to paint the backs and sides before you put already painted shelves in? Hopefully you’re going to spray this when it’s complete! The thought of brushing all that with the shelves in gives me the heebie jeebies!!!!
I’m hoping to spray, but literally everything needs to be caulked first, so there’s really no need to paint anything first.
I had this same thought. 😀
Hi Kristi. This may have been discussed before but have you thought about having a drawer under your washer and dryer for detergent, your iron, etc.
I live in my grandparents 1941 farmhouse with no closet space. My plan is to build cabinets like yours but keep procrasting due to messing up expensive plywood. You have motivated me to just do it. We’ve lived with clothes hanging on racks in our bedroom for far too long. I want doors so I’m looking forward to your door build. Thanks for the motivation!!
I considered it, but I really don’t want my washer and dryer any taller. Right now the countertops are already so high (for me at 5′ tall) that they won’t be much use to me. They’re too high to use as countertops for folding laundry. I’ll still be able to have small things up there, like dryer sheets, a small dehumidifier, etc. But if they were any higher, they wouldn’t even be useful to me for things like that. The drawer pedestals that match my washer and dryer are 16 inches tall. That would put the washer and dryer cabinet at 59.25″ high, and I’m 60″ tall.
This is amazing progress! For your necklaces, I was wondering about whether you could hang dowels on the cabinet sides on either side of the mirror (maybe 2 or 3 on each side, under the sconces) and hang your necklaces on those. That way, they would be visible, they would not cover the wallpaper, and they would dress up the cabinet sides. Just a thought. (Something like this: https://poshmark.com/listing/NEW-Wall-Hanging-Jewelry-Organizer-126-Necklace-Holder-for-Earring-67cbffc614d7a6a40a447d11)
I would need so many of those that they would cover both sides of that section. I’m already using a 45-inch dowel rod, and it’s filled up. I have more necklaces that aren’t even on my current necklace holder because I’ve run out of room. 😀
Just a thought as I’m 5’ and also struggle getting things off high shelves…if you reversed the height of each shoe shelf, from top to bottom, it would be much easier to access the flat shoes you probably use most. In other words go from tall boots on the top shelf down to flip flops & tennis shoes on the bottom 😊
I almost did this because I do agree with you that I wear those with less frequency, but the reason I changed my mind (and you’ll probably roll your eyes at this 😀 ) is because most of my boots aren’t my cutest shoes. So I didn’t want them to be the most visible. 😀 That’s just how my brain works. I may have created a bit of a hardship for myself, but I think it’ll be fine. Since I’ll have an extra shelf at the bottom of the wallpapered section now, maybe I’ll just stash a little step stool (single step) there so I can pull it over and reach the top shelf shoes easily.
Hahahahaha, girl I hear you. Cute ultimately wins out every time!
Is there a reason you haven’t moved the washer and dryer in yet? I would want access to laundry ability stat!
I’m going to be spraying the cabinets, and as anxious as I am to get them hooked up, I don’t want to create more obstacles for myself at this point. I still have a washer, though. I’m just living without a dryer for now.
You are moving right along with your building. I am amazed at what you can get done in such short time. You certainly do not have a time management problem. I am impressed. I read the comments and laughed at the comment that you had too many shelves for your shoes. They must have missed the picture of the shoes in your studio.
Anyway, I am sure you have thought and thought about how you want things. I do like the necklaces under the mirror instead of being on the island. You are too short to have the washer and dryer be any higher. Stick with that. But you will need a little step stool to reach the top shelf! Keep up the good work and then you can be like the kitty for maybe a half of a day!
I saw in your post that you ripped down 1x3s to 3/4″x3/4″ on your table saw. If there is any tool that intimidates me, it is a tie between a table saw and a circular saw. Do you have any advice on how to get comfortable using them? Things to keep in mind? Encouragement? 🙂 🙂 Your closet is going to be so beautiful and functional!
I find power tools less intimidating when I’m wearing earplugs, which I definitely would do anyway! That and always being extra-aware of what I’m doing and planning ahead for the outfeed.
Yes! Here are my suggestions for getting comfortable with a table saw:
1. Start with using a table saw that has a *brand new* finishing blade on it. (Finishing blades have more teeth and cut cleaner.)
2. If the table saw has a blade guard, make sure it’s attached.
3. Start by cutting scrap pieces of MDF just to get a feel for the saw. Because MDF is basically glorified particle board and has no knots in it, I’ve never had any kind of kick back with MDF. With a brand new finishing blade on the saw, it should cut like butter.
4. Once you’re comfortable cutting MDF and have a feel for the saw, try cutting plywood. It should also cut like butter with a new finishing blade on the saw. Don’t cut thin 1/4-inch because it’s so floppy that it’s harder to control. Start with 3/4-inch plywood that is already cut to a size that’s small enough to handle, like a 2′ x 2′ piece. You’re just wanting to get a feel for the saw and get a feel for how it cuts these materials. With a brand new finishing blade, I think you’ll be surprised at how easily it cuts.
5. Once you’ve had lots of practice with MDF and plywood, then work your way up to cutting solid lumber. I suggest starting with something like primed finger joint boards i.e., the pre-primed white boards in the lumber aisle of Home Depot or Lowe’s, which tend to be a softer wood and have almost no knots in them.
6. Make sure you don’t get your fingers anywhere near the blade. Once you have to push any material to the end, make sure you’re using a push stick so that your fingers stay clear of the blade.
7. Never stand directly behind the material you’re cutting, especially when cutting solid lumber. Kick backs happen in a split second, so stand to the side as you’re pushing the material through.
I think if you practice in that order — MDF, plywood, and then solid lumber — and give yourself time to get a feel for the saw and how it cuts through these various materials, you’ll start to feel comfortable with it. But the main key is to never get TOO comfortable with a table saw. Always be aware and on guard. When you get too comfortable is when accidents can happen.
I should add that I’d use that same process for a circular saw as well. Start with MDF and then go to plywood. Make sure you’re cutting on a flat surface, and place a 1-inch solid foam insulation board underneath. And if you’re cutting pieces smaller than a 4’x8′ piece of 3/4-inch plywood, make sure your material is clamped down to the work table so that it won’t move. If your circular saw has a rip fence, make sure it’s attached and use it to cut straight lines.
I think you’ll feel more comfortable with a table saw than you will a circular saw, but you’ll get the hang of a circular saw pretty quickly as long as you start with MDF before cutting plywood. And for the circular saw, I also suggest starting with a brand new finishing blade as well.
Fantastic progress! Lookin great Kristi!
It’s looking SO AMAZING already!!! WOW WOW WOW!!!
Really enjoy your A2D Daily!!
Oh my goodness, the kitty is so sweet looking! And yes, she looks totally relaxed and comfortable. I love how she is holding her paws! So far, that seems like a lot of work that you have done…great start. Looking amazing!
I am late, just catching up with this post now.
A suggestion for you: Before you start the trim and especially the painting, consider vacuuming out the dust and doing a test of all your shoes in the shoe cabinet and all your purses in that other one. Because you are making all these shelves fixed, rather that moveable, wouldn’t it be a good idea to make sure that all your beautiful shoes and bags will fit the way the shelves are built now, before you do the finishing?
Good idea!