D.I.Y. Details:: My Closet Shelves and Cassandra’s Painted Piano
Hello, and a very happy Monday morning to you!! I hope that all of you here in the U.S. had a fantastic Thanksgiving holiday. Mine was so relaxing, and so refreshing. I took an entire four days off…completely. I can’t even remember the last time I took four days off!!! It was exactly what I needed. I feel so energized and refreshed, and so ready to get back to work.
Today I thought I’d tie up some loose ends by answering a few questions that some of you had about my closet project and Cassandra’s piano.
First up, my closet:

The first question was about how I installed the shelves. Here’s a close-up view that will show you the details.
The shelves are supported on three sides with quarter round. One flat side is against the wall, and the other flat side is facing up so that the shelf can sit on it. I always, ALWAYS glue the quarter round first, with either Loctite construction adhesive or Gorilla Glue wood glue before putting it on the wall, and then I secure it using my nail gun. If you don’t have a nail gun, you can use a hammer and finishing nails, but you will want to have a second set of hands to help you hold the quarter round.
On top of the quarter round, I placed a piece of MDF, cut to size. If you don’t have a table saw or circular saw to cut your own MDF, the home improvement store can usually cut it for you. In fact, when I’m using MDF on a project, even though I have all of the tools, I generally get Home Depot to cut it for me just because it’s so darn convenient!
For my closet shelves, I used 1/2-inch MDF, just because I was trying to use up some leftover MDF, and that’s what I had on hand. HOWEVER, because of the length of the shelves, I really should have used 3/4-inch MDF. I’m not too concerned about it because I don’t plan on storing anything heavy on these shelves–just mostly t-shirts, sweaters, and shoes. I first placed wood glue on the top edge of the quarter round, then placed the MDF on top, and secured along the edge and in the corners with my nail gun (using very short finishing nails).
Then on front of the MDF shelf, I attached a 1″ x 2″ MDF board, again using wood glue AND a nail gun. This not only gives the shelf a clean, finished look, but it also adds structural support. I used MDF board again because that’s what I had on hand. However, a real piece of 1″ x 2″ lumber would have added even more support, as it’s structurally stronger than MDF board.
And that’s it! Quarter round on three sides, MDF board on top, and 1″ x 2″ lumber on the front. Voila! You have a shelf, with simple, clean lines.
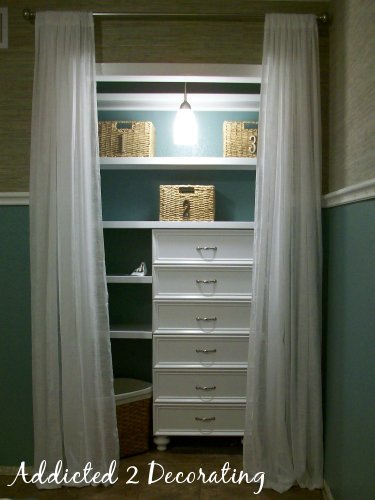
The second question regarding my closet was about how I attached the drawer units to each other and to the wall.
This was one of those things that I messed up on. The drawers come with little plastic things that you attach into the drawer glides so that the drawers will no longer come all the way out. I made the mistake of attaching those plastic things before installing the units into the closet, and once they’re in, there’s no taking them out. I should have attached the boxes to the wall before installing the drawers by reaching through the front of the boxes (where the drawers go), and nailing the box to the wall. That would have been so easy! But I made things much more difficult for myself by prematurely attaching those plastic drawer glide lock thingies.
So I had to move on to Plan B, which was to secure the drawer units from the side. Here was my solution:
I placed a 1″ x 2″ MDF board on each side of the drawer unit, and of course, I glued and nailed it to the wall, and then glued and nailed it to the side of the drawer unit. That would have been enough to hold it secure, but in addition, the small shelves add an extra measure of holding power, since they’re attached (using the shelf method above) to the wall and to the side of the drawer unit.
And as you can see, with those side braces painted the wall color, they pretty much disappear.
If you have any other how-to questions about my closet makeover, let me know!
Now, let’s move on to Cassandra’s painted piano:

She gave me the scoop on the how-to. Here’s what she had to say:
Step 1: Sand the piano. She used an electric sander. If your piano has a lot of detail, you will also need to either sand parts by hand, or use a detail sander. She didn’t specify what sandpaper she used, but my personal preference is to start with a 150-grit sandpaper for general sanding, and then finish with a 220-grit.
Step 2: Wipe off all of the dust from sanding. You can do with with a dry cloth or a tack cloth, however, I generally use a dry paint brush for this step. A brush really makes it easy to get down into the grooves and details.
Step 3: Brush on two coats of Kilz primer. Kilz is also my brand of preference, and I would add that my brush of choice is always a Purdy 2 1/2-inch sash brush (the kind with the angled bristles). A quality brush makes all the difference in the world!!
Step 4: Brush on two coats of Sherwin Williams oil-based paint in a gloss sheen. For the piano, Cassandra used a Behr color called Teal Bayou, and had it color matched in Sherwin Williams paint.
That’s it! Okay, I won’t lie or mislead you and tell you it was easy. Cassandra and her husband wrestled with this project for weeks, and actually called a professional painter to see how much they would charge to finish it up just because the process was so tedious and time-consuming. However, the $1000 price tag for the pro seemed a bit much, so they bit the bullet and did it themselves.
If I missed any of your questions, just let me know! I’ll add that my own oil-based paint of choice is Kelly Moore. I just love the consistency of the paint, and the results I get with it. But I must say…Cassandra’s piano looked fabulous in person with the Sherwin Williams paint.
Well, I hope that wasn’t information overload on a Monday morning!! Oh, who am I kidding. You all are tough DIYers!! You can take it!
Have a great day,
Psstt…If you’d like to see more of my closet transformation, including a time-lapse video, click here. And if you’d like to see more pictures of Cassandra’s incredible piano, you can click here.


I am so glad you posted the details of the closet! I need to add some shelves and didn't know how I was going to do it. Now I do! Just love your closet, I know I have said that before, but I had to say it again! Great job.
Cool site. Closet turned out nice!
Hi Kristi,
thanks so much for posting another picture of the painted piano. I'm sorry I was one of the very few people not agreeing on it in first hand but now since I can see a little bit more of the decoration around the piano I do like it too.
Kristi, hereby I revise my former comment on the painted piano … it does not stick out like a sore thumb. LOL It really sticks out like a turquoise painted piano. 🙂
Best Regards
Paula Jo
I absolutely LOVE the color you painted the piano,makes me happy just looking at it.