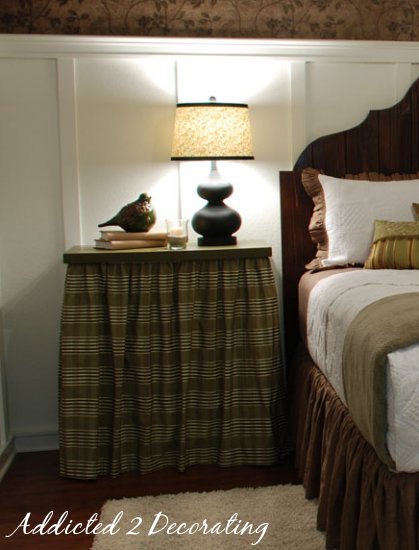
Well, D.I.Y. Week is almost over here at A2D. I know there are still a couple that some of you asked for and I didn’t get to, and I’ll try to add those during the coming weeks. But today, I’ll finish off this parade of D.I.Y. projects with the skirted bedside table that I made for John & Alice’s master bedroom.
Here’s how to make your own skirted bedside table…
 |
I started out with two decorator tables built out of MDF. I have the step-by-step
instructions for building those right here. |
|
| For the skirt, I needed three measurements. (1) The length from the tip of the table to the floor, (2) the width of the table, and (3) the depth of the table. I cut three pieces of fabric for the skirt–one front piece and two side pieces. These are the sizes I cut the fabric: |
Front piece:
height = measurement #1 (above) plus two inches
width = measurement #2 (above) doubled, plus four inches.
For each side piece:
height = measurement #1 (above) plus two inches
width = measurement #3 (above) doubled, plus two inches
|
| Along the bottom edge of the front piece, I placed the fabric on my work table with the front of the fabric facing down. Then on the botton edge, I turned up the fabric 1 inch and used my iron to press in the fold. Pin if necessary. |
|
| Then I folded the fabric up one more inch, so that the raw edge no longer shows. Press in the fold. |
|
| I repeated this on each side, except that I turned it up 1/2″ and pressed…. |
|
| …and turned it up another 1/2″ and pressed again. Pin if necessary, and repeat on the other side. |
|
| Next, I used my sewing machine to stitch the hem on the sides and the bottom edge. Repeat this with the other two pieces of fabric cut for the sides. |
|
| I then placed two gathering threads along the top edge of the fabric. (On larger items, I use two gathering threads so that if one of them breaks, I still have the other and don’t have to start completely over.) |
|
| On the front piece, before I started gathering, I marked the center point of the fabric. |
|
| And then I gathered half at a time. Starting with the right side, I gathered until the right half measured about 16″ (half of the width of the table, plus about 1 inch). |
|
| And then using my favorite double-sided fabric tape, I placed a strip of tape on that half of the skirt, right on top of the gathers. This worked great to hold in the gathers while I gathered the left half of the front piece. |
|
| I gathered the left half to about 16 inches, and then secure it with the double-sided fabric tape in the same way. |
|
| When the front piece was all gathered and taped, I attached it to the table beginning in the middle and working out to the sides. |
|
| On the sides, I wrapped the extra 1″ of fabric around to the sides. This overlape will ensure that the MDF doesn’t ever peek out from under the skirt. |
With the front on, I repeated the gathering process with the sides, but because they were much narrower, I didn’t bother with marking the center and gathering in two sections. I gathered the sides to about 16″ (the depth of the table plus 1 inch), and wrapped the extra 1″ around to the front of the table in the same way I did the front piece.
|
| When it was all put together, it looked like one continuous skirt… |
|
| But with the skirt in three separate sections, the shelves underneath are much easier to access. |
This project is really so easy and very basic. It’s one of those projects where you can really wow people with your skills, and they’ll never know that it only required the most basic of skills in both the building of the table AND the making of the skirts. In fact, if you don’t know how to sew even a stitch with a sewing machine, you can still make this skirt very easily using fusible tape and an iron to “sew” in the hems on the skirt. This would be a great no-sew project!!
Well that wraps up D.I.Y. week. I hope you found a project to inspire you!!
Addicted 2 Decorating is where I share my DIY and decorating journey as I remodel and decorate the 1948 fixer upper that my husband, Matt, and I bought in 2013. Matt has M.S. and is unable to do physical work, so I do the majority of the work on the house by myself. You can learn more about me here.


Thanks for posting this beautyful blog. Your decorating style is so good.
AWESOME,, I just got some great books from the library, all about this kind of thing. 🙂
You did a great job, thanks for sharing!!!
Bella 🙂
Thanks for posting this beautyful blog. Your decorating style is so good.
This is my first time visiting your website; in a word, it's DELICIOUS! I especially love this master bedroom redo — so many beautiful elements done in such a truly high-end style that you'd NEVER realize how most of these items looked in their earlier incarnations! Just 2 quick questions regarding these table skirts: Exactly what is the 2-sided fabric tape? Where do you purchase it? Oh, 3 questions actually –You applied it to the wrong size of the fabric – correct? (Dumb, I know, but just double checking).
I so look forward to fully exploring your website and becoming inspired by the room transformations!
All the best, Donna
Donna, I purchase the double sided sticky fabric tape at JoAnn Fabrics. It's just like a two-sided tape, but it's specifically made for use with fabric. And it..is..STICKY! And I actually applied the tape to the right side (the face) of the fabric, which was necessary because of the way it was adhered to the back side of the strip of wood on the front edge of the table. Hope that makes sense!
I am always inspired to try projects when I look at what you’ve accomplished. You make it look easy and not intimidating at all! Keep those great projects coming!Thanks,Jenny>…