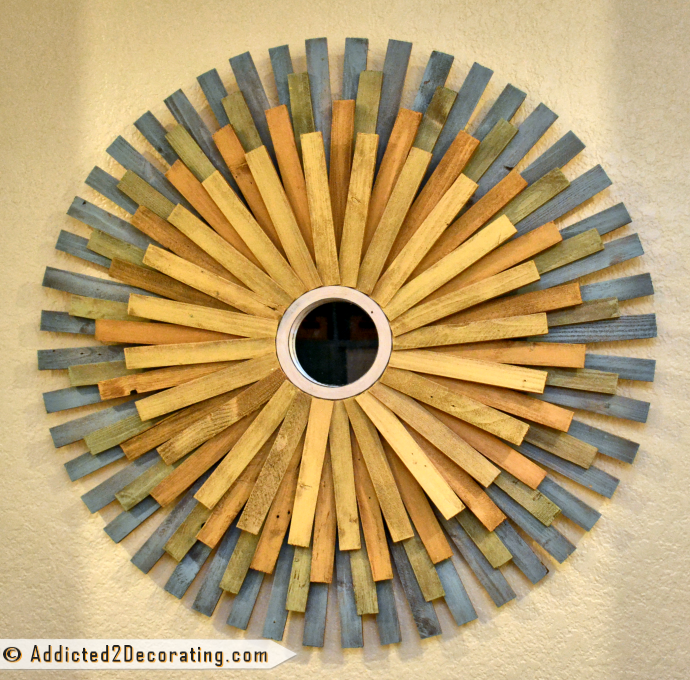
DIY: Large Multi-Colored Wood Shim Sunburst Mirror
I’ve been working on walls, trim, doors, and other not-so-fun things like that, so I decided to take a break on that stuff and do something a little more fun and creative. So I made a giant multi-colored wood shim sunburst mirror to go in the t.v. space between the bookcases in my living room.

Now I know what you’re thinking. “Kristi, sunburst mirrors are sooooo 2011!!” 😉
Well, I still like them, and I still see them everywhere. I can’t open up any of my favorite shelter magazines without seeing a sunburst mirror. So even though they kind of took the blogosphere by storm in 2011, and then died a quick death as people moved on to the next fad, I think they’ve been a bit longer lasting in the real decorating and design world.
So when I needed something to fill the large space between my bookcases in my living room, I thought that a sunburst mirror would be the perfect thing. This one is very large (37 inches in diameter), and they’re so inexpensive to make.
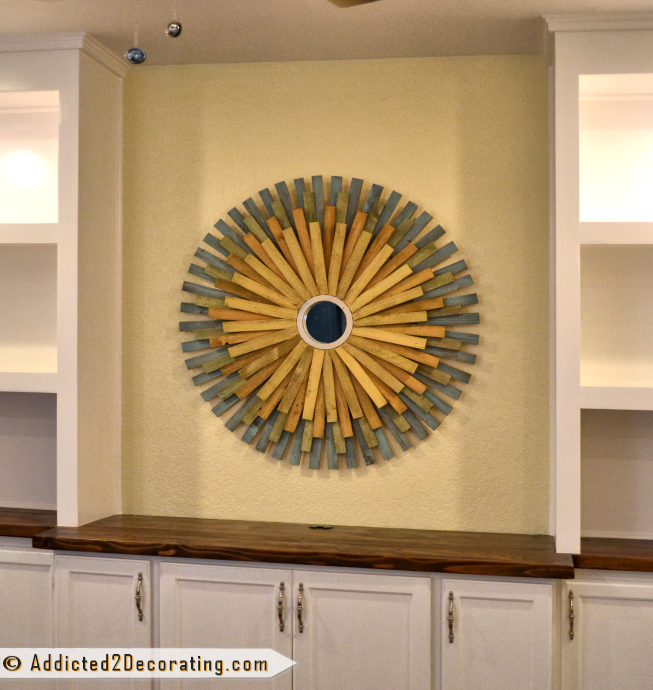
The picture doesn’t really do it justice. For some reason, the pictures just don’t capture the SIZE of this sunburst mirror properly. In person, it looks quite a bit bigger.

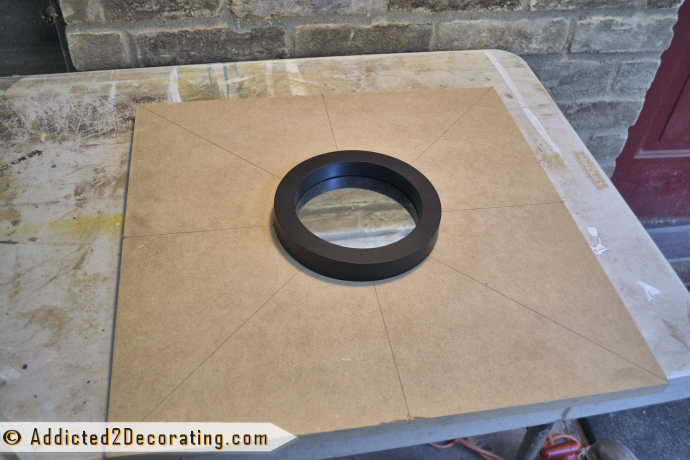
To make this, I used three packages of the large (very long) wood shims, a piece of MDF cut to about 19 inches square, a round framed mirror, wood stain, leftover paints, and lots of hot glue.
I used four different colors for my shims. I used 48 blue shims cut to 15 inches long, and then 24 of each of the other three colors. The green ones are 13 inches long, the orange are 11 inches long, and the yellow are 9 inches long. I used my miter saw to cut them to length, then I stained them and dry brushed the paint onto the shims so that they looked rustic and aged.
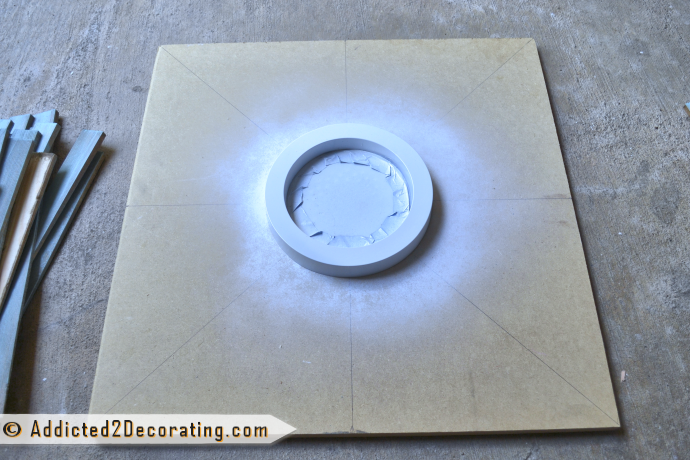
I started by marking some lines on my MDF from corner to corner, and then from side to side. These are just guides so that I’d know where to place the first shims so that I could get them as straight as possible. Then I glued a 7-inch mirror in the center.
Next I gave the mirror a coat of white spray paint. I did a terrible job at taping the mirror. In fact, I didn’t even bother to protect the middle. That’s nothing that a couple of minutes of time and a razor blade can’t take care of. 🙂
I attached the first blue shims using the lines that I had drawn onto the MDF as guides.
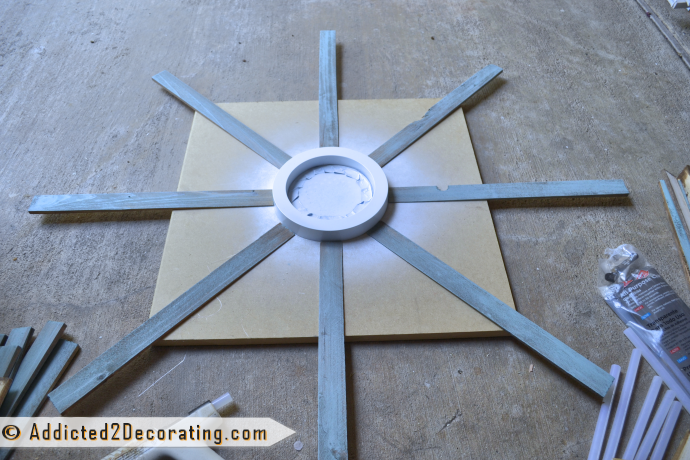
Then I began filling in, spacing them as evenly as possible.
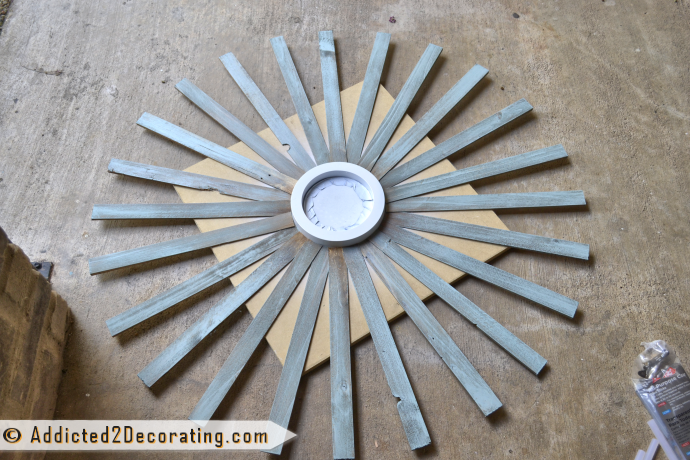
And then I filled in between those shims. I used 48 shims on the first row of blue.

Then I moved on to the green shims. For this row, I used only 24 shims.

And then on the two subsequent rows, I used 24 of each color.

This thing was kind of a pain to handle and hang once it was made. If I had to do it over again, I would have attached the hardware for hanging to the back of the MDF before attaching the wood shims. But I managed.
Are you wondering why I’m putting a sunburst mirror here instead of a t.v.? Well, my plan for short term rentals isn’t going to work out. According to the condo bylaws, I’m not allowed to rent out the place for a term shorter than 30 days. I’m pretty bummed about that.
So we’re back to selling. And since our little 36-inch t.v. looks so funny sitting in that large space (and we have no plans for purchasing a larger one since we’re not t.v. watchers at all), I decided to fill the space another way. I think I actually prefer this to a t.v.! 🙂

Addicted 2 Decorating is where I share my DIY and decorating journey as I remodel and decorate the 1948 fixer upper that my husband, Matt, and I bought in 2013. Matt has M.S. and is unable to do physical work, so I do the majority of the work on the house by myself. You can learn more about me here.
How beautiful! You are so talented.
This is beautiful, Kristi!
Love this!!! You are so creative.
What is hanging from the ceiling in the second pic? Easter eggs? So curious.
They’re the pull chains from the ceiling fan/light in the foreground of the picture.
Oh! Forgot how small your space is. They look much larger than they are, but it’s because you are right on top of them.
I know you are bummed about not being able to rent, but it will be so much less hassle in the long run. Good luck getting it ready in the next month. Can hardly wait to see the living room and the black room when you are done.
I like it! Maybe you could put a battery operated clock in the center and then it could be used on another wall if someone does put a TV in there. Good luck with finishing up everything.
You never disappoint…..I may have to try one…..I think what draws me, in part to your designs are the colors you put together……..I love your choices!
I’m sorry you won’t be able to rent this property but I’m sure with all the designs you put into it, you’ll get a great selling price! This sunburst mirror is one of the best I’ve ever seen. I love it and am definately putting it on my ever-growing list of to dos. Thanks for sharing and it looks beautiful in that space.
That looks great! Loving the colors!
I was sorry that your plans for renting fell through. But I hope you can take it as there is a reason things don’t work the way we want and one needs to trust that there is something else in store for you. The good news; your place is a real show stopper and will get you a good price.
Really do enjoy your blog Kristi, love the colour choices and design of your sunburst. You always inspire, even when you are not happy with your results! lol Looking forward to your creativity in your new home. Warmest regards…..
I love this sunburst Kristi! You are right…they are everywhere. We often forget that the blogging world is light years ahead of the rest of the world. [wink] This project was great…for your mental health no doubt…but also it looks great and fills your space nicely and doesn’t say…”Where is the TV?”
I love that Kristi! What a great way to fill up that space. Love the colors you used. 🙂
Did you think about renting with the contract written for 30 days even if the renters are only going to be there for a week? Collecting a fair fee for the weekly rental and giving you 3 weeks to clean between renters. Perhaps some will even stay longer, and you could charge accordingly . However you just will not be able to collect rent from any other renter for that same 30 day period.
You could possibly have you family members stay there if they visit, “hiring ” them to clean and decorate. I remember your in-laws are good at that.
LOVE this!!!!
I love this!
I love your DIY mirror! Sunburst mirrors are great and I love the colors you added. I’m pinning. Have a great weekend.
Leslie
I love how you always make SOMETHING BEAUTIFUL out of nothing! You are so talented and I can’t wait to check your page everyday to see what creative thing you have come up with. I’m looking forward to the makeover on your new house.
It’s a shame about the short-term rental idea. Well, more money to put into your new house? I would think some parent would love to buy that rental for their Baylor baby. Great deal for them, wonderful deal for you. Love the sunburst mirror. I still love them, too!
I definitely do not think the sunburst mirror has died just yet. I see them everywhere!
This Sunburst is really cool!!! I just wanted to said that I look so forward to seeing a new post from you! Keep up the decorating and sharing of ideas. Love it!!!
Love the sunburst mirror – I have been trying to make one forever, but they never seem to come out just right……where did you get the little mirror from? Also, what paint colors did you use – they would be perfect in my living room!!!!
I love this! 2 questions: Did I miss how you attached the wood to the MDF? And do you possibly know the names of the colors you used? I truly am in love with them. I am in the planning stages of a laundry room makeover and I want this in these exact colors. 🙂 Thanks and again, well done!
Hi Cristy~
I just used hot glue to attach the shims. I have one of those big hot glue guns from Home Depot, with the really fat, long glue sticks. If you try to use one of those cheap, tiny hot glue guns that use the skinny, short glue sticks and cost $3.99 from Hobby Lobby, you might possibly go insane way before you finish this project. 🙂
As far as the colors, the orange is one that I mixed myself. Sorry. 🙁 The yellow is Arizona Tan, the green is Grass Cloth, and the turquoise is Gulf Winds. All Behr colors from Home Depot.
All of those colors were dry brushed over wood shims that had been stained with Minwax Early American stain.
Loved it…loved it…loved it…!!…beautiful creation…:)
My daughter has made one of these mirrors for her apartment and was wondering what kind of hardware you used to hang it.
Terry, I just used a really large sawtooth picture hanger, nailed into the back of the MDF square that the shims are glued to.
Stumbled upon your site and have been thoroughly enjoying it. Your ideas are so interesting and many seem like do-able projects:) Now just to find some free time…Could you please explain what ‘dry brushing’ is? Did you water your colours down or use them straight from the can. I am very curious as I would really like to attempt this and get a similar look with the muted tones etc. Thank you xx
Kristi, is there anything you can’t do?
What a great look! I love mirrors, and this small mirror in the center of that pretty starburst must look gorgeous on your wall.
I stumbled on your site searching for ideas on how to make a frame for a large 30″ round mirror. I love the sunburst, but I am concerned that the weight with a 30″ might make it too heavy to hang. Do you have any suggestions?
This is no heavier than a framed mirror. Just regular picture hanging hardware will work. I always use Ook Hangman French cleats to hang things like this. The small ones will hold 60 pounds, and the large ones will hold 200 pounds.
This looks like so much fun to make! and i know just where to put it in my house. Thanks for your inspiration and How To Guide.
Also, i know you aren’t looking for comments on your TV, but I must say that I agree. We aren’t TV people either. The sunburst looks awesome!
Love this sunburst mirror. I have a large wall that needs “something” and I think this is it! Question….. it doesn’t look like you rounded the ends of the shims that butted up to the round mirror. How is it that the flat sides worked so well around the round mirror? Also, do you have a tutorial on exactly how you finished the shims? Did you stain them 1st, then dry brush the colors on? Thank you in advance & also thank you for posting your gorgeous projects.