DIY Fireplace Part 2 – The Basic Structure Finished
I didn’t get as much done on my fireplace yesterday as I had hoped, but I was able to get the basic structure completed. Here’s how the fireplace looks now that the basics are complete.
If you missed Part 1 of this project, you can click here to see it.
Now let me emphasize that this fireplace is electric. There will be no actual flames (which is why nothing has to actually be fireproof), and all heat generated is blown out the front through the vent at the bottom of the electric fire insert. So no heat at all is blown into or gathered inside the box.
Of course, it’s very rough at this point. There’s still lots of sanding, wood filling, trimming, caulking, priming, painting, tiling, and grouting to do. Plus, I still need a mantel. But it’ll get there!
But let’s back up a bit. When I left you yesterday, the fireplace looked like this…
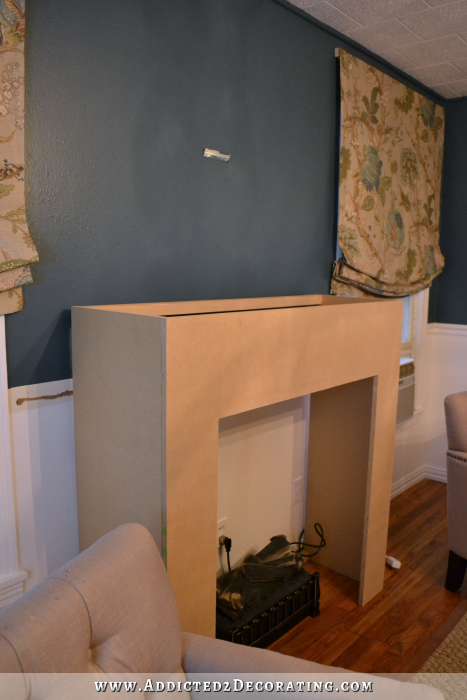
Now obviously I wasn’t just going to set the insert on the floor, and have the floor, wall, and the inside of the fireplace showing like that, right? Of course not! 🙂 I still needed to build the whole interior that included the fire box.
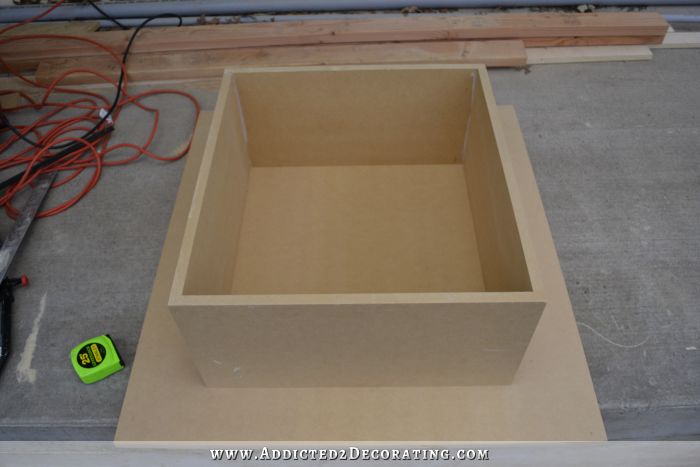
To do so, I started with my two 11.5″ x 24″ pieces, and my two 11.5″ x 23.5″ pieces, and glued and nailed them together to form box that was 22″ x 24″ in the inside. (My electric insert is 20″ wide, so I wanted my fire box to be 22″ wide and 24″ high.)

(Note: Most real fire boxes are angled in towards the back, but I would need a table saw to make those kinds of cuts. So I just went with a box with 90-degree angles. Hopefully once it’s all painted and finished, people won’t even notice my lack of angled sides. 😀 )
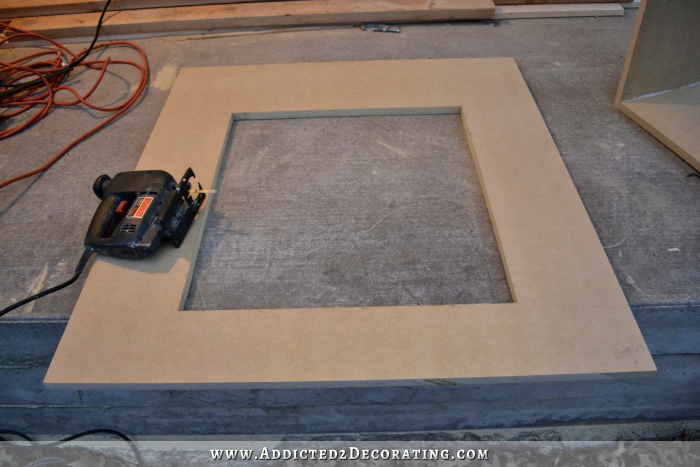
Once that box was built, I took my 36″ x 39″ piece of MDF and arranged the box on top of it like I wanted it. Then I used a pencil to mark the inside edges of the box onto the piece of MDF.
Using those lines as my guide, I cut out the center using my jigsaw. Since I couldn’t start on an edge, I started by drilling a 1/2-inch hole close to the line (inside the box), and then using that hole as the starting point for my jigsaw blade.
And then I glued and nailed this frame onto the box. (Sorry! No picture of that step.)
With the frame attached to the box, I set the fire box upright leaving the frame hanging over the edge of my work surface (i.e., my front porch 😀 ) so that it would sit upright completely. Then I cut a piece of plywood to fit over the back of the fire box, and just leaned it into place. Then with my fireplace insert inside the box, I marked where the hole needed to be for the electrical cord and plug.
Using my jigsaw, I cut away the rectangle for the electrical cord, and then attached the plywood backing onto the firebox using glue and a nail gun.

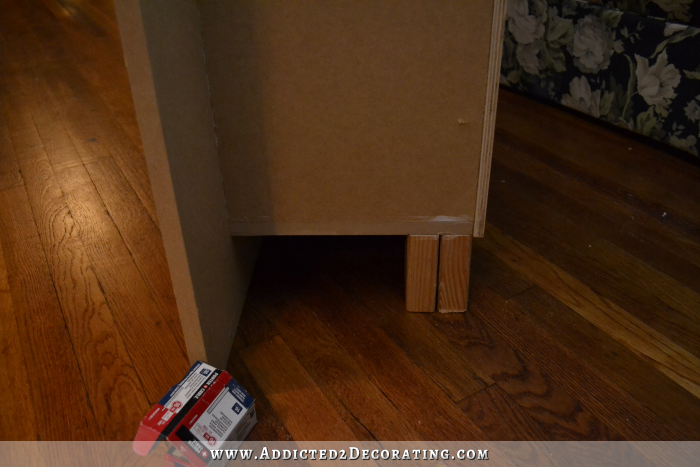
The last thing I needed to do on the fire box insert was add some legs to the back so that it would stand on its own. And since they would be completely hidden, they didn’t have to be pretty at all. I measured and cut four pieces of 2″ x 4″ lumber, and glued and screwed two pieces together to form each leg. Then I glued and nailed those into place. I nailed them from the inside of the firebox since the electric insert would cover those holes.
And with that, the fire box insert was finished!
Then I just needed to do one more thing before placing the fire box insert into the fireplace box that I showed you yesterday.
Using 1″ x 2″ lumber, I cut, glued, and nailed a “frame” around the inside edge of the opening. I did this on the left, right, and top of the opening. The purpose of this frame is to give the fireplace some dimension.

And then with that frame in place, I was ready to put the fire box insert into place. You can see here how that frame I just created gives some nice dimension to the fire box insert.

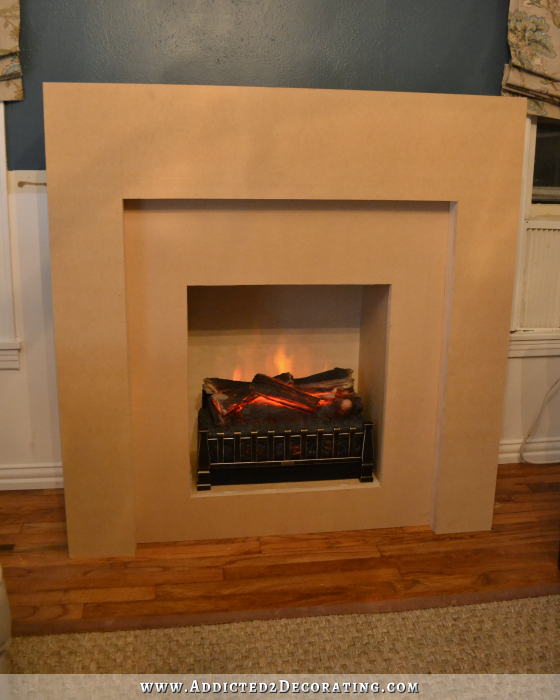
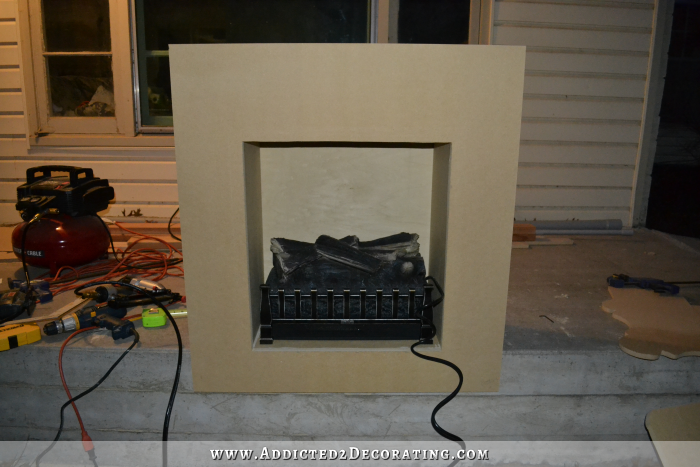
And here’s what the whole thing looks like at this point.

Can you envision it now? Here’s my drawing to help you envision how this whole thing will come together once it’s trimmed, painted, and tiled.
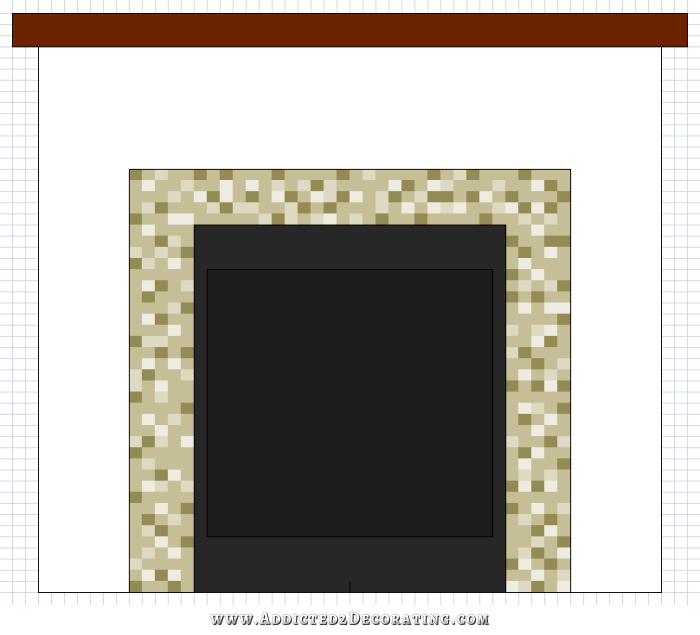
It’s starting to make sense now, right? I hope so! 🙂
And even though it’s sooooo far from complete, I went ahead and added the electric insert just because I was anxious to see how it would look.
It’s a perfect fit!
Today I’ll move on to the trim work, and hopefully the weather will cooperate so that I can get some painting done!

Addicted 2 Decorating is where I share my DIY and decorating journey as I remodel and decorate the 1948 fixer upper that my husband, Matt, and I bought in 2013. Matt has M.S. and is unable to do physical work, so I do the majority of the work on the house by myself. You can learn more about me here.


Nice work so far. Can’t wait to see how it turns out.
Love this. Am planning to be a copy cat.
You continue to amaze with both your design talent and your handywoman skills. I’m so excited for you, and eagerly await the finished project. I’m also very interested to see how well the electric insert works to heat the room.
Are you going to paint the wall above the fireplace the same color as the fireplace to give the impression of an overmantle, or leave it the teal? Whichever you decide, I know it’s going to be fabulous!
I’m actually going to build an overmantel eventually, and trim it out and paint it to match the fireplace, but that will have to wait until I remove the polystyrene ceiling tiles and get the drywall repaired. So for now, I’ll just have a teal wall above my fireplace.
🙂
Wish I could send you a photo of the over-mantle on my fireplace. I really like it…or I will once the room is painted. It will have an accent color on the fireplace wall. I’m not certain on how to insert a photo into a Comment anyway.
So far I think it looks great and the change to the room will be dramatic!
Looks great, of course!!
Love it already !! Cant wait to see it finished !!
(Good luck with the weather today. I’m in Waco working and just praying it doesn’t get icy so I can make it home to West, but on second thought, if it starts to get bad, boss might tell us to go home, and I sure could do some sewing today!! )
You are my hero! I can’t even draw a straight line. My husband holds his breath everytime I paint. It has gotten to the point where I am not allowed to pain. Seems I have more paint on me than whatever I am trying to paint. I think your projects are just awesome. Love how handy, crafty and talented you are. Great job!
LOl, that should be paint not pain. Though I can be quite a pain. hehe
Good start, can’t wait to see it finished .
Now you’re ready to start adding some pretty detailing. Love it.
It is looking better every day, even my kitty keeps looking at it.
Girl, you are on fire! 😉 love it.
Awesome!
Love it!! Did you ever see the photos I sent you of the fireplace we redid?
I have been looking for a couple years for a fireplace that fits the space I have, I want one that will be under my flat screen TV in my living room (I really want the TV out of that room, but that’s been a whole different “story” with the hubby) & I can’t find one that works, I had no clue that I could just buy the insert and build my own. You have inspired me! After I redo my countertops in my kitchen (using a product you have shown on your blog) and doing a new backsplash, this will be my next project! I think I need to take a few “sick days” and get started, shhh don’t tell the boss!
Geesh, you are so talented!
Great day! You are amazing!
Ditto! You are amazing
All electric fireplaces I have seen that are complete with the box and mantle have a mirror behind the insert. This increases the size of the “fire” and makes it brighter also. Are you going to add a mirror or paint or tile behind the fire logs?
Just curious – are you going to build some sort of hearth? I know you won’t need one, as there will be no actual fire to throw sparks and ruin your floor, but it might look cool to add one. Your imagination never ceases to amaze!
It is going to be so pretty when it’s finished. Such a cozy living room. I’ll have to get us some hamburgers and come over to sit and enjoy the “fire” when you get through.
Do you ever get tired of hearing, “You’re amazing!”…? ~;)
The “fire” looks more like a real wood burning fire than I have seen before. What’s the mfg? You are so gutsy & talented. I’m tempted to try new things after watching what you’ve done & that’s a great thing, you should be proud of the way you inspire the rest of us. Thanks again & keep it coming:)
In her January 28 post she gives information on where she bought it.
http://www.electricfireplacesdirect.com/products-accessories/electric-fireplace-log-inserts/duraflame-electric-fireplace-insert-log-set-DFI020ARU#pr-header-back-to-top-link
You’ve made progress. Looks great!
Fantastic! I love it when I see your blog on my inbox!!
Your home is going to be so beautiful. I’m going to copy cat this also. Just wonder how many people will copy cat this. You are such a blessing to follow. Thank you so much for sharing your talent with so many people. You are an angel my dear.
So creative!! It’s going to be beautiful!!
Did you get your electric fireplace at Electric Fireplaces Direct.com?
Thanks!!
In her January 28 post she gives information on where she bought it.
http://www.electricfireplacesdirect.com/products-accessories/electric-fireplace-log-inserts/duraflame-electric-fireplace-insert-log-set-DFI020ARU#pr-header-back-to-top-link
Kristi,
As I see your photos of all of your work equipment laying outside on the front porch and I imagine you working away..It just makes me think of what that cranky neighbor across the way at the condo would be irritated about. Blessed are you to have your own house and space for all of your wonderful projects! Keep up the good work. YOU ARE INSPIRING!
Excellent, Gorgeous, And I like the electric insert, where did you get it ??
Ellen
http://www.electricfireplacesdirect.com/products-accessories/electric-fireplace-log-inserts/duraflame-electric-fireplace-insert-log-set-DFI020ARU#pr-header-back-to-top-link
Wow! I love it! You got it to fit perfectly too, you are so good in your cuts and fitting..not an easy thing…can’t wait to see it competed:)
Bravo! I have a gas log fireplace and an electric fireplace. The best backing for prettiest flame in both of them has been black. We tried various colors on the brick in the gas one, but the flames just came alive when we painted the bricks black.
Love it !!
It is going to look wonderful. I am so glad I found your site. I am ‘addicted’ to it. I have been working on redecorating my home, one room at a time. I love color and your ideas are inspiration to us all. My husband just lets me do my thing and adds his artistic ideas here and there. I look forward to each new project you have. Gets the creative wheels turning. Thank you.
If I ever do this for my house, I think I’d like to make fake ‘bricks’ inside the firebox out of joint compound and then paint the whole thing flat black, as some have suggested above. I’d just use 1/4″ masking tape for the ‘grout’ between the ‘bricks’, spread a thin layer of joint compound over that to give some dimension for the ‘bricks’, and immediately remove the masking tape. Once the joint compound was dry, I’d lightly sand the edges of the ‘bricks’, then paint the inside of the whole firebox in the flat black. I saw this technique done in a kitchen makeover where they sponged the ‘bricks’ with various colors, and it looked fantastic. But in this application, painting the ‘bricks’ in flat black would be the ticket.
I’ve seen this technique done for faux tile but not bricks. Great idea to give the fireplace character. I’ll have to remember this technique when I give our faux fireplace a facelift.
Looking forwards to seeing the completed project. I know it’s going to look fantastic.
That’s going to be really nice! Are you going to put some sort of “hearth” below the fireplace? I know, somebody already asked… You could get some tiles and place them on a rubber backing that might make them look like they are built in. Your fireplace box is looking pret-ty darn good!
This looks great! I love it. You got it to fit perfectly too, you are so good in your cuts and fitting..not an easy thing…:). I’ve just bought an electric fireplace insert like yours, I found in the internet and got your project, I’m really thank you so much, It is exactly what I need to do with my fireplace. Hope my wife will be suprise.
very cool. .great job.