DIY Fireplace — FINISHED!
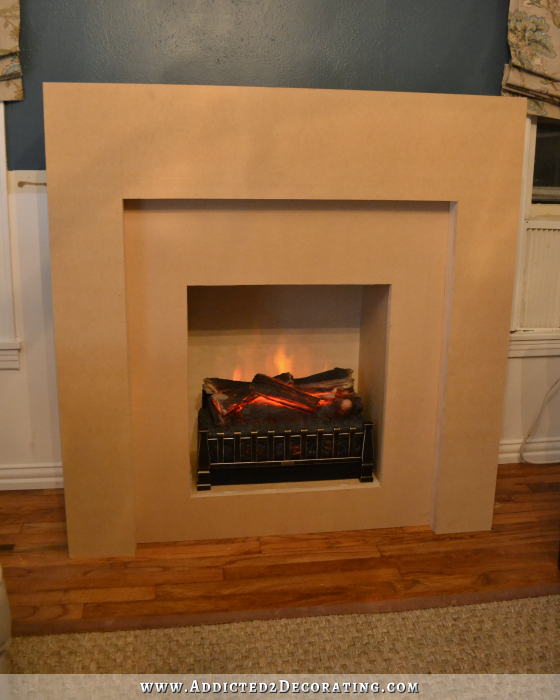
I was beginning to think I’d never be able to say this, but the fireplace is finished! I finished the final bit of painting at 12:18 this morning. :~D (Unfortunately, I wasn’t able to finish up the trim on the wall, but I’ll get to it.)
Now I feel like every big “It’s finished!” post I do comes with a few “well, except for…” items, and this project is no exception. I still need to polyurethane the mantel, but I thought it was silly to wait another day just for polyurethane before showing y’all the (almost) finished fireplace.
Also, the trim around the hearth needs some work.
Almost every picture I found of a hearth on hardwood floors had trim around it that matched the hardwood floors. (Of course, almost 100% of them also had the tile inset into the hardwood floors, but there was no way I was about to cut out my hardwood floors. I’m not that brave. So having it raised and adding some trim will have to do.)
Anyway, I have no idea why I thought I could add some Waterlox (the product I used on my floors) to pine trim and have it come out the same color as my red oak floors. Obviously the primer, paint and Waterlox fumes had taken their toll. 😀 So I’ll have to play around with some stain/Waterlox combos until I find just the right combo to match my hardwood floors so that it’ll blend in rather than sticking out like a sore thumb.
But other than those two things, it’s officially finished!!
So let me back up just a bit and show you the final steps on this project.
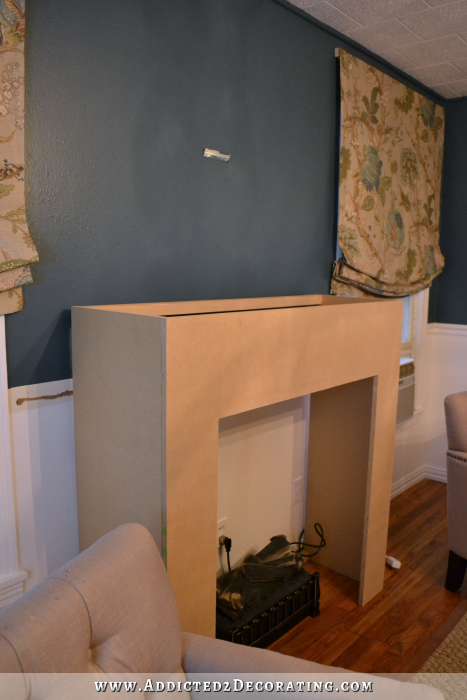
In my last post, the fireplace looked like this…
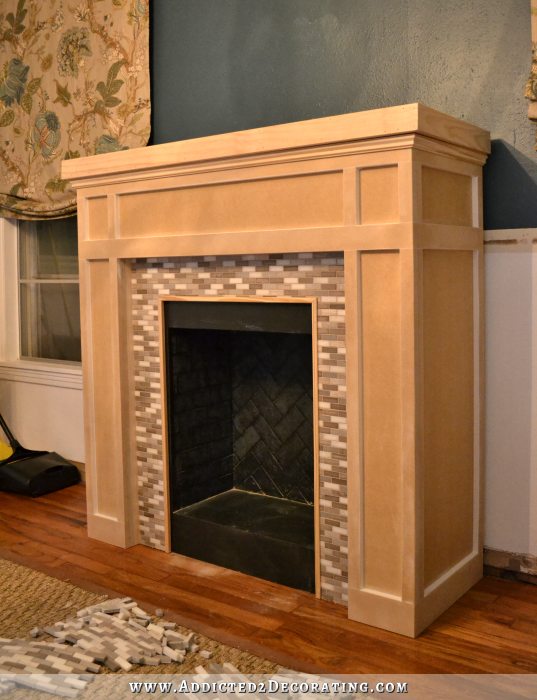
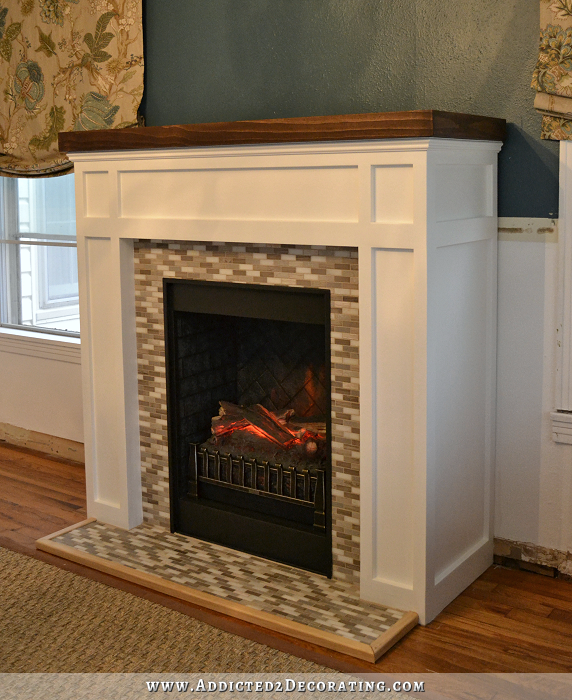
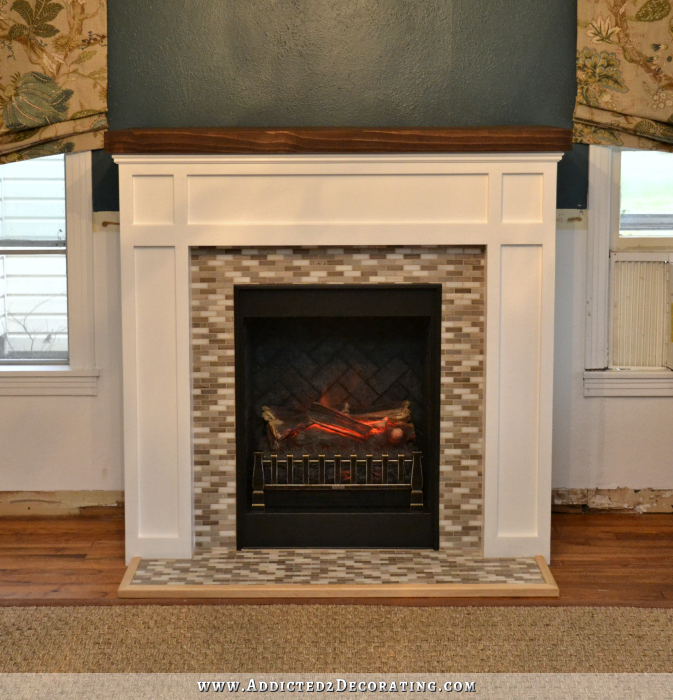
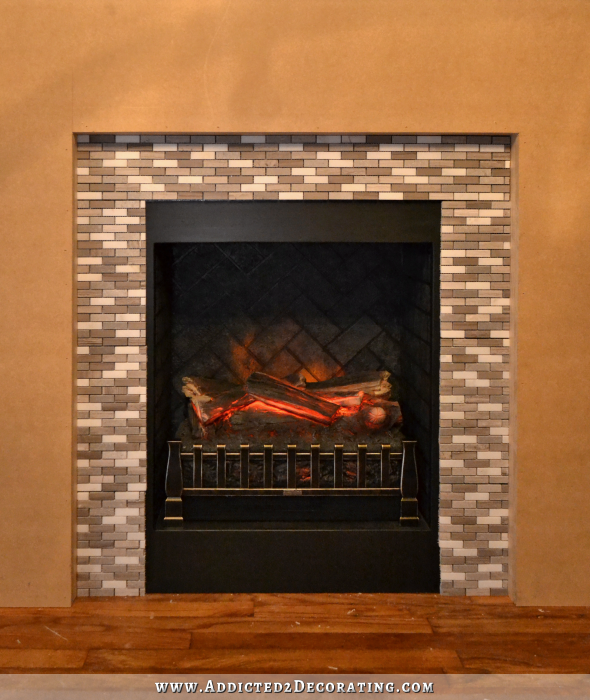
Obviously, I finished out the main parts by staining the mantel (which I attached to the fireplace with wood glue), and then priming and painting the fireplace. The trim around the fire box got two coats of black (Black Suede by Behr), and the fireplace got two coats of Polar Bear by Behr, which is the same color I use on my trim, and the same color that I’ll use on the wainscoting in the (hopefully) near future.
So the last major element was the hearth. I started by cutting out a piece of 1/2-inch MDF to fit around the fireplace.
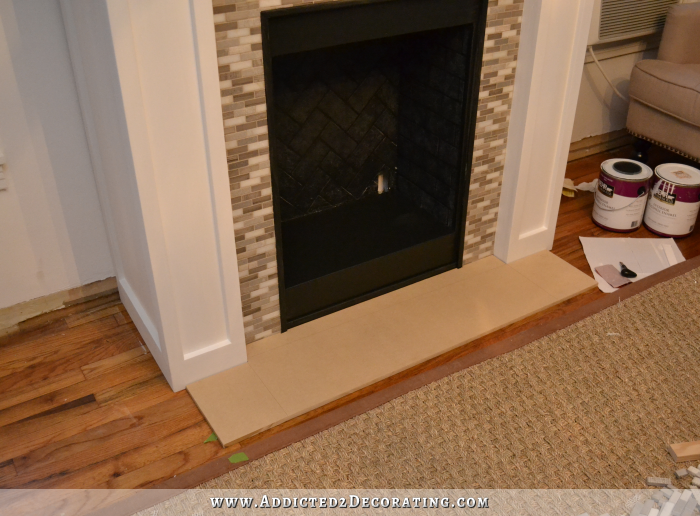
And then I used the same Simple Mat product to adhere the tiles to the MDF.
Remember how I told you that the grout made a huge difference in the color? You can see that more clearly here…

See how the grouted tiles look way more brown, while the ungrouted tiles on the hearth look so much more gray? I can’t believe the difference, but I’m so glad it turned brown like that!
After getting all of the MDF covered with tiles, and then grouting it, I cut some of this outside corner trim…
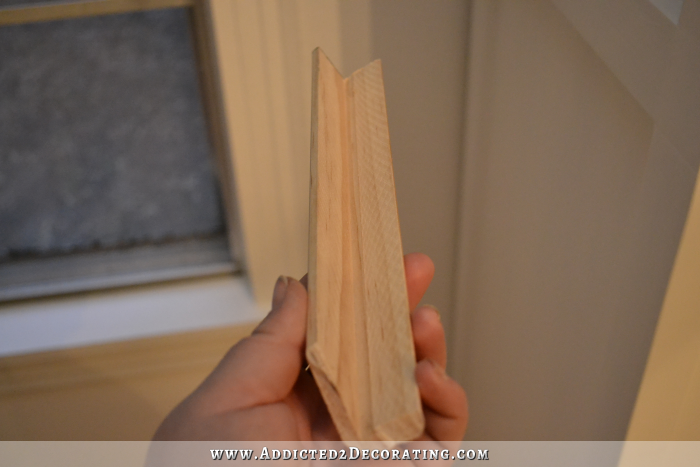
…which was the same thing that I used to trim the tiles around the fire box, but this trim was quite a bit bigger. And I used it to cover the edges of the cut tiles.
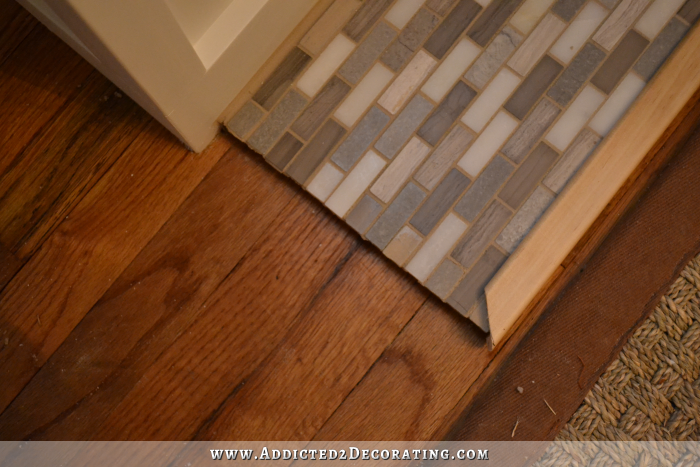
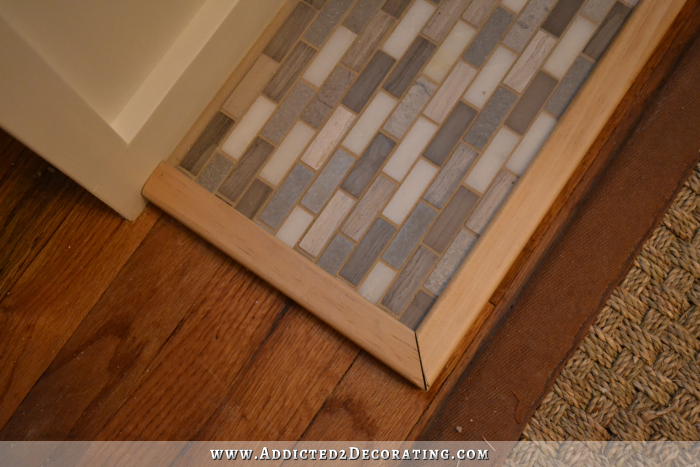
Right now, they’re still just sitting there. I’ll probably attach them with construction adhesive, but I want to wait until I get the stain color right before attaching them.
So why did I make a hearth when my inspiration fireplace didn’t have one?
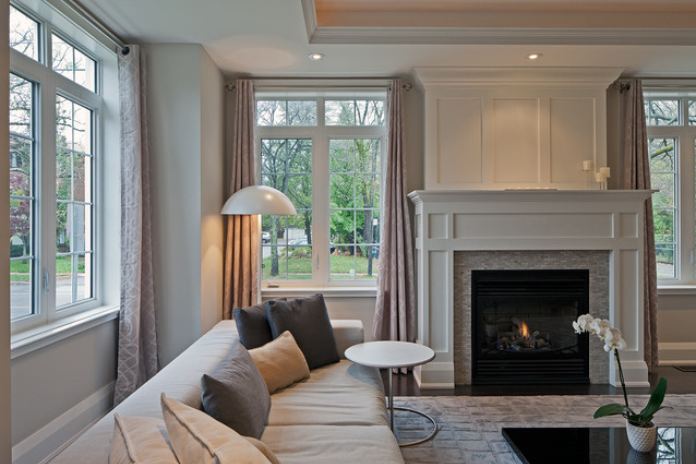 Contemporary Living Room by Toronto Photographers Peter A. Sellar – Architectural Photographer
The main reason is because that fireplace looks like a glass-front gas insert to me, which is why it has vents on it where the hot air blows through. That’s the kind of fireplace we had in our first house in Oregon, and it had carpet right up to the front of the fireplace. I hated that fireplace. Having grown up with a real wood-burning fireplace, that one always looked so fake to me.
So since I built mine to have an open front like a real wood-burning fireplace, I decided that it needed a hearth for a more authentic look. 🙂 And that’s why I made a hearth.
Now just in case you missed any of the posts/steps of this project, you can find them here:
Part 1 – Building the main fireplace structure
Part 2 – Building the fire box insert
Part 3 – Creating faux bricks with drywall compound

Part 4 – Painting the “bricks” and installing the mosaic tile surround
Part 5 – Adding trim, grouting the tiles, and building the mantel
And Part 6 – Building the hearth, and the big “taaa daaaa!!” (in this post, obviously) 🙂
I’m so glad it’s finished! Well, except for those two finishing touches. Now I can add my wall trim, and get back on track with living room makeover.
Side note: I will eventually be building an overmantel like the one on my inspiration fireplace. But that will have to wait until after some other things are done, like removing the polystyrene ceiling tiles and patching/replacing the drywall on the ceiling.
And as far as the cost, here are the details:
- MDF, plywood, lumber & trim: $162.45
- 16-gauge nails: $10.00
- Paint: $21.00
- Drywall mud: $8.00
- 1/4″ masking tape: $7.50
- 8 square feet of mosaic tile: $80.00
- Simple Mat: $20.00
- Grout: $20.00
- Electric fireplace insert: $135.00
- TOTAL: $463.95

Addicted 2 Decorating is where I share my DIY and decorating journey as I remodel and decorate the 1948 fixer upper that my husband, Matt, and I bought in 2013. Matt has M.S. and is unable to do physical work, so I do the majority of the work on the house by myself. You can learn more about me here.

It looks wonderful! You did a fantastic job. Adding the hearth really made a difference.
I love it! You are a very talented lady!
WOW! it turned out fabulous! Hard work certainly pays off.
Your fireplace looks marvelous! You did a great job and your how to steps make it more attainable for me to accomplish something like this. Pat yourself on the back, you did a good job!
Wow, Kristi, you’re right, it does look better with the hearth. The open logs do make it look more like a real wood-burning fireplace, which would need a hearth.
Your fireplace is definitely the piece de resistance in the room. Now I’m looking forward to seeing it accessorized!
Wow Kristi….Fantastic job! You are truly a DIY DIVA 🙂
I’m loving all of your projects! I especially like this one as I’ve been thinking of adding one to our living room as well! I realize you made this look easy and I know it’s not going to be! 🙂 Thanks so much for the inspiring ideas!!
Amazing! I’m always so inspired by your posts, and envious of your power tools and work space!
Beautiful work. What an accomplishment. Be proud of yourself!
It looks absolutely spectacular. I never would have thought an electric fireplace could look so real, and so classy! Very, very inspiring.
Love the finished product and how well it acts as a functional focal point in the room. I apologize if you’ve already posted it and I missed it (I’ve been super busy lately trying to finalize our master bath remodel) but what have you done with the credenza that was sitting in the same space as a temporary placeholder? That was a very cool piece!
LOVE! It looks awesome.. as always amazed by your work. Love that you can recreate these beautiful things for so much less money. Appreciate that you are realistic about how much effort and TIME do-it-yourself can take. But the pride in your work shows through. And for those of us who love DIY, that feeling of pride is so much better than just buying a pre-fab piece from a store 🙂
You are one amazing, talented lady!! You are an inspiration to all DIYers. Can’t wait to see the finished living room.
You did a GREAT job!!!!! Looks beautiful!!!!
Congratulations on a job VERY well done!! It is gorgeous!!!! 🙂
What can I saw? It’s AMAZING! (of course). You are my inspiration, Kristi!
I am so impressed with your construction skills. Where did you learn them? Do you have a power miter saw, or are you a whiz with a miter box? I love the contrast of dark stain and white paint. Simply an outstanding job…again. Brava.
It looks fantastic! I think you could also stain the hearth trim the same as the mantel and it would look great. Really nice job …. that’s WAY more DIY than I would ever tackle! You ‘da Queen!
Yayyyyy! It looks wonderful. I am glad you added the hearth. I wish acool night or two for you to enjoy it.
I LOVE IT! It turned out gorgeous! Beautiful Job! I am so impressed with your talent!
Great job! Looks fantastic!
It looks simply wonderful. Should be a book on the horizon for all these projects with press and TV interviews, etc. The faux brick is an especially interesting accomplishment in the eyes of Ms. SpoolTeacher and that you were thoughtful to do diagonal and horizontal for wonderful interest and to solve perfection issues. Well, well done.
are you linked up with the owner builder network? http://theownerbuildernetwork.co/
I’m new to the party, but I love the fireplace! I actually really like the trim around the hearth being a different color than the floor. I dunno, maybe it’s just my preference, but I think it makes it look more friendly. Either way, a fantastic job!
WOW! It looks great! And yes, the tiles DO look brown now. I love it when your projects come together so nicely. You clearly have the gift for visioning out what can be done with a blank canvas. Love it!
I absolutely love the fireplace. But , can you move it into another house should you so desire to? I would love something like that in my house, but if we move in the next year, I would want to move it.
Looks so great! So happy for you to have another wonderful accomplishment under your belt. Can’t wait to see a pic of the whole room, like a view from the front door.
Amazing…! I’m always in awe of your DIY vision and skills. Beautiful work!
I’m so amazed at how you can transform your ideas into realities! Beautiful job! You are a wonderful inspiration
Beautiful job! (I had no doubts it would be.) Thanks so much for sharing with us!
You are a great inspiration. Everything you do is AMAZING!!!
you would be just so easy to hate if you weren’t so darn nice, another great job my dear. You are incredible.nancy
I love it….it turned out great! The hearth is a great addition. If I could make something like this (which I don’t think I could) I think the only thing I would have done differently would be to make the mantel a bit bigger then the fireplace. But wow, what a project and really looks great in the room.
So very stunning! ~:0)
All of you Kristi/A2D Fans! have a chance to nominate Kristi’s blog for the Apartment Therapy Homie Awards here: http://www.apartmenttherapy.com/nominate-your-favorite-home-projects-diy-blogs-for-the-homies-awards-the-homies-2014-200257#nominate
Nice job! Bet it feels homey. Oh, nope-I’m sure you will be crazy until that trim is perfect!
I cannot believe how quickly you got that fireplace done. And it looks wonderful. You might consider leaving the hearth trim a lighter color; if it “sticks out like a sore thumb” it might keep you from tripping over it. I just got done chopping my heath out. There is cement imbedded in the floor the pepper distance for building code (it is word burning) which I am going to paint with fire-retardant paint. It was one brick high and in a circular pattern that stuck out into the tiny room much further than required. It was too low to sit on but too high to not trip over. Too small to place all 4 legs of a chair and to high to place just one or two. So it is gone. I am inspired by you to replace the surround and mantle that former owner took with them. Thank you for sharing and inspiring!
So beautiful! I look forward to each one of your projects. Absolutely incredible what you can do!
Beautiful! Any chance of a full room photo so we can see how the fireplace looks with all of the wonderful decor you already created?
I love it Kristi! Are you still intending to do a “chimney” like the inspiration photo once your floors are leveled? I think it looks phenomenal. The chimney will certainlyb e the icing on the cake! Stunning!! and so inspiring…
I am extremely impressed! Your fireplace is beautiful! I have been wanting to be able to build things, and re-purpose old furniture but not long after I asked my husband to teach me how to use his power equipment in the garage, I nearly cut off my thumb with the hedge trimmers and now I have been ban from anything with a blade! BUMMER,
Kristi you are amazing I look always look forward to seeing a post from you in my email box.
Thanking you for being such an inspiration.
Cheers Margo on Vancouver Island
As usual, you pulled it off and quite successfully! It looks great. It looks SOOOOO Real!
Kristi, I am aghast that you occasionally receive negative comments. I really am. A sad commentary on a small part of our society for whatever reason..?
I apologize for them and want to add my comment that you are
The Bomb!!
Each morning when you post another amazing feat that you accomplished AGAIN I picture your sweet little self up till the wee hours. While I sleep lol
You have amazing talent, ambition, work ethic and kindness to share with us. Thank you. You are an inspiration to many. Don’t let anyone get you down 🙂
Awesome!
It is just gorgeous! I love it! Every time I read one of your DIY posts, I come away wanting to duplicate the project for my home until reality sets in and I remember that I am no where near as talented as you are! You truly are an amazing talent!
WOW!!! I’ve been reading along and getting your newsletter and I am in awe! I WISH I could tackle something that large. I seriously said to myself “and this week you made cupcakes and faux milk glass” LOL!!! Joking aside, your fireplace came out great. My parents just had one installed and yours is nicer!!! (Don’t tell them I said that!) I love the tile too! It’s really pops!
Congrats on a big job, well done!!! Julia
Oh La La!! ..You did a great job and it looks wonderful!
Looks great!! Your fireplace project inspired me to take a look at my own fireplace! I just bought an electric insert (looks like the one you have) and am waiting delivery of it. Will bring a cozyness to my living room, like yours!
I love it! Since watching your posts that I discovered before Christmas holidays,this old gal is re-inspired to get going on my projects once again! Thanks,and I am hooked on watching for your posts!
FOR KRISTI’S FANS:
Apartment Therapy runs an annual contest, the “Homies” award, for home decorating, DIY and similar blogs. Here’s the link to cast your vote: http://www.apartmenttherapy.com/nominate-your-favorite-home-projects-diy-blogs-for-the-homies-awards-the-homies-2014-200257
Great job. Love the design, the paint, the tiles, the grout, the handiwork, everything. Just a couple of questions to satisfy my own curiosity: Why did you use pine moulding and not oak? Wouldn’t it be easier to match the stain color? And when/how do you choose wood filler over spackle when painting? To help me in future projects, I’d really like to hear your reasoning—I’ve read you long enough to know that you always have good reasons for doing things! 😀 Thanks.
Well done!
Fantastic job! You are the DIY Queen, for sure! Looking forward to the over mantle…it’ll really be a focal point then.
I still can’t get over how fantastic your black “bricks” turned out. That’s my favorite part… or maybe it’s the contrast of the stain and the white paint, or the hearth, or the tile, or the trim, or … Ok. I love all of it. 😀
Wow! That is so gorgeous! I’ve really enjoyed watching the progress and the process. I will admit I like it better without the hearth though. Just a personal preference. I know the room is not done but could you post some pictures of what the room likes like now that the fireplace is in? I am so anxious to see it.
You are truly amazing! Love it. Joy (from Canada)
I think it’s beautiful. The black brick is my favorite, also. And thanks for the hearth explanation.
You must be so pleased and proud of yourself! It’s absolutely beautiful and adds so much to your room. Hope you and your husband can relax and enjoy it soon!
That is gorgeous..what wonderful work you do!
Kristi, your end result is the reward. Your hunches always seem to be exactly right.
The finished fireplace is so elegant and beautiful. Another inspiring job completed!
Wow….it looks amazing….you did such an awesome job! I bet it’s so cozy in the evenings especially…your whole room is beautiful!
http://queenoftheisle.blogspot.ca
That is simply the most realistic looking electric fireplace I have ever seen. The hearth adds so much, but every bit of it is equally charming. And like others, I love the black brick. I just had a flashback to where this room began, and I have never been so in awe of a living human being! It’s time to invite that realtor for a spot of tea in this living room. I want to be a fly on the wall when they get a peek, and you tell them you are just working on “Phase 1” of this room! I hope Matt is as happy with this wall as he was of the entrance wall. LOL. I feel like doing a happy dance for you! I know every one of your fans will join in.
It looks fab!!!!!!! What a wonderful job you did…
I love the fireplace. I ordered the insert the day you posted it so I could copy you once again:) I am a 50 some year old woman and my sister asked me today how I get my projects done so fast. I replied Kristi! I watch what you do and I try to keep up. Keep the projects coming, I am inspired
I love it
What wonderful craftsmanship! The time and effort have definitely paid off!!!
Ever since your comment about the a/c in the window I’ve been thinking…
WHAT IF you built a frame that covers the top and sides with a vented front (similar to a radiator cover) in some really awesome cut out pattern. Hinge it at the bottom to the window trip or just below and the use a cool latch at the top that would allow access to the controls and proper venting/air flow. This would allow the much needed function of the a/c but would disguise the not so sheekness of it. Work with it, not against it right?!? You could paint it out the same color as trim / window casings and it would “blend in” as a more of a decor element.
Anyway just a thought I had to share.
I can’t stand negativity and so when I read the post about the a/c and ugly comments it sort of became a challenge to make that necessary evil blend into the beautiful home you are creating.
Many blessings to you!!
This is a great idea!
And that fireplace really is a work of art! It had never even occurred to me that you could build one like that!
Incredibly pretty! I just love it. And its build seemed very fast to me too.
gorgeous, your blog has got to be one of the most inspiring and educational. you may thing it takes a long time to get things done, but you should see my list…..currently stepping over cabinet parts for my laundry room just to get to my washer, and scraping my leg each time. ouch
It came out beautiful! I love the hearth, that is part of what makes it look real.
I love it! It came out beautiful! I still find it freaky the grout changed the tile color to the eye, yowzers:)
The hearth was such a great idea, I love the trimwork you did on the sides and front, it’s truly beautiful!
Absolutely stunning! LOVE it!
I absolutely love the whole thing, but I’m dying over that fabulous faux brick treatment! Way to go!!!!
Yowzas!!!!! That is beautiful! I especially love the color of the mantel, the shape of the whole thing in your living room, and those gorgeous tiles on the front and hearth. You work at an amazing pace (I have to have a nap in the middle of each of your posts) and accomplish so much on a smallish budget. Well done!
*THUNDERING ROUND OF APPLAUSE!* Wow! It’s AH-MAZING! YOU are AH-MAZING! I am so thrilled with the way this fireplace turned out, and it’s not even mine! I’m living vicariously through your DIY experiences! As per usual, you got this project done in an astonishingly short amount of time. I’m so impressed with it, and with your talent!
Yay you!
Absolutely FANTASTIC!! It is beautiful and it makes me want to make one. GREAT job!!!
Oh my gosh Kristi, it’s gorgeous! I simply love it. The detail is amazing and I just can’t say enough. Job well done! My hearth is exactly like that and yes, the trim is the same color as the hardwoods. Every time you do a project you do it with such style! I love that you spend so much time on the detail. It shows!
I have 2 questions for you please!
1. Is it on purpose that the trim on your fireplace lines up perfectly with the trim on your wall? If so, well done and good planning -and if not…well it looks like it was suppose to and looks awesome! Perfection.
2. On a different subject all together….the close up of the rug next to the fireplace looks exactly like the one I just purchased online. It was delivered yesterday and it is quite a bit rougher than I had expected. I’m wondering if yours is very rough too and if so is it hard to vacuum and/or clean?
Thanks for posting, I was so excited to see the finished fireplace!
Wow!
You are freakin’ awesome! Love it!
So beautiful! You will have many hours of enjoyment from this fireplace! It adds so much warmth and character to the room.
It’s BEAUTIFUL and I love it with the hearth
Thank you for all of your detailed instructions on all of your projects. This is just amazing! What has been your favorite project you’ve done? Also, I live in Oregon and was wondering where you lived in Oregon and how long ago. Do you ever rest, lady?
I think you did a wonderful job! You are an inspiration to all. I can’t wait till you get the top part done so it will look totally done! So happy for you!
Looks fantastic,you work so fast,looking forward to seeing the whole room finished x
O M G!!!! It looks absolutely fantastic!!!
Very nice and way to go!
Please….PLEASE… rethink the Hearth. You have such an eye for detail, which is why I’m a fan. However the hearth, in my humble opinion, took away from so much more than it added to your creation.
Absolutey beautiful! So wish I was as talented.
YOU MADE THAT!!!!! Wow, I just love it. You continue to amaze me with every project you do! Thanks for sharing what you do with us, it is inspiring.
Hi kristi, simply amazing. I have no idea how you can do this all by yourself. I can’t tell you just how impressed I am with your skills and stamina. This fireplace is truly remarkable. I’d love to see a post about how you work. What a typical kristi day is like. Anyway I love your work and your blog. Cheers.
Hi Kristi,
I love your blog; in fact, you are most talented person .The grate, which you are adding is amazing. You have done good job. I especially like this one as I have been thinking of adding one to our living room as well.
Thanks
Looks great. My idea worked for you, too. Happy to have shared. You’re welcome. 😉
The fire place is absolutely AMAZING!! The room is coming along great and I can’t wait to see the front window completed. I too think the side tables are crowding the room a bit – the beautiful floor lamps you had earlier would fit nicely and provide the lighting you are looking for. I have seen canvas art copied and it is a perfect solution; mom’s art over your fireplace will compliment the room beautifully! Thanks for all you share!!!
I am new to your blog, but this build is amazing. I love the way your “bricks” look. I’m so glad you decided to bite the bullet and add those. It’s awesome!!!!!
Great job. I was wondering why you decided not to build a chimney to finish the look if a real fireplace.
Kristi I really love your blog. Love your creativity and applaud your patience. My house is 10 years old and certainly ready for some small repairs but I’m ready to change my decor and will be using this idea of yours in my master bedroom. Well if I can get my husband around to helping me between his full time job and masters degree courses (ok not gonna happen). So I will try and see if where this falls on my must or will or want TO DO List. But it’s so great I want to share with my website readers
Thanks again
Tracy
http://www.housewise.com
Amazing blog! It is BEAUTIFUL and I love it with the hearth. I think you did a wonderful job! You are an inspiration to all. I am so happy with your ideas. It is just good, sound thinking.
Hi, I really like this faux fireplace, say I had a question. Is that grate, logs and ember insert from QVC? It looks like the one I am planning to get for my own faux fireplace and I’m wondering if the dimensions are the same as yours? Thanks so much for the instructions. I think it turned out beautiful.
No, I bought mine from electricfireplacesdirect.com
I would love a fireplace in our home but they can be so expensive. This is so neat that you were able to make your own and it looks like you spent a lot less than you would have if you would have bought it in the store. It also looks beautiful and cozy! Nice work!
This is so much less expensive than if you were to buy this in a store. This is also extremely beautiful.
You did a beautiful job!
We have 2 faux fireplaces.
Both old 1950s faux fireplaces found on Craiglist that we “did our own thing with” including the same electric fireplace insert that you have used, the other we have the original 1950s faux birch logs with a light bulb socket that still works.
We created a more substantial hearth – laying 2 cinder-blocks locks on the side and re-painting the original black wood hearth black, under the heath lined up bricks from Home Depot painted the same black to hide the cinder-blocks the black bricks encase the hearth boosts the whole faux fireplace up about 4 inches from the floor.
We LOVE both or our faux fireplaces.
One in the extra bedroom/office/man-cave has a flat-screen TV hung over it, the room has a day-bed, wing chairs, ottoman, desk.
One is in the eat in kitchen just 14 inches deep it hugs the wall “cut-outs for the baseboard” by the manufacturer it holds candlesticks, baskets full of napkins, etc. perfect for the dinning area. much less bulky that a china cabinet.
Using old faux fireplaces saved us a bundle $$$ no costly lumber, tile just some paint, bricks, etc.
Kevin