DIY MDF Bathroom Countertop For An Undermount Sink
I’ve made a lot of bathroom countertops over the years, always out of stained wood. But for my studio half bathroom, I wanted a bright white countertop. I didn’t want to pay $50+ per square foot for something like marble or quartz, so I did something I’ve been wanting to try for a long time now. I DIYed an MDF bathroom countertop for an undermount sink.
Yes, that’s right. I took one of the least water-resistant wood products available and turned it into a countertop. 😀 Here’s how it turned out…
It’s coated in a beautiful and almost flawless layer of resin to make it waterproof. But I’ll get to that later. Let me start at the beginning.
I used two layers of 3/4-inch MDF to make my countertop. Since my countertop is small, I was able to use two of the smaller panels (2′ x 4′) which are more convenient to use, but if your countertop is larger, you’ll have to use a 4′ x 8′ sheet. You can have Home Depot or Lowe’s cut it down for you. Either way, I would suggest starting with pieces that are larger than the finished size you need.
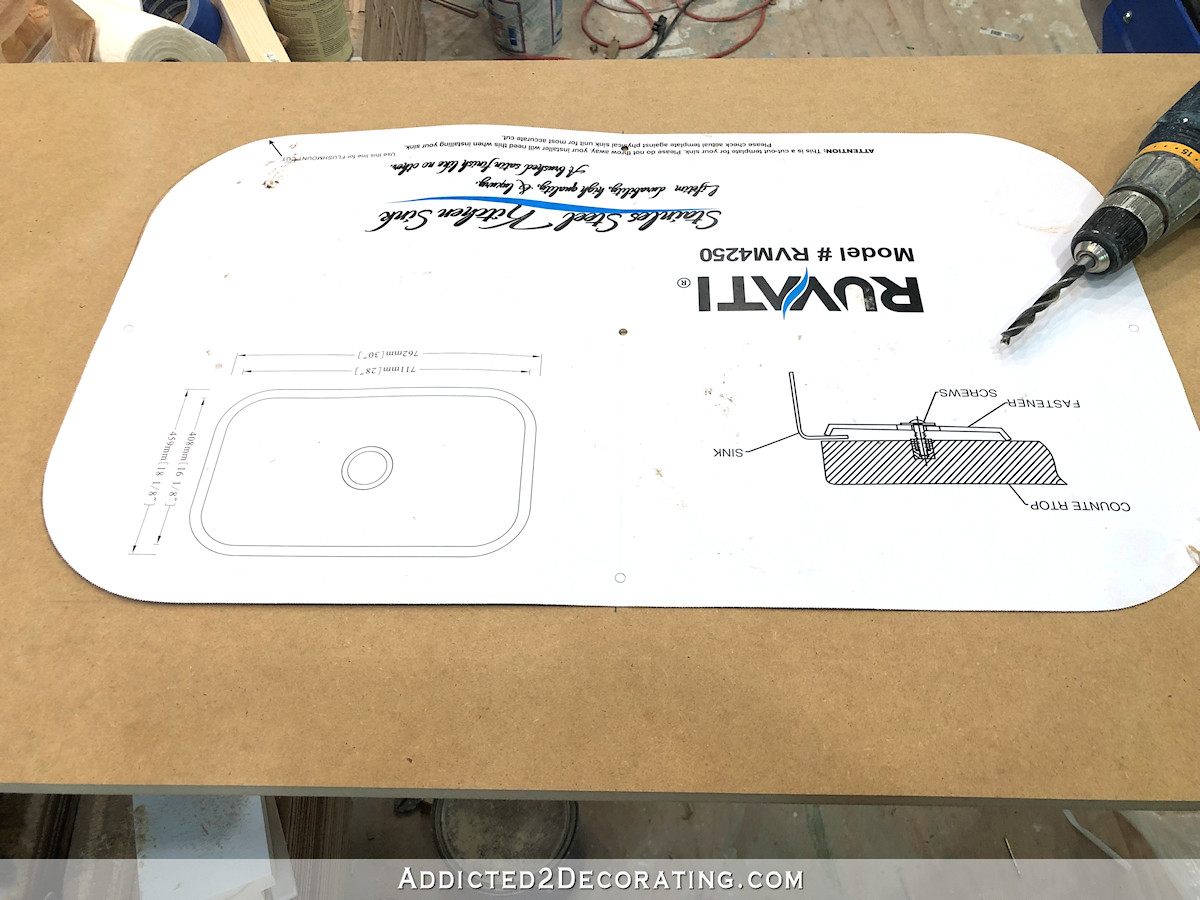
I put the first piece of MDF on sawhorses and used the template that came with my undermount sink to trace the pattern onto the center of the MDF.
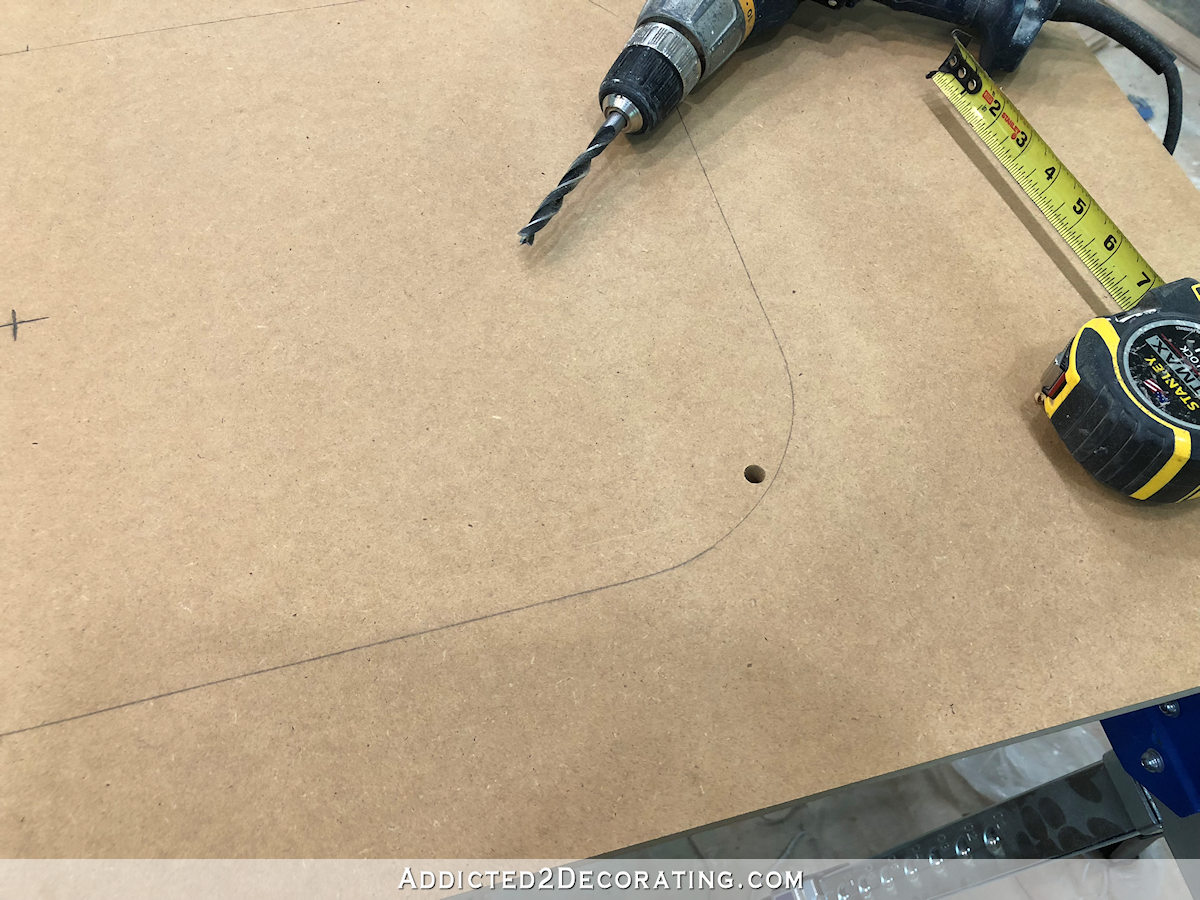
Then I drilled a pilot hole in one corner to use as a starting point to use a jigsaw to cut the sink hole.
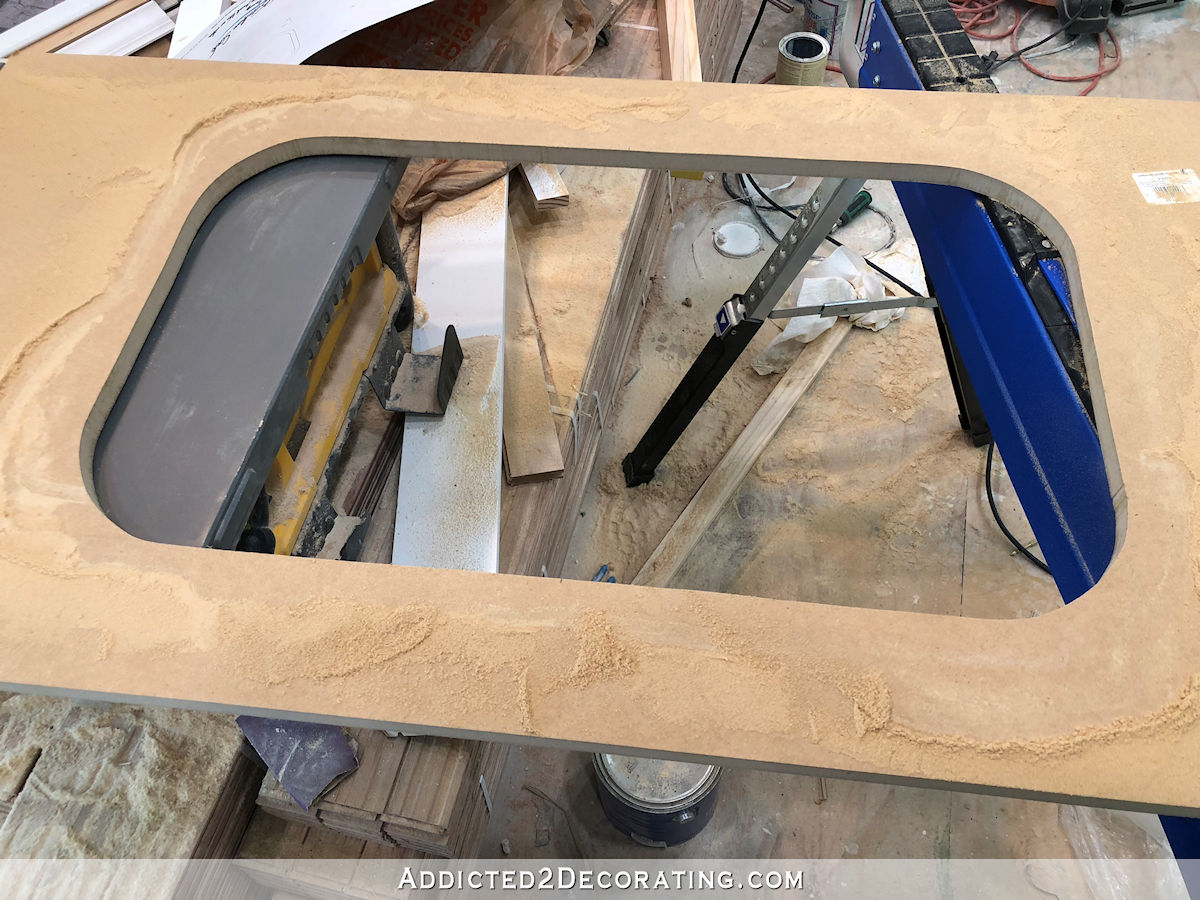
I cut it very slowly and very carefully to make it as accurate and near-perfect as possible. Here’s how it looked at this point…
I did a quick test fit on the sink to make sure it lined up just right.

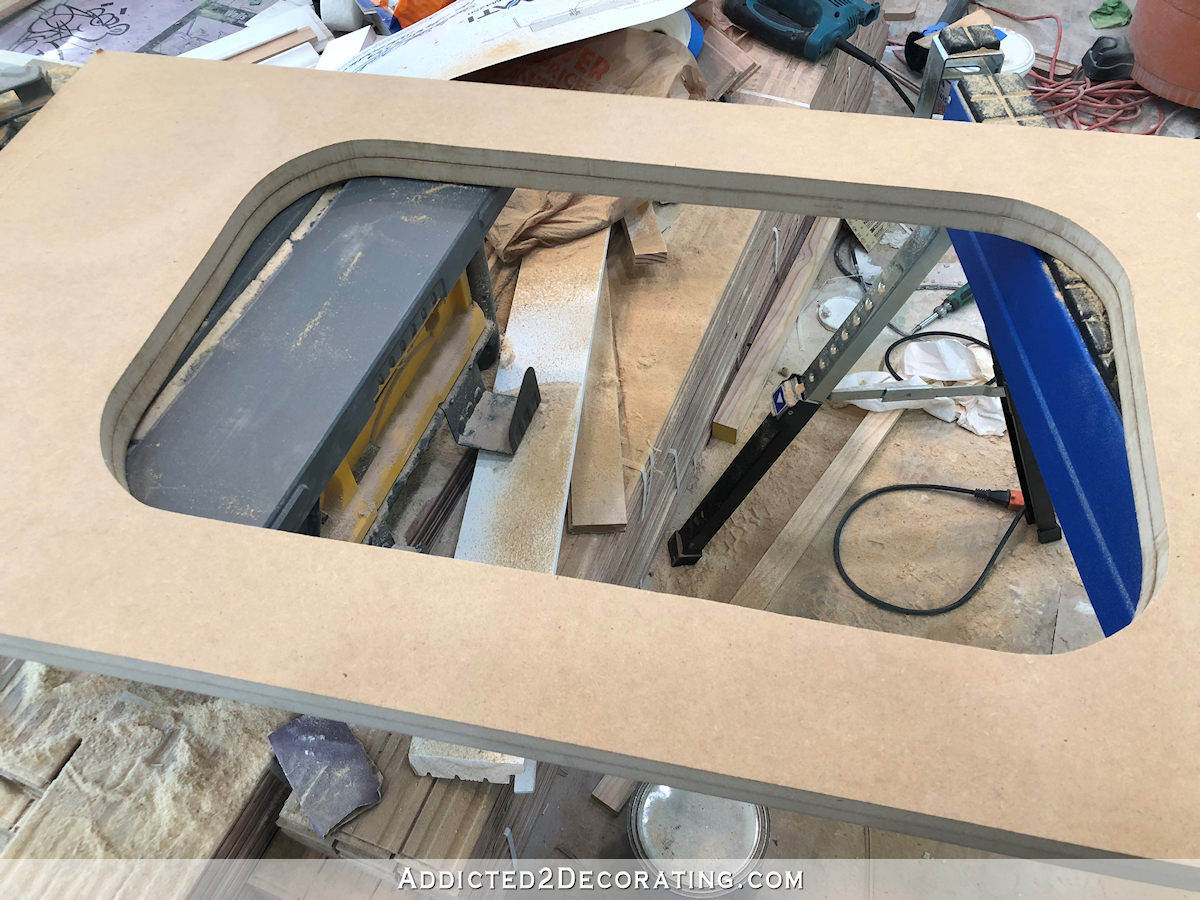
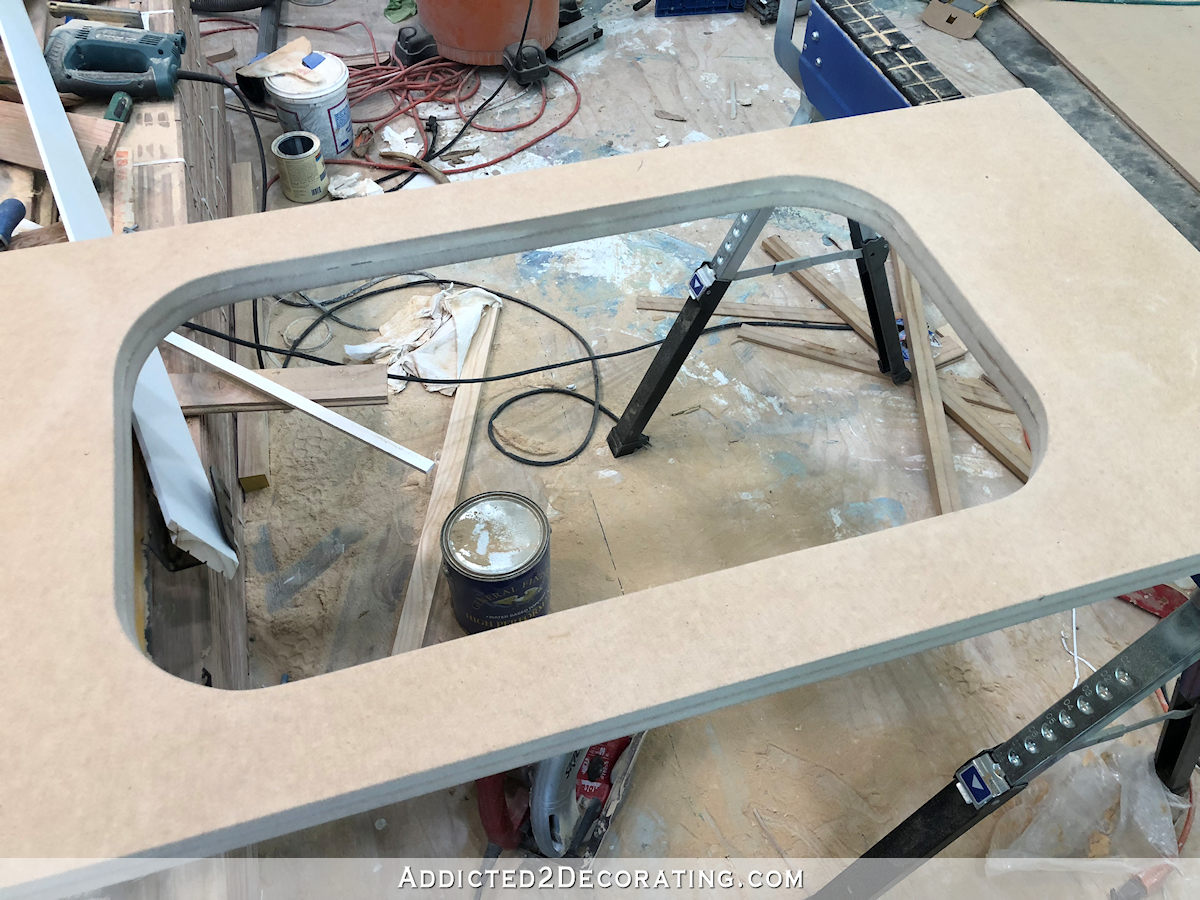
I used this piece of MDF to trace the sink hole onto the second piece of MDF, and cut it out the same way. Then I stacked the two pieces to make sure they lined up.
At this point, it wasn’t perfect. It wasn’t anywhere near perfect. But it’s MDF, so I was confident that I could sand my way to near-perfection.
Next I used a generous amount of wood glue on the first piece of MDF…
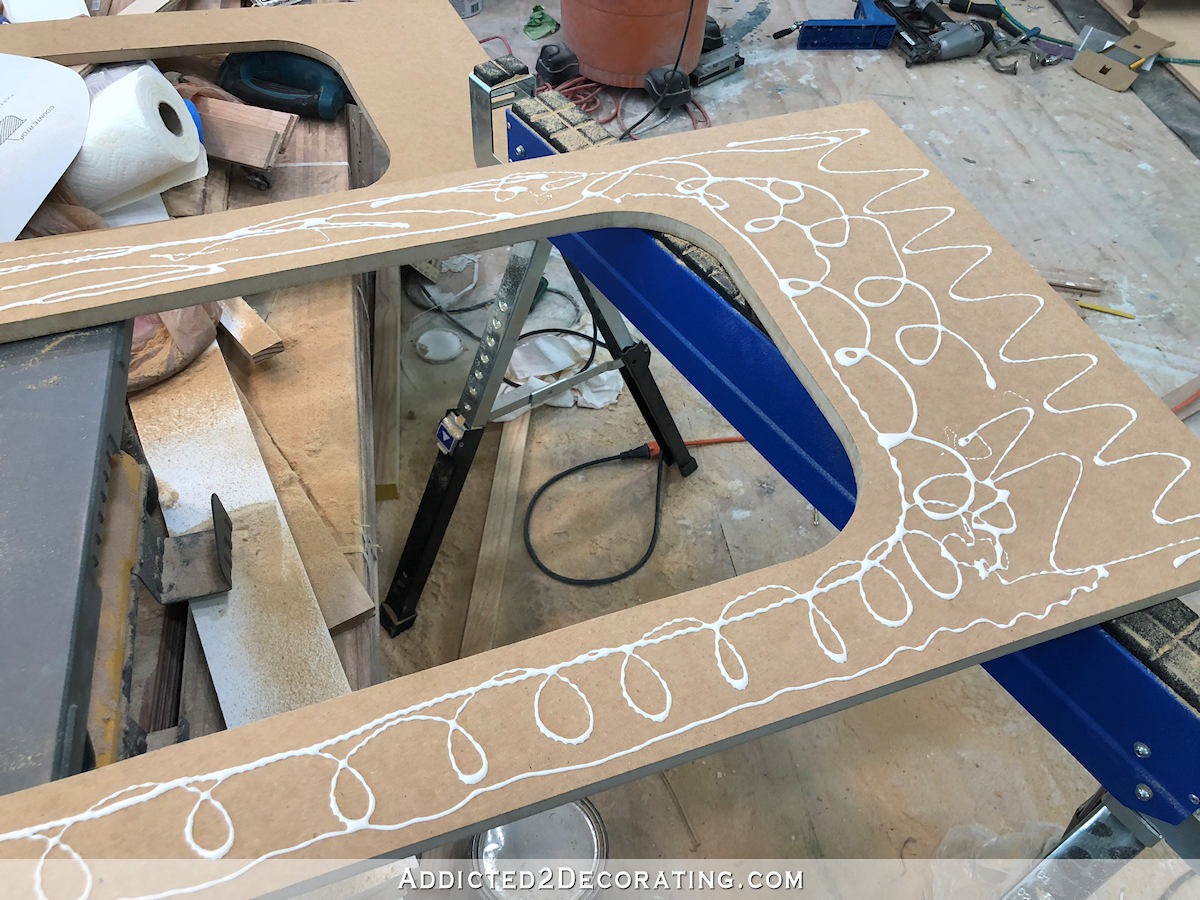
I spread the glue, making sure that there was a continuous and even layer around the sink hole.

Then I placed the second piece of MDF on top, lined it up, and clamped the two pieces together. I let it dry for about three hours.
I used wood filler around the inside edge of the sink hole to make sure any tiny little voids would be filled and the finished sink hole edges would be as smooth as possible.
When sanding, I spent a lot of time concentrating on these sharp edges…
…using 150-grit sandpaper and sanding by hand to soften those sharp edges ever so slightly. I didn’t want rounded edges, but I just wanted to soften them a bit.
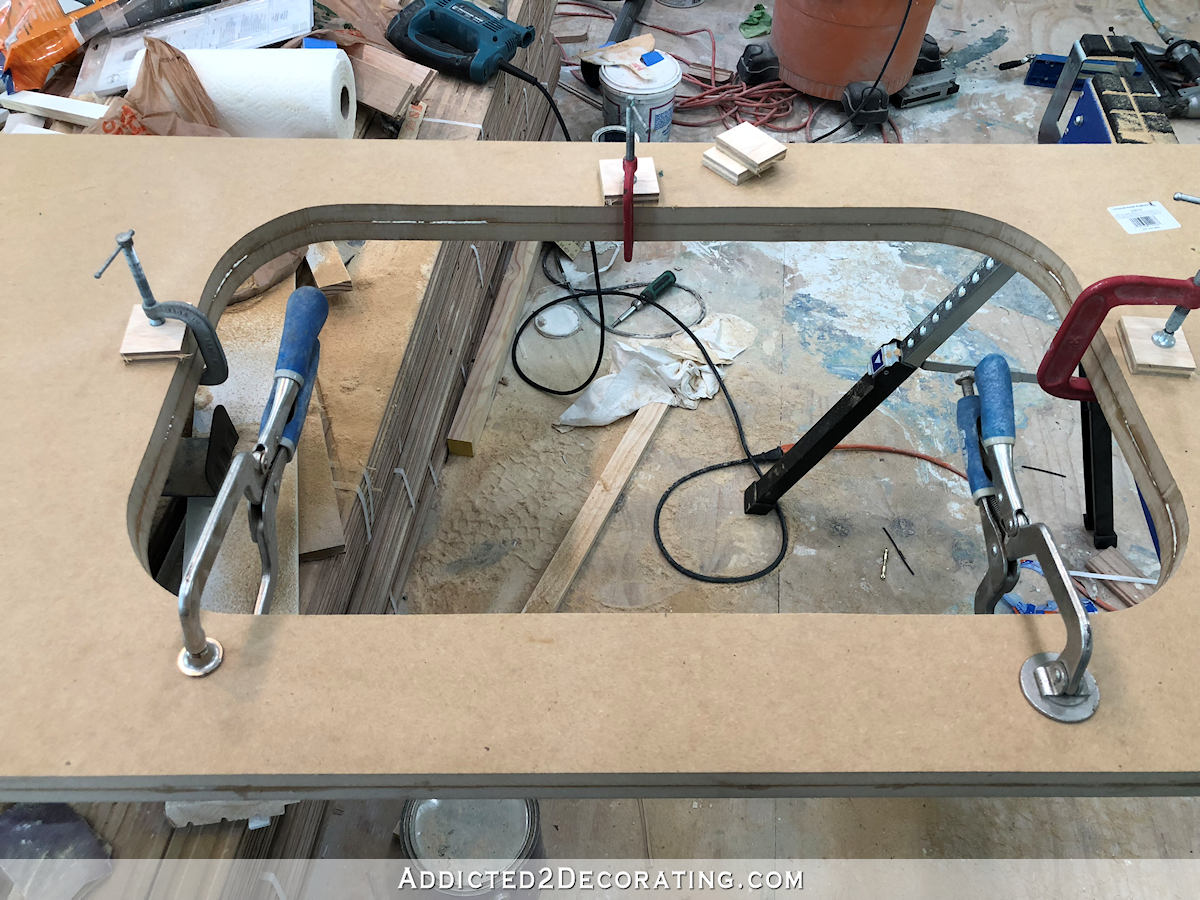
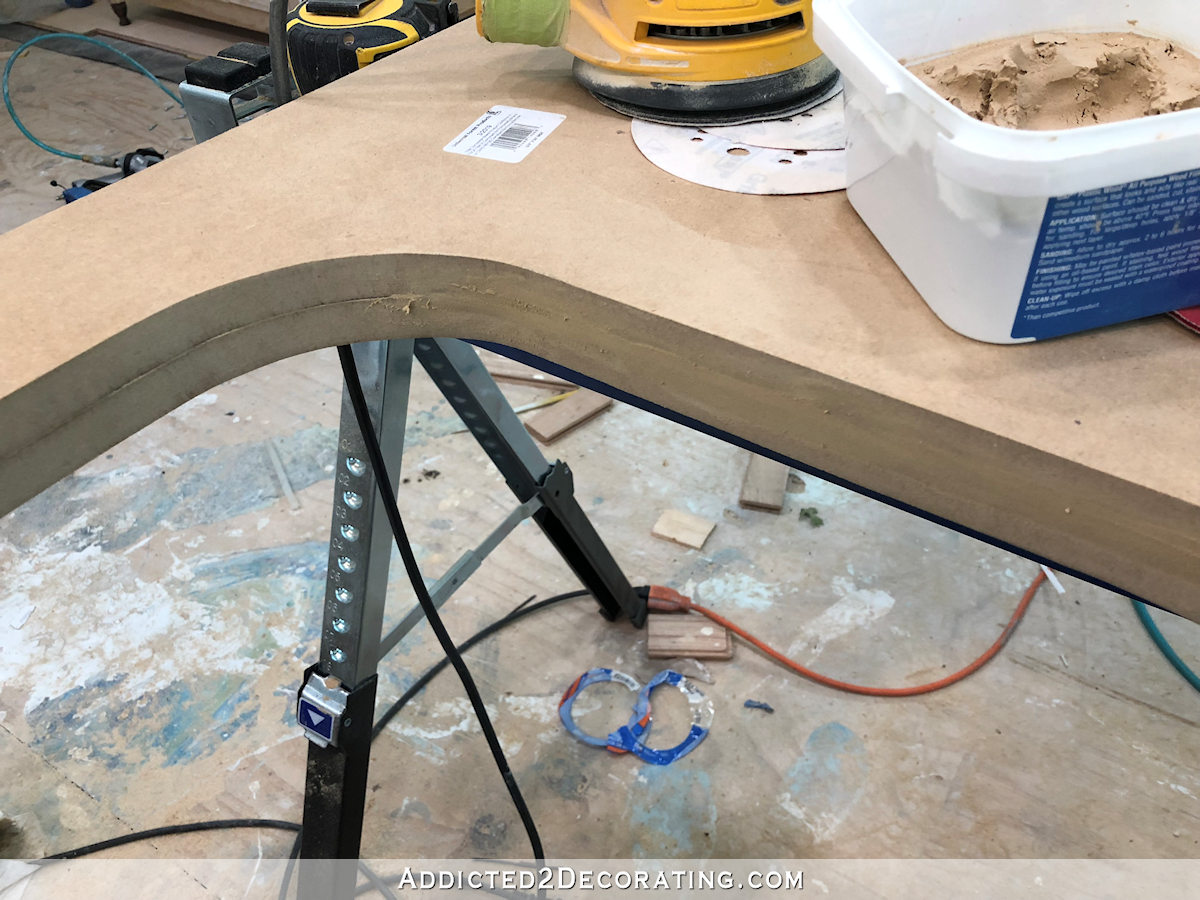
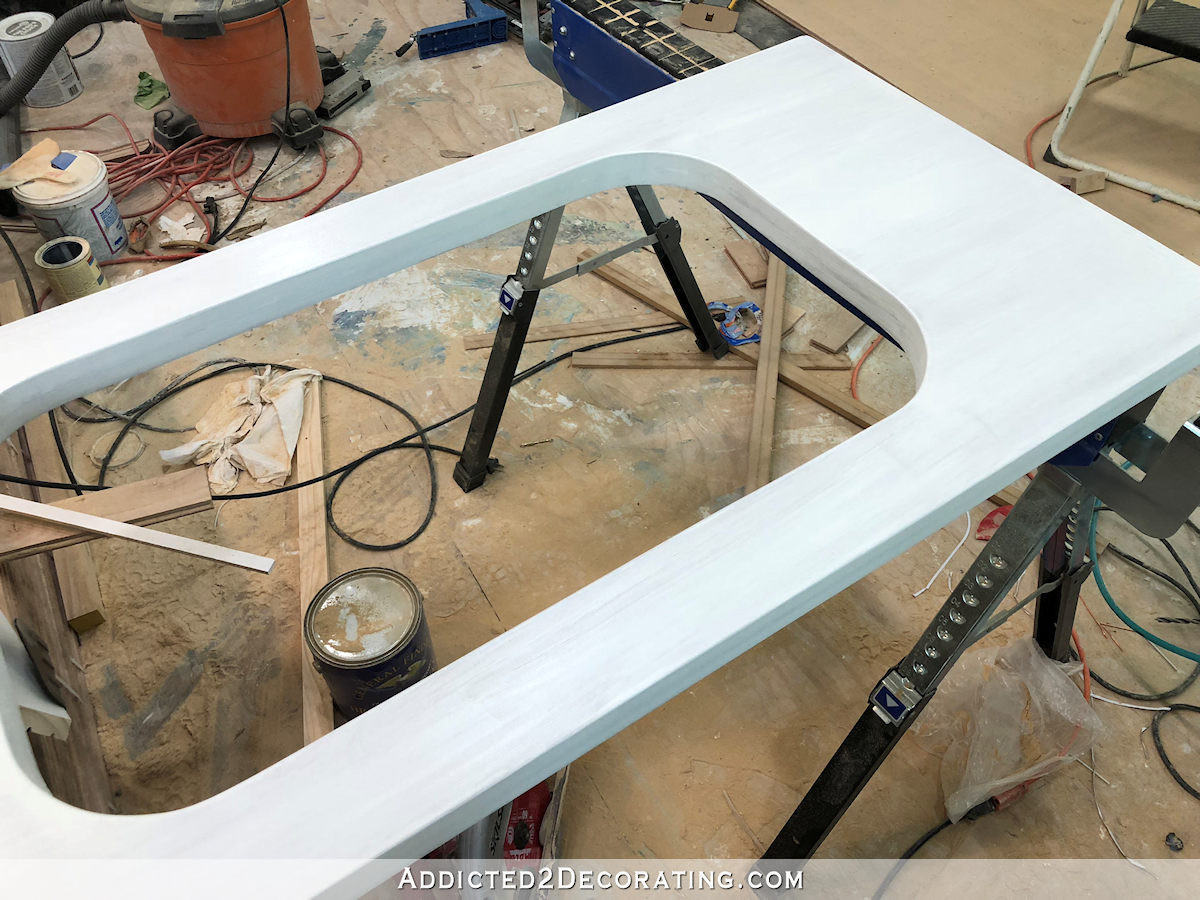
At this point, I did one more test fit on the sink and vanity.
With the countertop there, I used a pencil to trace around the vanity on the underside of the countertop.
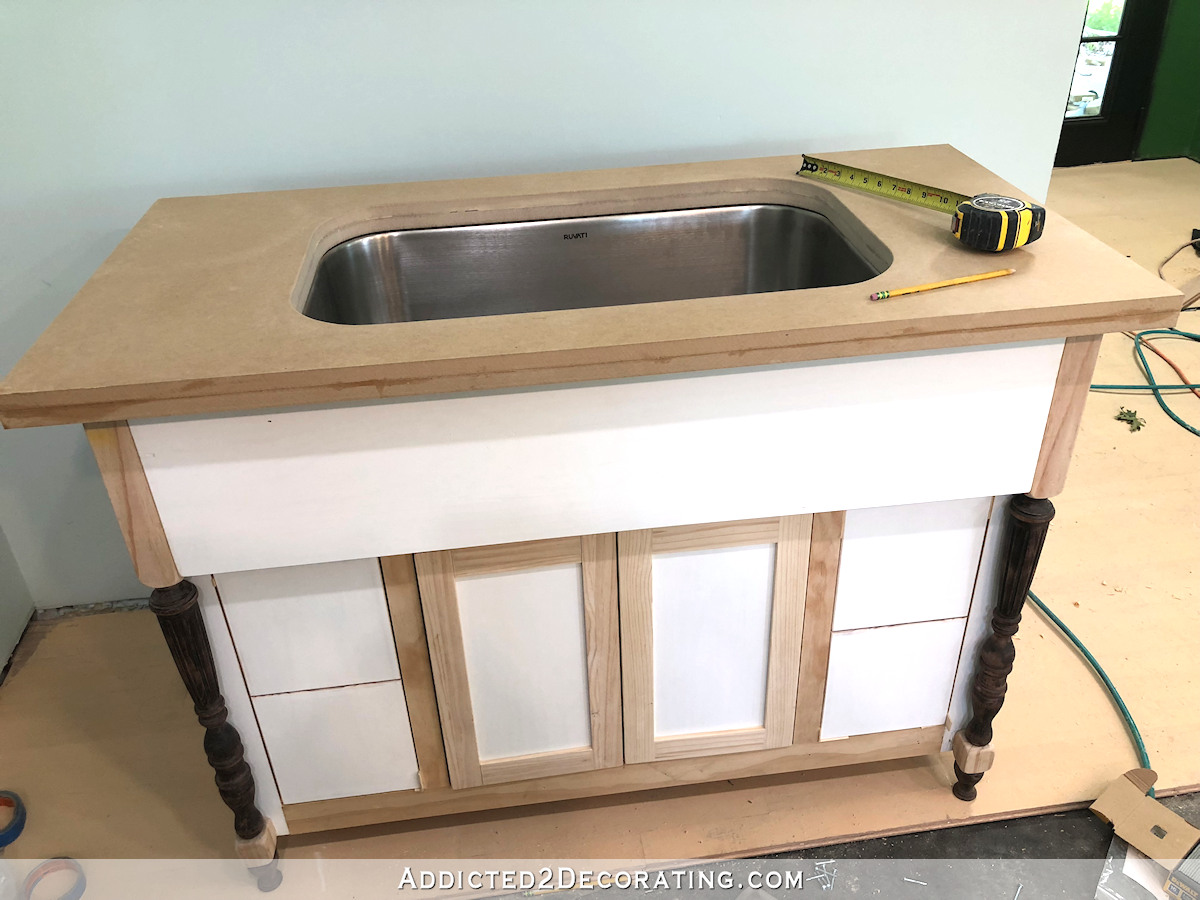
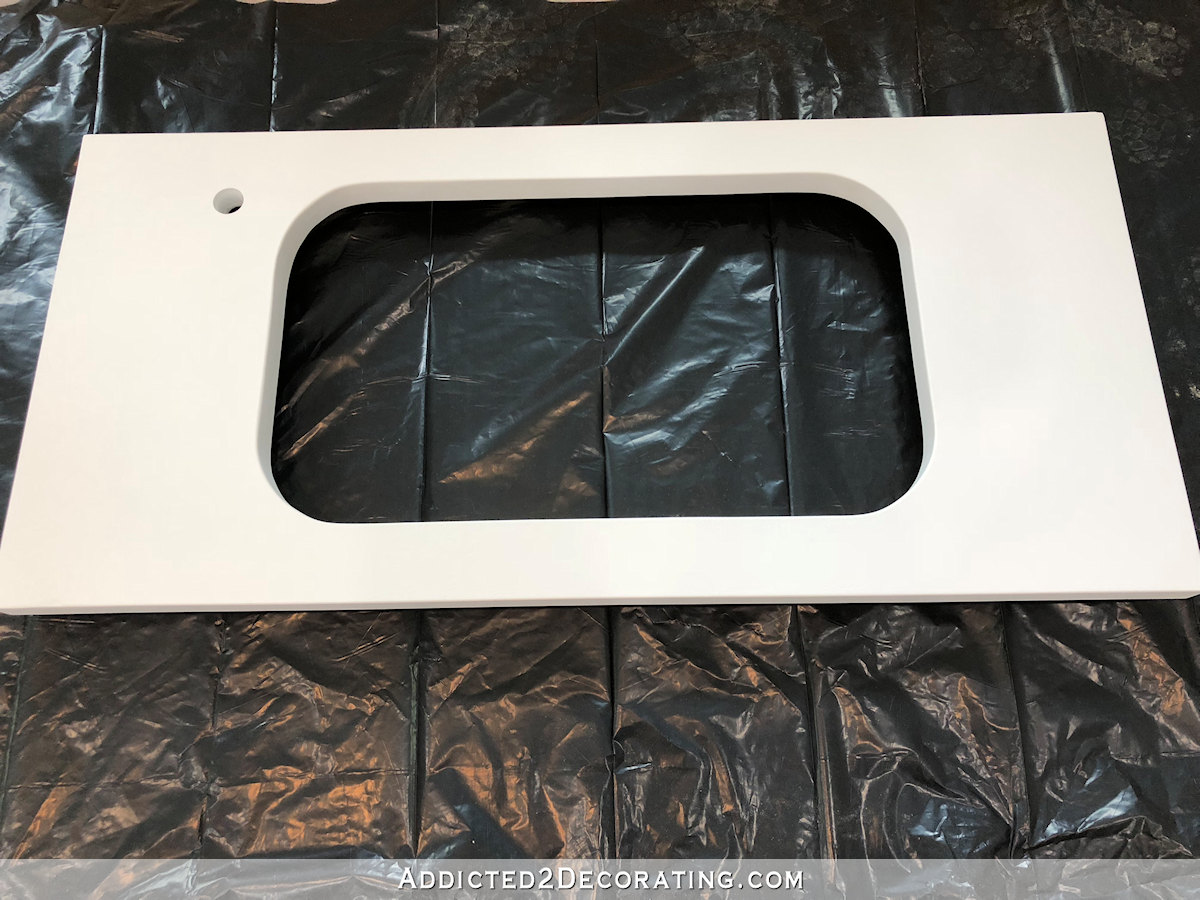
And then using those pencil marks, I used my circular saw to cut the countertop to size. I left a 1.25-inch overhang on the front and right side. I cut the back side flush with the back of the vanity. And on the left side at the wall, I cut it just a bit over 1.25 inches so that it would go all the way to the wall. I’m hoping that discrepancy won’t be noticeable in the finished bathroom.
With the fit just right, I started sanding. And sanding. And sanding some more. I sanded the sink hole edges using my electric sander starting with 80-grit sanding discs and working my way to 220-grit. I did the same around the outer edges of the countertop. And then I sanded the entire thing by hand with 150-grit sandpaper, concentrating again on softening any sharp corners and edges.
I got everything as smooth as possible, and then started the priming and painting process.
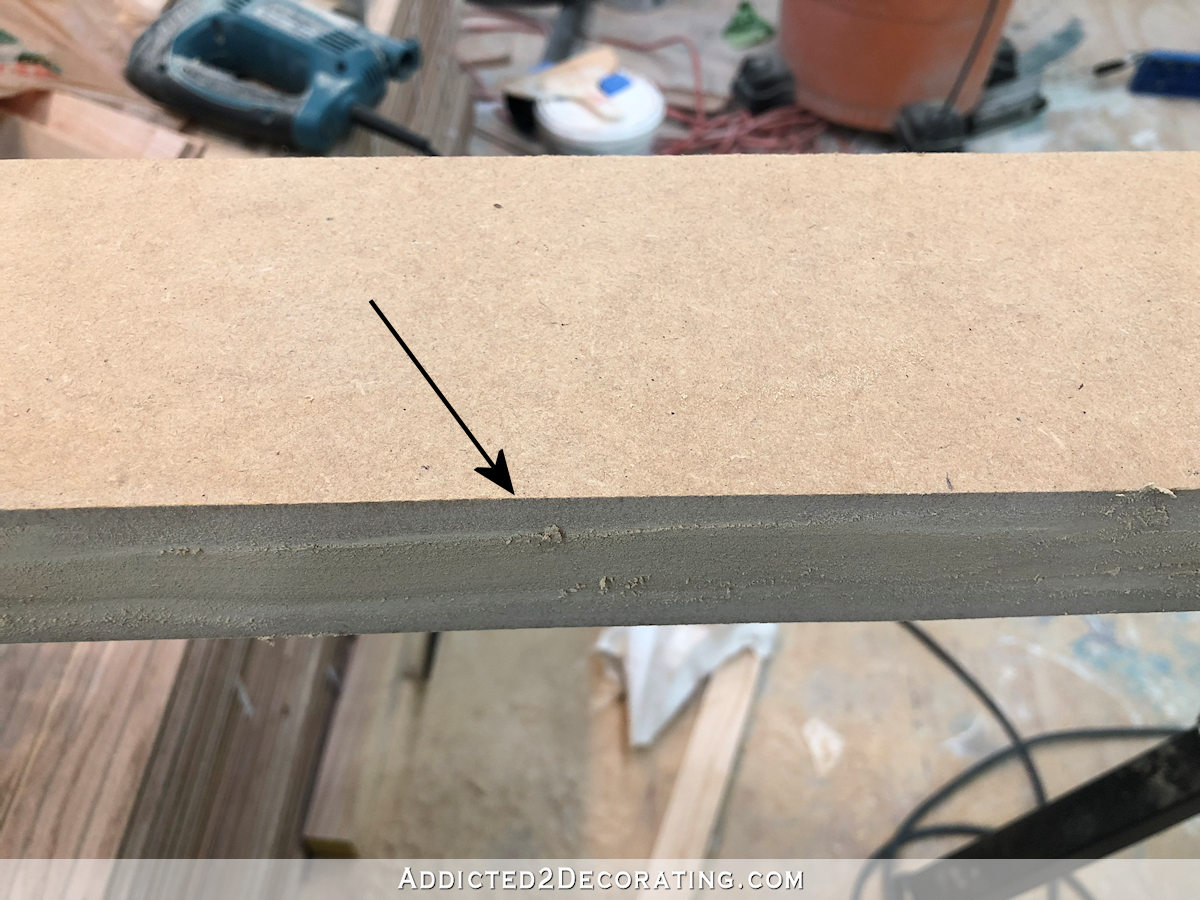
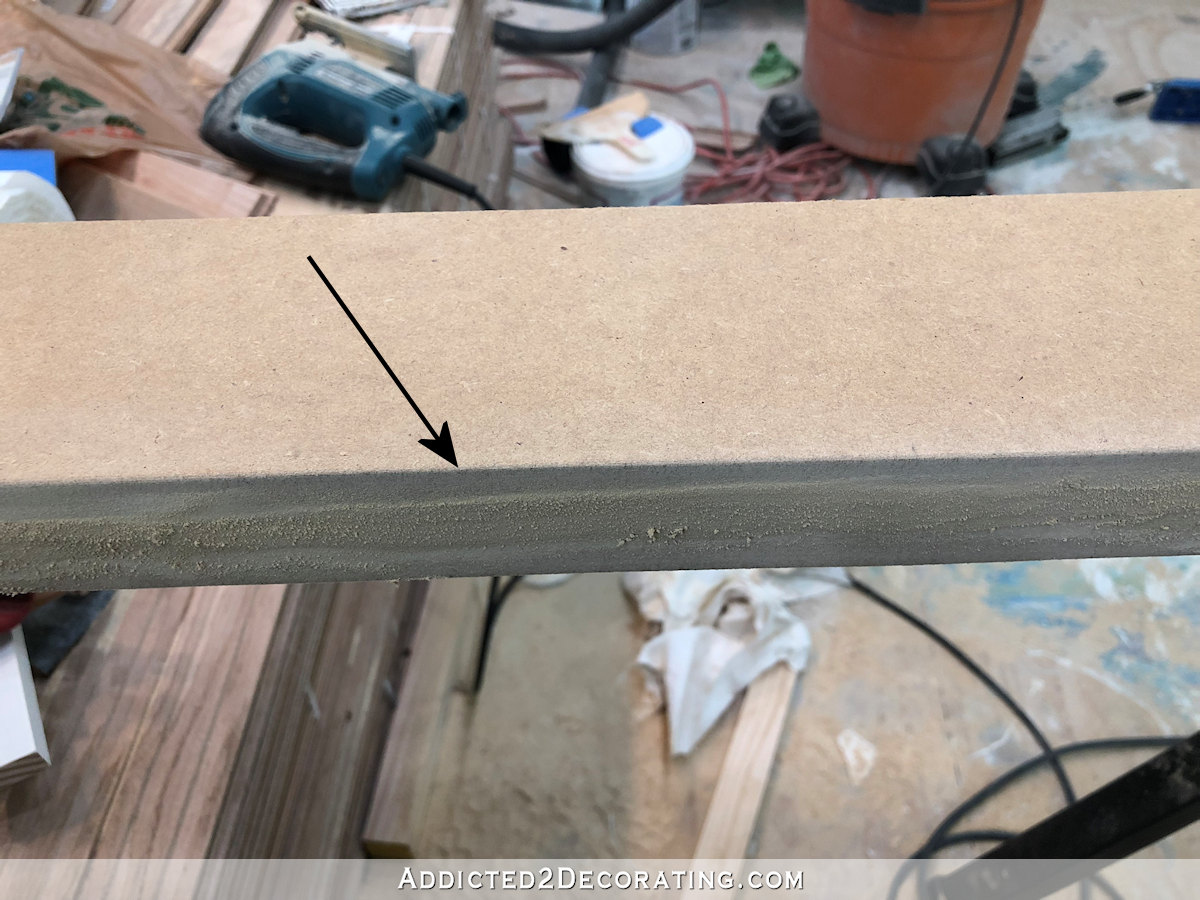
I did the bottom side of the countertop first, and primed it with my favorite primer — Zinsser Cover Stain (the oil-based stuff). I used a brush to apply it. It’s virtually impossible to get a perfectly smooth sanded finish on unprimed wood and MDF, so the primer highlighted imperfections that still needed to be sanded.
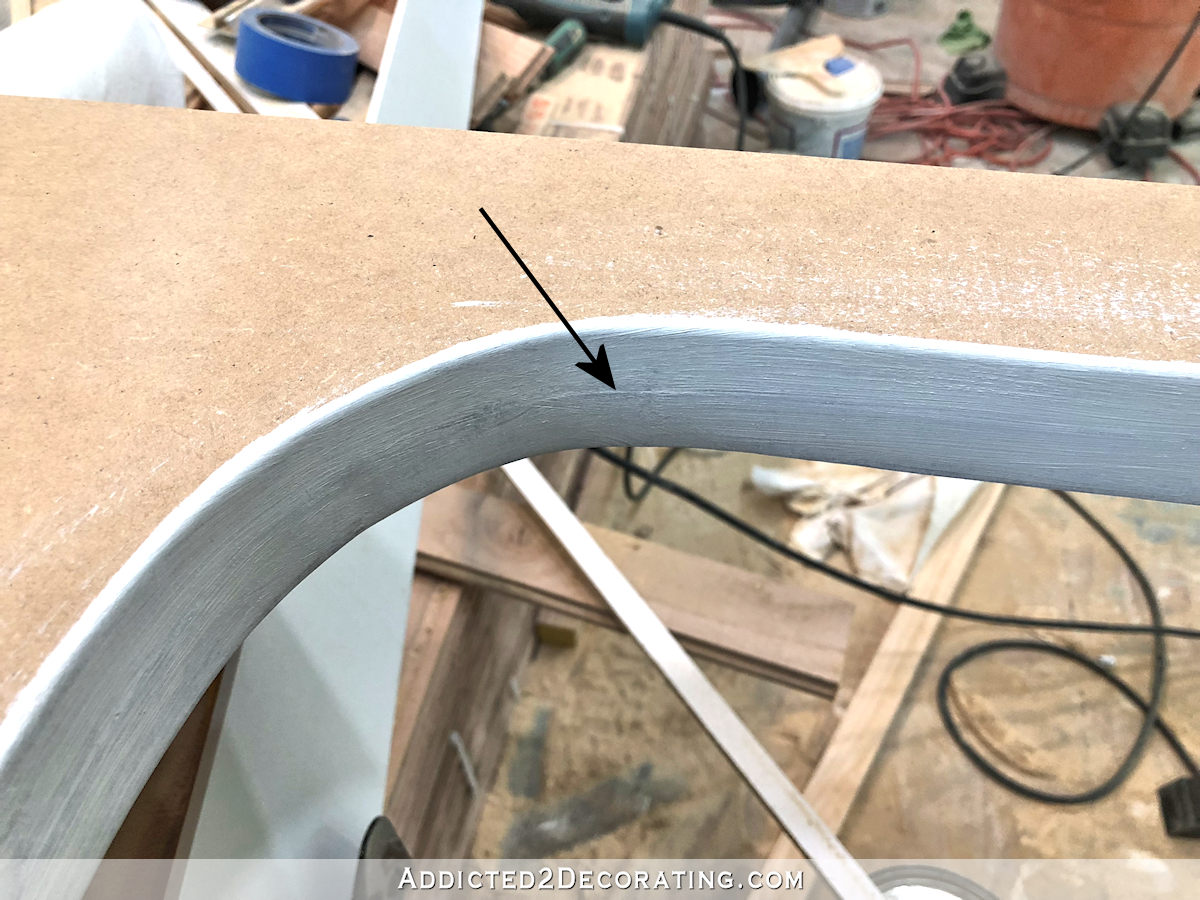
But that’s a good thing. Primed wood and MDF is so much easier to sand and get a near-perfect finish on, so once the primer was really dry, I did quite a bit more sanding. You can see in the picture below some of those imperfections in the sink hole edges that needed more sanding once the primer was dry.
Once the primer was dry and the additional sanding was finished, I drilled the faucet hole using a 1 3/8-inch spade bit, and then painted the underside of the countertop using a 6-inch roller for smooth surfaces.

Once that was dry, I gave it a quick sanding by hand with 220-grit sandpaper, and then applied three coats of General Finishes High Performance topcoat in a flat finish.
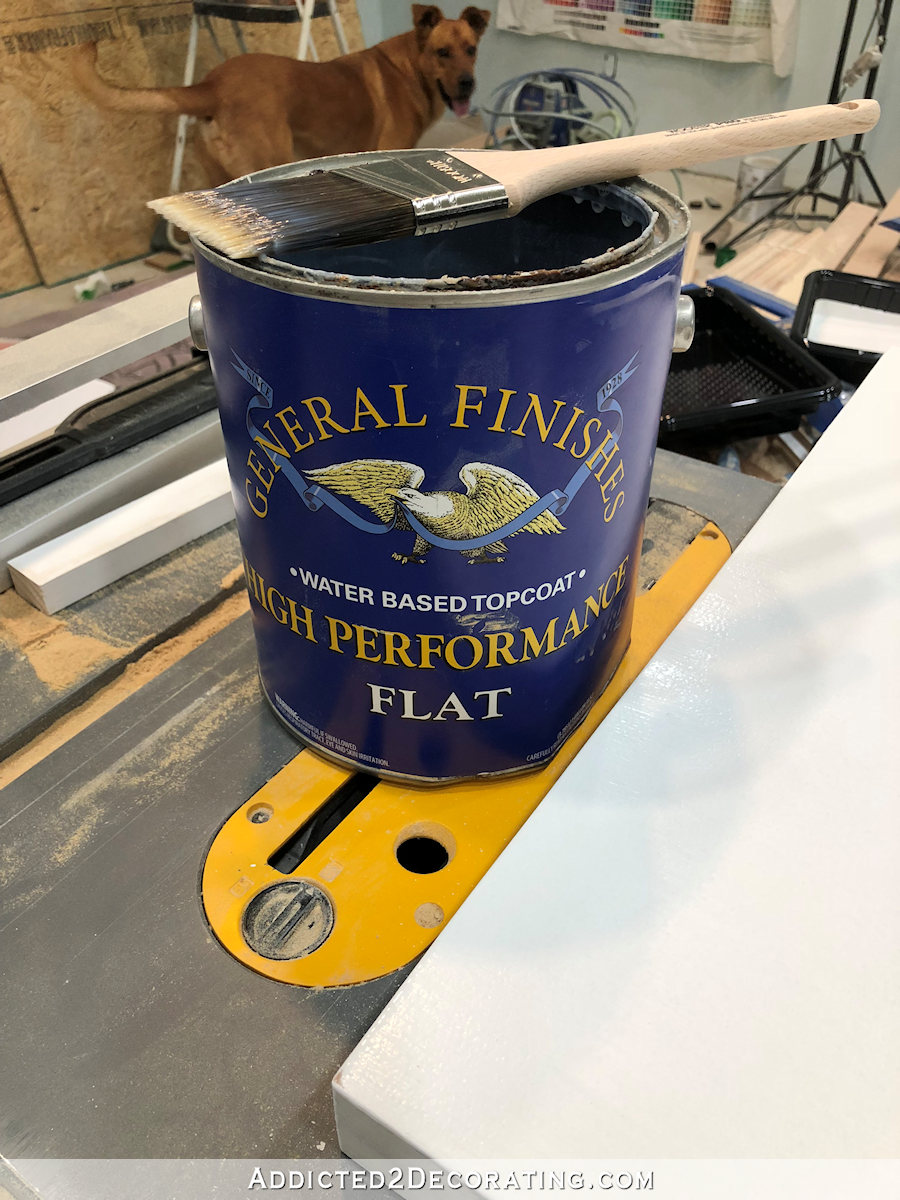
That stuff dries really fast, so within about 30 or 45 minutes, I was able to flip the countertop so that it was right side up, and start that whole process on the top.
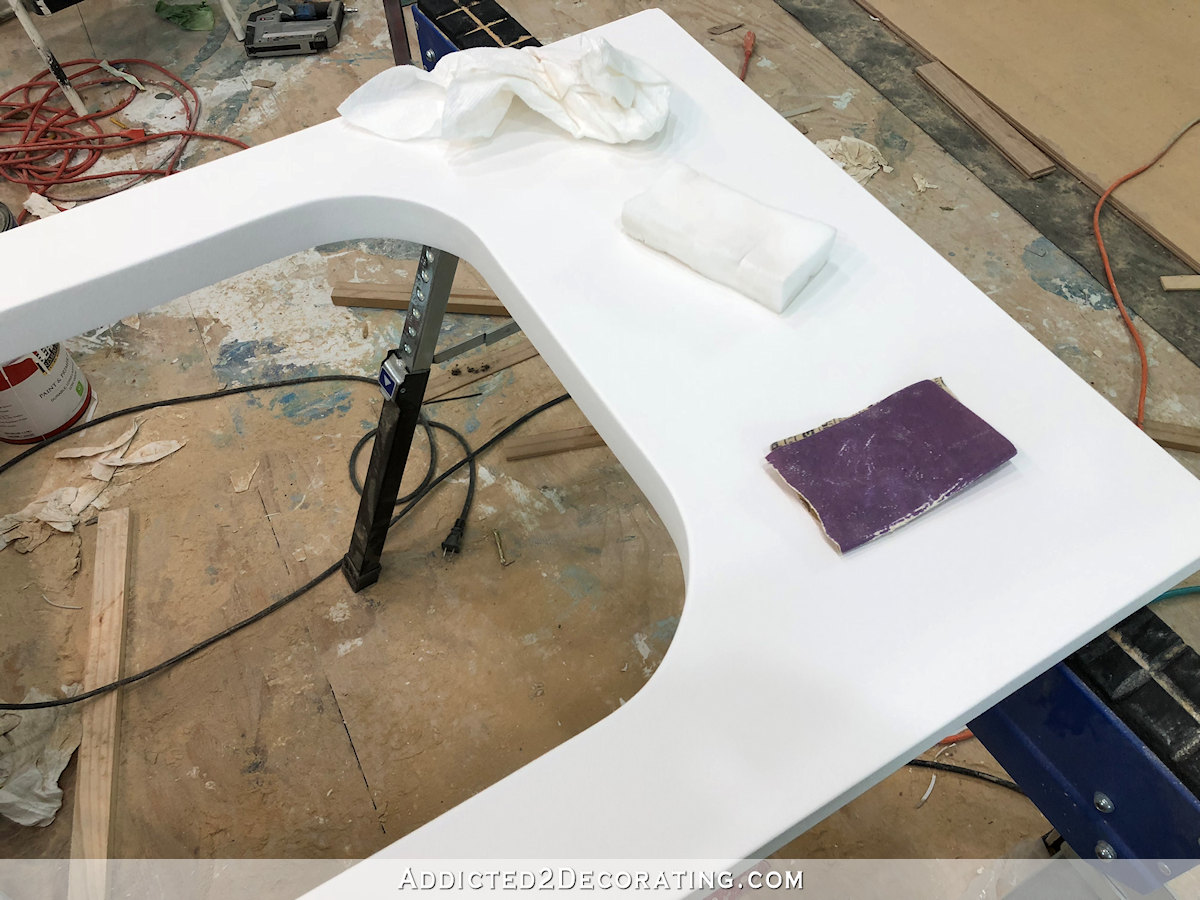
Naturally, on the top, I was much more of a perfectionist about the priming, sanding out any brush strokes and imperfections, and getting a smooth coat (or five) of paint. I used Behr Polar Bear in a flat finish (because it seems to dry faster), and sanded everything by hand after each layer of paint with 220-grit sandpaper.

I really did do about four or five coats of paint, and after the last coat, I left it to dry for about 24 hours.
Then I did a final sanding with 220-grit sandpaper, wiped the whole surface down with a Mr. Clean Magic Eraser, and made sure that the entire surface was dry and free of lint or debris.
I prepared a work area where I could pour resin by spreading out a contractor bag (cut open so that it was just one layer of plastic) and placed the countertop on top, sitting on scrap pieces of wood so that it wasn’t sitting directly on the plastic.
I mixed my resin and added some of the paint to it so that I was working with tinted resin instead of clear resin. It wasn’t as opaque as paint, but it wasn’t really translucent either. It was just a softer white than the paint.

For my countertop, I used ArtResin. It’s not really a resin that’s made for countertops, but it’s what I had on hand, so I went with it. If you’re purchasing resin for this project, I would recommend finding a resin that’s specifically made for countertops. And the amount of additive/colorant that you can add to the resin will be completely dependent upon the brand that you use.
Also, the amount of resin that you need will be dependent upon the brand that you use. For ArtResin, they recommend four ounces of mixed resin per square foot, but keep in mind that you’ll need a little extra because trying to resin vertical edges is tricky and you’ll end up with more waste than you would if you were just applying resin to a flat surface. I ended up using 24 ounces of mixed resin for my countertop.
Resin is finicky, because it will keep on dripping off of the edges until it hardens up, which can take a couple of hours. So I’d come in and check on my countertop about every 30 minutes for the first two hours, scraping off the drips from the bottom edges and making sure that no lint or bugs got into the resin. Believe me, if you have even a single fruit fly anywhere in your house, it’s almost guaranteed to find your resin. 😀
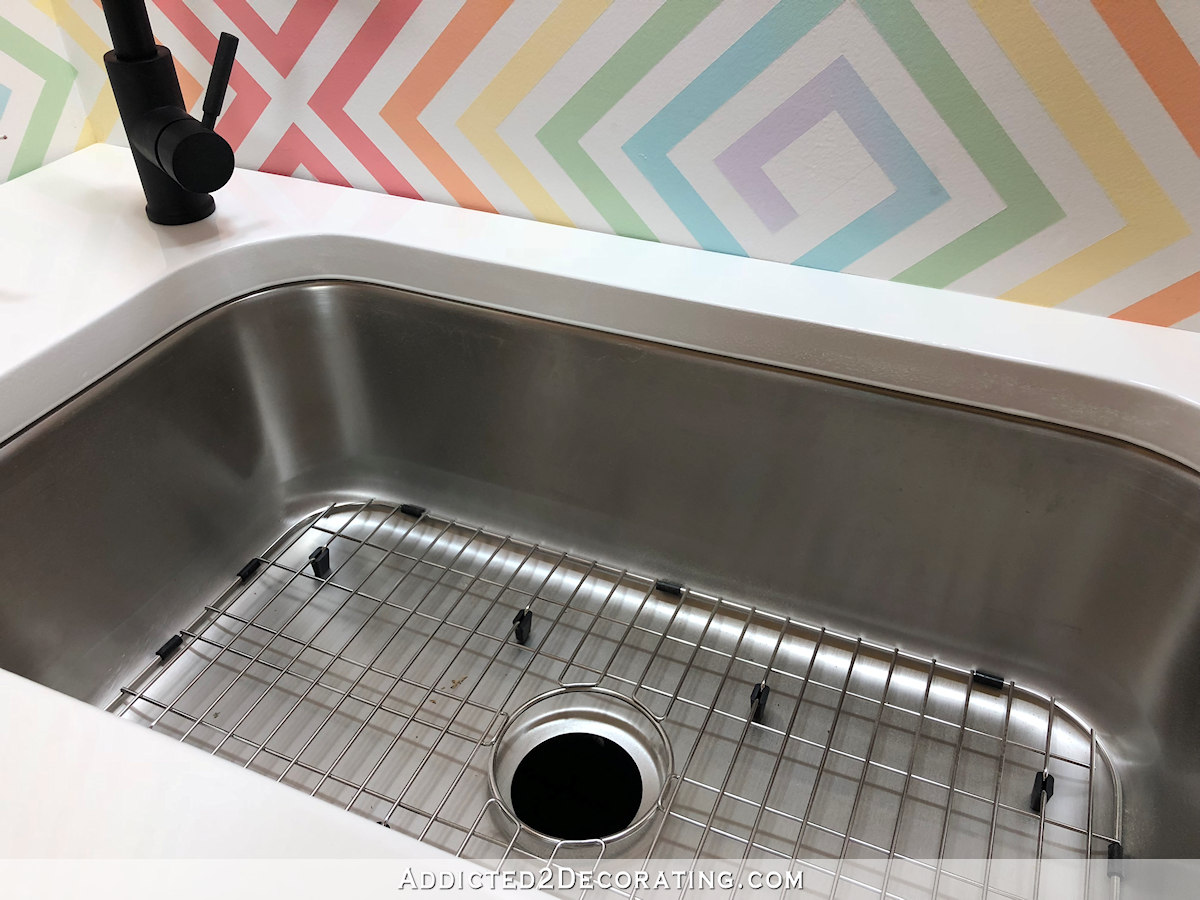
On the edges around the sink hole, rather than scraping off all of the excess that was dripping off, I used my gloved finger to spread some of the drips onto the underside of the sink hole so that there was an area about an inch wide all the way around the sink hole on the underside of the countertop that was covered in resin. The rest of the underside is sealed with the General Finishes top coat, but the area right around the sink hole needs a bit of extra attention and waterproofing, which the resin can provide.
Again, all resins will be different, but with ArtResin, I was able to get imperfections (two fruit flies and three pieces of dog hair) out of the resin as much as an hour-and-a-half after I poured the resin. I used a straight pin to get the fly or hair out of the resin, and then used my propane torch over the area to smooth it back out. You have to be very careful about using a torch to do this after that much time, because if you hold the flame to the resin too long, it will burn. So you have to do several very quick passes over the area until you see that the flame is reducing the viscosity of the resin and resin is self-leveling. Just don’t hold the flame to one area of the resin or it will burn.
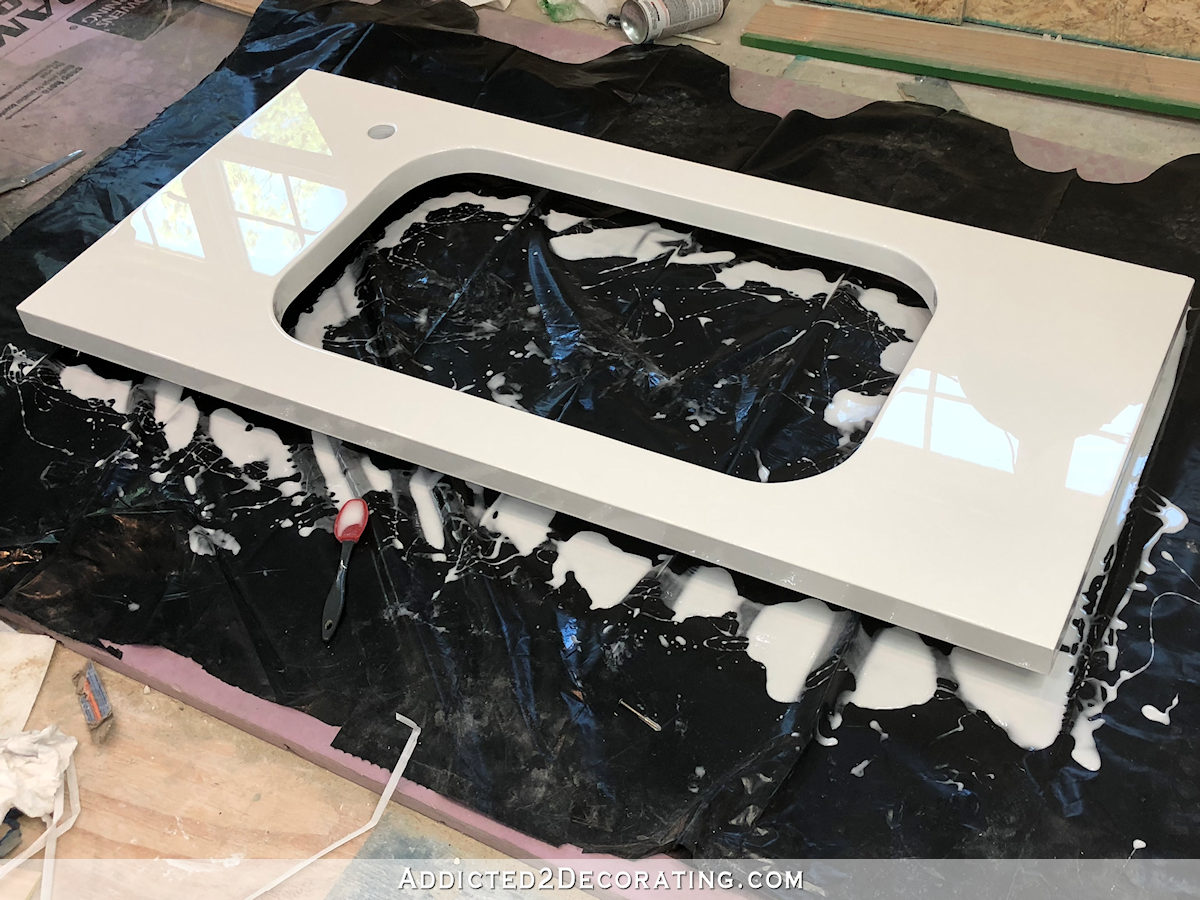
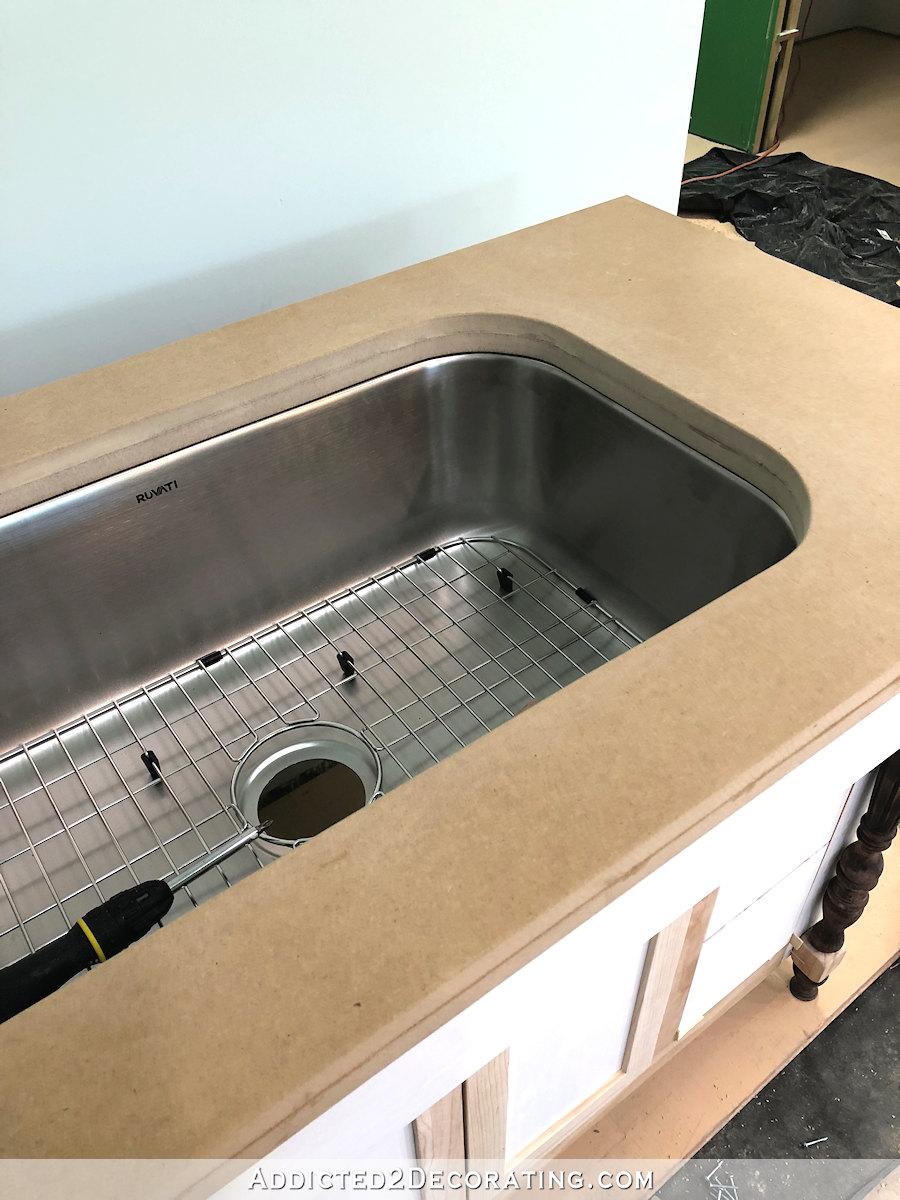
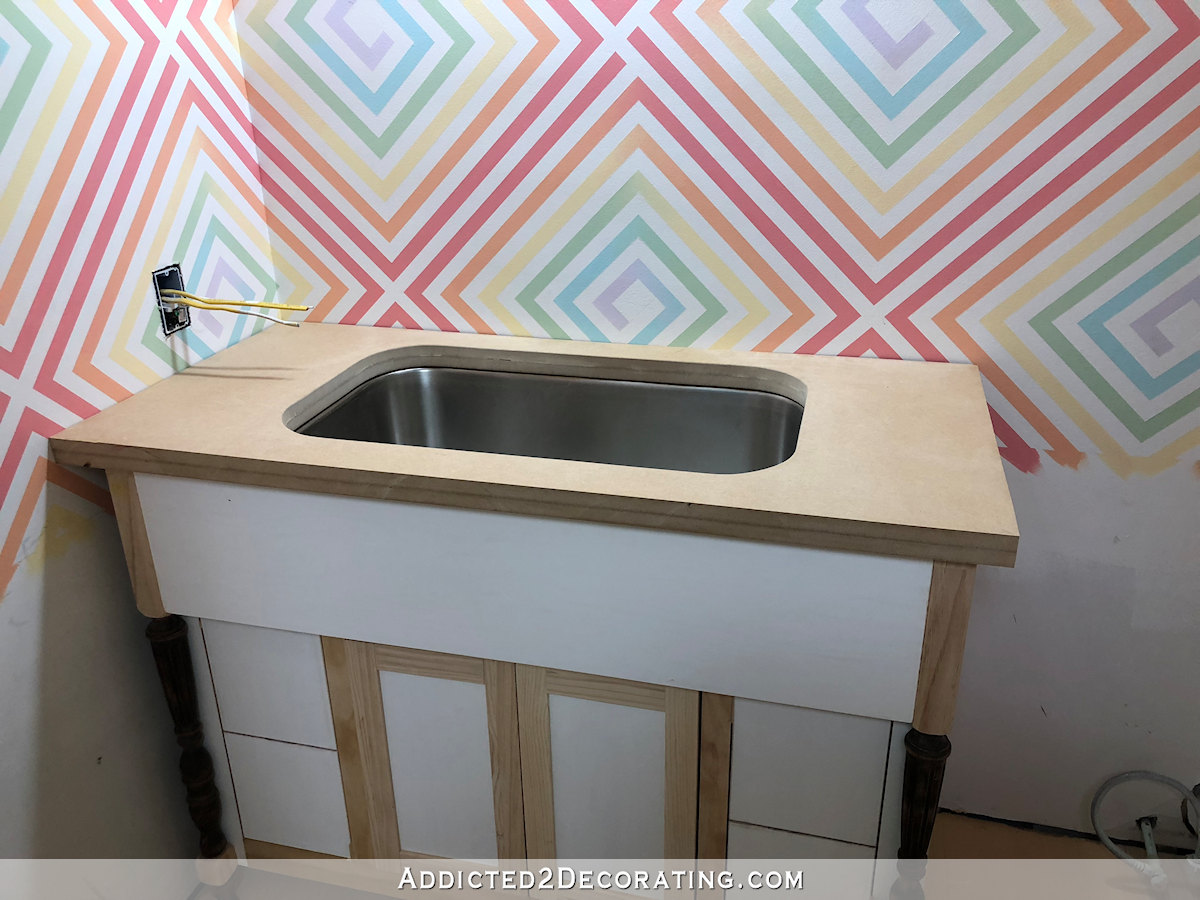
After about three hours, the resin was dry enough so that I didn’t have to worry about flies or lint, but it did need to be left alone for a few more hours (overnight, actually) to dry enough so that the countertop could be handled. It will still take several days for it to cure (again, the amount of curing time needed will depend on the brand), but after leaving it overnight (a total of about 16 hours after I poured the resin)I was able to pick up the countertop and put it into place in the bathroom without damaging it. I also placed the faucet into the hole.
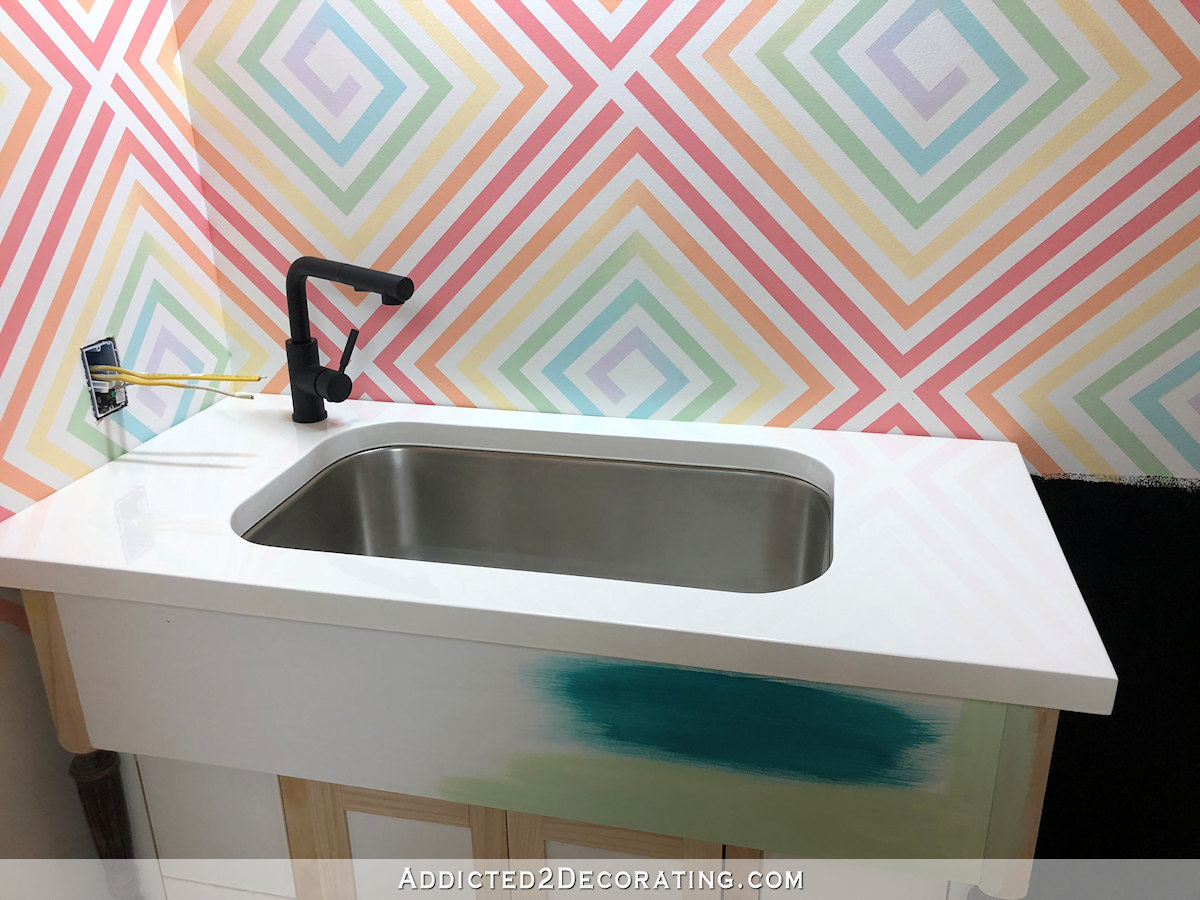
The faucet isn’t actually installed, which is why it’s leaning a bit, but you get the idea of how it will look.
Also, you can see a tiny ridge of resin buildup around the bottom edge of the sink hole. I don’t know if there’s any way to avoid that when pouring resin onto vertical surfaces, but since the ridge is pretty uniform all the way around, it doesn’t bother me. But it is something that you need to be aware of if you’re planning a resin countertop. If that ridge will drive you crazy, then a resin countertop probably isn’t your best option. 🙂
I knew it was possible to create an inexpensive, beautiful, waterproof bathroom countertop out of MDF! Now we’ll see how my ArtResin holds up. It’s very possible that I’ll need to do a second coat of resin with another brand that’s actually made for countertops. But for now, I’m very pleased with how this turned out, and I’ll just baby it until it’s fully cured and go from there.

Addicted 2 Decorating is where I share my DIY and decorating journey as I remodel and decorate the 1948 fixer upper that my husband, Matt, and I bought in 2013. Matt has M.S. and is unable to do physical work, so I do the majority of the work on the house by myself. You can learn more about me here.

A small cup with a little apple cider vinegar, covered in plastic wrap with a small hole poked in the top will get rid of the fruit flies. Just be sure to empty it out before the flies figure out how to crawl back out. 🙃
The countertop is gorgeous! I am so interested to see how it holds up to water. Your creativity is amazing!
If you add a little dish soap they can’t crawl back out.
THAT’S a great tip! I will definitely do that next time! Thanks!
Thank you for this post! You have just helped me to save a ton of money!
Thanks for this tutorial. The possibilities this opens up are mind boggling! The colors! The patterns!
As we say in the south, “You just beat all I’ve ever seen!!”.
You are amazing!!! Every time I read your post I am inspired. Thanks for sharing every detail with us.
Mindblowing for sure!
As a total DIY ignoramus, can anyone please explain for me why you couldn’t just buy the store cabinet and alter the top to fit a different sink? TIA!
There are many reasons that that wouldn’t work, but it’s mostly (1) size and (2) price.
The store cabinet is only 22 inches deep (from wall to front edge). That might fit a kitchen sink, but it would be a very tight fit. But also the top section that protrudes in the store cabinet isn’t tall enough for a deep kitchen sink. That means that the kitchen sink would literally be sitting on the top edge of the inset doors underneath the section that protrudes at the top, and the sink would still be sitting up too high out of the cabinet.
But also, the store cabinet costs $2000. Taking a piece of furniture apart and modifying it is almost never easier than building from scratch (plus, you risk ruining pieces as you take it apart and needing to purchase lumber to replace the messed up pieces), but in the event that you do want to take a part and modify a piece of furniture, you probably wouldn’t ever want to start with a brand new $2000 piece, especially when you can build from scratch for about $200.
Thank you Kristi, yes that all sure makes perfect sense! Love following your progress.. I often pop on here for a little break from my own day!
This looks fantastic! I love how this is coming togather.
With you, I am always assured of seeing something different that I’ve never come across before!! Your countertop is really beautiful—all your projects really have your heart and soul (and blood, sweat and tears, too) in them.
Mind blown. That’s all.
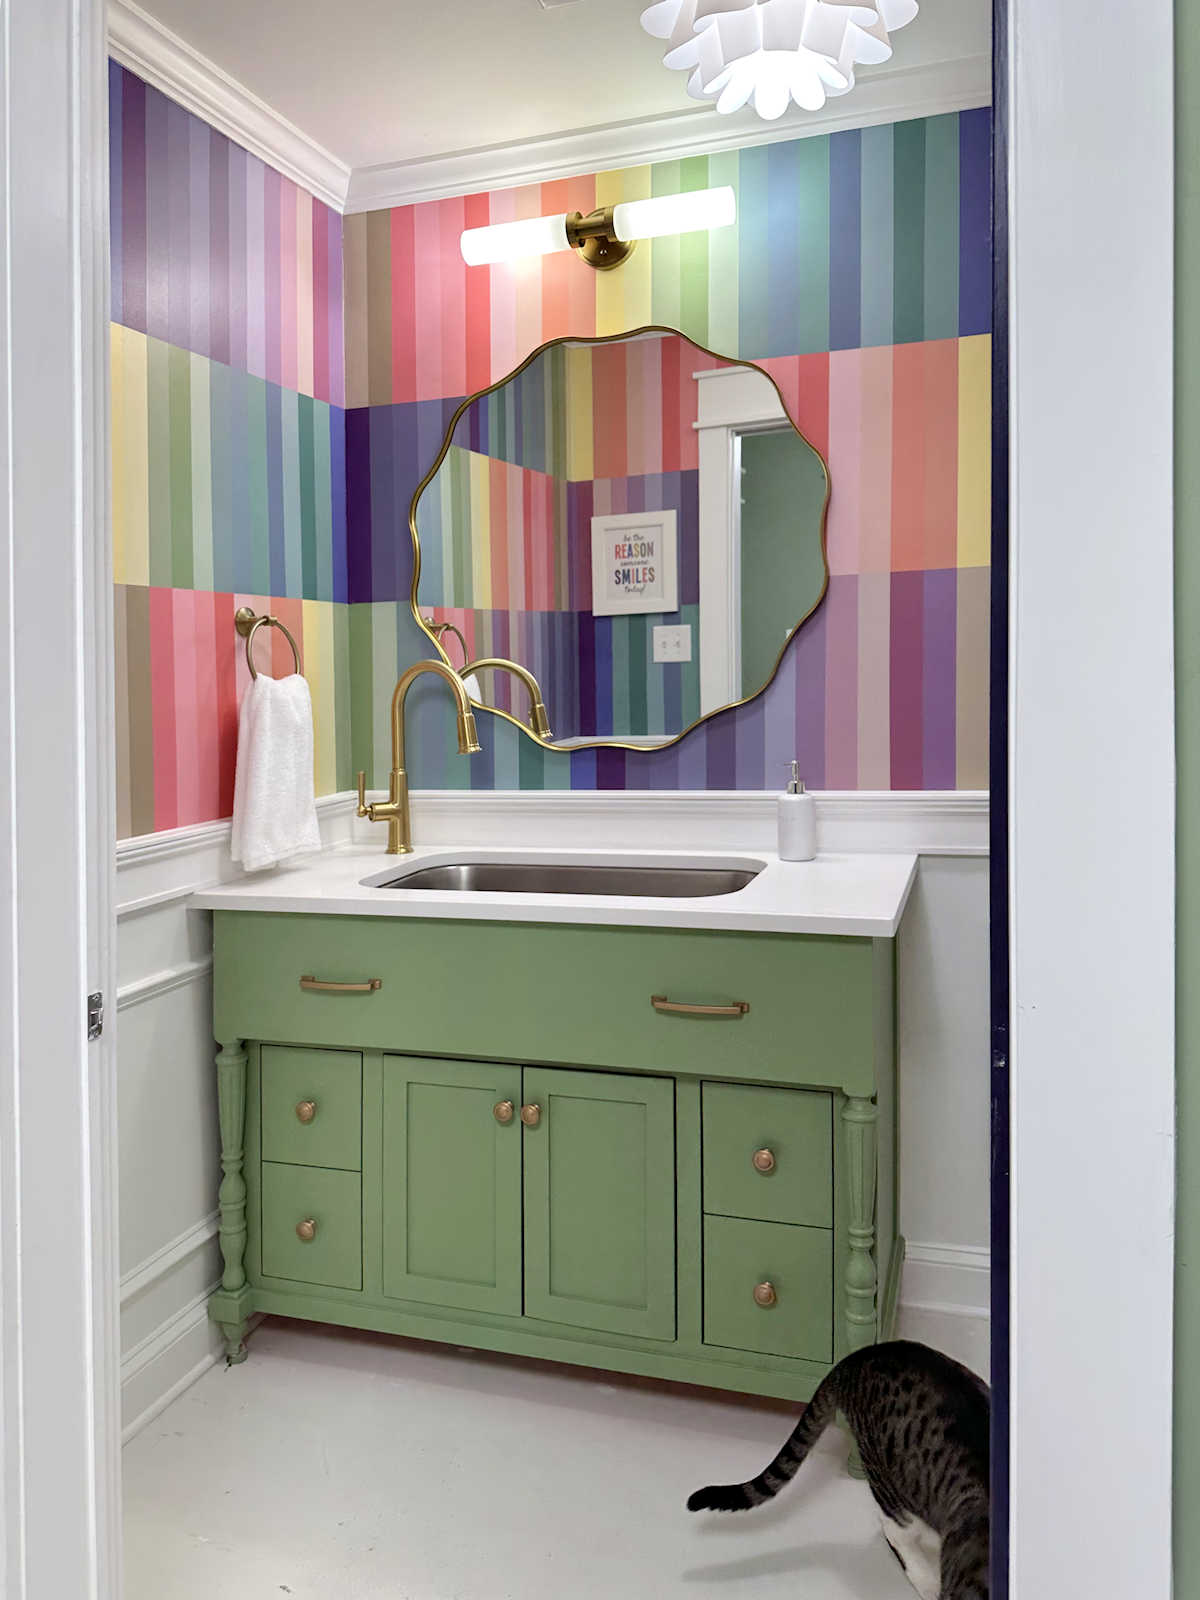
Very nice, Kristi! What color did you decide to paint the vanity base?
It’s going to be green, somewhere between the green in the bathroom wall design and the green on the back entry walls.
I just don’t know what to say…..you always amaze me with your talent! Looks wonderful!
Just amazing! Is there anything you cannot do? I don’t think so!
I learned of outdoor mdf While watching a program about the restoration of a Charleston home this very morning. I had never heard of it but they were cutting balustrades from it. The mdf is put together with an outdoor glue. They said it would hold up even in Charleston SC where the air is moist and salty. Just thought I would pass this along for further projects.
I learn so much from you! Thank you!
This is amazing! Very cool!
You should’ve collected MORE fruit flies for your resin to give it a granite look! 😉 Just kidding, it looks really good!
What?!? This is just amazing. Your a creative genius and always come up with the most incredible things that I would never have considered. And yet, you show how very doable and beautiful everything always turns out.
Gorgeous!!! Way to go!!
That turned out great! I do hope it holds up, I’d hate to see you have to replace it down the line. But resin is pretty hard once it cures, so I would think it will work out! And I read your comment about the vanity color – YIPPEE! That will be so awesome! You always amaze us with your talents.
I love how your brain works. That is a brilliant idea. It turned out really beautiful.
This opens up SO many different color and styling options. It’s really great.
Do you mind doing a cost breakdown for us Kristi, and linking to sources of resin you use (or recommend, or think about using). I know that stuff isn’t cheap.
amazing! i am working on my bathroom and am looking at all diy options… i think i love this one the most!! it actually has me rethinking what my vanity top can look like… off to look at expensive wallpaper remnants!
p.s. did you see that your bathroom walls inspired one ORC’r to use it on her floor for the challenge! shameless!
Impressive! and a fun read.
Looks beautiful!!
My gosh this looks so good, I mean really good! Your ideas are genius!
It is beautiful, and I love reading your posts! I don’t believe there is anything you cannot do or create. Thank you for giving me “vision” in places I never dreamed would be possible. Fantastic job!
Beautiful work and thanks for the step by step instructions. I’m wondering how is the sink attached? Did you attach it to the countertop or use supports connected to your vanity? Can wait to see it painted!!
Check out stone coat countertops on you tube! Amazing resin countertops how too’s. He shows you step by step how to mimic any stone pattern, plus free form artsy kinds.
Products are super easy to work with too and they sell all the glitters, metallics, add in’s you could ever need.
So far Ive done a white quarts countertop and back splash, and a grey and teal granite!
Oh and I dont know about art resin, but with counter top resin there is a finishing step of sanding and waxing and polishing. It makes it look amazing and smoothes out that ridge she was talking about around sink hole.
Very cool! The finished room is going to look great!
YOU ARE A…MAZ….ING…!!!!!
It looks amazing! The bright white is great and with the resin, it should be easy to keep clean from different projects.
YOU. ARE. AMAZING!!! I want to adopt you!
Honestly, on first look, I thought it was Corian. You’re a genius and I’m convinced you can do anything! YOU are the real DIY star of Waco!
Can you tell me what resin did you use? Also, how / what did you use to attack the countertop to the table ? I want to do this in my kitchen! Please reply!
I used ArtResin, but if you’re using it for kitchen countertops, I would recommend a different brand. I don’t have experience with other brands, though, so you’ll just need to research what brand is best for hard-wearing surfaces like kitchen countertops. You might try with Counterculture DIY. They have a project called Artist Resin that they say can be used for countertops. Stone Coat Countertops also has a resin made specifically for countertops. But again, I don’t have any personal experience with their product.
I haven’t yet attached my countertop to the cabinet, but I’ll probably just use small L-brackets, attached to both the cabinet and the bottom side of the countertop, to attach the two together.
Thank you so much! I will do more research! You really helped me think about the endless possibilities!
I use Pro Marine epoxy table top, counters. I did 3 kitchen counters for a friend, then my own 8 ft bathroom counter, it turned out great, black base , a little white and some shiney gold. I have made little bar tables and odds and ends. Pro Marine has done great in all my projects
Rosemary, I would love to see photos of your projects.
Kristi, you are my hero for tackling projects and trying things that I just think about. Thank you for all of the great information and excellent tutorials.
JUDY I’d love to show you some pictures. Not sure how to load them on here.
Any updates on how this held up? I just love it!
I ended up not using it because it yellowed. I’m not quite sure why that happened, but I have two theories, because it’s not normal for resin to yellow to that extent. One possibility is that I used two different kinds of resin, and perhaps the interaction between them caused the serious yellowing. I’ve used each on their own, and had no problems. The second possibility is that this was going in a bathroom remodel in a part of the house that wasn’t being used yet, so we didn’t have air conditioning turned on in that area. We’re in Texas, and our summers get very hot, which means that this resin countertop was sitting in a very hot room in the summer. I have a suspicion that heat can cause resin to yellow. Or it could have to been a combination of the two.
With that said, I do think this project can work out very well if it’s going in a climate-controlled room, and only one brand of resin is used for the project from start to finish. I hope to have a chance to try it again someday, because I really do think it’s a great way to have a great looking, low cost countertop.
Hello –
I have worked with epoxy resin for over a decade and do epoxy countertops, professionally. I can tell you exactly why the countertop yellowed:
1) You NEVER use any oil-based products under an epoxy resin. They are incompatible and will eventually break down.
2) You NEVER mix anything in epoxy resin that isn’t compatible and latex and/or acrylic paint is incompatible. Examples of compatible additives would be mica pigment, Alumilite pigment drops, alcohol inks and some pigment powders. And even with the compatible additives, you still must remain under a certain percentage, otherwise they will keep the epoxy from curing properly.
Hope I solved your mystery/answered your question as to why it excessively yellowed.
Good luck on future epoxy endeavors.
Thank you!
I did my kitchen countertop and the instructions I had said to paint it first. Apparently, that was wrong. It totally yellowed within a few months. I was going for white.
Thank you for sharing this, very helpful!