DIY Necklace Organizer (Please Help Me Finish Or Improve Upon This Design!)
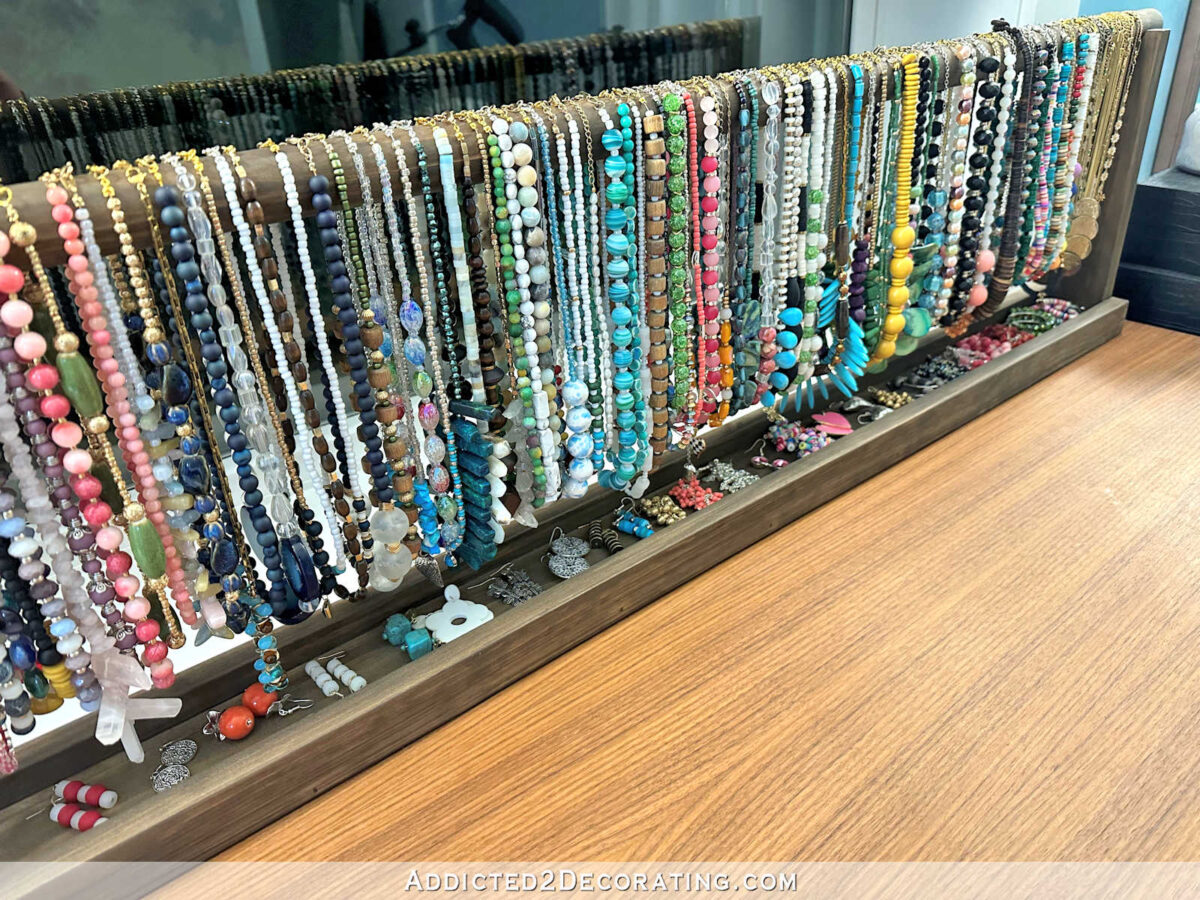
Yesterday, I worked on building the final piece of the perimeter cabinets in my walk-in closet — a DIY necklace organizer. For the last year, I’ve been using this very simple DIY jewelry organizer that I made to sit on the countertop in our bathroom.

If you missed that project, you can see it here: Easy DIY Jewelry Organizer
I have loved this design. All of my necklaces, which I make myself, have clasps on them because I like the versatility of having clasps on my necklaces so that I can add extenders when I want them to be longer for a particular outfit. So this design has worked perfectly for me. I simply unhook the clasp to remove it from the necklace holder.
So I wanted the same type of design for the closet, minus the little tray on the bottom for earrings. I don’t need that little earring tray anymore since I now have an entire glass-top drawer for small items like that.
If you missed that project, you can see it here: DIY Jewelry Organizer – Jewelry Drawer With Glass Top
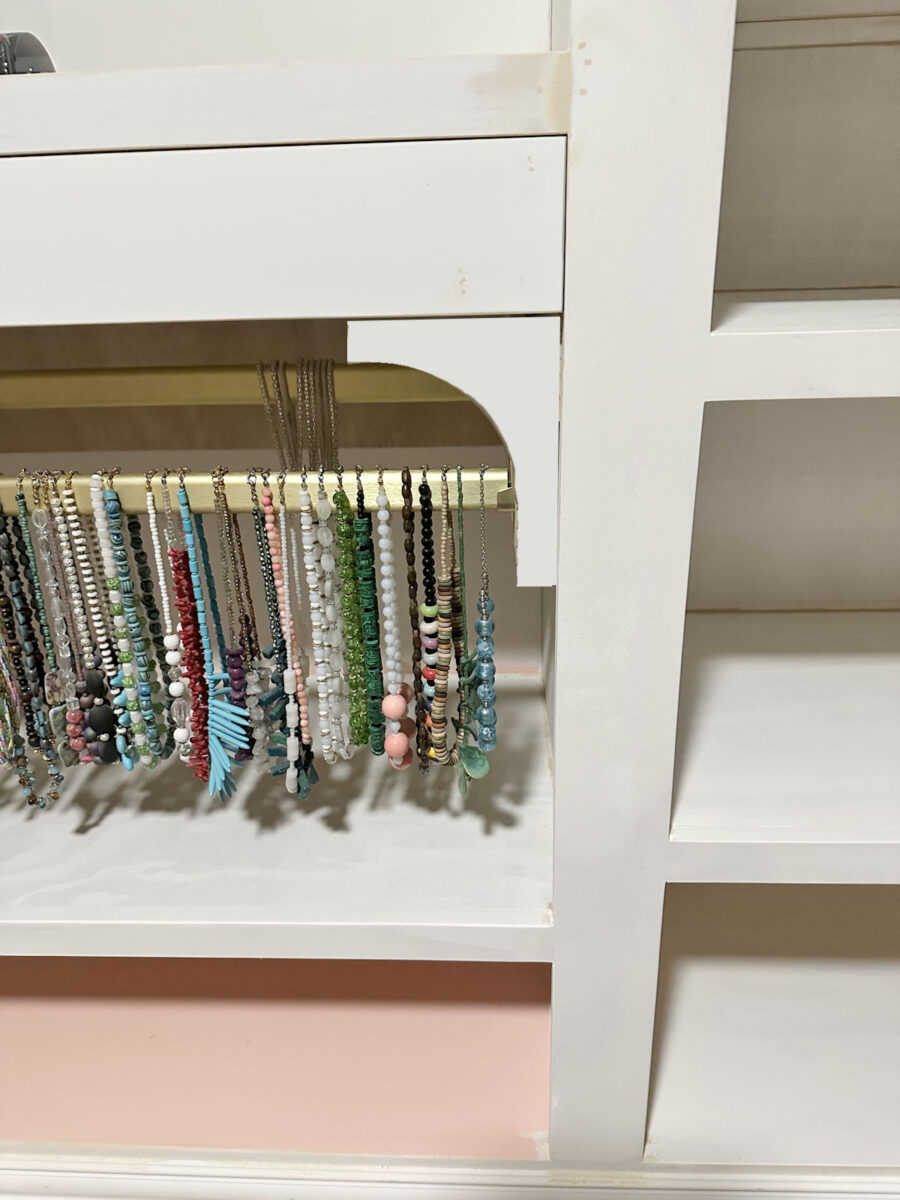
So with that in mind, here is what I came up with. I built a drawer-type structure that doesn’t have a bottom on it, put it on drawer slides, and added two closet rods inside the structure. When it’s pushed into the cabinet, it looks like this…
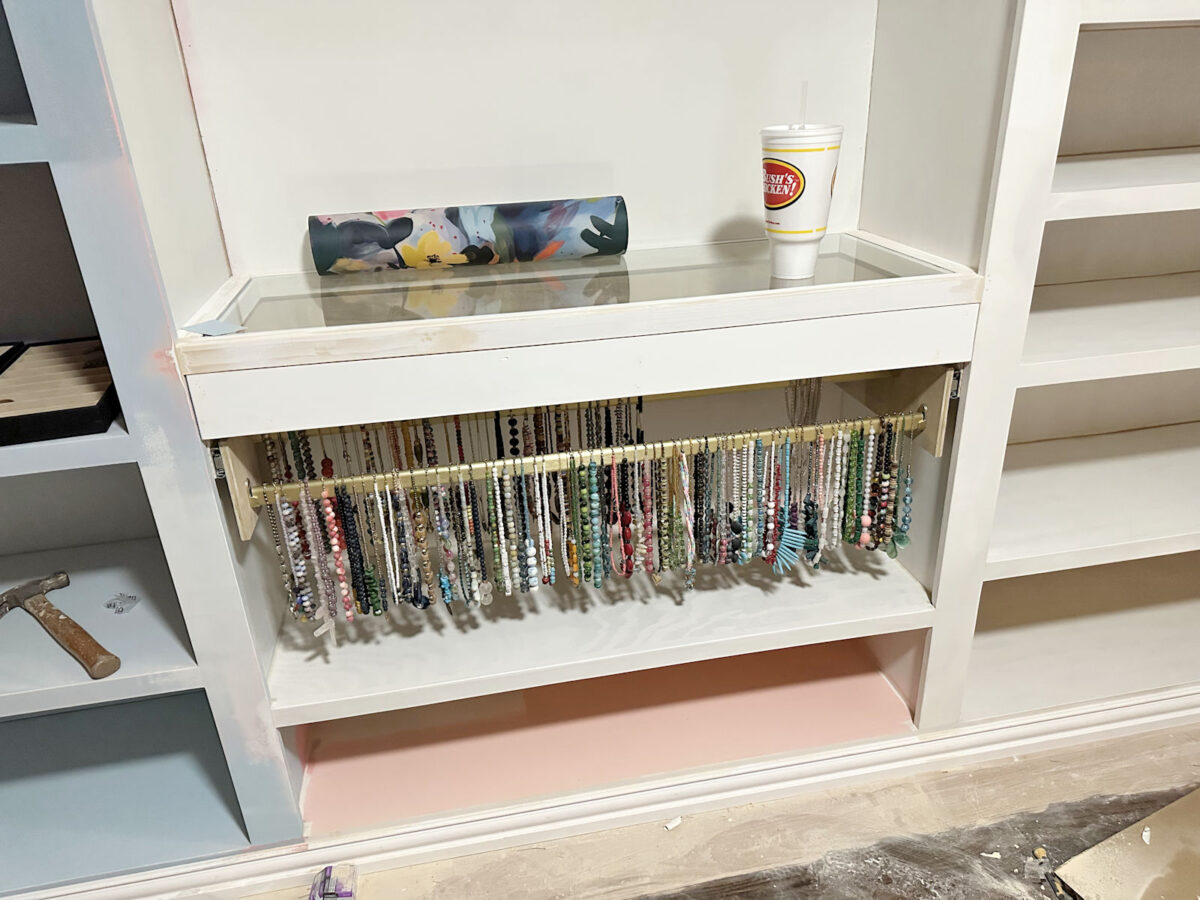
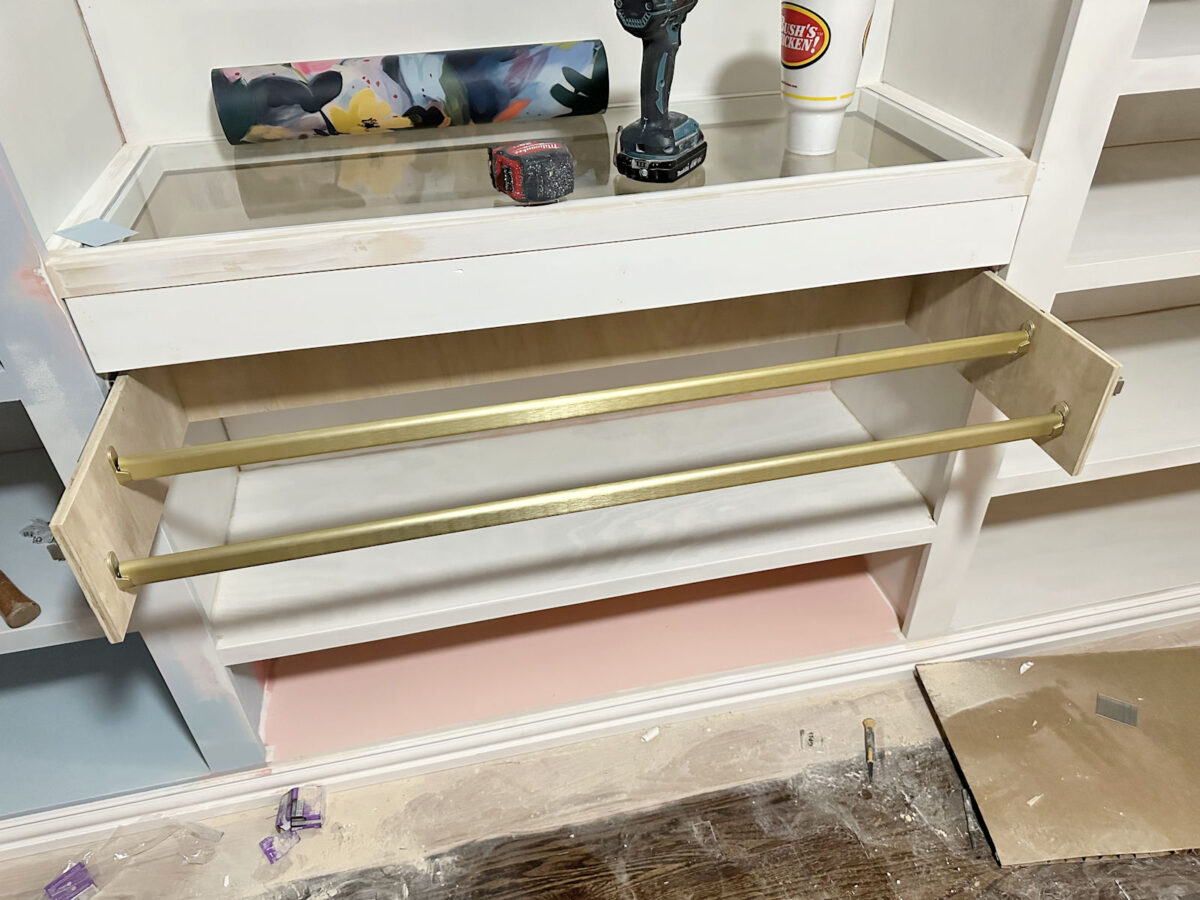
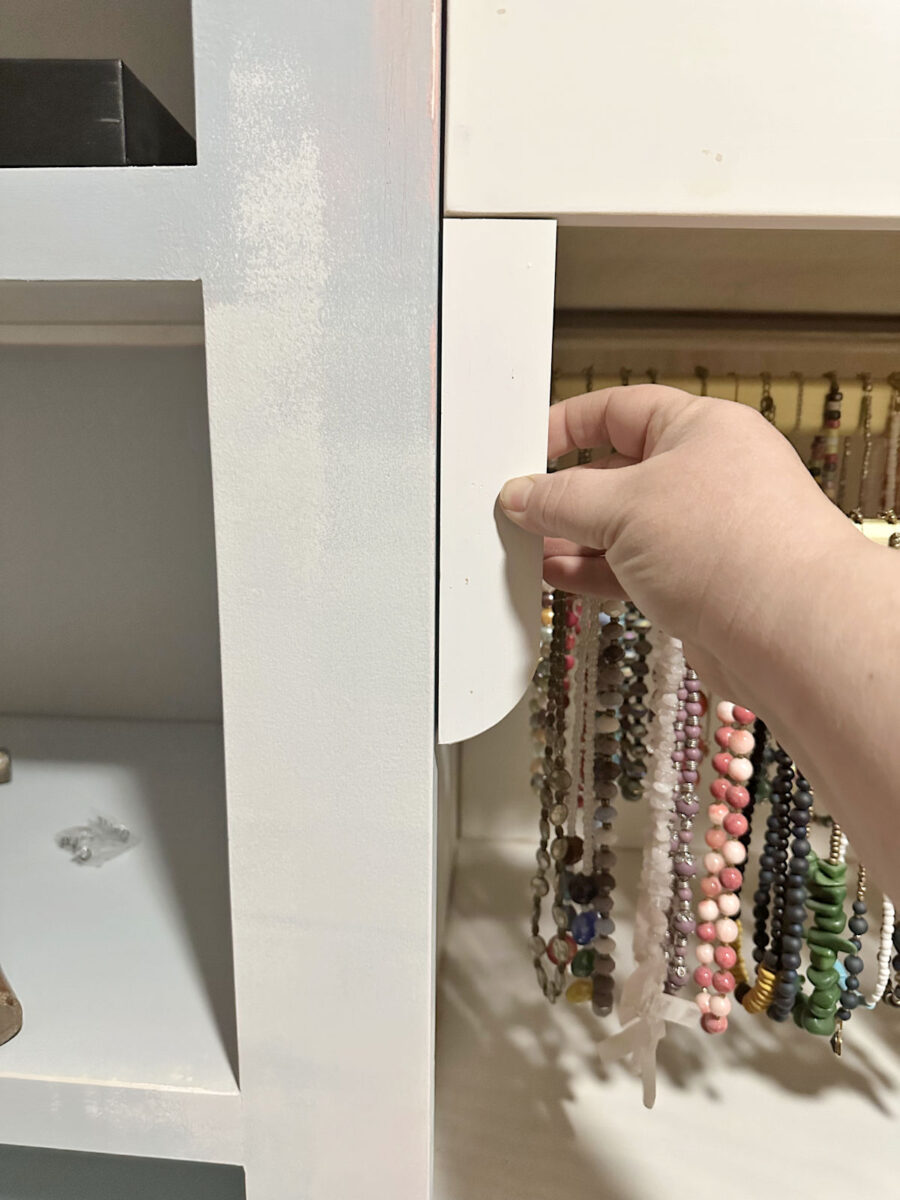
And then it pulls out like a drawer so I can easily access the necklaces…

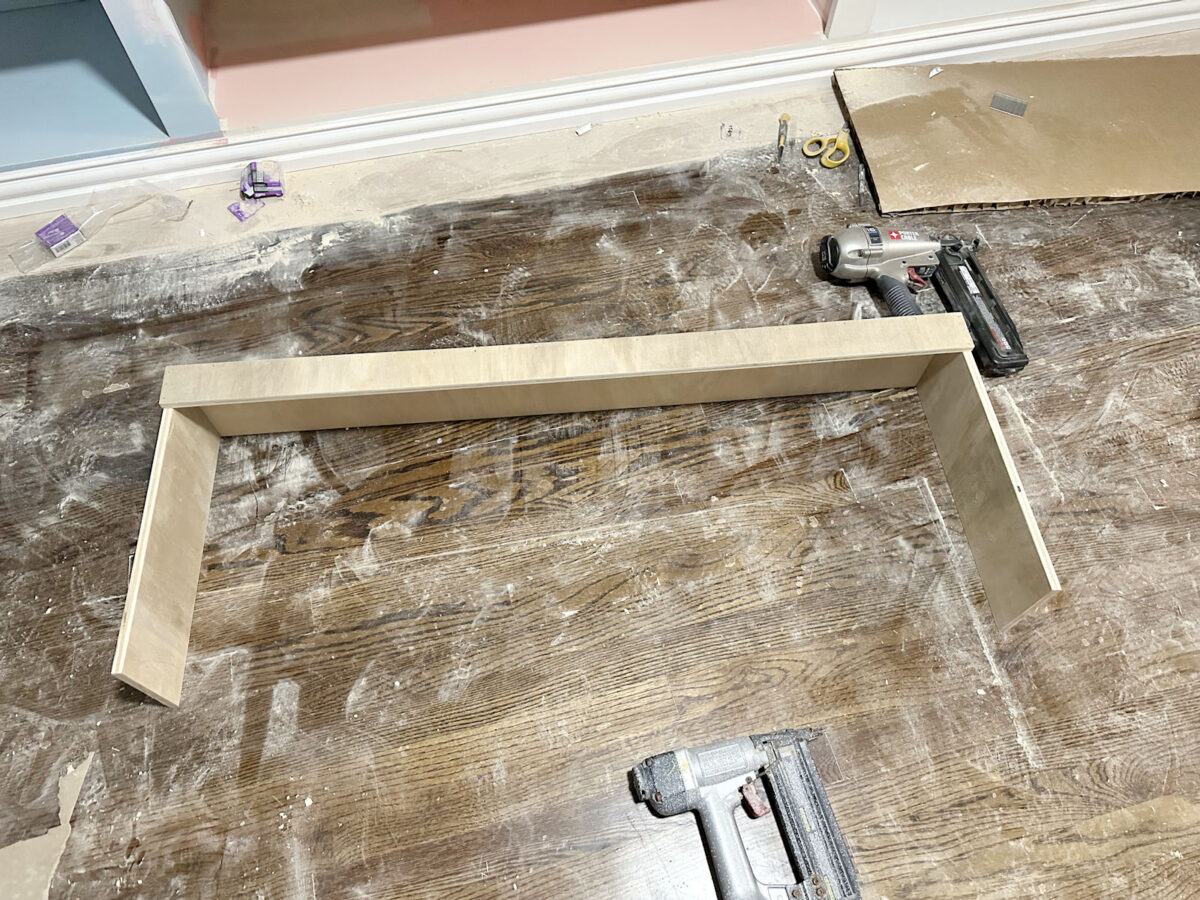
The building process was incredibly simple. I ripped some 1/2-inch plywood (the same plywood I used to build my jewelry drawer) to six inches wide, and then I cut a long piece for the back, and two short pieces for the sides. I nailed those together using 1.5-inch 18-gauge nails.
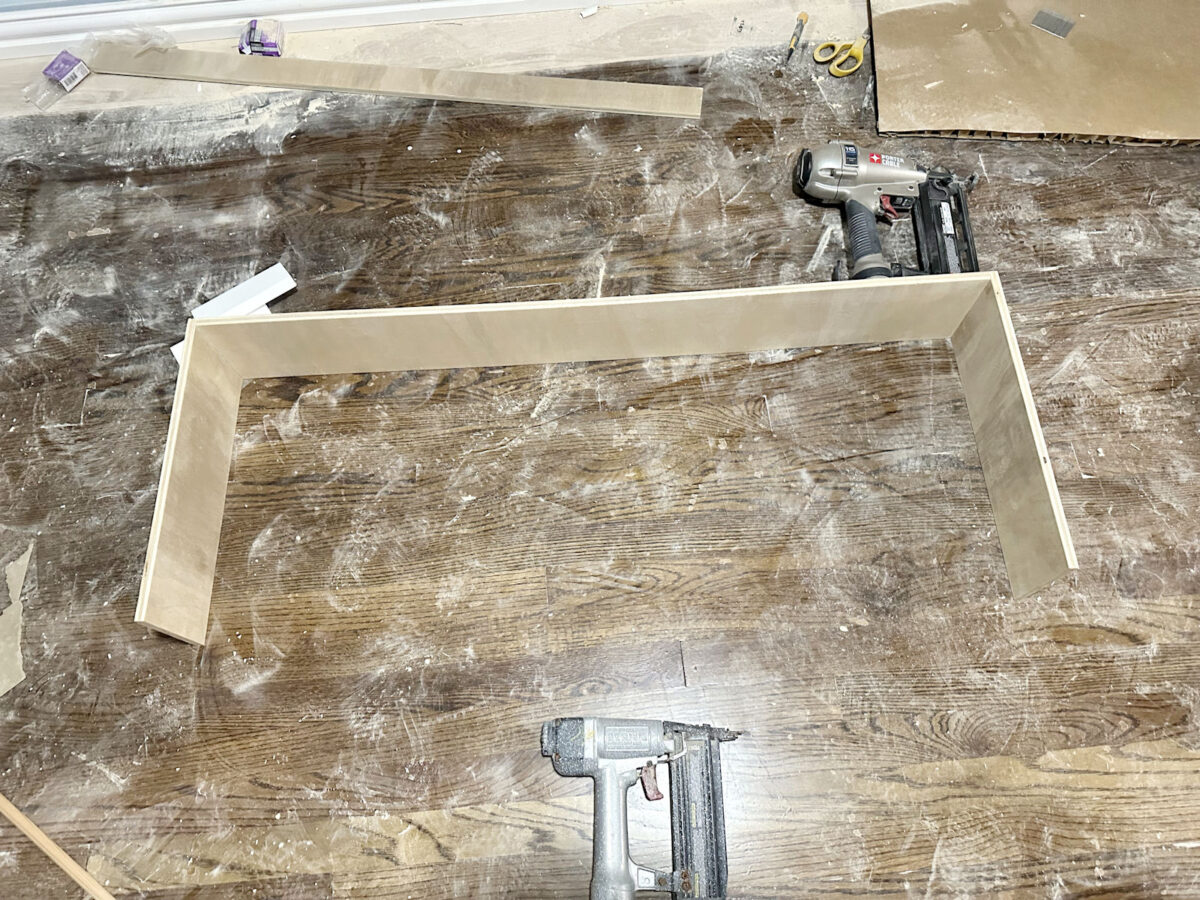
And then, to keep those pieces square, I ripped another strip of 1/2-inch plywood to 2.5 inches wide, cut it to the proper length on my miter saw, and nailed that to the top at the back so that it was nailed into the top edges of the sides pieces and the back piece.
And then I added the drawer slides, slid the structure into the cabinet, and added the closet rods. I used the same closet rods that I’ll be using for the hanging storage in the closet. You can find those here (affiliate link).
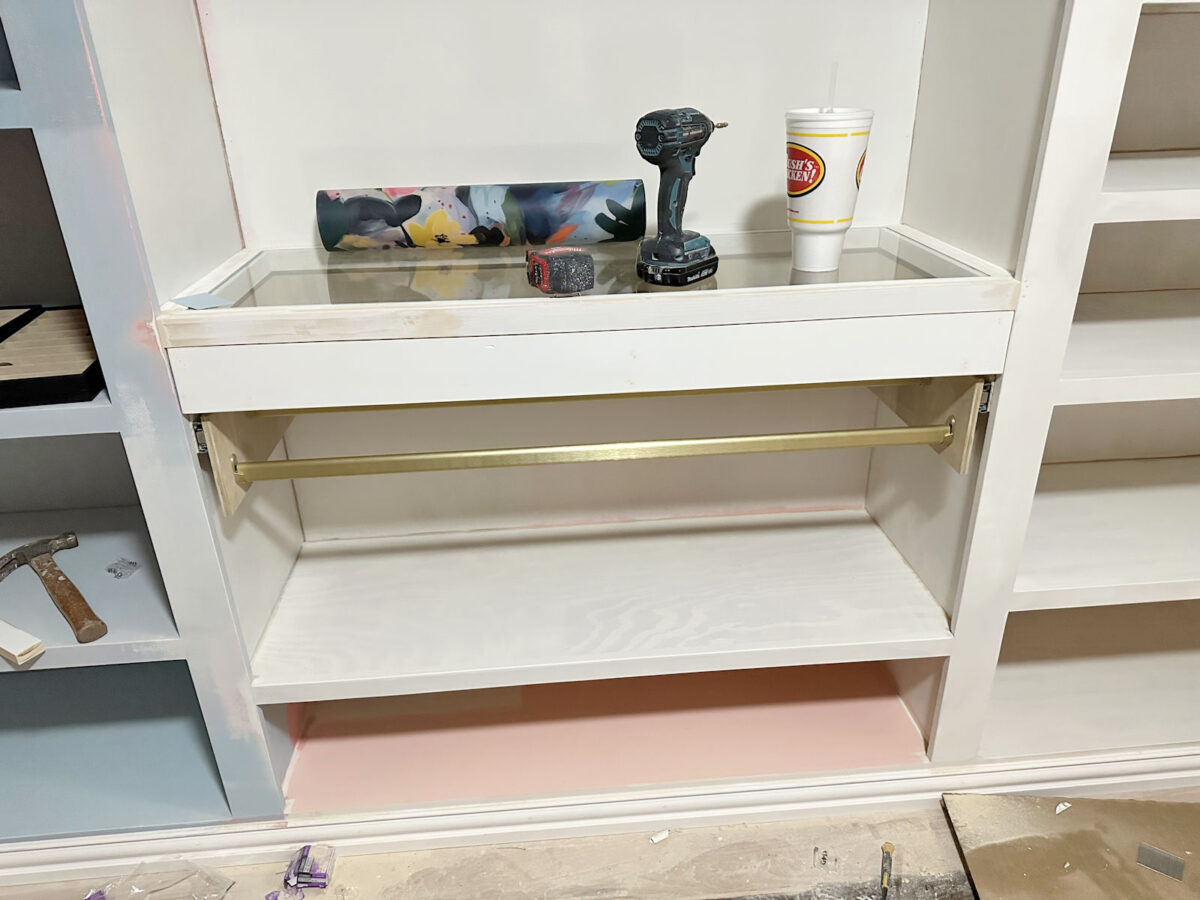
And of course, I’ll be painting the whole thing the same color as the cabinets, so it’ll blend in once it’s painted.
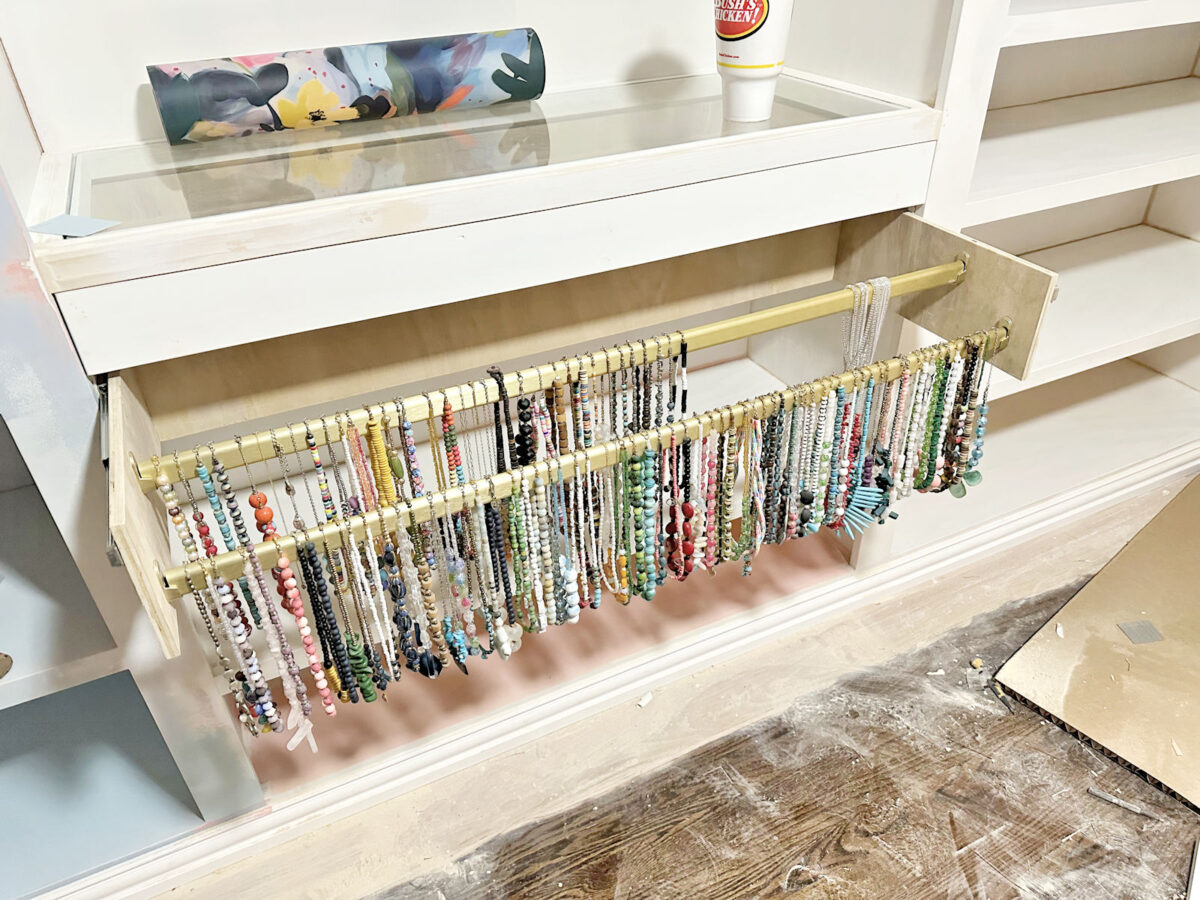
I was anxious to see how it would look with all of my necklaces hanging on it, so I went ahead and added those. I staggered the height of the two bars, with the back bar about two inches higher than the front bar. And I do want to figure out a way to add tape lights under there. I think it will look amazing to have those lit from the back.
And here’s what it looks like when they’re pulled out for easy access.
Overall, I really love the simplicity of the design. And it pulls out easily just by grabbing the bar and pulling. So there’s no need to figure out a way to add any additional pulls.
I know many people suggested that I find a way to bring the necklaces up to eye level, but really, I’m so short that this will work out perfectly for me. I intentionally installed the glass countertop a bit higher than countertop height so that the necklaces could be up a couple of inches higher than I had originally planned.

My height, plus the fact that it pulls out for easy access, makes this design work out perfectly for me.

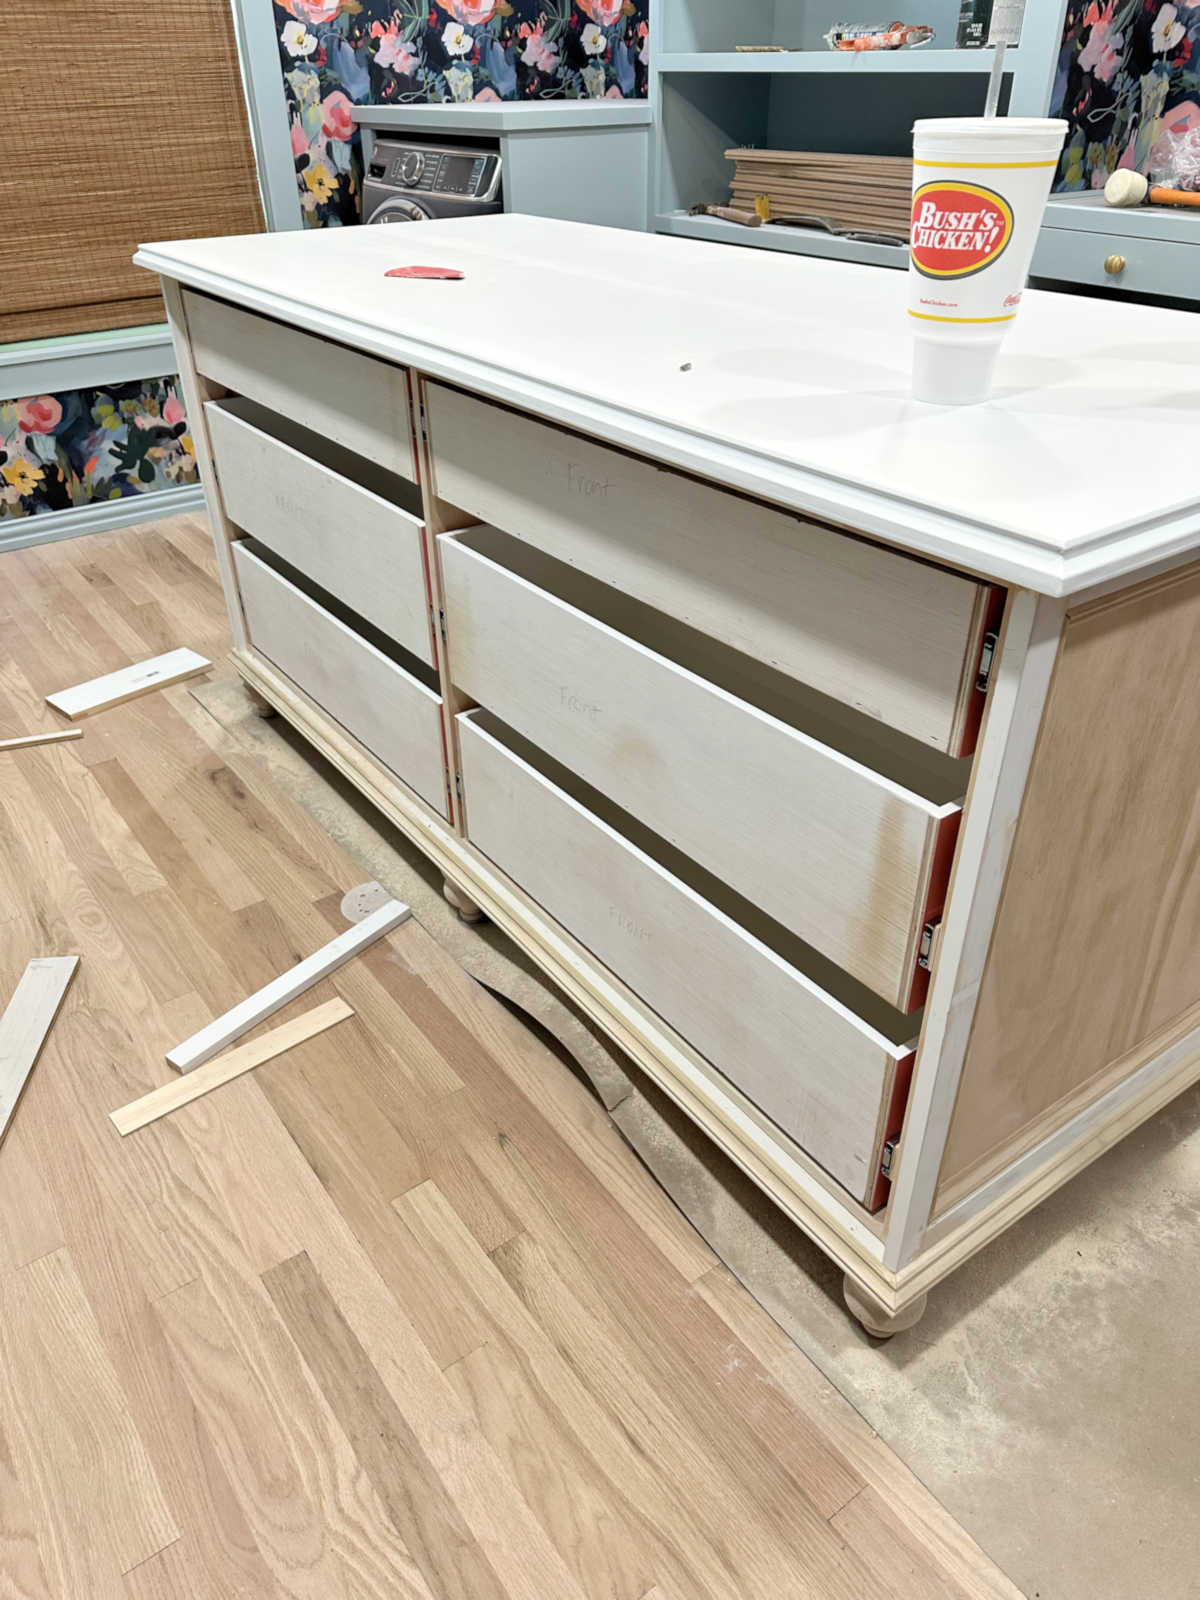
The one thing I’m unsure about is how to finish off these edges. Obviously, I can’t leave it like this with the edge of the plywood and the drawer slide showing.

I’ve had two ideas for finishing off those edges. The first is to repeat the design that I used at the top of the cabinets…
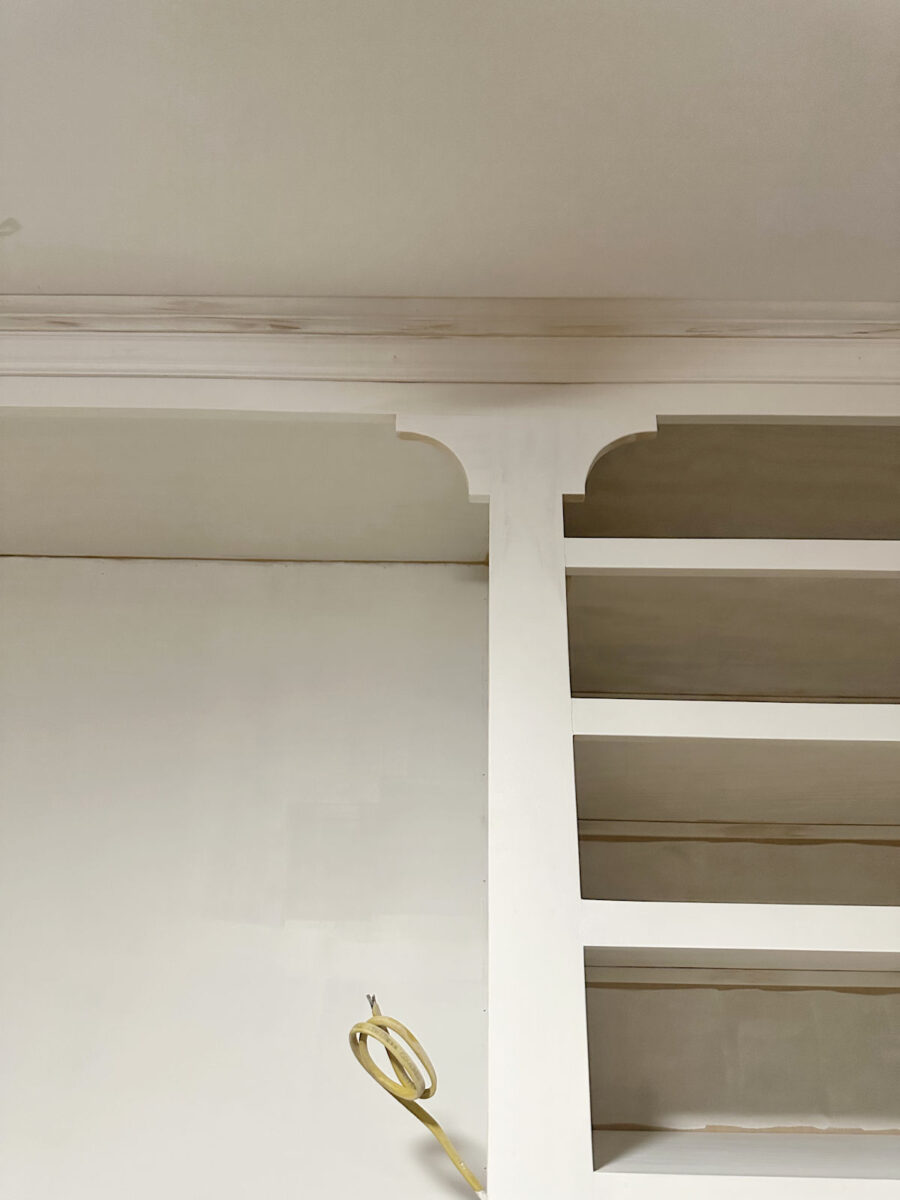
There are a couple of issues with that, but maybe I could figure them out. First, those corbels at the top are 4.5 inches square. The frame for the necklace organizer is six inches high. So if I try to repeat that design, the bottom tail on it would have to be longer. I’m not sure if that would throw off the continuity of the design, or if it would work. Also, there’s nothing to nail that top edge to, so it would just be free. I’m not sure if it would stay put. The only thing I have to nail it to is the six-inch-high edge of the 1/2-inch plywood. Here’s a mock-up I did of that potential design.
The simplest way to finish it off would be to use a narrow piece of wood attached to the edge of that plywood. I tested out this idea using a 1″x2″ (which is actually 1.5″ wide), but if I go this direction, I would rip that down to only 1″ wide, which is all that I need to cover the edge of the plywood. I used my band saw to round off the bottom corner of the piece to see what that would look like.
So those are the two ideas I had, but I know that y’all are incredibly creative and may have a better idea. If anything comes to mind, let me know! I want to keep it simple, and I don’t want anything to cover the front of the necklaces.
If I can figure out that final piece, I will officially have every single part of the perimeter cabinets built. This necklace storage was the last thing I had to figure out and build, and those finishing touches on the necklace storage are the final pieces of the puzzle.


Addicted 2 Decorating is where I share my DIY and decorating journey as I remodel and decorate the 1948 fixer upper that my husband, Matt, and I bought in 2013. Matt has M.S. and is unable to do physical work, so I do the majority of the work on the house by myself. You can learn more about me here.


Ahhhh it’s so good! I’m so so glad you moved the necklaces to that spot out of the island.
I prefer the second option, although I personally would just do a rectangle, no curve at the bottom.
Agree
Kate – I agree that a simple rectangle would be a good option. It would be consistent with the straight lines of the shelves rather than adding another design element in that spot. There is already so much going on – once the wallpaper, mirror, lights go in above that area, I think it would just look better for the piece that hides the drawer slides to be simple. Just MHO.
This looks like something a retail store would have. I like the idea of option 1 and put a 1″ piece across the front then set the corner pieces below that to mimic the top details.
If you wanted the matching element, you could add very small L brackets to secure them to the plywood. Painted to match, they would disappear from sight.
Yes. That raw edge definitely needs covering up. I think the 2nd example looks more intentional (rather than an add-on) and is more in keeping with the pared back simplicity of the overall design.
It’s all coming together really rather nicely!
Ingenious!!
Second option.
When I saw the first option, I immediately thought I would extend the small bit where the corbel normally ends across the entire width of the piece to the other side and corbel to have them both connected. that way, they are similar to the other design but distinctive enough to be ok with different measurements – and you would have the middle piece of wood going across as a piece to grab and pull the entire thing out. Only I wonder how to make it sturdy enough as you said it only attaches at the small bits… if anybody can figure that out, it’s you (if you like the idea at all). Have a wonderful and relaxed Easter!
I agree with this idea it would give a grab/pull spot and allow either the corbels or the other end trim to cover the raw edges.
I love this idea. I don’t think the corbels have to be exactly the same size as the ones at the top of the cabinetry.
Yes. That raw edge definitely needs covering up. I think the 2nd example looks more intentional (rather then an add-on) and is more in keeping with the pared back simplicity of the overall design.
It’s all coming together really rather nicely!
I love the idea of using the corbels again. If you move both bars up a little would you be able to trim 1.5″ off the bottom so that the 4.5″ corbel would work? Then you could maybe use a bracket like this to support the free end of the corbel:
https://www.homedepot.com/p/Everbilt-2-in-Steel-Zinc-Plated-Corner-Brace-4-Pack-24520/327600254
(Sorry, I can’t get it to post as a direct link)
You clever thing you. I just love how you did that, and I think I would love that, but would need to make sure my bracelets were included with the necklaces, this is so cool. Can’t wait to see it all lit up, that will be a stunning art display. I liked both end caps that you made, perhaps the second one better, but I know your need for continuity, but with it being an open shelf, I think the second choice would not detract from the corbels at all, if anything, it would enhance it or coordinate with them. So much to take in. I love the closet bars, since our hardware will be gold, I am really liking them more and more. Have fun with this. This project will be wrapped up before you know it.
Cheers to you and Matt!
I’d leave the corbel detail for the top. I think it would look weird to have that pulled down in one spot. I like option 2, the simpler the better–let the necklaces shine. I thought maybe put a piece across the top and use a pull to match the others, but the picture of it pulled out shows that a piece across the top wouldn’t really work. Can’t wait to see what you figure out. I’m sure it will look perfect.
Love the necklace drawer. Lots of mine don’t have clasps so my mind went in a totally different direction. Anyway, my vote would be the corbel design. Maybe add an angle bracket to stablize it? How do you pull it out? I’m not sure if adding a narrow strip across would cover too much. But another thought is to integrate the narrow trim/strip (like across the top of the closet) and corbels that would span across the width and angle brackets or blocking could be used in the corner. So, the trim piece and corbels would be one piece. Don’t known if that makes any sense!
I’m wondering about rounding the bottom edge of each 6″ side piece. Perhaps that would be enough to make that bottom edge recede from view and you could then attach a 4.5″ corbel so that it will match the top.
The corbels would be a little lost? You only have them on the top, it looks very intentional and the repetition gives it balance. Maybe you could do a mock up of tge ehole wall, see what you like best. I prefer the second option, discreet yet “going” with the corbels.
Sorry for the typos!
Have you considered the iron on edge finish for plywood? That will give you a clean finish without having to make up a corbel that doesn’t really match the others. With your need for symmetry, I would think corbels of a different size would bother you. And I mean in that in the nicest way. 🙂
The iron-on edging for plywood won’t hide the drawer slides, though. 🙁 I need those to be hidden when it’s closed.
I prefer the simpler rectangle. The corbels could turn into a design/detail creep where it could get hard to determine where to have it or not (if used too much). If you really wanted the corbels- I’d chop a long triangular corner off the front bottom corner off the the wood side (with the slide hardware). Then you have a narrower visible front, the corbel fits on. It lets perspective hide the bulk of the back of the pull to keep it for strength.
So at home my favorite quirky thing is my air dry stuff. It has a place in front of a box fan. This is parked in an awkward place in my master bath. I lay/hang my stuff out. Turn on the box fan and bath vent. By the end of the day to a few hours, the fans dried the clothes.
Simple rectangle but in the same gold as the bar!
I think option #2 is better than the corbel idea. But can you think of a way to make it look like the jewelry drawer front? It may cover the very tops of the bars, but you’d still see the prettiest parts of the necklaces.
My idea to help provide a grab bar yet tie in with the overall look:
Could you attach another gold hanger bar at the top edge from left to right, but attached with flat side facing up? (versus how they are attached vertically now). The gold would match the other bars, be mostly out of site when closed, and add a decorative feature of gold. If you prefer to have everything match the paint, you could add a thin strip of wood in front of it, painted to match the shelves, yet still have the bar behind that as reinforcement. I know you would see it from above when it’s pulled out, but serves the purposes of providing a grab bar.
Excited to see how you decide to move forward on this part of the project.
So the last thing you had to figure out (necklaces) is done. Yay for you. I am not creative so cantoffer any suggestions for the edges but I do like the simplist edge the best. I love how the necklaces look hanging there and putting lights should be easy peasy for you.
I can’t believe how close you are to painting..
Stunning! I love it!
You’re a genious!!! I love to watch you problem solve!!
I’d vote for option 2, as a better visual match for the drawer above – simple and linear, which will work to unify the ‘jewelry area’ and distinguish it from the clothing shelves with their corbels.
Option 2…but cut from one piece of wood so there is a narrow piece going across the front. I think glue and L brackets screwed in via the top when it’s open would do the trick. Then it would hide the hardware and have a sense of continuity, like it was meant to be there.
I prefer the simplicity and clean lines of the straight piece.
Also, I’d stick with a straight cut bottom instead of introducing a curve. This will mimic the straight bottom of the corbels. I like the corbels kept at the top of the cabinets only. Taking them down to the necklace holder looks overworked, IMO.
Going against the majority here and voting for the corbels.
Hallie.
I love, love, love how this is all coming together! For the necklace pullout, I think the simple option, but without the curved bottom since it wouldn’t match the flat bottoms of your current accents at the top. But I do LOVE the idea of somehow putting gold there which some people have suggested!
Very nice solution! How about adding a narrow “part front” at the top of the necklace drawer frame, a piece that has the same width as the edge of the glass shelf, so that the jewellery drawer would look like it’s inset between these two pieces? Then possibly adding the corbels below this “front” or just a vertical additional piece like option 2.
I keep thinking a mirror should go on the bottom of the necklace “drawer”, but then you would see all the ugly stuff too. But you would see all the pretty necklaces from a different angle. 🙂 To stop from seeing the drawer slides from the front, I would go with your 2nd option, but it is not my house. 🙂 I like easy. Keep up the good work. Kara
How clever is your necklace storage solution! I really love the idea of finishing it off with the little corbels like the other trim pieces. You’re really getting there with all the details!
I think your mock up of the arched piece looks the best. As someone else pointed out, you could add a small painted L bracket and no one would notice including you after a few weeks.
Brilliant!!
It’s so pretty and colorful. I can’t wait to see it lit up. The thing that is distracting to me is the way the piece covering the slide “floats”. I’m so used to seeing how you perfectly caulk all gaps. I have seen small knobs on a narrow backplate that might be a possibility. I imagine the screw would split the plywood edge so maybe you could attach it with a strong glue after cutting the screw off. I wouldn’t expect it to be functional but I think you could get a tight fit against the cabinet edge and it would look intentional. You could even paint it like you did the P traps if necessary. I saw one on Rejuvenation that is 6″ long. Another thought is if the closet rod is hollow you might be able to cut a slot in the back wide enough to straddle the exposed plywood edge. You could make it just the length of the plywood piece or run it all the way to the bottom. You could probably cut the edge to fit snugly against the adjoining cabinet and leave the rounded edge showing. I hope that makes sense.
Apologies if this is a repeat. I scanned previous comments but didn’t read all in detail. How about the second option, but instead of the rounded bottom corner you do a smaller notched corner that mimics the corbel shape. No matter what you choose I’ll enjoy following along with your construction process!
It looks so good. All those necklaces hanging so pretty. I like your second idea the best on covering up the end of the plywood.
You will probably paint next week.
Enjoy your Good Friday and Happy Easter this weekend. Rest.
That looks fabulous! I was puzzled by this plan as I was imagining you’d need to crouch down to see the necklaces but the pull-out makes all the difference. You probably explained that but I must have missed it.
Just stand next to your jewelry area and that’ll show everyone how perfect this is for your height! It looks so wonderful and tape lights in the back will be the chef’s kiss 😘!
How about the second option, but make the curve at the bottom match the curve of the corbels at the top of the cabinet?
Consider some thin molding I had something similar to this “open front drawer design” (that’s what I called it) and I used a molding that kinda looked like rope it worked perfectly it was thin enough, added a little something without being over the top. (Mine was in a nautical bathroom; hand towels on the front row.. that’s why I had the rope molding but there’s a lot of styles and home Depot charged by the foot so it was less than $2)… Out of the 2 options though I would go with the more low profile version the arch would probably need to be reattached or replaced fairly frequently
If you decide on the corbel option, wood glue and clamps ought to create sufficient adhesion.
Hi Kristi, have you considered creating a full drawer front out of plexiglass to finish your necklace drawer? It would keep dust and dirt from landing on your necklaces. It would help the drawer feel finished and put focus on your jewelry. I think a frame of narrow would around the plexiglass would look great.
Just a thought.
Definitely prefer option #2!