Bathroom Makeover Day 3 – How To Make Cabinet Doors (Without Using Special Tools)
Last night I did something that I’ve wanted to do for quite a long time. I figured out how to make cabinet doors without using any kind of special tools!
Now don’t get me wrong. These do require tools. But they only require standard tools that most DIYers would already have, like a circular saw, a miter saw, and a brad nailer (a nail gun that shoots small 18-gauge finishing nails). However, they don’t require any of the specialty tools (or skills) that generally only the pros, the cabinet makers, and the long-time, almost-pro hobbyists have, like jointers, routers, etc.
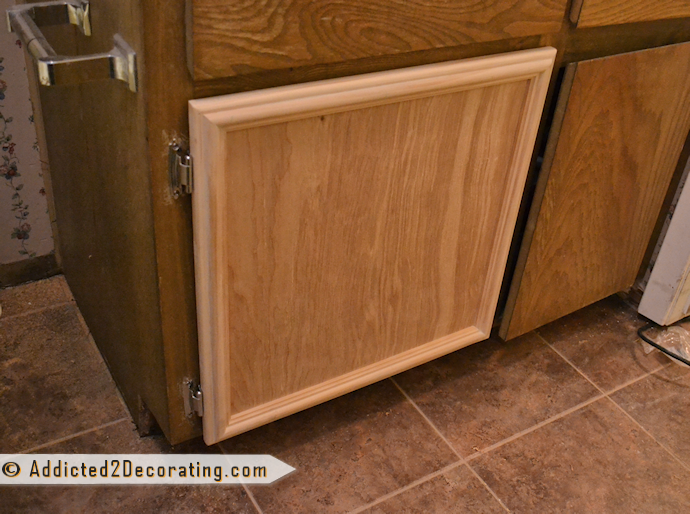
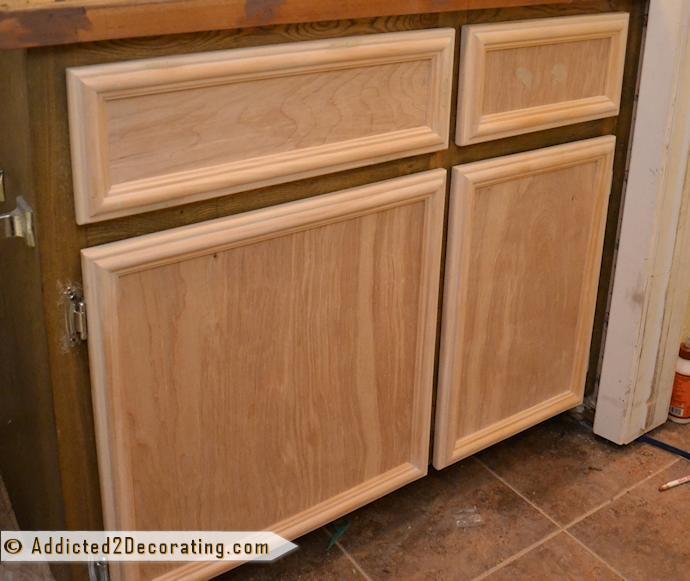
I didn’t get my doors and drawer fronts completely finished (because I’m incredibly math-challenged), but here’s how one of my finished doors turned out…

It’s a vast improvement over the original doors, don’t you think?
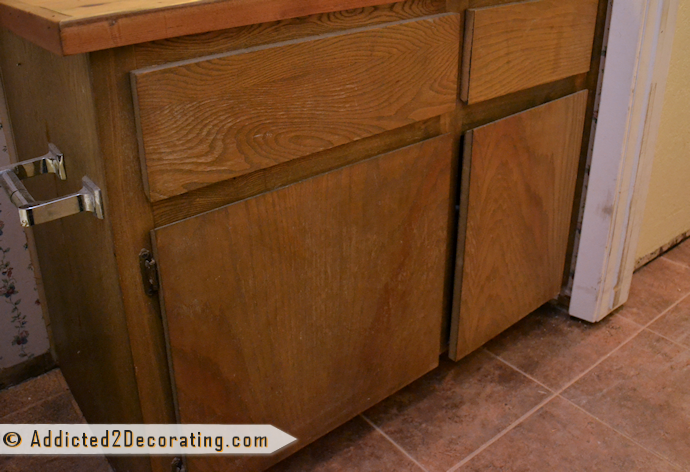
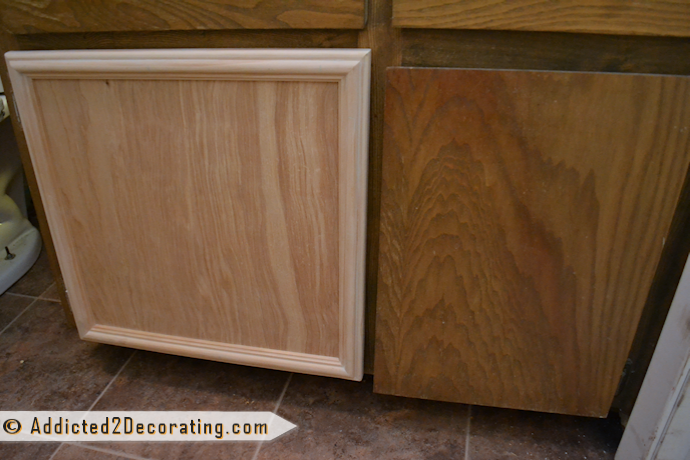
My original plan was to just add some pretty trim to the existing doors and drawers, and then paint everything. That definitely would have improved the doors, but there are two reasons I decided not to go that direction.
- The existing doors and drawers have these weird beveled edges that bevel towards the cabinet. I guess those bevels were created in lieu of having handles and knobs. The beveled edges almost act as a “pull”. Quite simply, I hate the way it looks.
- The existing doors and drawers are 3/4″ thick, so adding trim to the fronts would make even thicker…so thick, in fact, that the door fronts would extend past the edge of the countertop. There’s just something not right about that.
So I decided to just make brand new cabinet doors from scratch. But since I’m limited in both tools and knowledge, I had to make do with my basic tools and general DIY knowledge. And I’m actually really pleased with the outcome! Here’s how I made my cabinet doors…
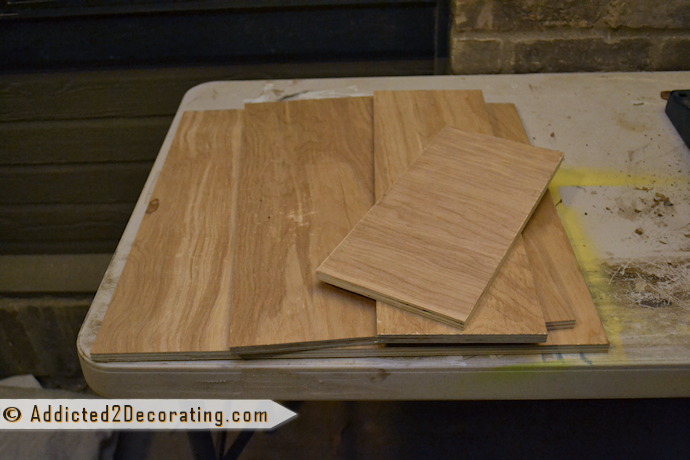
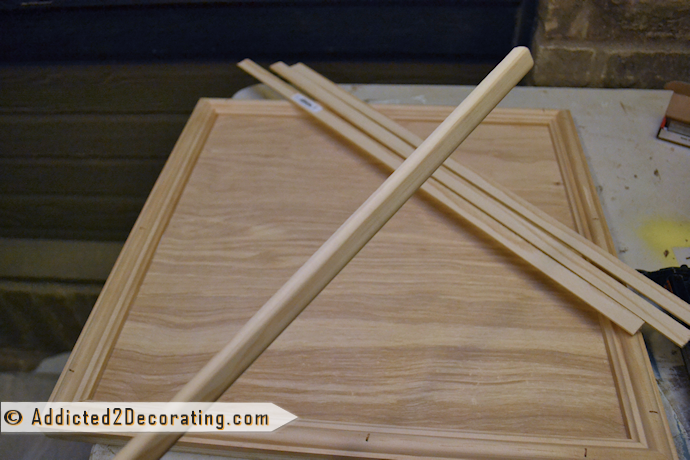
I started out by using my circular saw to cut pieces of 1/2″ plywood to the finished size of my doors and drawers, minus 1/4″. So my biggest door needed to be around 19 3/4″ wide by 19 3/4″ high, and I cut the plywood to 19 1/2″ by 19 1/2″.
Next, I used my miter saw to cut pieces of cabinet trim to frame the pieces of plywood. The trim I used came from Home Depot, and it’s sold in the area where you buy it by the piece, not by the linear foot.
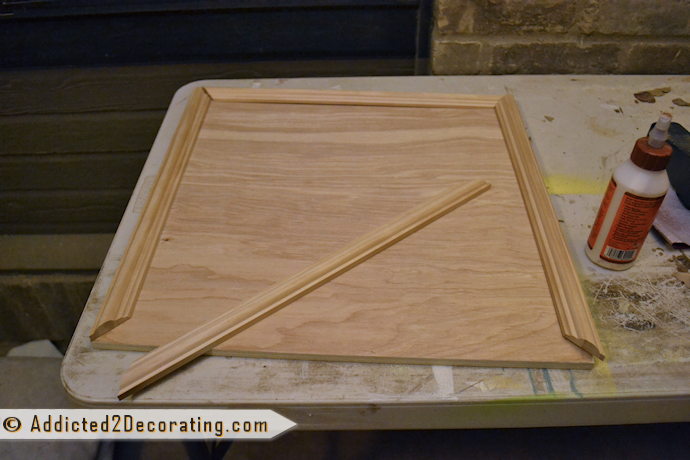
Then I attached the trim using wood glue and my brad nailer with 3/4″ brads.
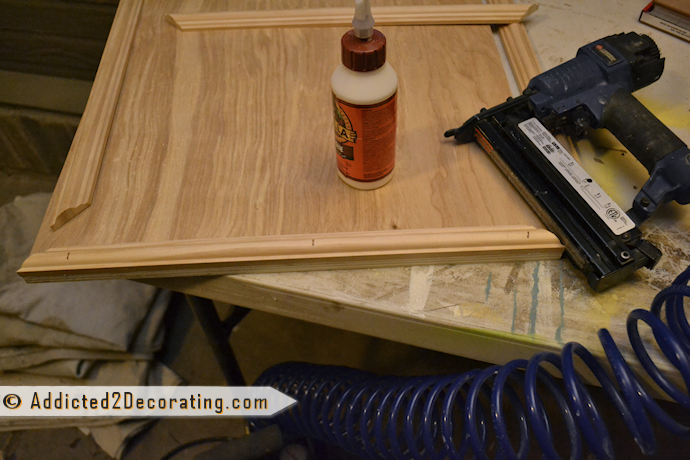
That did a great job at dressing up the front, but obviously I had to do something to cover up the edges since you can see where the plywood edge meets the trim.
So next I took this really small trim (I have no idea what this is for, but it’s incredibly cheap, and rounded on both edges), and cut pieces to cover the edges of the door.
I mitered the corners, and attached it to the edges of the door with wood glue and my brad nailer with the 3/4″ finishing nails.
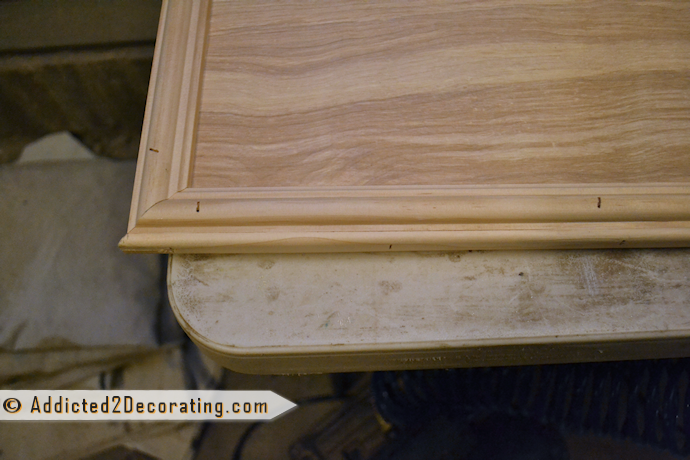
See how nicely it disguises the edge?
And the last step is to add wood filler to the nail holes and the tiny spaces between the front trim and the edge trim. Once everything was sanded down, the two pieces of trim actually looked like one continuous piece of trim.
Now I just need to head back to Home Depot today and get more trim. Gah! I hate it when I don’t get enough supplies to finish my project!! If I had purchased enough, I could have easily finished making these doors and drawer fronts yesterday. They’re so simple and fairly quick to make.
So, that’s where I’ll leave you today. 🙂 Once again, you’ll have to use your goggles to imagine how this will look once all of the doors and drawer fronts are added, and it’s all prettied up with paint and pretty handles.
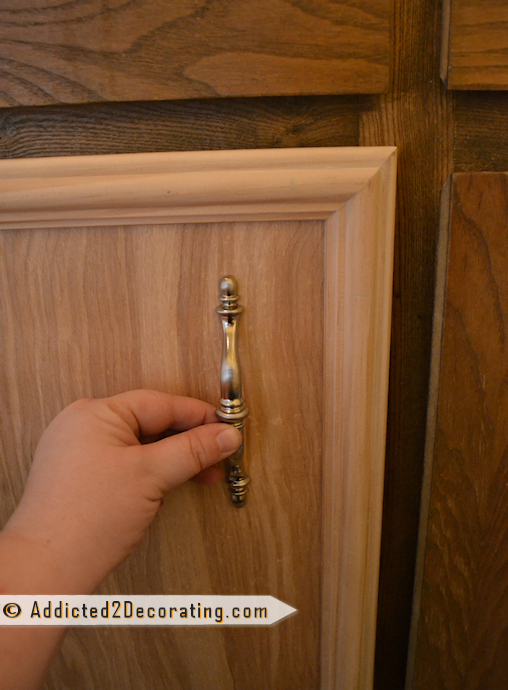
Speaking of cabinet hardware….
I generally use knobs on doors, and pulls on drawers. But this time, I’ve decided to use these pretty pulls on both the doors and the drawers. Is that strange? Have you ever used pulls on doors? I know I’ve seen it before, but I don’t know if it’s a normal thing. What do you think?
UPDATE: I finally finished all of the door and drawer fronts, and thought I’d add a picture for you to see. It’s still not painted. Hopefully I’ll get to that soon!

Addicted 2 Decorating is where I share my DIY and decorating journey as I remodel and decorate the 1948 fixer upper that my husband, Matt, and I bought in 2013. Matt has M.S. and is unable to do physical work, so I do the majority of the work on the house by myself. You can learn more about me here.

I’m excited to see the final product!
Me too, Graziela! I’m hoping to finish it up today!
The mystery trim is called “stop” because it’s used on the inside of door frames to stop the door when it closes. Most modern pre-hung doors use stop trim. It also happens to make pretty awesome banding or edging, as you discovered. 🙂
Thank you for solving that mystery, Justin!! 🙂 I spend sooo much time in that trim aisle, but I seldom use any of them for their intended purposes, so I have no idea what they’re called…other than the basics, like “baseboards” and “crown molding”. 😀 I do use this stop trim quite often. It has so many great uses!
In my neck of the woods, the smaller 3/4″ trim is called “screen molding”. There is a slightly larger molding that is used as the ‘stop’ for doors.
Wow! That is an amazing difference. I love it! Can’t wait to see it all finished.
Thank you! 🙂 Hopefully I can get it finished and painted today. That’s the plan, anyway.
I can’t help but giggle a little bit at how modest you are: “general DIY knowledge” hehehe I think you did an amazing job as usual. I like the new cabinet doors 100% better than the old ones. The original ones made it look dated and I’m glad you changed your mind about keeping them. About the pulls, I honestly don’t know if that’s the norm, but my new bathroom cabinet came with pulls and I actually really like them.
Thank you, Paula! I’m pretty confident in my DIY skills, but those professional cabinet makers have skills that are way beyond what I could accomplish. 😀 I’ve tried using a router before, and that tool scares the heck out of me. LOL
Well that’s how I feel about pretty much ALL tools. I am sure I get mini panic attacks when my husband drills holes around the house. I go into the bedroom and hide with the pups hahaha So you are kind of my hero
Love it!!!! I’m making a list of tools I need..everyone is afraid I will cut a finger off..LOL I keep saying “but I NEED these”…look what I can do if I have them..so looking at second had ones..HA! I log on first thing in the morning to see your updates and what you have been up to..fav part of my day. Great job again!! you are awesome.
You definitely need to start buying tools, Jennifer!! Just tell them that they will save you so much money in the long run when you start making these things on your own. 🙂 And I don’t buy second hand tools, but I certainly never buy the top-of-the-line tools either. I think my circular saw was somewhere around $40, and my miter saw was about $120. The lower to mid-range tools are just fine for a DIYer.
Thank you for sharing this amazing information! I always wished my old cabinet doors were plain and flat so I could just add trim, but you’ve made a believer out of me that I could just as easily build my own! Love how yo finished off the edges, what is the width of the piece you used?
Whitney, the edge trim that I used was 3/4″ wide and 1/4″ thick. I couldn’t believe my luck when I found it, and it covered the edge of the plywood and the other trim perfectly! And it’s super cheap. I think I paid something like 33 cents per linear foot.
Great Job! I leave the building to the hubby – I am jealous that you are so handy…I always use handles on the doors – I really am not fond of knobs…I think handles look more upscale especially on cabinets, I leave knobs for furniture.
Oh good! I’m glad to hear that you use handles on doors. I’m not sure why, but I just thought it would be the perfect touch on my new doors. Not sure why I’ve never tried it before!
I am thrilled that you posted this AND with pictures, I am dying to do this to my kitchen, cabinets and have not been able to visualize it. Thank you so much!
I think these would look great in a kitchen, Tara! And if you do it, please send pictures!! 🙂
Super impressed! Motivational! How are you going to do the drawer fronts? Can you just pop the old fronts off and reuse the rest of the drawer, or will you be building new drawers as well?
Well, the one “drawer” under the sink is just a false front that is probably just glued on. I’ll use my mini crowbar and just pop it off and glue the new one on. On the other one…the actual drawer…it looks like the drawer front is glued onto the front of the drawer box. So hopefully I can just pop that one off as well, and then glue on the new one. Although sometimes that old wood glue is as hard as cement, so if all else fails, I’ll just build a new drawer box.
What an improvement! I am in awe of your creativity and I love your brad nailer…now I want one, lol….Great job!
You need one, Becky! 🙂 They’re really not that expensive. My air compressor and brad nailer came together as a set, and they were only $99 at Lowe’s. I can’t imagine trying to do projects without it!
Hi Kristi,
thanks for letting me know about Lowes…now I know what I want for my birthday:)
That looks so good! It’s amazing what a little molding can do for a straight piece of board. This is fun to watch your new bathroom unfold. 🙂 Sharon
We non-carpenter types can do amazing things with molding and a tub of wood filler. 😀 I’m sure an actual cabinet maker would cringe at my doors, but I’m okay with that. LOL
Looks great! I’m impressed!
Thanks so much, Deanna!
Wow, Kristi, is there anything you can’t do?! Your cabinet doors look amazing. I wish you had done this a year ago when my hubby was making doors for the front of our tub- we just ended up with plain boards rounded on the edges.
Ha! I’m sure there are PLENTY of things I can’t do, but I just don’t publicize them. 😉
I LOVE IT!!! I so look forward to your emails and the amazing things you do.
The only thing you have to worry about with handles on cupboards is that sometimes you can get your finger stuck in them when they swing out. Kind of hurts the few times you do it until you learn NOT to insert your finger all the way through the handle – LOL.
Thanks, Kate! And thank you for that door handle tip. 🙂 I do tend to get in a hurry and not pay attention, so that could easily happen to me!
Sooooo excited to see someone tackle making door fronts as I have 33 kitchen cupboards that are in desperate need of a makeover but the pocketbook doesn’t have enough in it to get ready-made. Possibly this could be our way to go.
p.s. am new to the “blogging” community so just getting blog, etc. set up!
If you have the patience for it, this is definitely a great way to save money on a kitchen makeover! If you do it, please send pictures!
And congratulations on your new blog. I hope you love it as much as I do! 🙂
Good job my dear.
I just recently hired a pro to make a complete cabinet which holds food for a buffet in a restaurant and your work is better than his….no joke …..well done.
Wow Kristi it looks so much better!! Each morning your email is the first that I open because I can’t wait to see what you have been up to 🙂
I am so impressed with your work ! I love the new doors and I also prefer pulls over knobs. I love the pictures of your progress ,can’t wait to see the finished product. Look forward to you emails every day.
Great job, I have never had the nerve to do something like that–mainly because I couldnt tell you a 90 degree angle from a 45 degree–horrible at math (and my hubby is a woodworker). I love love your home and I have to tell you–I have been looking for a countertop for my bathroom for over a year (husband made the cabinet and its not normal sized) and you saved the day with your wood countertops–I am totally inspired!—again!
Kristi… can you rewind a little and tell me where you put the small trim that was rounded on both ends? Is it around the plywood under the framing trim or butted to it? Your projects are encouraging me to finally start the shelving unit around our fireplace and I wanted the bottom shelves to have doors that hide the kids gaming tv… Thanks for the inexpensive and where to get supply tips!
Kristi, these are gorgeous! I really look forward to seeing the finished, painted vanity!
Girl! You are awesome! Love the handles, they are so much better. Don’t forget to put a handle on the faux front drawer. My husband had a really hard time doing that when we refinished our master bath – he thought it would look stupid – but it made it all go together better.
Could the small trim be called a half round? It usually finishes the top of baseboards.
These doors look great! Can’t wait to see the rest of the vanity after a couple of coats of paint.
The doors and drawers look awesome! Really looking forward to the final product.
We have the same style door, only uglier–the strange angle toward the cabinet, but it is framed. Now I have a plan, thanks to you:)
I can’t believe you just unlocked a secret about making doors! I have so many project I would love to make a door for, but always felt like I had to have some special carpentry skill. So clever! Pinning this then going to see what is in my ‘stash that needs a door!
All the cabinets in our home were exactly like the ones in your condo. We completed renovating all the cabinets three years ago (one set of cabinets at a time by either tearing out the cabinets or refacing them). If I had seen this blog back then, I would’ve definitely tried making these cabinet door and drawer fronts and saved a bundle of money!
Your whole bathroom project turned out beautifully! Love the plank walls & paint colors. Great job on everything!
For like $3 you can get some clear rubber bump-stops that self-adhere to the back of your cabinet doors and drawers. They are just thick enough to compensate for your now thicker door and will prevent it from slamming shut.
When I did my kitchen I bought unfinished oak cabinets for like 1/4 the cost of finished cabinets and nearly 1/10 the cost of cabinets from someone like Kraftmaid. I finished them all and reworked their weak points and believe that they are nearly as good as a much more expensive model. I used those rubber bump stops, installed some better drawer glides and reinforced the particle board boxes with glued and screwed 2x4s at the toe kicks and 2x2s to the top of the box. Made a vast improvement.
What’s your favorite paint for cabinets?
My absolute favorite is interior oil-based paint in a satin finish from Kelly Moore. When I can, I always use oil-based paint for cabinets, but I always use a paint conditioner in it (Penetrol, available at Home Depot). If I can’t use oil-based, then I’ll use latex. I’ve had good results with Behr, but again I always use paint conditioner when painting cabinets. Penetrol for oil-based paints, and Floetrol for latex paints, both available at Home Depot.
Hi there, thanks so much for such a fantastic tutorial. It’s hands down the best one I’ve seen.. And don’t apologise for the pictures, they’re what make it so good!
Hi there, thanks so much for such a fantastic tutorial on making Roman shades. It’s hands down the best one I’ve seen.. And don’t apologise for having too many pictures, they’re what make it so easy to follow!
Any chance anyone has a link to the trim used on the cabinets? I’ve tried our local big boxes (Lowes and Home Depot). I’m having no luck finding something similar to match my existing and aren’t versed enough with my router yet to fabricate one.
Travis, the profile on the trim that I used looks like this one:
http://www.homedepot.com/p/DecraMold-DM-L58-7-32-in-x-17-32-in-Pine-Trim-Plain-Moulding-100485/100392983
You’ll find it in the molding aisle at Home Depot, and it’s sold by the linear foot. I don’t think the one on that link is the exact one I used (the dimensions seem wrong), but the profile looks exactly like that.
And then the one that I used around the edge is called screen molding. It’s just a small strip (probably about 1/2-inch or 3/4-inch wide) and the edges are rounded rather than square.
http://www.homedepot.com/p/Woodgrain-Millwork-WG-142-1-4-in-x-3-4-in-x-96-in-Pine-Wood-Screen-Moulding-109605/203898775
Great Ideas- i am going to tackle cabinets after hours and hours of looking– i wish I would have seen your posting first. your bathroom change is amazing. I admire you for tackling the cabinet doors and you make it simple to follow and inspiring to do. Thanks!
I love this!! I have these exact doors on my kitchen cupboards and one is broken… I’m debating whether I should try this and redo all of them. (My husband will flip!!) Just discovered your blog- love it!!!
What kind of plywood is that? birch?
I actually don’t know. I wasn’t particular about the type since I was painting it. I just made sure it was very smooth.
Looks outstanding! I can tell you what your little trim pieces are for. I think they are the trim that goes on a wooden screen door. Love checking out your projects!
Hi Kristy
Im addicted to your blog. I have tried some of your projects and they came out beautiful, so thank you for the detail instructions. I have a question about this project, why didi you cut the plywood 1/4 smaller than the actual size of the original door.
Thanks in advance
Joan
Because I added a trim around the outside edge that was 1/4-inch thick. 🙂
Just what I needed! Kristi, I also have that hideous cabinet door style, in my KITCHEN, UGH! You’re the first person I’ve seen, besides me, with it. I’m so excited to give this a try!
Did you ever post a pic of your finished vanity painted?
Thanks!
You can see the vanity in the finished room here:
https://www.addicted2decorating.com/small-bathroom-makeover.html
This is awesome, thank you Kristi. All I was finding was tutorials like Decor and the Dog and kept leaving when they showed how to bevel an edge and I don’t have those tools either. This is what I was looking for. (All my kitchen cabinet doors are too short for the cabinets and need to go. Hopefully the laminate will come off of the cabinets too so I can paint everything.